Updated Anet A8 Plus. Large and made of metal
Hello! I am glad to present to our readers a review of the updated hit from Anet3D - Anet A8 Plus printer. It really became noticeably larger and truly metal. In addition, the manufacturer did serious work on the bugs and the printer is now going to very easily and really print out of the box, even with some minor problems.
It will be about this device:

')
Under the cut letters, photos and videos about the preparation for work and modest operating experience.
Main technical characteristics (from official sources):
The printer starts pleasantly surprising already at the delivery stage. Everything is very well packaged in a neat foam brick. The size of the box is quite sane, despite the fact that the printer is almost completely assembled.
At the top of this brick is the base of the printer with the guides and the table installed. Glass for printing has already been thrown on the table and there are stationery clips. I always just printed and advise everyone. Only I like the mirror more.

At the bottom is the vertical part of the frame with the axes X and Z, as well as all the electronics from the printer.
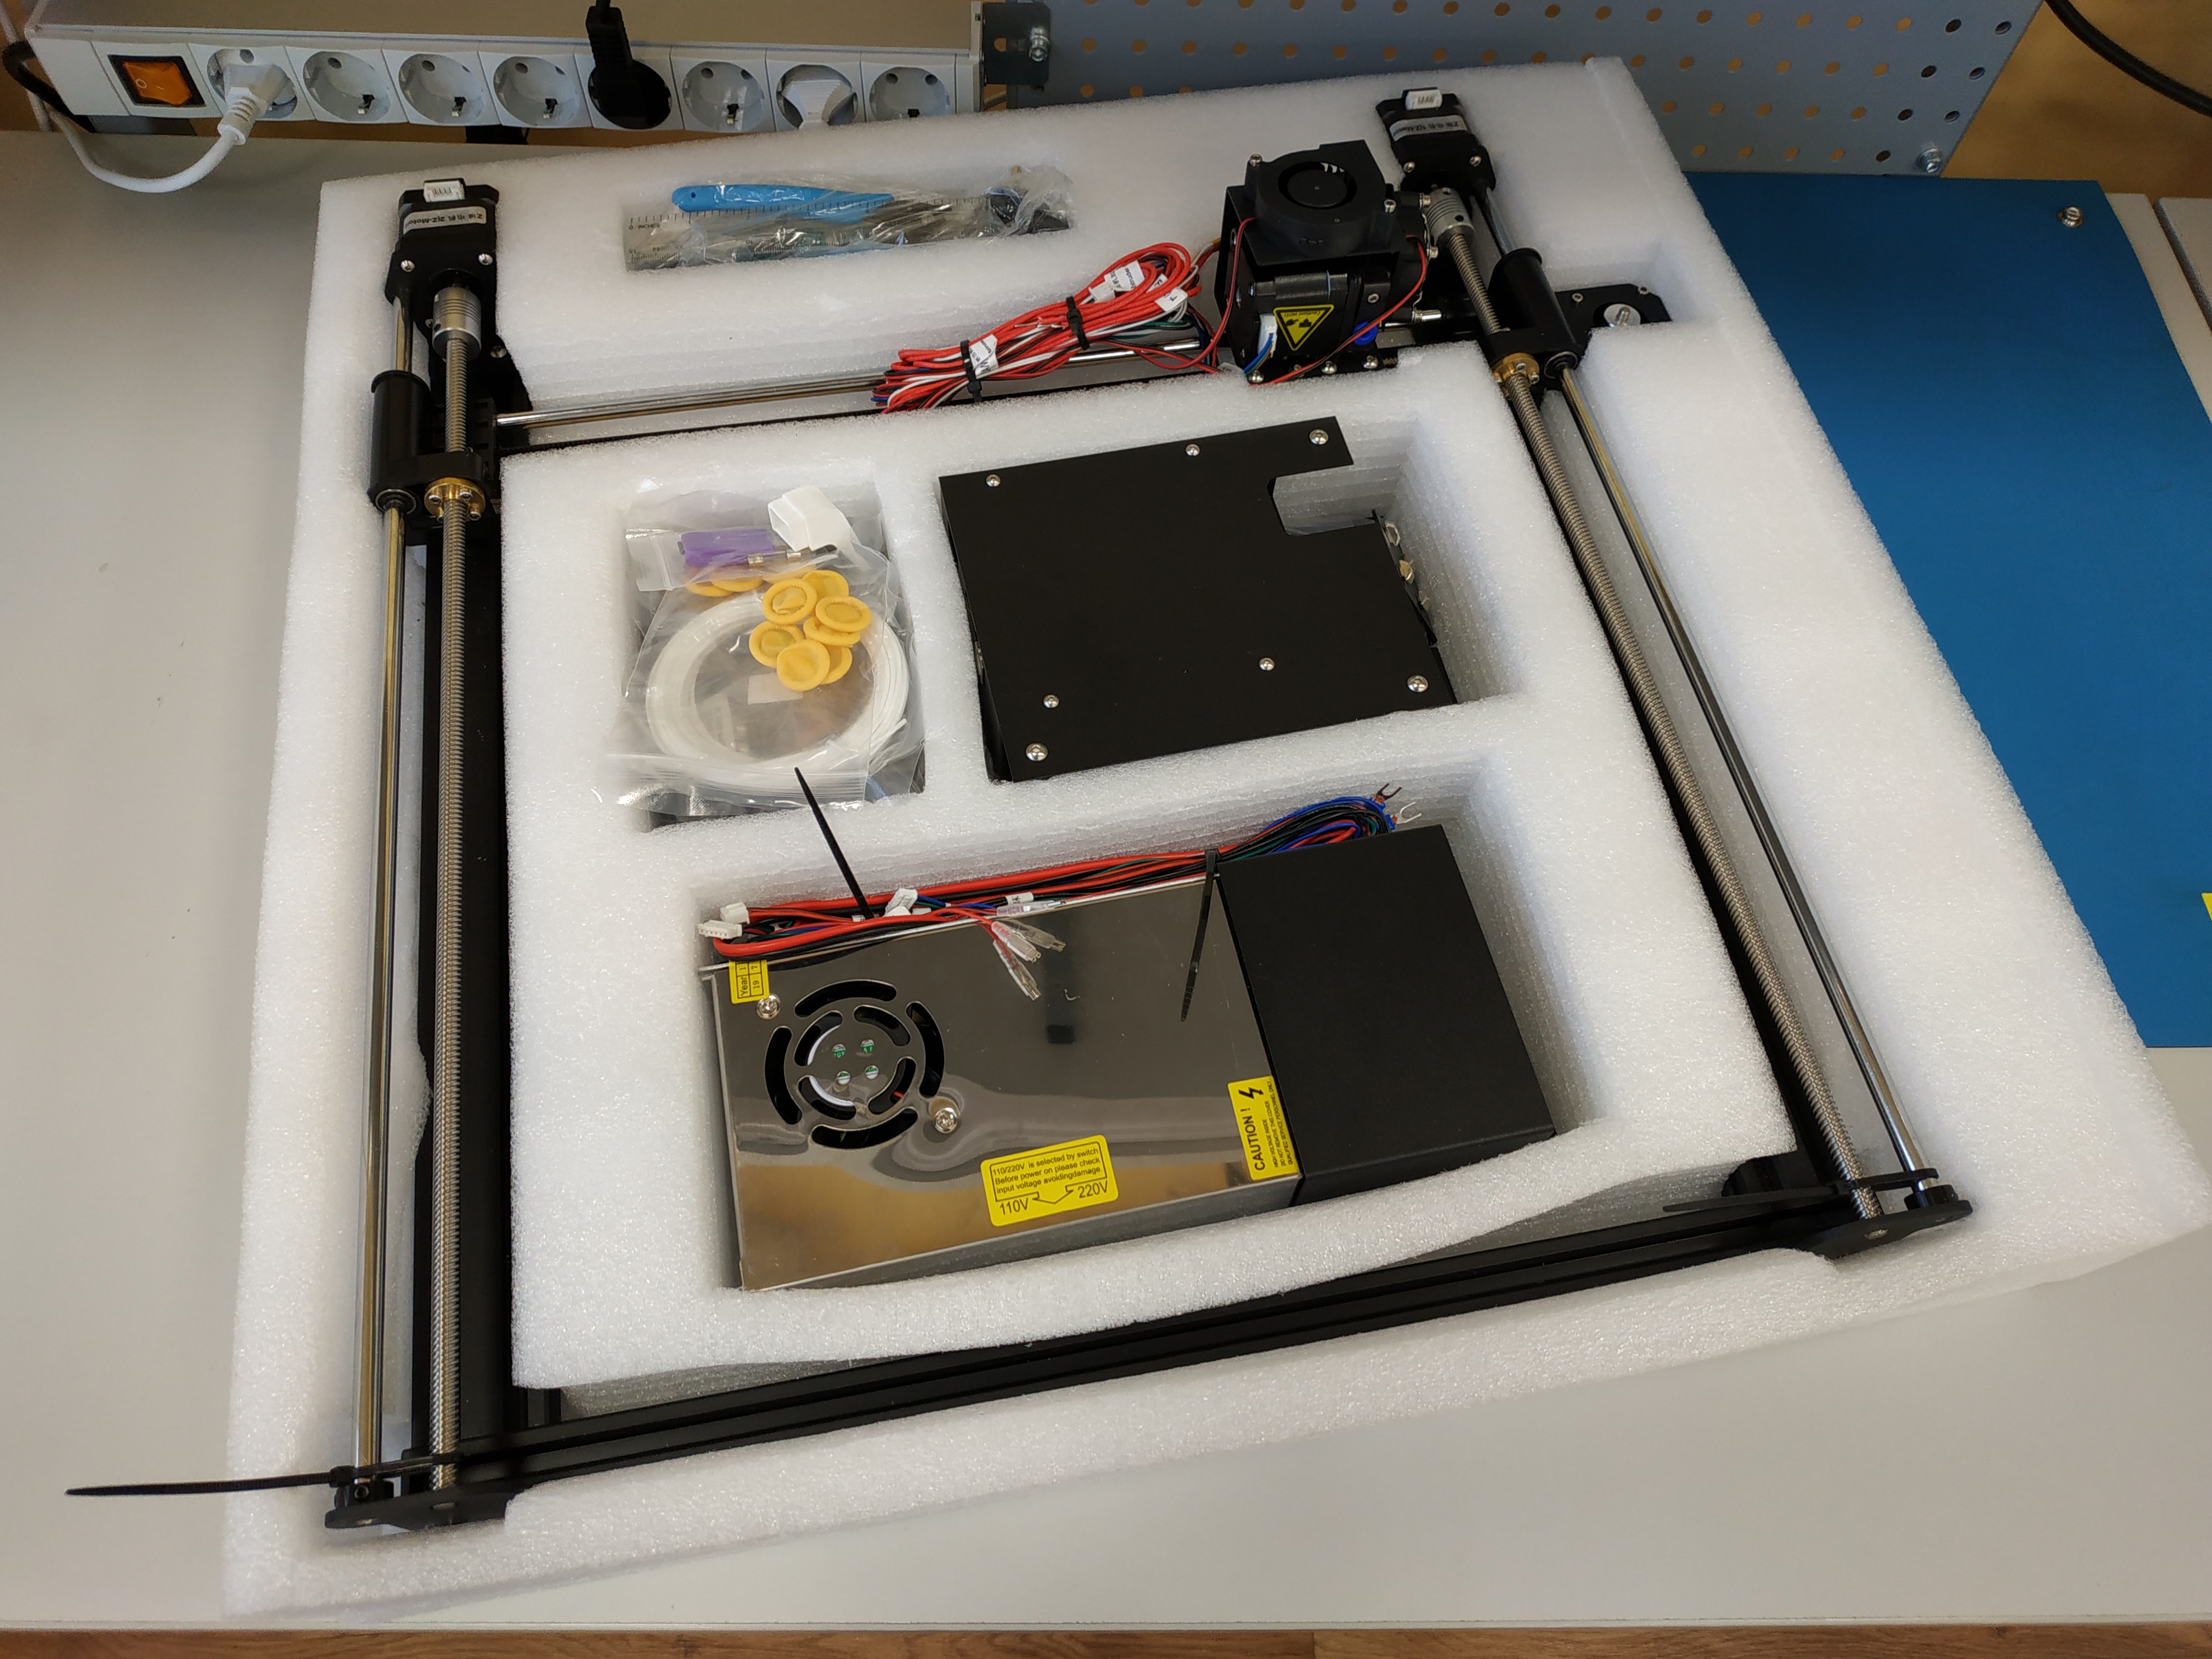
The printer also includes:
First, the vertical axis is set. For a start, it is screwed corner and screw in the end of the profile. You can immediately remove the shipping straps that secure the straps and tighten the set screws of the Z-axis studs. That's it! At this assembly mechanics over!

The basis of the frame is made of 20x20mm aluminum structural section. Guides along the Y axis 20x40mm. Plastic parts are very few and almost all of them are made by casting. Even the auxiliary parts of the extruder are made of thin sheet metal. Both belts, X and Y, have normal tensioners.
With all this, it is the same, the good old Prusa. On belts, ballscrews, shafts and linear bearings. Here I must make a small digression. Despite all the disadvantages of this linear displacement system, I consider its use in budget machines to be more than justified. If the shafts are crooked or the bearings have deteriorated, they are always very easy to find and change. Also, if the shafts are not parallel, they can always be slightly moved and adjusted. If you take the machine on rails or rollers, then it will be a completely different price category.
The power supply unit is mounted on the right side of the machine and plays the role of an additional kerchief, which adds rigidity to the structure. Please note that it also has a metal casing, a network cable connector and a toggle switch for switching on. And all this, of course, has already been assembled and connected.

Next, set the limit switches of the axes X and Z. Everything is already thought out and molded in plastic. All fasteners are selected optimally. Seat under the limit switch of the X axis:

Even the holder of the Z-axis switch is made of metal. It is attached very securely, and it is very easy to move it for calibration.

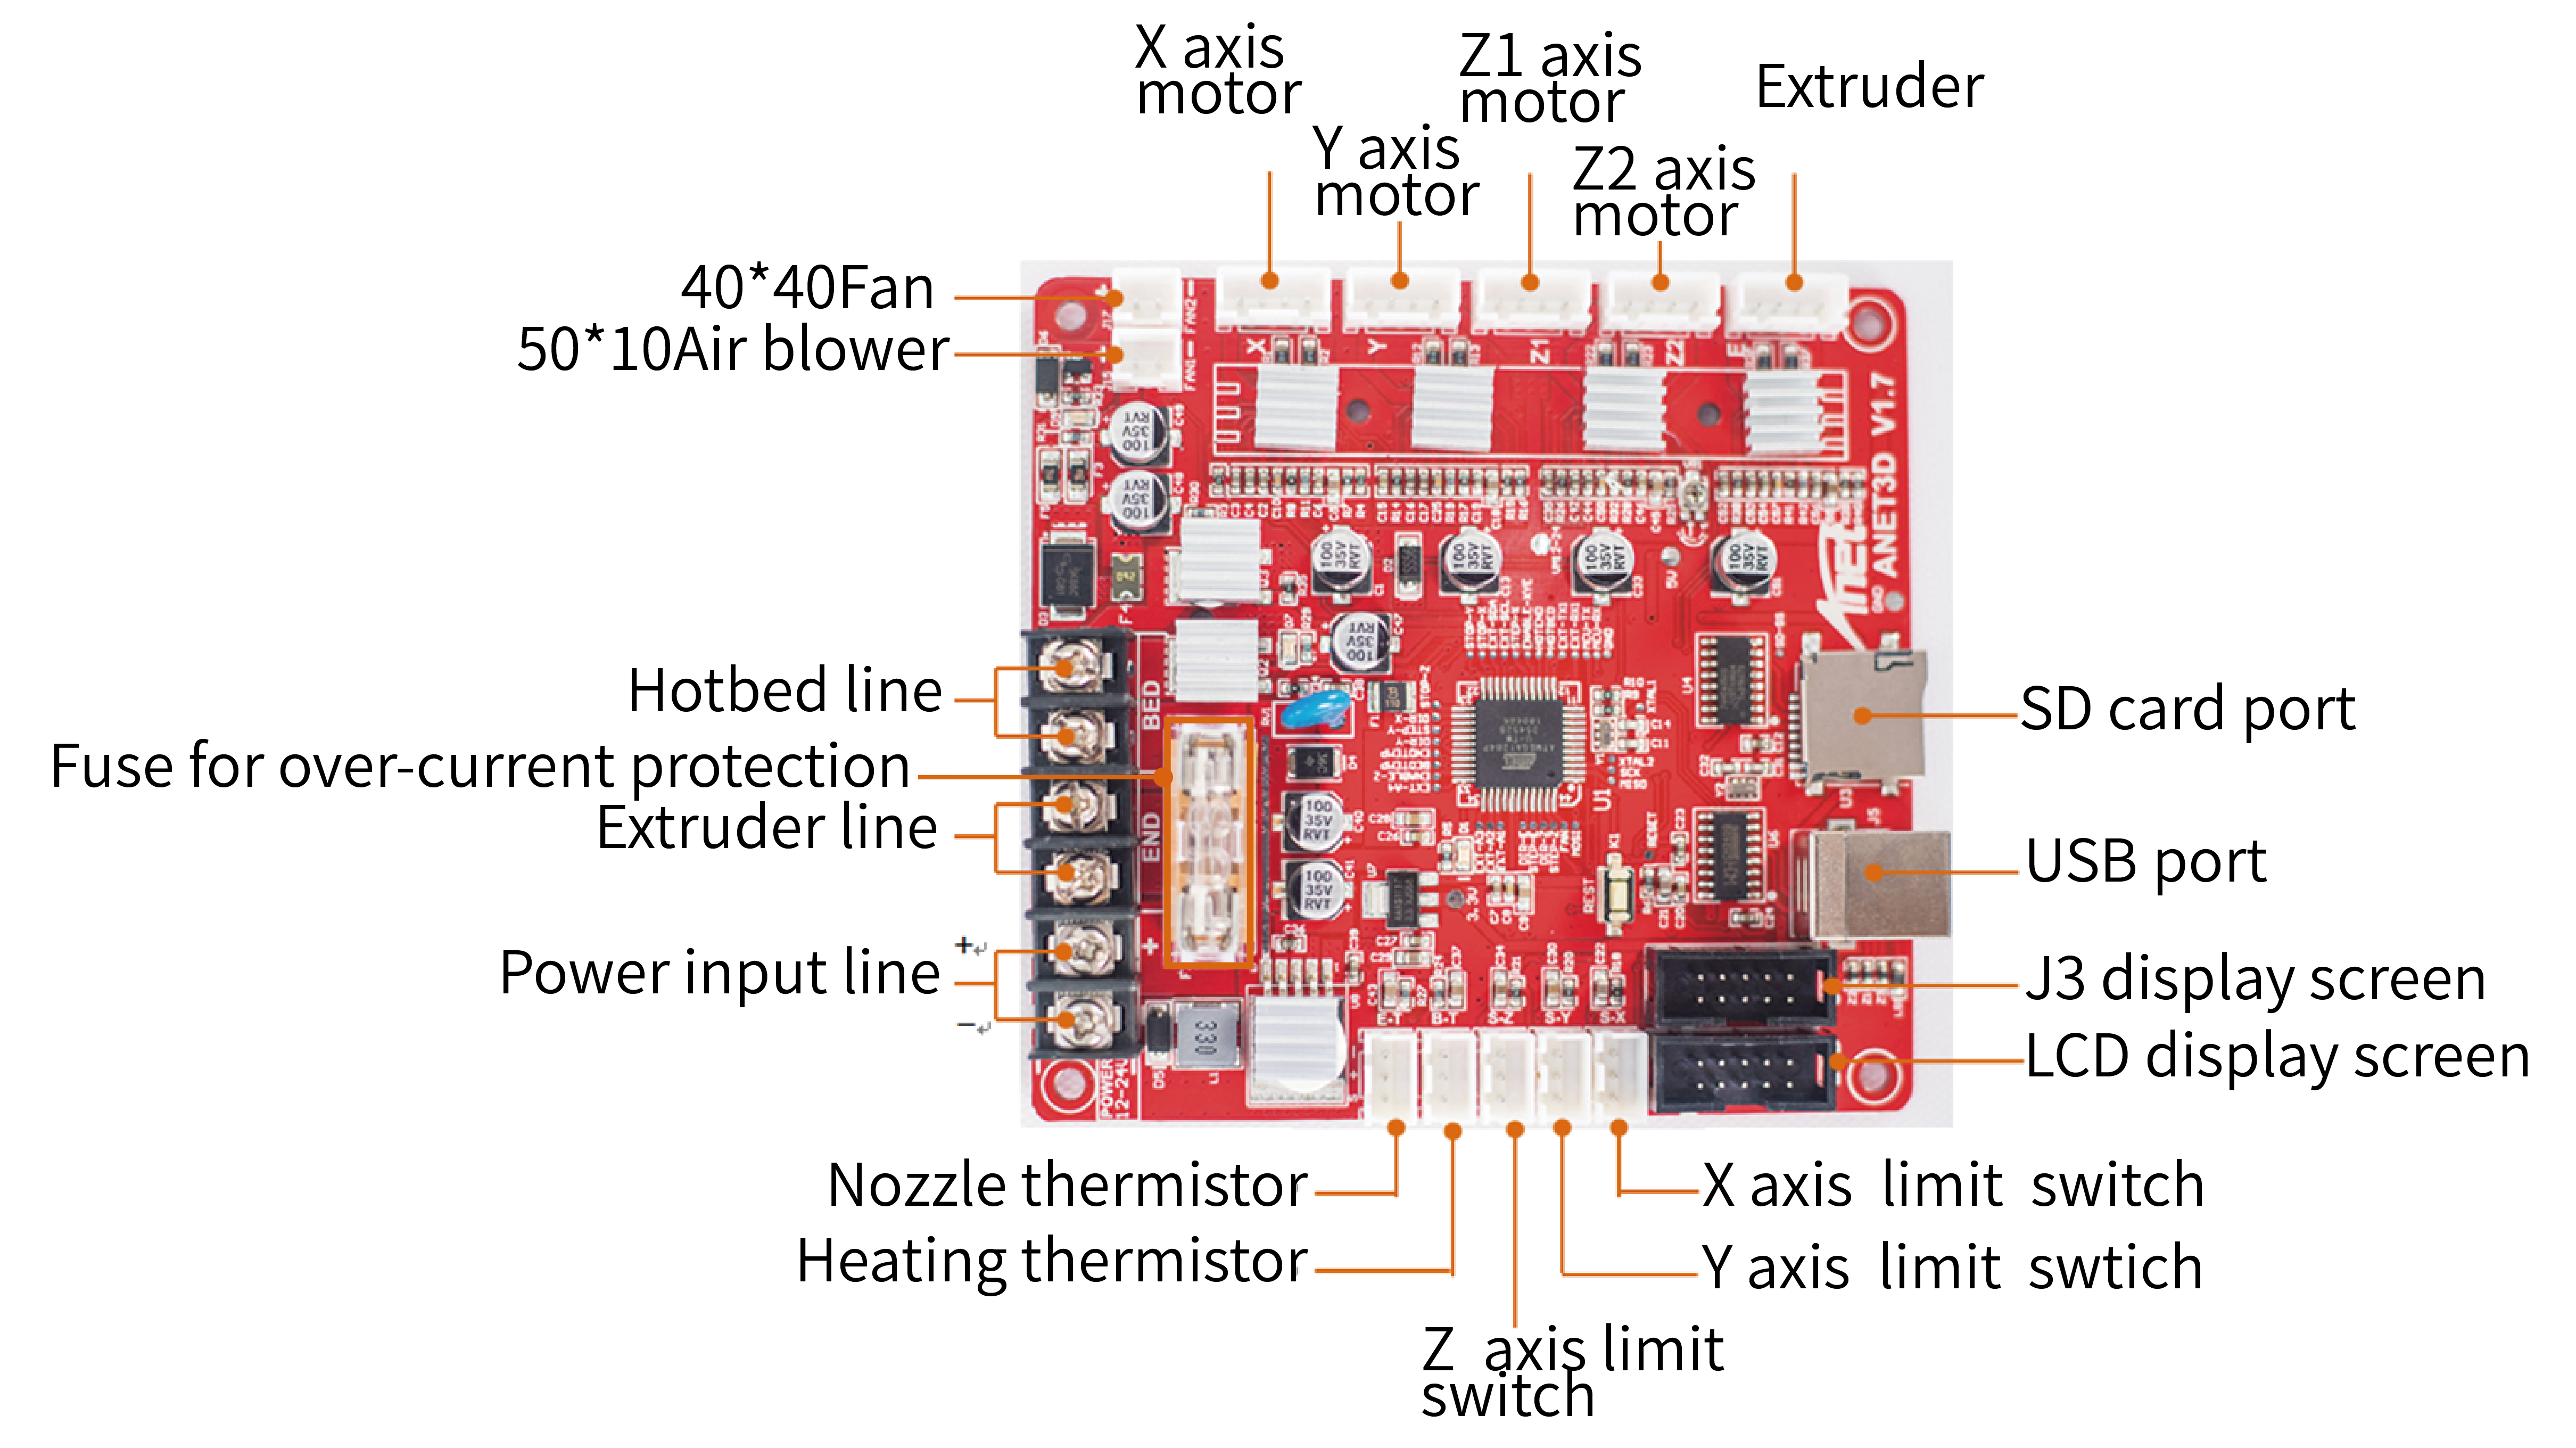
One of the variations of Anet3D RAMPS is also used as a motherboard. The drivers are soldered, there is a current adjustment of the Z axis. On the one hand, this is a minus (the fact that the drivers are not removable), on the other hand, in my practice, no driver has suffered. There is a fuse on the table and a slot for printing from a memory card. The board is also stitched with some kind of Marlin assembly from the manufacturer. At the end of the article I will give a link to the software for this machine, but even on the stock firmware, everything started up confidently for me.

Connecting the wires takes much longer than the assembly of mechanics. But everything is signed and you can connect without especially looking at the instructions. No need to solder. All switching is thought out very well. Even for limit switches made special cable lugs.

By the way, the table heats up from 24V. With the old model, I had a problem that the heater contacts in the connector were heated. Anet A8 Plus in the table connector already has two contacts for plus and minus (the wires themselves are also duplicated), and the contacts themselves are filled with a sealant.
I will add here an illustration with a picture to connect. It just shows better the board itself. In fact, even it is not needed. There are signatures on the board and nameplates on all cables. This generally applies to the whole machine as a whole. Everything is going very uniquely and intuitively.
As a result, after the complete assembly and cleaning of wires braided, it looks like this:


Many product photos display the Anet3D color logo, but in fact use a regular monochrome LCD display. By the way, it is very original installed on the ratchet with a magnet and it can be removed, picked up and operated by the printer as a large adult CNC machine from the console!)
The display with the encoder and the reset button is in a separate metal box. Having examined it, I still found something to find fault with in this machine!

At first glance, it makes a very good impression. It is not much different from the national MK2 and it will be easy to find spare parts for it. In fact, the manufacturer made sure that the coolers of the extruder and the model were conveniently installed on the printer. On the thermal barrier itself, an additional radiator is installed right in front of the cube - a very elegant solution compared to how it was on the previous version.
There are additional guides for plastic. I tried typing with Flex and I had no problems with loading or extrusion.

With such a large print area, this turned out to be much more difficult than I expected.
At first I had problems with the fact that too little current was set on the Z axis. The right engine started to skip steps and the entire calibration swam away at once. But with this problem I figured out very quickly, and then began dancing around the frame.
Looking ahead, I will say that in the end I was able to calibrate the printer only on a flat piece of chipboard with a piece of fiberglass laminate under the near right leg. And to come to this decision, I spent 8 hours!

The large size of the printer entails big calibration problems. Even with a very small distortion of the frame diagonally, it becomes almost impossible. I put it on a flat panel of chipboard and tried to align all the mechanics with respect to it. Perhaps, I managed to eliminate some major irregularities, but in the end I just experimentally selected which leg and thickness to put the part under. But in the end, everything calibrated just perfect. I even dragged it from place to place in this form.
Much of what I have said and something else new can be seen in the video:
Print
If you try to summarize, I would say that nothing has changed in principle. Yes, the design has become metallic, but everything has become bigger and heavier.
In other words, there is a clear increase in print volume, but not in quality. It remained quite suitable for printing various structural elements. And there is a nice bonus from the fact that the printer began to print noticeably quieter (probably, thanks to the rubber feet in the first place).
To an inexperienced viewer it may seem that the test model is printed very badly. It is made of 0.4 m nozzle with a layer height of 0.15 mm. In fact, this is quite a good result for a Chinese budget printer and it will allow you to very confidently print products like SkullBota.

I emphasize - this is the result of printing out of the box! That is, you can still work on fine-tuning the mechanics and play around with the printing algorithms to improve the result.
I also tried to get rid of a larger print from a memory card - a girl stylized as T800 in the first photo. Almost 30 hours of printing, 140Mb G-code, 900g of plastic. On the one hand, everything went smoothly, but the quality of the plastic was not very. And we must understand that when there is almost a kilogram of plastic on the table, it starts rocking very neatly, which affects the print quality.
Software from Anet3D
You can buy this printer for about $ 300 at the links below:
Anet official online shop for A8 Plus
Amazon for Anet A8 Plus
Aliexpress for Anet A8 Plus
Ebay for Anet A8 Plus
TomTop for Anet A8 Plus
Thanks for attention. I will be glad to answer any questions and listen to the recommendations!
It will be about this device:
')
Under the cut letters, photos and videos about the preparation for work and modest operating experience.
Main technical characteristics (from official sources):
- Printing field 300x300x350mm
- Frame made of 20x20mm and 20x40mm aluminum construction profiles
- 8mm double polished shafts and linear bearings on each axis
- Drive axles X and Y with a belt with a tension system
- Two Z axis stepper motors with trapezoidal driving vinats
- Extra fuses for overheating protection
- Removable control panel (display with encoder)
- Heated table
Unpacking
The printer starts pleasantly surprising already at the delivery stage. Everything is very well packaged in a neat foam brick. The size of the box is quite sane, despite the fact that the printer is almost completely assembled.
At the top of this brick is the base of the printer with the guides and the table installed. Glass for printing has already been thrown on the table and there are stationery clips. I always just printed and advise everyone. Only I like the mirror more.
At the bottom is the vertical part of the frame with the axes X and Z, as well as all the electronics from the printer.
The printer also includes:
- Two screwdrivers
- Hex key set
- 8GB microSD memory card with USB adapter
- Side cutters
- Coil holder
- PLA-plastic probe (about 10m)
- Wire Braid
- Spare fuses
- Blowing nozzle
- Napalechniki
- Instruction
Assembly
First, the vertical axis is set. For a start, it is screwed corner and screw in the end of the profile. You can immediately remove the shipping straps that secure the straps and tighten the set screws of the Z-axis studs. That's it! At this assembly mechanics over!
The basis of the frame is made of 20x20mm aluminum structural section. Guides along the Y axis 20x40mm. Plastic parts are very few and almost all of them are made by casting. Even the auxiliary parts of the extruder are made of thin sheet metal. Both belts, X and Y, have normal tensioners.
With all this, it is the same, the good old Prusa. On belts, ballscrews, shafts and linear bearings. Here I must make a small digression. Despite all the disadvantages of this linear displacement system, I consider its use in budget machines to be more than justified. If the shafts are crooked or the bearings have deteriorated, they are always very easy to find and change. Also, if the shafts are not parallel, they can always be slightly moved and adjusted. If you take the machine on rails or rollers, then it will be a completely different price category.
The power supply unit is mounted on the right side of the machine and plays the role of an additional kerchief, which adds rigidity to the structure. Please note that it also has a metal casing, a network cable connector and a toggle switch for switching on. And all this, of course, has already been assembled and connected.
Next, set the limit switches of the axes X and Z. Everything is already thought out and molded in plastic. All fasteners are selected optimally. Seat under the limit switch of the X axis:
Even the holder of the Z-axis switch is made of metal. It is attached very securely, and it is very easy to move it for calibration.
One of the variations of Anet3D RAMPS is also used as a motherboard. The drivers are soldered, there is a current adjustment of the Z axis. On the one hand, this is a minus (the fact that the drivers are not removable), on the other hand, in my practice, no driver has suffered. There is a fuse on the table and a slot for printing from a memory card. The board is also stitched with some kind of Marlin assembly from the manufacturer. At the end of the article I will give a link to the software for this machine, but even on the stock firmware, everything started up confidently for me.
Connecting the wires takes much longer than the assembly of mechanics. But everything is signed and you can connect without especially looking at the instructions. No need to solder. All switching is thought out very well. Even for limit switches made special cable lugs.
By the way, the table heats up from 24V. With the old model, I had a problem that the heater contacts in the connector were heated. Anet A8 Plus in the table connector already has two contacts for plus and minus (the wires themselves are also duplicated), and the contacts themselves are filled with a sealant.
I will add here an illustration with a picture to connect. It just shows better the board itself. In fact, even it is not needed. There are signatures on the board and nameplates on all cables. This generally applies to the whole machine as a whole. Everything is going very uniquely and intuitively.
As a result, after the complete assembly and cleaning of wires braided, it looks like this:
Many product photos display the Anet3D color logo, but in fact use a regular monochrome LCD display. By the way, it is very original installed on the ratchet with a magnet and it can be removed, picked up and operated by the printer as a large adult CNC machine from the console!)
The display with the encoder and the reset button is in a separate metal box. Having examined it, I still found something to find fault with in this machine!
Extruder
At first glance, it makes a very good impression. It is not much different from the national MK2 and it will be easy to find spare parts for it. In fact, the manufacturer made sure that the coolers of the extruder and the model were conveniently installed on the printer. On the thermal barrier itself, an additional radiator is installed right in front of the cube - a very elegant solution compared to how it was on the previous version.
There are additional guides for plastic. I tried typing with Flex and I had no problems with loading or extrusion.
Calibration
With such a large print area, this turned out to be much more difficult than I expected.
At first I had problems with the fact that too little current was set on the Z axis. The right engine started to skip steps and the entire calibration swam away at once. But with this problem I figured out very quickly, and then began dancing around the frame.
Looking ahead, I will say that in the end I was able to calibrate the printer only on a flat piece of chipboard with a piece of fiberglass laminate under the near right leg. And to come to this decision, I spent 8 hours!
The large size of the printer entails big calibration problems. Even with a very small distortion of the frame diagonally, it becomes almost impossible. I put it on a flat panel of chipboard and tried to align all the mechanics with respect to it. Perhaps, I managed to eliminate some major irregularities, but in the end I just experimentally selected which leg and thickness to put the part under. But in the end, everything calibrated just perfect. I even dragged it from place to place in this form.
Video
Much of what I have said and something else new can be seen in the video:
If you try to summarize, I would say that nothing has changed in principle. Yes, the design has become metallic, but everything has become bigger and heavier.
In other words, there is a clear increase in print volume, but not in quality. It remained quite suitable for printing various structural elements. And there is a nice bonus from the fact that the printer began to print noticeably quieter (probably, thanks to the rubber feet in the first place).
To an inexperienced viewer it may seem that the test model is printed very badly. It is made of 0.4 m nozzle with a layer height of 0.15 mm. In fact, this is quite a good result for a Chinese budget printer and it will allow you to very confidently print products like SkullBota.
I emphasize - this is the result of printing out of the box! That is, you can still work on fine-tuning the mechanics and play around with the printing algorithms to improve the result.
I also tried to get rid of a larger print from a memory card - a girl stylized as T800 in the first photo. Almost 30 hours of printing, 140Mb G-code, 900g of plastic. On the one hand, everything went smoothly, but the quality of the plastic was not very. And we must understand that when there is almost a kilogram of plastic on the table, it starts rocking very neatly, which affects the print quality.
Software from Anet3D
You can buy this printer for about $ 300 at the links below:
Anet official online shop for A8 Plus
Amazon for Anet A8 Plus
Aliexpress for Anet A8 Plus
Ebay for Anet A8 Plus
TomTop for Anet A8 Plus
Thanks for attention. I will be glad to answer any questions and listen to the recommendations!
Source: https://habr.com/ru/post/457786/
All Articles