Using the KOMPAS-3D API → Lesson 16 → Control Characters
We continue the series of articles on working with the CAD API KOMPAS-3D. Control characters have already met several times in previous lessons of the cycle. Then each time it was said that the output lines should not contain them, since COMPASS processes them in a special way. Now it's time to get to know them better.
Having mastered working with them, you will understand that the creation of complex compound lines is a trivial task, which in most cases does not require writing a large amount of code.
In the lesson we will look at how to use special characters and font characters using control characters, talk about how to create fractions and deviations with their help, and also consider their use in conjunction with paragraphs.
')
The control characters are @, $, &,;, ~, ^ and #. Unfortunately in the KOMPAS SDK there is very little information on how to use them. More detailed information is given in the KOMPAS help, in the section “9. KOMPAS-3D settings / Storing system settings / Service files / Custom menu file / File syntax " .

All control characters can be divided into two groups: basic and auxiliary. Auxiliary characters are used only in conjunction with the main and, by themselves, do not describe any component. The table below provides a brief description of the control characters.

Consider them in more detail.
We have already considered special characters (see lessons 4 and 10 ). Then a separate copy of the ksTextItemParam interface was used to insert one special character. With the help of control characters, you can insert as many special characters into the string as you see fit without repeatedly using the ksTextItemParam interface.
The syntax for inserting special characters is:
AA @ YXXXX ~ BB
Where
AA - a string to be placed before the special character,
Y - modifier of the special character code representation,
XXXX is the code of the special character to be inserted.
BB is a string that appears after the special character.
The code of the inserted special character is specified between @ and ~ . In this case, depending on the value of the Y modifier, it can be specified in decimal or hexadecimal notation. Valid values for the Y modifier are shown in the table below.

Note: as shown by my experiments, KOMPAS normally handles the absence of the ~ character. In this special characters are inserted as needed. However, I highly recommend not to rely on this behavior and always complete the insert operation with the ~ character.
Below is an example of a program that demonstrates the output of special characters.
In this example, the same character (α alpha) is displayed twice. The first time its code is set in decimal notation, the second time - in hexadecimal. The figure below shows the result of the program.

Control characters allow you to display several special characters in one line. Thus, the following example demonstrates the output of the first three letters of the Greek alphabet in one call to the ksText method.
The figure below shows the result of this program.

Modifier + is the default modifier. Therefore, the above line can be written as:
“@ 51 ~ @ 52 ~ @ 53 ~”
The result of the program will remain the same.
If there is an invalid character after @ , then the line between @ and ~ is output as is. At the same time, the characters @ and ~ are omitted. For example, with the line:
“Before @ T51 ~ After”
The document will display:
To T51 After
Note: this behavior of KOMPAS is undocumented and may vary in different versions of the program.
Note: control characters are not suitable for inserting special characters containing a string. The fact is that to limit their actions, you need to use the SPECIAL_SYMBOL_END flag (for more details, see the 10th cycle lesson ), but the control characters do not allow the use of flags.
In addition to special characters, you can insert ordinary characters by their code. Control characters ^ and ~ are used for this. Their syntax is below.
AA ^ ( FNAME ) YXXXX ~ BB
Where
AA - a line before the inserted character,
FNAME - the name of the font from which the character is taken,
Y - the modifier of the representation of the character code (similar to @),
XXXX is the numeric code of the character being inserted,
BB is a string after the inserted character.
According to its purpose, the control character ^ is similar to @ . They even have a similar syntax. But between them there are two important differences:
Character codes can be viewed using the charmap application (Character Map) included with the Windows operating system.
If the font is not specified, the default font is used. The following is an example of using the symbol ^ .
In this example, two characters are inserted into the resulting string, for the first one we select the Arial font, for the second we leave the default font. The figure below shows the line that is displayed in the document.

Note: the font is set only for the displayed character. As my experiments show, KOMPAS normally handles the absence of the trailer ~ . However, I do not recommend relying on this behavior and always putting a trailer.
If after ^ an invalid character is specified (or an invalid code), then ^ and ~ are omitted, and the line between them is displayed as is with the use of the default font. For example, with the line
“Before ^ Q (Arial) * B1 ~ After”
The document will display:
“Before Q (Arial) * B1 After”
If an incorrect font name is specified in the FNAME field, KOMPAS will select the font and output the character in it.
If the line does not have a closing parenthesis, then such a line will not be completely displayed. For example, with the line:
“Before ^ Q (Arial * B1 ~ After”
Only document will be displayed in the document.
"Before "
Note: the above behavior with incorrect syntax of control characters is valid for KOMPAS-3D V17 and is not documented. In other versions it may differ.
The symbols @ and ^ have analogues - & and #, respectively. They have a similar syntax:
AA & XX ~ BB
AA # ( FNAME ) XX ~ BB
Where
AA - the line output before the inserted character
XX - code of the symbol to be inserted (for & - special character, for # - font character),
BB - the line output after the inserted character
FNAME - font name.
There are only two differences between the characters @ and ^ , and their analogues:
The following is the source code of a program that demonstrates working with & and # characters.
The figure below shows the result of this program.

With the help of control characters you can display multi-line text. To do this, in the place of transfer to a new line you need to insert the sequence: @ / . Note: the @ symbol is used without a trailer ~ . Below is the source code of a program that demonstrates the output of multi-line text using control characters.
Note: thanks to the use of control characters, we output two-line text with just one call to the ksText method. The figure below shows the result of this program.

We figured out how to insert arbitrary special characters and Unicode characters. But what if you want to insert the control character itself? Here you can go two ways. The first way is to use the ^ character and insert them as normal font characters. But there is a simpler way.
Symbol ; is auxiliary and can be inserted directly into the text. To insert other control characters, you need to duplicate them. That is, a pair of @@ characters inserts one @ character into the text. The same is true for other control characters.
The following is an example of a program that demonstrates inserting control characters into a string.
The figure below shows the result of this program.

The following syntax is used to insert deviations:
AA $ XX ; YY $ BB
Where
AA - text output before deviations;
XX - upper deviation;
YY - lower deviation;
BB - text output after deviations.
Please note: the whole structure is limited to $ characters, and the symbol “ ; »Serves as a separator between upper and lower deviations.
If there is no separator between $ characters " ; ", Then the entire line between them is interpreted as an upper deviation. If component XX is missing, that is, after the first $ immediately goes " ; ", Then the entire subsequent line to the nearest $ is interpreted as the lower deviation.
Note: the text of the upper deviation should not begin with the letters b , d , s , m and l (lowercase L ). The reason for this will be explained later.
Below is an example of a program that demonstrates the output of text with deviations.
The figure below shows the result of this program:

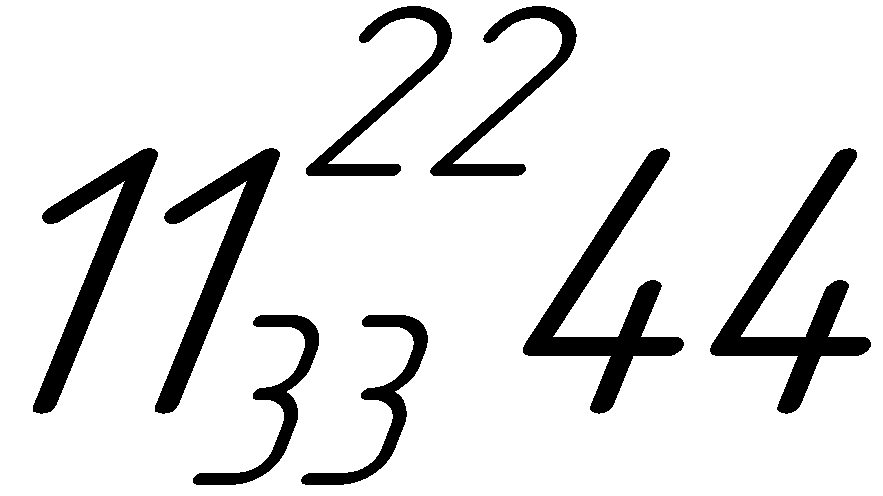
Note, KOMPAS processes only one character “ ; ". The second character is " ; "Can be interpreted as the finalizer of the whole structure. For example, with the line " 11 $ 22; 33; 44 $ " the following will be displayed:
Note: this behavior of KOMPAS is not documented, therefore it is impossible to rely on it.
The fraction syntax is similar to the deviation syntax and has two equivalent options:
AA $ bXX ; YY $ BB
AA $ dXX ; YY $ BB
Where
AA - text displayed before the fraction;
XX - numerator;
YY is the denominator;
BB - text displayed after the fraction.
Note: the only thing that distinguishes a fraction from the output of deviations is the presence of the letter d or b immediately after the first $ sign. In all other respects, their syntaxes are identical.
If between the characters $ d ( $ b ) and $ there is no symbol “ ; "Then the entire line between them will be interpreted as a numerator. If component XX is missing, that is, after $ d ( $ b ) immediately goes " ; ", Then the entire subsequent line to the nearest $ is interpreted as a denominator.
Note: the numerator text must not begin with the letters s , m or l (lowercase L ). The reason for this will be explained later.
Below is an example of a program that demonstrates the output of fractions using control characters.
The figure below shows the result of this program.

Note that KOMPAS handles “extra” characters “ ; »As in the case of deviations. This behavior is undocumented and cannot be relied upon.
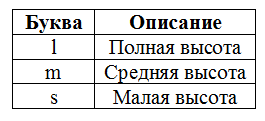
At the very beginning of the construction of the construction of deviations or fractions can be one of the letters: s , m or l (lowercase L ). They set the size of the deviations and elements of the fraction (numerator and denominator). Their purpose is described in the table below.
If none of these letters is specified, then l is used for a fraction, and m is used for deviations. Below is an example of a program that demonstrates the use of these letters.
The figure below shows the result of this program.
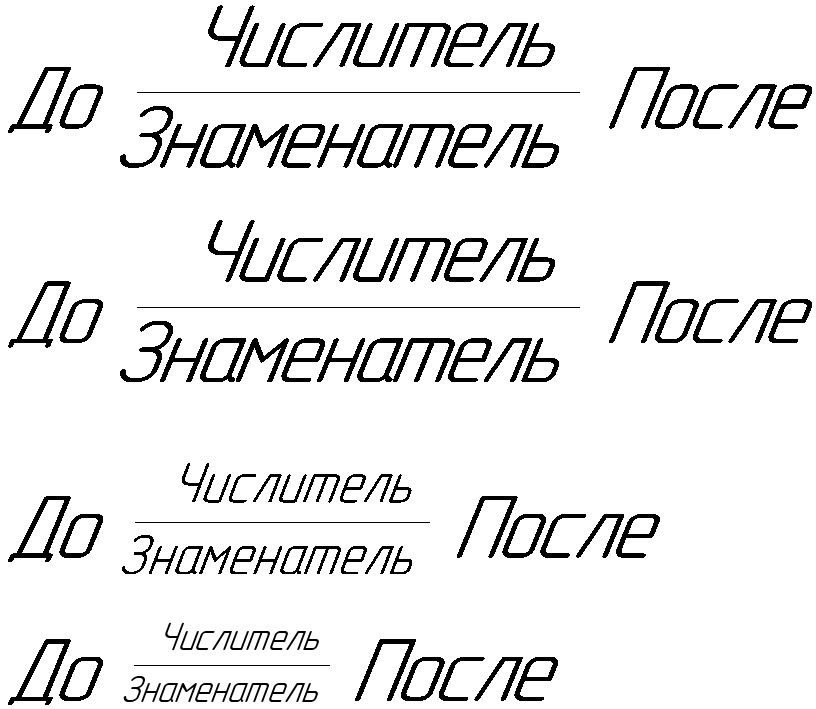
Although in this example, the letters s , m, and l are used for a fraction, their use for deviations is no different.
Note that if between the beginning of a fraction or a deviation ( $ , $ d or $ b ) and the letter s , m or l there is at least one “extraneous” character (for example, a space), then COMPASS will not “see” the letters and the fraction or the deviation will have a default size.
When displaying fractions and deviations, the lines in their composition are processed recursively. This means that when forming the numerator and denominator, control characters can also be used. This approach is demonstrated in the following example.
The figure below shows the result of this program.

To insert the letters of the Greek alphabet, we use the control characters @ and ^ (for the letter pi). The degree in the first addendum is derived from the deviations. It is output by the substring $ s2 $ . The letter s indicates a small deviation size, and due to the absence of a separator “ ; »Only upper deviation is displayed.
To form a fraction, the combination $ d; $ is used . Moreover, the numerator and denominator include control characters that provide the output of letters of the Greek alphabet.
The last subtracted (π pi) is displayed as a symbol of the Symbol font using the control characters ^ and ~ .
Unfortunately, the possibilities of such a “recursion” are severely limited. We can not fraction and deviations to invest in each other. The problem is that they are both formed using the $ control character. Because of this, KOMPAS cannot correctly make out which $ element belongs to.
Partially bypassing the constraint with embedded control characters is possible with the help of paragraphs. Sharing control characters and paragraphs allows you to build even more complex structures. The example below demonstrates the construction of a 4-level fraction.
In this example, control characters are used to build fractions in the numerator and denominator of the main fraction, as well as to insert the letters of the Greek alphabet. The figure below shows the result of this program.

In this lesson, we met with control characters and learned how to draw special characters and font characters using them. As you can see, they provide a simple syntax for creating strings that include special characters, fractions, deviations. Unfortunately, they are poorly suited for inserting special characters containing strings. But such special characters are extremely rare. This is one of the limitations of control characters. Also with their help it is impossible to create sublines and substrings, and there are limitations when working with special characters that include strings. But this does not detract from their merits. This concludes the consideration of control characters.
To be continued, stay tuned to the blog.
 Sergey Norseev, Ph.D., author of the book “Development of applications for COMPAS in Delphi”.
Having mastered working with them, you will understand that the creation of complex compound lines is a trivial task, which in most cases does not require writing a large amount of code.
In the lesson we will look at how to use special characters and font characters using control characters, talk about how to create fractions and deviations with their help, and also consider their use in conjunction with paragraphs.
')
Content of the cycle of lessons “Working with the KOMPAS-3D API”
- The basics
- Drawing design
- Correct connection to COMPAS
- Title block
- Graphic primitives
- Save the document in various formats
- Getting to know the settings
- More sophisticated writing methods
- Reading the caption cells
- Special characters including string
- Simple text lettering
- Compound strings
- Paragraphs
- Multiline text
- Paragraph-based compound lines
- Control characters
Quick review
The control characters are @, $, &,;, ~, ^ and #. Unfortunately in the KOMPAS SDK there is very little information on how to use them. More detailed information is given in the KOMPAS help, in the section “9. KOMPAS-3D settings / Storing system settings / Service files / Custom menu file / File syntax " .
All control characters can be divided into two groups: basic and auxiliary. Auxiliary characters are used only in conjunction with the main and, by themselves, do not describe any component. The table below provides a brief description of the control characters.
Consider them in more detail.
Insert Special Characters
We have already considered special characters (see lessons 4 and 10 ). Then a separate copy of the ksTextItemParam interface was used to insert one special character. With the help of control characters, you can insert as many special characters into the string as you see fit without repeatedly using the ksTextItemParam interface.
The syntax for inserting special characters is:
AA @ YXXXX ~ BB
Where
AA - a string to be placed before the special character,
Y - modifier of the special character code representation,
XXXX is the code of the special character to be inserted.
BB is a string that appears after the special character.
The code of the inserted special character is specified between @ and ~ . In this case, depending on the value of the Y modifier, it can be specified in decimal or hexadecimal notation. Valid values for the Y modifier are shown in the table below.
Note: as shown by my experiments, KOMPAS normally handles the absence of the ~ character. In this special characters are inserted as needed. However, I highly recommend not to rely on this behavior and always complete the insert operation with the ~ character.
Below is an example of a program that demonstrates the output of special characters.
BSTR str = SysAllocString(OLESTR(" @+51~ ")); document2D->ksText(100.0,100.0,0.0,0.0,0.0,0,str); SysFreeString(str); str = SysAllocString(OLESTR(" @*33~ ")); document2D->ksText(100.0,90.0,0.0,0.0,0.0,0,str); SysFreeString(str); In this example, the same character (α alpha) is displayed twice. The first time its code is set in decimal notation, the second time - in hexadecimal. The figure below shows the result of the program.
Control characters allow you to display several special characters in one line. Thus, the following example demonstrates the output of the first three letters of the Greek alphabet in one call to the ksText method.
BSTR str = SysAllocString(OLESTR("@+51~ @+52~ @+53~")); document2D->ksText(100.0,100.0,0.0,0.0,0.0,0,str); SysFreeString(str); The figure below shows the result of this program.
Modifier + is the default modifier. Therefore, the above line can be written as:
“@ 51 ~ @ 52 ~ @ 53 ~”
The result of the program will remain the same.
If there is an invalid character after @ , then the line between @ and ~ is output as is. At the same time, the characters @ and ~ are omitted. For example, with the line:
“Before @ T51 ~ After”
The document will display:
To T51 After
Note: this behavior of KOMPAS is undocumented and may vary in different versions of the program.
Note: control characters are not suitable for inserting special characters containing a string. The fact is that to limit their actions, you need to use the SPECIAL_SYMBOL_END flag (for more details, see the 10th cycle lesson ), but the control characters do not allow the use of flags.
Insert font characters
In addition to special characters, you can insert ordinary characters by their code. Control characters ^ and ~ are used for this. Their syntax is below.
AA ^ ( FNAME ) YXXXX ~ BB
Where
AA - a line before the inserted character,
FNAME - the name of the font from which the character is taken,
Y - the modifier of the representation of the character code (similar to @),
XXXX is the numeric code of the character being inserted,
BB is a string after the inserted character.
According to its purpose, the control character ^ is similar to @ . They even have a similar syntax. But between them there are two important differences:
- ^ inserts not a special character, but a font character by its code;
- for the character to be inserted, you can specify the font in the FNAME field (@ this does not allow).
Character codes can be viewed using the charmap application (Character Map) included with the Windows operating system.
If the font is not specified, the default font is used. The following is an example of using the symbol ^ .
BSTR str = SysAllocString(OLESTR(" ^(Arial)*B1~ ^*39~ ")); document2D->ksText(100.0,100.0,0.0,0.0,0.0,0,str); SysFreeString(str); In this example, two characters are inserted into the resulting string, for the first one we select the Arial font, for the second we leave the default font. The figure below shows the line that is displayed in the document.
Note: the font is set only for the displayed character. As my experiments show, KOMPAS normally handles the absence of the trailer ~ . However, I do not recommend relying on this behavior and always putting a trailer.
If after ^ an invalid character is specified (or an invalid code), then ^ and ~ are omitted, and the line between them is displayed as is with the use of the default font. For example, with the line
“Before ^ Q (Arial) * B1 ~ After”
The document will display:
“Before Q (Arial) * B1 After”
If an incorrect font name is specified in the FNAME field, KOMPAS will select the font and output the character in it.
If the line does not have a closing parenthesis, then such a line will not be completely displayed. For example, with the line:
“Before ^ Q (Arial * B1 ~ After”
Only document will be displayed in the document.
"Before "
Note: the above behavior with incorrect syntax of control characters is valid for KOMPAS-3D V17 and is not documented. In other versions it may differ.
Additional ways to insert characters
The symbols @ and ^ have analogues - & and #, respectively. They have a similar syntax:
AA & XX ~ BB
AA # ( FNAME ) XX ~ BB
Where
AA - the line output before the inserted character
XX - code of the symbol to be inserted (for & - special character, for # - font character),
BB - the line output after the inserted character
FNAME - font name.
There are only two differences between the characters @ and ^ , and their analogues:
- There is no Y modifier in the & and # characters. The character code is always in decimal notation.
- The code of the character to be inserted is given in up to two digits.
The following is the source code of a program that demonstrates working with & and # characters.
BSTR str = SysAllocString(OLESTR(" &51~ ")); document2D->ksText(100.0,100.0,0.0,0.0,0.0,0,str); SysFreeString(str); str = SysAllocString(OLESTR(" #(Arial)37~ #37~ ")); document2D->ksText(100.0,90.0,0.0,0.0,0.0,0,str); SysFreeString(str); The figure below shows the result of this program.
Multiline text
With the help of control characters you can display multi-line text. To do this, in the place of transfer to a new line you need to insert the sequence: @ / . Note: the @ symbol is used without a trailer ~ . Below is the source code of a program that demonstrates the output of multi-line text using control characters.
BSTR str = SysAllocString(OLESTR(" @/ ")); document2D->ksText(100.0,100.0,0.0,0.0,0.0,0,str); SysFreeString(str); Note: thanks to the use of control characters, we output two-line text with just one call to the ksText method. The figure below shows the result of this program.
Inserting Control Characters
We figured out how to insert arbitrary special characters and Unicode characters. But what if you want to insert the control character itself? Here you can go two ways. The first way is to use the ^ character and insert them as normal font characters. But there is a simpler way.
Symbol ; is auxiliary and can be inserted directly into the text. To insert other control characters, you need to duplicate them. That is, a pair of @@ characters inserts one @ character into the text. The same is true for other control characters.
The following is an example of a program that demonstrates inserting control characters into a string.
BSTR str = SysAllocString(OLESTR(" : @@ $$ && ; ~~ ^^ ##")); document2D->ksText(100.0,100.0,0.0,0.0,0.0,0,str); SysFreeString(str); The figure below shows the result of this program.
Upper and lower deviations
The following syntax is used to insert deviations:
AA $ XX ; YY $ BB
Where
AA - text output before deviations;
XX - upper deviation;
YY - lower deviation;
BB - text output after deviations.
Please note: the whole structure is limited to $ characters, and the symbol “ ; »Serves as a separator between upper and lower deviations.
If there is no separator between $ characters " ; ", Then the entire line between them is interpreted as an upper deviation. If component XX is missing, that is, after the first $ immediately goes " ; ", Then the entire subsequent line to the nearest $ is interpreted as the lower deviation.
Note: the text of the upper deviation should not begin with the letters b , d , s , m and l (lowercase L ). The reason for this will be explained later.
Below is an example of a program that demonstrates the output of text with deviations.
BSTR str = SysAllocString(OLESTR(" $;$ ")); document2D->ksText(100.0,100.0,0.0,0.0,0.0,0,str); SysFreeString(str); The figure below shows the result of this program:
Note, KOMPAS processes only one character “ ; ". The second character is " ; "Can be interpreted as the finalizer of the whole structure. For example, with the line " 11 $ 22; 33; 44 $ " the following will be displayed:
Note: this behavior of KOMPAS is not documented, therefore it is impossible to rely on it.
Fraction
The fraction syntax is similar to the deviation syntax and has two equivalent options:
AA $ bXX ; YY $ BB
AA $ dXX ; YY $ BB
Where
AA - text displayed before the fraction;
XX - numerator;
YY is the denominator;
BB - text displayed after the fraction.
Note: the only thing that distinguishes a fraction from the output of deviations is the presence of the letter d or b immediately after the first $ sign. In all other respects, their syntaxes are identical.
If between the characters $ d ( $ b ) and $ there is no symbol “ ; "Then the entire line between them will be interpreted as a numerator. If component XX is missing, that is, after $ d ( $ b ) immediately goes " ; ", Then the entire subsequent line to the nearest $ is interpreted as a denominator.
Note: the numerator text must not begin with the letters s , m or l (lowercase L ). The reason for this will be explained later.
Below is an example of a program that demonstrates the output of fractions using control characters.
BSTR str = SysAllocString(OLESTR(" $d;$ ")); document2D->ksText(100.0,100.0,0.0,0.0,0.0,0,str); SysFreeString(str); The figure below shows the result of this program.
Note that KOMPAS handles “extra” characters “ ; »As in the case of deviations. This behavior is undocumented and cannot be relied upon.
Manage the size of deviations and fractions
At the very beginning of the construction of the construction of deviations or fractions can be one of the letters: s , m or l (lowercase L ). They set the size of the deviations and elements of the fraction (numerator and denominator). Their purpose is described in the table below.
If none of these letters is specified, then l is used for a fraction, and m is used for deviations. Below is an example of a program that demonstrates the use of these letters.
BSTR str = SysAllocString(OLESTR(" $d;$ ")); document2D->ksText(100.0,100.0,0.0,0.0,0.0,0,str); SysFreeString(str); str = SysAllocString(OLESTR(" $dl;$ ")); document2D->ksText(100.0,85.0,0.0,0.0,0.0,0,str); SysFreeString(str); str = SysAllocString(OLESTR(" $dm;$ ")); document2D->ksText(100.0,70.0,0.0,0.0,0.0,0,str); SysFreeString(str); str = SysAllocString(OLESTR(" $ds;$ ")); document2D->ksText(100.0,60.0,0.0,0.0,0.0,0,str); SysFreeString(str); The figure below shows the result of this program.
Although in this example, the letters s , m, and l are used for a fraction, their use for deviations is no different.
Note that if between the beginning of a fraction or a deviation ( $ , $ d or $ b ) and the letter s , m or l there is at least one “extraneous” character (for example, a space), then COMPASS will not “see” the letters and the fraction or the deviation will have a default size.
Nested control characters
When displaying fractions and deviations, the lines in their composition are processed recursively. This means that when forming the numerator and denominator, control characters can also be used. This approach is demonstrated in the following example.
BSTR str = SysAllocString(OLESTR("@54~$s2$ + $d@+51~;@+52~$ - ^(Symbol)*70~")); document2D->ksText(100.0,100.0,0.0,0.0,0.0,0,str); SysFreeString(str); The figure below shows the result of this program.
To insert the letters of the Greek alphabet, we use the control characters @ and ^ (for the letter pi). The degree in the first addendum is derived from the deviations. It is output by the substring $ s2 $ . The letter s indicates a small deviation size, and due to the absence of a separator “ ; »Only upper deviation is displayed.
To form a fraction, the combination $ d; $ is used . Moreover, the numerator and denominator include control characters that provide the output of letters of the Greek alphabet.
The last subtracted (π pi) is displayed as a symbol of the Symbol font using the control characters ^ and ~ .
Unfortunately, the possibilities of such a “recursion” are severely limited. We can not fraction and deviations to invest in each other. The problem is that they are both formed using the $ control character. Because of this, KOMPAS cannot correctly make out which $ element belongs to.
Paragraph control characters
Partially bypassing the constraint with embedded control characters is possible with the help of paragraphs. Sharing control characters and paragraphs allows you to build even more complex structures. The example below demonstrates the construction of a 4-level fraction.
Program code for building a 4-level fraction
// DynamicArrayPtr dynamicArray; dynamicArray = static_cast<DynamicArrayPtr>(kompas->GetDynamicArray(TEXT_ITEM_ARR)); dynamicArray->ksClearArray(); TextItemParamPtr textItemParam; textItemParam = static_cast<TextItemParamPtr>(kompas->GetParamStruct(ko_TextItemParam)); // BSTR str = SysAllocString(OLESTR(" ")); textItemParam->set_s(str); dynamicArray->ksAddArrayItem(-1, textItemParam); SysFreeString(str); // TextItemFontPtr textItemFont; textItemFont = static_cast<TextItemFontPtr>(textItemParam->GetItemFont()); textItemFont->set_bitVector(NUMERATOR); str = SysAllocString(OLESTR("1 + $d@+51~;2$")); textItemParam->set_s(str); dynamicArray->ksAddArrayItem(-1, textItemParam); SysFreeString(str); // textItemFont->set_bitVector(DENOMINATOR); str = SysAllocString(OLESTR("1 + $d@+56~;2$")); textItemParam->set_s(str); dynamicArray->ksAddArrayItem(-1, textItemParam); SysFreeString(str); // textItemFont->set_bitVector(END_FRACTION); str = SysAllocString(OLESTR(" ")); textItemParam->set_s(str); dynamicArray->ksAddArrayItem(-1, textItemParam); SysFreeString(str); // textItemFont.Unbind(); textItemParam.Unbind(); // ksTextLineParam TextLineParamPtr textLineParam; textLineParam = static_cast<TextLineParamPtr>(kompas->GetParamStruct(ko_TextLineParam)); textLineParam->Init(); textLineParam->SetTextItemArr(dynamicArray); dynamicArray.Unbind(); // ParagraphParamPtr paragraphParam; paragraphParam=static_cast<ParagraphParamPtr>(kompas->GetParamStruct(ko_ParagraphParam)); paragraphParam->Init(); paragraphParam->set_x(100.0); paragraphParam->set_y(100.0); document2D->ksParagraph(paragraphParam); document2D->ksTextLine(textLineParam); document2D->ksEndObj(); // textLineParam.Unbind(); paragraphParam.Unbind(); In this example, control characters are used to build fractions in the numerator and denominator of the main fraction, as well as to insert the letters of the Greek alphabet. The figure below shows the result of this program.
Conclusion
In this lesson, we met with control characters and learned how to draw special characters and font characters using them. As you can see, they provide a simple syntax for creating strings that include special characters, fractions, deviations. Unfortunately, they are poorly suited for inserting special characters containing strings. But such special characters are extremely rare. This is one of the limitations of control characters. Also with their help it is impossible to create sublines and substrings, and there are limitations when working with special characters that include strings. But this does not detract from their merits. This concludes the consideration of control characters.
To be continued, stay tuned to the blog.
Sergey Norseev, Ph.D., author of the book “Development of applications for COMPAS in Delphi”.Source: https://habr.com/ru/post/457702/
All Articles