JavaScript: Creating a simple MEVN application
What is the article about
The purpose of this article is to show how you can create a basic MEVN application. Acronym MEVN
means - MongoDB + Express.js + Vue.js + Node.js. As an example, it will be written
one-page application that contains a form consisting of several text
fields. When filling out a form and sending data, the server will write them to the database, and
redirect client to the “Thank You” page.
The operating system is Ubuntu 18.10, the installation of all components will be
is relative to her.
Required Requirements
- Knowledge of HTML, CSS;
- Basic knowledge of javascript.
What we have at the exit
- Full-fledged Fullstack application;
- CRUD operations and REST API using Express.js;
- Connect to MongoDB.
Workspace preparation
To start developing an application, you need to install some tools.
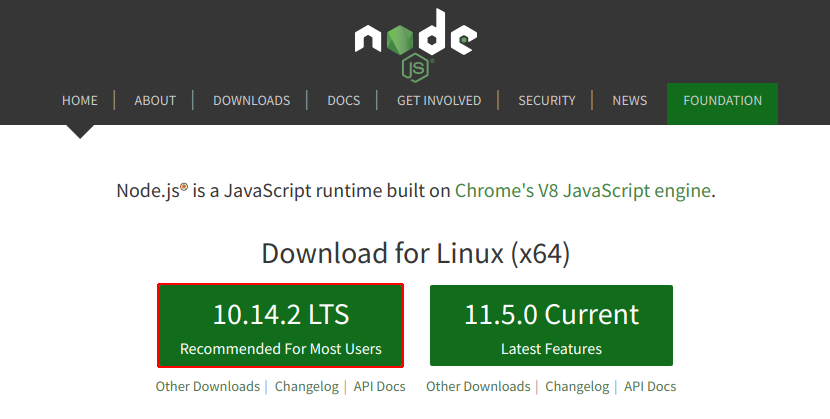
The basis of the entire project is Node.js and its NPM package manager. Node.js is the runtime
JavaScript, the environment of which includes everything you need to run a program,
written in javascript.
')
You can install here . You should select the “Stable” version as indicated in
screenshot:
You can also use NVM (Node Version Manager) - this is a handy tool for managing Node.js versions. You can install it from the terminal with the command:
env VERSION=`python tools/getnodeversion.py` make install DESTDIR=`nvm_version_path v$VERSION` PREFIX="" Then run nvm use * version *, for example:
nvm use 10 Now Node.js is installed, you can check it with the node -v command:
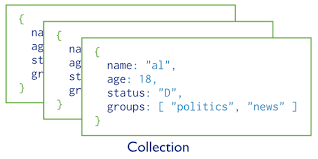
node -v > 10.14.2 Next is MongoDB. This DBMS, classified as NoSQL, uses JSON-like documents and a database schema.
To install you need to run a sequence of commands:
sudo apt-key adv --keyserver hkp://keyserver.ubuntu.com:80 --recv 9DA31620334BD75D9DCB49F368818C72E52529D4 echo "deb [ arch=amd64 ] https://repo.mongodb.org/apt/ubuntu bionic/mongodb-org/4.0 multiverse" | sudo tee /etc/apt/sources.list.d/mongodb-org-4.0.list sudo apt-get update sudo apt-get install -y mongodb-org When MongoDB is installed, you can run it in the background like this:
sudo systemctl start mongod Vue.js is a front-end framework for creating user interfaces. Vue is completely suitable for creating single page applications (SPA).
To work with Vue.js, there is an official CLI (Command Line Interface) - a complete system for quick development on Vue.js. It will provide an opportunity to create an interactive project, as well as provide the ability to update and optimal settings for working with the framework. You can install using NPM by specifying the -g (global) flag so that the dependency is established globally and can be used outside a specific project, i.e. globally:
npm install -g @vue/cli Now, when there is a MongoDB and Node.js + NPM installed, it remains to decide on a text editor. I will use VS Code as a text editor. You can choose any editor to your taste: be it Sublime, Atom or even Notepad ++.
Project Initialization
To create a new application Vue.js, use the previously installed Vue CLI. The create command looks like vue create * app_name *:
vue create mevn-app An interface appears in the terminal, allowing you to make settings for a new application. Select “Manually select features” for detailed settings, make the following list:

At the end of the application generation, a similar message should appear:
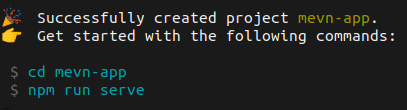
You can start the application using the npm run serve command above and see what the Vue CLI generated:
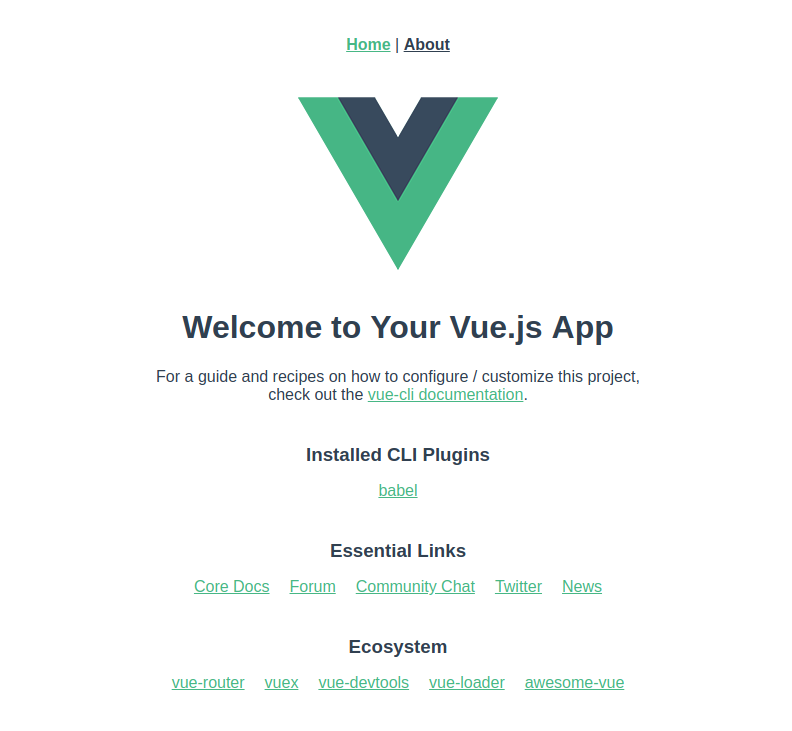
This start page features Vue Router functionality (two links at the top), CLI-installed plug-ins, as well as links to documentation, Vue ecosystem projects and social networks.
This is what the hierarchy of the created project now looks like:
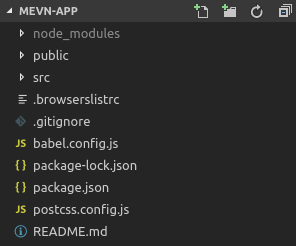
- node_modules - directory of installed dependencies required for project operation. Usually, it is not indexed in git, since its volume sometimes reaches very large sizes.
- package.json is a project initialization file that is very tightly linked to the node_modules directory. It contains information about the project (name, author, version), scripts are written running NPM, as well as all installed dependencies, which are contained in the node_modules. Dependencies are indicated by the values of the keys “dependencies” (dependencies used for production) and “devDependencies” (dependencies used in development). Those. This file is needed first of all so that the project can be deployed on any machine, just with the npm i command. You can try to delete the node_modules directory, and then run the npm i command in the project root: it will re-tighten all the necessary dependencies that are listed in package.json.
- package-lock.json - snapshot of the entire dependency tree. The fact is that packages have top level dependencies. When installing it is not noticeable, but you can always see in package-lock.json. For example, the bootstrap package will pull the jquery package after installation. Jquery will not be listed in package.json, but it will still be installed as the bootstrap dependency, i.e. There is no need to additionally specify jquery in “dependencies” to complete bootstrap work.
- babel.config.js is a file containing rules (presets) through which Babel learns how to translate code. Babel is a code transporter. The JavaScript language has specifications that need to be followed in order for the code to work correctly on production. But often not all browsers manage to implement a new specification in their interpreters, and some specifications never implement at all. This is what Babel is for: it translates the code from any specification into a specification that most browsers understand. Those. When developing, you write one code, and, thanks to Babel, another comes out of production. In our case, there is only one preset, '@ vue / app'.
- postcss.config.js is a PostCSS configuration file. This is a CSS post-processing tool that can transform your CSS in many cool ways, such as automatically adding prefixes, checking adherence to the code design standard, and many others. It is automatically installed by the Vue CLI and so far contains only rules for adding prefixes, which will ensure cross-browser application.
- browserslist.rc - a file that determines which browsers the application is designed for. In our case, these are the last 2 versions of browsers having more than 5% of users all over the world, excluding Internet Explorer below version 8 inclusive.
- README.md - project information file, written on Markdown - a lightweight markup language, created to write the most readable and easy to edit text. Usually, this file contains the description of the project, information about the versions of the main packages, installation instructions, etc.
- src (source) is the directory within which development takes place directly. This contains all the written code, as well as the assets / directory, where scss / css, js files, fonts, images, etc. are placed. Vue.js uses the Webpack for building: all the code needed for the application to work correctly will be packaged into a single vendor.js file inside the dist / directory. It is worth adding this directory to .gitignor, because collected application takes up extra space in the repository. Like node_modules, dist / can be compiled using a single NPM command.
- public - the directory that contains the basic html template for generating the finished application and, usually, its icon (favicon.ico).
Start of development (frontend)
Since we are using the Vue CLI, instead of splitting the code into separate html, css and js, vue files are created. There is nothing supernatural in this: vue files imply the following structure:
<template> * HTML * </template> <script> * JavaScript * </script> <style> * Stylesheet * </style> This is done for more convenient design of the components Vue and is only syntactic sugar. Files with this format are processed by Babel for subsequent release in production.
In the src / directory, in addition to the Vue components, there are also main.js and router.js files.
In main.js, Vue imports all the necessary packages, and then creates a new instance of Vue and mounts it into the specified element, at the Virtual DOM level, using the Vue class method -. $ Mount ("# app"). Inside the method, you should specify a string with the id of the html element specified in the base html template.
In router.js, Vue imports the vue-router package that Vue CLI installed when creating the project and all components that participate in routing. Routing occurs by passing, as an argument, an array of objects to the Router class, when creating its instance:
new Router({ routes: [ { path: '/', name: 'home', component: Home }, ... ] ) First, remove the default Vue styles from App.vue. Then you should delete the components / directory with HelloWorld.vue, they are no longer needed. In addition to the directory and the component itself, you should remove its import inside views / Home.vue, where it is used:
views / Home.vue:
<template> <div class="home"> <img alt="Vue logo" src="../assets/logo.png"> - <HelloWorld msg="Welcome to Your Vue.js App"/> </div> </template> <script> - import HelloWorld from '@/components/HelloWorld.vue' export default { name: 'home', components: { - HelloWorld } } </script> Now from the application there are only a couple of links and their presentation. The content of these pages is also not needed, but not necessarily delete them, you can simply change, but first you need to edit the routing file:
router.js:
import Vue from 'vue' import Router from 'vue-router' import Home from './views/Home.vue' + import Thanks from './views/Thanks.vue' Vue.use(Router) export default new Router({ routes: [ { path: '/', name: 'home', component: Home }, - { - path: '/about', - name: 'about', - component: () => import(/* webpackChunkName: "about" */ './views/About.vue') - } + { + path: '/thanks', + name: 'thanks', + component: Thanks + } ] }) Now go to the components, based on the routing system. Need new component Thanks. Instead of creating a new one, edit About.vue and rename it in Thanks.vue:
views / About.vue> views / Thanks.vue:
<template> - <div class="about"> + <div class="thanks"> <h1>Thank you for your record!</h1> </div> </template> And we’ll change Home.vue: let's add a form that will send such data as Name, Email, Address and Gender:
views / Home.vue:
<template> <div class="home"> - <img alt="Vue logo" src="../assets/logo.png"> + <form @submit.prevent="sendData"> + <div class="form-control"> + <label for="name">Name</label> + <input v-model="name" id="name" type="text"> + </div> + <div class="form-control"> + <label for="email">Email</label> + <input v-model="email" id="email" type="email"> + </div> + <div class="form-control"> + <label for="address">Address</label> + <input v-model="address" id="address" type="text"> + </div> + <div class="form-control"> + <label for="gender">Gender</label> + <span>Male <input v-model="gender" id="gender" type="radio" value="male"></span> + <span>Female <input v-model="gender" id="gender" type="radio" value="female"></span> + </div> + <input type="submit" class="send" value="Send"> + </form> </div> </template> <script> export default { name: 'home', - components: {} + data: function () { + return { + name: '', + email: '', + address: '', + gender: '', + + }, + methods: { + sendData() { + console.log(this.name, this.email, this.address, this.gender); + + } </script> + <style> + .form-control { + padding: 5px; + } + .form-control label { + display: block; + + .send { + margin: 5px + + </style> The first thing that can be misleading is @ submit.prevent = "sendData". In Vue, events are heard using the v-on: attribute, but since this attribute is used quite often in development, its abbreviation was invented - @. Those. This line can be represented as v-on: submit.prevent = "sendData".
Let us see what this generally means:
- v-on or @ indicates Vue to listen for an event;
- submit - this is the event (submit applies only to forms. To a button, for example, you can apply a click event, and input or change to an input);
- .prevent is an event modifier that calls the preventDefault () js handler, which suspends a browser event for an element — in our case, a form. A browser event for a form is sending data and reloading the page, which should be avoided. Also, there are modifiers such as .stop (complete removal of a browser event), .once (executing the method only once) and others.
- sendData is the method (function inside the object) that will be called when the event is processed. Please note that parentheses () to the method should be set only if it accepts parameters.
Further, at each input there is an attribute v-model. It bidirectionally associates form elements (input, select, textarea) with data. That is, the value written to the input, where v-model = ”someText”, will be immediately written to the data property someText, if it exists.
In the exported object, we remove the components property, since Home.vue will not have child components, but add the data method. The data contains a Vue data object. It is worth noting that you can not just write the value of data, as an object with data - be sure to write the value as a function that returns it. This is a feature of Vue components.
In our case, the data is the value of the name, email, address and gender inputs.
In addition to data, a methods property appeared that contains all the methods for working with data. It contains only one method - sendData, which was mentioned above. It is tied to the form submission and so far it simply displays input values in the console.
And the last part of the component is the style. Styles are recorded here so that the form is displayed correctly.
Now open our application. Before us is a form that should be filled out and sent data using the Send button.


When you submit, the page does not reload, and form values are not reset. It's time to look in the browser console (Ctrl + Shift + I):

If you see about the same in the console, only with the values you specify - congratulations, you wrote your first full-fledged Vue application. If not, then it is worth checking the correctness of each step and come to a positive result.
For now, let's leave the Vue application as it is and move on to developing a server on Node.js, so that the application has something to exchange data with.
Continuing development (backend)
First you need to install the necessary npm packages for server operation:
npm install -S express morgan mongoose The -S switch tells npm that these packages need to be added to package.json, as an element of the dependencies array. The output will be a similar message:

- Express.js is a Node.js web application framework designed for creating web applications and APIs. It is minimalistic and includes a large number of plug-ins.
- Morgan - a package for logging HTTP requests to the server.
- Mongoose is an ORM (Object-Relational Mapping) for MongoDB done under Node.js.
Then we add one more directory to the project root - server, with the following hierarchy:
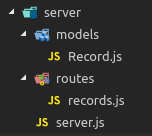
server.js - this will be the Node.js server that is launched using the Node environment. You can try Node by writing simple code here, for example:
server / server.js
console.log('Hello, world!'); Then start server.js using the node command from the project root, specifying the path to the file and its name:
node server/server.js > Hello, world! Clean up the server.js file and start development. First, you should import all previously installed packages (express, morgan and mongoose), as well as initialize the Express application:
server / server.js
+ const express = require('express'); + const mongoose = require('mongoose'); + const morgan = require('morgan'); + const path = require('path'); + + const app = express(); If you have not previously encountered const: const is one of two variable declaration statements (the second let) that came to replace var, the ES6 standard. Its peculiarity is that the value assigned to a variable cannot be changed. For variables with further variable values, it is recommended to use let.
require () is a function of the Node.js environment that implements the ability to connect various modules, both own and npm. Note that we did not install the path package, but import it - it is already included in the environment dependencies.
const app = express () - initialization of the Express application. Next we will work with the app variable, this will be our server.
Next, you should set the settings for our Express application, but since it is small, you need to set only one parameter - port. Take, for example, the value 3000 (or any available port). After we start listening on the port, i.e. run the server:
server / server.js
... + app.set('port', 3000); + + app.listen(app.get('port'), () => { + console.log(`[OK] Server is running on localhost:${app.get('port')}`); + }); The set method simply adds the specified property to the specified object with the specified value, which can then be obtained by referring to the property name using the get method. This is exactly what we do when we set up listening to the application: app.get ('port') will return the previously set value of 3000. After receiving the port, there is an arrow callback function. If you have not previously encountered arrow functions: the arrow function is denoted as () => {} and is almost the complete analogy of function () {}, except for one: the arrow function has a global object (Global in the Node.js and Window environment in the browser environment), and the usual function is itself, i.e. Function. In this situation, the arrow function simply simplifies recording, since we do not use this. So, as a callback function, a message is simply executed to the console stating that the server is running at localhost: 3000. Writing $ {...} inside a string allows you to insert a calculated value into it, in our case, the return value of the app.get () function.
Now, when you open localhost: 3000 in your browser, you will see the message “Cannot GET /”. This means that our server has started and is working correctly. Later we will make our Vue.js application be output instead of this message, but for now we will establish a connection with the MongoDB database and middleware:
server / server.js
... app.set('port', 3000); + + mongoose.connect('mongodb://localhost:27017/mevn-course', { useNewUrlParser: true }) + then(db => console.log('[OK] DB is connected')) + catch(err => console.error(err)); + + app.use(express.json()); + app.use(express.urlencoded({extended: false})); + app.use(morgan('dev')); ... Using mongoose.connect () connects to the database. Note that MongoDB itself must be active before connecting to it later. Two parameters are passed to this method - the address of the database and the set of settings as an object. In our case, this is the string “mongodb: // localhost: 27017 / mevn-course” and the object {useNewUrlParser: true}.
useNewUrlParser is used to work with MongoDB version 3.1.0+. If for some reason you are using a version lower than 3.1.0, you should not specify this parameter.
.then and .catch are methods that return the Promise during execution and failure, respectively. Inside these methods, a callback function is called, which as a result of the Promise for .then returns a database object — db, and for .catch — an error. Both of these methods output information to the console: either about a successful connection, or about an error.
Using app.use () installs the middleware for our application. These are functions that have access to the request object (req), the response object (res), and the next intermediate processing function (next) in the application's “request-response” cycle. We will use the parsers coming in with Express data (in our case, this is json and urlencoded) and the morgan package installed earlier with the 'dev' parameter, which means logging in the “development” mode, as the middleware. Now the server can receive incoming data with requests in json and urlencoded format and log all incoming requests. Run the application again:
node server / server.js
> [OK] Server is running on localhost:3000 > [OK] DB is connected Now, if we go to the browser at localhost: 3000, all requests will be logged in the console, in this case a GET request:

We are engaged in the development of the model records. This is necessary in order for the data to be sent to the database in the correct format (This format is called Schema). Our form from the Vue application sends the Name, Email, Address and Gender - everything can be represented as a string. This means that a record in the database must contain 4 fields of the type “string”. Create a model:
server / models / Record.js
+ const mongoose = require('mongoose'); + const { Schema } = mongoose; + + const Record = new Schema({ + name: String, + email: String, + address: String, + gender: String, + }); + + module.exports = mongoose.model('Record', Record); We import the mongoose package and assign the Schema class value from the mongoose package to the Schema variable. The record “const {Schema} = mongoose” is called ES6 destructurization and is equivalent to “const Schema = mongoose.Schema”. Next, an instance of the Schema class is created, as a parameter of which an object is passed with the names of the record properties and their data types.
“Module.exports = ...” is an export record. Those. when we import this module, the import result is mongoose.model ('Record', Record).
When the model is created, you need to make an API routing file. REST will be used as an architectural style of interaction between the components.The REST API defines a set of functions to which developers can make requests and receive responses. The interaction takes place via HTTP. The REST API call methods are CRUD (Create, Read, Update, Delete) methodology, i.e. GET, POST, PUT, DELETE. Add the code to the routing file:
server / models / Record.js
+ const express = require('express'); + const router = express.Router(); + + const Record = require('../models/Record'); + + router.get('/', async (req, res) => { + res.json(await Record.find()); + }); + + router.post('/', async (req, res) => { + const record = new Record(req.body); + await record.save(); + res.json({state: 'success'}); + }); + + router.get('/:id', async (req, res) => { + res.json(await Record.findById(req.params.id)); + }); + + router.put('/:id', async (req, res) => { + await Record.findByIdAndUpdate(req.params.id, req.body); + res.json({state: 'updated'}); + }); + + router.delete('/:id', async (req, res) => { + await Record.findByIdAndRemove(req.params.id); + res.json({state: 'deleted'}); + }); + + module.exports = router; We import the Express package and create a router object. We also import the Record model module to interact with the database. The following simply describes the routing. The async / await construct is a relatively new way of writing asynchronous code. Previously, similar code was written using callback functions and promises. Thanks to async / await, asynchronous code becomes similar to synchronous, and in its behavior features of such code appear, very useful in some situations in which the promises to use were, for various reasons, inconvenient.
Instead:
router.get('/', req, res) => { res.json(Record.find() .then((data) => { return data; })); }); We have:
router.get('/', async (req, res) => { res.json(await Record.find()); }); Router methods such as .get (), .post (), .put () and .delete () give the server an understanding of how to handle certain requests. Inside the methods there is an asynchronously running callback function with two parameters req - the request object and res - the response object. In each method, except for the POST method, an asynchronous access to the database occurs using the methods of the Record model, such as find (), findById (), findByIdAndUpdate (), findByIdAndRemove (). Then comes the response from the server in JSON format, for example, res.json ({state: 'success'}). In the POST method, processing is different: first an instance of the Record class is created, the parameter of which is the request body that comes from the Vue application, then the instance is asynchronously saved to the database using the save () method, and only then the response is sent in the format Json Also,Pay attention to the last three queries: get, put and delete - in the address they have: id. This means that everything that will be written to the address after “/” will be available, as the value of req.params.id and represented as a string. so we can call by id.
Perhaps the question is, by what id we will refer to the records in the database, if the Schema contains only the name, email, address and gender fields? Answer: MongoDB itself creates an identifier for each record, which will be named _id.
The model and routing are written, it remains only to import the necessary module into server.js:
server / server.js
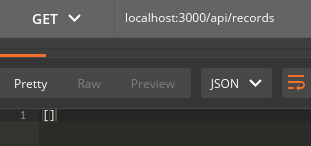
... app.use(morgan('dev')); + + app.use('/api/records', require('./routes/records')); This record means that the routing we write will start with / api / records. Ie, to add a new record you need to send a POST request with a body containing valid data (name, email, address and gender) to localhost : 3000 / api / records.
Make sure the server works - run it and test the API. I use Postman for this. This is a complete API testing tool.
A GET request to the address localhost : 3000 / api / records now returns an empty array:
In this case, we will execute a POST request to the same address, in the body of which we will enter valid data to write to the database:
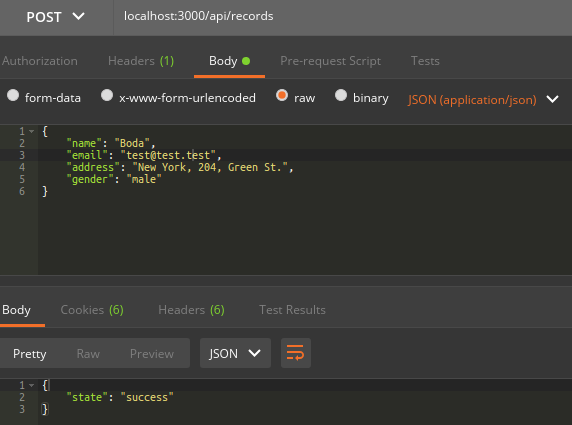
We see that the response from the server came in JSON format as we indicated this message
{“State”: “success”}. Perform the previous GET request again:

Everything turned out, you can independently test the remaining operations on the data (UPDATE, DELETE or GET one).
The development of the backend part has come to an end, it remains to make the final touch - mark static files for display at localhost : 3000 /. Add the code:
server / server.js
... app.use('/api/records', require('./routes/records')); + app.use('/', express.static(path.join(__dirname, '../dist'))); Continuing development (frontend)
Back to the Vue application, now there is an API with which it can interact. Therefore, without losing time, we will change the sendData method, which was written earlier, but first, using npm, install the axios package - npm i -S axios.
views / Home.vue
... <script> + import axios from 'axios'; ... methods: { + async sendData() { - console.log(this.name, this.email, this.address, this.gender); + console.log(await axios({ + url: 'http://localhost:3000/api/records', + method: 'post', + data: { + name: this.name, + email: this.email, + address: this.address, + gender: this.gender + + })); } } Axios is a client library for sending requests to the server, which uses promises by default. Here we use the familiar async / await construction. An object is passed to the axios function - a set of options (url, method, data). When the method is executed, the request is sent.
Now run the npm run build command. With it, Vue will assemble the finished application into the dist directory, which we have specified as static files for the server:
npm run build 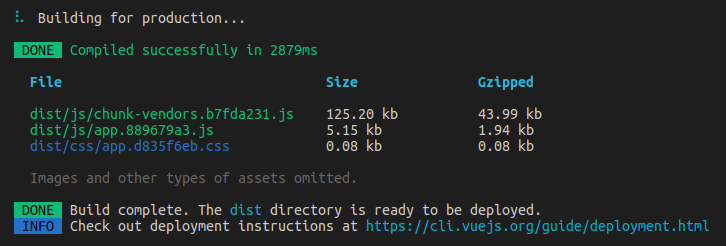
Then we restart the server and go to localhost : 3000 / in the browser . Right, now our Vue application is displayed here. Fill out the form and send the data by clicking Send. We look into the console:
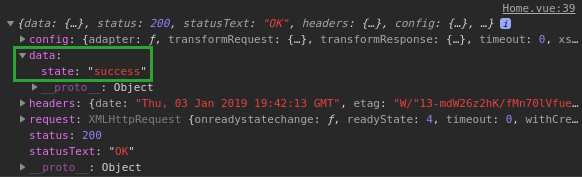
The response from the server is returned as data. This means that the record is added, and our application works as it should.
Now we will put the final touches in the appended: redirect when sending the form to the thanks page; the ability to go from the thank you page to the home page, delete the links of the navbar, delete the console.log ():
views / Thanks.vue
<template> <div class="thanks"> <h1>Thank you for your record!</h1> + router-link to="/">Home</router-link> </div> </template> views / Home.vue
... async sendData() { - console.log(await axios({ + await axios({ url: 'http://localhost:3000/api/records', method: 'post', data: { name: this.name, email: this.email, address: this.address, gender: this.gender } - })); + }); + this.$router.push('thanks'); } ... App.vue
... <div id="app"> - <div id="nav"> - <router-link to="/">Home</router-link> | - <router-link to="/thanks">About</router-link> - </div> <router-view/> </div> ... Our Vue-application is completely ready, we build it using npm run build, restart the server, check the performance.
Development completion (backend)
It would be nice if the server sent a notification by mail when the client added each new record to the database. For this we will use the service for sending emails for Node.js - Nodemailer. Install it: npm install -S nodemailer. Now that Nodemailer is installed, let's add the functionality to server.js:
server / routes / records.js
... const router = express.Router(); + const nodemailer = require('nodemailer'); ... router.post('/', async (req, res) => { const record = new Record(req.body); await record.save(); + const output = ` + <p>You have a new message from MEVN-course:</p> + <ul> + <li>name: ${req.body.name}</li> + <li>email: ${req.body.email}</li> + <li>address: ${req.body.address}</li> + <li>gender: ${req.body.gender}</li> + </ul> + `; + let transporter = nodemailer.createTransport({ + host: 'smtp.gmail.com', + port: 587, + secure: false, + auth: { + user: 'your_email@gmail.com', + pass: 'your_password' + + }); + let mailOptions = { + from: '"MEVN-course " <your_email@gmail.com>', + to: 'some_email@gmail.com', + subject: `MEVN-course | New message`, + text: req.body.name, + html: output + }; + transporter.sendMail(mailOptions, (error, info) => { + if (error) { + return console.log(error); + + console.log('Message sent: %s', info.messageId); + console.log('Preview URL: %s', nodemailer.getTestMessageUrl(info)); + }); res.json({state: 'success'}); }); We will understand what is happening here. First, the previously installed nodemailer package is imported. Secondly, the post method changes so that in addition to saving the record in the database, the server also sends a notification to the mail. First, the output variable is created, into which the html markup is written. Then, the transporter variable is created using the node node's createTransport method to which the object is passed — a set of options for authenticating the mail account: the host name, the port, as well as the login and password. Note that if you use Gmail, in addition to just authentication, you will need to allow the use of the mailbox by third-party applications to configure your Gmail account. Next, the mailOptions variable is created, into which the object is written — the letter options: from whom the letter was sent, to whom it was sent, the subject of the letter and its body. And finallyusing the sendMail method of the transporter object, the letter is sent.
Reboot the server and test. If the data for authentication is correct, and the account settings are allowed to use the mailbox by third-party applications, the letter will be sent, and a message on successful sending will be displayed to the console, if not, the error will also be specified in the console. It looks like a successful dispatch:

And so unsuccessful:

Total
At the development of the application came to an end. What we have:
- experience in developing a Vue application;
- development experience Node + Express server;
- experience with MongoDB;
- experience with npm;
- the ability to organize redirect pages;
- ability to organize email-mailing from the server;
- ability to send http requests from the client and receive on the server;
- understanding of CRUD and REST API;
Source: https://habr.com/ru/post/457580/
All Articles