Reduce the build time of your Android projects
Good morning! We start Monday with the material, the translation of which was prepared specifically for students of the course “Android-developer. Advanced course .

I recently transferred the Android code base to Kure on AndroidX. It seemed to me that this is a great opportunity to work on the project build speed. Gradle has always had a bad reputation because of its slowness and resource-intensiveness, but I was very surprised that minor changes in the configuration of an assembly can increase its speed so much.
Look at assembly scan rates before / after optimization
')
before optimization

after optimization ️️
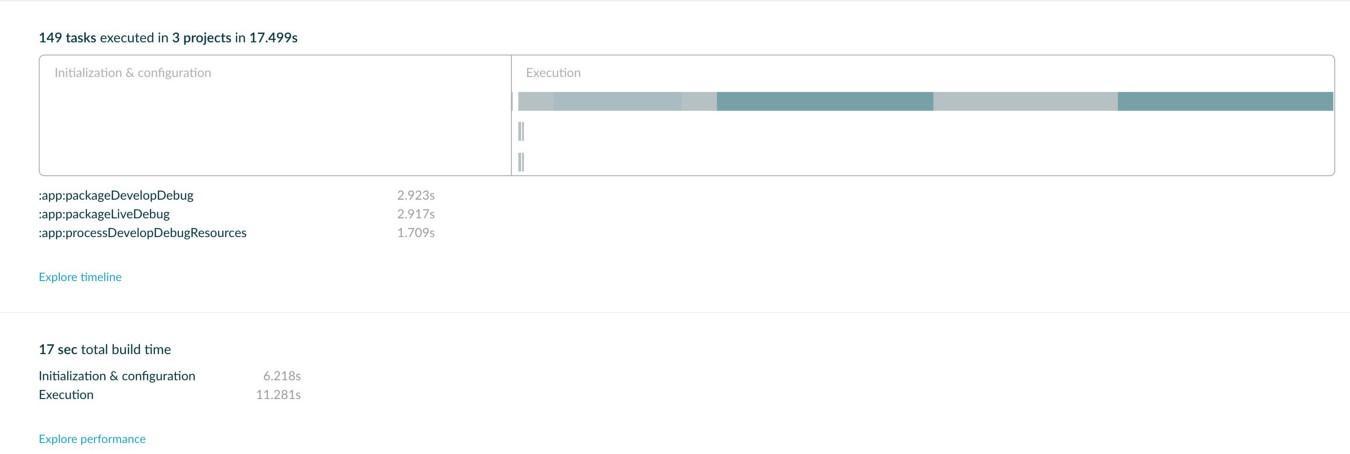
Reduced from 5.5 minutes to 17 seconds ?? Wow!
It's not too difficult to overdo it with optimization, to further reduce the build time. But in order to make the post understandable to beginners, I will deliberately focus on the minor, painless measures that I have taken to get closer to such an indicator.
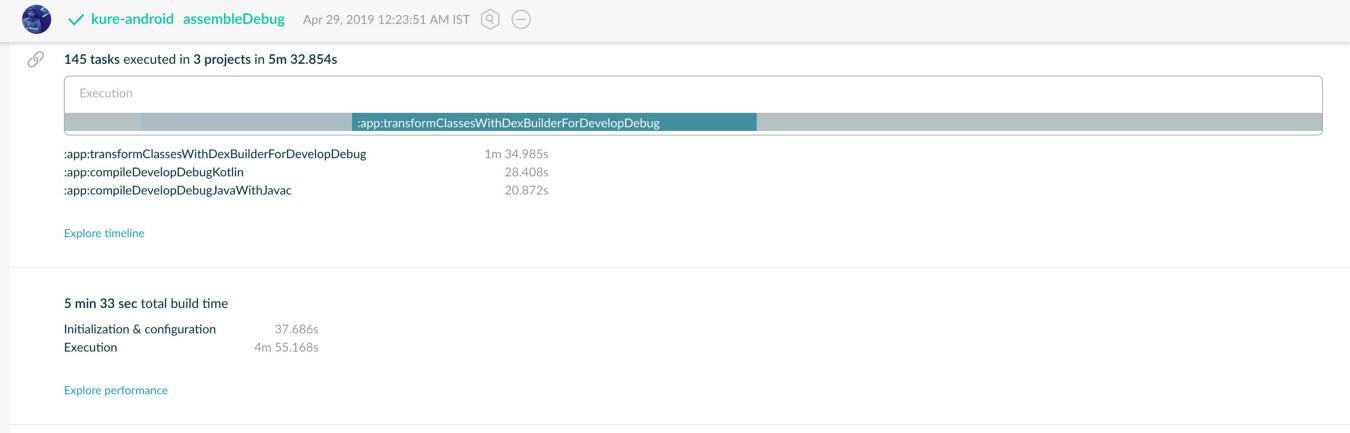
Before you start optimizing, it is important to test our project to find out how long it takes to build it. Gradle has a handy scan option that you can use to analyze the performance of your task. Start the terminal in Android Studio and run the following command:
Upon successful completion of the assembly, you will be prompted to accept the terms of service to download the scan results. Enter yes to continue. After the publication is completed, you will receive a link to the terminal to validate the scan. Open it up.
There are quite a few options on the site, but for brevity, we will consider only what is most important.
Summary displays a summary of the tasks performed and the time they were completed. But what interests us here is the Performance section. It makes a more detailed breakdown of the total build time, as shown below.

In the Performance section there is a tab called Settings and suggestions , which contains recommendations for improving assembly speed. Let's look at them.
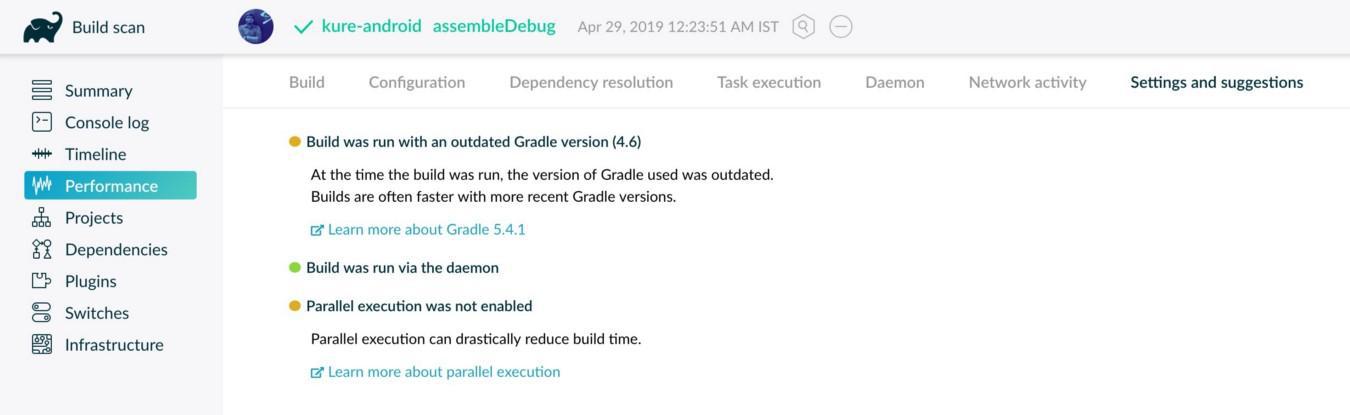
In this section, we can find a few simple fixes to improve speed. So let's continue and apply these fixes to our project.
The Android team is constantly improving and developing the build system. Thus, in most cases, you can get a significant improvement by simply installing the latest version of the toolkit.
During this refactoring, our project was on version 3.2.1 of the Gradle plugin for Android Studio ( several versions older than the latest release ).
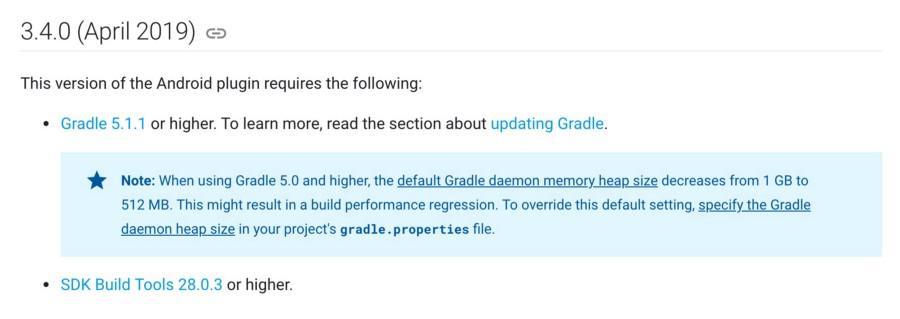
You can follow this link to get the latest version of the Gradle Plugin. At the time of this writing, the latest version was 3.4.0.
But there is a catch here that we need to remember:
( Note: When using Gradle version 5.0 or higher, the default memory size of the Gradle daemon is reduced from 1 GB to 512 MB. This may cause poor build performance. To override this default setting, specify the memory size for the Gradle daemon in the gradle.properties file your project.)
https://developer.android.com/studio/releases/gradle-plugin
When using Gradle 5.0 and higher, we will need to explicitly increase the memory size so that the speed of our assembly does not deteriorate. We will come back to this in a minute.
Open the top-level build.gradle file, which you will find at the root of your project, and add the following line to the dependencies section :
You also need to update the distribution URL in the Gradle Wrapper properties file, which is located at
( This link will be available on the Android Gradle plugin page . )
You will encounter an error when using Kotlin if the version of the Kotlin Gradle plugin is less than 1.3.0. If so, use the IDE hint to update the Gradle plugin for Kotlin to the latest version (at the time of this writing, this is version 1.3.31 ).
Ok, let's run the build from the terminal again to see if we have made any improvements.

So, we were able to cut about 2.5 minutes from the assembly time, but this is still not good enough. Having studied the assembly logs in the terminal, I came across one line that would interest us:

(> Task: app: compileDevelopDebugJavawithJavac
Gradle can disable incremental compilation because the following annotation processors are not incremental: butterknife-compiler-10.1.0.jar (com.jakewharton: butterknife-compiler: 10.1.0), dagger-compiler-2.9.jar (com.google. dagger: dagger-compiler: 2.9).
Consider setting the experimental android.enableSeparateAnnotationProcessing-true flag in the gradle.properties file to start processing annotations in a separate task and performing incremental compilation.)
Incremental compilation basically prevents wasteful compilation of the entire set of source files and instead compiles only those files that have been modified. From the logs it is clear that we do not use this function. He suggests that we use
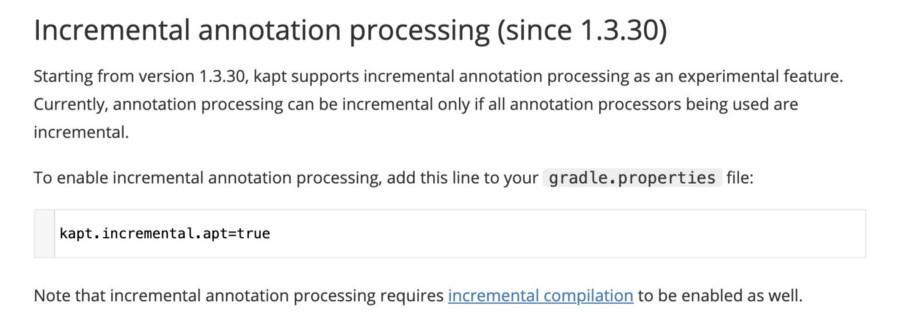
Fortunately, version 1.3.30 of Kotlin adds support for step-by-step annotation processing.
https://kotlinlang.org/docs/reference/kapt.html
Starting with version 1.3.30,
To enable annotation incremental processing, add this line to the
Note that incremental annotation processing requires that incremental compilation is also included.)
So, let's begin:
Open the
Then change all annotationProcessor configurations in the dependencies section to use kapt. For example:
Now open the gradle.properties file located in the root of your project and add the following line:
Let's run the build again.

Well, we seem to have made some progress.
We are at the last stage. Remember the trick we encountered when updating the Gradle plugin version? It turns out that newer versions of Gradle reduce the size of the memory used to 512 MB. This is done so that weak machines do not consume too much memory. I have a computer with 16 gigabytes of RAM, so I can afford to feed about 2-3 gigs to the Gradle daemon, but your numbers may differ.
Open the gradle.properties file located in the root of your project and add the following line. Remember to choose a size according to your requirements and computer specification.
While we are doing this, let's also enable parallel assemblies and customization on demand in the properties.
Here’s what my final version of the
Having done this, let's see what we have now indicators of assembly speed:

Like this!
This is by no means an extensive coverage of all ways to optimize assembly speed. There are many other things that I didn’t discuss in this post, such as using minSdk 21 when using MultiDex, pre-indexing libraries, disabling PNG compression, etc., these are just some of them.
But most of these configurations require a deeper understanding of the Android build system and experience with large multi-module projects (where the advantages are most obvious). The steps I mentioned above are easily incorporated into the project even by the junior developers and have significant benefits. I hope this helps you increase assembly speed!
See you next time, peace be with you!
I recently transferred the Android code base to Kure on AndroidX. It seemed to me that this is a great opportunity to work on the project build speed. Gradle has always had a bad reputation because of its slowness and resource-intensiveness, but I was very surprised that minor changes in the configuration of an assembly can increase its speed so much.
Look at assembly scan rates before / after optimization
')
before optimization
after optimization ️️
Reduced from 5.5 minutes to 17 seconds ?? Wow!
It's not too difficult to overdo it with optimization, to further reduce the build time. But in order to make the post understandable to beginners, I will deliberately focus on the minor, painless measures that I have taken to get closer to such an indicator.
First of all!
Before you start optimizing, it is important to test our project to find out how long it takes to build it. Gradle has a handy scan option that you can use to analyze the performance of your task. Start the terminal in Android Studio and run the following command:
./gradlew assembleDebug --scan Upon successful completion of the assembly, you will be prompted to accept the terms of service to download the scan results. Enter yes to continue. After the publication is completed, you will receive a link to the terminal to validate the scan. Open it up.
There are quite a few options on the site, but for brevity, we will consider only what is most important.
Summary displays a summary of the tasks performed and the time they were completed. But what interests us here is the Performance section. It makes a more detailed breakdown of the total build time, as shown below.
In the Performance section there is a tab called Settings and suggestions , which contains recommendations for improving assembly speed. Let's look at them.
In this section, we can find a few simple fixes to improve speed. So let's continue and apply these fixes to our project.
Step # 1: Update Tools
The Android team is constantly improving and developing the build system. Thus, in most cases, you can get a significant improvement by simply installing the latest version of the toolkit.
During this refactoring, our project was on version 3.2.1 of the Gradle plugin for Android Studio ( several versions older than the latest release ).
You can follow this link to get the latest version of the Gradle Plugin. At the time of this writing, the latest version was 3.4.0.
But there is a catch here that we need to remember:
( Note: When using Gradle version 5.0 or higher, the default memory size of the Gradle daemon is reduced from 1 GB to 512 MB. This may cause poor build performance. To override this default setting, specify the memory size for the Gradle daemon in the gradle.properties file your project.)
https://developer.android.com/studio/releases/gradle-plugin
When using Gradle 5.0 and higher, we will need to explicitly increase the memory size so that the speed of our assembly does not deteriorate. We will come back to this in a minute.
Open the top-level build.gradle file, which you will find at the root of your project, and add the following line to the dependencies section :
classpath 'com.android.tools.build:gradle:3.4.0'You also need to update the distribution URL in the Gradle Wrapper properties file, which is located at
gradle/wrapper/gradle-wrapper.properties . Update the URL to the following.( This link will be available on the Android Gradle plugin page . )
distributionUrl=https\://services.gradle.org/distributions/gradle-5.1.1-all.zipYou will encounter an error when using Kotlin if the version of the Kotlin Gradle plugin is less than 1.3.0. If so, use the IDE hint to update the Gradle plugin for Kotlin to the latest version (at the time of this writing, this is version 1.3.31 ).
Ok, let's run the build from the terminal again to see if we have made any improvements.
Step # 2: Update Configurations
So, we were able to cut about 2.5 minutes from the assembly time, but this is still not good enough. Having studied the assembly logs in the terminal, I came across one line that would interest us:
(> Task: app: compileDevelopDebugJavawithJavac
Gradle can disable incremental compilation because the following annotation processors are not incremental: butterknife-compiler-10.1.0.jar (com.jakewharton: butterknife-compiler: 10.1.0), dagger-compiler-2.9.jar (com.google. dagger: dagger-compiler: 2.9).
Consider setting the experimental android.enableSeparateAnnotationProcessing-true flag in the gradle.properties file to start processing annotations in a separate task and performing incremental compilation.)
Incremental compilation basically prevents wasteful compilation of the entire set of source files and instead compiles only those files that have been modified. From the logs it is clear that we do not use this function. He suggests that we use
android.enableSeparateAnnotationProcessing=true , but, in any case, we should not use the “annotationProcessor” configuration since Kotlin is used in our project.Fortunately, version 1.3.30 of Kotlin adds support for step-by-step annotation processing.
https://kotlinlang.org/docs/reference/kapt.html
(Incremental handling of annotations (from 1.3.30)
Starting with version 1.3.30,
kapt supports incremental annotation processing as an experimental function. Currently, annotation processing can be performed incrementally only if all the annotation processors used are incremental.To enable annotation incremental processing, add this line to the
gradle.properties file:kapt.incremental.apt=trueNote that incremental annotation processing requires that incremental compilation is also included.)
So, let's begin:
- 1. Change the annotationProcessor configuration to kapt
- 2. Enable the experimental flag of incremental annotation processing.
Open the
build.gradle file of your module level and add the following line to the beginning of the file:apply plugin: 'kotlin-kapt'Then change all annotationProcessor configurations in the dependencies section to use kapt. For example:
//
annotationProcessor 'com.google.dagger:dagger-compiler:2.9'
//
kapt 'com.google.dagger:dagger-compiler:2.9'
Now open the gradle.properties file located in the root of your project and add the following line:
kapt.incremental.apt=trueLet's run the build again.
Well, we seem to have made some progress.
Step # 3: Gradle Properties
We are at the last stage. Remember the trick we encountered when updating the Gradle plugin version? It turns out that newer versions of Gradle reduce the size of the memory used to 512 MB. This is done so that weak machines do not consume too much memory. I have a computer with 16 gigabytes of RAM, so I can afford to feed about 2-3 gigs to the Gradle daemon, but your numbers may differ.
Open the gradle.properties file located in the root of your project and add the following line. Remember to choose a size according to your requirements and computer specification.
org.gradle.jvmargs=-Xmx3072m -XX:MaxPermSize=512m -XX:+HeapDumpOnOutOfMemoryError -Dfile.encoding=UTF-8While we are doing this, let's also enable parallel assemblies and customization on demand in the properties.
Here’s what my final version of the
gradle.properties file gradle.properties : org.gradle.jvmargs=-Xmx3072m -XX:MaxPermSize=512m -XX:+HeapDumpOnOutOfMemoryError -Dfile.encoding=UTF-8 org.gradle.parallel=true org.gradle.configureondemand=true kapt.incremental.apt=true org.gradle.parallel- this flag allows Gradle to assemble modules within a project in parallel, rather than sequentially. This is only useful for multi-module projects.org.gradle.configureondemand- this flag configures only those modules that are necessary for the project, and does not collect them all.
Having done this, let's see what we have now indicators of assembly speed:
Like this!
Concluding remarks
This is by no means an extensive coverage of all ways to optimize assembly speed. There are many other things that I didn’t discuss in this post, such as using minSdk 21 when using MultiDex, pre-indexing libraries, disabling PNG compression, etc., these are just some of them.
But most of these configurations require a deeper understanding of the Android build system and experience with large multi-module projects (where the advantages are most obvious). The steps I mentioned above are easily incorporated into the project even by the junior developers and have significant benefits. I hope this helps you increase assembly speed!
See you next time, peace be with you!
Source: https://habr.com/ru/post/457374/
All Articles