Signs from above: how did we save cartographers from unnecessary work and red eyes
2GIS is proud of the accuracy of the data. Every working day in each city, our specialists bypass entire areas in order to record on the map all the changes - new houses, roads and even paths. And they also collect and put road signs on it, helping to build automobile and pedestrian routes correctly. In this article I will tell you how we decided to help the cartographers and began to collect traffic signs automatically.
What is Fiji and why are there signs
Fiji is a cartographic editor that we develop for our GIS specialists. This is a classic client-server application. On Habré already there are several articles in which we talk about Fiji:
- UI in the Enterprise application, or how we made a convenient system for creating maps
- How do we make a map for those who make a map
- Infinite localization, or how we translate the map in real time
How to collect signs before
Fiji has a special mode of operation for collecting and updating signs. In this mode, the cartographer can open the video recorded by the DVR. The video itself is displayed in a separate window, and its track is displayed on the map. The marker shows the current position.
')
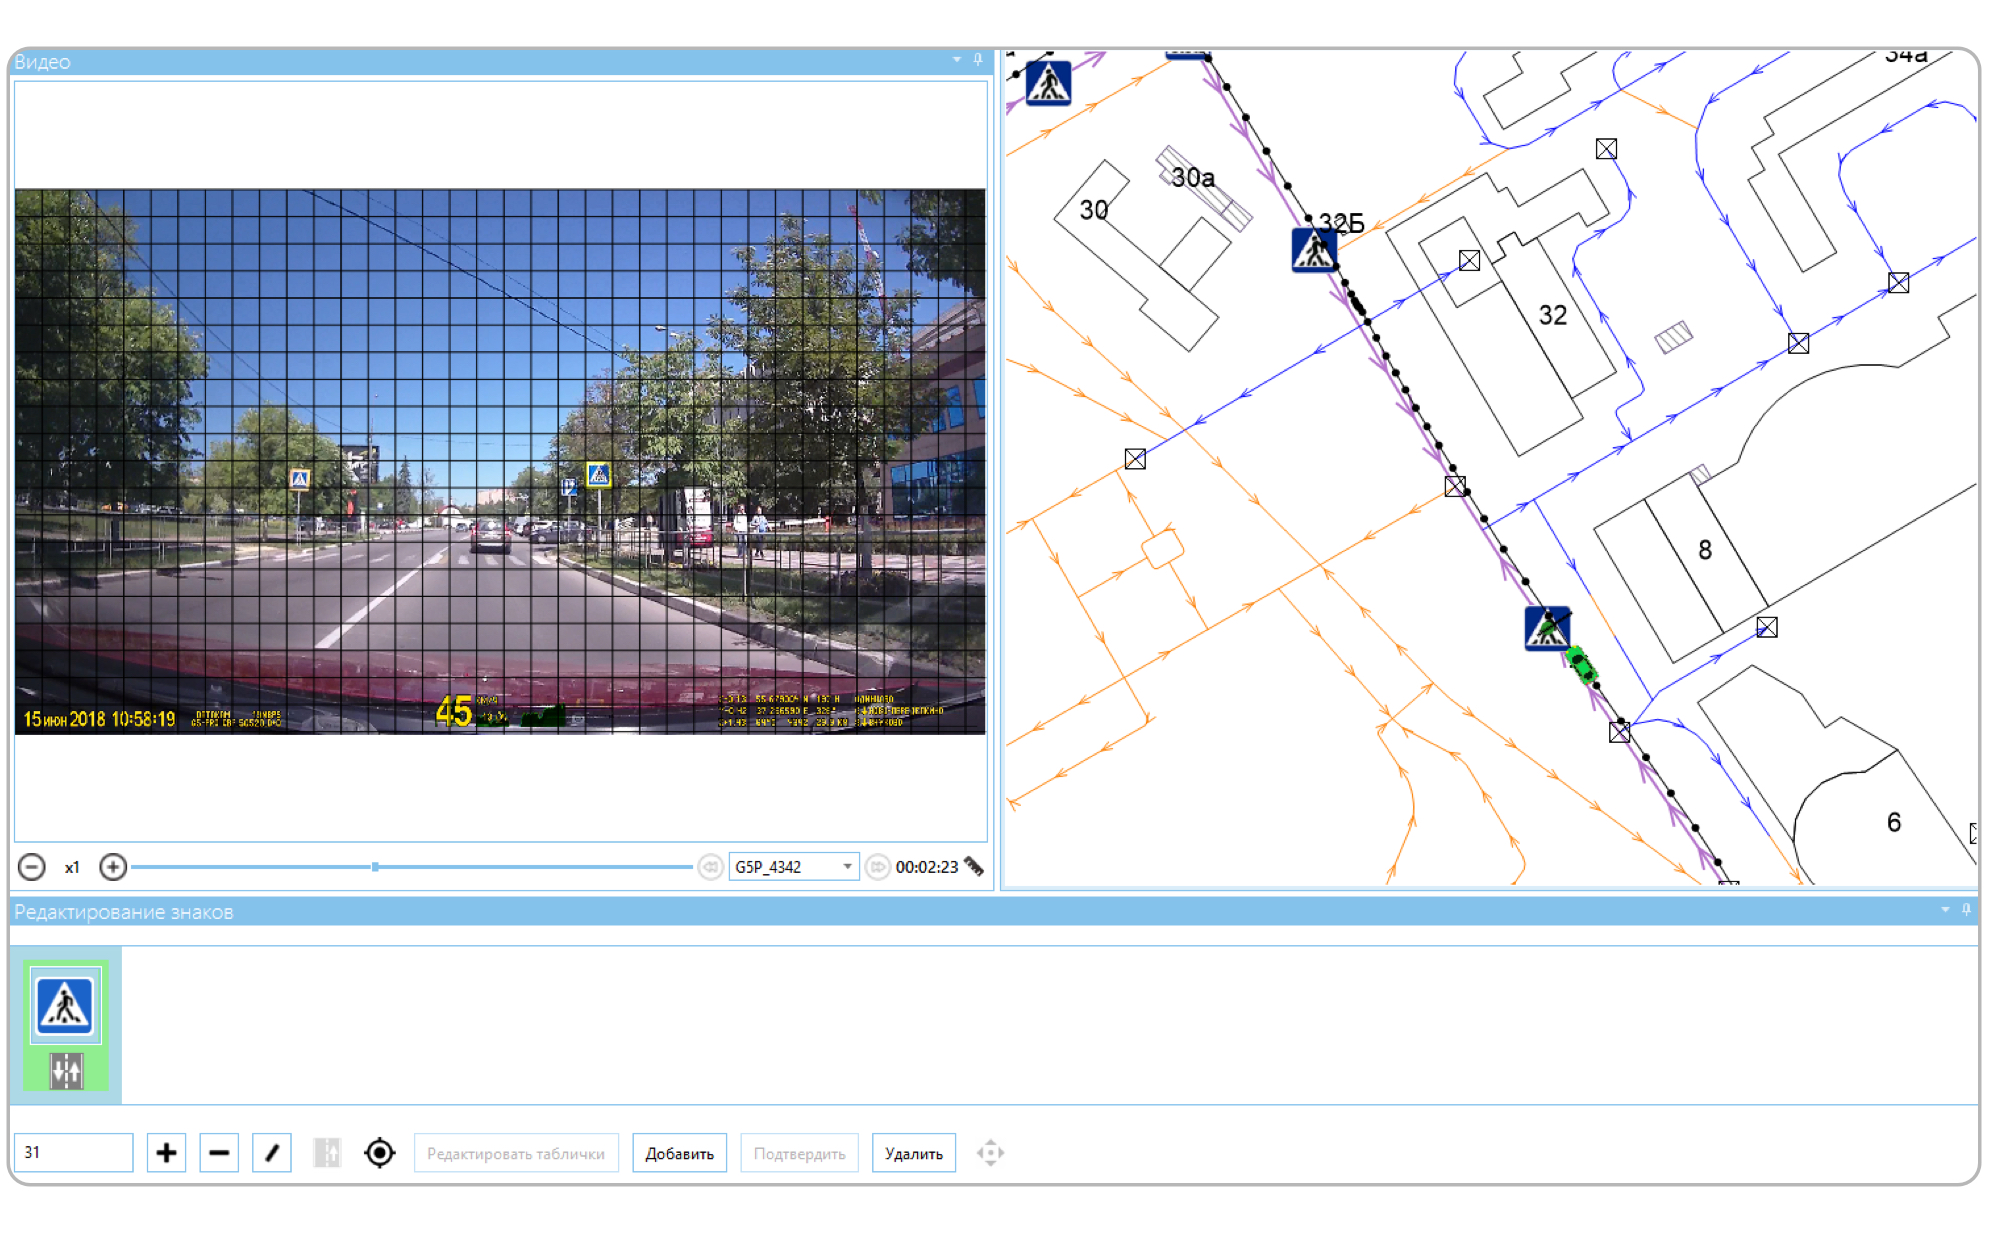
A grid is applied over the video - it allows you to determine the distance to the mark. As the mark becomes the size of a cell, the mapper pauses and creates the mark. We at this moment know the current position and the distance to the sign, so move it forward and attract to the link. The link in our terminology is a schematic depiction of a road section. Each sign has its own numerical code, its cartographer brings in a special field.
If we already have a sign, then we load it into the sign editor. The map maker checks the video and, if necessary, makes changes using the same numeric codes. Or, if the sign is correct, it marks it as updated.
Of course, this method requires the mapmaker to view each video - and then also spend the time to make each sign. In addition, the position of the mark on the map is not accurately determined: we simply retreat from the current position by a distance that is determined by the grid, and then we pull the resulting point to the nearest road. As a result, signs can be created not exactly there (or even not at all) where necessary. This means that the cartographer must also move him to the right place, which also consumes his time. In addition, there may be no signs on the video at all, but the cartographer still has to look at it. Of course, the program allows you to increase the speed of the video, but the time costs will in any case be greater than zero. Therefore, we decided to automate this process.
How to collect now
We still need video from the recorders. But now, instead of seeing each one, the cartographer simply selects the files he needs and presses the “Download” button. After that, he can do other things - the video will be processed and traffic signs will appear on the map. Different doubtful cases will be specially marked. Therefore, all that remains for the cartographer is to go through these cases and correct them.
Architecture
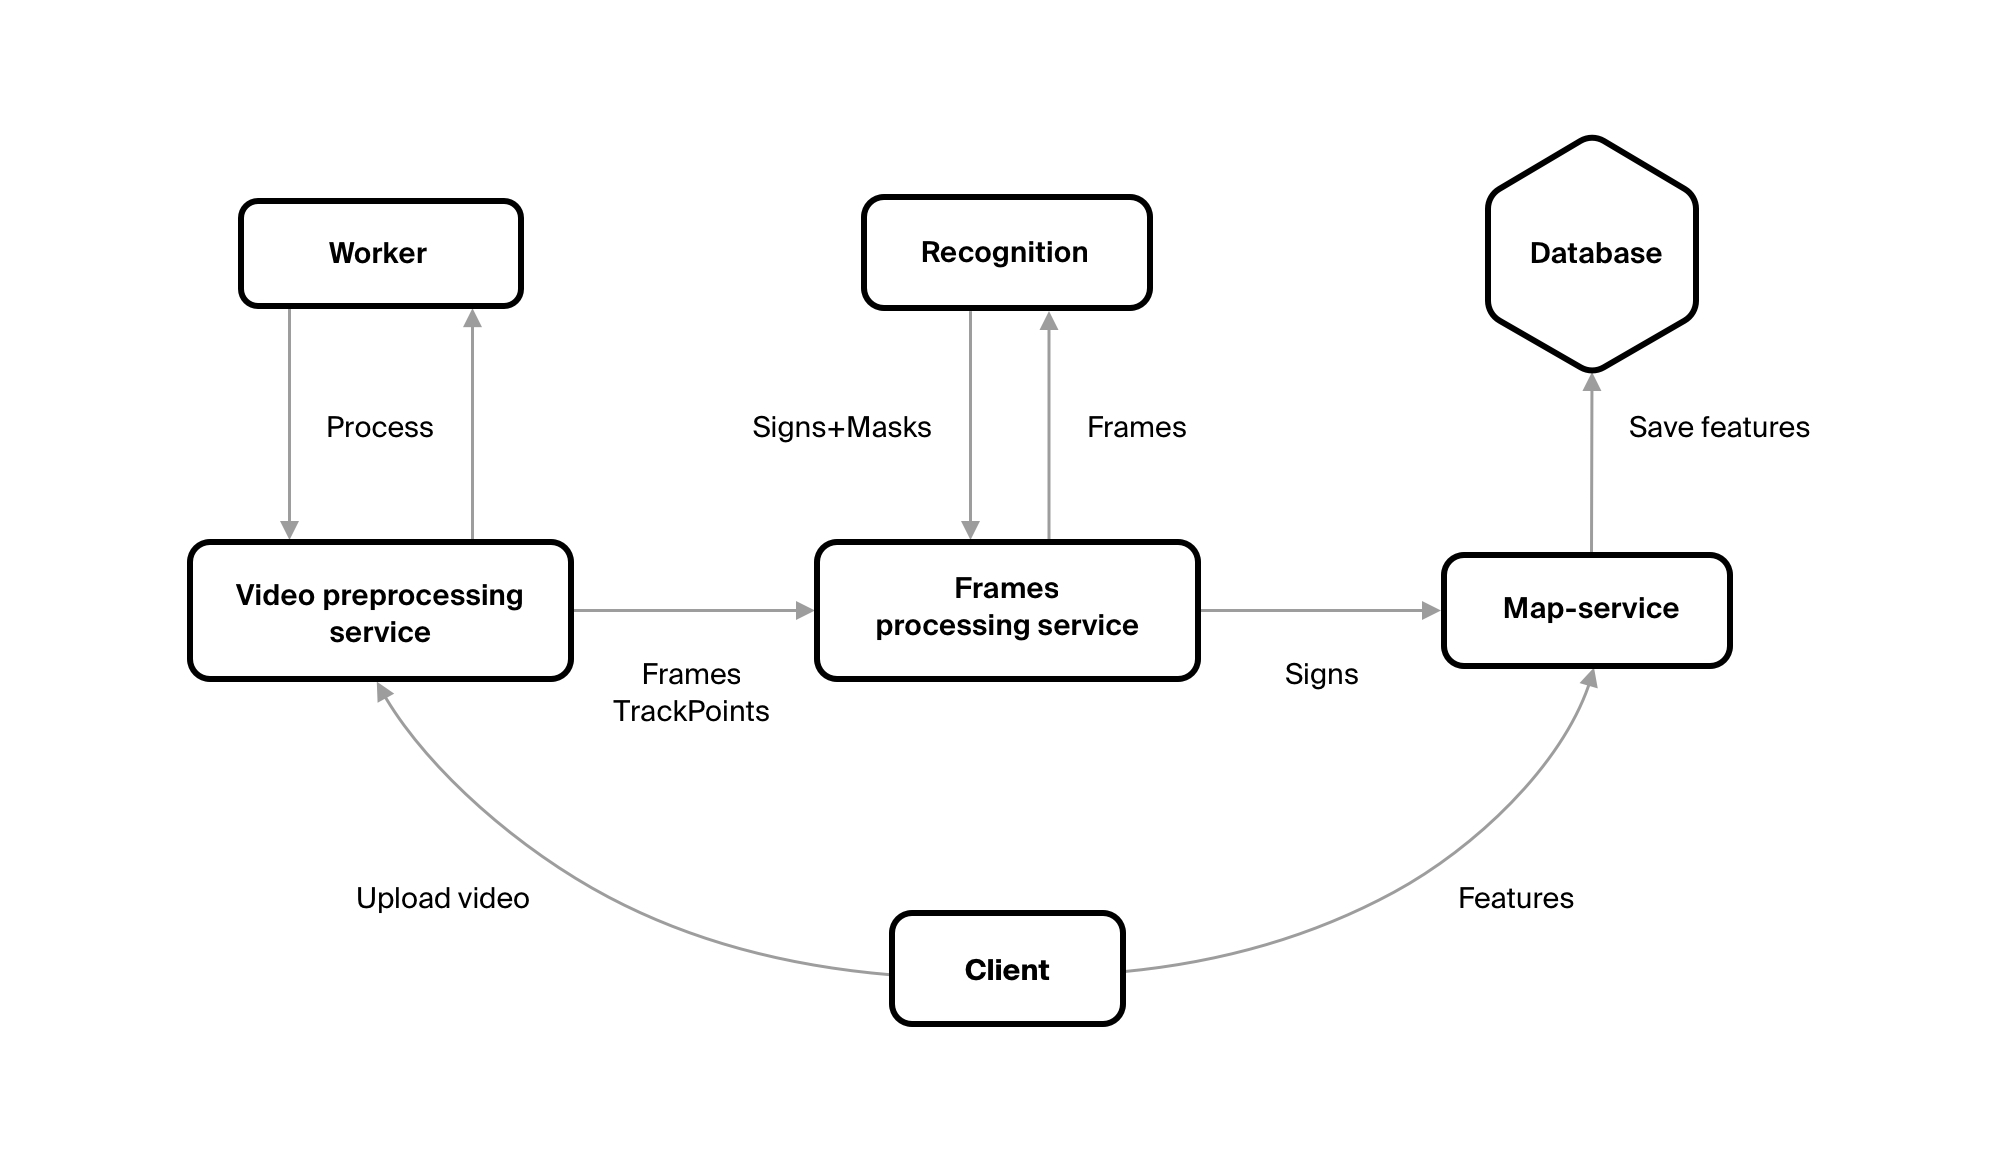
In order to get the objects of the necessary classes from the video with the necessary attributes, we wrote several services.
The first is VideoPreprocessingService - the video file is loaded there. The service sends the file to the repository, makes an entry about it in the database and creates tasks for its processing. It is necessary to cut out video frames with a certain frequency, pick up GPS points for them from the track, send the result of the work to the Frames Processing service.
The first two tasks are performed not by the service itself, but by the Worker. This is done in order to be able to easily change the number of these workers. Increasing productivity, if there is such a need.
FrameProcessingService saves all the received frames and points. And he unloads frames in the queue. She reads the service, which was written by our colleagues - Machine Learning experts. He recognizes road signs. Of course, the FrameProcessingService reads and the responses from this service are the character codes, if they are on the frame, and the rectangles into which this sign is inscribed. Knowing the size of the rectangle, we understand the distance to the sign. And when all the frames from the video are processed, it sends them to our card server.
The card server is the most important part of the system. From it, customers receive all the data that we have stored ( except for tiles ). He also saves this data and executes all the business logic.
general description
Our map data is geo objects. A geoobject is a geometry (that is, the location of an object in space) and a set of attributes. We store them in a DB and we operate with them. But from FrameProcessingService we get only the sign code, the coordinates of the point from which the sign was recognized, the frame itself and the sign mask on this frame. So we need to turn this data set into a geo-object. Each geoobject belongs to some class. Each type of road signs is a separate class. We can easily get it from the sign code. From the sign code we can get attributes specific to this class. For example, we received the code 3_24_60. 3_24 - says that this is a speed limit (sign 3.24 in traffic rules). For these signs the value of the restriction must be indicated It is given to us by the third part of the code - here it will be 60 km / h.
So, the geoobject class is defined, its specific attributes too. It would seem that it is already possible to create a geo-object. But it is still early. First, each sign has a “Direction” attribute, which says in which direction the sign acts. Secondly, we still have no geometry for this geoobject. We have a point from which we saw the sign. So, the sign itself is at some distance from us. In addition, its geometry affects the value of the Direction attribute.

Here we make a small digression. Of course, we have a road network. It consists of individual links. Each link is a line. In the first part of the picture, we have just drawn two links. The arrows indicate the direction in which they were drawn, i.e. the left one was drawn from the bottom up, and the right one - from top to bottom.
Each link carries information about the direction in which it can move. The direction of movement is a separate attribute, it is not equal to the direction of drawing. This attribute tells us in which direction you can move along the link, relative to the direction of rendering. In the second part of the figure, both links have the same value of this attribute, and in the third figure - opposite values.
How does this relate to signs? So, we move along the links from the bottom up, and we see some kind of sign. So, on the left link, the sign will have the direction “Only straight”, on the right - “Only back”, i.e. the same as the links in the third figure. Here everything turned out simple, but this is because our links are one-sided. In reality, a very large number of links are bilateral, i.e. their direction is “In both directions”. A sign is always directed in one direction, and we need to understand - in what direction.
Map matching
Before we begin to arrange the signs on the map, we need to understand which roads we drove along when recording the video. GPS data is not enough for this: it is often mistaken for tens of meters. In addition, maps are still schemes and may also not coincide with real terrain. For example, on wide multi-lane roads.
This will solve a number of problems at once:
- Signs can already be created on these roads, so we can change them if there are any;
- Some of these signs may not be on the video, and we will be able to find such signs - and give them a special label;
- We will be able to understand which road we were on when we saw some recognized sign, which, in turn, would help us put this sign in the right place on the map.
Algorithm
The algorithm we used is pretty simple. On Habré already have an article with its description. In general terms, it sounds like this: we have the chosen road, take the GPS point closest to its end from the track. And with respect to this point, we estimate the roads connecting with ours — that is, we estimate how likely it is that our point belongs specifically to this road. Each road gets points, one that has more points is chosen. Repeat until the track ends.
In the process, we made several additions to the algorithm. The algorithm did not take into account the directions on the road links, so the first thing we did was to take them into account: now, if the link is one-sided, we understand the direction in which we should move along it. And if this direction does not coincide with the direction of the link - we discard this link.
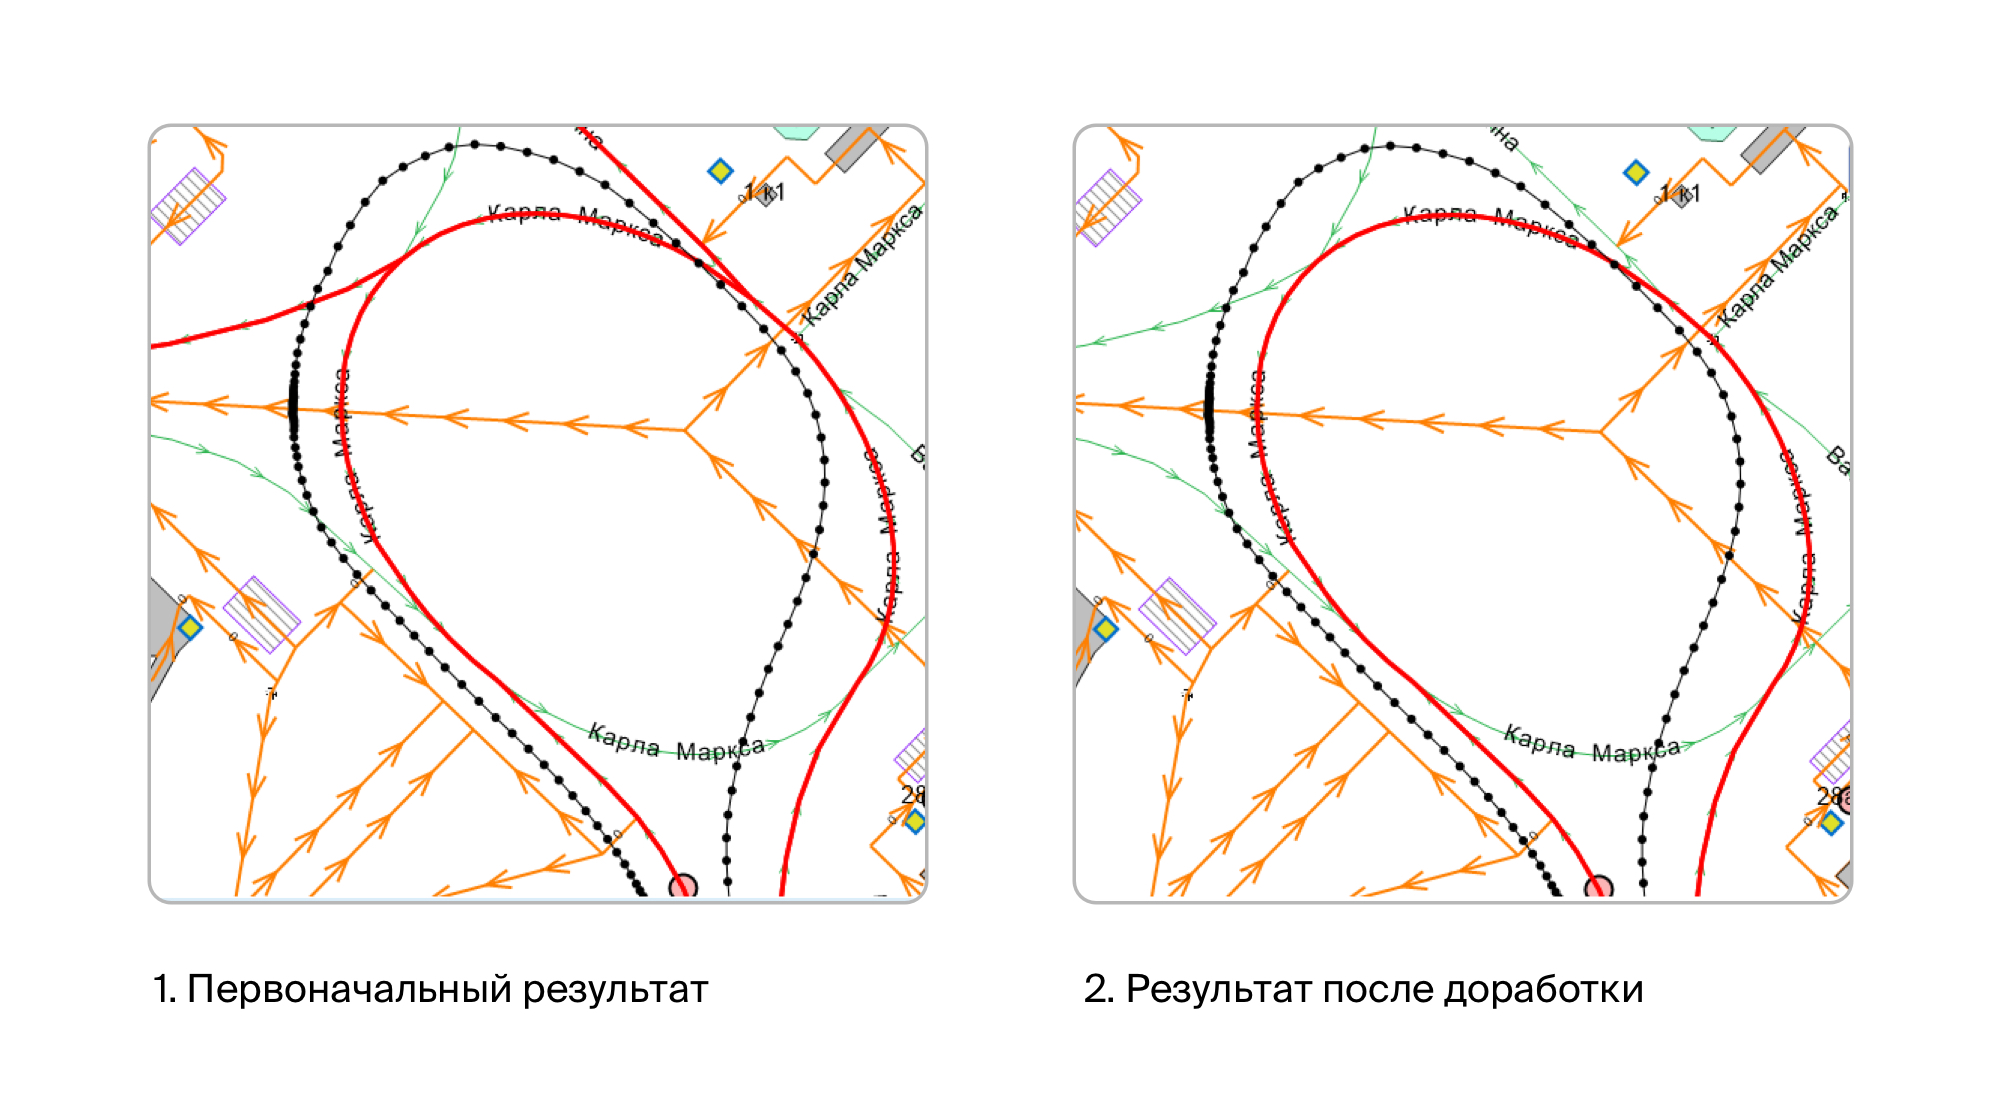
Initially, it seemed to us that this would be enough, and the first tests confirmed this. But then we began to check the video recorded in residential areas, and everything was not so rosy. The fact is that we have very high accuracy of data, including on the roads. Accordingly, we have drawn all the internal passages, down to the smallest details. On the other hand, as I said, GPS may not be very accurate or even very inaccurate. And if you go along the road around which there are tall buildings, then the points in the track can leave quite strongly. It happened that the points slid off to the side of more than 20 meters. As a result, it turns out that many points are close to the roads that we did not drive. The result of the shrinkage of such tracks was this picture:
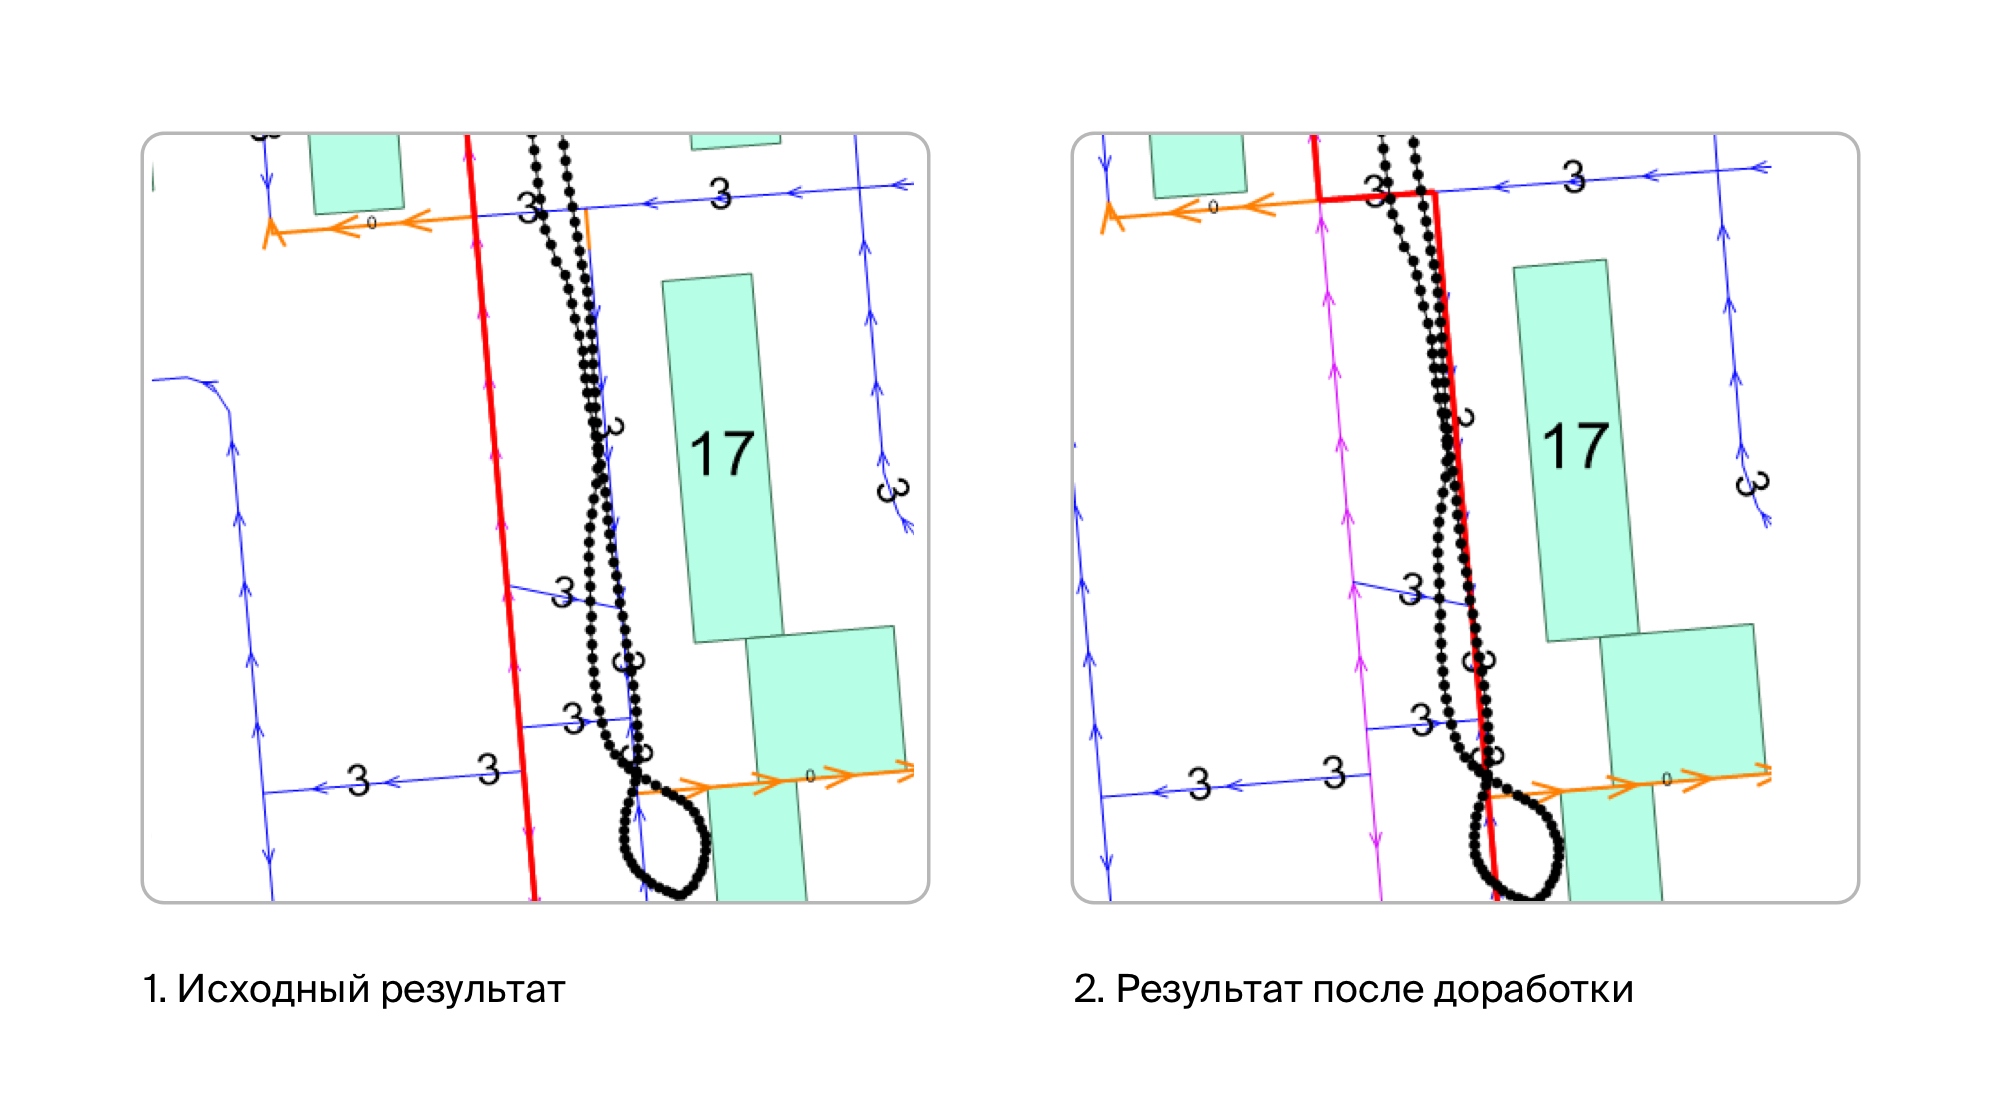
Common sense told us that there are few signs on such roads, and therefore there is no special point in collecting them there. Therefore, most likely, in most cases, the car moved along the main streets. Therefore, we have introduced a fine for intra-driveways. By fine, we mean a decrease in the number of points on the road. As a result, the problem with intrapassages was solved - they did not go out, when we didn’t drive over them, and when they really did, even in spite of the fine, they turn out to be the best option and then we choose them.
After this, the results have become quite good. And it seemed to us that it was over with mapmatching. But the trouble came from where it was not expected. Quite suddenly it turned out that there are cases when another road branches off from the road, and it does this very smoothly. And it was aggravated by the fact that the ramified road could also go parallel to ours, at least for a while. At the same time, I recall that the GPS track is almost never located on top of the links along which we traveled, it is slightly shifted in some direction from it. And of course, thanks to this, the algorithm began to cling to these branches. Because of what, at best, we received several links, which we didn’t actually follow. And at worst, the track was set up completely wrong.
Therefore, we have come up with an additional assessment of the road. Take the previous and next point of the GPS track relative to the point from which we selected the link. And we see that the azimuth at these points is not too different from the azimuth of movement along this link. If it is very different, we penalize this link.
As a result, we got the result that suits us, although sometimes there are still minor mistakes (sometimes an extra link can be chosen, in which we did not go). But they are quite rare, and therefore not critical for us.
Alignment of characters
Now we have a set of road links, on which we drove, and a set of frames with signs. As well as information about which sign on this frame, from which point of the track this frame was taken and the sign mask (a rectangle describing the sign on this frame). So you can place these signs on the map.
First of all, you need to get additional information that will help us put the sign in the right place:
- Azimuth mark. If the sign is located exactly in the center of the frame, it coincides with the azimuth at the GPS point. If the sign is not in the center, this is the azimuth at the point + angle between the center of the frame and the sign. We already have the azimuth of GPS points, and we can calculate the angle between the center of the frame and the sign, since we know where the mask of the mark is located on the frame and we know the viewing angle with which the video was recorded.
- The distance to the sign from the GPS point. We can calculate it, because we know the size of the mask mask, the frame resolution and the viewing angle with which the video was recorded.
Now you can go directly to the installation of the sign. Because track points are not always (and in fact almost never) do not lie on the road links, first we need to put our mark detection point on the link. We do this as follows:
- Among the roads on which the track was seated, we leave only those that cross some kind of buffer around our GPS point;
- We calculate the distance to each selected road and sort them according to its increase;
- Take the road, calculate the projection of the GPS point on it;
- We get the direction with which we are moving at this point along this road;
- If the direction from p.4 is unacceptable on this road, then we return to p.3 and take the next road there;
- If the direction is valid, then we stop.
Now we have a road that we drove when we put the GPS point, and the projection of this point onto our road. In fact, this road, and therefore the point, may be chosen incorrectly. For example, when cornering is very easy to make a mistake.

Therefore, before moving on, we must make sure that we are not mistaken. Or, if you made a mistake, replace the road with the right one and get a projection on it. To do this, take the roads that connect with our road and evaluate them by distance and azimuth. As a result, we get the road that is best for this point and build a projection on it.
Now that our GPS point is drawn to the road, we can calculate the position of the sign relative to it. To do this, we construct a vector from this point with a length equal to the distance to the sign in the direction coinciding with the azimuth of the sign. After that we try to draw a sign to one of the roads on which our track was seated. At the same time, we take into account the directions of the roads and the direction of the sign, which we calculate for each road through the azimuth of the sign.
At this stage, it may turn out that there was no suitable road. For example, because the sign will have a direction that is unacceptable on these roads (that is, they are one-way). In this case, this sign is located on a nearby road, on which we did not pass, which means we simply will not create it.
Now we have the coordinate of the sign pulled up to the road, it remains to check that it is set adequately, because sometimes we can make a mistake. To do this, we check that the sign is not too far from the original GPS point by comparing this distance with the distance to the sign obtained through the frame with some assumption. Also check that the mark was not behind the GPS point. If validation is successful, we received the coordinates of the sign on the road and its direction, which means our geoobject has geometry and all the necessary attributes. You can proceed to save it.
Merge signs
In fact, it is still too early to move on to conservation. The fact is that each sign can be seen from several frames, except for some special cases, when on some frames the sign is hidden behind some obstacle, for example, behind a truck.
From each of these frames we obtained a geo-object for the sign, they have the same attributes and they are located approximately at the same point. This means that we need to leave only one of them. In addition, if this sign is not new, then we already have it in the database, which means that we need to mark it, that it is updated, and not to create a new geo object.
To do this, we perform merge new geo-objects among themselves and with existing ones.
First of all we get all the signs that we have already created, on the links along which we passed. We add to them all the signs that we discern from the frames.
What we need to do with them: it is necessary to understand by their classes, attributes and geometries that a certain set of these geo-objects is the same sign. If there is an existing geo-object in this set, leave only it and note that it has been updated. If there are only new geo-objects in the set, leave only one of them.
We do this in four steps:
- Grouping geo-objects according to their class;
- In each group from step 1, we obtain attribute groups;
- For each group from step 2, we collect geometry groups;
- If there is an existing sign in the group from step 3 - we leave only it (if there are several of them - then we leave them all), and if there are no existing signs in the group - we leave the one in the middle.
After that, we still have the right amount of characters that can finally be saved.

Of course, it may turn out that we have some kind of sign, but we did not recognize it from the video. In this case, this sign will not be updated. Unfortunately, we cannot be sure that this sign is also no longer on the territory, since he could simply be closed by some obstacle during video recording. Therefore, we do not remove this mark right away, but mark it as missing from the video. If this sign is visible on some other video, then we simply remove this tag from it and update it. If he still does not appear, the cartographer will have to deal with this sign. And remove it if it is really no more.
Immediate plans
Signs from side roads
On the video there are signs not only from the roads along which we are driving, but also from side roads: these can be roads that cross ours, or which are adjacent to ours. Or vice versa - the roads that branch off from ours. It may even be roads that are parallel to ours. It is very difficult to distinguish the signs that stand on these roads from the signs that we need. After all, they are often close to our road.
To solve the problem, we plan to use a number of semantic rules when putting a mark on a link. For example, the speed limit of 5 km / h is unlikely to be on the highway, but it is very likely it will stand at the entrance to the gas station.
Tracking Signs
Sometimes we do not bear signs, and sometimes vice versa - we need signs that we don’t need to be. Therefore, we plan to make tracking of signs by frames - in order to recognize the same sign on different frames even before we turn them into geo objects. And use this knowledge when merzh.
Conclusion
The current version is essentially beta. Therefore, it is not ideal. There are problems that we are going to solve soon. There are problems that are not yet clear how to solve. And there are those who are generally unlikely to solve with the help of algorithms. For example, GPS tracks can be of very poor quality. Or a video where the image and track are out of sync - and this can be understood only by looking at it. In general, the task was much more difficult than we originally expected.
We have a huge field for solving various problems. So, we will decide. And of course, to tell, if we stumble upon something interesting.
Source: https://habr.com/ru/post/457342/
All Articles