TacacsGUI, Configuration Manager
Good day! Today I would like to bring to your attention the Configuration Manager plugin included in the TacacsGUI project.
What is a Configuration Manager ? It is a configuration manager (such as Oxidized or RANCID ) with various modes of viewing changes (diff) and journal entries AAA (Authentication Authorization Accounting). Thus, you can not only control the difference (diff) between configurations, but also determine who made these changes. Tested on Cisco and Juniper. Links to demos inside.

So, we have this plan: we are familiar with the main interface; we appreciate all the advantagesand disadvantages ; next we study how to set up this function; watch the demo; draw conclusions and leave comments.
')
We begin with the most interesting - with a view of configuration changes. Next, I will shorten the Configuration Manager to CM .

Now we will analyze the picture above:
This is the main interface that you will work with using CM . Let us turn to the description of the settings.
Brief cheat sheet in the figure below.

And now let's take a closer look at each step shown in the picture:
Everything is simple: you specify the address, protocol (ssh, telnet) and port. Optionally, you can specify a user (Credential) and Prompt. If the user is not specified at this step, the default user will be used (defined in Step 4). If the Prompt field is empty, its value will be determined in Step 3 (Creating a model).
Now let's talk about Prompt. Prompt is a device prompt to enter a command, for example, Switch> or Router> . The same device may have different Prompt, depending on the level of access, for example, Switch> , Switch # or Switch (config) # . CM uses the Prompt entry to figure out when to enter a command. You can list all possible Prompt options by separating them with a comma. In the future, I will not once refer to this description.

There are three fields that should be filled in: account name (Credential Name), username (Username) and password (Password). The Credential Name field will be displayed in the user lists when it is selected and is required, and the Username field is used for authorization on the device, and it is not mandatory, for example, when only the password is used via telnet.

The most crucial step. Here we indicate the order of actions that the SM must perform. Filling the Prompt field is similar to that described in Step 1 and its value will be applied to all devices defined in Step 4. If the Prompt field is left empty, the CM will use the # and > characters by default. Further, it is better to explain by example.

In this example, the CM , after a successful connection, executes 5 commands:
I hope I shed light on what a model is.
And yes, this is the most common expect. These settings are used in conjunction with the Pexpect library.
If before that we created objects, then here we put them together. Choose where we will save the file (s), model (model), devices (devices), user by default, and also we can trim the output file and check how it will look (Preview, second image). Each file will be a name composed of a template - device-name __ device -id _ request id .

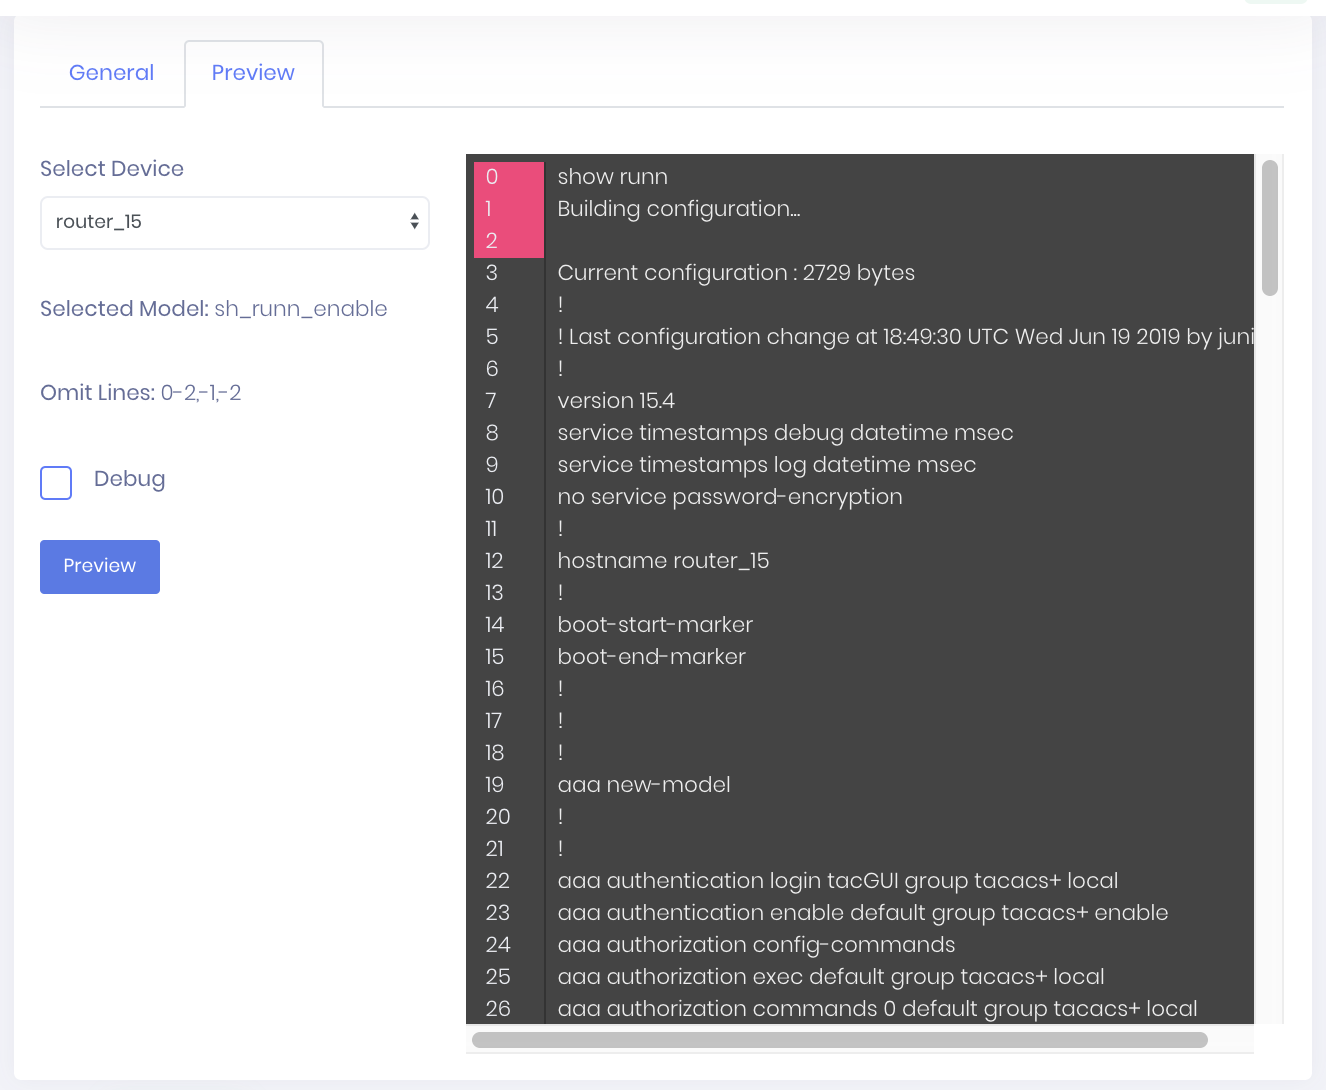
You can trim a file both from the beginning and from the end. For example, we trim lines 0 through 2, and -1 (the last) and -2 (the last).
With the help of Preview, you can immediately determine whether your model will work and how the file will look like.
In conclusion, my advice to you is that if you cannot get a configuration, then try to connect yourself to this device and execute the specified commands at the beginning. It is best to do this directly from the server.
This completes the request setup. It now remains to make sure that the scheduler (cron) is turned on and wait for the CM to go through the requests and collect all the configurations, or to start the CM without waiting for the specified time (Force Start).
Since this is a plugin, Configuration Manager is not very prominent. To exclude questions, “and where exactly should I watch the demo,” I decided to put it in a separate section.
Do you have any ideas what else you can add? Leave your comments.
That's all. If you want to see more articles about TacacsGUI by type of recipes and operating tips, you can write about it in the comments.
All the best!
What is a Configuration Manager ? It is a configuration manager (such as Oxidized or RANCID ) with various modes of viewing changes (diff) and journal entries AAA (Authentication Authorization Accounting). Thus, you can not only control the difference (diff) between configurations, but also determine who made these changes. Tested on Cisco and Juniper. Links to demos inside.
So, we have this plan: we are familiar with the main interface; we appreciate all the advantages
')
Main Interface. Preview
We begin with the most interesting - with a view of configuration changes. Next, I will shorten the Configuration Manager to CM .
Now we will analyze the picture above:
- We have several viewing modes:
- Brief (Short) - the most optimal viewing mode diff. Only changes and adjacent configuration lines are shown here. The number 3 just indicates the number of lines of text around the change. If you wish, you can increase this number so that the “picture” becomes clearer.
- Full View is the same as Brief, only this time the configuration is shown in its entirety.
- Preview is just a preview of the configuration file. Select the file version and browse.
- Clear Diff - for those "who are in the tank" and loves the "classics."
- Each version of the file is determined by the date and hash commit (the hash will be visible in the future). Those. The configuration from the devices will be collected every day, but a new version of the file will appear only when any changes have occurred.
- Actually, the diff configuration itself. Here you can clearly see which lines have been added, changed or deleted, compared to the older version of the file.
- We are approaching the most interesting. It contains important information that tells us by what criteria a selection of AAA journals is conducted, namely, the date range and device address.
- A list of users who accessed the device during a specified period of time, as well as a summary of the entries in the AAA journal associated with them. From left to right count of Authentication, Authorization, Accounting.
- Here we can see when and what commands the user entered. In the future, add filtering for easy searching.
This is the main interface that you will work with using CM . Let us turn to the description of the settings.
CM setting
Brief cheat sheet in the figure below.
And now let's take a closer look at each step shown in the picture:
Step 1. Adding a Device
Everything is simple: you specify the address, protocol (ssh, telnet) and port. Optionally, you can specify a user (Credential) and Prompt. If the user is not specified at this step, the default user will be used (defined in Step 4). If the Prompt field is empty, its value will be determined in Step 3 (Creating a model).
Now let's talk about Prompt. Prompt is a device prompt to enter a command, for example, Switch> or Router> . The same device may have different Prompt, depending on the level of access, for example, Switch> , Switch # or Switch (config) # . CM uses the Prompt entry to figure out when to enter a command. You can list all possible Prompt options by separating them with a comma. In the future, I will not once refer to this description.
Step 2. Creating a user
There are three fields that should be filled in: account name (Credential Name), username (Username) and password (Password). The Credential Name field will be displayed in the user lists when it is selected and is required, and the Username field is used for authorization on the device, and it is not mandatory, for example, when only the password is used via telnet.
Step 3. Creating a model
The most crucial step. Here we indicate the order of actions that the SM must perform. Filling the Prompt field is similar to that described in Step 1 and its value will be applied to all devices defined in Step 4. If the Prompt field is left empty, the CM will use the # and > characters by default. Further, it is better to explain by example.
In this example, the CM , after a successful connection, executes 5 commands:
- Waiting for an invitation (Expect): router_15>
Send (send) command: enable - Waiting for an invitation (Expect): assword: (the output string can be partially specified)
Sends a command (Send): ****** (if you send a password, you can hide it / hide) - Waiting for an invitation (Expect): (if the output is not specified, then a line from the Prompt field will be used instead)
Sends a command (Send): terminal length 0 (some devices use the more function, which hides some information for convenience, the CM does not work with more) - Waiting for an invitation (Expect):
Sends a command (Send): show runn and saves (Write) the output to a file - Waiting for an invitation (Expect):
Sends command (Send): exit (it is desirable to be disconnected)
I hope I shed light on what a model is.
And yes, this is the most common expect. These settings are used in conjunction with the Pexpect library.
Step 4. Create a query
If before that we created objects, then here we put them together. Choose where we will save the file (s), model (model), devices (devices), user by default, and also we can trim the output file and check how it will look (Preview, second image). Each file will be a name composed of a template - device-name __ device -id _ request id .
You can trim a file both from the beginning and from the end. For example, we trim lines 0 through 2, and -1 (the last) and -2 (the last).
With the help of Preview, you can immediately determine whether your model will work and how the file will look like.
In conclusion, my advice to you is that if you cannot get a configuration, then try to connect yourself to this device and execute the specified commands at the beginning. It is best to do this directly from the server.
This completes the request setup. It now remains to make sure that the scheduler (cron) is turned on and wait for the CM to go through the requests and collect all the configurations, or to start the CM without waiting for the specified time (Force Start).
Demo
Since this is a plugin, Configuration Manager is not very prominent. To exclude questions, “and where exactly should I watch the demo,” I decided to put it in a separate section.
- Go to the site demo.tacacsgui.com , log in.
- Next, look at the bottom of the Configuration Manager sidebar -> Configurations

- Select the file and double-click to open the Preview menu.

Hooray! We are on the spot.
Future plans
- Download any version of the configuration (it already exists, not configured in the gui).
- Add more information for files in CM Explorer .
- Add pattern templates.
- Update a specific file, i.e. make a quick request.
- Scheduler. Not just once a day or once a week to fulfill all requests. And execute requests on schedule. With the help of the SM, you can not only build the configuration, but also collect something like optimization, for example, save the configuration on devices.
- Add support for SFTP (SCP), FTP. To be able to dump files from devices directly to the CM .
- SNMP support, so that the device throws a message that the configuration has changed and the CM has started working.
Do you have any ideas what else you can add? Leave your comments.
That's all. If you want to see more articles about TacacsGUI by type of recipes and operating tips, you can write about it in the comments.
All the best!
Source: https://habr.com/ru/post/457334/
All Articles