PKCS # 11 token-based cryptographic workstations. Electronic signature. Part 2
 In the first part of our narration, we showed how, having a cryptographic token with Russian cryptography support, create a request for a certificate, obtain and install a certificate for a token, check the electronic signature of the certificate and its validity in the certificate revocation list (CRL), delete the certificate from token, change tags, etc. Having created a request for a certificate (having generated a key pair), having received a certificate in the CA and setting it on a token, nothing now prevents you from using a personal certificate (certificate with a key pair) for electronic signing of documents. Let's get started For a start, recall where the cryptoarmp11 utility is located.
Next, run the utility and press the button "1. Sign the document":
')
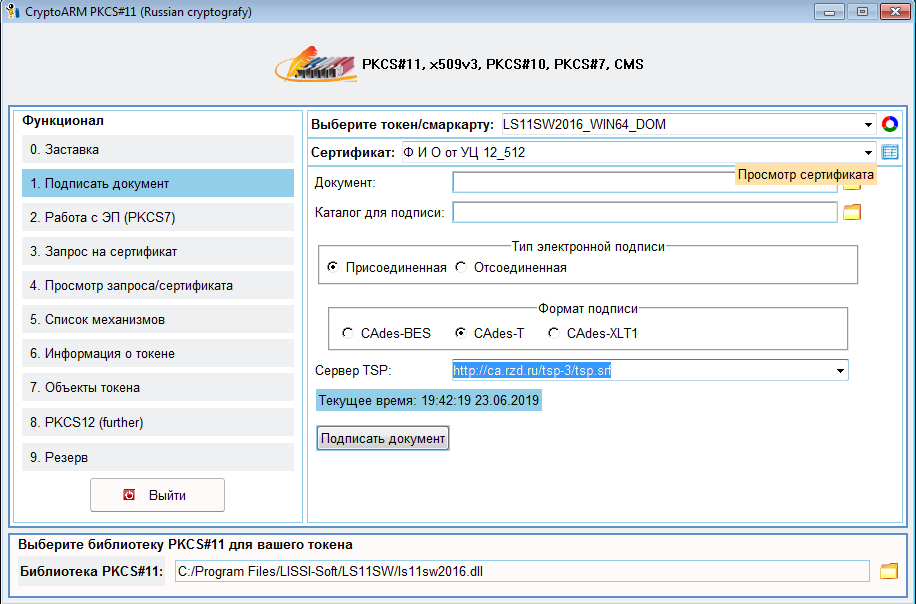
Select the file with the document that we want to sign, and determine the directory where we will save the file with the signature (the end of the name of this file will be .p7s). We decide whether the signed document itself will be stored in the body of the signature or not (attached / disconnected signature). And the most significant, we determine the format of the signature. In my opinion, you can follow the following rules. If this is an internal corporate document flow where strict control is exercised over computers, then it suffices to use the CAdes -BES signature format, which includes, in addition to the mathematical signature, in accordance with GOST R 34.10-2012 and the signature generation time (the “Current time” field). If there is no tight control over computers (everyone can set up any time on his computer), and the date of signing the document is important, then CAdes-T or CAdes-XLT1 format should be used. When using the CAdes-T and CAdes-XLT1 formats, the external side is attracted (similar to the natarius attraction) - the time stamp server. With CAdes-T format, the response of the time stamp server is added to the file with an electronic signature (see the “TSP Server” field). This answer (and this is also a PKCS # 7 document signed by the TSP server) allows you to determine at what point in time the document was signed. It should be borne in mind that often only the mathematical signature is checked, and the validity of the signature itself according to the time stamps is omitted. To verify the validity of the signature, of course, requires checking the validity of certificates. And so, in order to simplify this work, the CAdes-XLT1 signature format implies the inclusion of all evidence of the signature validity at the time of its creation into the signed file. These include certificates, including CA certificates, timestamp servers, ocsp servers, as well as lists of revoked certificates and OCSP server responses. We will not dwell on this again. Who wants to find the appropriate literature.
So, we decided on the format of the signature and clicked the button “Sign the document”. Next, we will need to enter another PIN for the token, then a warning will appear about the beginning of the signature generation and the need to be patient and, finally, the signature will be created:

What time does it take to form a signature? This is, of course, the mathematical calculations themselves and the collection of various data (certificates, CRLs, OCSP server responses, time stamps). Everything, the signature is created. When you receive a certificate in the CA, be sure to find out the address of the time stamp server of your CA. If references to certificates of certification authorities ( chain of certificates ), lists of revoked certificates, as well as the OCSP server are taken from certificates, then the time stamp server address must be entered with pens (the "TSP Server" field).
How to make sure that the signature is created correctly and the document can be transferred to the file. On the Internet you can find various sites for signature verification. Some of them check only the disconnected signature, others check everything and inform them well:

But in either case, this does not guarantee you that your signature will be accepted in the organization where you submit the signed document, for example, on the website of State Services. This is due to the fact that evidence of the validity of the signature in the XLT1 format can be stored and checked in different ways. So, for example, on the website of state services it is required that evidence of the validity of the time stamp server certificate is stored in the signature received from the server. And if they are not there, then, despite the fact that they may be present in the signature of the document, the signature on the website of state services will be declared invalid. Our signature is good:

Go to the “2. Work with ES (PKCS7)” page and immediately select the file with the created signature:
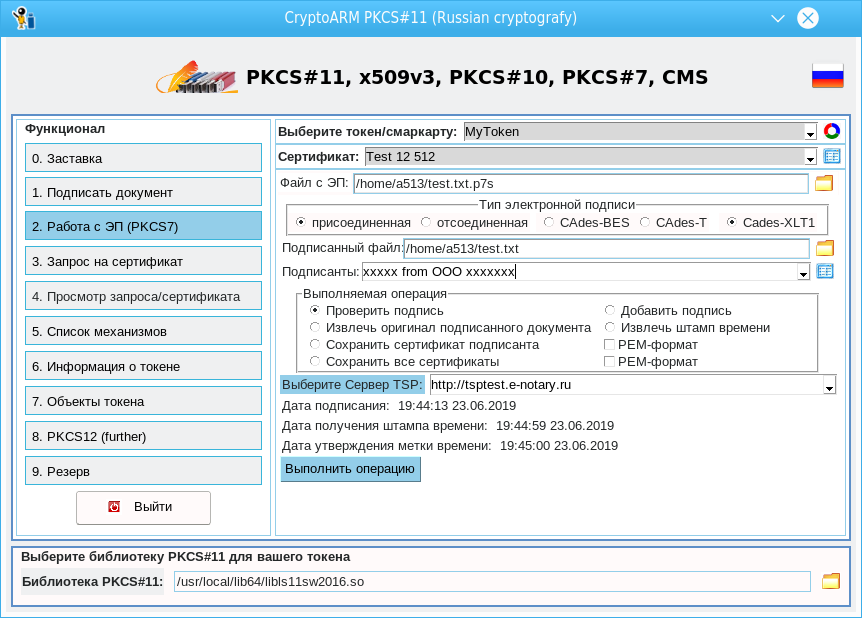
When loading the signature, the utility fills in the corresponding fields on the main window. The screenshot shows this well. It shows when the signature was generated on the user's computer (the field “Date of signing:”), when this date was certified on the time stamp server (the field “Date of receipt of the time stamp”) and when all evidence of validity was collected (the field “Date of approval of the label time ").
What operations can be performed on a signature is also clear. Of greatest interest here is the addition of a signature to a previously signed document. To do this, it is enough to choose a certificate to add a new signature (an analogue of document approval) and do not forget about the choice of the TSP server:

And if you look at who signed the document, then there are now two signatories. And both signatures were successfully tested on the website of public services:

In my opinion, the utility corresponds to the aspirations of having a utility for signing documents, having on hand “certificates on tokens with non-recoverable keys that they can count everything”.
However, we decided to go further and include in this utility a page for working with the PKCS # 12 container, which is becoming increasingly popular. And if now for signing the document you need the PKCS # 11 token and a library for it, then when using PKCS # 12 you will only need the container itself. And of course the utility that we talked about today. But this utility is absolutely self-sufficient and, unlike various CSPs, does not patch any kernel and works on any platform. Therefore, we are waiting for the third part.
Source: https://habr.com/ru/post/457288/
All Articles