Navigation in a cross-platform .NET Core application with saving state to disk using ReactiveUI and Avalonia as an example
User interfaces of modern application applications are usually complex - it is often necessary to implement support for page-by-page navigation, handle various input fields, and display or hide information based on parameters selected by the user. At the same time, to improve the UX, the application must save the state of the interface elements to the disk when it is paused or shut down, restore the state from disk when the program is restarted.
MVVM framework ReactiveUI proposes to preserve the state of the application by serializing the representation model graph at the moment of program suspension, and the mechanisms for determining the moment of suspension are different for frameworks and platforms. So, for WPF the Exit event is used, for Xamarin.Android - ActivityPaused , for Xamarin.iOS - DidEnterBackground , for UWP - OnLaunched overload.
In this material, we will consider using ReactiveUI to save and restore the state of the software with the GUI, including the state of the router, using the example of the cross-platform GUI framework Avalonia . The material assumes the presence of basic ideas about the MVVM design pattern and about reactive programming in the context of the C # language and the .NET platform in the reader. The sequence of actions described in the article applies to Windows 10 and Ubuntu 18.
Project creation
To try routing in action, create a new .NET Core project from the Avalonia template, install the Avalonia.ReactiveUI package - a thin layer of Avalonia and ReactiveUI integration. Make sure you have the .NET Core SDK and git installed before you begin.
git clone https://github.com/AvaloniaUI/avalonia-dotnet-templates git --git-dir ./avalonia-dotnet-templates/.git checkout 9263c6b dotnet new --install ./avalonia-dotnet-templates dotnet new avalonia.app -o ReactiveUI.Samples.Suspension cd ./ReactiveUI.Samples.Suspension dotnet add package Avalonia.ReactiveUI Make sure that the application starts and shows a window with the words Welcome to Avalonia!
dotnet run --framework netcoreapp2.1 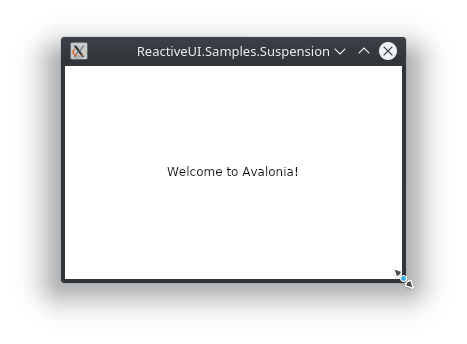
Connecting pre-builds Avalonia from MyGet
To connect and use the newest Avalonia builds that are automatically published in MyGet when the Avalonia master repository branch changes on GitHub , use the package source configuration file nuget.config . In order for the IDE and the .NET Core CLI to see nuget.config , you need to generate a sln file for the project created above. Let's use the tools .NET Core CLI:
dotnet new sln dotnet sln ReactiveUI.Samples.Suspension.sln add ReactiveUI.Samples.Suspension.csproj Create a nuget.config file in the folder with the .sln file with the following content:
<?xml version="1.0" encoding="utf-8"?> <configuration> <packageSources> <add key="AvaloniaCI" value="https://www.myget.org/F/avalonia-ci/api/v2" /> </packageSources> </configuration> It may be necessary to restart the IDE, or to upload and download the entire solution. Update Avalonia packages to the required version (at least 0.8.1-cibuild0003100-beta ) using your IDE's NuGet package manager interface, or using the Windows command line tools or the Linux terminal:
dotnet add package Avalonia.ReactiveUI --version 0.8.1-cibuild0003100-beta dotnet add package Avalonia.Desktop --version 0.8.1-cibuild0003100-beta dotnet add package Avalonia --version 0.8.1-cibuild0003100-beta Create the Views/ and ViewModels/ folders in the project root, change the name of the MainWindow class to MainView for convenience, move it to the Views/ directory, change the namespace accordingly to ReactiveUI.Samples.Suspension.Views . Edit the contents of the Program.cs and App.xaml.cs — apply the call UseReactiveUI to the Avalonia application builder, move the initialization of the main view to OnFrameworkInitializationCompleted , to follow the recommendations for managing the lifecycle of the application:
Program.cs
class Program { // . API Avalonia , // SynchronizationContext, // OnFrameworkInitializationCompleted App.xaml.cs: // - . public static void Main(string[] args) => BuildAvaloniaApp() .StartWithClassicDesktopLifetime(args); // Avalonia. // , . public static AppBuilder BuildAvaloniaApp() => AppBuilder.Configure<App>() .UseReactiveUI() // ! .UsePlatformDetect() .LogToDebug(); } App.xaml.cs
public class App : Application { public override void Initialize() => AvaloniaXamlLoader.Load(this); // . // MVVM , DI . // ApplicationLifetime, // . public override void OnFrameworkInitializationCompleted() { new Views.MainView().Show(); base.OnFrameworkInitializationCompleted(); } } You will need to add using Avalonia.ReactiveUI to Program.cs . Make sure that after updating the packages, the project starts and displays the default welcome screen.
dotnet run --framework netcoreapp2.1
Cross-platform routing ReactiveUI
As a rule, there are two main approaches to the implementation of navigation between the pages of the .NET application - view-first and view model-first. The view-first approach involves managing the navigation stack and navigating between pages at the View level in MVVM terminology — for example, using the Frame and Page classes in the case of UWP or WPF, and using the view model-first approach, navigation is implemented at the view model level. ReactiveUI tools that organize routing in the application are focused on using the view model-first approach. Routing ReactiveUI consists of an IScreen implementation containing the state of the router, several implementations of IRoutableViewModel and a platform- RoutedViewHost XAML control - RoutedViewHost .
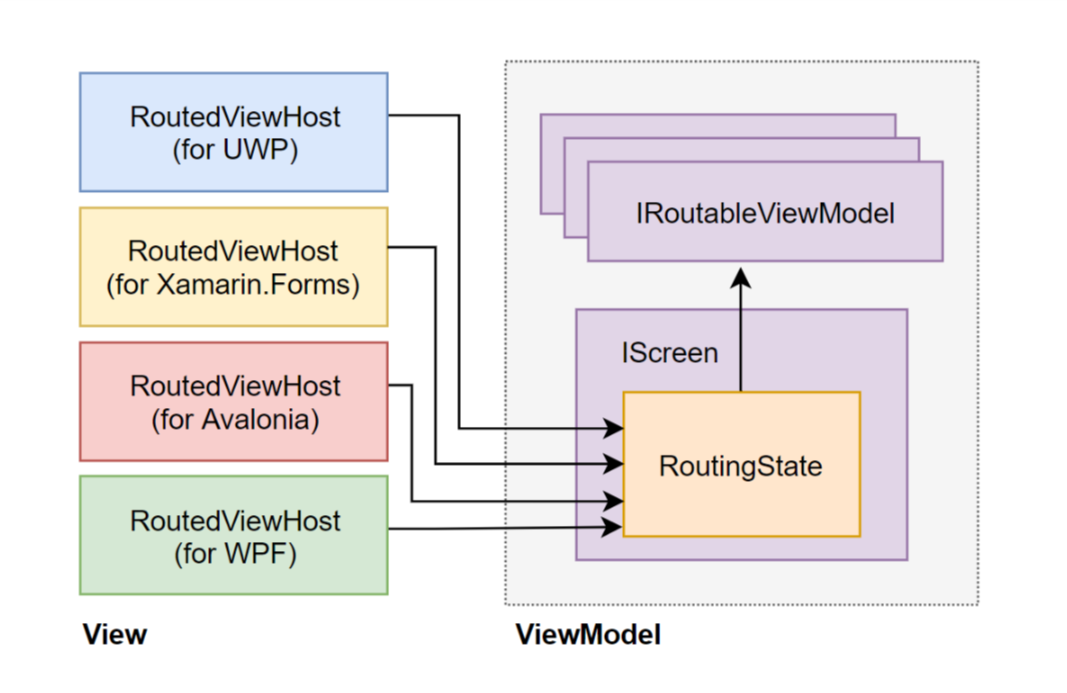
The state of the router is represented by the RoutingState object that manages the navigation stack. IScreen is the root of the navigation stack, and there can be several navigation roots in an application. RoutedViewHost monitors the state of the corresponding RoutingState router in response to changes in the navigation stack by embedding the corresponding IRoutableViewModel XAML control. The described functionality will be illustrated with examples below.
Saving the state of view models to disk
Consider a typical display model of an information search screen as an example.

We need to decide which elements of the screen view model are saved to disk during pausing or shutting down the application, and which ones should be re-created each time it is started. There is no need to save the state of the ReactiveUI commands that implement the ICommand interface and are attached to the buttons - ReactiveCommand<TIn, TOut> are created and initialized in the designer, while the state of the CanExecute indicator depends on the properties of the presentation model and is recalculated when they change. The need to save search results - a controversial issue - depends on the specifics of the application, but the state of the SearchQuery input SearchQuery would be reasonable to save and restore!
ViewModels / SearchViewModel.cs
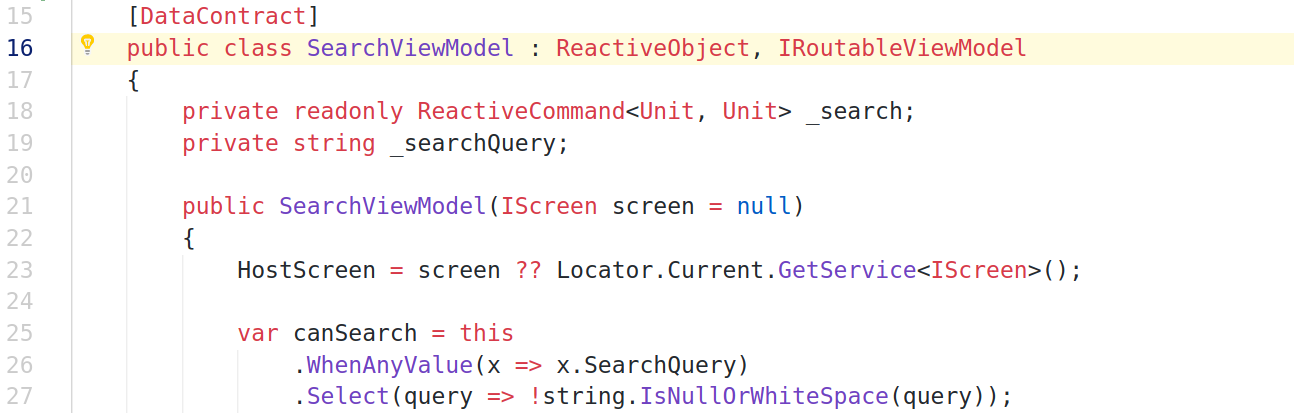
[DataContract] public class SearchViewModel : ReactiveObject, IRoutableViewModel { private readonly ReactiveCommand<Unit, Unit> _search; private string _searchQuery; // IScreen , NULL // IScreen Splat.Locator. // . public SearchViewModel(IScreen screen = null) { HostScreen = screen ?? Locator.Current.GetService<IScreen>(); // SearchQuery , // . var canSearch = this .WhenAnyValue(x => x.SearchQuery) .Select(query => !string.IsNullOrWhiteSpace(query)); // , // . _search = ReactiveCommand.CreateFromTask( () => Task.Delay(1000), // canSearch); } public IScreen HostScreen { get; } public string UrlPathSegment => "/search"; public ICommand Search => _search; [DataMember] public string SearchQuery { get => _searchQuery; set => this.RaiseAndSetIfChanged(ref _searchQuery, value); } } The class of the view model is marked with the [DataContract] attribute, and the properties that need to be serialized are marked with the [DataMember] . This is sufficient if the serializer uses the opt-in approach - it saves only properties explicitly marked with attributes to disk; in the case of an opt-out approach, you need to mark with [IgnoreDataMember] those properties that you don’t need to be saved to disk. Additionally, we implement the IRoutableViewModel interface in our view model so that it can later become part of the application’s router navigation stack.
ViewModels / LoginViewModel.cs
[DataContract] public class LoginViewModel : ReactiveObject, IRoutableViewModel { private readonly ReactiveCommand<Unit, Unit> _login; private string _password; private string _username; // IScreen , NULL // IScreen Splat.Locator. // . public LoginViewModel(IScreen screen = null) { HostScreen = Locator.Current.GetService<IScreen>(); // Username Password // , . var canLogin = this .WhenAnyValue( x => x.Username, x => x.Password, (user, pass) => !string.IsNullOrWhiteSpace(user) && !string.IsNullOrWhiteSpace(pass)); // , // . _login = ReactiveCommand.CreateFromTask( () => Task.Delay(1000), // canLogin); } public IScreen HostScreen { get; } public string UrlPathSegment => "/login"; public ICommand Login => _login; [DataMember] public string Username { get => _username; set => this.RaiseAndSetIfChanged(ref _username, value); } // ! public string Password { get => _password; set => this.RaiseAndSetIfChanged(ref _password, value); } } The presentation models of the two pages of the application are ready, they implement the IRoutableViewModel interface and can be built into the IScreen router. Now we implement directly IScreen . Mark using [DataContract] attributes, which properties of the view model to serialize, and which ones to ignore. Pay attention to the public setter of the property marked with the [DataMember] in the example below — the property is intentionally open for writing so that the serializer can change the newly created instance of the object when the model is deserialized.
ViewModels / MainViewModel.cs
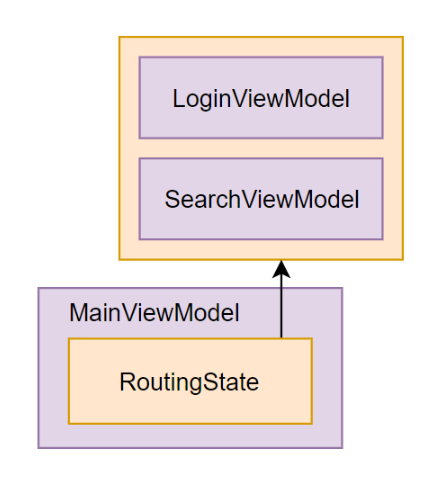
[DataContract] public class MainViewModel : ReactiveObject, IScreen { private readonly ReactiveCommand<Unit, Unit> _search; private readonly ReactiveCommand<Unit, Unit> _login; private RoutingState _router = new RoutingState(); public MainViewModel() { // , // , . var canLogin = this .WhenAnyObservable(x => x.Router.CurrentViewModel) .Select(current => !(current is LoginViewModel)); _login = ReactiveCommand.Create( () => { Router.Navigate.Execute(new LoginViewModel()); }, canLogin); // , // , . var canSearch = this .WhenAnyObservable(x => x.Router.CurrentViewModel) .Select(current => !(current is SearchViewModel)); _search = ReactiveCommand.Create( () => { Router.Navigate.Execute(new SearchViewModel()); }, canSearch); } [DataMember] public RoutingState Router { get => _router; set => this.RaiseAndSetIfChanged(ref _router, value); } public ICommand Search => _search; public ICommand Login => _login; } In our application, only RoutingState necessary to save to disk; commands for obvious reasons are not necessary to save to disk - their state depends entirely on the router. The serialized object must include extended information about the types that implement the IRoutableViewModel , so that when deserializing the navigation stack can be restored. We describe the logic of the MainViewModel view MainViewModel , place the class in ViewModels/MainViewModel.cs and in the corresponding namespace of ReactiveUI.Samples.Suspension.ViewModels .
Routing in the Avalonia application
The user interface logic at the layer level of the model and the presentation model of the demo application is implemented and can be moved to a separate assembly aimed at the .NET Standard, because it knows nothing about the GUI framework used. Let's take a presentation layer. The presentation layer in MVVM terminology is responsible for drawing the state of the view model to the screen; the XAML control RoutedViewHost contained in the Avalonia.ReactiveUI package is used to draw the current state of the RoutingState router. Implement the GUI for SearchViewModel - for this, in the Views/ directory, create two files: SearchView.xaml and SearchView.xaml.cs .
Describing the user interface using the XAML dialect used in Avalonia is likely to appear familiar to developers on the Windows Presentation Foundation, Universal Windows Platform, or Xamarin.Forms. In the example above, we create the trivial interface of the search form — we draw a text field to enter a search query and a button that launches the search, while binding the controls to the properties of the SearchViewModel view model defined above.
Views / SearchView.xaml
<UserControl xmlns="https://github.com/avaloniaui" xmlns:d="http://schemas.microsoft.com/expression/blend/2008" xmlns:mc="http://schemas.openxmlformats.org/markup-compatibility/2006" d:DataContext="{d:DesignInstance viewModels:SearchViewModel}" xmlns:viewModels="clr-namespace:ReactiveUI.Samples.Suspension.ViewModels" xmlns:x="http://schemas.microsoft.com/winfx/2006/xaml" x:Class="ReactiveUI.Samples.Suspension.Views.SearchView" xmlns:reactiveUi="http://reactiveui.net" mc:Ignorable="d"> <Grid> <Grid.RowDefinitions> <RowDefinition Height="48" /> <RowDefinition Height="48" /> <RowDefinition Height="48" /> <RowDefinition Height="*" /> </Grid.RowDefinitions> <TextBlock Grid.Row="0" Text="Search view" Margin="5" /> <TextBox Grid.Row="1" Text="{Binding SearchQuery, Mode=TwoWay}" /> <Button Grid.Row="2" Content="Search" Command="{Binding Search}" /> </Grid> </UserControl> Views / SearchView.xaml.cs
public sealed class SearchView : ReactiveUserControl<SearchViewModel> { public SearchView() { // WhenActivated // . this.WhenActivated((CompositeDisposable disposable) => { }); AvaloniaXamlLoader.Load(this); } } The code-behind of the SearchView.xaml control will also appear to familiar developers on WPF, UWP and XF. The WhenActivated call is used to execute some code at the moment of activating and deactivating a view or view model. If your application uses hot observables (timers, geolocation, connection to the message bus), it would be wise to attach them to CompositeDisposable calling DisposeWith so that when you DisposeWith XAML control and its corresponding view model from the visual tree, hot observables stop publishing new values and there are no leaks of memory.
Views / LoginView.xaml
<UserControl xmlns="https://github.com/avaloniaui" xmlns:d="http://schemas.microsoft.com/expression/blend/2008" xmlns:mc="http://schemas.openxmlformats.org/markup-compatibility/2006" d:DataContext="{d:DesignInstance viewModels:LoginViewModel, IsDesignTimeCreatable=True}" xmlns:viewModels="clr-namespace:ReactiveUI.Samples.Suspension.ViewModels" xmlns:x="http://schemas.microsoft.com/winfx/2006/xaml" x:Class="ReactiveUI.Samples.Suspension.Views.LoginView" xmlns:reactiveUi="http://reactiveui.net" mc:Ignorable="d"> <Grid> <Grid.RowDefinitions> <RowDefinition Height="48" /> <RowDefinition Height="48" /> <RowDefinition Height="48" /> <RowDefinition Height="48" /> <RowDefinition Height="*" /> </Grid.RowDefinitions> <TextBlock Grid.Row="0" Text="Login view" Margin="5" /> <TextBox Grid.Row="1" Text="{Binding Username, Mode=TwoWay}" /> <TextBox Grid.Row="2" PasswordChar="*" Text="{Binding Password, Mode=TwoWay}" /> <Button Grid.Row="3" Content="Login" Command="{Binding Login}" /> </Grid> </UserControl> Views / LoginView.xaml.cs
public sealed class LoginView : ReactiveUserControl<LoginViewModel> { public LoginView() { this.WhenActivated(disposables => { }); AvaloniaXamlLoader.Load(this); } } Edit the Views/MainView.xaml and Views/MainView.xaml.cs . RoutedViewHost XAML RoutedViewHost from the RoutedViewHost namespace on the main screen, assign the state of the RoutingState router to the RoutingState property. Add buttons to navigate to the search and authorization pages, link them to the ViewModels/MainViewModel properties described above.
Views / MainView.xaml
<Window xmlns="https://github.com/avaloniaui" xmlns:x="http://schemas.microsoft.com/winfx/2006/xaml" xmlns:d="http://schemas.microsoft.com/expression/blend/2008" xmlns:mc="http://schemas.openxmlformats.org/markup-compatibility/2006" mc:Ignorable="d" d:DesignWidth="800" d:DesignHeight="450" x:Class="ReactiveUI.Samples.Suspension.Views.MainView" xmlns:reactiveUi="http://reactiveui.net" Title="ReactiveUI.Samples.Suspension"> <Grid> <Grid.RowDefinitions> <RowDefinition Height="*" /> <RowDefinition Height="48" /> </Grid.RowDefinitions> <!-- , RoutingState, View ViewModel --> <reactiveUi:RoutedViewHost Grid.Row="0" Router="{Binding Router}"> <reactiveUi:RoutedViewHost.DefaultContent> <TextBlock Text="Default Content" /> </reactiveUi:RoutedViewHost.DefaultContent> </reactiveUi:RoutedViewHost> <Grid Grid.Row="1"> <Grid.ColumnDefinitions> <ColumnDefinition Width="*" /> <ColumnDefinition Width="*" /> <ColumnDefinition Width="*" /> </Grid.ColumnDefinitions> <Button Grid.Column="0" Command="{Binding Search}" Content="Search" /> <Button Grid.Column="1" Command="{Binding Login}" Content="Login" /> <Button Grid.Column="2" Command="{Binding Router.NavigateBack}" Content="Back" /> </Grid> </Grid> </Window> Views / MainView.xaml.cs
public sealed class MainView : ReactiveWindow<MainViewModel> { public MainView() { this.WhenActivated(disposables => { }); AvaloniaXamlLoader.Load(this); } } A simple application that demonstrates the capabilities of routing ReactiveUI and Avalonia , is ready. When clicking the Search and Login buttons, the corresponding commands are invoked, a new instance of the view model is created and the RoutingState updated. The XAML control RoutedViewHost , which subscribes to the RoutingState changes, tries to get the IViewFor<TViewModel> , where TViewModel is the view model type, from Locator.Current . If the registered IViewFor<TViewModel> implementation is found, a new instance of it will be created, embedded in the RoutedViewHost and displayed in the Avalonia application window.

We register the necessary IViewFor<TViewModel> and IScreen in the App.OnFrameworkInitializationCompleted method of our application using Locator.CurrentMutable . IViewFor<TViewModel> necessary for RoutedViewHost work RoutedViewHost , and IScreen registration IScreen necessary so that when deserializing, the SearchViewModel and LoginViewModel can be correctly initialized using the constructor without parameters and Locator.Current .
App.xaml.cs
public override void OnFrameworkInitializationCompleted() { // . Locator.CurrentMutable.RegisterConstant<IScreen>(new MainViewModel()); Locator.CurrentMutable.Register<IViewFor<SearchViewModel>>(() => new SearchView()); Locator.CurrentMutable.Register<IViewFor<LoginViewModel>>(() => new LoginView()); // . new MainView { DataContext = Locator.Current.GetService<IScreen>() }.Show(); base.OnFrameworkInitializationCompleted(); } Run the application and make sure that the routing works correctly. If there are any errors in the XAML markup, the XamlIl compiler used in Avalonia will tell us where it is at the compilation stage. And XamlIl supports XAML debugging right in the IDE debugger !
dotnet run --framework netcoreapp2.1 
Saving and restoring the entire application state
Now, when routing is configured and working, the most interesting part begins - it is necessary to save data to disk when you close the application and read data from the disk when it starts, along with the state of the router. The initialization of hooks that listen to the launch and close events of an application is handled by a special class, AutoSuspendHelper , which is different for each platform that ReactiveUI supports. The task of the developer is to initialize this class at the very beginning of the application composition root. You also need to initialize the RxApp.SuspensionHost.CreateNewAppState property RxApp.SuspensionHost.CreateNewAppState function that returns the default state of the application, if the saved state is missing or an unexpected error occurred, or if the saved file is damaged.
Next, you need to call the RxApp.SuspensionHost.SetupDefaultSuspendResume method, passing it an implementation of ISuspensionDriver , a driver that ISuspensionDriver and reads a state object. To implement ISuspensionDriver , ISuspensionDriver use the Newtonsoft.Json library and the System.IO namespace for working with the file system. To do this, install the Newtonsoft.Json package:
dotnet add package Newtonsoft.Json Drivers / NewtonsoftJsonSuspensionDriver.cs
public class NewtonsoftJsonSuspensionDriver : ISuspensionDriver { private readonly string _file; private readonly JsonSerializerSettings _settings = new JsonSerializerSettings { TypeNameHandling = TypeNameHandling.All }; public NewtonsoftJsonSuspensionDriver(string file) => _file = file; public IObservable<Unit> InvalidateState() { if (File.Exists(_file)) File.Delete(_file); return Observable.Return(Unit.Default); } public IObservable<object> LoadState() { var lines = File.ReadAllText(_file); var state = JsonConvert.DeserializeObject<object>(lines, _settings); return Observable.Return(state); } public IObservable<Unit> SaveState(object state) { var lines = JsonConvert.SerializeObject(state, _settings); File.WriteAllText(_file, lines); return Observable.Return(Unit.Default); } } This approach has disadvantages - System.IO does not work with the Universal Winows Platform, but this is easy to fix - it’s enough to use StorageFile and StorageFolder instead of File and Directory . , IRoutableViewModel , Newtonsoft.Json TypeNameHandling.All . Avalonia — App.OnFrameworkInitializationCompleted :
public override void OnFrameworkInitializationCompleted() { // . var suspension = new AutoSuspendHelper(ApplicationLifetime); RxApp.SuspensionHost.CreateNewAppState = () => new MainViewModel(); RxApp.SuspensionHost.SetupDefaultSuspendResume(new NewtonsoftJsonSuspensionDriver("appstate.json")); suspension.OnFrameworkInitializationCompleted(); // , . var state = RxApp.SuspensionHost.GetAppState<MainViewModel>(); Locator.CurrentMutable.RegisterConstant<IScreen>(state); Locator.CurrentMutable.Register<IViewFor<SearchViewModel>>(() => new SearchView()); Locator.CurrentMutable.Register<IViewFor<LoginViewModel>>(() => new LoginView()); // . new MainView { DataContext = Locator.Current.GetService<IScreen>() }.Show(); base.OnFrameworkInitializationCompleted(); } AutoSuspendHelper Avalonia.ReactiveUI IApplicationLifetime — , ISuspensionDriver . ISuspensionDriver appstate.json :
— $type , , .
{ "$type": "ReactiveUI.Samples.Suspension.ViewModels.MainViewModel, ReactiveUI.Samples.Suspension", "Router": { "$type": "ReactiveUI.RoutingState, ReactiveUI", "_navigationStack": { "$type": "System.Collections.ObjectModel.ObservableCollection`1[[ReactiveUI.IRoutableViewModel, ReactiveUI]], System.ObjectModel", "$values": [ { "$type": "ReactiveUI.Samples.Suspension.ViewModels.SearchViewModel, ReactiveUI.Samples.Suspension", "SearchQuery": "funny cats" }, { "$type": "ReactiveUI.Samples.Suspension.ViewModels.LoginViewModel, ReactiveUI.Samples.Suspension", "Username": "worldbeater" } ] } } } , , , , , , ! , , ReactiveUI — UWP WPF, Xamarin.Forms.

: ISuspensionDriver Akavache — UserAccount Secure iOS UWP , , Android BundleSuspensionDriver ReactiveUI.AndroidSupport . JSON Xamarin.Essentials SecureStorage . , — !
useful links
- , , GitHub .
- Avalonia .
- You can start learning ReactiveUI with articles about ReactiveUI on Habré .
- You can learn about working with reactive-style collections in the DynamicData article .
')
Source: https://habr.com/ru/post/457164/
All Articles