WWDC19: Getting Started with Test Plan for XCTest
Hi, Habr! I present to you the translation of the article "WWDC19: Getting Started with the Test Plan for XCTest" by Shashikant Jagtap.

At the last WWDC conference, Apple showed new cool features for developers. Xcode 11 also added some amazing features. You can read about them in release notes . One of the most significant tools announced this year is the Test Plan for XCTest and Xcode UI tests. In this article we will take a closer look at how the Test Plan functionality will work with XCTest. If you want to know more details, watch the video session “Testing on Xcode”
')
With Xcode Test Plan, you can configure test suites independently of Xcode schemes. This is a significant improvement in testing technology that can take your tests to a new level. Now let's take a look at the Xcode Test plan in action.
Suppose that we create a test plan for functional tests with the following requirements:
We will create this test plan for Xcode for various Apple platforms.
Xcode 11 allows us to define these requirements in a Test Plan. Xcode allows you to create a Test Plan from the current schema configuration. When you edit the schema and go to the current test actions, Xcode displays the option to create a Test Plan. You can create a Test Plan with the following settings:
For review, we will create a Test Plan from the circuit configuration.

You need to name the Test Plan and specify the correct test target. When the Test Plan is created, it is attached to the schematic. However, the schema can override any Test Plan created after using the flag when invoking the Xcodebuild command. After creating a Test Plan, you can attach it to a specific target. Let's add the current plan to the target with UI tests and assign it a name.
You will find a new file with the extension functional.xctestplan. This is your Test Plan. It can be edited if necessary. You can make a composite Test Plan in the same target, depending on the needs of the tests. In this place we have an available Test Plan for our target with UI tests.
The Test Plan file is a simple json-like configuration file that contains information on how to configure your tests to run independently of any circuit. Here are the various test configuration options available in Test Plan. Basic Test Plan contains three key elements:
Each configuration in the Test Plan contains a set of tests attached to it with different settings. In accordance with the requirements of our test plan, we will need two configurations: one for Smoke tests, the other for regression tests.
Now let's open the file functional.xctestplan in Xcode and rename configuration1 to smoke-uk, then click on the “+” button at the top of the plan and add another configuration to regression-usa.
Now we have two configurations in Test Plan and Test Plan already tied to the target with UI tests. Add some settings to each configuration. When the smoke-uk configuration is selected, we can change the location to London and make other changes to the settings. Similarly, we will change the configuration of regression-usa. This is what a Test Plan will look like to start a regression:

Settings available in Test Plan:
If you do not want to create a Test Plan using the Xcode scheme, then you can always create a new Test Plan via Xcode → Product → Test Plan.
After creating a Test Plan in this way, we attach it to some test target by adding tests to it. In the example below, we created a new Test Plan and added tests to it.
As mentioned earlier, Xcode Test Plan is just a configuration file where we installed all the configurations we defined. In our script, we created functional.xctestplan, and the source code for it looks like this:
You can create a configuration this way and save it to a file with the .xctestplan extension in Xcode 11.
Now we understand the process of creating a Test Plan file in Xcode. Let's take a look at how to run a Test Plan and get reports in Xcode. You can run tests through Xcode → Product → Test as usual by running attached Test Plans to the schema. In our case, it will launch both test configurations - Smoke and regression.
There are several command line options in Xcodebuild for viewing and running Test Plans. You can run the following command:
It will display all the Test Plans for the current scheme. You can also run a separate test:
This script will run the test using the Test Plan configuration.
After executing the tests for a specific Test Plan, you can see good reports generated in Xcode. Reports are generated separately for each configuration.
In Xcode, in the test navigator section, you can filter reports by Test Plans. Xcode Test Plan reports can be configured on the Xcode server.
The source code of the demo is available on Github: XCTestPlan
Briefly about where the Xcode Test Plan can be used and how it changes depending on the configuration of the circuit. Here are some examples of using the Xcode Test Plan:
Many other scenarios are also possible where Xcode Test Plans can help extend the testing process.
With Xcode Test Plan, XCTest can be taken to a new level in configuration management and running your tests. Xcode Test Plans allows you to better control the testing platform based on Apple.
At the last WWDC conference, Apple showed new cool features for developers. Xcode 11 also added some amazing features. You can read about them in release notes . One of the most significant tools announced this year is the Test Plan for XCTest and Xcode UI tests. In this article we will take a closer look at how the Test Plan functionality will work with XCTest. If you want to know more details, watch the video session “Testing on Xcode”
')
Xcode Test Plan
Before Xcode 11, the test configuration was part of the Xcode schemes. If the developers wanted to configure different test suites for different conditions, they either created a new circuit or edited an existing one for specific test needs. The test configuration was closely related to Xcode schemes, so I had to create a lot of schemes for different tasks during testing.
New functionality in Xcode 11 allows developers and QA engineers to configure tests according to their needs. Test Plan allows you to determine:
- what tests to run in the assembly;
- how to run these tests (for example, in random or alphabetical order);
- how to manage test artifacts (for example, attachments and screenshots);
- how to use runtime tools as part of testing.
With Xcode Test Plan, you can configure test suites independently of Xcode schemes. This is a significant improvement in testing technology that can take your tests to a new level. Now let's take a look at the Xcode Test plan in action.
Scenario
Suppose that we create a test plan for functional tests with the following requirements:
- Functional tests should include smoke and regression test kits;
- Smoke tests should run in London (UK), and regression tests should run in San Francisco (USA);
- Smoke tests should be run alphabetically, and regression tests should run randomly in order to catch problems between tests.
We will create this test plan for Xcode for various Apple platforms.
Creating a Test Plan in Xcode
Xcode 11 allows us to define these requirements in a Test Plan. Xcode allows you to create a Test Plan from the current schema configuration. When you edit the schema and go to the current test actions, Xcode displays the option to create a Test Plan. You can create a Test Plan with the following settings:
- Blank Test Plan : Creates a blank template and allows you to make your own plan;
- Test Plan from Scheme : Take the schema configuration and create a Test Plan;
- Choose Test Plan : If you already have a Test Plan created, you can select and add it to the circuit.
For review, we will create a Test Plan from the circuit configuration.
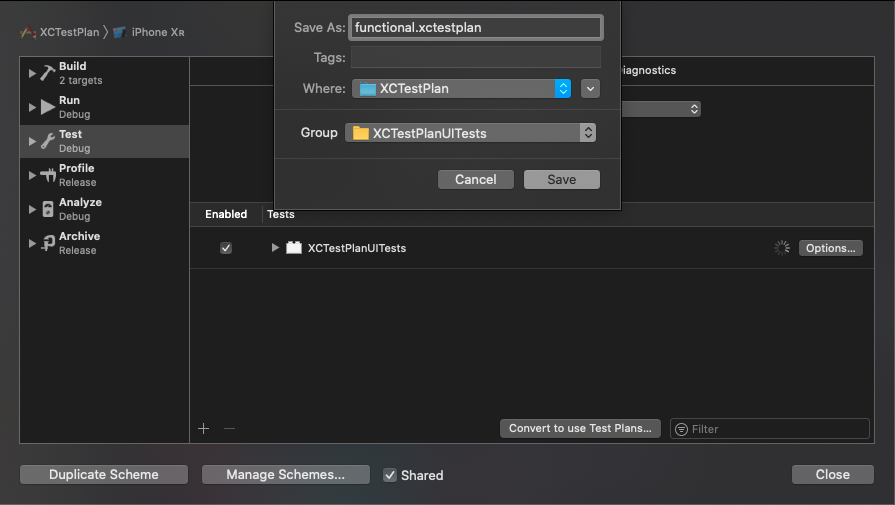
You need to name the Test Plan and specify the correct test target. When the Test Plan is created, it is attached to the schematic. However, the schema can override any Test Plan created after using the flag when invoking the Xcodebuild command. After creating a Test Plan, you can attach it to a specific target. Let's add the current plan to the target with UI tests and assign it a name.
You will find a new file with the extension functional.xctestplan. This is your Test Plan. It can be edited if necessary. You can make a composite Test Plan in the same target, depending on the needs of the tests. In this place we have an available Test Plan for our target with UI tests.
Test plan file
The Test Plan file is a simple json-like configuration file that contains information on how to configure your tests to run independently of any circuit. Here are the various test configuration options available in Test Plan. Basic Test Plan contains three key elements:
- Configurations;
- Test Targets;
- Settings.
Each configuration in the Test Plan contains a set of tests attached to it with different settings. In accordance with the requirements of our test plan, we will need two configurations: one for Smoke tests, the other for regression tests.
Now let's open the file functional.xctestplan in Xcode and rename configuration1 to smoke-uk, then click on the “+” button at the top of the plan and add another configuration to regression-usa.
Now we have two configurations in Test Plan and Test Plan already tied to the target with UI tests. Add some settings to each configuration. When the smoke-uk configuration is selected, we can change the location to London and make other changes to the settings. Similarly, we will change the configuration of regression-usa. This is what a Test Plan will look like to start a regression:
Settings available in Test Plan:
- Arguments - allows you to override the launch arguments and launch environment for tests;
- Localization - allows you to configure tests for different geolocations, locales and languages. This is a very cool setup for testing internationalization and localization;
- UI Testing / Attachment / Test Execution / Code Coverage - specific options for UI testing and test artifacts. You can decide whether to leave the artifacts or delete them as soon as possible. You can also choose the order of running tests and counting code coverage;
- Xcode Code Diagnostic tools — Several Xcode tools for diagnosing code, such as Address Sanitizer or Thread Sanitizer, are available for finding runtime errors. You can also use other options that help you look for memory leaks, etc.
Creating a Test Plan from scratch
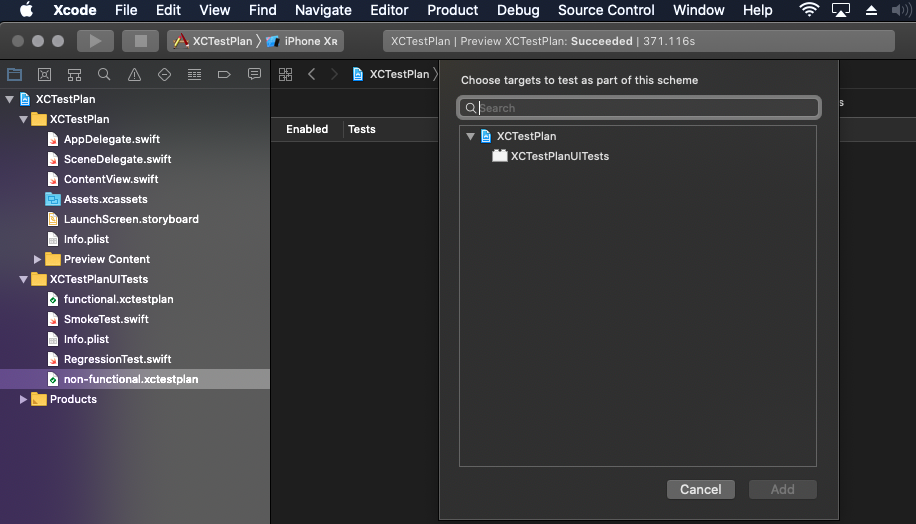
If you do not want to create a Test Plan using the Xcode scheme, then you can always create a new Test Plan via Xcode → Product → Test Plan.
After creating a Test Plan in this way, we attach it to some test target by adding tests to it. In the example below, we created a new Test Plan and added tests to it.
Creating a Test Plan from source
As mentioned earlier, Xcode Test Plan is just a configuration file where we installed all the configurations we defined. In our script, we created functional.xctestplan, and the source code for it looks like this:
{ "configurations" : [ { "name" : "smoke-uk", "options" : { "language" : "en-GB", "locationScenario" : { "identifier" : "London, England", "referenceType" : "built-in" }, "region" : "GB", "testExecutionOrdering" : "lexical" } }, { "name" : "Regression-usa", "options" : { "addressSanitizer" : { "enabled" : true }, "language" : "en", "locationScenario" : { "identifier" : "San Francisco, CA, USA", "referenceType" : "built-in" }, "region" : "US", "testExecutionOrdering" : "random" } } ], "defaultOptions" : { "codeCoverage" : false }, "testTargets" : [ { "target" : { "containerPath" : "container:XCTestPlan.xcodeproj", "identifier" : "9B0E393A22A6EB5400F666A1", "name" : "XCTestPlanUITests" } } ], "version" : 1 } You can create a configuration this way and save it to a file with the .xctestplan extension in Xcode 11.
Launch Test Plan
Now we understand the process of creating a Test Plan file in Xcode. Let's take a look at how to run a Test Plan and get reports in Xcode. You can run tests through Xcode → Product → Test as usual by running attached Test Plans to the schema. In our case, it will launch both test configurations - Smoke and regression.
There are several command line options in Xcodebuild for viewing and running Test Plans. You can run the following command:
$ Xcodebuild -showTestPlans -scheme YOUR_SCEME It will display all the Test Plans for the current scheme. You can also run a separate test:
$ Xcodebuild -project XCTestPlan.Xcodeproj/ -scheme XCTestPlan -destination 'platform=iOS Simulator,OS=13.0,name=iPhone XR' test -testPlan functional This script will run the test using the Test Plan configuration.
Test Plan Reports
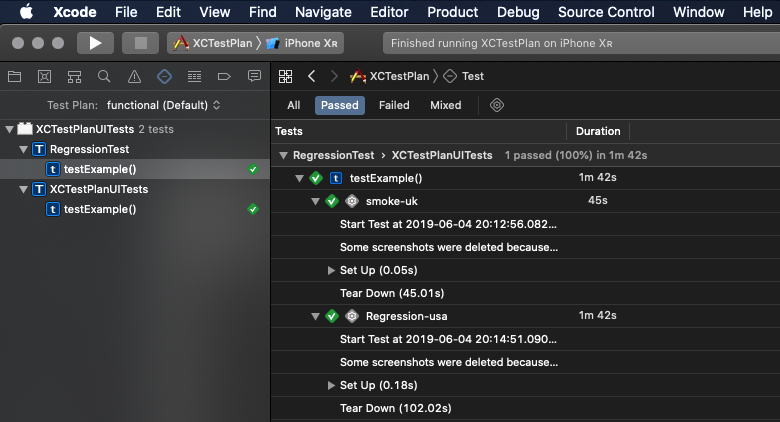
After executing the tests for a specific Test Plan, you can see good reports generated in Xcode. Reports are generated separately for each configuration.
In Xcode, in the test navigator section, you can filter reports by Test Plans. Xcode Test Plan reports can be configured on the Xcode server.
The source code of the demo is available on Github: XCTestPlan
Xcode Test Plan: Application
Briefly about where the Xcode Test Plan can be used and how it changes depending on the configuration of the circuit. Here are some examples of using the Xcode Test Plan:
- Various types of testing, as shown in the demo: Smoke, regression, etc .;
- Testing the internationalization and localization of the application, for example, if you want to test your application for several languages, you can create different configurations;
- Running heavy tests, such as performance tests, load tests, and separating them from functional tests. You can configure work tests along with code diagnostic tools or other non-functional tests.
Many other scenarios are also possible where Xcode Test Plans can help extend the testing process.
Conclusion
With Xcode Test Plan, XCTest can be taken to a new level in configuration management and running your tests. Xcode Test Plans allows you to better control the testing platform based on Apple.
Source: https://habr.com/ru/post/457108/
All Articles