Do-it-yourself autoscaling using AWX, Ansible, haproxy and KROK Clouds

Some time ago we did agentless monitoring and alarms to it. This is similar to CloudWatch in AWS with a compatible API. Now we are working on balancers and automatic scaling. But while we do not provide such a service, we offer our customers to do it themselves, using our monitoring and tags (AWS Resource Tagging API) as a data source as a simple service discovery. How to do this will show in this post.
An example of a minimal infrastructure of a simple web service: DNS -> 2 balancers -> 2 backend. This infrastructure can be considered the minimum required for fault-tolerant work and for maintenance. For this reason, we will not “compress” even more strongly this infrastructure, leaving, for example, only one backend. But I would like to increase the number of backend servers and reduce back to two. This will be our task. All examples are available in the repository .
Basic infrastructure
We will not dwell in detail on setting up the above infrastructure, we will show only how to create it. We prefer to deploy the infrastructure using Terraform. It helps to quickly create everything you need (VPC, Subnet, Security Group, VMs) and repeat this procedure time after time.
Script to raise the basic infrastructure:
variable "ec2_url" {} variable "access_key" {} variable "secret_key" {} variable "region" {} variable "vpc_cidr_block" {} variable "instance_type" {} variable "big_instance_type" {} variable "az" {} variable "ami" {} variable "client_ip" {} variable "material" {} provider "aws" { endpoints { ec2 = "${var.ec2_url}" } skip_credentials_validation = true skip_requesting_account_id = true skip_region_validation = true access_key = "${var.access_key}" secret_key = "${var.secret_key}" region = "${var.region}" } resource "aws_vpc" "vpc" { cidr_block = "${var.vpc_cidr_block}" } resource "aws_subnet" "subnet" { availability_zone = "${var.az}" vpc_id = "${aws_vpc.vpc.id}" cidr_block = "${cidrsubnet(aws_vpc.vpc.cidr_block, 8, 0)}" } resource "aws_security_group" "sg" { name = "auto-scaling" vpc_id = "${aws_vpc.vpc.id}" ingress { from_port = 22 to_port = 22 protocol = "tcp" cidr_blocks = ["0.0.0.0/0"] } ingress { from_port = 80 to_port = 80 protocol = "tcp" cidr_blocks = ["${cidrsubnet(aws_vpc.vpc.cidr_block, 8, 0)}"] } ingress { from_port = 8080 to_port = 8080 protocol = "tcp" cidr_blocks = ["${cidrsubnet(aws_vpc.vpc.cidr_block, 8, 0)}"] } egress { from_port = 0 to_port = 0 protocol = "-1" cidr_blocks = ["0.0.0.0/0"] } } resource "aws_key_pair" "key" { key_name = "auto-scaling-new" public_key = "${var.material}" } resource "aws_instance" "compute" { count = 5 ami = "${var.ami}" instance_type = "${count.index == 0 ? var.big_instance_type : var.instance_type}" key_name = "${aws_key_pair.key.key_name}" subnet_id = "${aws_subnet.subnet.id}" availability_zone = "${var.az}" security_groups = ["${aws_security_group.sg.id}"] } resource "aws_eip" "pub_ip" { instance = "${aws_instance.compute.0.id}" vpc = true } output "awx" { value = "${aws_eip.pub_ip.public_ip}" } output "haproxy_id" { value = ["${slice(aws_instance.compute.*.id, 1, 3)}"] } output "awx_id" { value = "${aws_instance.compute.0.id}" } output "backend_id" { value = ["${slice(aws_instance.compute.*.id, 3, 5)}"] } All entities described in this configuration seem to be understandable to the ordinary user of modern clouds. We place the variables specific to our cloud and for a specific task into a separate file - terraform.tfvars:
ec2_url = "https://api.cloud.croc.ru" access_key = "project:user@customer" secret_key = "secret-key" region = "croc" az = "ru-msk-vol51" instance_type = "m1.2small" big_instance_type = "m1.large" vpc_cidr_block = "10.10.0.0/16" ami = "cmi-3F5B011E" Launch Terraform:
yes yes | terraform apply -var client_ip="$(curl -s ipinfo.io/ip)/32" -var material="$(cat <ssh_publick_key_path>)" Monitoring setup
The VMs launched above are automatically monitored by our cloud. It is the data of this monitoring that will be the source of information for future auto-scaling. Relying on certain metrics we can increase or decrease capacity.
Monitoring in our cloud allows you to configure alarms on various conditions for different metrics. It is very convenient. We do not need to analyze the metrics for some intervals and make a decision - this will make the monitoring of the cloud. In this example, we will use alarms on CPU metrics, but in our monitoring you can also configure them for such metrics as network utilization (speed / pps), disk utilization (speed / iops).
export CLOUDWATCH_URL=https://monitoring.cloud.croc.ru for instance_id in <backend_instance_ids>; do \ aws --profile <aws_cli_profile> --endpoint-url $CLOUDWATCH_URL \ cloudwatch put-metric-alarm \ --alarm-name "scaling-low_$instance_id" \ --dimensions Name=InstanceId,Value="$instance_id" \ --namespace "AWS/EC2" --metric-name CPUUtilization --statistic Average \ --period 60 --evaluation-periods 3 --threshold 15 --comparison-operator LessThanOrEqualToThreshold; done for instance_id in <backend_instance_ids>; do \ aws --profile <aws_cli_profile> --endpoint-url $CLOUDWATCH_URL \ cloudwatch put-metric-alarm\ --alarm-name "scaling-high_$instance_id" \ --dimensions Name=InstanceId,Value="$instance_id" \ --namespace "AWS/EC2" --metric-name CPUUtilization --statistic Average\ --period 60 --evaluation-periods 3 --threshold 80 --comparison-operator GreaterThanOrEqualToThreshold; done Description of some parameters that may not be clear:
--profile is an aws-cli settings profile, described in ~ / .aws / config. Typically, different profiles are given different access keys.
--dimensions - the parameter determines for which resource an alarm will be created, in the example above, for an instance with an identifier from the variable $ instance_id.
--namespace - namespace from which the monitoring metric will be selected.
--metric-name - the name of the monitoring metric.
--statistic — name of the method of aggregation of metric values
--period - time interval between events of monitoring values collection.
--evaluation-periods - the number of intervals required to trigger an alarm.
--threshold - threshold metric for assessing the state of the alarm.
--comparison-operator - a method that is used to estimate the value of a metric relative to a threshold value.
In the example above, two alarms are created for each backend instance. Scaling-low- <instance-id> will switch to the Alarm state when the CPU is loaded less than 15% for 3 minutes. Scaling-high- <instance-id> will switch to the Alarm state when the CPU is loaded for more than 80% for 3 minutes.
Tag customization
After setting up monitoring, we face the following task - the detection of instances and their names (service discovery). We need to somehow understand how much backend instances we have now running, and also need to know their names. In the world outside the cloud, for example, the consul and consul template would be well suited for generating a balancer config. But in our cloud there are tags. Tags will help us categorize resources. By requesting information on a specific tag (describe-tags), we can understand how many instances we have in the pool now and what id they have. By default, the unique id of the instance is used as the hostname. Thanks to the internal DNS that runs inside the VPC, these id / hostname are resolved to the internal ip instances.
Set tags for backend instances and balancers:
export EC2_URL="https://api.cloud.croc.ru" aws --profile <aws_cli_profile> --endpoint-url $EC2_URL \ ec2 create-tags --resources "<awx_instance_id>" \ --tags Key=env,Value=auto-scaling Key=role,Value=awx for i in <backend_instance_ids>; do \ aws --profile <aws_cli_profile> --endpoint-url $EC2_URL \ ec2 create-tags --resources "$i" \ --tags Key=env,Value=auto-scaling Key=role,Value=backend ; done; for i in <haproxy_instance_ids>; do \ aws --profile <aws_cli_profile> --endpoint-url $EC2_URL \ ec2 create-tags --resources "$i" \ --tags Key=env,Value=auto-scaling Key=role,Value=haproxy; done; Where:
--resources - list of resource identifiers that will be tagged.
--tags - a list of key-value pairs.
An example describe-tags is available in the CRIC Cloud documentation .
Autoscaling setting
Now, when the cloud is monitoring, and we know how to work with tags, we can only poll the status of configured alarms for their triggering. Here we need an entity that will be engaged in periodic polling of monitoring and launching tasks for creating / deleting instances. Here you can use various automation tools. We will use AWX. AWX is an open-source version of commercial Ansible Tower , a product for centralized management of Ansible infrastructure. The main task is to periodically run our ansible playbook.
An example of the AWX deployment is available on the wiki page in the official repository. AWX configuration is also described in the Ansible Tower documentation. In order for the AWX service to start launching a custom playbook, you need to configure it by creating the following entities:
- redentials of three types:
- AWS credentials - to authorize operations related to the CRIC Cloud.
- Machine credentials - ssh keys for access to newly created instances.
- SCM credentials - for authorization in the version control system. - Project - an entity that will tilt the git repository from the playbook.
- Scripts - script dynamic inventory for ansible.
- Inventory is an entity that will invoke the dynamic inventory script before launching the playbook.
- Template - configuration of a specific playbook call, consists of a set of Credentials, Inventory and playbook from Project.
- Workflow - a sequence of playbooks calls.
The process of autoscaling can be divided into two parts:
- scale_up - create an instance when at least one high alarm is triggered;
- scale_down is the instance termination if a low alarm worked for it.
Within the scale_up part you will need:
- interrogate the cloud monitoring service about the presence of high alarms in the "Alarm" state;
- stop scale_up ahead of time if all high alarms are in the "OK" state;
- create a new instance with the necessary attributes (tag, subnet, security_group, etc.);
- create high and low alarms for the running instance;
- configure our application inside a new instance (in our case it will be just nginx with a test page);
- update the haproxy configuration, make a reload so that new requests start to go to the new instance.
--- - name: get alarm statuses describe_alarms: region: "croc" alarm_name_prefix: "scaling-high" alarm_state: "alarm" register: describe_alarms_query - name: stop if no alarms fired fail: msg: zero high alarms in alarm state when: describe_alarms_query.meta | length == 0 - name: create instance ec2: region: "croc" wait: yes state: present count: 1 key_name: "{{ hostvars[groups['tag_role_backend'][0]].ec2_key_name }}" instance_type: "{{ hostvars[groups['tag_role_backend'][0]].ec2_instance_type }}" image: "{{ hostvars[groups['tag_role_backend'][0]].ec2_image_id }}" group_id: "{{ hostvars[groups['tag_role_backend'][0]].ec2_security_group_ids }}" vpc_subnet_id: "{{ hostvars[groups['tag_role_backend'][0]].ec2_subnet_id }}" user_data: | #!/bin/sh sudo yum install epel-release -y sudo yum install nginx -y cat <<EOF > /etc/nginx/conf.d/dummy.conf server { listen 8080; location / { return 200 '{"message": "$HOSTNAME is up"}'; } } EOF sudo systemctl restart nginx loop: "{{ hostvars[groups['tag_role_backend'][0]] }}" register: new - name: create tag entry ec2_tag: ec2_url: "https://api.cloud.croc.ru" region: croc state: present resource: "{{ item.id }}" tags: role: backend loop: "{{ new.instances }}" - name: create low alarms ec2_metric_alarm: state: present region: croc name: "scaling-low_{ item.id }}" metric: "CPUUtilization" namespace: "AWS/EC2" statistic: Average comparison: "<=" threshold: 15 period: 300 evaluation_periods: 3 unit: "Percent" dimensions: {'InstanceId':"{{ item.id }}"} loop: "{{ new.instances }}" - name: create high alarms ec2_metric_alarm: state: present region: croc name: "scaling-high_{{ item.id }}" metric: "CPUUtilization" namespace: "AWS/EC2" statistic: Average comparison: ">=" threshold: 80.0 period: 300 evaluation_periods: 3 unit: "Percent" dimensions: {'InstanceId':"{{ item.id }}"} loop: "{{ new.instances }}" In create-instance.yaml, an instance is created with the correct parameters, this instance is tagged and the necessary alarms are created. Also through user-data the script of installation and the nginx settings is transferred. User-data is processed by the cloud-init service, which allows for flexible customization of the instance during startup, without resorting to other automation tools.
The update-lb.yaml re-creates the /etc/haproxy/haproxy.cfg file on the haproxy instance and reload the haproxy service:
- name: update haproxy configs template: src: haproxy.cfg.j2 dest: /etc/haproxy/haproxy.cfg - name: add new backend host to haproxy systemd: name: haproxy state: restarted Where haproxy.cfg.j2 is the haproxy service configuration file template:
# {{ ansible_managed }} global log /dev/log local0 log /dev/log local1 notice chroot /var/lib/haproxy stats timeout 30s user haproxy group haproxy daemon defaults log global mode http option httplog option dontlognull timeout connect 5000 timeout client 50000 timeout server 50000 frontend loadbalancing bind *:80 mode http default_backend backendnodes backend backendnodes balance roundrobin option httpchk HEAD / {% for host in groups['tag_role_backend'] %} server {{hostvars[host]['ec2_id']}} {{hostvars[host]['ec2_private_ip_address']}}:8080 check {% endfor %} Since the option httpchk option is defined in the backend section of the haproxy config, the haproxy service will self-poll the backend instances and balance the traffic only between those who have passed the health check.
In the scale_down part you need:
- check state of low alarm;
- to finish the play ahead of schedule if there are no low alarms in the "Alarm" state;
- To terminate all instances that have a low alarm in the "Alarm" state;
- prohibit the termination of the last pair of instances, even if their alarms are in the "Alarm" state;
- remove load balancer from instances that we have removed.
- name: look for alarm status describe_alarms: region: "croc" alarm_name_prefix: "scaling-low" alarm_state: "alarm" register: describe_alarms_query - name: count alarmed instances set_fact: alarmed_count: "{{ describe_alarms_query.meta | length }}" alarmed_ids: "{{ describe_alarms_query.meta }}" - name: stop if no alarms fail: msg: no alarms fired when: alarmed_count | int == 0 - name: count all described instances set_fact: all_count: "{{ groups['tag_role_backend'] | length }}" - name: fail if last two instance remaining fail: msg: cant destroy last two instances when: all_count | int == 2 - name: destroy tags for marked instances ec2_tag: ec2_url: "https://api.cloud.croc.ru" region: croc resource: "{{ alarmed_ids[0].split('_')[1] }}" state: absent tags: role: backend - name: destroy instances ec2: region: croc state: absent instance_ids: "{{ alarmed_ids[0].split('_')[1] }}" - name: destroy low alarms ec2_metric_alarm: state: absent region: croc name: "scaling-low_{{ alarmed_ids[0].split('_')[1] }}" - name: destroy high alarms ec2_metric_alarm: state: absent region: croc name: "scaling-high_{{ alarmed_ids[0].split('_')[1] }}" In destroy-instance.yaml, the alarm is deleted, the instance and its tag are terminated, and the conditions of the last instances are prohibited from being terminated.
We explicitly remove tags after deleting instances due to the fact that after an instance is deleted, tags associated with it are removed pending and are available for another minute.
Awx.
Setting up tasks, templates
The following tasks set will create the necessary entities in AWX:
--- - name: Create tower organization tower_organization: name: "scaling-org" description: "scaling-org organization" state: present - name: Add tower cloud credential tower_credential: name: cloud description: croc cloud api creds organization: scaling-org kind: aws state: present username: "{{ croc_user }}" password: "{{ croc_password }}" - name: Add tower github credential tower_credential: name: ghe organization: scaling-org kind: scm state: present username: "{{ ghe_user }}" password: "{{ ghe_password }}" - name: Add tower ssh credential tower_credential: name: ssh description: ssh creds organization: scaling-org kind: ssh state: present username: "ec2-user" ssh_key_data: "{{ lookup('file', 'private.key') }}" - name: Add tower project tower_project: name: "auto-scaling" scm_type: git scm_credential: ghe scm_url: <repo-name> organization: "scaling-org" scm_branch: master state: present - name: create inventory tower_inventory: name: dynamic-inventory organization: "scaling-org" state: present - name: copy inventory script to awx copy: src: "{{ role_path }}/files/ec2.py" dest: /root/ec2.py - name: create inventory source shell: | export SCRIPT=$(tower-cli inventory_script create -n "ec2-script" --organization "scaling-org" --script @/root/ec2.py | grep ec2 | awk '{print $1}') tower-cli inventory_source create --update-on-launch True --credential cloud --source custom --inventory dynamic-inventory -n "ec2-source" --source-script $SCRIPT --source-vars '{"EC2_URL":"api.cloud.croc.ru","AWS_REGION": "croc"}' --overwrite True - name: Create create-instance template tower_job_template: name: "create-instance" job_type: "run" inventory: "dynamic-inventory" credential: "cloud" project: "auto-scaling" playbook: "create-instance.yaml" state: "present" register: create_instance - name: Create update-lb template tower_job_template: name: "update-lb" job_type: "run" inventory: "dynamic-inventory" credential: "ssh" project: "auto-scaling" playbook: "update-lb.yaml" credential: "ssh" state: "present" register: update_lb - name: Create destroy-instance template tower_job_template: name: "destroy-instance" job_type: "run" inventory: "dynamic-inventory" project: "auto-scaling" credential: "cloud" playbook: "destroy-instance.yaml" credential: "ssh" state: "present" register: destroy_instance - name: create workflow tower_workflow_template: name: auto_scaling organization: scaling-org schema: "{{ lookup('template', 'schema.j2')}}" - name: set scheduling shell: | tower-cli schedule create -n "3min" --workflow "auto_scaling" --rrule "DTSTART:$(date +%Y%m%dT%H%M%SZ) RRULE:FREQ=MINUTELY;INTERVAL=3" The previous snippet will create a template for each of the used ansible playbooks. Each template configures the launch of a playbook with a set of defined credentials and inventory.
To build a pipe for calls to playbooks will allow the workflow template. The autoflow scans workflow configuration is shown below:
- failure_nodes: - id: 101 job_template: {{ destroy_instance.id }} success_nodes: - id: 102 job_template: {{ update_lb.id }} id: 103 job_template: {{ create_instance.id }} success_nodes: - id: 104 job_template: {{ update_lb.id }} The previous template presents the workflow scheme, i.e. template execution sequence. In this workflow, each next step (success_nodes) will be executed only if the previous one is successful. Graphic representation of the workflow presented in the picture: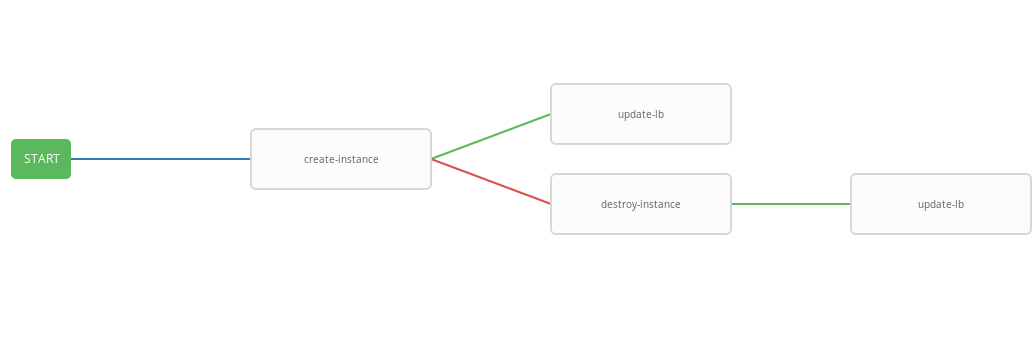
As a result, a generic workflow was created that performs a create-instace playbook and, depending on the execution status, destroy-instance and / or update-lb playbook. Combined workflow is convenient to run on a predetermined schedule. The autoscaling process will run every three minutes, starting and terminating the instances depending on the state of the alarms.
Testing work
Now check the work of the configured system. First, install the wrk-utility for http benchmarking.
ssh -A ec2-user@<aws_instance_ip> sudo su - cd /opt yum groupinstall 'Development Tools' yum install -y openssl-devel git git clone https://github.com/wg/wrk.git wrk cd wrk make install wrk /usr/local/bin exit We use cloud monitoring to monitor the use of instance resources during load:
function CPUUtilizationMonitoring() { local AWS_CLI_PROFILE="<aws_cli_profile>" local CLOUDWATCH_URL="https://monitoring.cloud.croc.ru" local API_URL="https://api.cloud.croc.ru" local STATS="" local ALARM_STATUS="" local IDS=$(aws --profile $AWS_CLI_PROFILE --endpoint-url $API_URL ec2 describe-instances --filter Name=tag:role,Values=backend | grep -i instanceid | grep -oE 'i-[a-zA-Z0-9]*' | tr '\n' ' ') for instance_id in $IDS; do STATS="$STATS$(aws --profile $AWS_CLI_PROFILE --endpoint-url $CLOUDWATCH_URL cloudwatch get-metric-statistics --dimensions Name=InstanceId,Value=$instance_id --namespace "AWS/EC2" --metric CPUUtilization --end-time $(date --iso-8601=minutes) --start-time $(date -d "$(date --iso-8601=minutes) - 1 min" --iso-8601=minutes) --period 60 --statistics Average | grep -i average)"; ALARMS_STATUS="$ALARMS_STATUS$(aws --profile $AWS_CLI_PROFILE --endpoint-url $CLOUDWATCH_URL cloudwatch describe-alarms --alarm-names scaling-high-$instance_id | grep -i statevalue)" done echo $STATS | column -s ',' -o '|' -N $(echo $IDS | tr ' ' ',') -t echo $ALARMS_STATUS | column -s ',' -o '|' -N $(echo $IDS | tr ' ' ',') -t } export -f CPUUtilizationMonitoring watch -n 60 bash -c CPUUtilizationMonitoring The previous script every 60 seconds collects information about the average value of the CPUUtilization metric for the last minute and polls the alarm status for the backend instances.
Now you can run wrk and look at resource utilization of backend instances under load:
ssh -A ec2-user@<awx_instance_ip> wrk -t12 -c100 -d500s http://<haproxy_instance_id> exit The last command will start the benchmark for 500 seconds, using 12 threads and opening 100 http connections.
Over the course of time, the monitoring script should show that during the benchmarking period, the statistics value of the CPUUtilization metric increases until it reaches 300%. 180 seconds after the start of the benchmark, the StateValue flag should switch to the Alarm state. Once every two minutes, autoscaling workflow starts. By default, parallel execution of the same workflow is prohibited. That is, every two minutes the task to execute the workflow will be added to the queue and will be launched only after the previous one is completed. Thus, while wrk is running, there will be a steady increase in resources until the high alarms of all backend instances go into the OK state. Upon completion, wrk scale_down workflow terminates all backend instances except two.
An example of the output of the monitoring script:
# start test i-43477460 |i-AC5D9EE0 "Average": 0.0 | "Average": 0.0 i-43477460 |i-AC5D9EE0 "StateValue": "ok"| "StateValue": "ok" # start http load i-43477460 |i-AC5D9EE0 "Average": 267.0 | "Average": 111.0 i-43477460 |i-AC5D9EE0 "StateValue": "ok"| "StateValue": "ok" # alarm state i-43477460 |i-AC5D9EE0 "Average": 267.0 | "Average": 282.0 i-43477460 |i-AC5D9EE0 "StateValue": "alarm"| "StateValue": "alarm" # two new instances created i-1E399860 |i-F307FB00 |i-43477460 |i-AC5D9EE0 "Average": 185.0 | "Average": 215.0 | "Average": 245.0 | i-1E399860 |i-F307FB00 |i-43477460 |i-AC5D9EE0 "StateValue": "insufficient_data"| "StateValue": "insufficient_data"| "StateValue": "alarm"| "StateValue": "alarm" # only two instances left after load has been stopped i-935BAB40 |i-AC5D9EE0 "Average": 0.0 | "Average": 0.0 i-935BAB40 |i-AC5D9EE0 "StateValue": "ok"| "StateValue": "ok" Also in the CROC Cloud, it is possible to view the graphs used in the monitoring post on the instance page on the corresponding tab.
Alarm view is available on the monitoring page on the alarm tab.
Conclusion
Autospeaking is quite a popular scenario, but, unfortunately, it is not in our cloud yet (but only so far). However, we have quite a lot of powerful API to do similar and many other things, using popular, one can say almost standard, tools such as: Terraform, ansible, aws-cli and others.
')
Source: https://habr.com/ru/post/456826/
All Articles