iOS Storyboards: analysis of the pros and cons, best practices

Apple has created Storyboards so that developers can visualize the screens of iOS applications and the connections between them. Not everyone liked this tool, and for good reason. I have met many articles criticizing Storyboards, but I have not found a detailed and unbiased analysis of all the pros and cons of the best practices. In the end, I decided to write such an article myself.
I will try to make out in detail the disadvantages and advantages of using Storyboards. After weighing them, you can make a sensible decision whether they are needed in the project or not. This decision does not have to be radical. If in some situations Storyboards create problems, in others - their use is justified: it helps to effectively solve the tasks and write simple, easily supported code.
Let's start with the shortcomings and analyze whether all of them are still relevant.
')
disadvantages
1. In Storyboards it’s hard to manage conflicts when merging changes
Storyboard is an XML file. It is worse to read than the code, so it is more difficult to resolve conflicts in it. But this complexity also depends on how we work with the Storyboard. You can significantly simplify your task by following the rules below:
- Do not put the entire UI in a single Storyboard, divide it into several smaller ones. This will allow to distribute the work on Storyboards among developers without the risk of conflicts, and in the case of their inevitability they will simplify the task of resolving them.
- If you need to use the same View in several places - select it into a separate subclass with its own Xib file.
- Make commits more often, as it is much easier to work with changes coming in small chunks.
Using multiple Storyboards instead of one makes it impossible for us to watch the entire application map in one file. But often this is not necessary - just a specific part, on which we are working at the moment.
2. Storyboards interfere with code reuse
If we are talking about using only Storyboards in the project without Xibs, then problems will surely arise. However, Xibs, in my opinion, are necessary elements when working with Storyboards. Thanks to them, you can easily create reusable Views, with which it is also convenient to work in code.
To begin with, let's create a base class
XibView , which is responsible for drawing a UIView created in Xib in the Storyboard: @IBDesignable class XibView: UIView { var contentView: UIView? } XibView will load the UIView from Xib into the contentView and add it as its own subview. We do this in the setup() method: private func setup() { guard let view = loadViewFromNib() else { return } view.frame = bounds view.autoresizingMask = [.flexibleWidth, .flexibleHeight] addSubview(view) contentView = view } The
loadViewFromNib() method looks like this: private func loadViewFromNib() -> UIView? { let nibName = String(describing: type(of: self)) let nib = UINib(nibName: nibName, bundle: Bundle(for: XibView.self)) return nib.instantiate(withOwner: self, options: nil).first as? UIView } The
setup() method must be called in initializers: override init(frame: CGRect) { super.init(frame: frame) setup() } required init?(coder aDecoder: NSCoder) { super.init(coder: aDecoder) setup() } The
XibView class XibView ready. Reusable Views whose appearance is drawn in the Xib file will inherit from XibView : final class RedView: XibView { } 
If you now add a new
UIView to the Storyboard and set its class in RedView , then everything will be successfully displayed: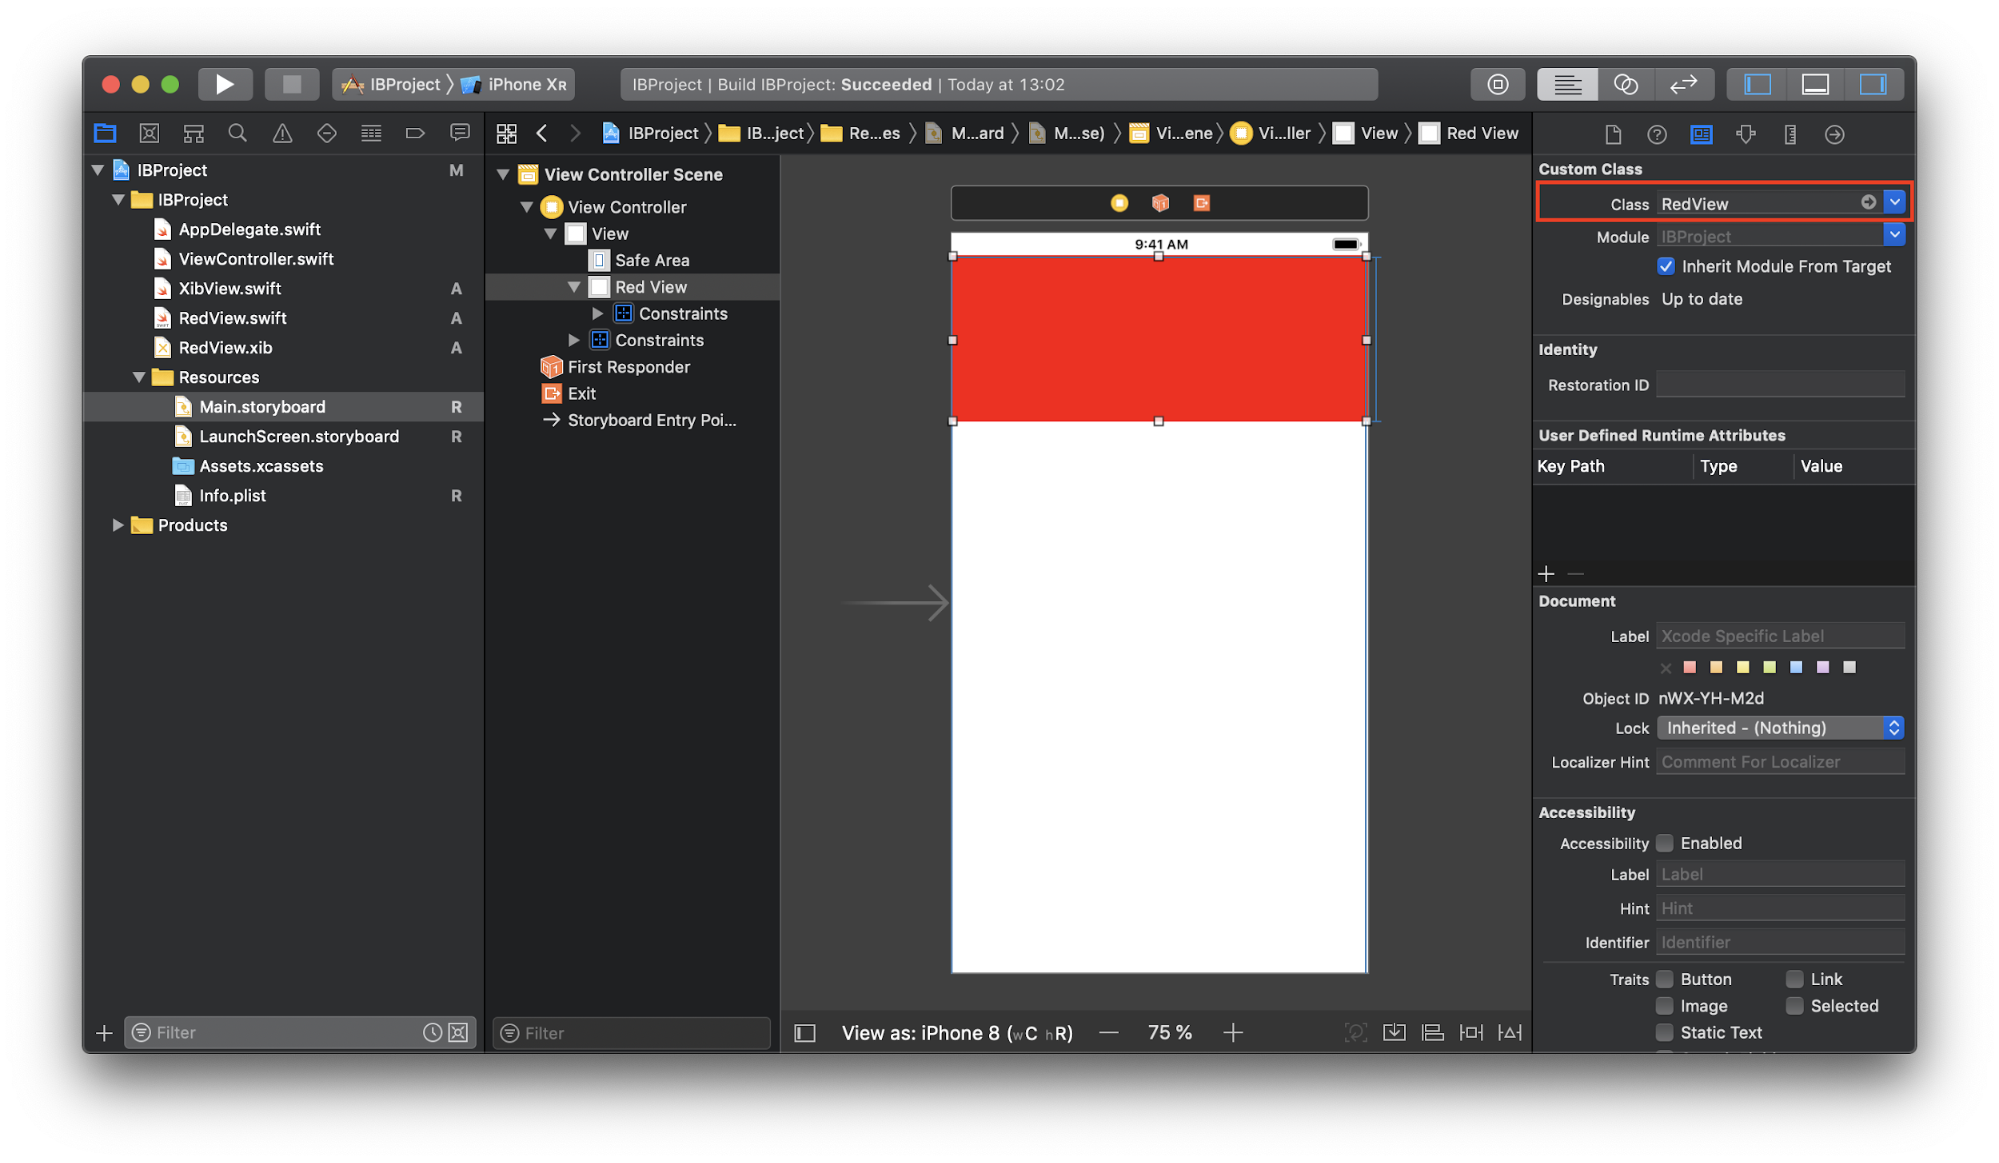
Creating a
RedView instance in code happens in the usual way: let redView = RedView() Another useful detail that not everyone can know about is the ability to add colors to the .xcassets catalog. This allows you to change them globally in all Storyboards and Xibs where they are used.
To add a color, click "+" at the bottom left and select "New Color Set":
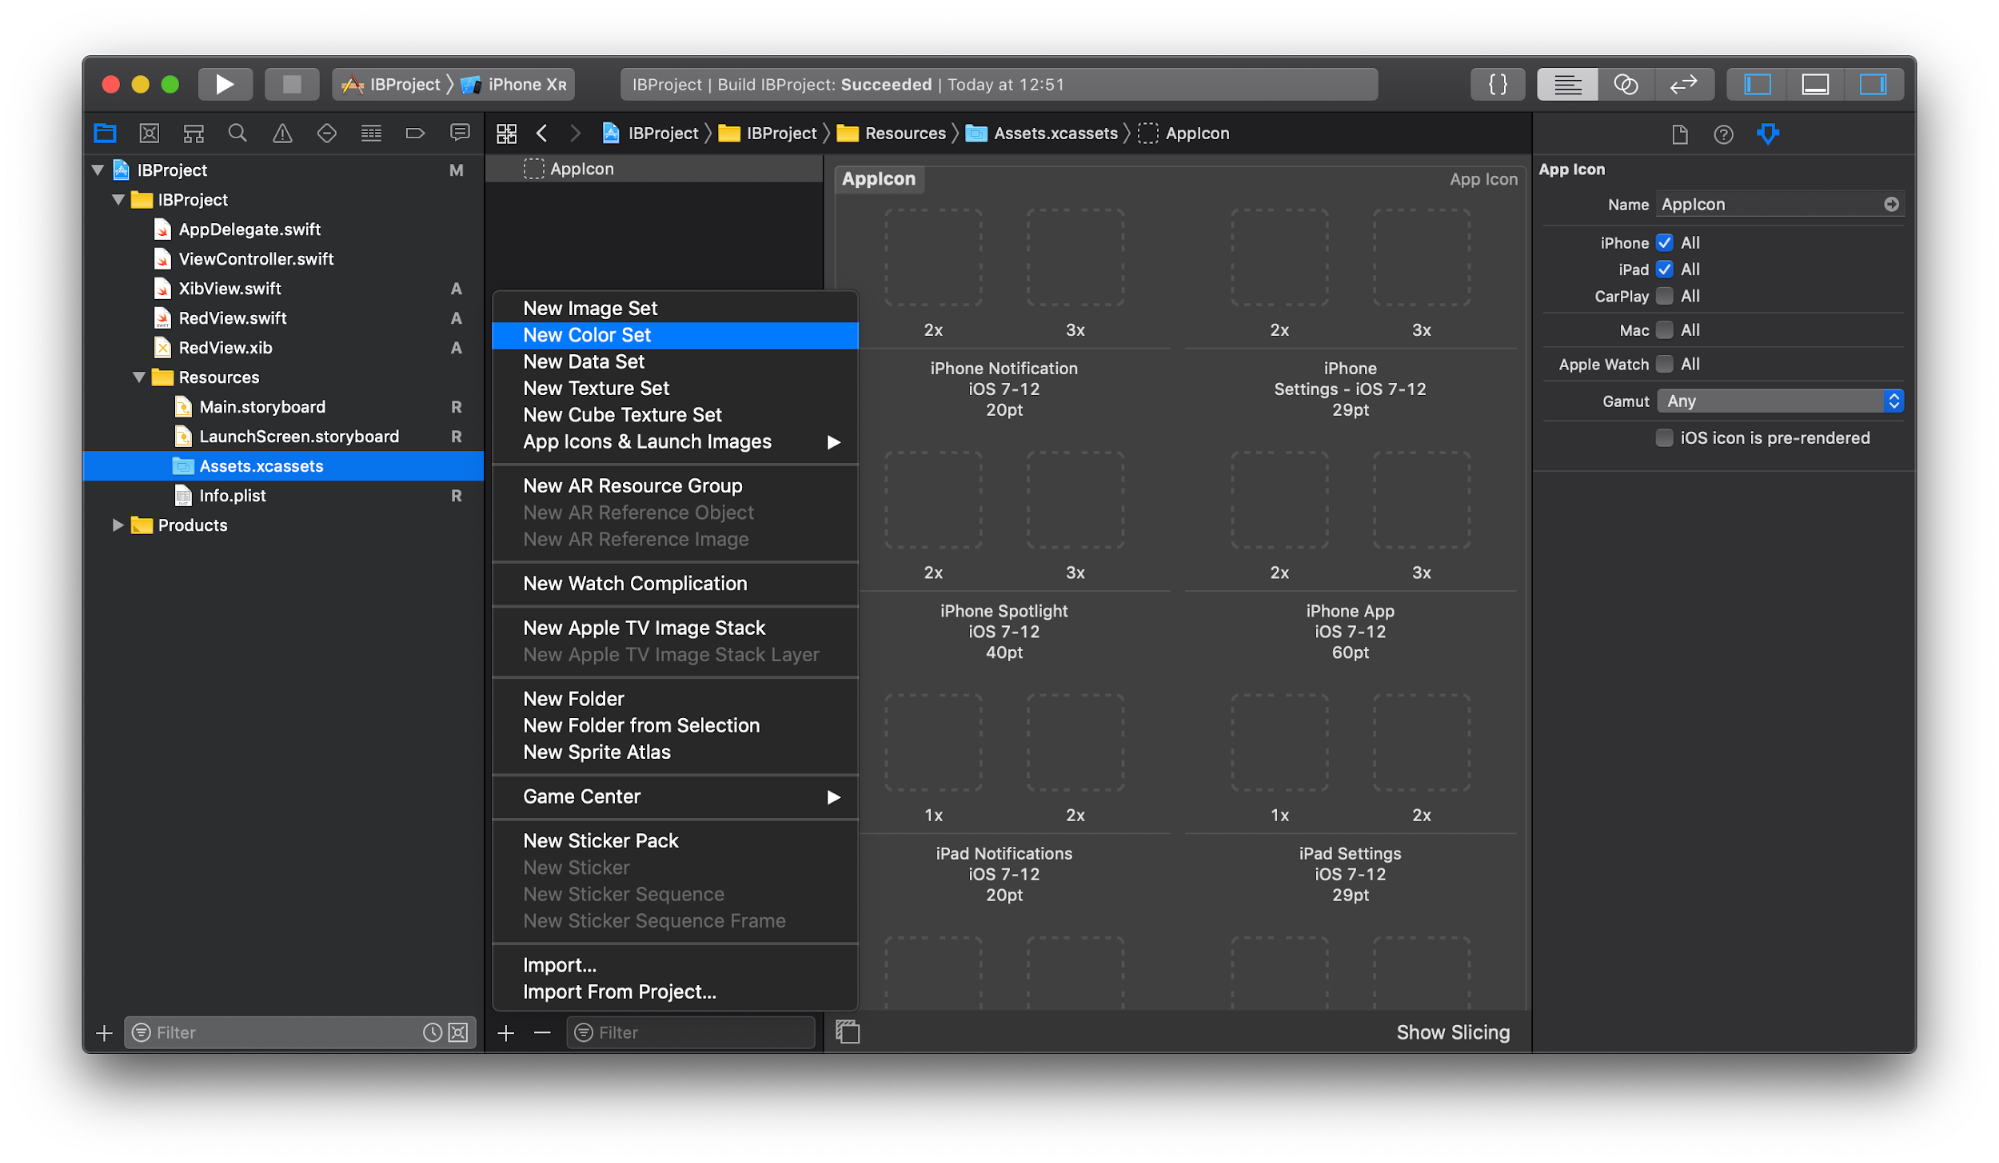
Specify the desired name and color:
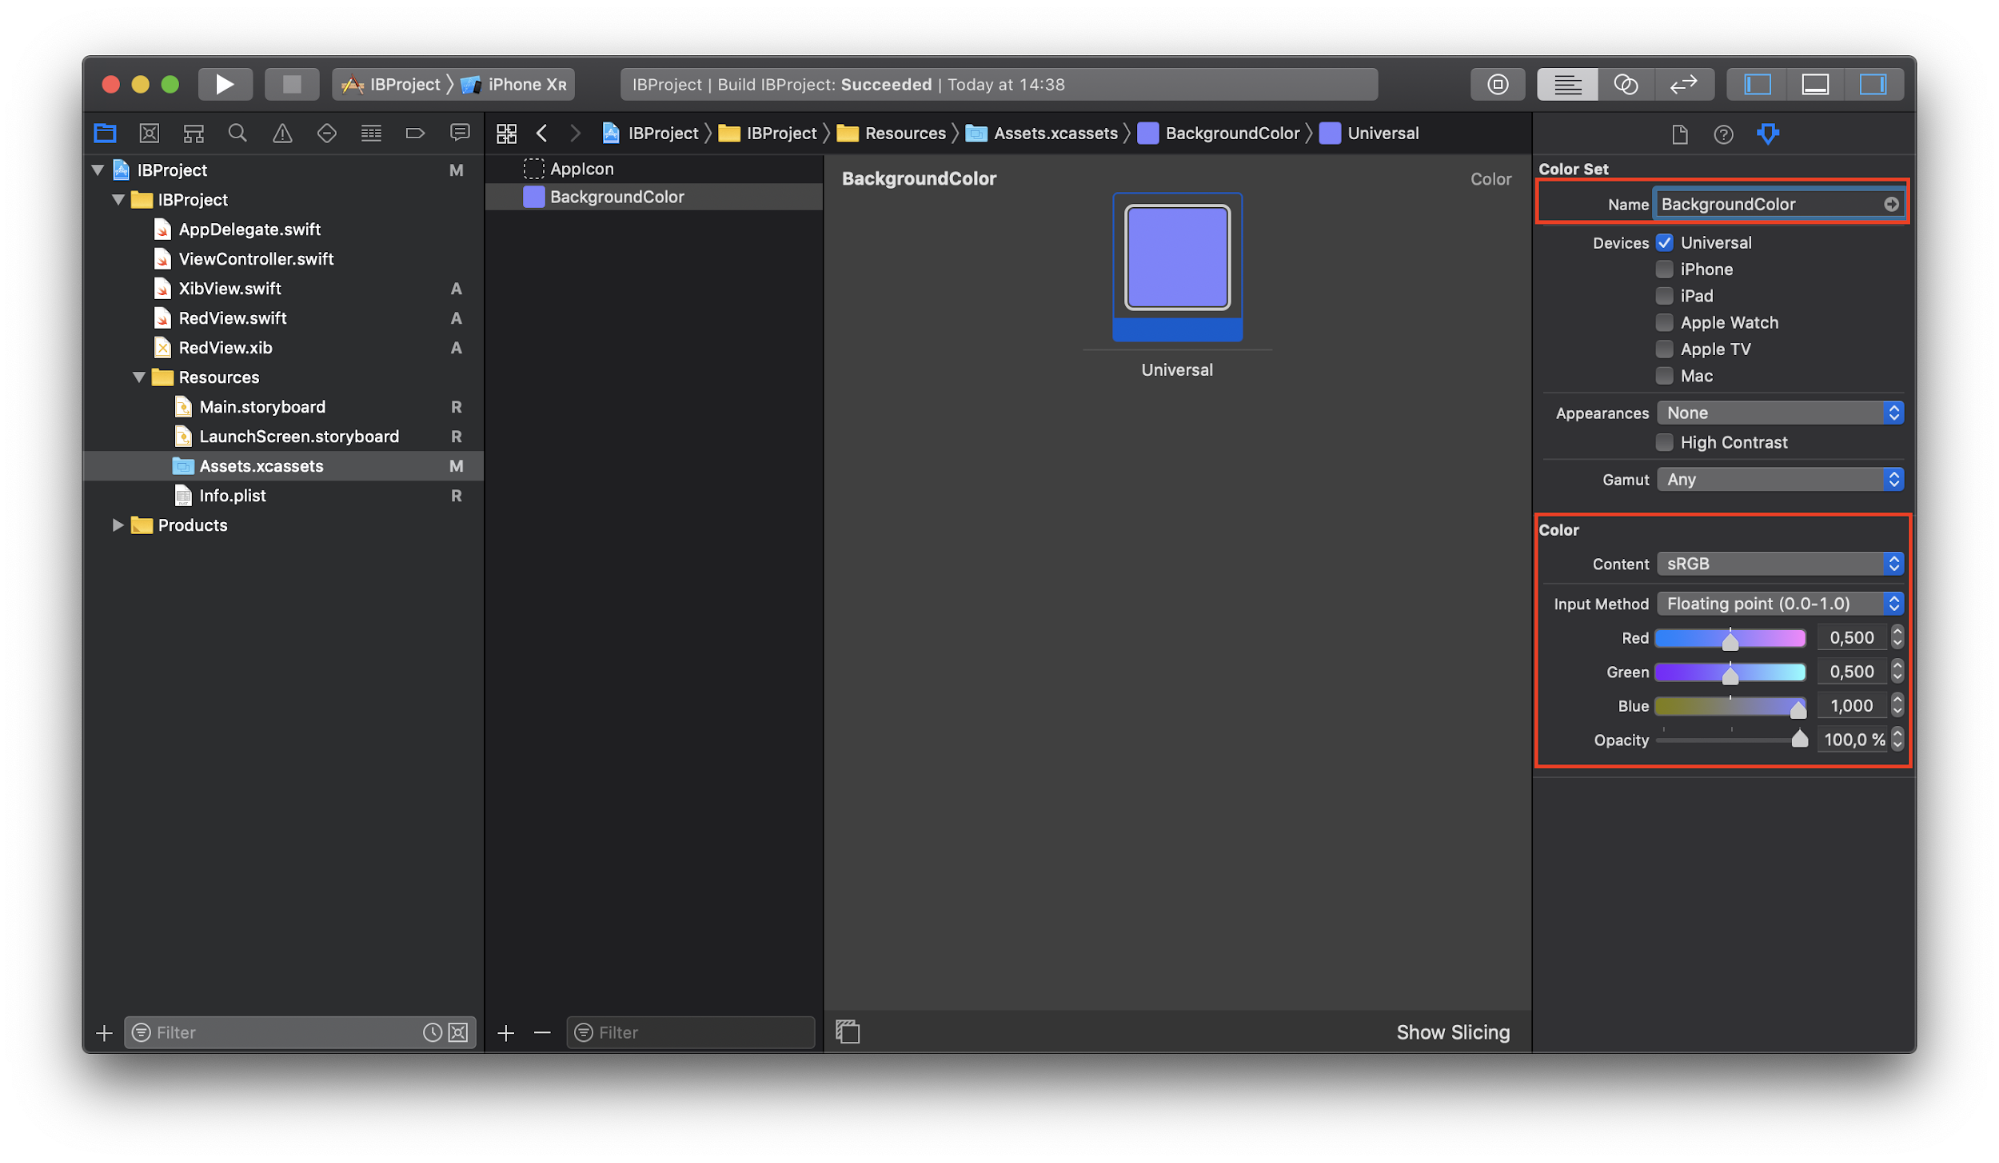
The color created will appear in the “Named Colors” section:
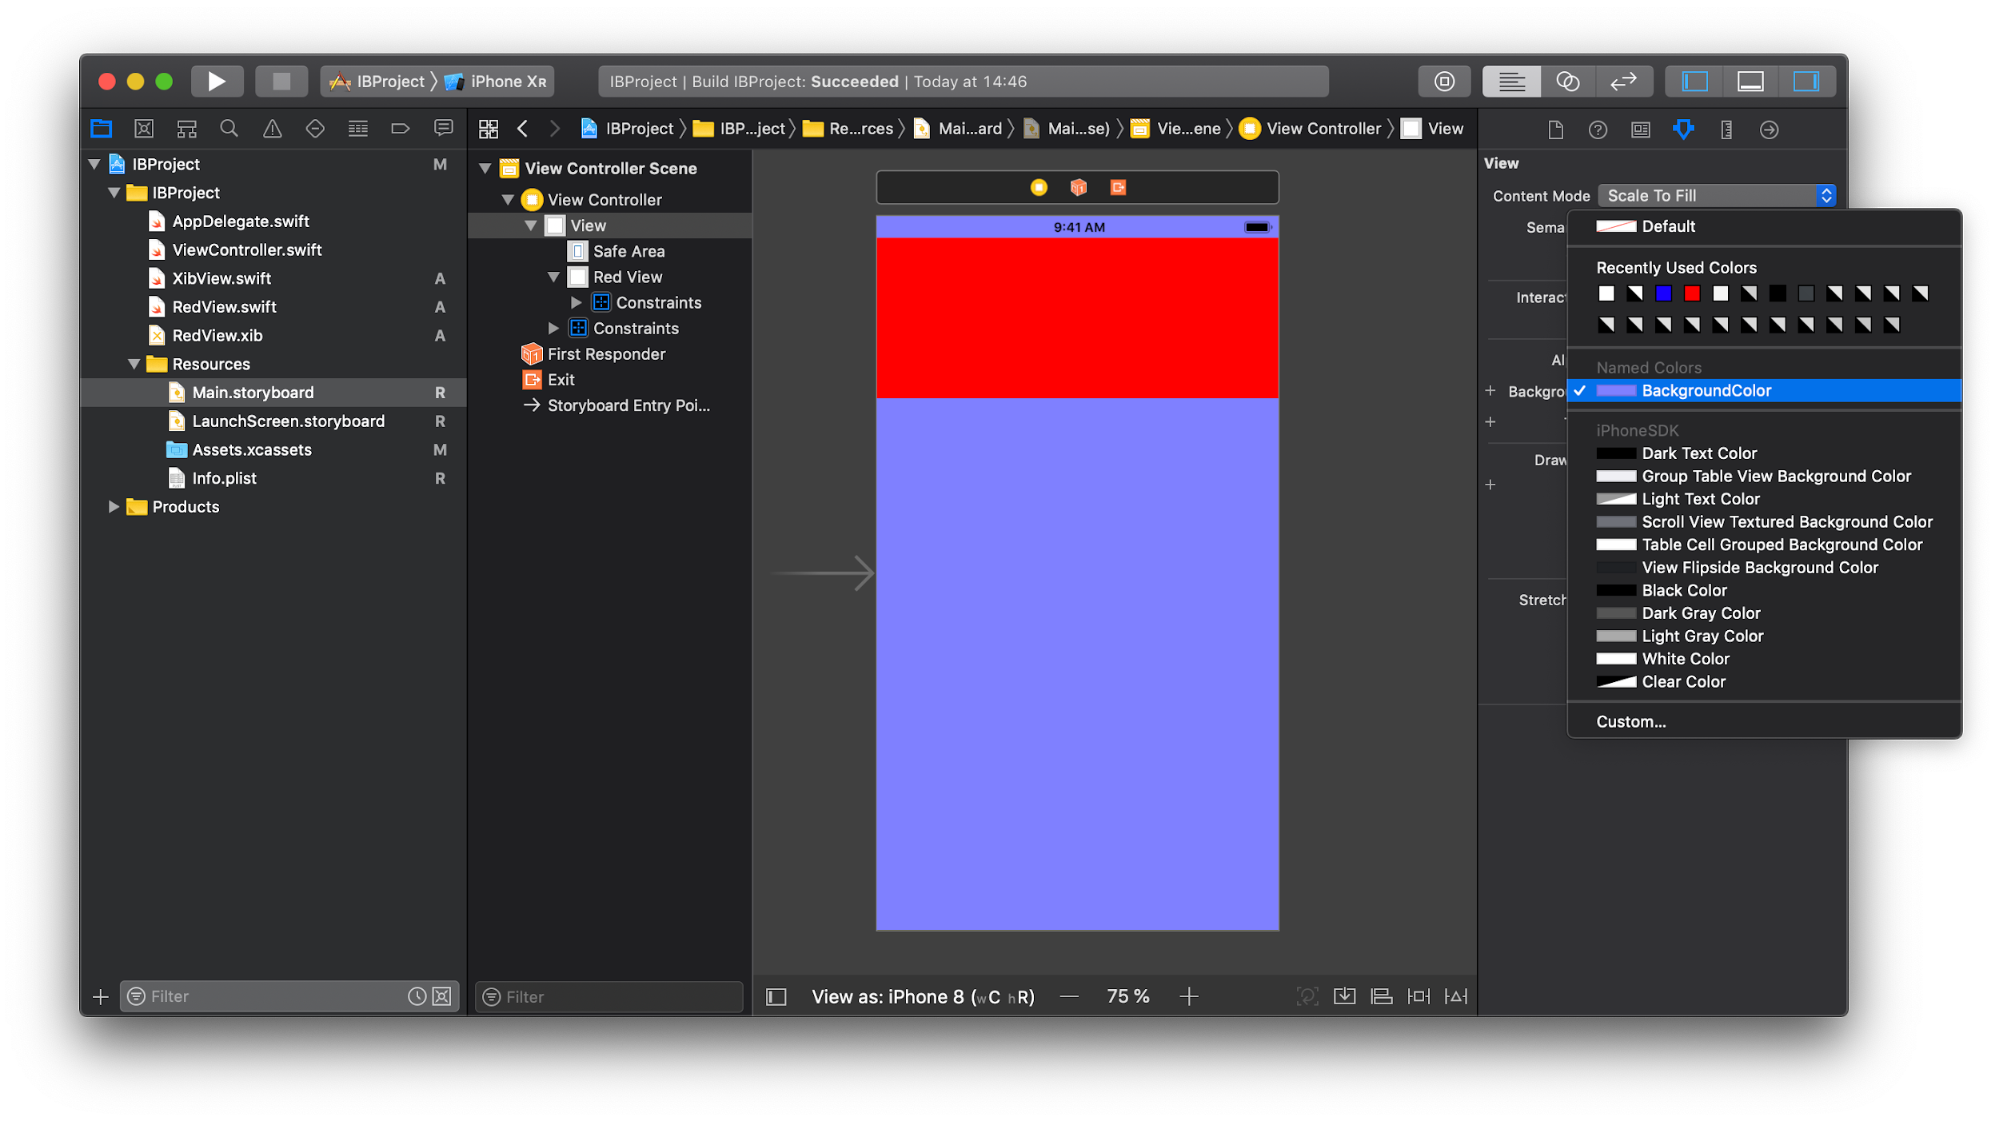
In addition, it can be obtained in the code:
innerView.backgroundColor = UIColor(named: "BackgroundColor") 3. You cannot use custom initializers for UIViewControllers created in Storyboard
In the case of Storyboard, we cannot pass dependencies in the initializers of
UIViewControllers . Usually it looks like this: override func prepare(for segue: UIStoryboardSegue, sender: Any?) { guard segue.identifier == "detail", let detailVC = segue.destination as? DetailViewController else { return } let object = Object() detailVC.object = object } This code can be done better by using some constants to represent identifiers or tools such as SwiftGen and R.swift , and maybe even Perform . But this is how we only get rid of string literals and add syntactic sugar, and do not solve the problems that arise:
- How do I know how
DetailViewControllerconfigured in the example above? If you are new to the project and do not have this knowledge, you will have to open the file with the description of this controller and study it. - The
DetailViewControllerpropertiesDetailViewControllerset after initialization, which means they should be optional. It is necessary to handle cases where a property isnil, otherwise the application may fall at the most inopportune moment. You can mark properties as implicitly expanded optional (var object: Object!), But the essence will not change. - Properties should be marked as
var, notlet. So a situation is possible when someone from the outside wants to change them.DetailViewControllershould handle such situations.
One of the solutions is described in this article .
4. As the Storyboard grows, its navigation becomes harder.
As we noted earlier, it is not necessary to put everything in one Storyboard, it is better to break it into several smaller ones. With the advent of the Storyboard Reference it has become very simple.
Add the Storyboard Reference from the object library to the Storyboard:
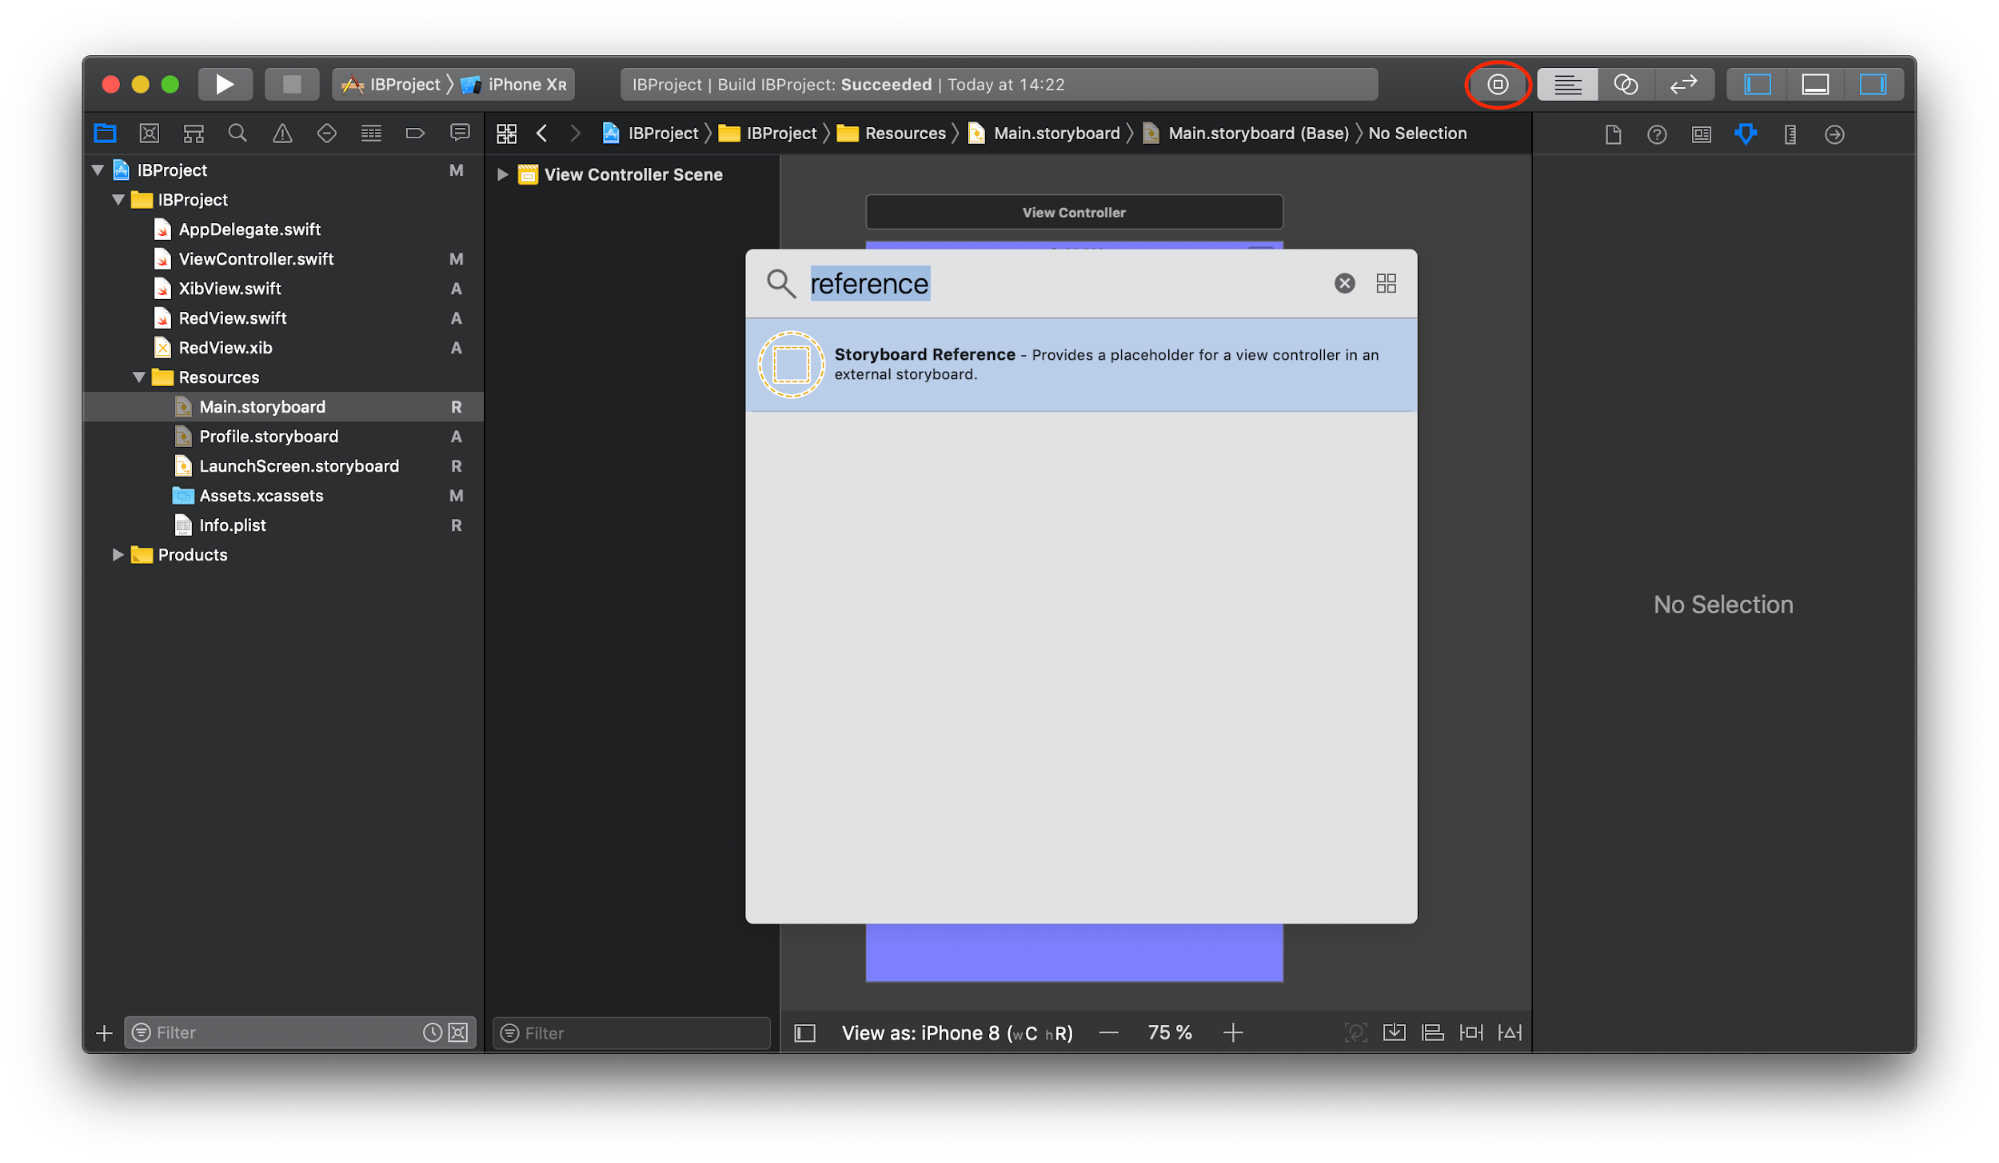
Set the required field values in Attributes Inspector - this is the name of the Storyboard file and, if necessary, the Referenced ID , which corresponds to the Storyboard ID of the desired screen. By default, the Initial View Controller will be loaded:

If you enter an invalid name in the Storyboard field or refer to a non-existent Storyboard ID, Xcode will warn you about this at compile time.
5. Xcode slows down when loading Storyboards
If the Storyboard contains a large number of screens with numerous constraints, then loading it will indeed take some time. But again, it is better to break a large Storyboard into smaller ones. Separately, they are loaded much faster and it becomes easier to work with them.
6. Storyboards are fragile; an error may cause the application to crash at runtime.
Main weaknesses:
- Errors in the identifiers
UITableViewCellandUICollectionViewCell. - Errors in segues ids.
- Use a subclass of
UIViewthat no longer exists. - Synchronize
IBActionsandIBOutletswith code.
All this and some other problems can cause the application to crash at runtime, which means that there is a possibility that such errors will fall into the release assembly. For example, when we specify cell identifiers or segues in a Storyboard, they must be copied to code wherever they are used. By changing the identifier in one place, it must be changed in all others. There is a possibility that you will simply forget about it or make a typo, but you will learn about the error only while the application is running.
You can reduce the likelihood of an error if you get rid of string literals in your code. To do this, the
UITableViewCell and UICollectionViewCell can be assigned the names of the cell classes themselves: for example, the ItemTableViewCell string will be the ItemTableViewCell identifier. In the code we get the cell like this: let cell = tableView.dequeueReusableCell(withIdentifier: String(describing: ItemTableViewCell.self)) as! ItemTableViewCell You can add a generic function to the
UITableView : extension UITableView { open func dequeueReusableCell<T>() -> T where T: UITableViewCell { return dequeueReusableCell(withIdentifier: String(describing: T.self)) as! T } } And then it becomes easier to get a cell:
let cell: ItemTableViewCell = tableView.dequeueReusableCell() If suddenly you forget to specify the value of the cell ID in the Storyboard, Xcode will give a warning, so do not ignore them.
As for segues identifiers, you can use enumerations for them. Create a special protocol:
protocol SegueHandler { associatedtype SegueIdentifier: RawRepresentable } UIViewController supporting this protocol will need to define a nested type with the same name. It lists all segues identifiers that this UIViewController can handle: extension StartViewController: SegueHandler { enum SegueIdentifier: String { case signIn, signUp } } In addition, in the
SegueHandler protocol extension, SegueHandler define two functions: one takes the UIStoryboardSegue and returns the corresponding value of SegueIdentifier , and the other simply calls the performSegue , taking as input SegueIdentifier : extension SegueHandler where Self: UIViewController, SegueIdentifier.RawValue == String { func performSegue(withIdentifier segueIdentifier: SegueIdentifier, sender: AnyObject?) { performSegue(withIdentifier: segueIdentifier.rawValue, sender: sender) } func segueIdentifier(for segue: UIStoryboardSegue) -> SegueIdentifier { guard let identifier = segue.identifier, let identifierCase = SegueIdentifier(rawValue: identifier) else { fatalError("Invalid segue identifier \(String(describing: segue.identifier)).") } return identifierCase } } And now in
UIViewController , which supports the new protocol, with prepare(for:sender:) you can work as follows: extension StartViewController: SegueHandler { enum SegueIdentifier: String { case signIn, signUp } override func prepare(for segue: UIStoryboardSegue, sender: Any?) { switch segueIdentifier(for: segue) { case .signIn: print("signIn") case .signUp: print("signUp") } } } And run segue like this:
performSegue(withIdentifier: .signIn, sender: nil) If you add a new identifier to
SegueIdentifier , then Xcode will surely force it to process in switch/case .Another option to get rid of string literals such as segues and other identifiers is to use code generation tools like R.swift .
7. Storyboards less flexible, unlike code
Yes this is true. If the task is to create a complex screen with animations and effects that the Storyboard cannot handle, then you need to use the code!
8. Storyboards do not allow changing the type of special UIViewControllers
For example, when you need to change the type of
UITableViewController to UICollectionViewController , you have to delete the object, add a new one with a different type, and reconfigure it again. Although this is an infrequent case, it is worth noting that such changes are made faster in the code.9. Storyboards add two additional dependencies to the project. They may contain errors that the developer cannot fix.
This is the Interface Builder and Storyboards parser. Such cases are rare, and they can often be circumvented by other solutions.
10. Difficult code review
It is necessary to take into account that code review is not quite a search for bugs. Yes, they are found in the process of viewing the code, but the main goal is to identify weak points that can create problems in the long term. For Storyboards, this is, first of all, the work of Auto Layout . There should be no ambiguous and misplaced . To find them, just search the Storyboard XML in the strings “ambiguous =“ YES ”and“ misplaced = “YES”, or simply open the Storyboard in Interface Builder and look for red and yellow dots:
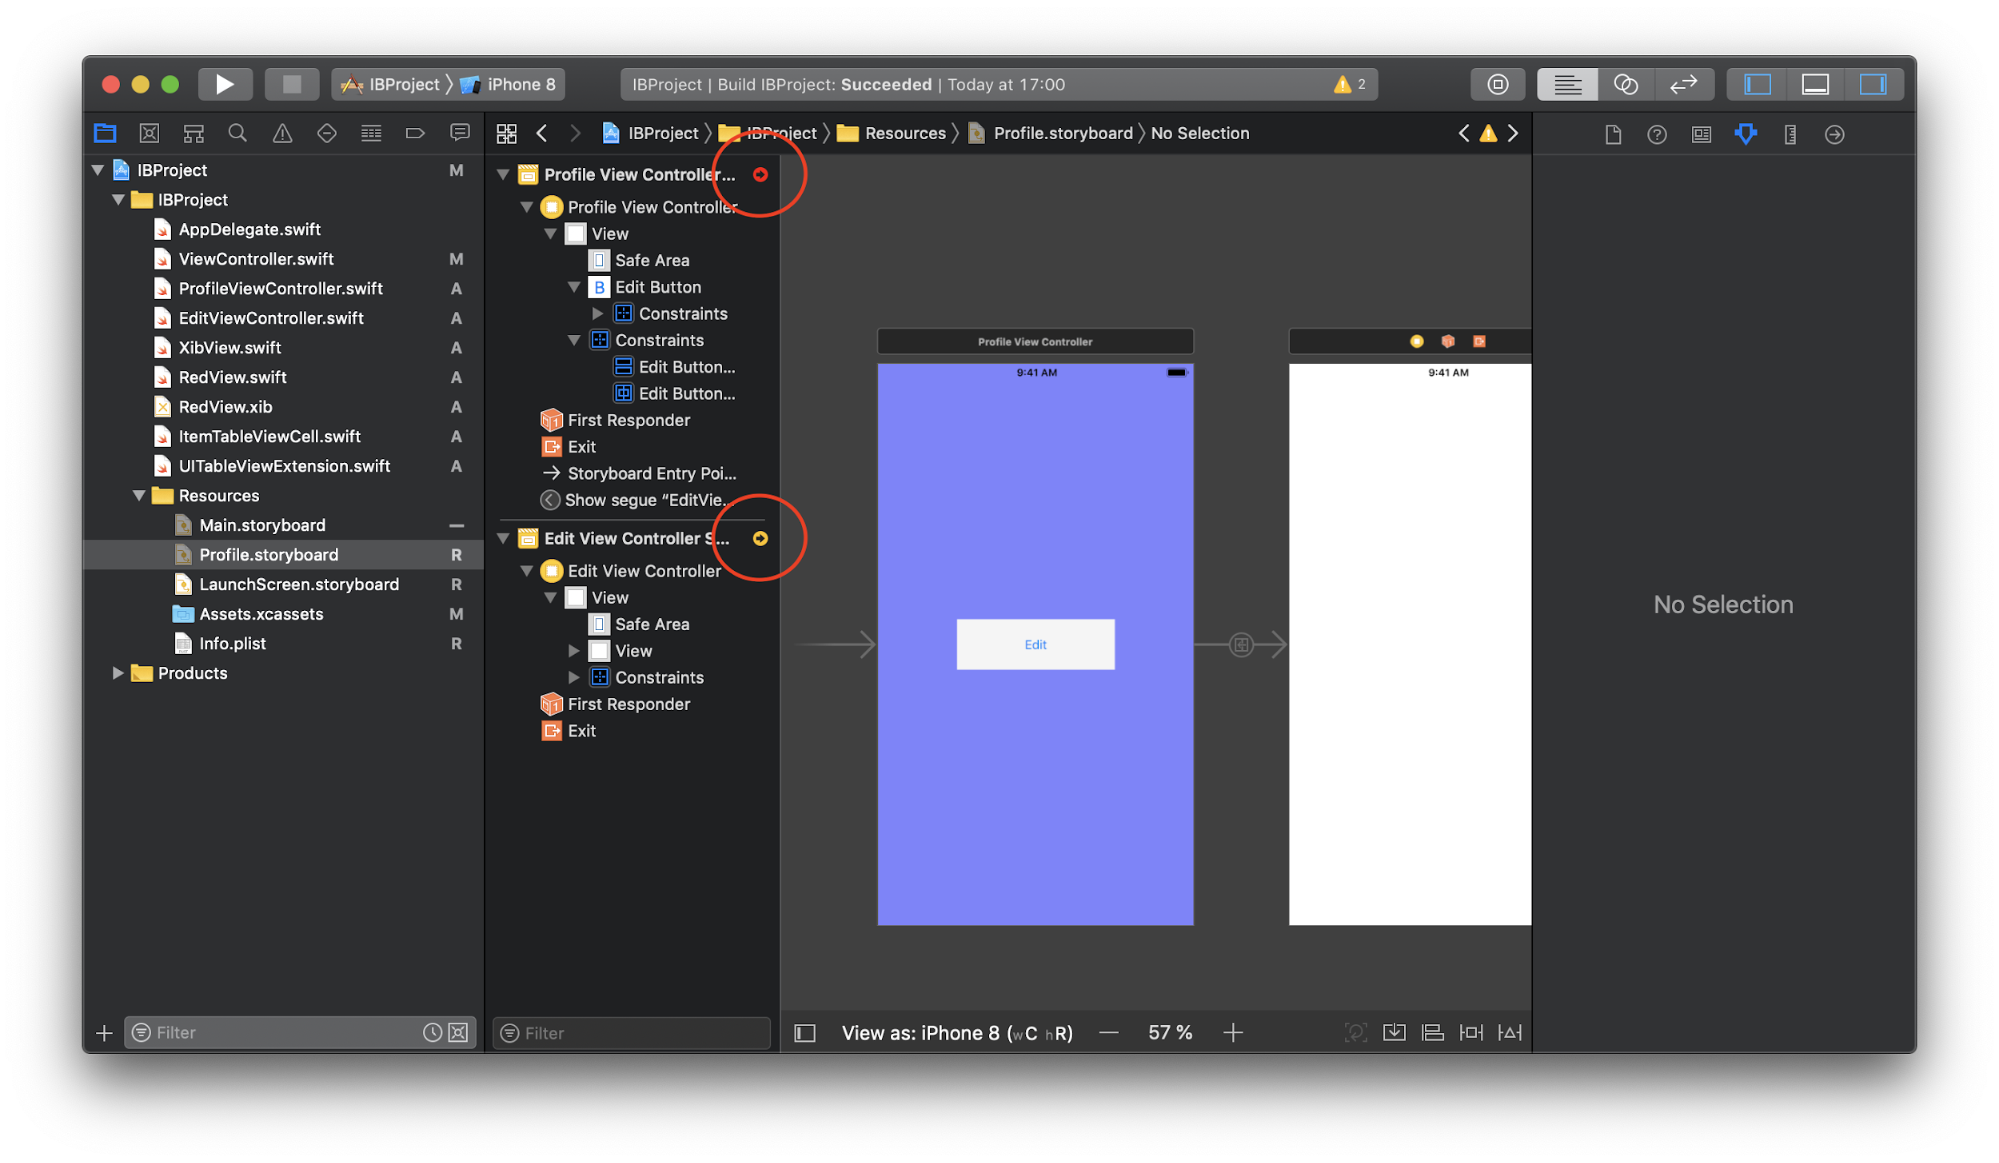
However, this may not be enough. Conflicts between constraints can also be detected while the application is running. If a similar situation occurs, information about this is displayed in the console. Such cases are not uncommon, so their search should also be taken seriously.
Everything else - matching the position and size of elements with the design, the correct binding
IBOutlets and IBActions - not for code review.In addition, it is important to commit more often, then it will be easier for the reviewer to view the changes in small chunks. He can better understand the details without losing anything. This, in turn, will positively affect the quality of the review code.
Total
In the list of deficiencies of Storyboards I left 4 points (in descending order of their value):
- In Storyboards, it’s hard to manage conflicts when merging changes.
- Storyboards are less flexible, unlike code.
- Storyboards are fragile; an error may cause the application to crash at runtime.
- You cannot use custom initializers for
UIViewControllerscreated in Storyboard.
Benefits
1. User interface visualization and constraints
Even if you are a beginner and just take on an unfamiliar project, you can easily find the entry point into the application and how to get to the desired screen from it. You know how each button, label or text field will look like, what position they will occupy, how they are affected by constraints, how they interact with other elements. With a few clicks you can easily create a new
UIView , customize its appearance and behavior. Auto Layout allows us to work with UIView naturally, as if we said: "This button should be to the left of that label and have the same height with it." Such work with the user interface is intuitive and efficient. You can try to give examples where well-written code saves more time when creating some elements of the UI, but globally it makes little difference. Storyboard copes well with its task.Separately, we note Auto Layout. This is a very powerful and useful tool, without which it would be difficult to create an application that supports all the many different screen sizes. Interface Builder allows you to see the result of working with Auto Layout without starting the application, and if any constraints do not fit into the overall scheme, Xcode will immediately warn about it. Of course, there are cases when Interface Builder is not able to provide the desired behavior of some very dynamic and complex interface, then you have to rely on the code. But even in such situations, you can do most in Interface Builder and only add a couple of lines of code to this.
Let's look at a few examples that demonstrate the useful features of Interface Builder.
Dynamic tables based on UIStackView
Create a new
UIViewController , add a UIScrollView to the full screen: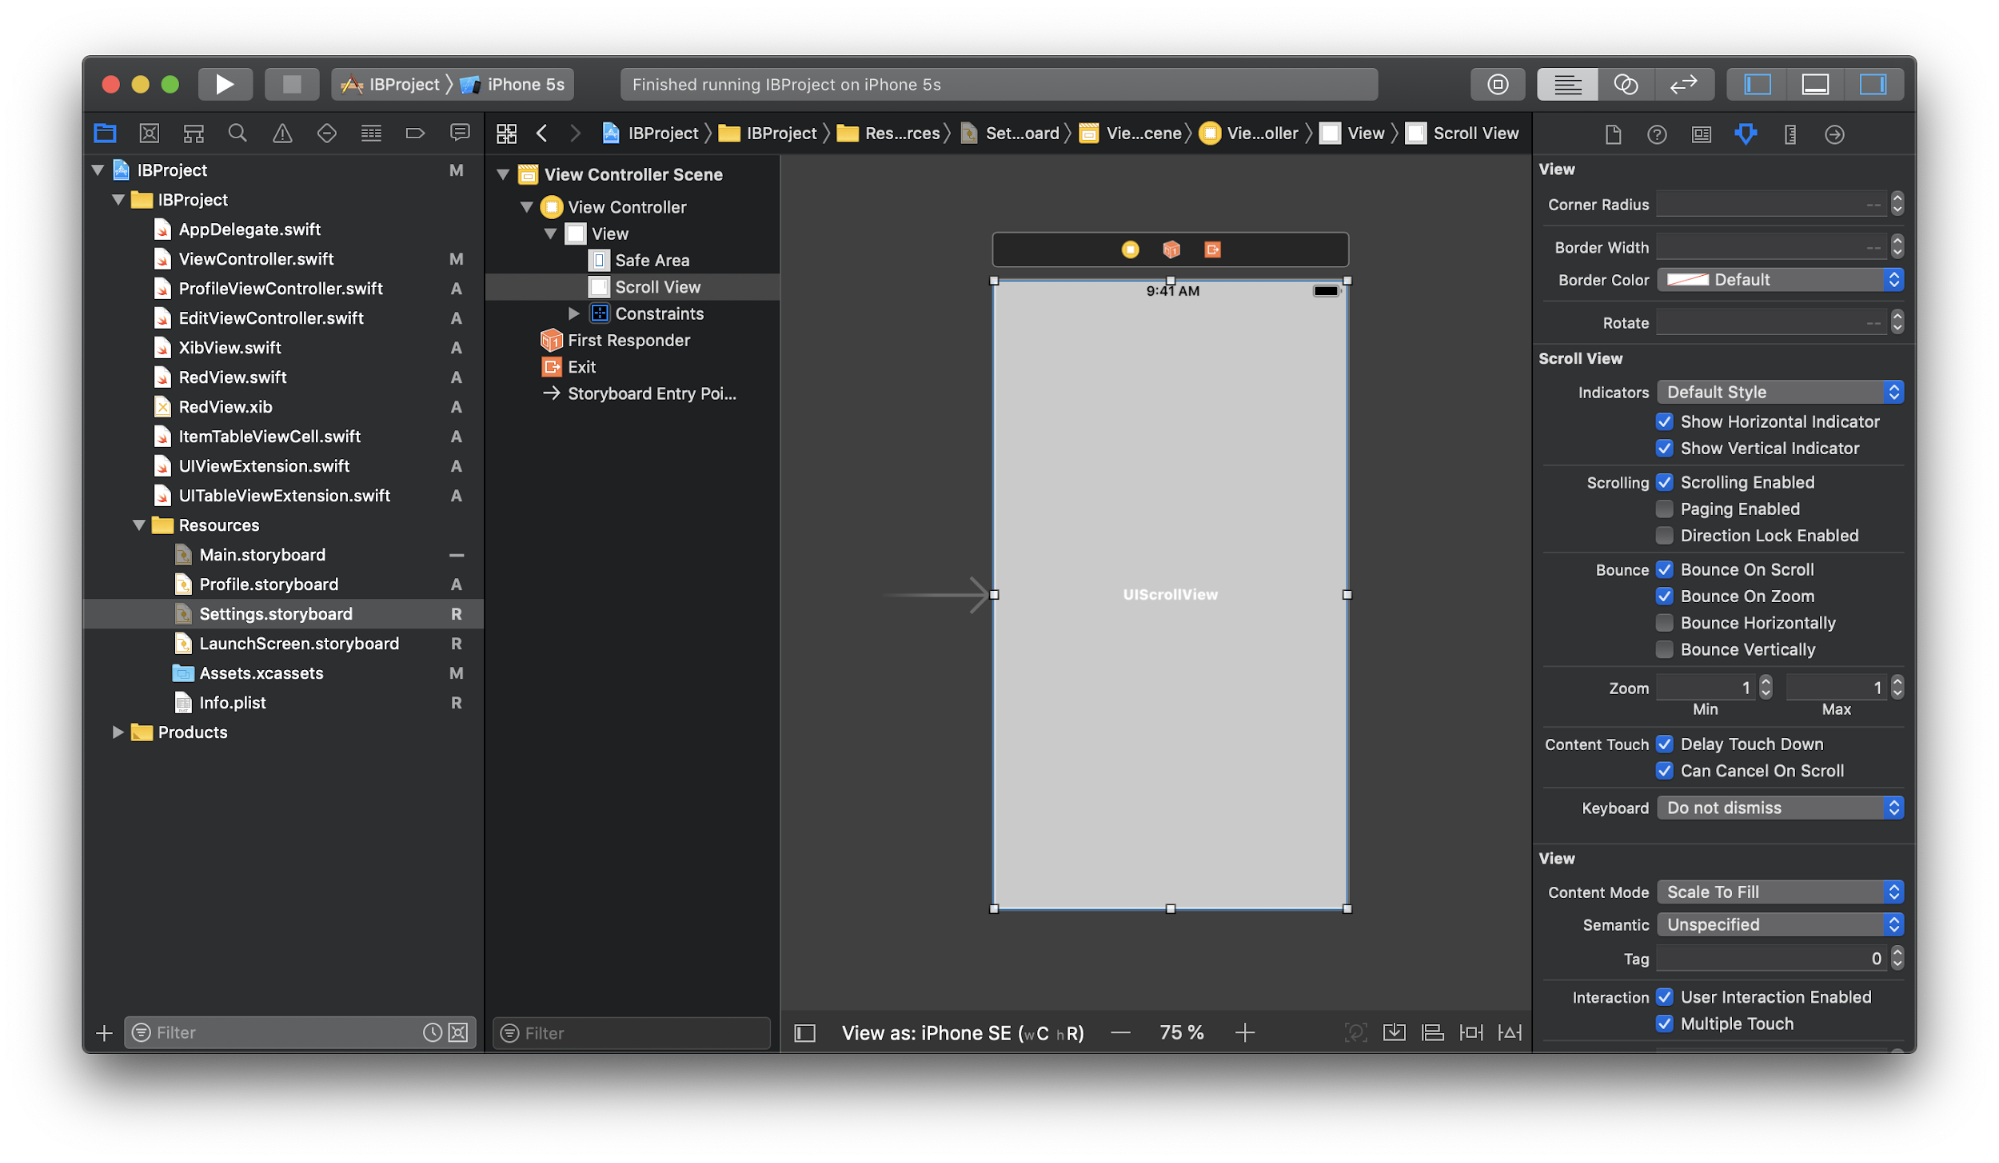
In
UIScrollView add a vertical UIStackView , we tie it to the edges and set the height and width equal to UIScrollView . At this height, we assign priority = Low (250) :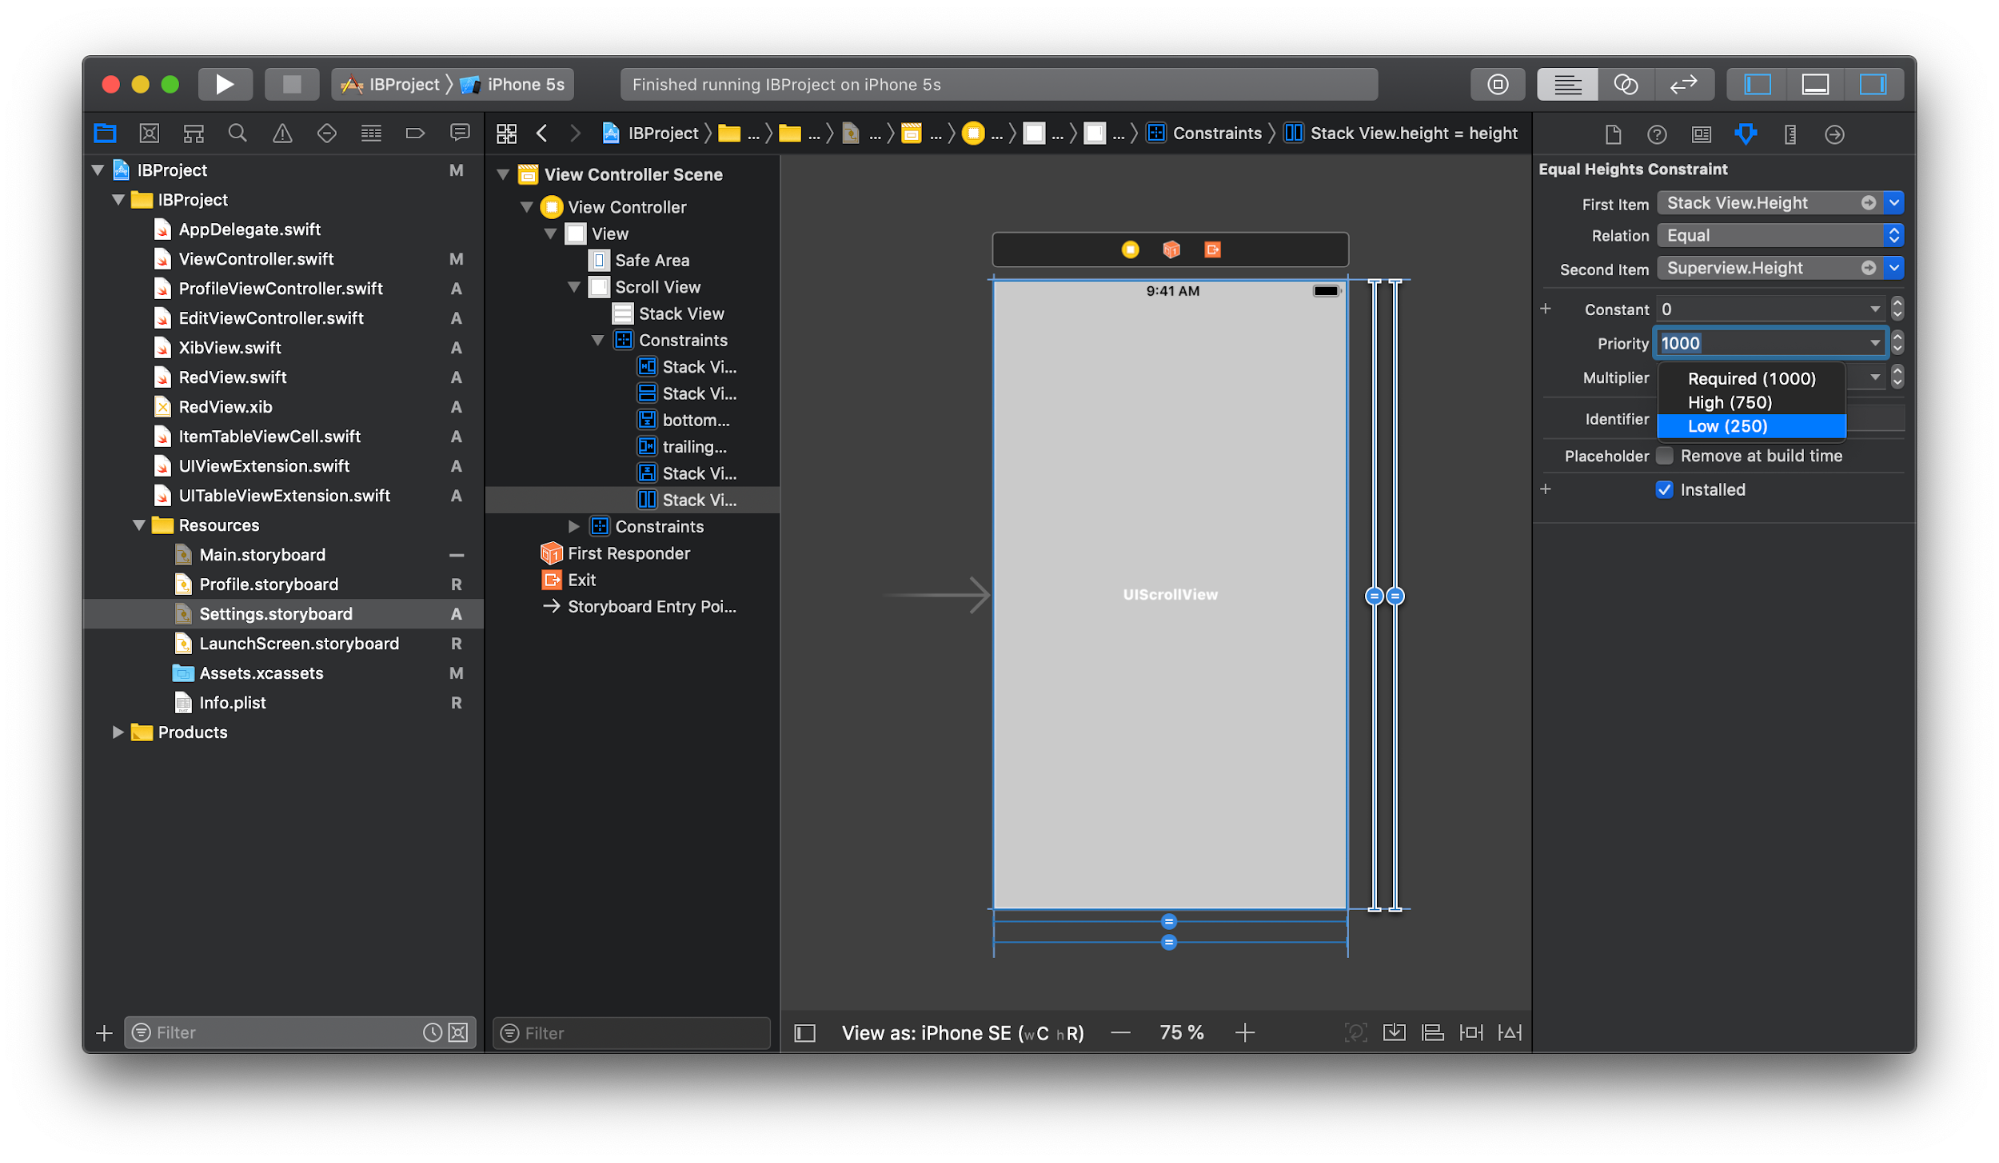
Next, create all the necessary cells and add them to the
UIStackView . Maybe these will be the usual UIView in a single copy, and maybe the reused UIView , for which we created our Xib file. In any case, the entire UI of this screen is in the Storyboard, and thanks to the correctly configured Auto Layout, scrolling will work perfectly, adjusting to the content:
We can also make cells adapt to the size of their content. Add to each cell by
UILabel , tie them to the edges:
It is already clear how all this will look like at the execution stage. You can attach any actions to cells, for example, switching to another screen. And all this without a single line of code.
Moreover, if you set
hidden = true for UIView from UIStackView , then it is not only hidden = true , but also will not occupy space. UIStackView automatically recalculates its size: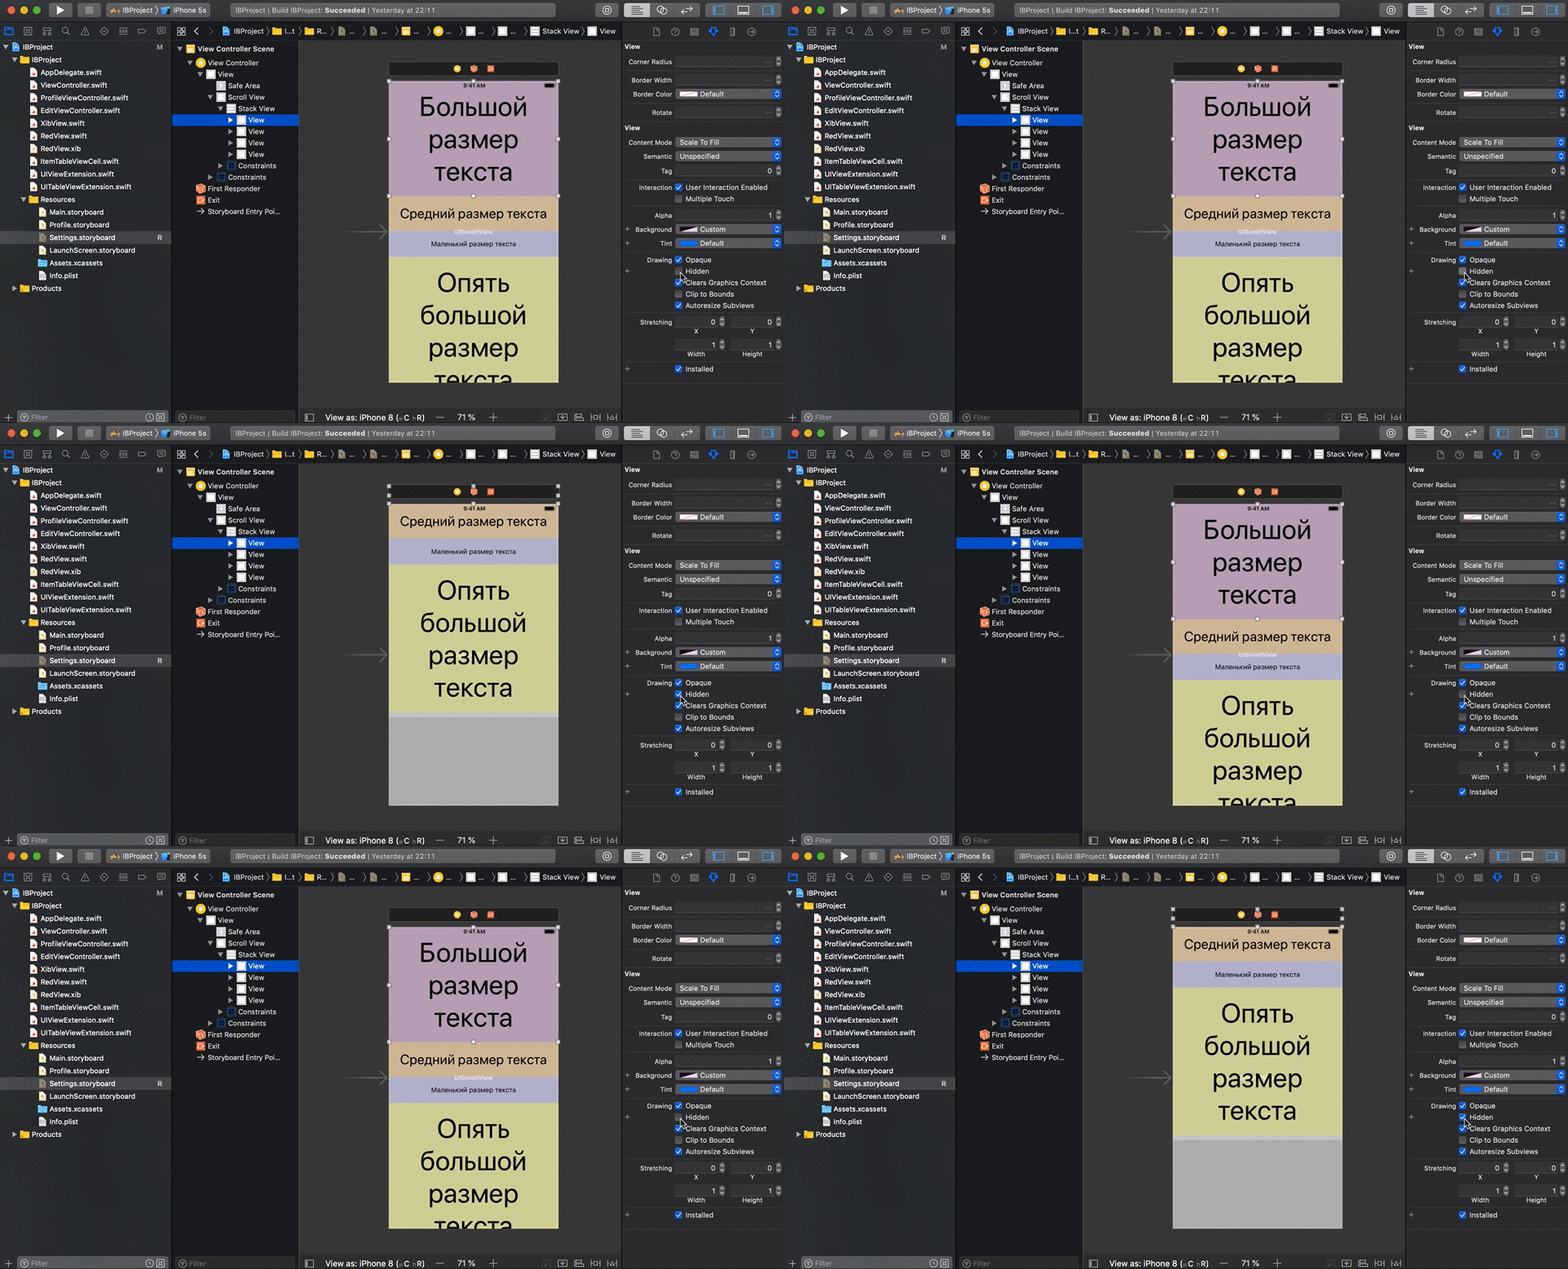
Self-sizing cells
In the Size inspector of the table, set Row Height = Automatic , and Estimate - to some mean value:
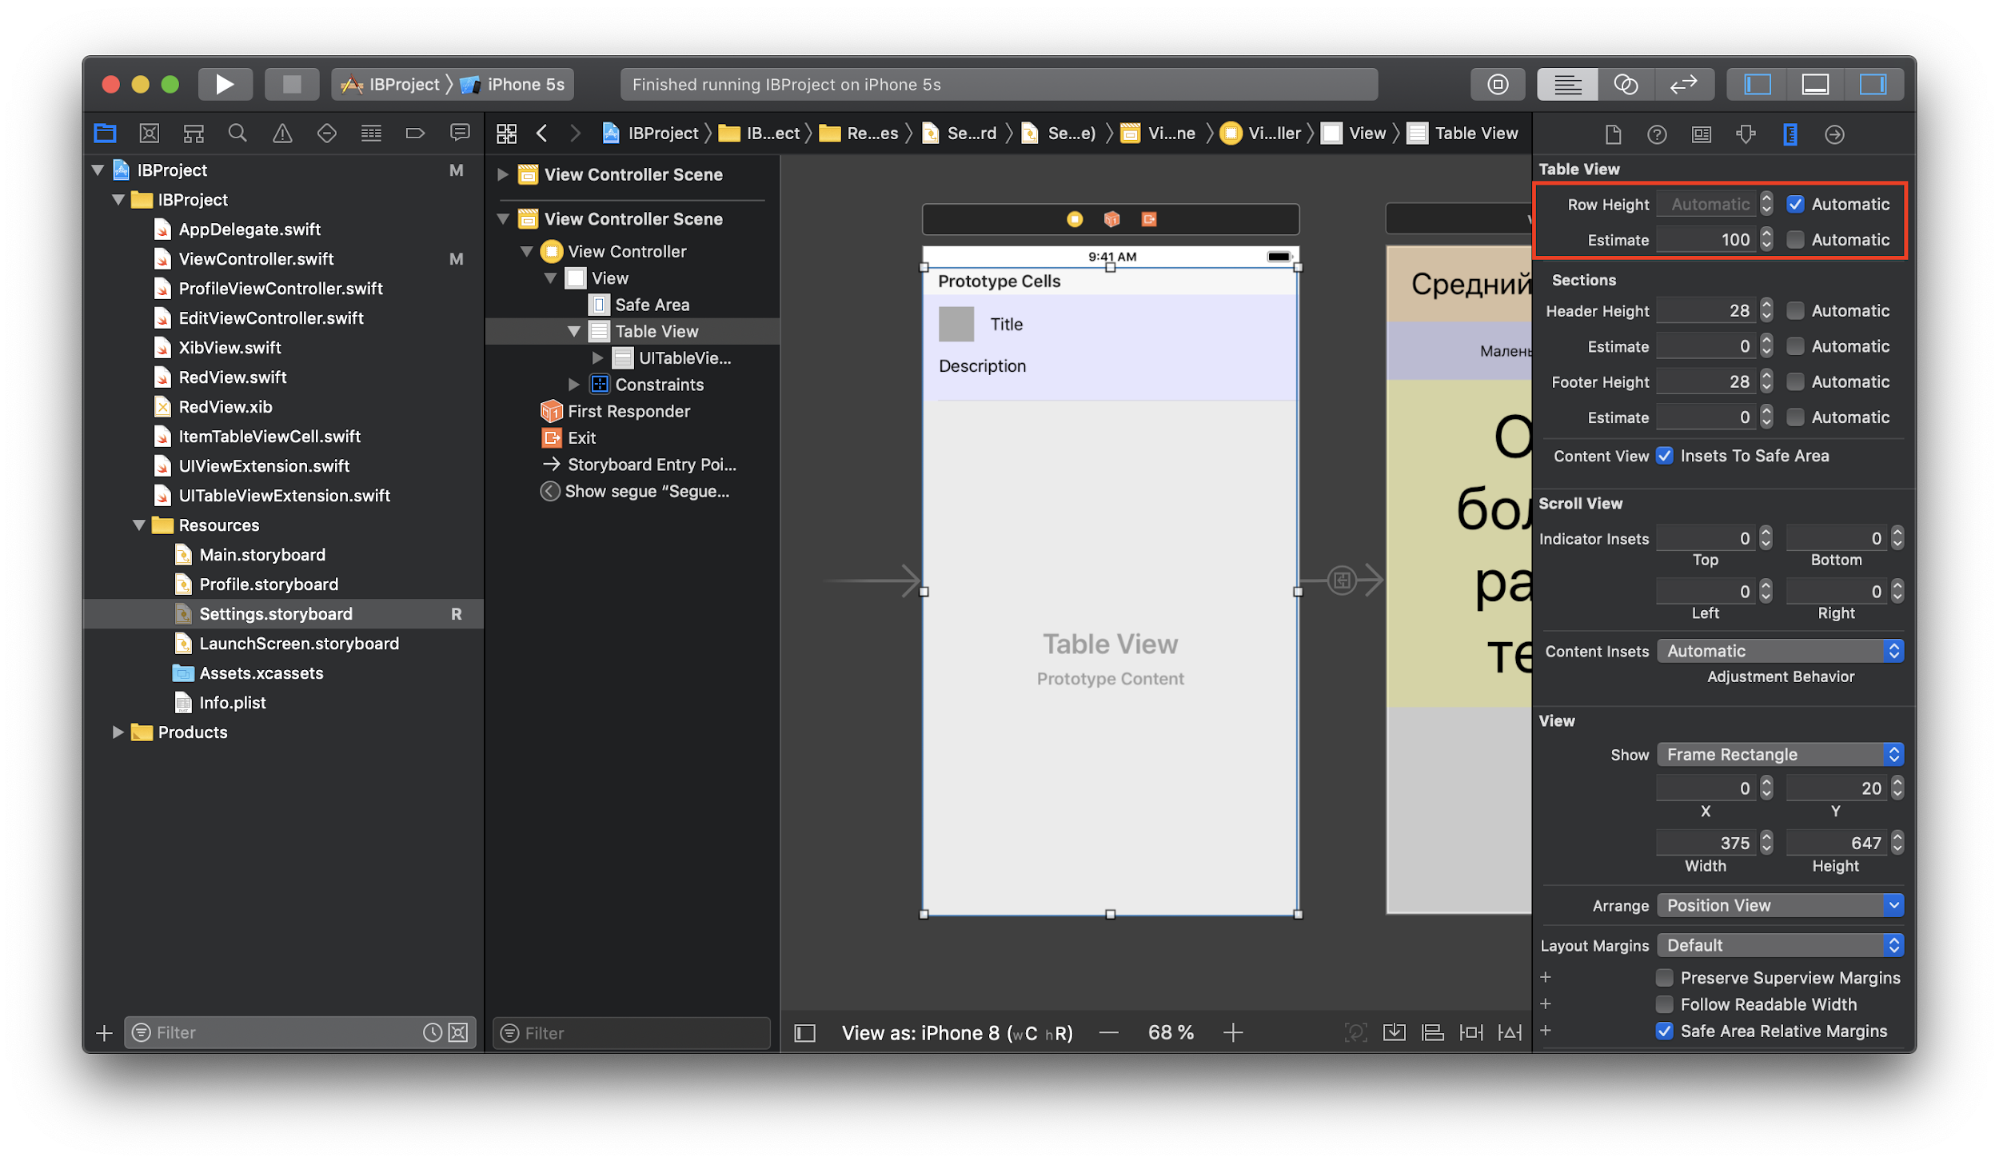
For this to work, the cells themselves must have the constraints properly configured and allow you to accurately calculate the height of the cell based on the content at run time. If it is not clear what is being said, a very good explanation is in the official documentation .
As a result, running the application, we will see that everything is displayed correctly:
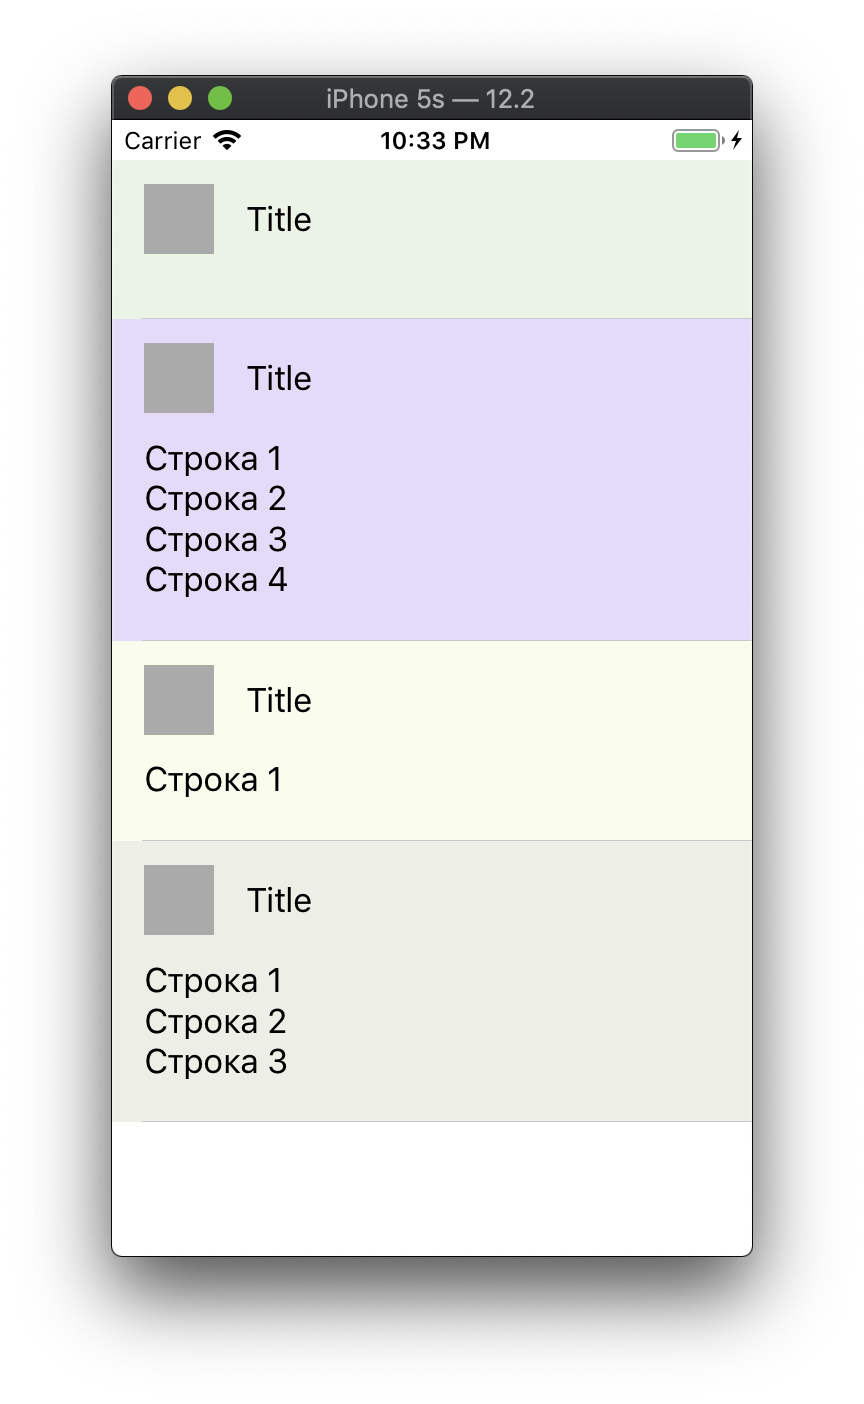
Self-sizing table
You need to implement this table behavior:

How to achieve such a dynamic height change? Unlike
UILabel , UIButton and other UIView subclasses, it is a little more difficult to do this with the table, since the Intrinsic Content Size does not depend on the size of cells inside it. She cannot calculate her height based on the content, but there is an opportunity to help her in this.Note that at some point in the video, the height of the table stops changing, reaching a certain maximum value. This can be achieved by setting the height constraint of the table with the value Relation = Less Than Or Equal :

At this stage, Interface Builder does not yet know what height the table will be; it only knows its maximum value, equal to 200 (from height constraint). As noted earlier, the Intrinsic Content Size is not equal to the table content. However, we have the opportunity to set a placeholder in the Intrinsic Size field:
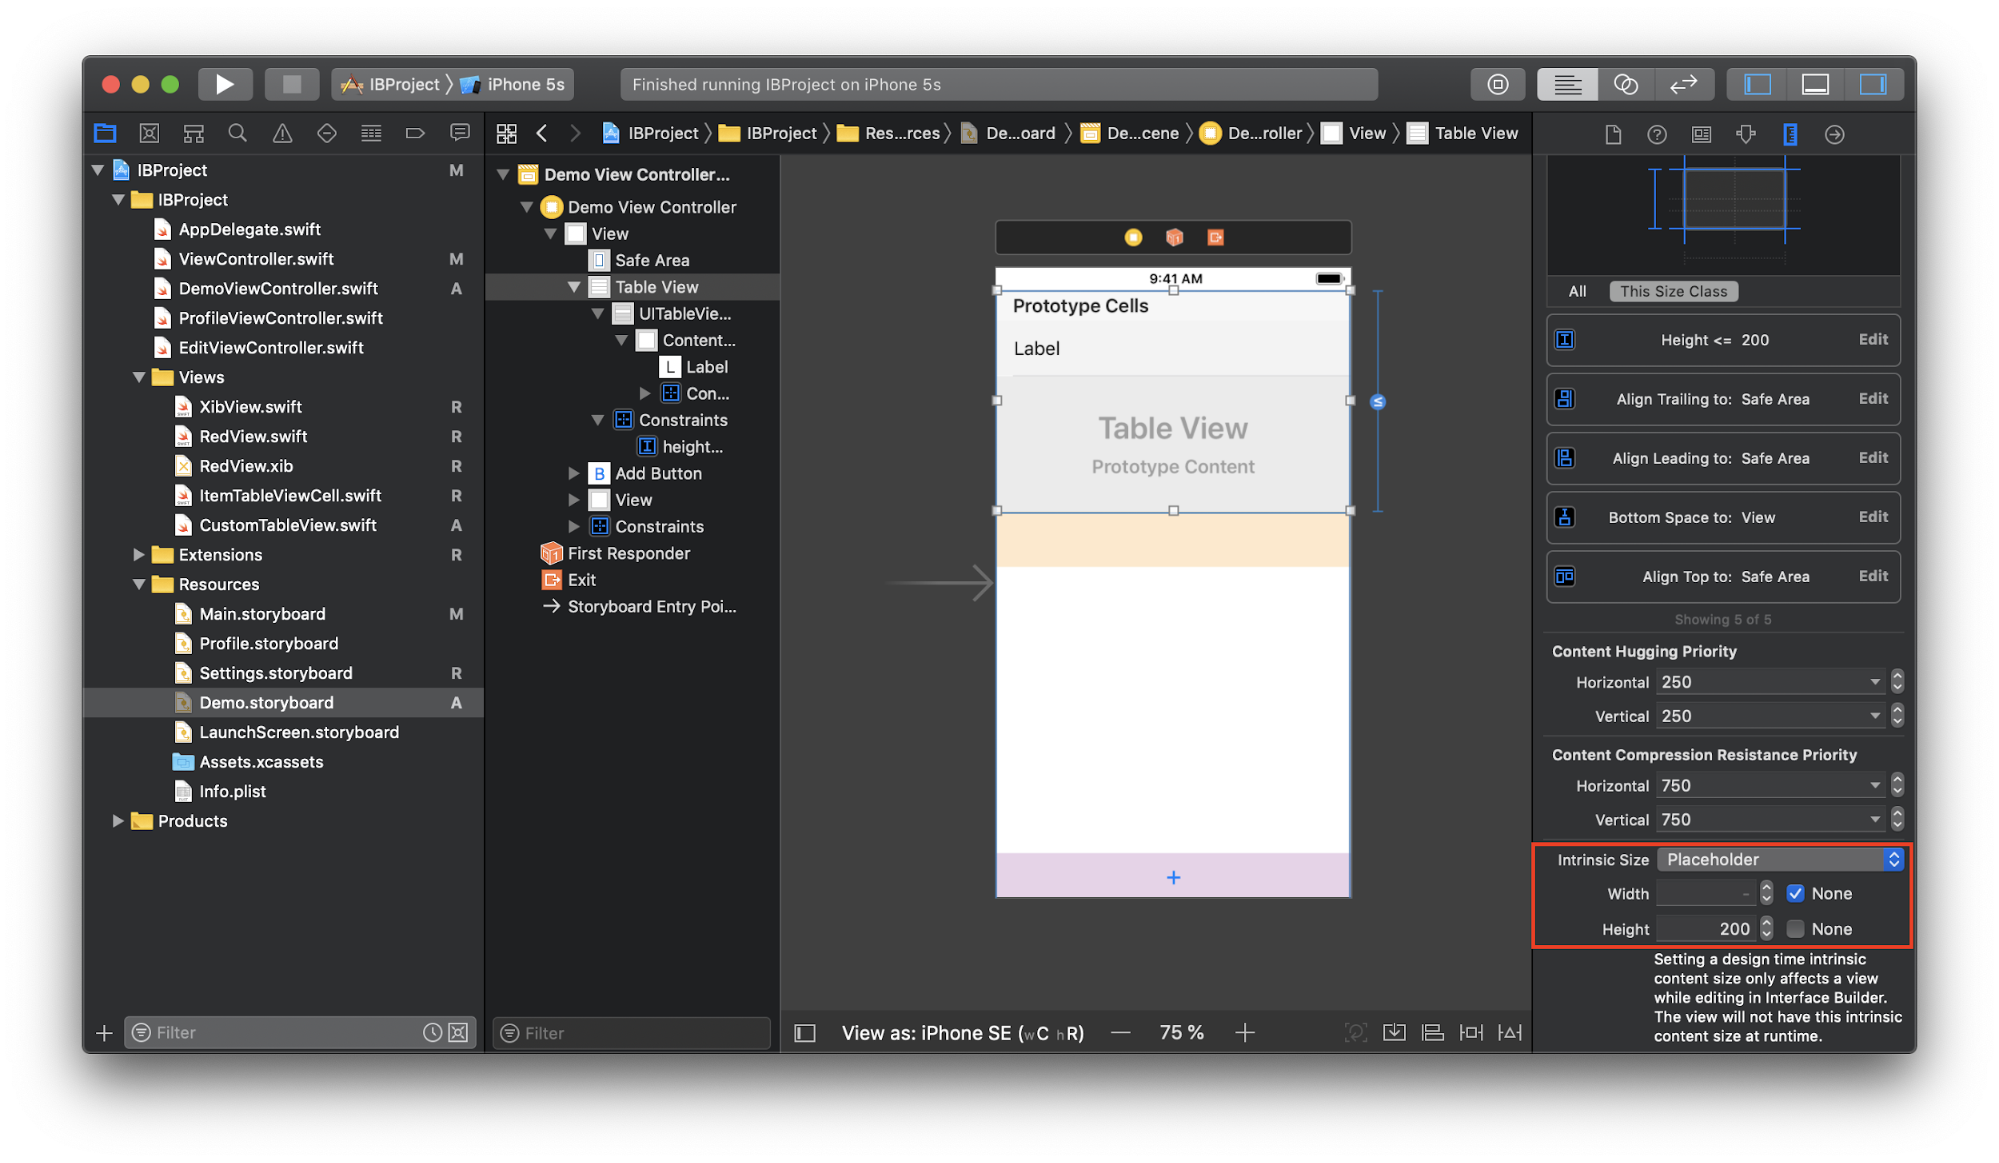
This value is valid only while working with Interface Builder. Of course, the Intrinsic Content Size does not have to be equal to this value at run time. We just told Interface Builder that everything is under control.
Next, create a new subclass of the
CustomTableView table: final class CustomTableView: UITableView { override var contentSize: CGSize { didSet { invalidateIntrinsicContentSize() } } override var intrinsicContentSize: CGSize { return contentSize } } One of those cases when the code is needed. Here we call
invalidateIntrinsicContentSize whenever the contentSize table changes. This will allow the system to adopt the new Intrinsic Content Size value. It, in turn, returns contentSize , forcing the table to dynamically adjust its height and display a certain number of cells without scrolling. Scrolling appears when we reach the height of height constraint.All these three features of Interface Builder can be combined with each other. They add more flexibility in organizing content without the need for additional configuration of constraints or any
UIView .2. The ability to instantly see the result of their actions
If you change the size of
UIView , move it a couple of points to the side or change the background color, you will immediately see how it will look at the execution stage without the need to launch the application. No need to guess why some button did not appear on the screen or why the behavior of UIView does not correspond to the desired one.Using
@IBInspectable reveals this advantage even more interesting. Add two UILabel and two properties to RedView : final class RedView: XibView { @IBOutlet weak var titleLabel: UILabel! @IBOutlet weak var subtitleLabel: UILabel! @IBInspectable var title: String = "" { didSet { titleLabel.text = title } } @IBInspectable var subtitle: String = "" { didSet { subtitleLabel.text = subtitle } } } Two new fields will appear in the Attributes Inspector for
RedView - Title and Subtitle , which we have marked as @IBInspectable :
If we try to enter values into these fields, we will immediately see how everything will look like at the execution stage:
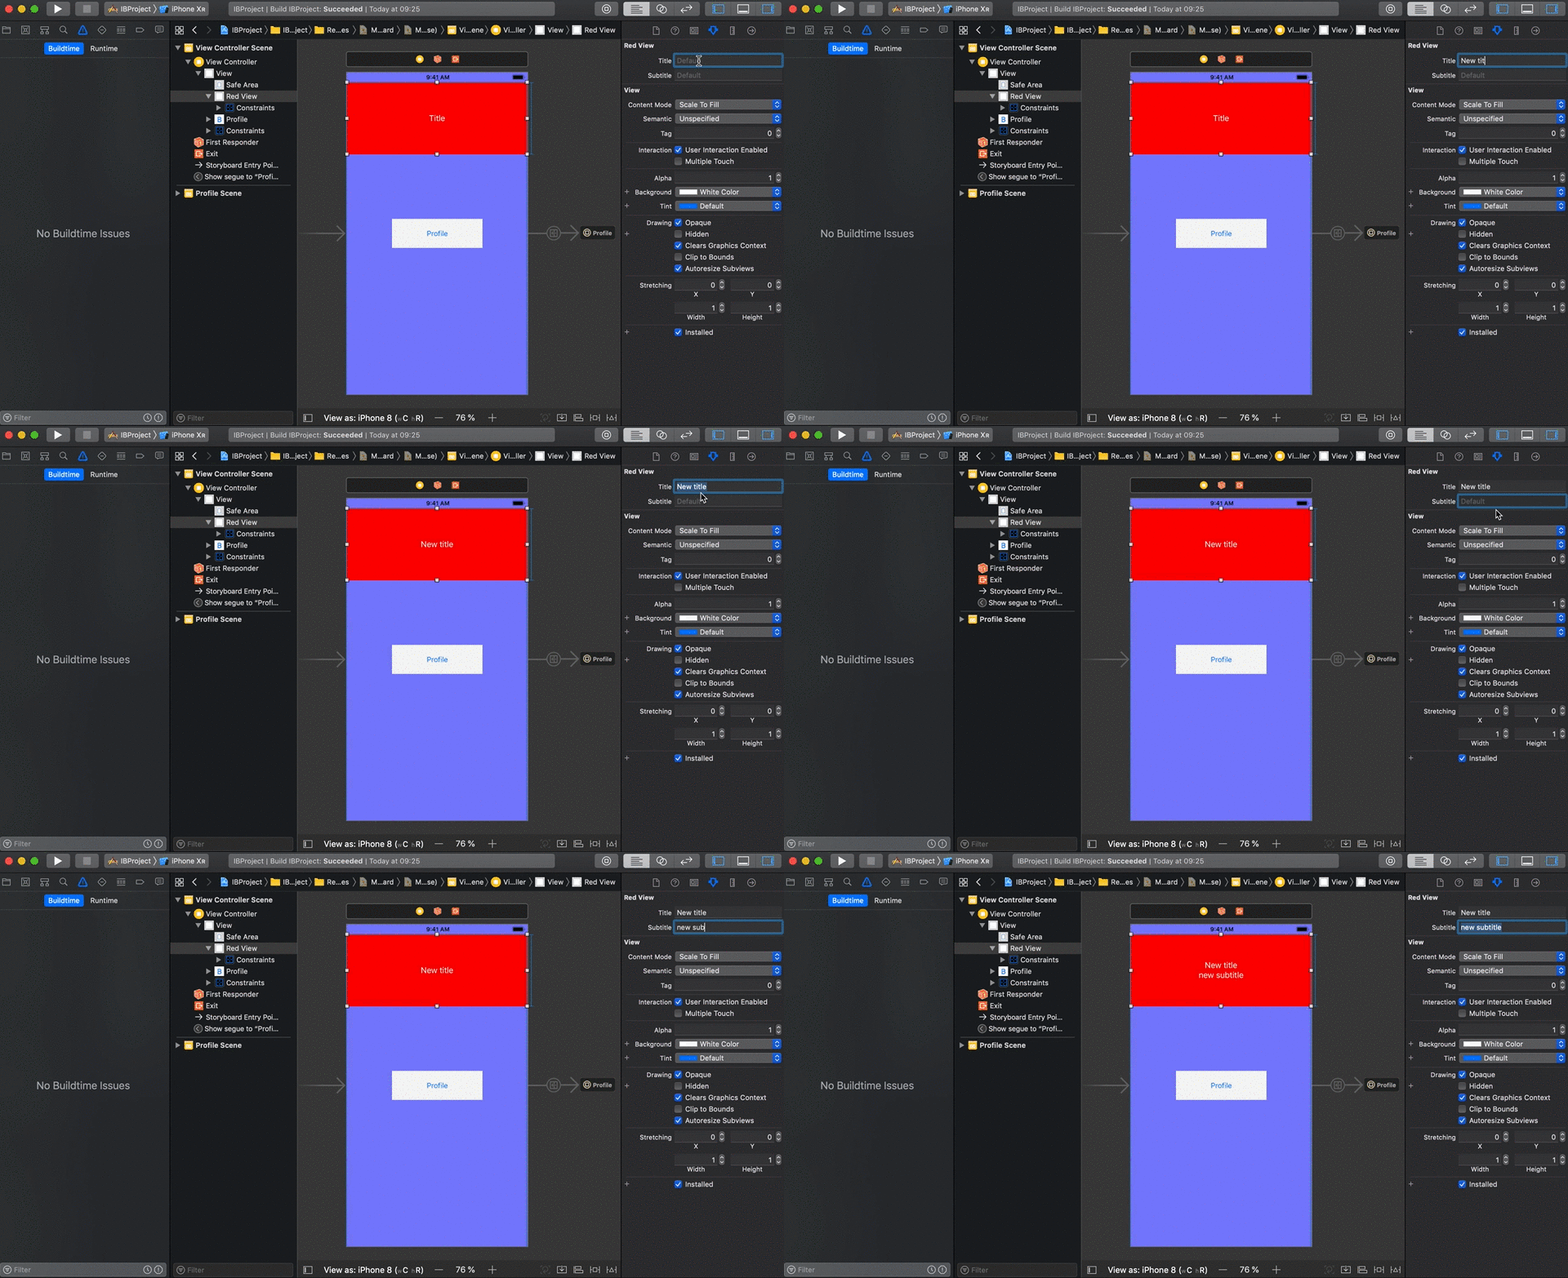
You can control anything:
cornerRadius , borderWidth , borderColor . For example, UIView base class: extension UIView { @IBInspectable var cornerRadius: CGFloat { set { layer.cornerRadius = newValue } get { return layer.cornerRadius } } @IBInspectable var borderWidth: CGFloat { set { layer.borderWidth = newValue } get { return layer.borderWidth } } @IBInspectable var borderColor: UIColor? { set { layer.borderColor = newValue?.cgColor } get { return layer.borderColor != nil ? UIColor(cgColor: layer.borderColor!) : nil } } @IBInspectable var rotate: CGFloat { set { transform = CGAffineTransform(rotationAngle: newValue * .pi/180) } get { return 0 } } } We see that the
RedView Attributes Inspector of the RedView object RedView got 4 more new fields, which can now be played with: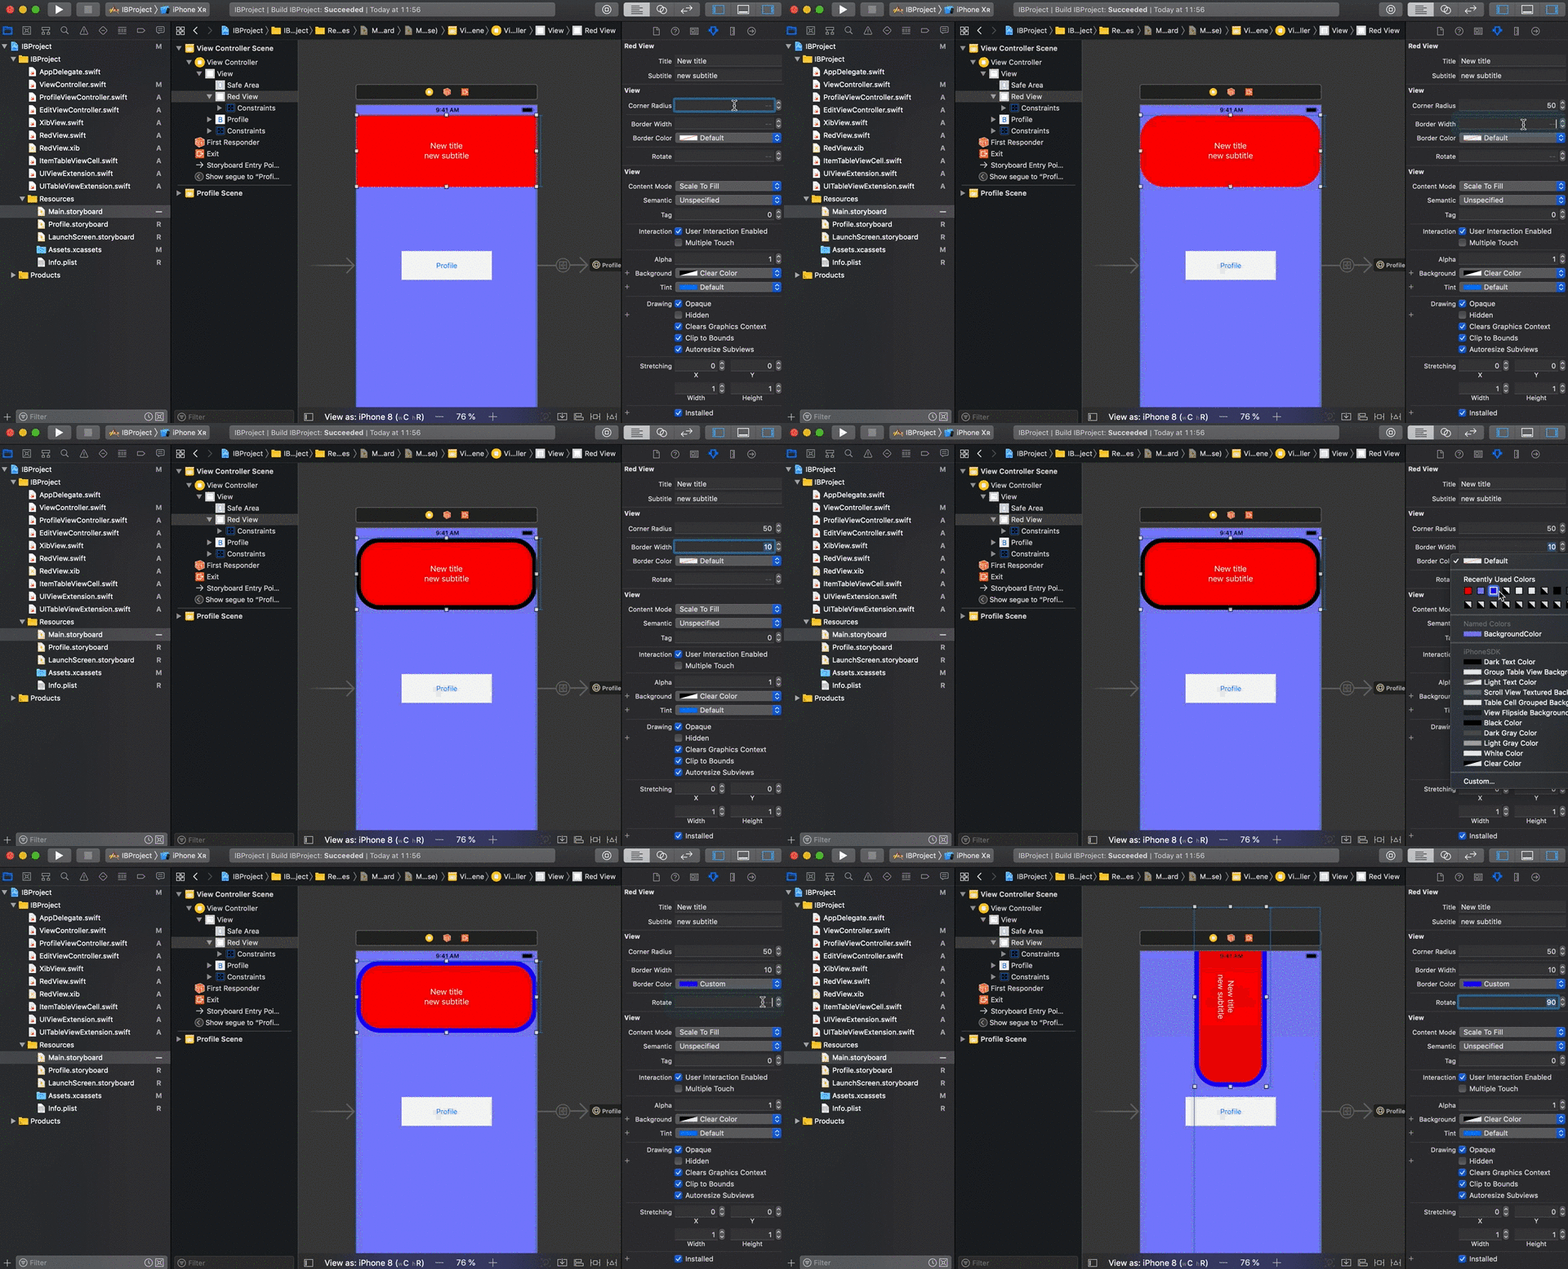
3. Preview all screen sizes at once.
So we threw the necessary elements onto the screen, adjusted their appearance and added the necessary constraints. How do we figure out whether the content will display correctly on different screen sizes? Of course, you can run the application on each simulator, but it will take a lot of time. There is a better option: Xcode has a preview mode, it allows you to see several screen sizes at the same time without running the application.
Call the Assistant editor , click on the first segment of the transition panel, select Preview -> Settings.storyboard (as an example):

At first we see only one screen, but we can add as many as we need by clicking on the “+” in the lower left corner and selecting the necessary devices from the list:
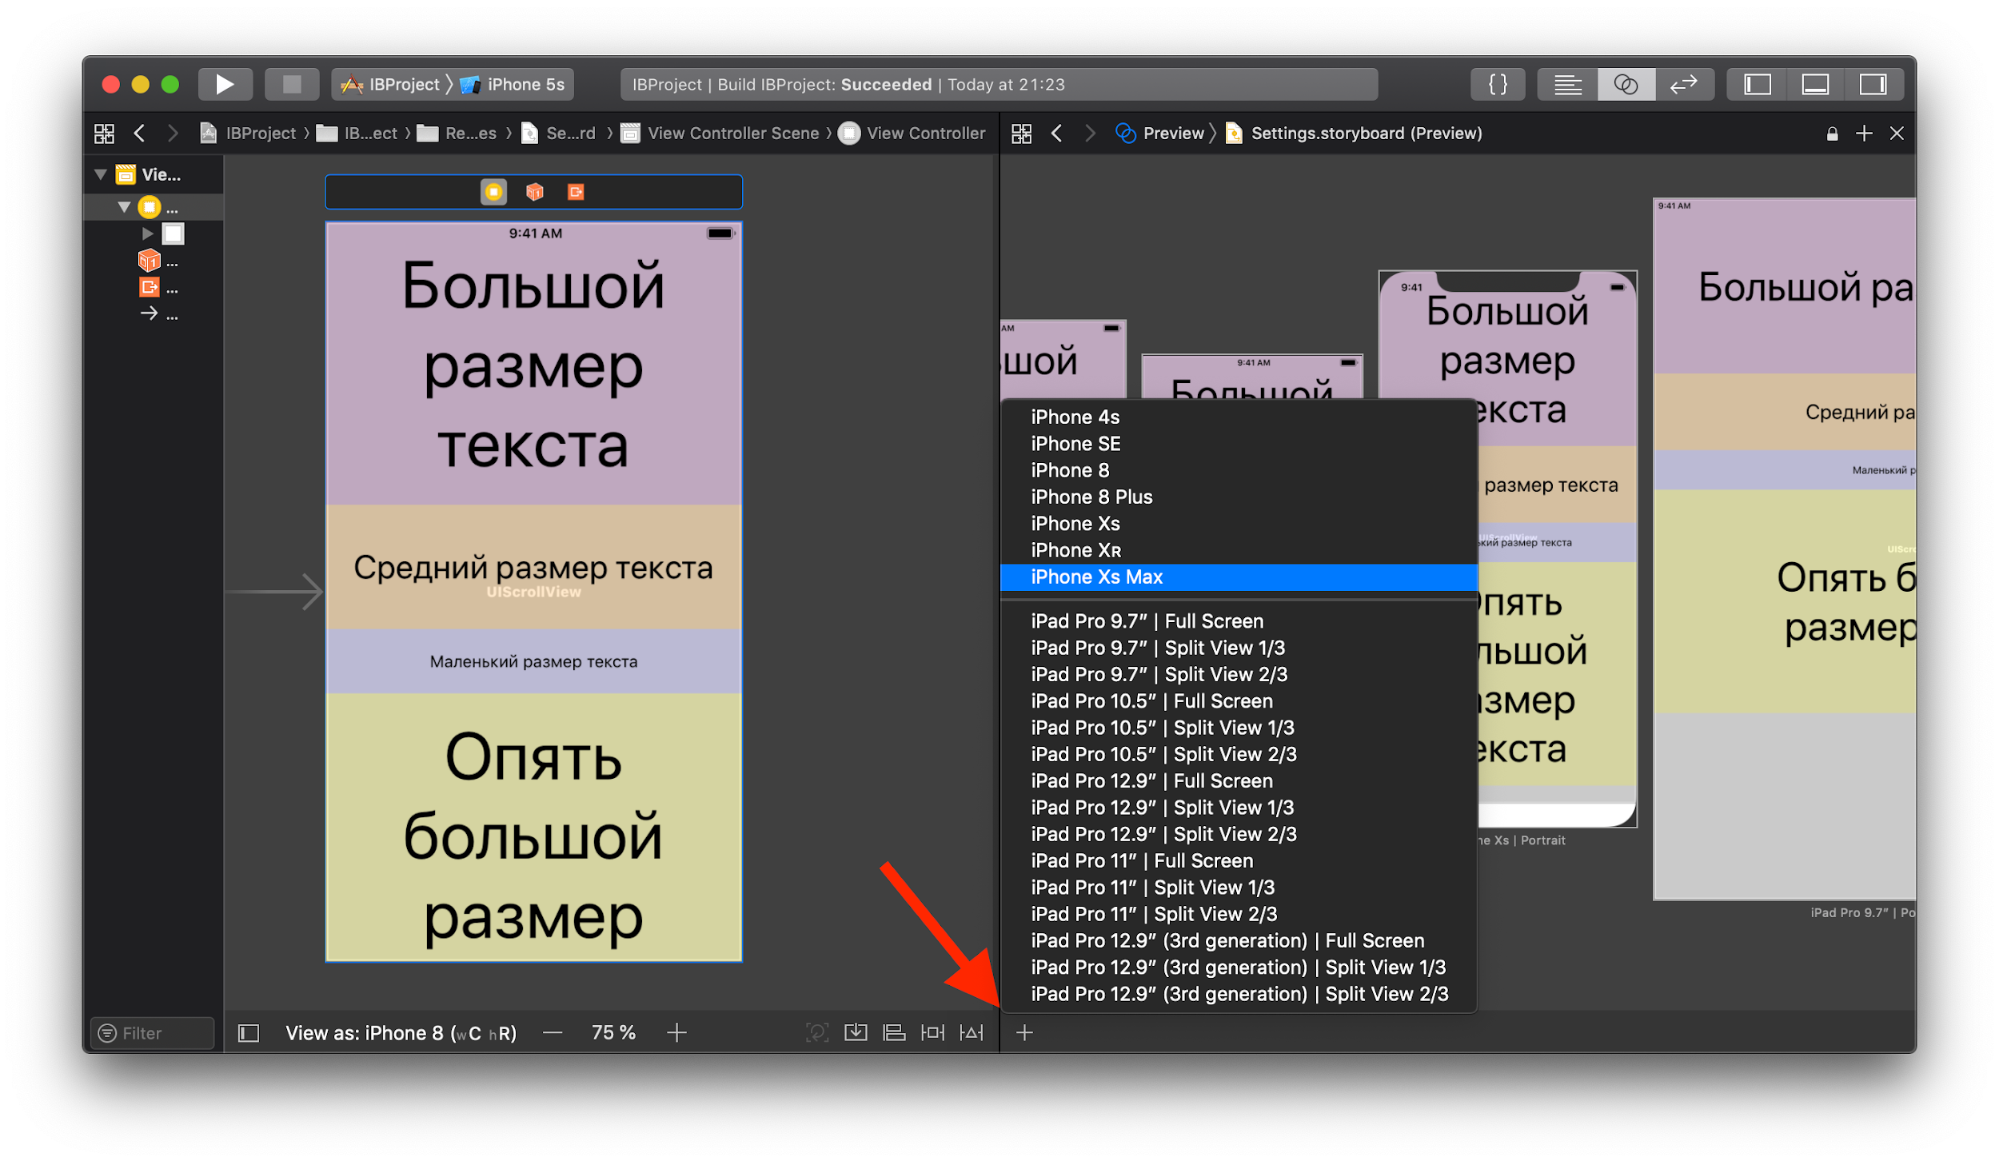
In addition, if the Storyboard supports multiple languages, you can see how the selected screen will look like with each of them:
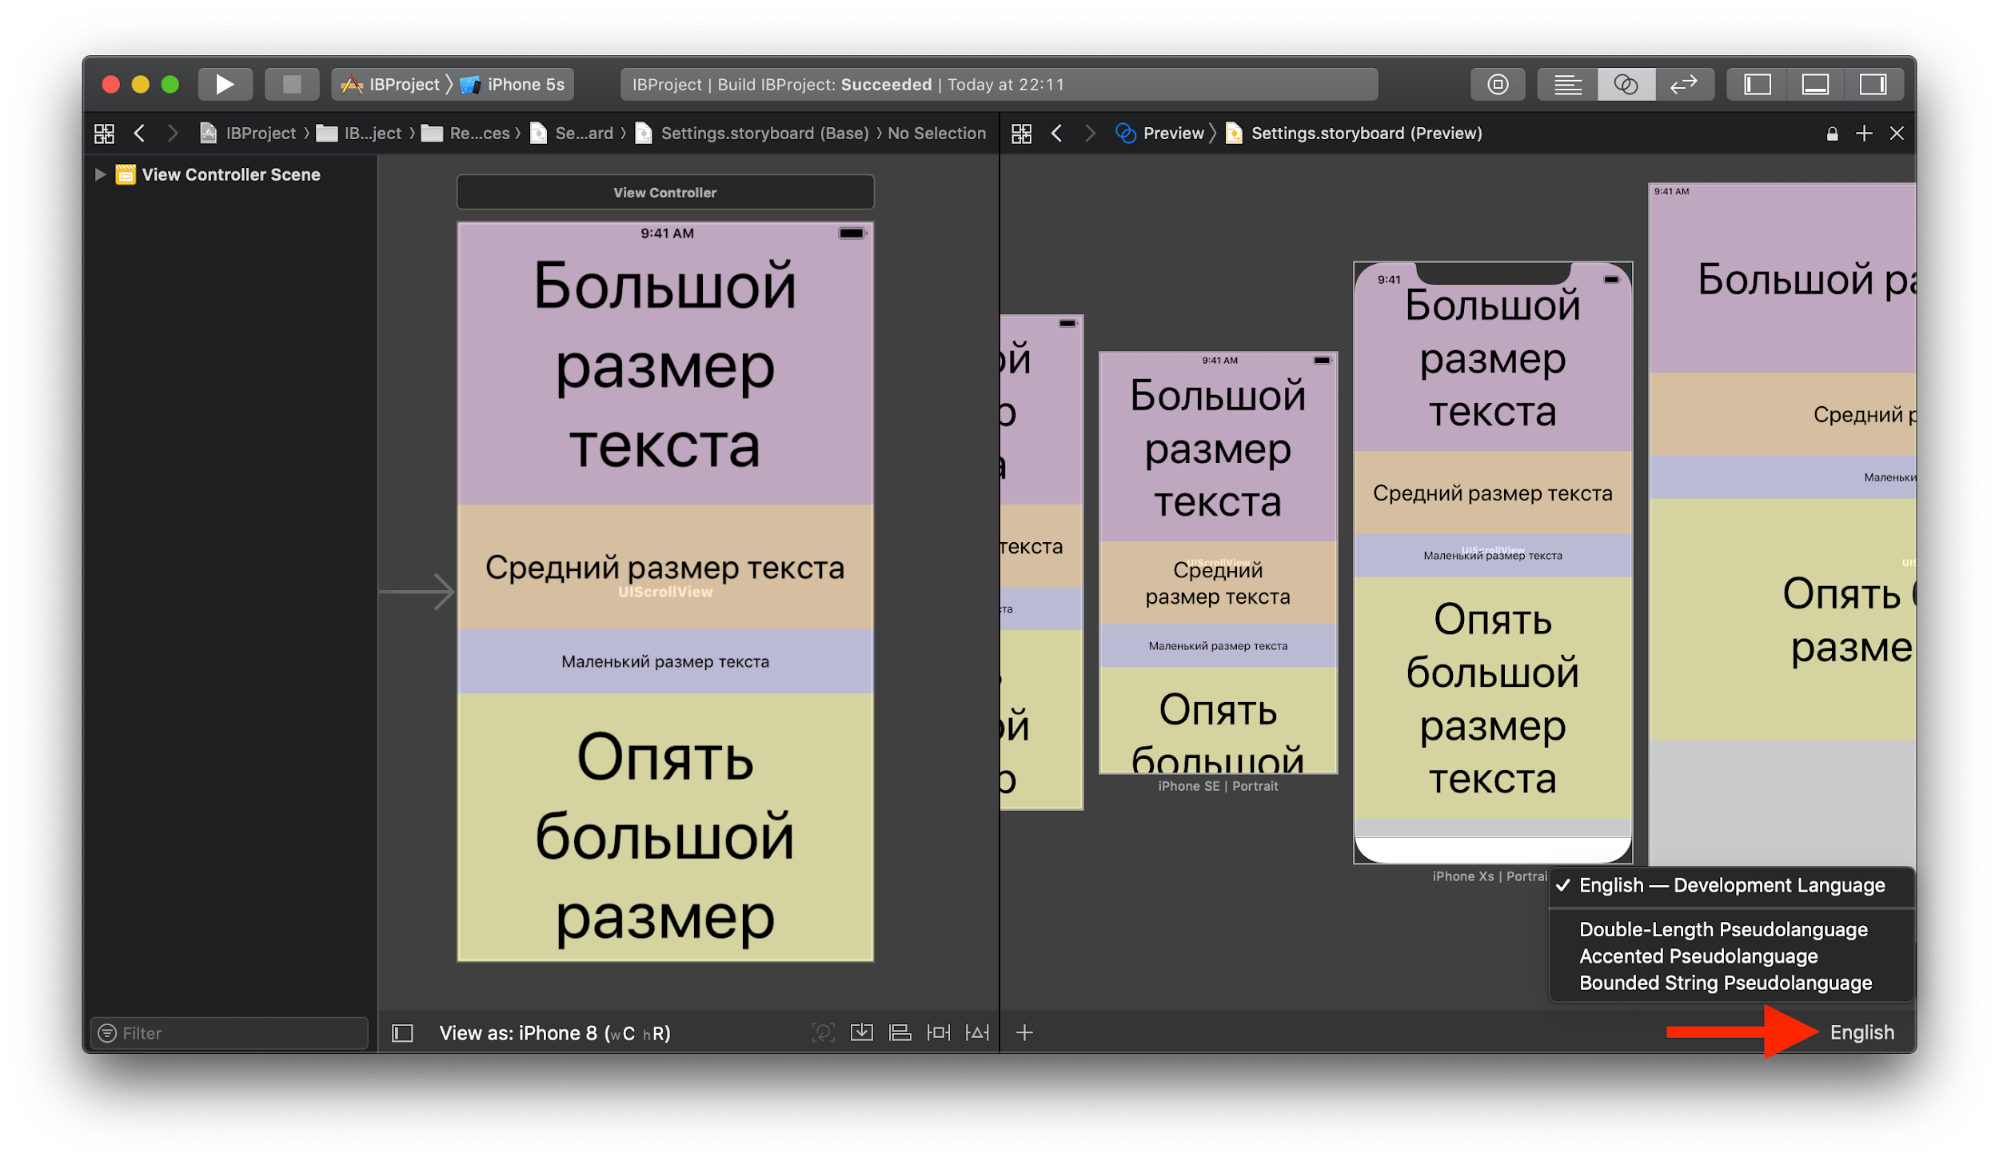
Language can be selected for all screens at once, and for each separately.
4. Deleting a template UI code
Creating a user interface without Interface Builder is accompanied by either a large number of template code, or superclasses and extensions that entail additional maintenance work. This code can penetrate other parts of the application, making it difficult to read and search. Using Storyboards and Xibs allows you to unload the code, making it more focused on logic.
5. Size classes
Every year there are new devices for which you need to adapt the user interface. This helps the concept of trait variations and, in particular, size classes , which allow you to create a UI for any size and orientation of the screen.
Size classes classify the height (h) and width (w) of device screens in terms of compact and regular ( C and R ). For example, iPhone 8 has a size class (wC hR) in portrait orientation and (wC hC) in landscape, and iPhone 8 Plus - (wC hR) and (wR hC), respectively. For the rest of the device can be found here .
In one Storyboard or Xib for each of the size classes you can store your own data set, and the application will use the appropriate device depending on the device and screen orientation at the execution stage, thus identifying the current size class.If any layout parameters are the same for all size classes, then they can be configured in the category “ Any ”, which is already selected by default.
For example, adjust the font size depending on the size class. Select for viewing in the Storyboard the iPhone 8 Plus device in portrait orientation and add a new condition for
font: if width - Regular (everything else is set to “Any”), then the font size should be 37:
Now, if we change the screen orientation, the font size increase - the new condition will work, since in landscape orientation the iPhone 8 Plus has size class (wR hC) . In Storyboard, depending on the size class, you can also hide Views, enable / disable constraints, change their value
constantand much more. Read more about how to do this all here .In the screenshot above, it is worth noting the bottom panel with the choice of device for displaying the layout. It allows you to quickly check the adaptability of the UI on any device and for any screen orientation, and also shows the size class of the current configuration (next to the device name). Among other things, on the right there is a button " Vary for Traits ". Its goal is to enable trait variations only for a certain category of width, height or width and height at the same time. For example, choosing an iPad with size class (wR hR) , click "Vary for Traits" and tick the width and height. Now all subsequent layout changes will only be applied to devices with (wR hR) until we click “ Done Varying ”.
Conclusion
| # | disadvantages | Benefits |
|---|---|---|
| one | Hard to rule conflicts | UI visualization and constraints |
| 2 | Not as flexible as code | The ability to instantly see the result of their actions |
| 3 | An error can lead to a crash at run time. | Preview all screen sizes at the same time |
| four | You cannot use custom initializers for UIViewControllers | Deleting a template UI code |
| five | Size classes |
Source: https://habr.com/ru/post/456086/
All Articles