Everything you wanted to know about SwiftUI, but were afraid to ask

Hello! My name is Renat, I am developing a subscription analytics service in iOS - Apphud.
As you know, Apple at WWDC 2019 introduced its new framework SwiftUI, which is intended in the future to replace (or not?) With the usual UIKit. SwiftUI allows you to describe the application interface in a declarative style and greatly reduces the amount of code.
Apple has already presented some interesting tutorials in English with many examples. I will try to talk about the new framework in the form of questions and answers. So let's go.
Before starting work
To work with SwiftUI, you need to download Xcode 11 Beta . You must also be a registered Apple developer. Having the latest macOS Catalina is desirable, but not necessary. Without it, the Canvas will not be available.
So, in Xcode 11 Beta, create a new project and make sure that the tick “Use SwiftUI” is ticked.
Questions and answers
Where did Interface Builder go?
For SwiftUI, Interface Builder is no longer needed - Canvas has replaced it with an interactive interface editor, which is closely related to the code. When writing code, its visual part is automatically generated on canvas and vice versa. Very convenient, and most importantly safe. Now your application will not fall due to the fact that you forgot to update the @IBOutlet connection with the variable. In this article we will not touch canvas , we will consider only the code.
Has the launch of the application changed?
Yes, now the initial object in the application interface is not a UIWindow , but a new UIScene class (or its successor UIWindowScene ). And a window is added to the scene. These changes concern not only SwiftUI, but also iOS 13 as a whole.
When you create a project, you will see the files AppDelegate , SceneDelegate and ContentView . SceneDelegate - a delegate of the UIWindowScene class, used to control scenes in an application. Strongly reminiscent of AppDelegate .
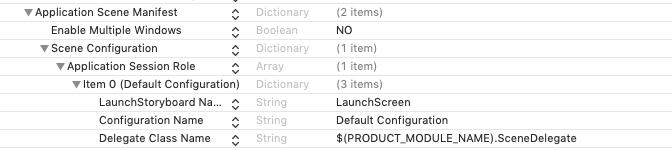
The SceneDelegate class is specified in Info.plist.
In the delegate method scene: willConnectTo: options: a window is created and a root UIHostingController that contains the ContentView . ContentView is our homepage. All development will be conducted in this class.
How does View differ from UIView?
ContentView.swift you open ContentView.swift , you will see the declaration of the ContentView container. As you already understood, SwiftUI does not have the usual viewDidLoad or viewDidAppear . The basis of the screens here is not the UIViewController , but the View . The first thing to notice is that the ContentView is a structure ( struct ) that accepts the View protocol. Yes, View now become a protocol, and very simple. The only method you should implement in ContentView is to describe the body variable. All your subview and custom views must accept the View protocol, that is, they must have a body variable.
What is body?
Body is directly our container where all other subviews are added. This is somewhat similar to the body in the html page, where the html page is the ContentView . Body must always have exactly one descendant, and any class that accepts the View protocol.
struct ContentView: View { var body: some View { Text("Hello, world!") } } Opaque return types or what is some?
The construction of some TypeName is an innovation of Swift 5.1, which is called the opaque return type . It is used for cases when it does not matter to us which particular object to return, the main thing is that it supports the specified type, in this case, the View protocol.
If we just wrote var body: View , it would mean that we should return View . The Any class is also not suitable, since we would have to perform a cast operation ( using the as! operator as! ). Therefore, they invented a special word some before the name of the protocol to refer to opaque return type . Instead of View we can return Text , Image , VStack — anything, since they all support the View protocol. But there must be exactly one element: when trying to return more than one View compiler will generate an error.
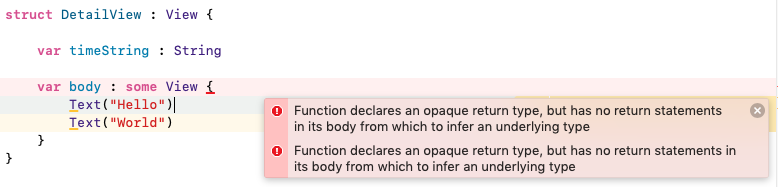
Compile error when trying to return more than one element in body
What is the syntax inside brackets and where is addSubview?
In Swift 5.1, it became possible to group objects into something whole in a declarative style. This looks like an array inside a closure block, but items are listed on a new line without commas and return . This mechanism was called Function Builder .
This has found widespread use in SwiftUI. Based on the Function Builder , ViewBuilder is a declarative interface constructor. Using ViewBuilder we no longer need to write addSubview for each element — just enumerate all the View from a new line inside the closure block. SwiftUI will add and group elements into a more complex parent container.
@available(iOS 13.0, OSX 10.15, tvOS 13.0, watchOS 6.0, *) @_functionBuilder public struct ViewBuilder { /// Builds an empty view from an block containing no statements, `{ }`. public static func buildBlock() -> EmptyView /// Passes a single view written as a child view (e..g, `{ Text("Hello") }`) through /// unmodified. public static func buildBlock<Content>(_ content: Content) -> Content where Content : View } ViewBuilder announcement in the SwiftUI framework
How to add UILabel, UIImageView and other elements?
Elements are created very simply: each View needs to be written from a new line and changed its appearance with the help of modifying functions ( view modifiers ). The difference between modifiers and functions familiar to us is that they always return a container object instead of void . Therefore, we can create whole chains of modifiers through a dot.
var body: some View { VStack{ Text("World Time").font(.system(size: 30)) Text("Yet another subtitle").font(.system(size: 20)) } } However, not all controls and View have their own SwiftUI counterparts. Here is a partial list of classes from UIKit and their analogues:
UITableView->ListUICollectionViewhas no counterpartUILabel->TextUITextField->TextFieldUIImageView->ImageUINavigationController->NavigationViewUIButton->ButtonUIStackView->HStack/VStackUISwitch->ToggleUISlider->SliderUITextViewhas no counterpartUIAlertController->Alert/ActionSheetUISegmentedControl->SegmentedControlUIStepper->StepperUIDatePicker->DatePicker
How do you navigate between screens?
The role of the navigation controller takes on a special NavigationView . Enough to wrap your code in NavigationView{} . And the transition action itself can be added to the special NavigationButton button, which pulls the conventional DetailView screen.
var body: some View { NavigationView { Text("World Time").font(.system(size: 30)) NavigationButton(destination: DetailView() { Text("Go Detail") } } } How to present a new view modally? This is done, for example, using the presentation button :
PresentationButton(Text("Present"), destination: DetailView()) As mentioned above, body can return not only an instance of View , but also any other class that accepts this protocol. This gives us the opportunity to DetailView not the DetailView , but even Text or Image !
How to place elements on the screen?
The elements are located dependent on each other and can be arranged vertically inside the VStack , horizontally HStack and one above another ZStack . We also have ScrollView and ListView . You can alternate and share these containers to get any mesh of elements.
By combining containers with each other you can get a rather large tree with a large number of investments. However, SwiftUI is optimized specifically for this, so the deep nesting of containers does not affect performance. This is stated in the video from wwdc ( since 15:32 ).
var body: some View { NavigationView { VStack { NavigationButton(destination: LargeView(timeString: subtitle)) { Text("See Fullscreen") } Text("World Time").font(.system(size: 30)) } } } How to show the Navigation Bar?
Announcing NavigationView not enough, you must specify the navigation title and the style of the navigation bar .
NavigationView { VStack{}.navigationBarTitle(Text("World Time"), displayMode: .inline) } Note that the navigationBarTitle function is not called from NavigationView , but from its internal View . DisplayMode is a parameter that indicates the style of the navigation bar 'a: large or standard.
Is there an analogue of the viewDidLoad method?
If you want to execute code when initializing a View , you can do this by adding the onAppear {} function. OnAppear can be added to any View , for example, to VStack . In this example, when the container appears on the screen, an http request to the server is made.
struct ContentView : View { @State var statusString : String = "World Time" var body: some View { NavigationView { VStack { NavigationButton(destination:DetailView()) { Text("Go Detail") } Text(statusString).font(.system(size: 30)) }.onAppear { self.loadTime() } } } func loadTime(){ NetworkService().getTime { (time) in if let aTime = time { self.statusString = "\(aTime.date())" } } } } We call theloadTimefunction, which requests the current time from the server and returns theWorldTimemodel. We will not dwell on theNetworkServiceclass, you can view all the code by downloading the source code. Link at the end of the article.
The var statusString was rendered in order to assign the current time to it later. The variable is preceded by a special attribute @State . What does he mean?
Property Wrappers or what is @State ?
In Swift 5.1, the so-called property wrappers (or property delegates ) appeared. In SwiftUI, property wrappers are used to update or associate one of the view parameters with our own variable, for example, the value of the switch ( Toggle ).
The @State attribute is a special attribute that is set before a variable is declared. This allows us to automatically track property changes without additional code. In the example above, the text "World Time" will change to the current date as soon as we update the statusString value.
To bind values ( Properties Binding ), we can specify a special $ character in front of the variable name in the code itself:
struct DetailsView: View { @State var changeToggle: Bool var body: some View { Toggle(isOn: $changeToggle) { Text("Change Toggle") } } } Changing the switch position will change the value of the variable.
Property wrappers are a very important part of SwiftUI, I just casually mentioned them. For more information on property wrappers, watch the video from wwdc here (from the 37th minute), here (from the 12th minute) and here (from the 19th minute).
How to add view in runtime?
Immediately it should be noted that it is impossible to add a view at any time in the literal sense of the word. SwiftUI is a declarative framework that renders the entire view entirely. However, you can set different conditions inside the body and update the view state when they change. In this example, we use the simplest bundle of @State – if with the variable isTimeLoaded .
struct ContentView : View { @State var statusString : String = "World Time" @State var isTimeLoaded : Bool = false var body: some View { NavigationView { VStack { if isTimeLoaded { addNavigationButton() } Text(statusString).font(.system(size: 30)).lineLimit(nil) }.navigationBarTitle(Text("World Time"), displayMode: .inline) }.onAppear { self.loadTime() } } func addNavigationButton() -> some View { NavigationButton(destination: Text("124!!!")) { Text("Go Detail") } } func loadTime(){ NetworkService().getTime { (time) in if let aTime = time { self.statusString = "\(aTime.date().description(with: Locale.current))" self.isTimeLoaded = true } } } } struct DetailView : View { var timeString : String var body : some View { Text(timeString).font(.system(size: 40)).lineLimit(nil) } } By the way, did you notice that in the addNavigationButton() function there is no word return ? This is another Swift 5.1 innovation - for functions with a single expression, it is not necessary to write return . But you can write.
Conclusion
This is only part of the questions and answers on SwiftUI. I looked at general issues, I hope this article will help beginners understand the main points of this framework. SwiftUI is still raw, but no doubt it will be improved.
The logical question is: is it worth studying UIKit? Of course, yes . UIKit is the basis of programming on iOS and it will continue to evolve. Moreover, many SwiftUI components are wrappers for UIKit. Well, so far there are no libraries, frameworks, pods for SwiftUI. All while it is necessary to write independently. So better study both approaches to development - this is how you will be a more valuable developer.
Project sources can be downloaded here .
Thank you for reading the article to the end. I hope she was useful to you.
What to read?
')
Source: https://habr.com/ru/post/455970/
All Articles