How to implement context menus (Context Menu) in iOS 13
Hello everyone, my name is Denis, we are developing a service for analyzing subscriptions of iOS applications - Apphud.
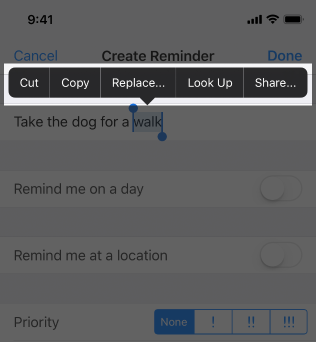
At WWDC 2019, Apple introduced a new way to interact with your application interface: context menus . They look like this:

In this article we will consider some subtleties of their use and learn how to do them.
The context menus are a logical continuation of the “Peek and Pop” technology, when the user could open a preview of an element by strongly pressing on it. But between them there are several significant differences.
Context menus work on any device running iOS 13. Support for 3D touch from the device is not required. Therefore, in particular, they can be used on all iPads.
Buttons that allow you to interact with the element appear immediately and do not require a swipe up.
To open the context menu, the user simply holds his finger on the desired item or press it hard (if the device supports 3D Touch).
Recommendations when using context menus
Apple in Human Interface Guidelines recommends following the rules when designing context menus.
Design correctly
It will be bad if you add a menu for some items in some places and not add it for similar items in others. Then the user will feel that the application is not working properly.
Include only necessary items in the menu
The context menu is a great place for the most frequently used commands. “Most often” is the key phrase. Do not add everything there in a row.
Use submenus
Use nested menus to make it easier for the user to navigate. Give the menu items simple and clear names.
Use no more than 1 level of nesting
Despite the fact that the submenus can make navigation easier, they can easily complicate it. Apple does not recommend using more than 1 level of nesting.
Locate the most frequently used items at the top.
People primarily focus on the top of the menu, so it will be a little easier for them to navigate in your application.
Use grouping
Group similar menu items
Avoid simultaneous use of the context menu and the edit menu on the same item.
They may conflict with each other, because both are caused by a long tap.
Do not add a separate “Open” button to the menu.
Users can open an item by simply tapping on it. An additional “Open” button will be superfluous.
The simplest context menu for UIView
Now that we have learned the basic rules for using context menus, let's move on to practice. Of course, the menus work only on iOS 13 and higher, and for testing you will need Xcode 11. You can download the beta version of Xcode 11 here .
You can download an example completely from here .
Let's add a context menu, for example, on a UIImageView , as in the animation above .
For this, it is enough to add the UIImageView object to the controller and write several lines of code, for example, in the viewDidLoad method:
class SingleViewController: UIViewController { @IBOutlet var imageView: UIImageView! override func viewDidLoad() { super.viewDidLoad() imageView.isUserInteractionEnabled = true let interaction = UIContextMenuInteraction(delegate: self) imageView.addInteraction(interaction) } } At the beginning, an object of class UIContextMenuInteraction . The designer requires you to specify a delegate who will be responsible for the menu. Let's come back to this a little later. And by the addInteraction method we add our menu to the picture.
Now it remains to implement the protocol UIContextMenuInteractionDelegate . It has only one mandatory method, which is responsible for creating the menu:
extension SingleViewController: UIContextMenuInteractionDelegate { func contextMenuInteraction(_ interaction: UIContextMenuInteraction, configurationForMenuAtLocation location: CGPoint) -> UIContextMenuConfiguration? { let configuration = UIContextMenuConfiguration(identifier: nil, previewProvider: nil) { actions -> UIMenu<UIAction>? in let save = UIAction(__title: "My Button", image: nil, options: []) { action in // Put button handler here } return configuration } } If this method returns nil , the context menu will not be called. Inside the method itself, we create an object of class UIContextMenuConfiguration . When creating, we pass these parameters:
identifier- the menu identifier.previewProvideris a custom controller that can optionally be displayed instead of the current item in the menu. We will look at this a little later.in
actionProviderwe pass context menu items.
The elements themselves are simpler to create: the name, an optional icon and a handler for clicking on a menu item are indicated. That's all!
Add a submenu
Let's complicate things a bit. Add to our picture a menu with two items: “Save” and “Edit ...”. Clicking on “Edit ...” opens a submenu with the items “Rotate” and “Delete”. It should look like this:

To do this, you need to rewrite the protocol method UIContextMenuInteractionDelegate as follows:
func contextMenuInteraction(_ interaction: UIContextMenuInteraction, configurationForMenuAtLocation location: CGPoint) -> UIContextMenuConfiguration? { let configuration = UIContextMenuConfiguration(identifier: nil, previewProvider: nil) { actions -> UIMenu<UIAction>? in // Creating Save button let save = UIAction(__title: "Save", image: UIImage(systemName: "tray.and.arrow.down.fill"), options: []) { action in // Just showing some alert self.showAlert(title: action.title) } // Creating Rotate button let rotate = UIAction(__title: "Rotate", image: UIImage(systemName: "arrow.counterclockwise"), options: []) { action in self.showAlert(title: action.title) } // Creating Delete button let delete = UIAction(__title: "Delete", image: UIImage(systemName: "trash.fill"), options: .destructive) { action in self.showAlert(title: action.title) } // Creating Edit, which will open Submenu let edit = UIMenu<UIAction>.create(title: "Edit...", children: [rotate, delete]) // Creating main context menu return UIMenu<UIAction>.create(title: "Menu", children: [save, edit]) } return configuration } Here we create the “Save”, “Rotate” and “Delete” buttons, add the last two to the “Edit ...” submenu and wrap everything into the main context menu.
Add context menu to UICollectionView
Let's add a context menu to a UICollectionView . With a long press on the cell, the user will be shown a menu with the item “Archive”, like this:
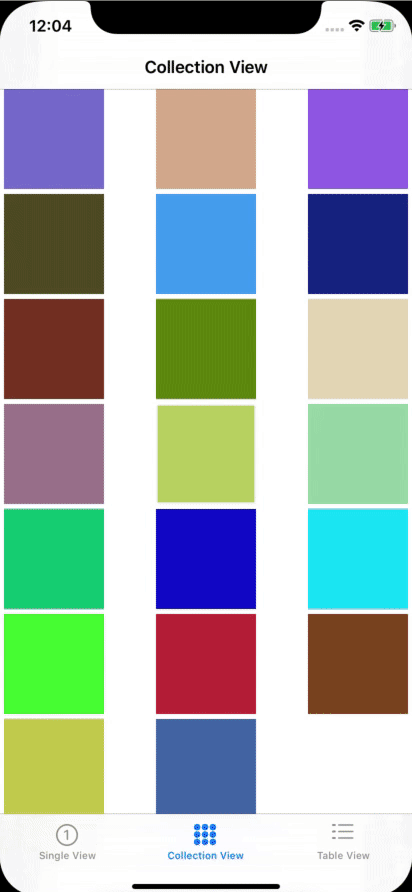
Adding a context menu to a UICollectionView is easy: just implement the optional func collectionView(_ collectionView: UICollectionView, contextMenuConfigurationForItemAt indexPath: IndexPath, point: CGPoint) -> UIContextMenuConfiguration? method func collectionView(_ collectionView: UICollectionView, contextMenuConfigurationForItemAt indexPath: IndexPath, point: CGPoint) -> UIContextMenuConfiguration? UICollectionViewDelegate protocol. This is what happened with us:
override func collectionView(_ collectionView: UICollectionView, contextMenuConfigurationForItemAt indexPath: IndexPath, point: CGPoint) -> UIContextMenuConfiguration? { let configuration = UIContextMenuConfiguration(identifier: nil, previewProvider: nil) { actions -> UIMenu<UIAction>? in let action = UIAction(__title: "Archive", image: UIImage(systemName: "archivebox.fill"), options: .destructive) { action in // Put button handler here } return UIMenu<UIAction>.create(title: "Menu", children: [action]) } return configuration } Here, as before, the element and the menu itself are created. Now with a long (strong) click on the cell, the user will see the context menu.
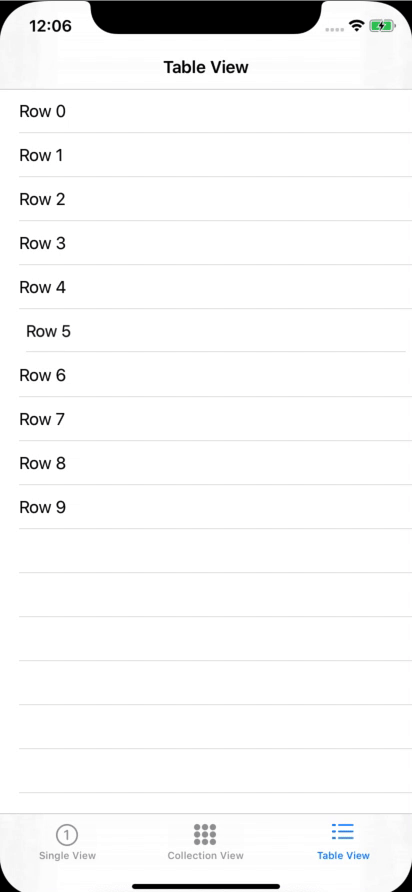
Add context menu in UITableView
Here everything is similar to UICollectionView . You need to implement the contextMenuConfigurationForRowAt method of the UITableViewDelegate protocol like this:
override func tableView(_ tableView: UITableView, contextMenuConfigurationForRowAt indexPath: IndexPath, point: CGPoint) -> UIContextMenuConfiguration? { let configuration = UIContextMenuConfiguration(identifier: nil, previewProvider: nil) { actions -> UIMenu<UIAction>? in let action = UIAction(__title: "Custom action", image: nil, options: []) { action in // Put button handler here } return UIMenu<UIAction>.create(title: "Menu", children: [action]) } return configuration } But what if we want to use the custom screen in the context menu? For example, such:
To do this, when creating a UIContextMenuConfiguration should pass the desired UIViewController to the previewProvider . Here is a sample code that implements this:
class PreviewViewController: UIViewController { static func controller() -> PreviewViewController { let storyboard = UIStoryboard(name: "Main", bundle: nil) let controller = storyboard.instantiateViewController(withIdentifier: "PreviewViewController") as! PreviewViewController return controller } } extension TableViewController: UITableViewDelegate { override func tableView(_ tableView: UITableView, contextMenuConfigurationForRowAt indexPath: IndexPath, point: CGPoint) -> UIContextMenuConfiguration? { let configuration = UIContextMenuConfiguration(identifier: nil, previewProvider: { () -> UIViewController? in // Return Preview View Controller here return PreviewViewController.controller() }) { _ -> UIMenu<UIAction>? in let action = UIAction(__title: "Custom action", image: nil, options: []) { action in // Put button handler here } return UIMenu<UIAction>.create(title: "Menu", children: [action]) } return configuration } } In the example, PreviewViewController initialized from the storyboard and displayed in the context menu.
It remains to add the processing of clicking on this ViewController. To do this, you need to implement the willCommitMenuWithAnimator method of the UITableViewDelegate protocol. The handler itself will be placed inside animator.addCompletion :
override func tableView(_ tableView: UITableView, willCommitMenuWithAnimator animator: UIContextMenuInteractionCommitAnimating) { animator.addCompletion { // Put handler here } } Conclusion
Context menus are a new powerful tool for user interaction with your application. And, as you can see, their implementation is quite simple. But we should not forget that the methods can change until the release version of iOS 13 is released.
What to read?
')
Source: https://habr.com/ru/post/455854/
All Articles