Home automation do-it-yourself
My article will be useful to those who are only thinking about this kind of system, will help decide whether to do it yourself and focus mainly on enthusiast-collective farmers. Initially, I am writing “automatics” and not a smart home, because at this stage there are no smart functions in my control system, now there was a task in data collection and device management. Everything should change in the future, when there will be algorithms that will make the house smart. From my point of view, if you can turn on the lights from your smartphone, then this does not make your home smart. It becomes smart when you have written scripts that help you, make it easier to control the house and make routine things invisible to you. For example, turn on the light on the porch, when the light level is below any threshold, and turn off at two nights, do not turn on watering if today they promise precipitation with a probability of more than 60 percent, if there is movement in the room, then turn on the backlight of the stairs, etc. And only in this case he becomes “smart”.
Some lyrics. I always wanted to have a house in the country, I decided on it for a long time, because building is not only big financial expenses, but also big expenses of your personal time, which you can devote to your favorite hobby, your family. Fortunately, one of them I have, it is just the development of any unnecessary devices. Somewhere else at the initial stage, I decided for myself that this could be interesting and, having chosen a site, I began to make plans. First, of course, I had to spend a lot of time on issues related to the construction site itself, such as a project, search for builders and all other troubles. But then, when the box was ready, it was time to think about the home automation system, that's what I like and what I wanted to do, well, it's just strange for a programmer to get up from the sofa to turn off the light in the bathroom.
Began to study what is on the market and what you can buy and do it yourself. As it turned out, the market is completely saturated with a multitude of solutions, but they lacked something else, then another, and nowhere was a holistic solution that would satisfy me (no, of course, there were solutions, but the cost was 20 tons. I was not satisfied) . For example, Schneider has a good solution based on KNX, on which you can build the control of lighting, rollers and ventilation, but integrating into the system anything other than standard elements is almost impossible, plus the web interface and control through Google Home can be forgotten, and the automation of scripts in general say no. On the other hand, there are enough solutions on the market, which are both wireless and friendly with Google and the aplicays are ready for them, but they have a lot of nuances that put such decisions to the background. For example, the complexity of simultaneous control of lighting from conventional switches and from the aplication is often impossible at all, or if it is possible that it is difficult to implement pass-through switches, but I would like to have a house in which everything works without a smart home in case of its crash. Plus, I didn’t really want to hang around the house with a mass of individual boxes, I still don’t understand why a motion sensor, carbon monoxide and temperature should not be placed in one building, even if it costs more, but I don’t have to hang the whole ceiling with some devices , and even change the batteries in them every two years.
In general, with the words, well, “tyzh programmer”, I began to think about how I would kill it myself and what is needed for that. Thinking through various options for using the system, it became clear that before doing something you need to think things through firmly (it seems obvious, but no, sometimes you want to do something right now) because putting the wiring in the grooves and plastering it, there is no way back .
')
Having formed a wish list, I got the following subsystems:
Initially, I wanted to collect everything on purchased devices and somehow bring them together into a single system, which seemed to be the best option in terms of time / finances and system reliability. Thoughts jumped from one subsystem to another, but no coherent solution was formulated for any of the subsystems, months passed, but the solution was not formed, plus the construction itself was distracting, and even winter began (and this time of mountains and snowboarding any compromises, then it was still so). I had to limit the flight of thought and force myself to work through one subsystem after another, it all started with lighting.
Let's take a quick look at each.
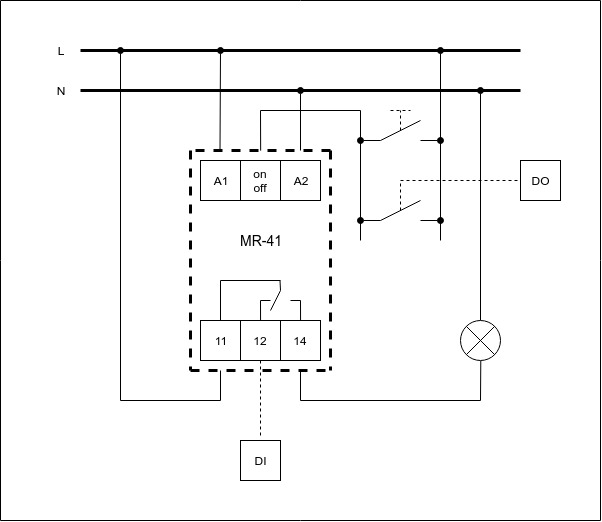
Lighting From the input there was the fact that the light should work simultaneously from both the switches and the control system (hereinafter referred to as the ACS), plus it should be possible to make the switches through. For this, the ACS should at least know whether it is currently on or not. There were several ideas on how to implement this, but I stopped on this circuit - a push-button switch - a pulse relay (Elko MR-41) - a discrete output - a discrete input. The discrete output is parallel with the push-button switch, the NO contact of the relay to the light bulb, the NC - to the discrete input to obtain the status.
From this all followed that to each point of the lighting, which should be controlled from the switch and ACS, should go your wire from the panel, similarly to and switches. The wiring diagram in the skepup really helped to realize the scale of the disaster, there were a lot of wires, but this should not scare the person who decided to go to the smart home. I recommend not being lazy and still doing this scheme, not necessarily in a skeptic, in the future this work will save you a lot of time and help even after years when you need to hang a picture and you will guess there is a wire there or not.
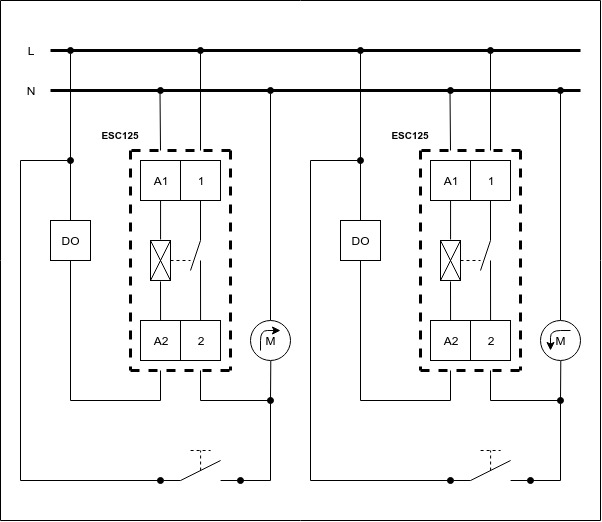
Rolety . The difference from the light is that the load in this case is not a light bulb but an electric motor, with all the consequences. Just as with lighting, we wanted to have control from a mechanical switch as well as from a control system. Therefore, the scheme turned out like this: a discrete output - a contactor and in parallel a push-button switch for each direction of rotation.
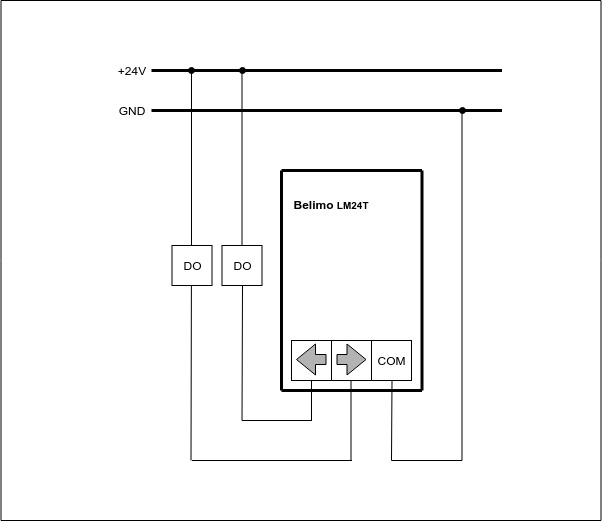
Ventilation . Everything is simple, I gave it to the ACS, and did not provide for any other management, I hardly ever want to open / close the ventilation channels with no aplimation. So the circuit - two discrete outputs - is a simple Belimo LM24-T drive with ebay for $ 25 without feedback.
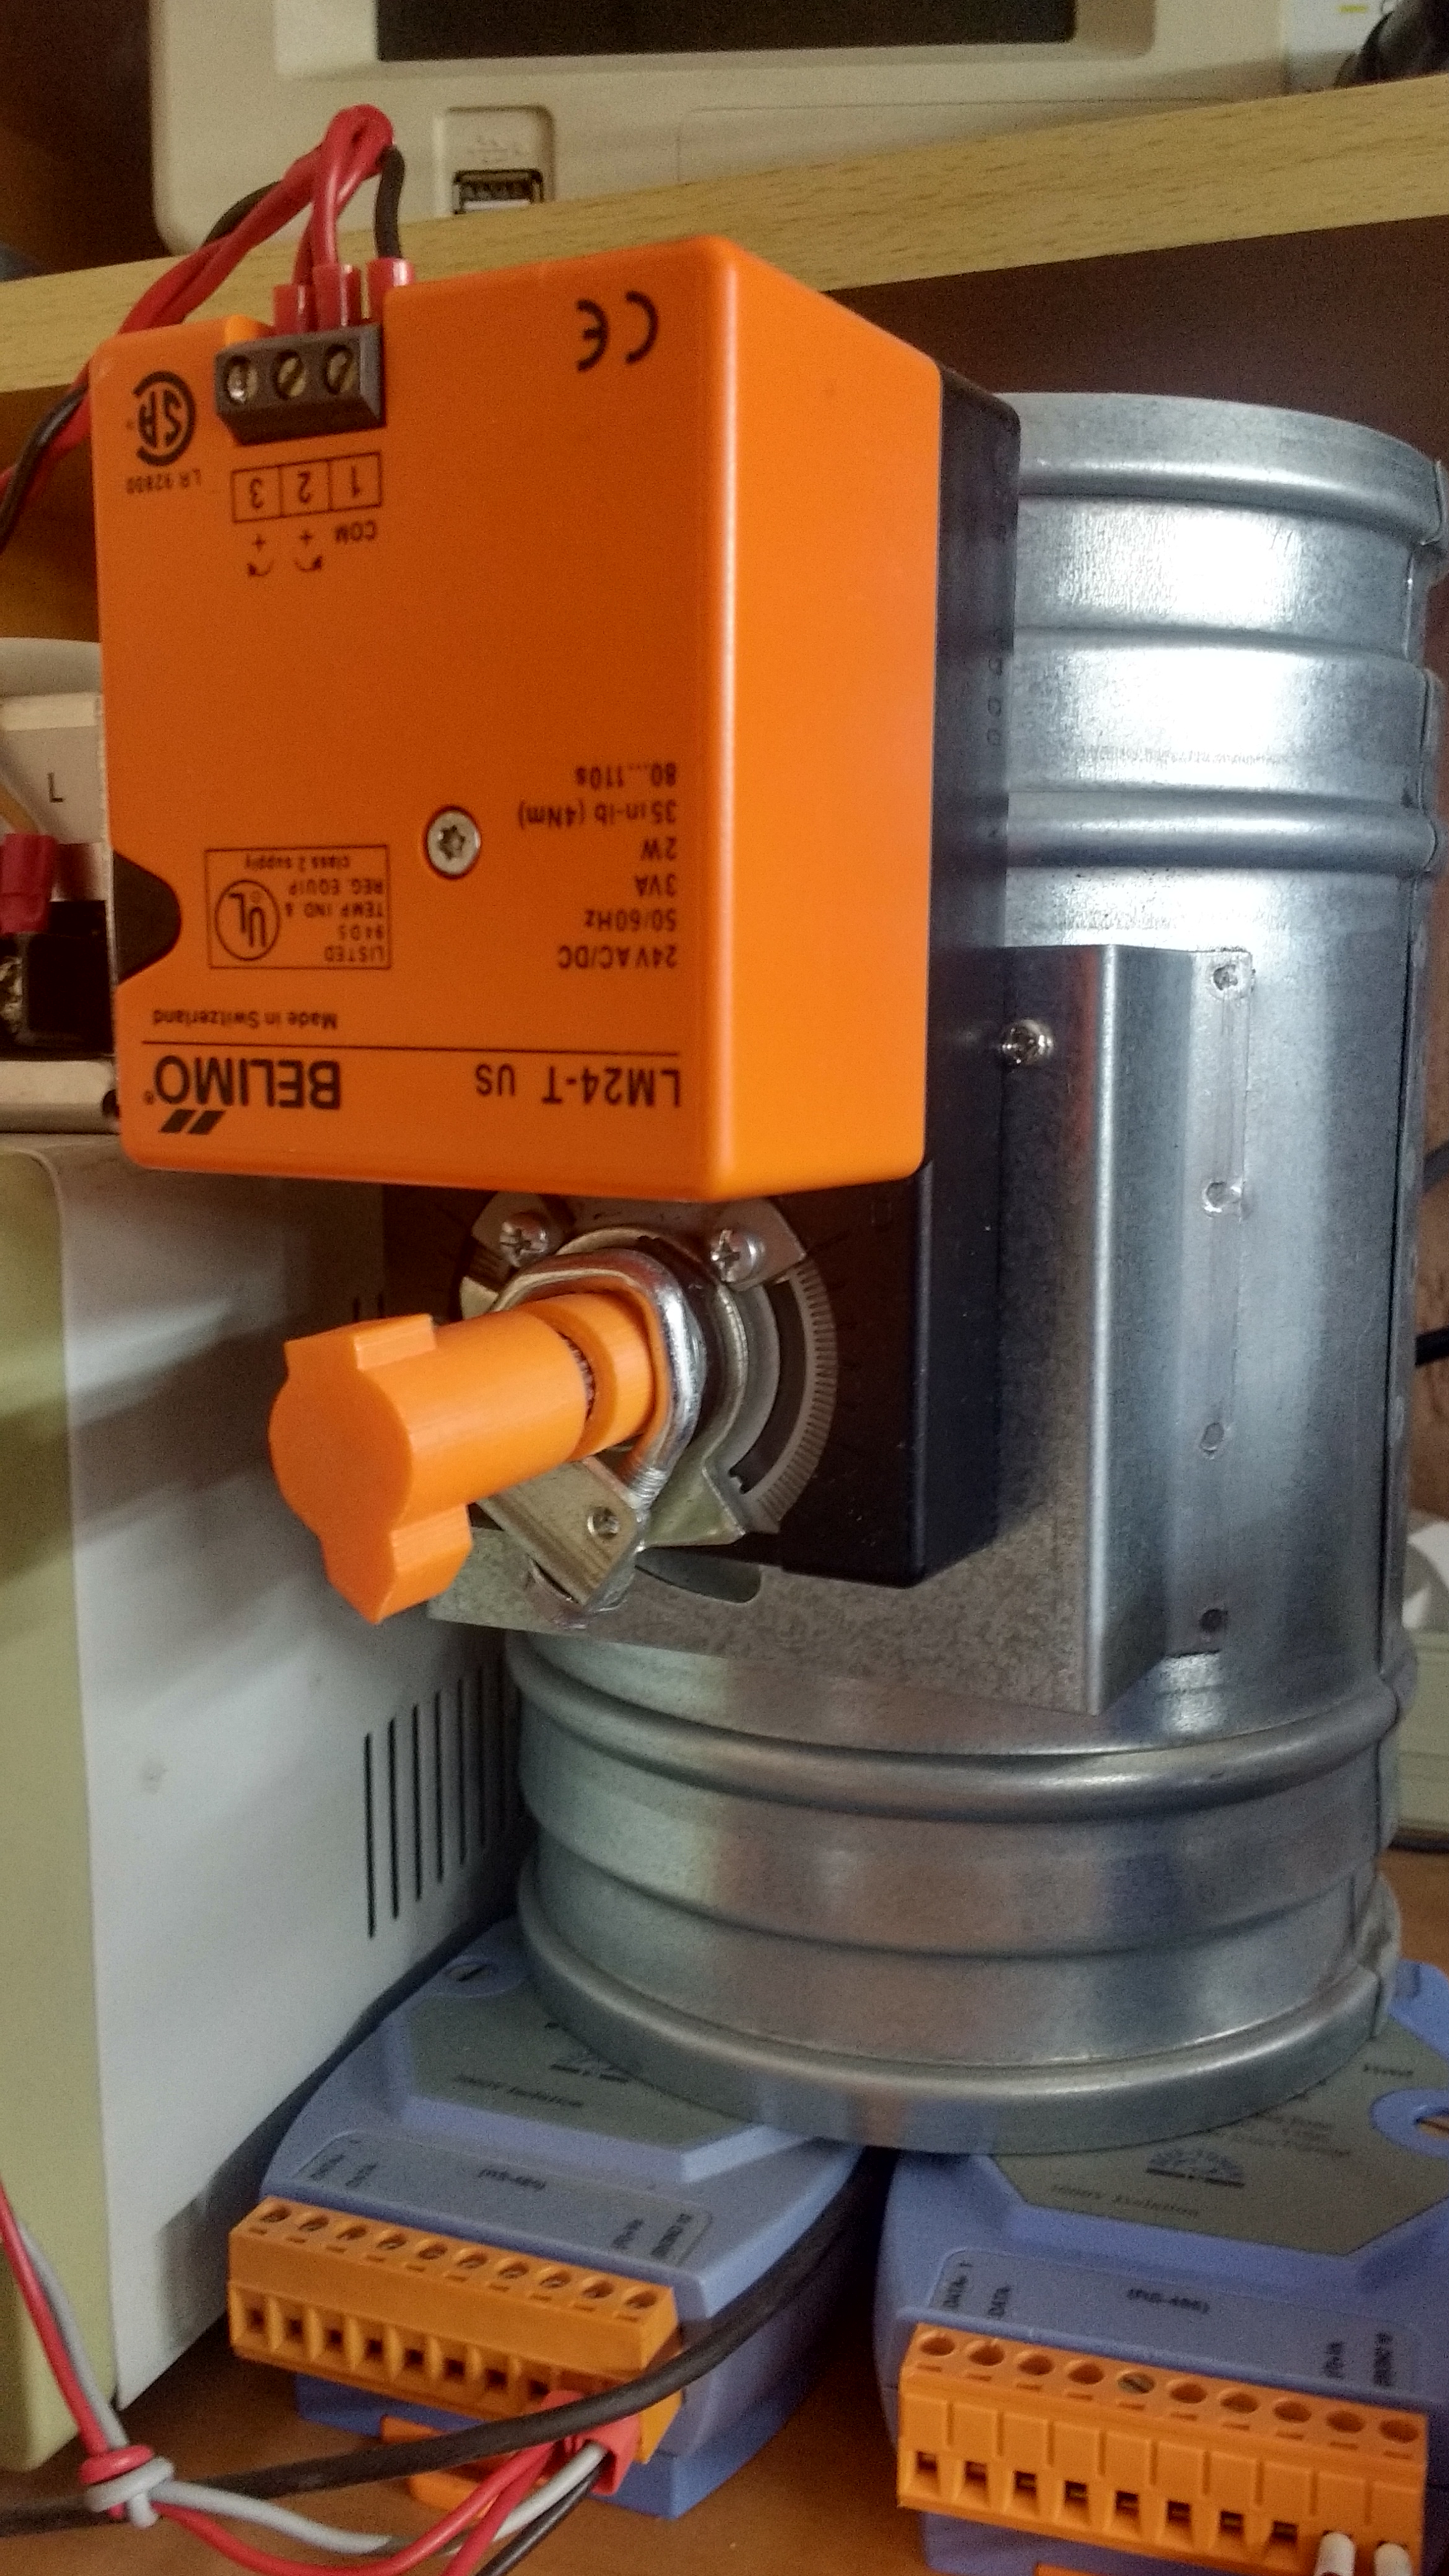
Here is the drive mounted on the ventilation flap:
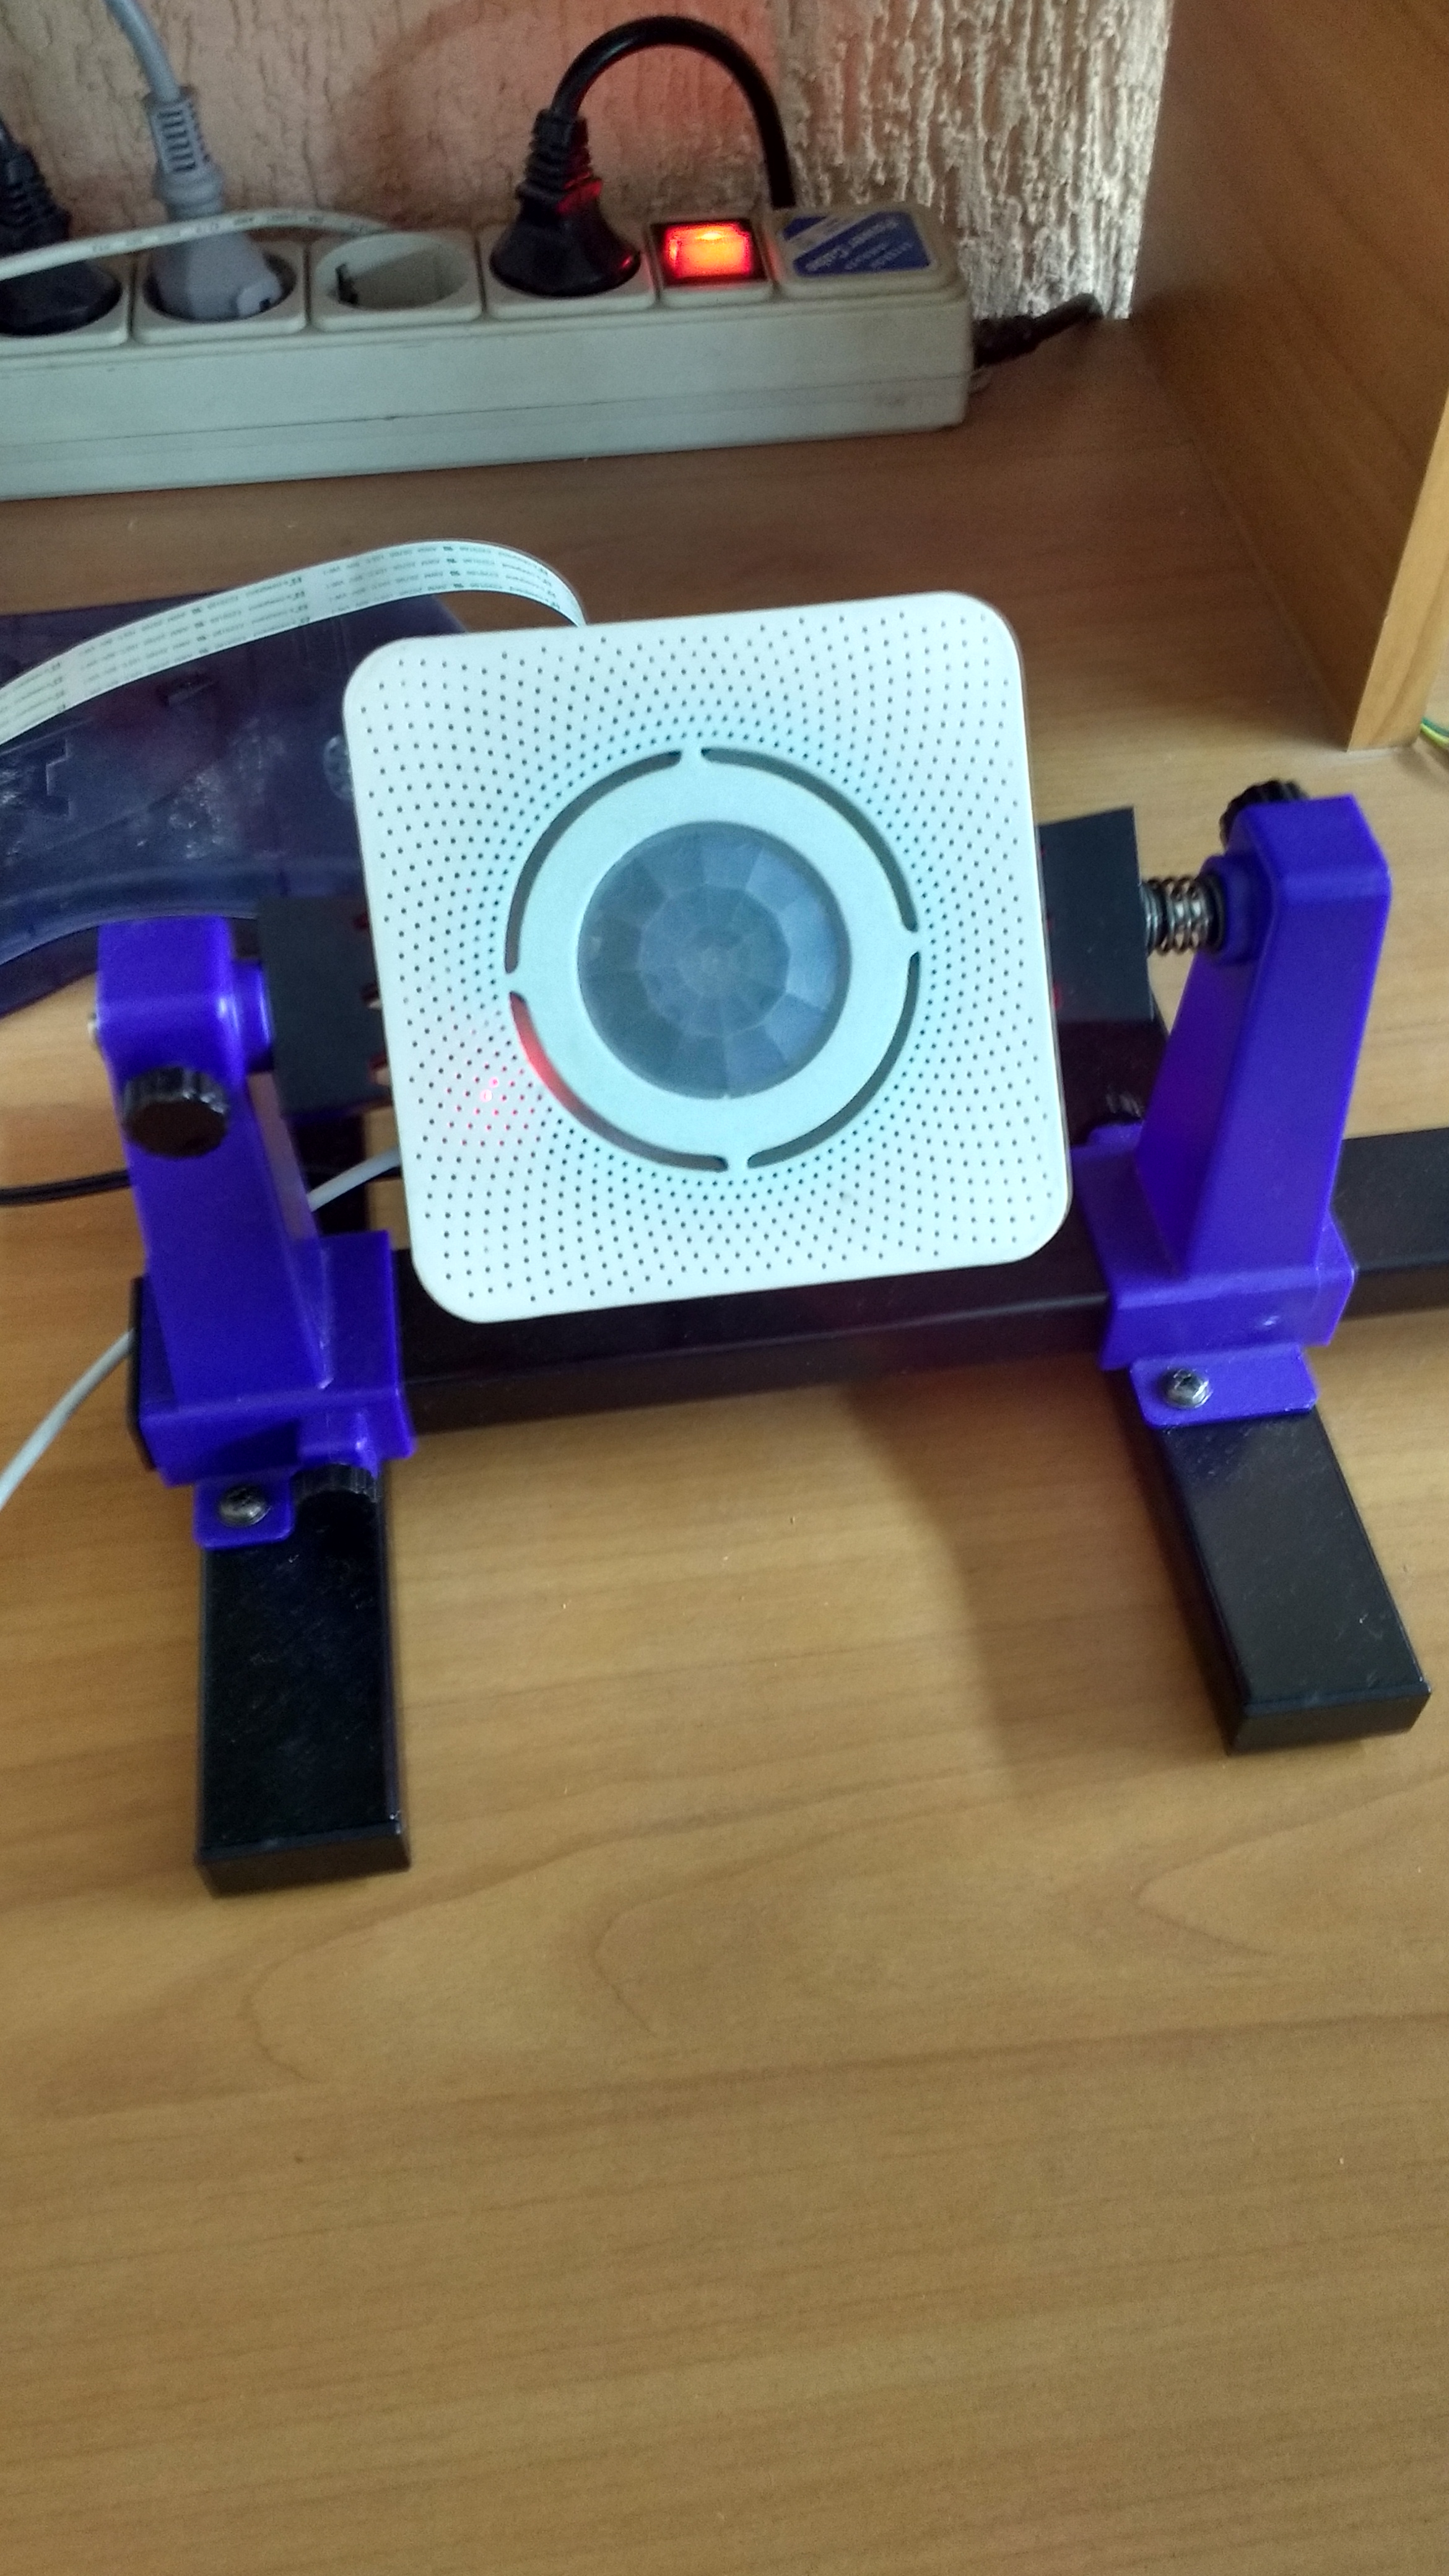
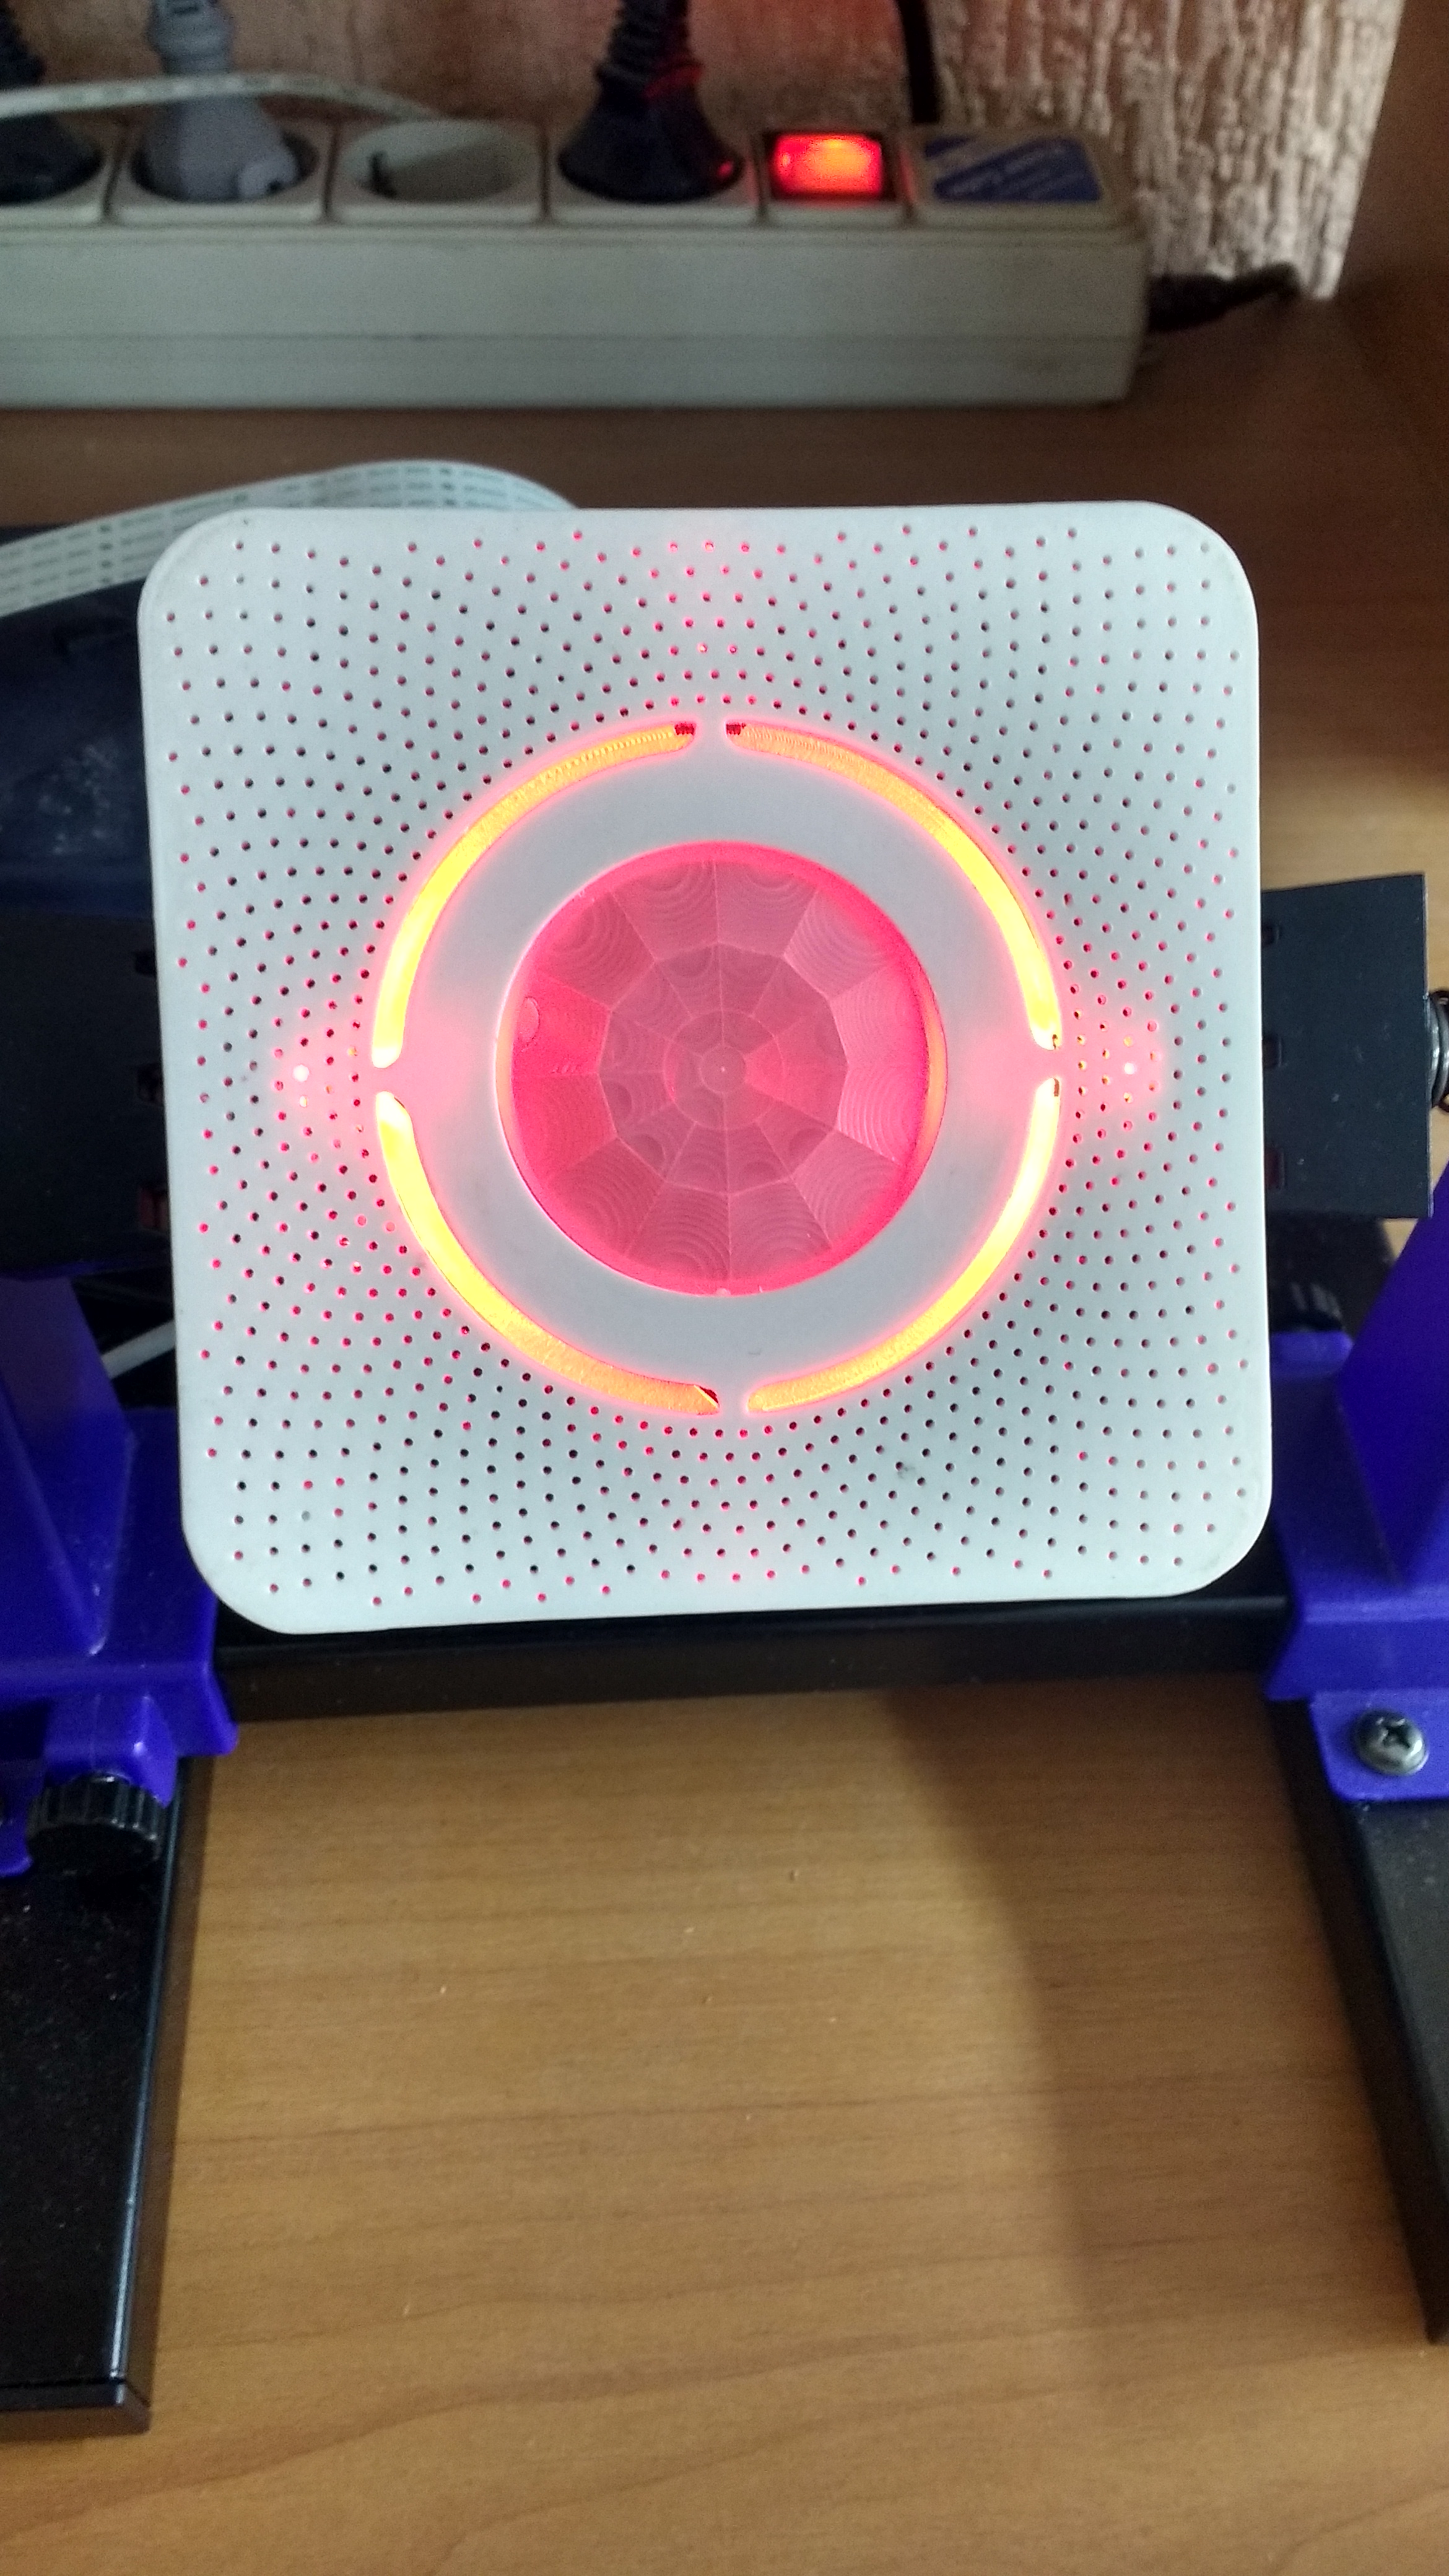
Motion sensors , light sensors, CO and temperature in the rooms. The market is now a shaft of such devices, but all with a proprietary interface and connect them to their homegrown system is quite difficult, plus the already mentioned problem with the fact that each sensor is trying to sell as a separate device in its case. The last thing I would like to see on the ceiling is a scattering of various devices, but how can you think that you need to change the batteries in all of them and it’s scary to become. Also, there always remains the probability that the manufacturer closes the open api of their devices, and will force you to use only your application as Google recently did with the nest and your entire system will fall apart. So I made my device on the AVR, calling it “sensorage” and packed it with everything I needed: a motion sensor with digital sensitivity tuning, light sensors, temperature, carbon monoxide, controlled backlight, ESP8266, RS485 with electrical isolation, 24V power supply . It turned out such a device, but in reality it needs to devote a separate article and not really dwell on it in this.
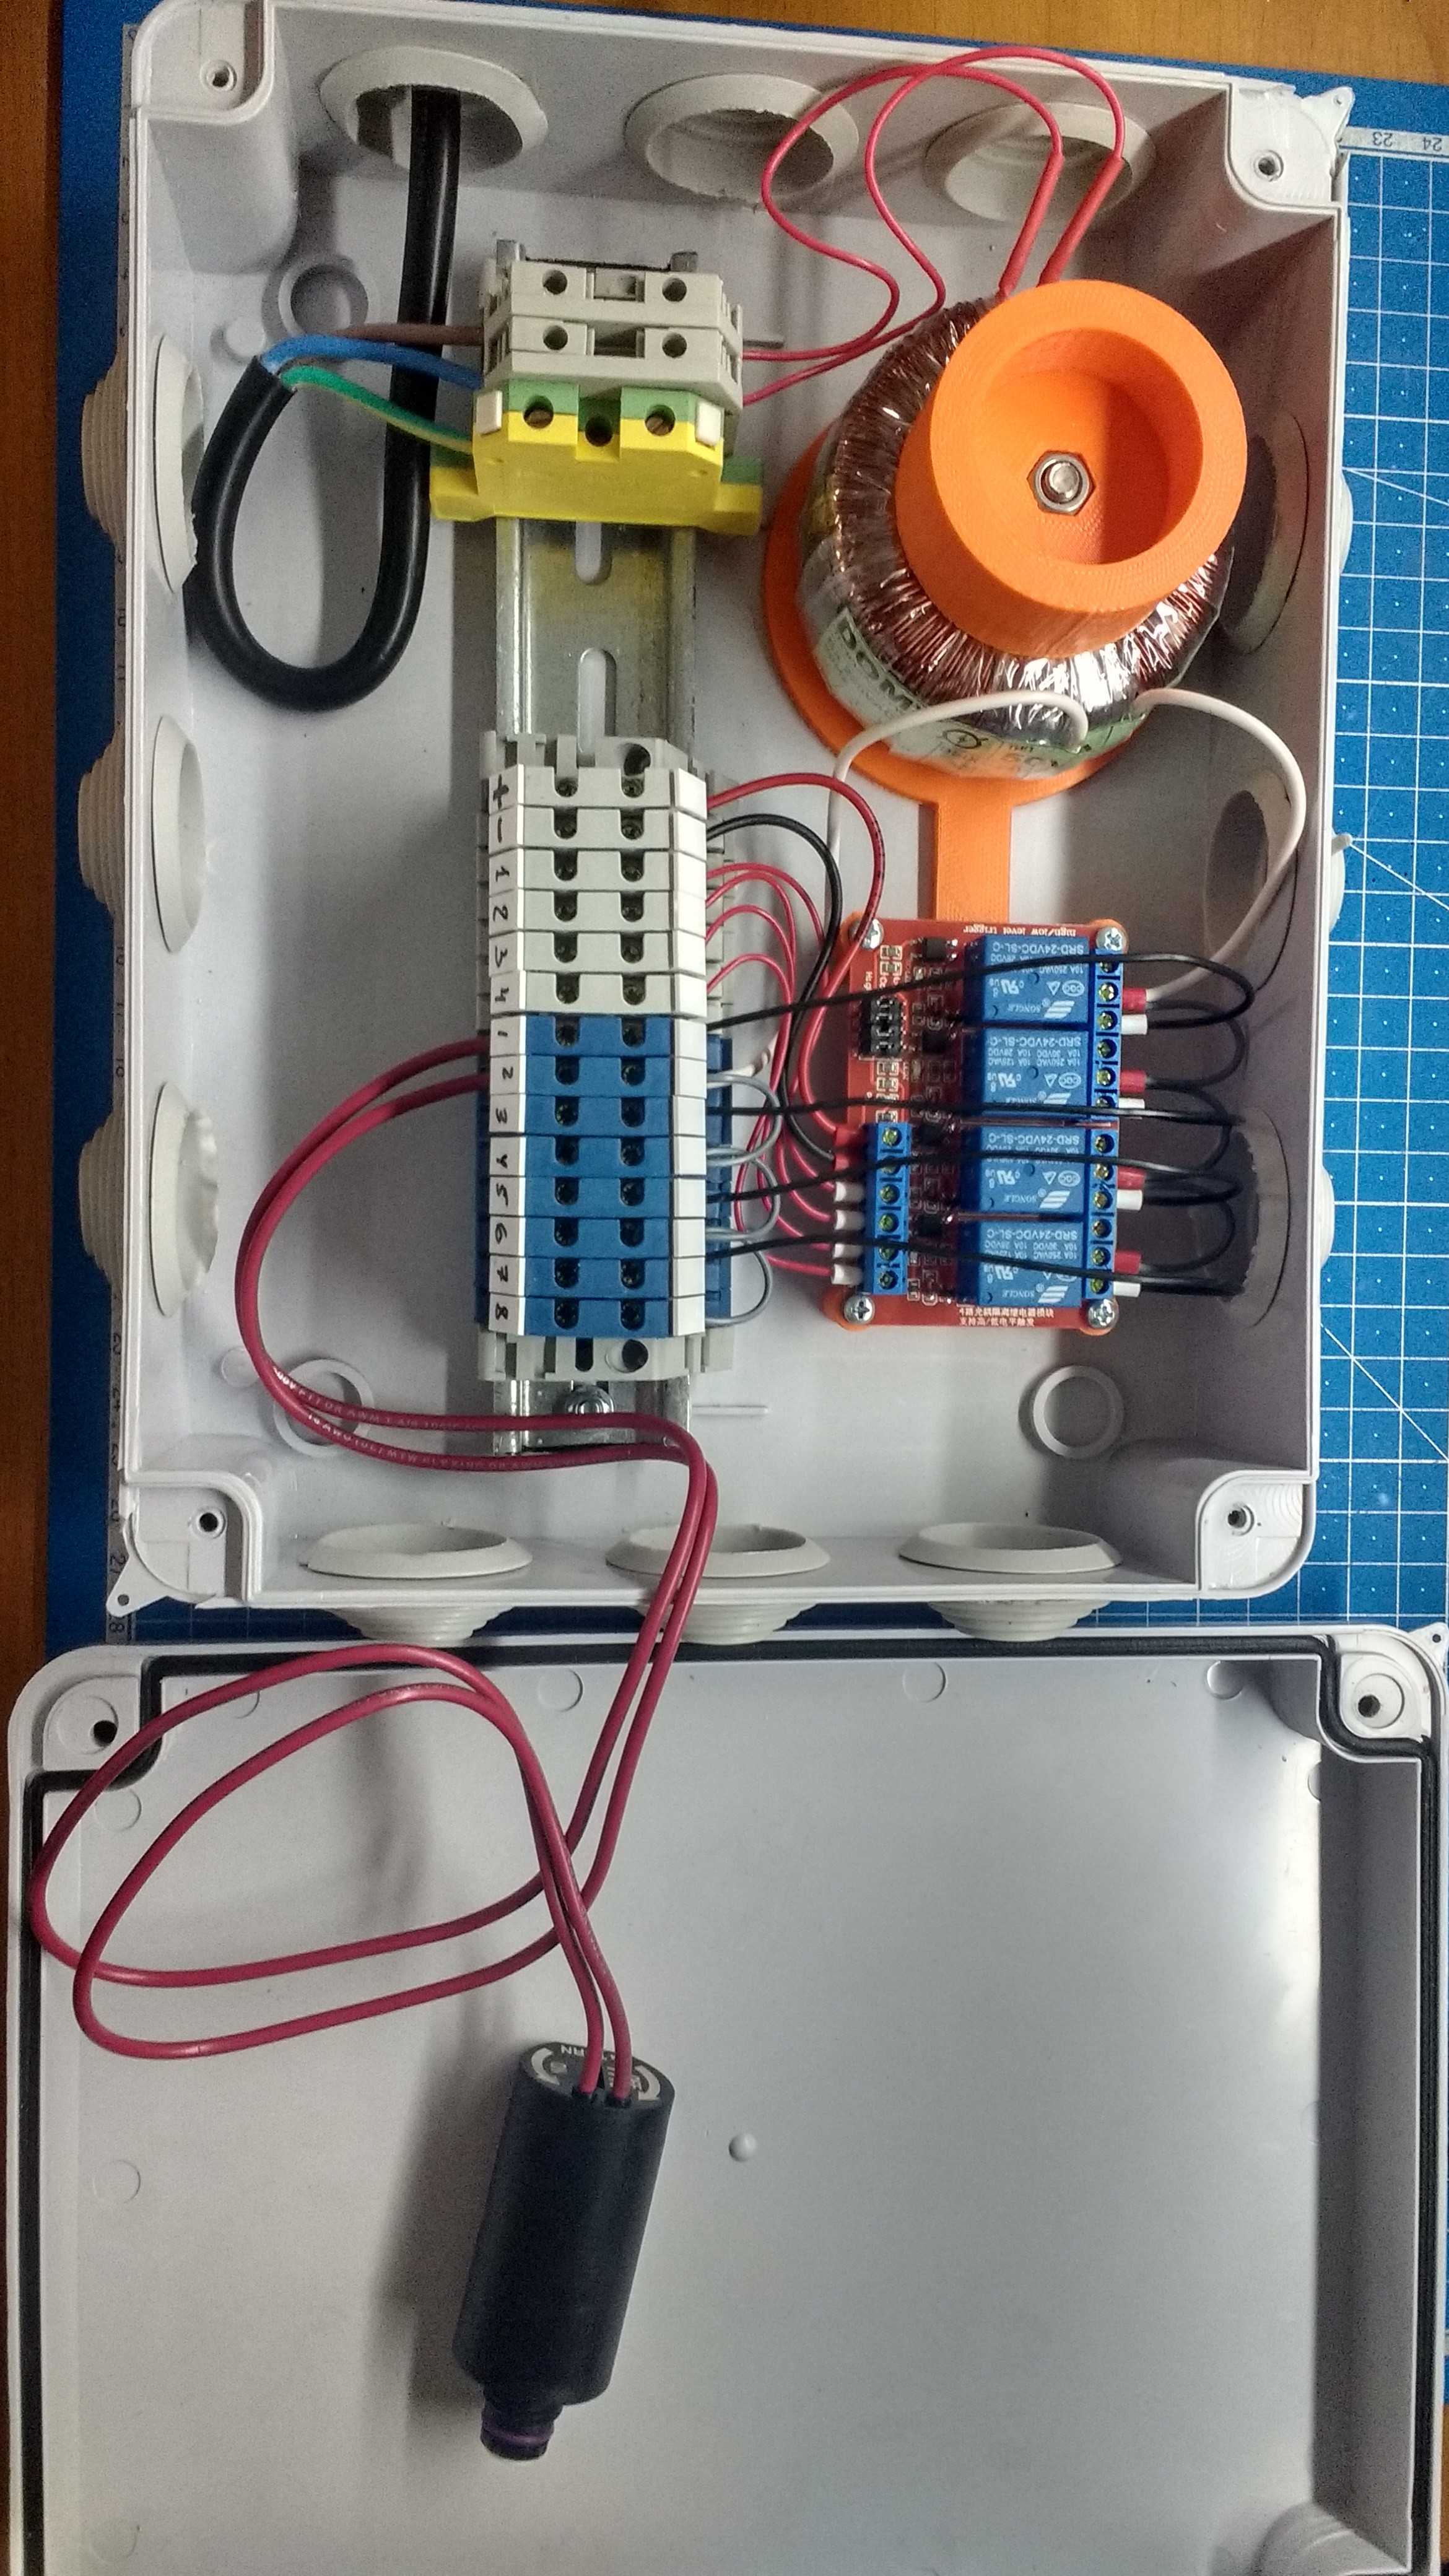
Automatic watering. It would seem that there is a complex, there must be the simplest device of the type discrete output - a 24V solenoid. But as it turned out that all the irrigation valves at 24V but AC. So we had to make a separate unit with a 24V transformer and a relay unit, which 24V DC commutes 24V AC.
Motion sensors on the site. Security sensors have outputs that are NR and NZ contacts, so everything is simple here, discrete inputs and everything, but don't forget about the arresters (the arrester version is suitable for patch panels).
Backup power. Initially it was not planned, but over time it turned out that outside the city, the loss of electricity is not a state of emergency, but quite common. And although, I believe that the smart home system should be designed so that it can be turned on / off at any time without sad consequences for it and at home, but I did not refuse backup power. Having decided that if I already have my 24V sensory-tags, 24V drives, then I will make all the power supply of the ACS 24V. It turned out a good bunch of mean well power supply, mean well oops and batteries, working, checked.

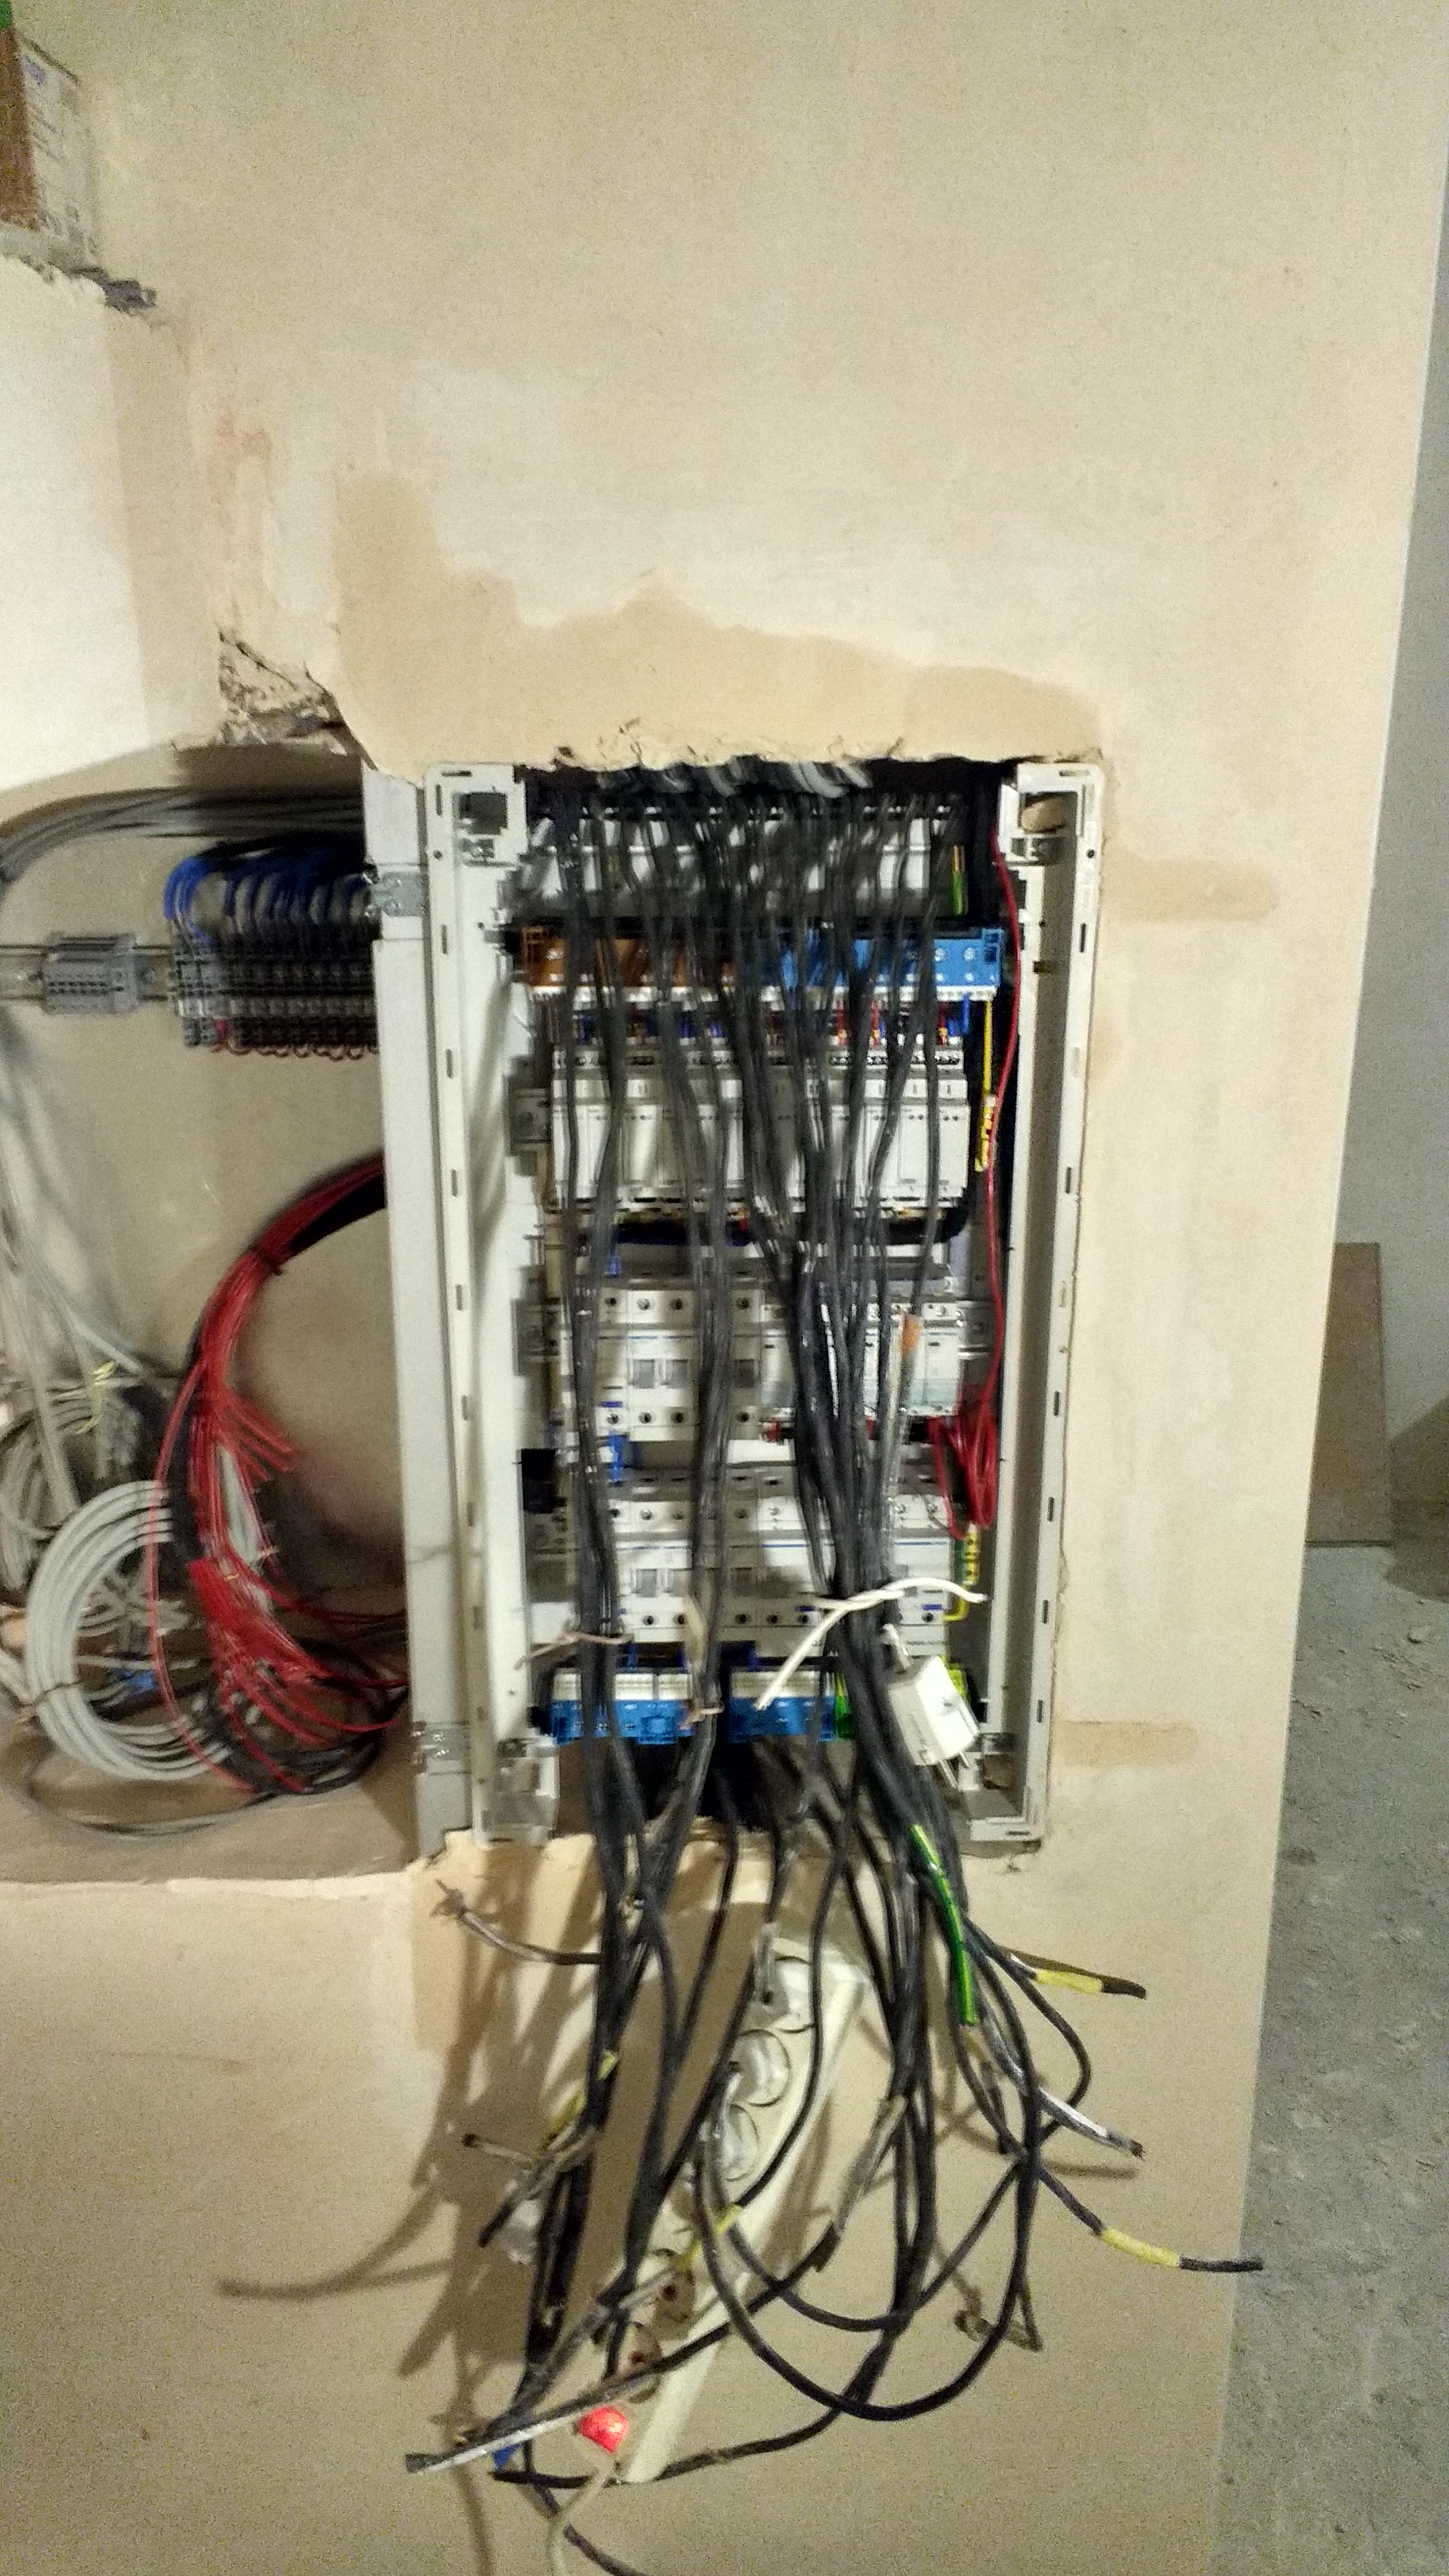
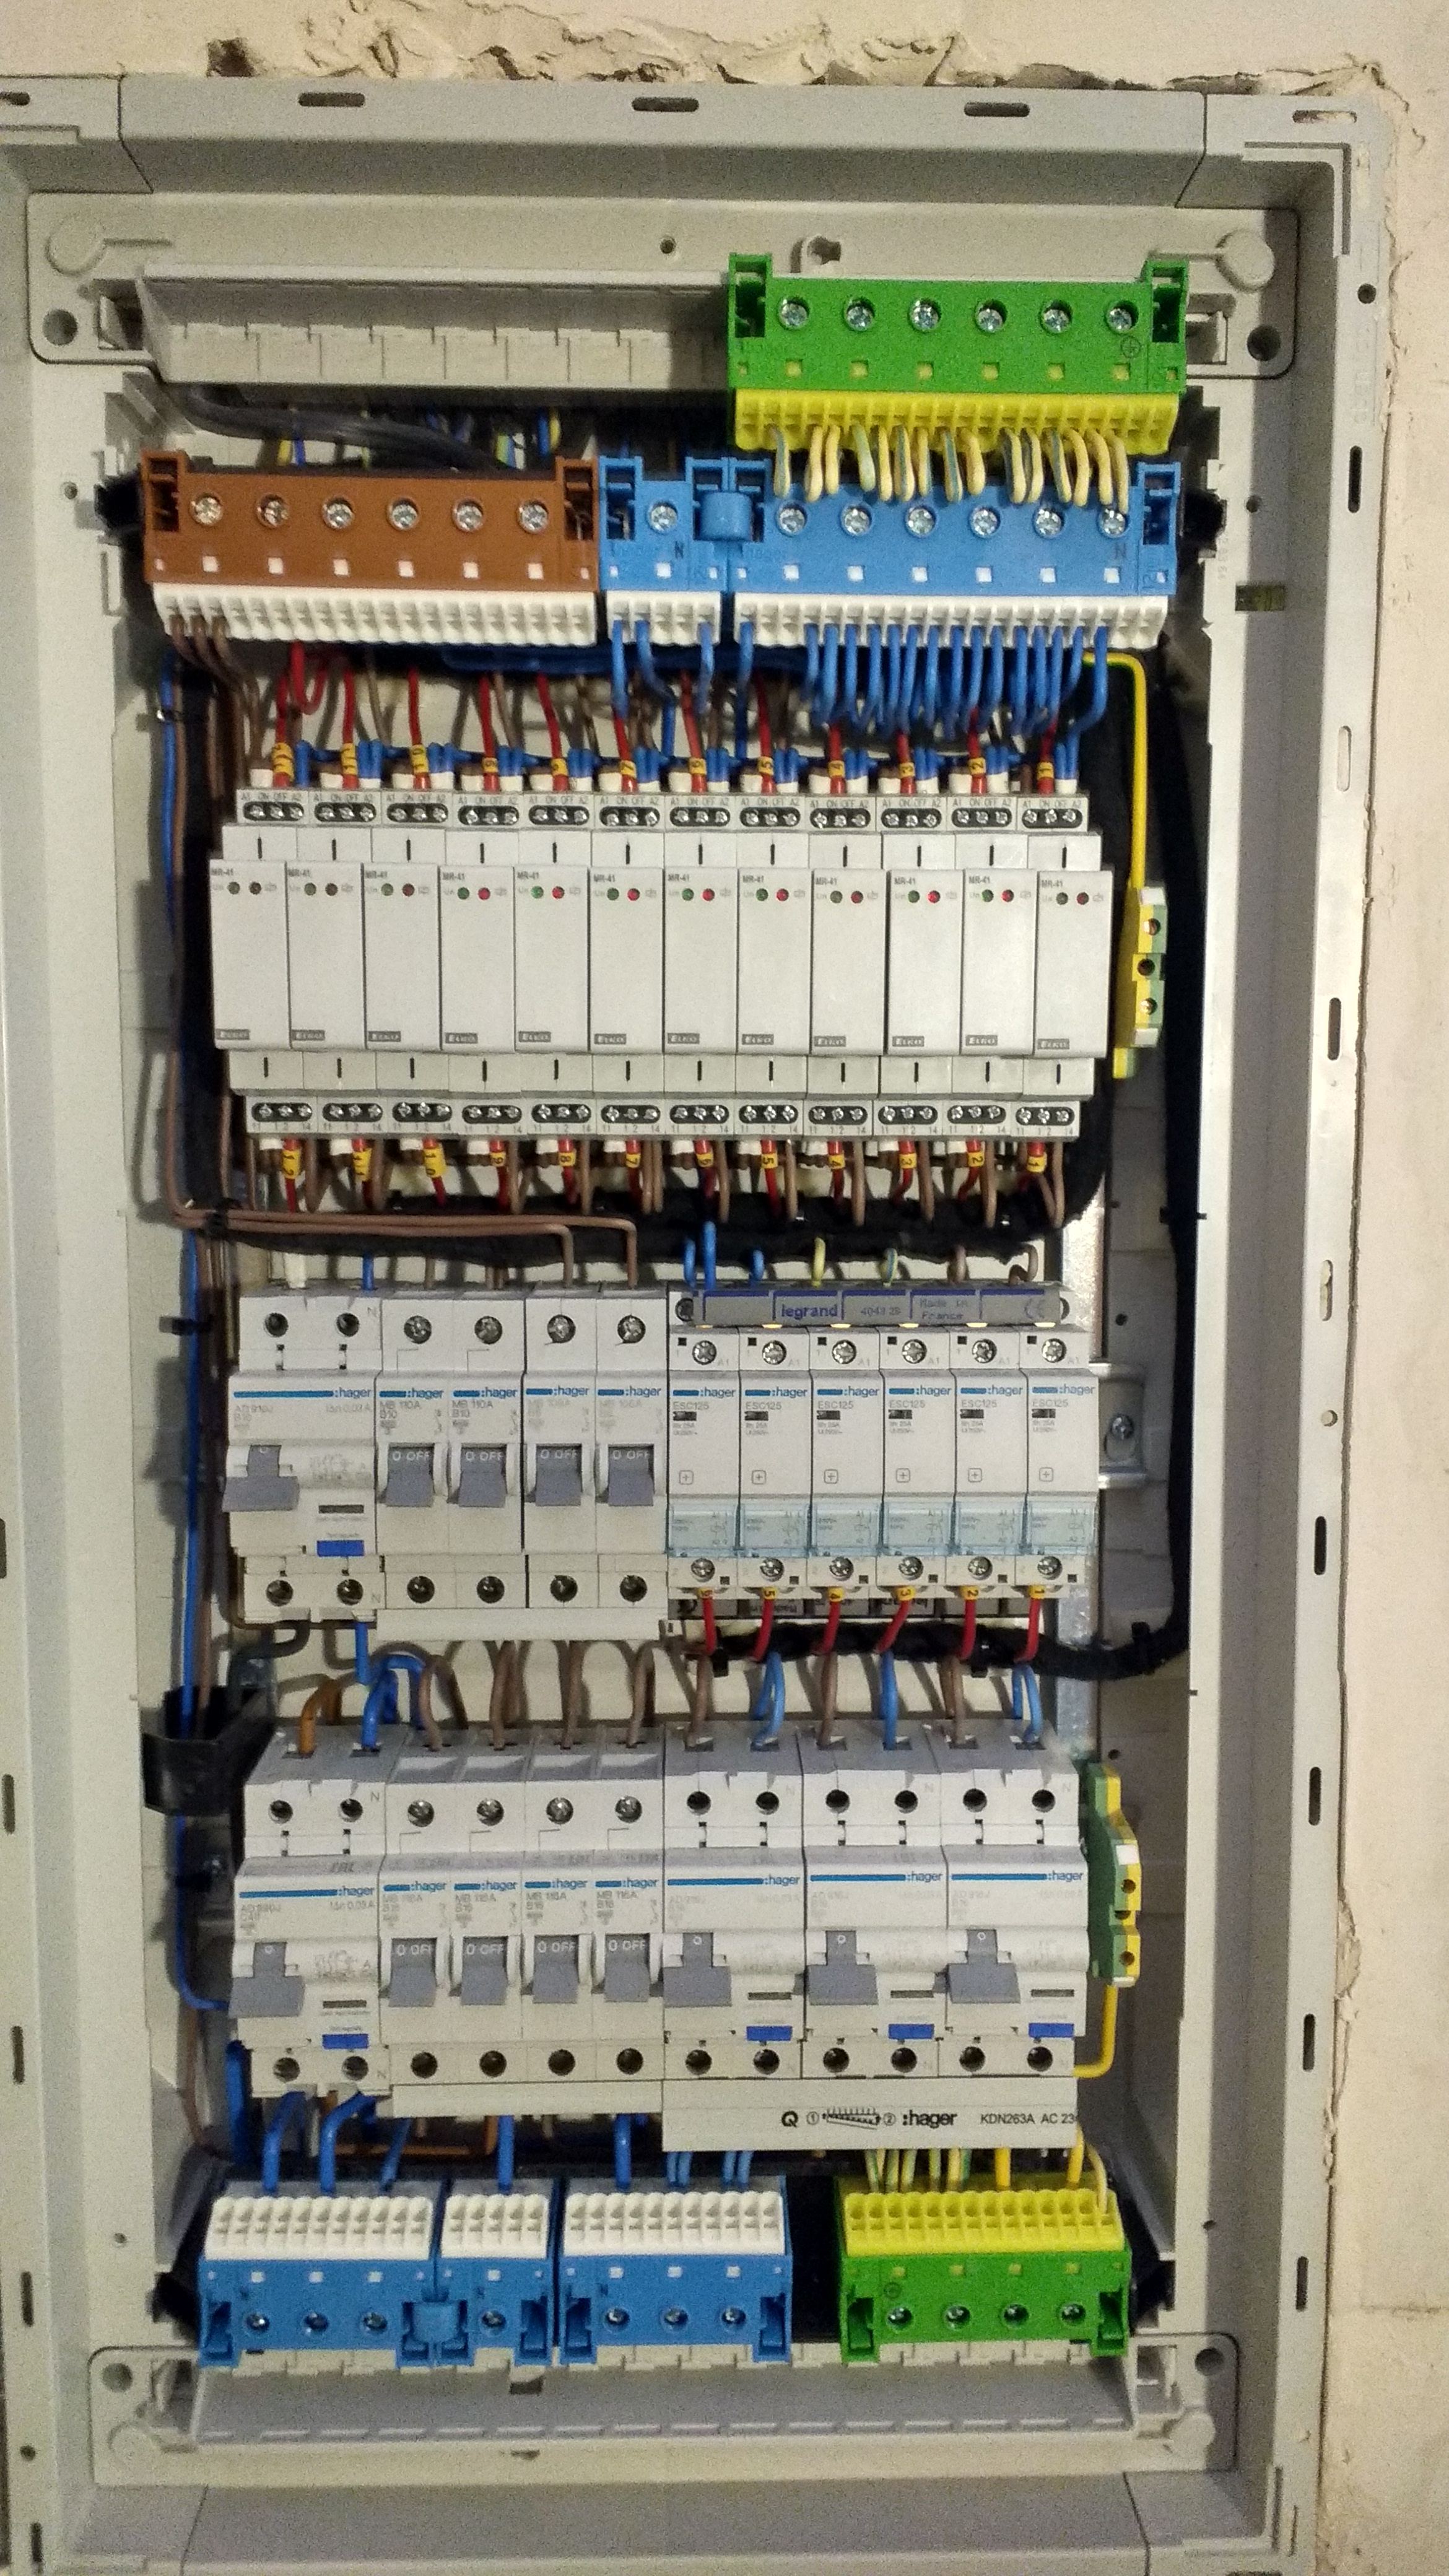
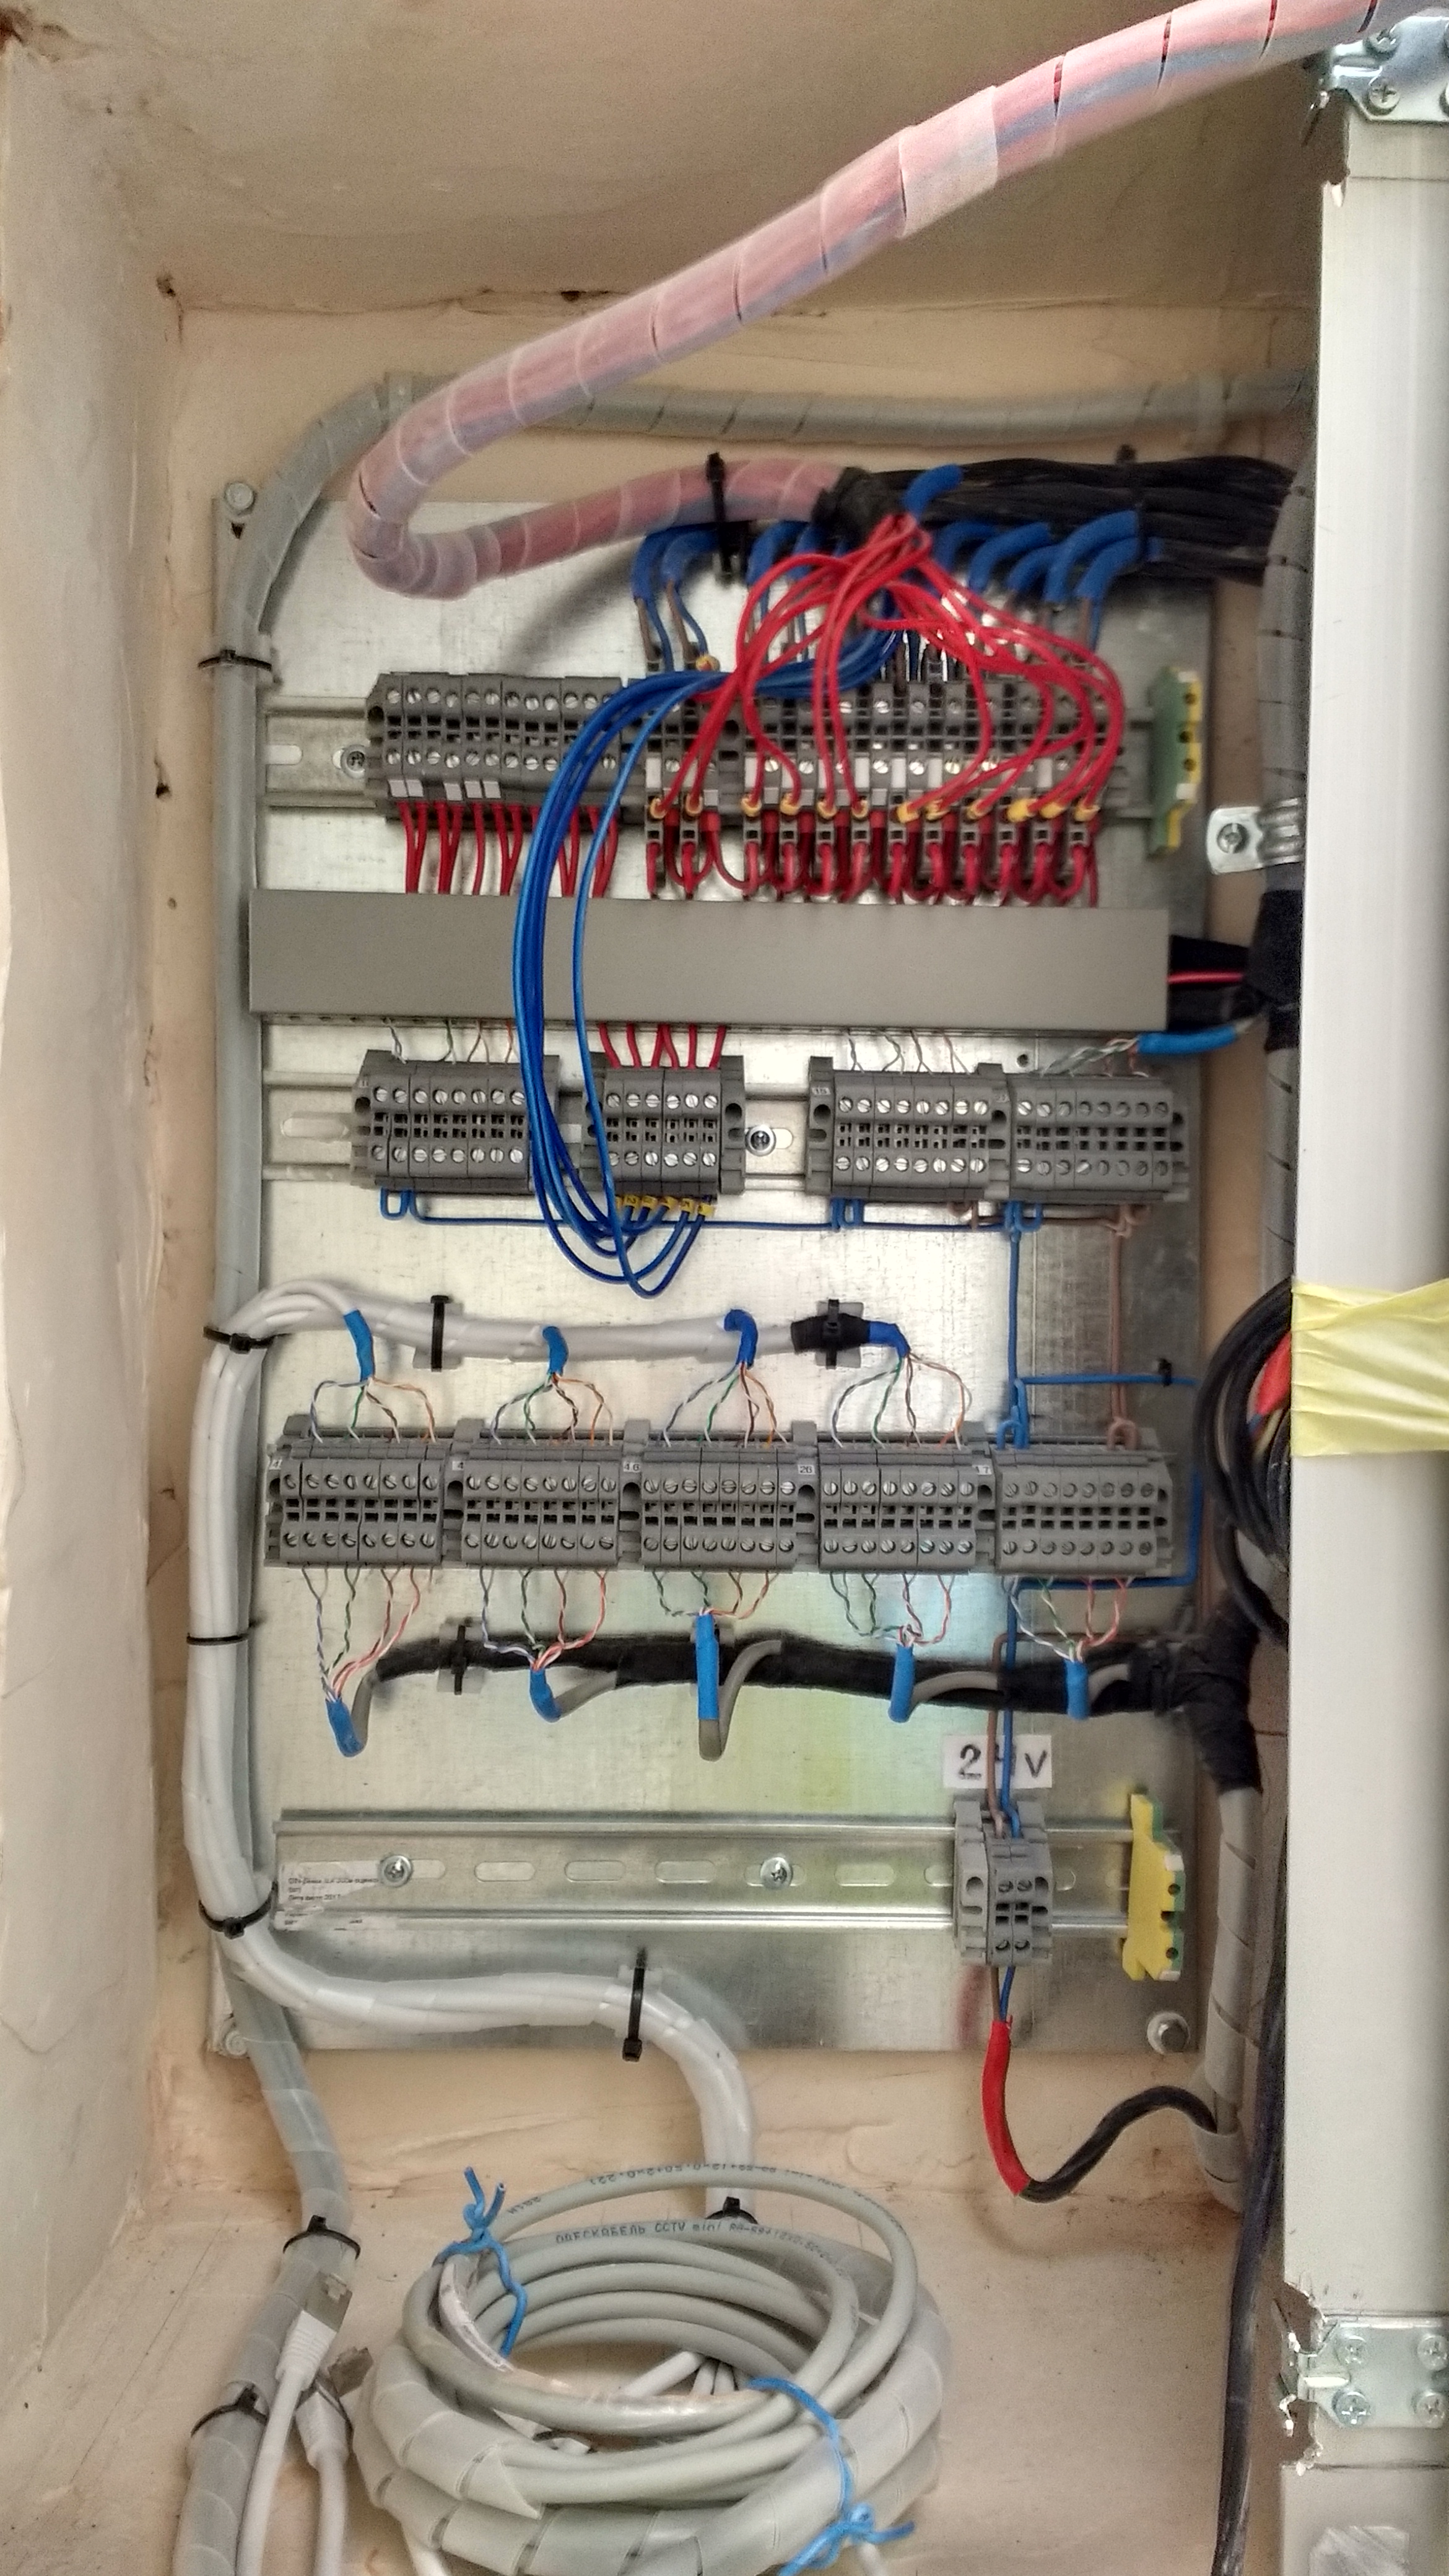
After the hardware solution was formed, it seemed that the complete system could be used for installation of the power section: laying of power wires, wiring of the power shield and wiring of the low point. The wires turned out to be frighteningly many, but from the weekends to the weekends it became more and more beautiful and more beautiful, as a result, in a month everything worked out and worked. The bonus was an opportunity to make a temporary control panel for light and roller blinds for builders.

The next step was planning the control panel with control modules.
System topology:

DI / DO Modules. It was necessary to estimate the topology of the system, which modules it includes, on which controllers what works. There are a lot of options for implementation, and they will all be correct if they work. Looking ahead, I’m going to say that I’ve stopped at the system from the purchased DI / DO modules, the control controller on Beaglebone black and the webserver on Raspberry Pi. Next, you need to count all the discrete inputs / outputs and their types. Because there was no desire to develop DI / DO modules, then I simply searched the market for those who were ready for a reasonable price. I stopped at the Aries modules, in principle, they covered all my management needs:
These modules are connected to the system via the RS485 ModBus interface, in principle an industrial standard, so that with its implementation no difficulties should arise (you can write the support of the main commands yourself or take a ready-made library).
Controller. In order to communicate with my sensorteg modules located in each room and Aries modules in the dashboard, I needed a controller that could interrogate them via the RS485 interface and had Ethernet to communicate with the server. Considered the option to use Wiren Board, but they have few RS485 ports and even the controller itself wanted to do. The controller wants to devote a separate article, so here we can mention that it is made on Beaglebone black and has 3 galvanically isolated RS-485 ports and 24V power.
The system for the Beaglebone black controller is assembled on the basis of Buildroot and brought to the state of running the build - we get the finished image for the SD card. The Beaglebone black software consists of: the communication core, MQTT gateway and Mosquitto server. The communication core polls the RS-485 ports, forming an internal table of discrete and analog points. MQTT gateway converts controller points to MQTT topic values and sends them to the Mosquitto server. Everything is available on this link .
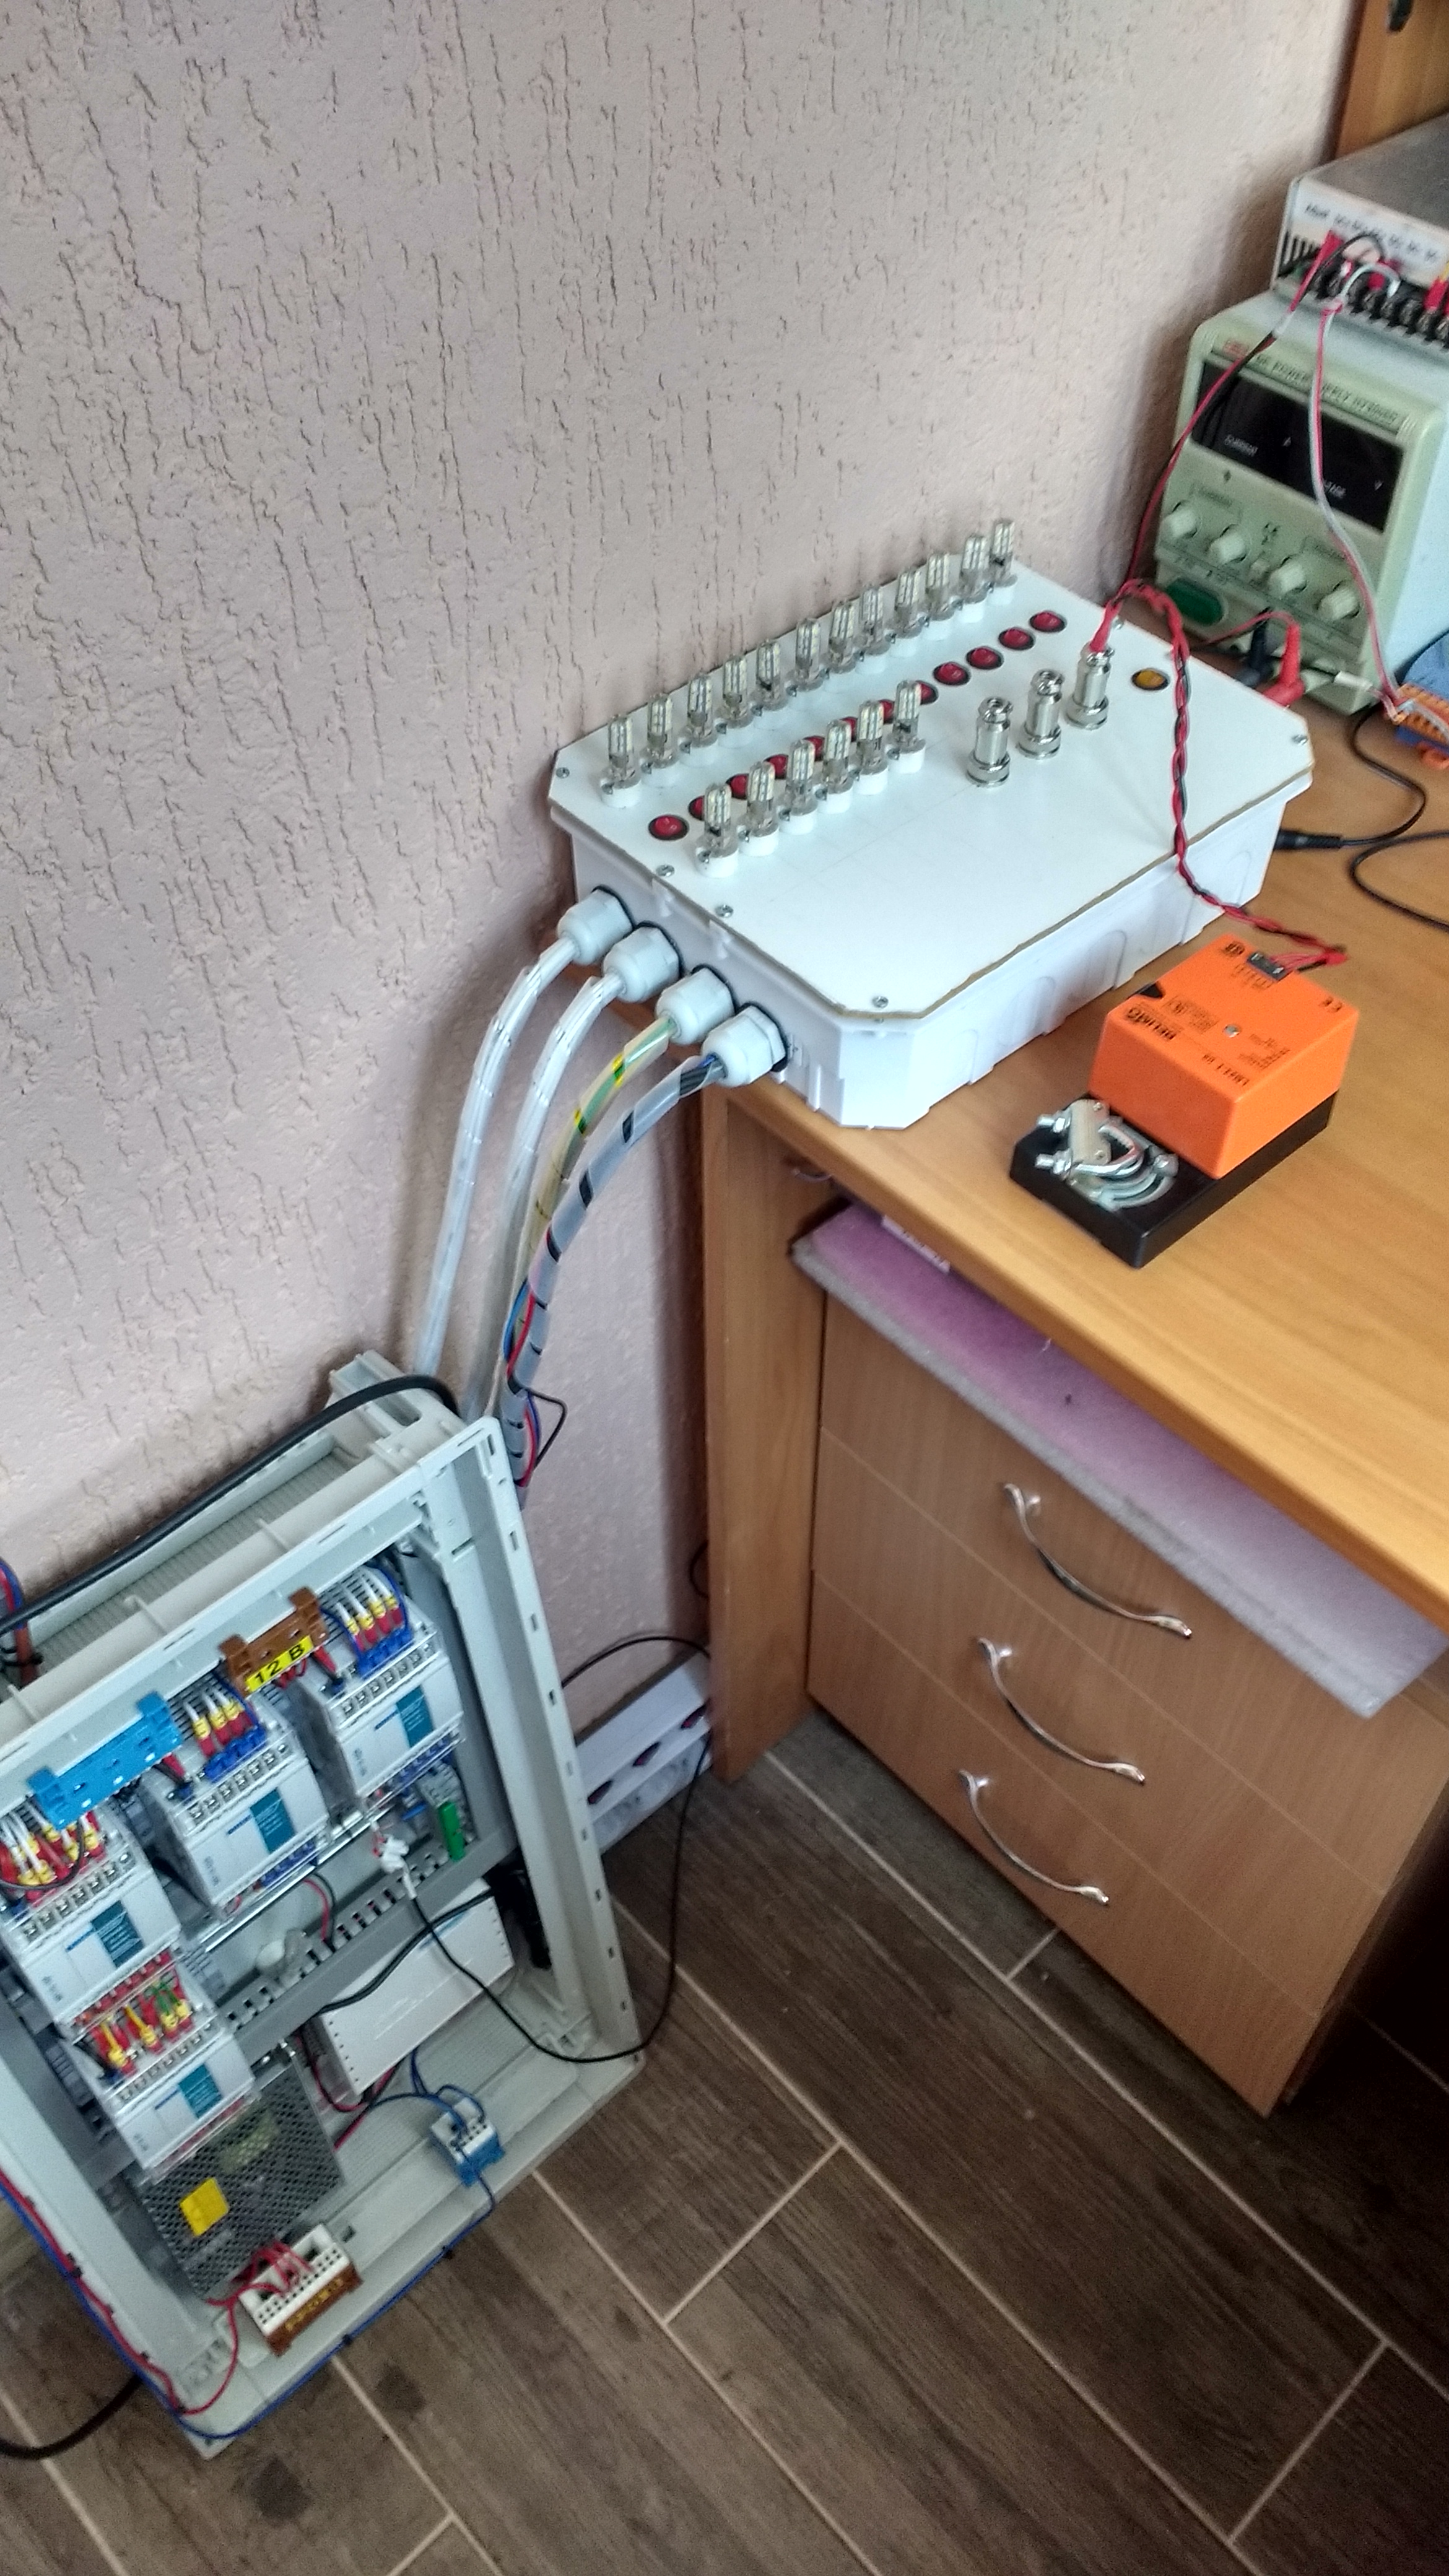
Control panel and signal simulator (lighting, roleta and ventilation):

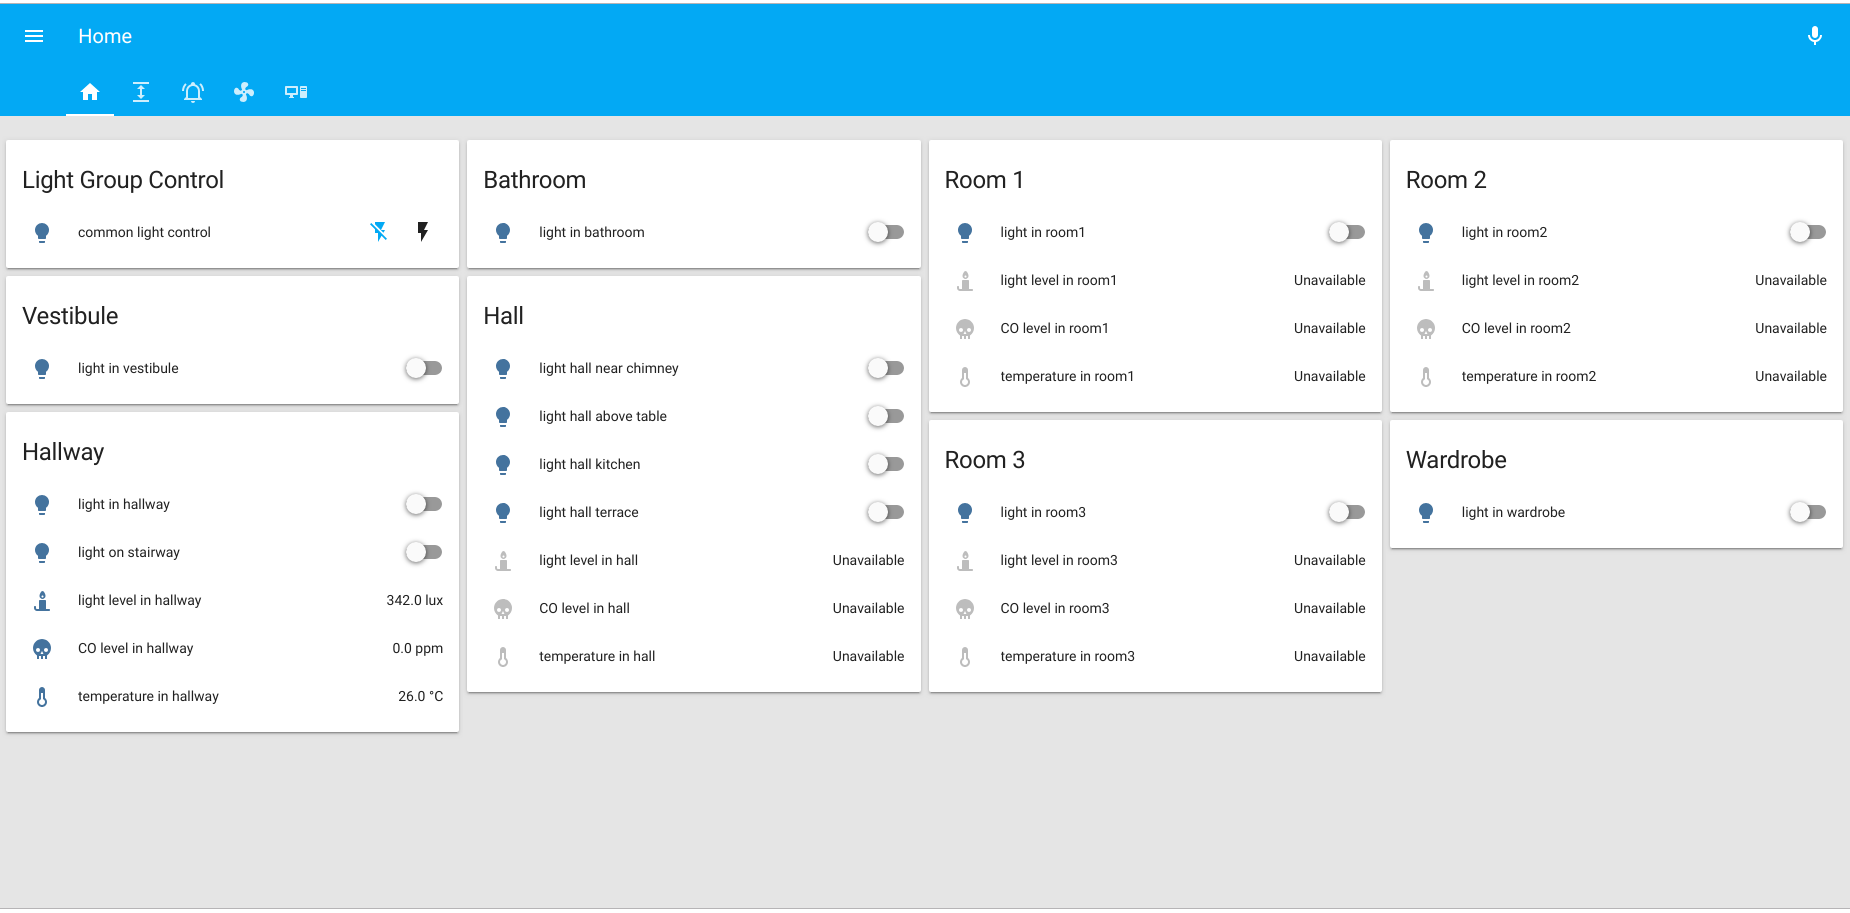
Raspberry Pi software is Home Assistant. I was pleased with this system, it is very simple, it supports a lot of ready-made devices and allows you to write your plug-ins in python very flexibly. For example, for a couple of weeks I wrote to myself my own MQTT plug-ins for lighting, shutters, alarms and various types of sensors (lighting, CO, movement, temperature) and several types of automation, everything is very flexible and most importantly with a low threshold for entering the system. Also, Home Assistant supports integration with Google Home and Alexa. You can suffer a little and configure it yourself, or make a paid subscription to their service ($ 5 per month) and then the Home Assistant and Google Home synchronization process takes two clicks. As a bonus, we get voice control, while in English, but promise support for the Russian is about to come. It looks like this:
In this article, I wanted to give an overview of the system and an example of a specific implementation, and I do not pretend to the correctness of the solutions I have chosen. Someone can say that this is a tumych for the house, and someone can go in favor. In general, do not be afraid of this fascinating, just structure everything well and start. All ideas do not come immediately, they appear in the process of implementation, so they will have to change, and more than once. Next, I plan to write about the development of my controller and sensorsega, which as a programmer is more interesting than everything described here.
Some lyrics. I always wanted to have a house in the country, I decided on it for a long time, because building is not only big financial expenses, but also big expenses of your personal time, which you can devote to your favorite hobby, your family. Fortunately, one of them I have, it is just the development of any unnecessary devices. Somewhere else at the initial stage, I decided for myself that this could be interesting and, having chosen a site, I began to make plans. First, of course, I had to spend a lot of time on issues related to the construction site itself, such as a project, search for builders and all other troubles. But then, when the box was ready, it was time to think about the home automation system, that's what I like and what I wanted to do, well, it's just strange for a programmer to get up from the sofa to turn off the light in the bathroom.
Began to study what is on the market and what you can buy and do it yourself. As it turned out, the market is completely saturated with a multitude of solutions, but they lacked something else, then another, and nowhere was a holistic solution that would satisfy me (no, of course, there were solutions, but the cost was 20 tons. I was not satisfied) . For example, Schneider has a good solution based on KNX, on which you can build the control of lighting, rollers and ventilation, but integrating into the system anything other than standard elements is almost impossible, plus the web interface and control through Google Home can be forgotten, and the automation of scripts in general say no. On the other hand, there are enough solutions on the market, which are both wireless and friendly with Google and the aplicays are ready for them, but they have a lot of nuances that put such decisions to the background. For example, the complexity of simultaneous control of lighting from conventional switches and from the aplication is often impossible at all, or if it is possible that it is difficult to implement pass-through switches, but I would like to have a house in which everything works without a smart home in case of its crash. Plus, I didn’t really want to hang around the house with a mass of individual boxes, I still don’t understand why a motion sensor, carbon monoxide and temperature should not be placed in one building, even if it costs more, but I don’t have to hang the whole ceiling with some devices , and even change the batteries in them every two years.
In general, with the words, well, “tyzh programmer”, I began to think about how I would kill it myself and what is needed for that. Thinking through various options for using the system, it became clear that before doing something you need to think things through firmly (it seems obvious, but no, sometimes you want to do something right now) because putting the wiring in the grooves and plastering it, there is no way back .
')
Having formed a wish list, I got the following subsystems:
- home lighting
- roller shutters
- control of ventilation flaps
- motion sensors, light sensors, CO and temperature in rooms
- automatic watering
- motion sensors on the site
- backup power
Initially, I wanted to collect everything on purchased devices and somehow bring them together into a single system, which seemed to be the best option in terms of time / finances and system reliability. Thoughts jumped from one subsystem to another, but no coherent solution was formulated for any of the subsystems, months passed, but the solution was not formed, plus the construction itself was distracting, and even winter began (and this time of mountains and snowboarding any compromises, then it was still so). I had to limit the flight of thought and force myself to work through one subsystem after another, it all started with lighting.
Let's take a quick look at each.
Lighting From the input there was the fact that the light should work simultaneously from both the switches and the control system (hereinafter referred to as the ACS), plus it should be possible to make the switches through. For this, the ACS should at least know whether it is currently on or not. There were several ideas on how to implement this, but I stopped on this circuit - a push-button switch - a pulse relay (Elko MR-41) - a discrete output - a discrete input. The discrete output is parallel with the push-button switch, the NO contact of the relay to the light bulb, the NC - to the discrete input to obtain the status.
From this all followed that to each point of the lighting, which should be controlled from the switch and ACS, should go your wire from the panel, similarly to and switches. The wiring diagram in the skepup really helped to realize the scale of the disaster, there were a lot of wires, but this should not scare the person who decided to go to the smart home. I recommend not being lazy and still doing this scheme, not necessarily in a skeptic, in the future this work will save you a lot of time and help even after years when you need to hang a picture and you will guess there is a wire there or not.
Rolety . The difference from the light is that the load in this case is not a light bulb but an electric motor, with all the consequences. Just as with lighting, we wanted to have control from a mechanical switch as well as from a control system. Therefore, the scheme turned out like this: a discrete output - a contactor and in parallel a push-button switch for each direction of rotation.
Ventilation . Everything is simple, I gave it to the ACS, and did not provide for any other management, I hardly ever want to open / close the ventilation channels with no aplimation. So the circuit - two discrete outputs - is a simple Belimo LM24-T drive with ebay for $ 25 without feedback.
Here is the drive mounted on the ventilation flap:
Motion sensors , light sensors, CO and temperature in the rooms. The market is now a shaft of such devices, but all with a proprietary interface and connect them to their homegrown system is quite difficult, plus the already mentioned problem with the fact that each sensor is trying to sell as a separate device in its case. The last thing I would like to see on the ceiling is a scattering of various devices, but how can you think that you need to change the batteries in all of them and it’s scary to become. Also, there always remains the probability that the manufacturer closes the open api of their devices, and will force you to use only your application as Google recently did with the nest and your entire system will fall apart. So I made my device on the AVR, calling it “sensorage” and packed it with everything I needed: a motion sensor with digital sensitivity tuning, light sensors, temperature, carbon monoxide, controlled backlight, ESP8266, RS485 with electrical isolation, 24V power supply . It turned out such a device, but in reality it needs to devote a separate article and not really dwell on it in this.
Automatic watering. It would seem that there is a complex, there must be the simplest device of the type discrete output - a 24V solenoid. But as it turned out that all the irrigation valves at 24V but AC. So we had to make a separate unit with a 24V transformer and a relay unit, which 24V DC commutes 24V AC.
Motion sensors on the site. Security sensors have outputs that are NR and NZ contacts, so everything is simple here, discrete inputs and everything, but don't forget about the arresters (the arrester version is suitable for patch panels).
Backup power. Initially it was not planned, but over time it turned out that outside the city, the loss of electricity is not a state of emergency, but quite common. And although, I believe that the smart home system should be designed so that it can be turned on / off at any time without sad consequences for it and at home, but I did not refuse backup power. Having decided that if I already have my 24V sensory-tags, 24V drives, then I will make all the power supply of the ACS 24V. It turned out a good bunch of mean well power supply, mean well oops and batteries, working, checked.
After the hardware solution was formed, it seemed that the complete system could be used for installation of the power section: laying of power wires, wiring of the power shield and wiring of the low point. The wires turned out to be frighteningly many, but from the weekends to the weekends it became more and more beautiful and more beautiful, as a result, in a month everything worked out and worked. The bonus was an opportunity to make a temporary control panel for light and roller blinds for builders.
The next step was planning the control panel with control modules.
System topology:
DI / DO Modules. It was necessary to estimate the topology of the system, which modules it includes, on which controllers what works. There are a lot of options for implementation, and they will all be correct if they work. Looking ahead, I’m going to say that I’ve stopped at the system from the purchased DI / DO modules, the control controller on Beaglebone black and the webserver on Raspberry Pi. Next, you need to count all the discrete inputs / outputs and their types. Because there was no desire to develop DI / DO modules, then I simply searched the market for those who were ready for a reasonable price. I stopped at the Aries modules, in principle, they covered all my management needs:
- MV110-8DF, as a discrete input module for 220V signals.
- MU110-16P, for controlling lighting, roller shutters, ventilation and irrigation valves.
- MV110-16DN, as a discrete input module for signals from street motion sensors.
These modules are connected to the system via the RS485 ModBus interface, in principle an industrial standard, so that with its implementation no difficulties should arise (you can write the support of the main commands yourself or take a ready-made library).
Controller. In order to communicate with my sensorteg modules located in each room and Aries modules in the dashboard, I needed a controller that could interrogate them via the RS485 interface and had Ethernet to communicate with the server. Considered the option to use Wiren Board, but they have few RS485 ports and even the controller itself wanted to do. The controller wants to devote a separate article, so here we can mention that it is made on Beaglebone black and has 3 galvanically isolated RS-485 ports and 24V power.
The system for the Beaglebone black controller is assembled on the basis of Buildroot and brought to the state of running the build - we get the finished image for the SD card. The Beaglebone black software consists of: the communication core, MQTT gateway and Mosquitto server. The communication core polls the RS-485 ports, forming an internal table of discrete and analog points. MQTT gateway converts controller points to MQTT topic values and sends them to the Mosquitto server. Everything is available on this link .
Control panel and signal simulator (lighting, roleta and ventilation):
Raspberry Pi software is Home Assistant. I was pleased with this system, it is very simple, it supports a lot of ready-made devices and allows you to write your plug-ins in python very flexibly. For example, for a couple of weeks I wrote to myself my own MQTT plug-ins for lighting, shutters, alarms and various types of sensors (lighting, CO, movement, temperature) and several types of automation, everything is very flexible and most importantly with a low threshold for entering the system. Also, Home Assistant supports integration with Google Home and Alexa. You can suffer a little and configure it yourself, or make a paid subscription to their service ($ 5 per month) and then the Home Assistant and Google Home synchronization process takes two clicks. As a bonus, we get voice control, while in English, but promise support for the Russian is about to come. It looks like this:
In this article, I wanted to give an overview of the system and an example of a specific implementation, and I do not pretend to the correctness of the solutions I have chosen. Someone can say that this is a tumych for the house, and someone can go in favor. In general, do not be afraid of this fascinating, just structure everything well and start. All ideas do not come immediately, they appear in the process of implementation, so they will have to change, and more than once. Next, I plan to write about the development of my controller and sensorsega, which as a programmer is more interesting than everything described here.
Source: https://habr.com/ru/post/455321/
All Articles