Training Cisco 200-125 CCNA v3.0. Day 8. Setting the switch
Welcome to the world of switches! Today we will talk about switches. Suppose you are a network administrator and are in the office of a new company. The manager with the out-of-box switch comes up to you and asks you to configure it. You may have thought that this is a conventional electric switch (in English, the word switch means both a network switch and an electric switch - interpreter), but this is not so - it means a network switch, or a Cisco switch.
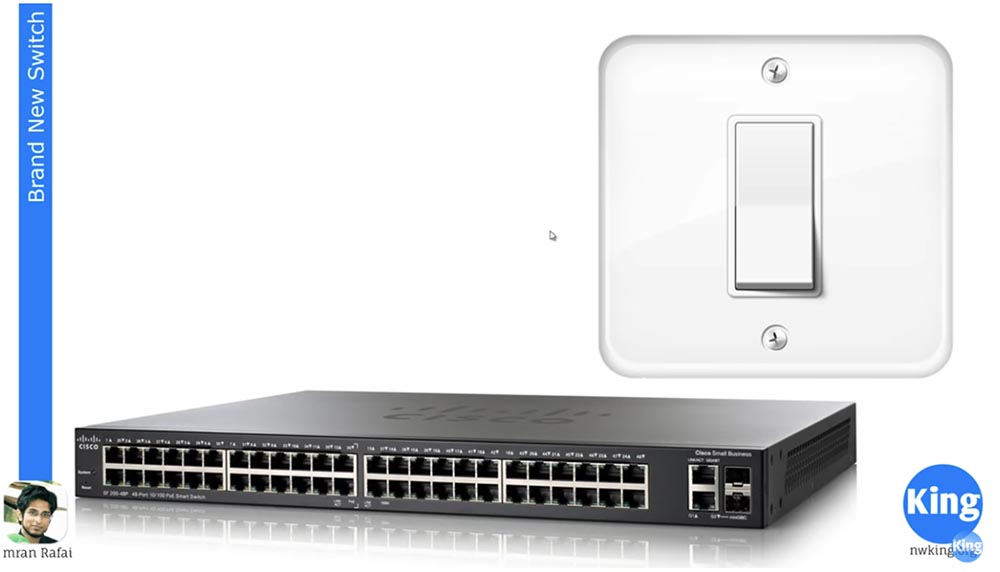
So, the manager sends you a new Cisco switch, which is equipped with multiple interfaces. This can be an 8.16 or 24-port switch. In this case, the slide shows a switch that has 48 ports in front, divided into 4 sections with 12 ports each. As we know from previous lessons, there are several other interfaces behind the switch, one of which is the console port. The console port is used for external access to the device and allows you to see how the switch operating system boots.
')
We have already discussed the case when you want to help your colleague and use remote desktop. You connect to his computer, make changes, but if you want your friend to reboot the computer, you will lose access and you will not be able to observe what is happening on the screen at the time of loading. This problem occurs if you do not have external access to this device and you are connected to it only via the network.
But if you have off-network access, you can see the boot screen, unpacking IOS and other processes. Another way to access this device is to connect to any of the front ports. If you set up IP address management on this device, as will be shown in this video, you can access it via Telnet. The problem is that you lose this access as soon as the device turns off.
Let's see how you can perform the initial setup of a new switch. Before we proceed directly to configuring, we need to introduce a few basic rules.
For most video tutorials, I used GNS3, an emulator that allows you to emulate a Cisco IOS operating system. In many cases, I need more than one device, for example, if I show how routing works. In this case, I may need, for example, four devices. Instead of buying physical devices, I can use the operating system of one of my devices, connect it to GNS3, and emulate this IOS on multiple instances of virtual devices.
Therefore, I do not need to physically have five routers, I can have only one router. I can use the operating system on my computer, install the emulator and get 5 copies of devices. In the following video tutorials we will look at how to do this, but for today the problem with using the GNS3 emulator is that it cannot be used to emulate a switch, because the Cisco switch has ASIC hardware chips. This special integrated circuit, which, in fact, makes the switch a switch, so you can not just emulate this hardware function.
In general, the GNS3 emulator helps to work with the switch, but there are some functions that cannot be performed with it. So for this tutorial and some other videos, I used other Cisco software called Cisco Packet Tracer. Do not ask me how to get access to Cisco Packet Tracer, you can find out about it with Google, I can only say that you must be a member of Network Academy.
You can have access to Cisco Packet Tracer, you can have access to a physical device, or to GNS3, you can use any of these tools when learning Cisco ICND. You can use GNS3, if you have a router, an operating system and a switch, and it will work without problems, you can use a physical device, or Packet Tracer - just decide what suits you best.
But in my video tutorials, I’m going to use Packet Tracer, so I’ll have a couple of videos, one exclusively for Packet Tracer and one exclusively for GNS3, I’ll post them soon, in the meantime, we’ll use Packet Tracer. This is how it looks. If you also have access to Network Academy, you can access this program, and if not, you can use other tools.
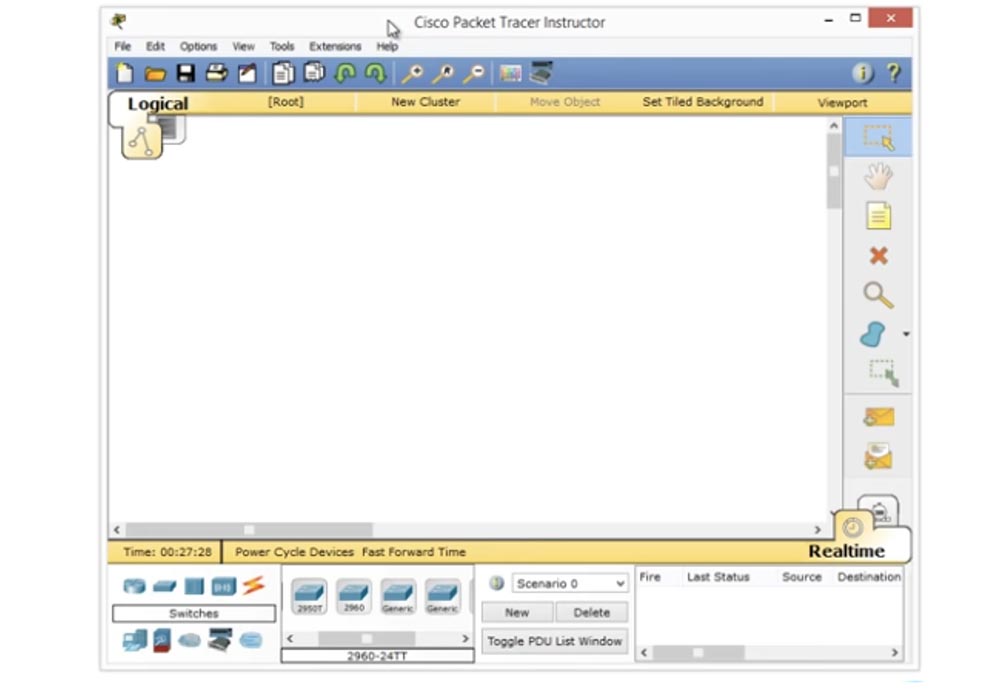
So, since today we are talking about switches, I will check the Switches item, select the model of the 2960 series switch and drag its icon to the program window. If I double-click on this icon, I will go to the command line interface.
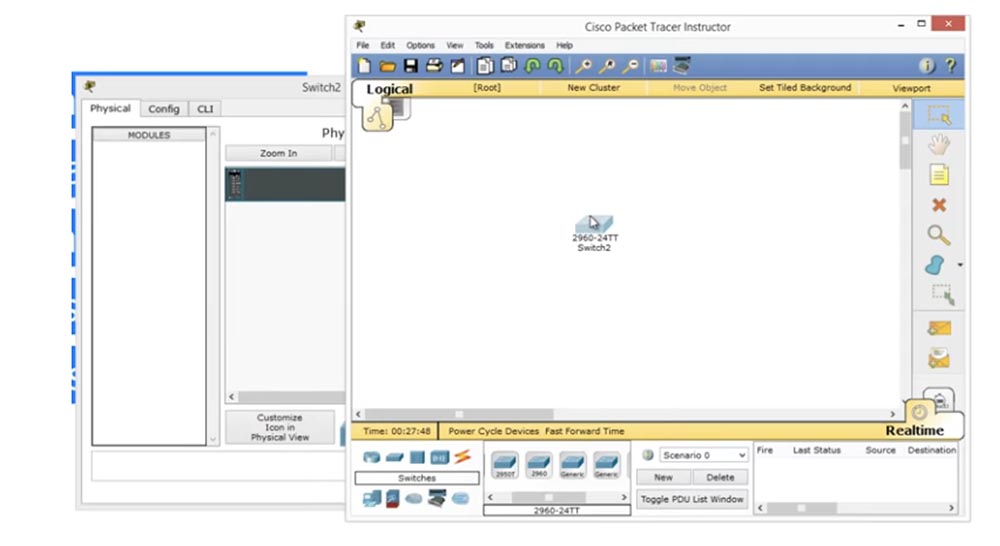
Next, I see how the switch operating system boots.
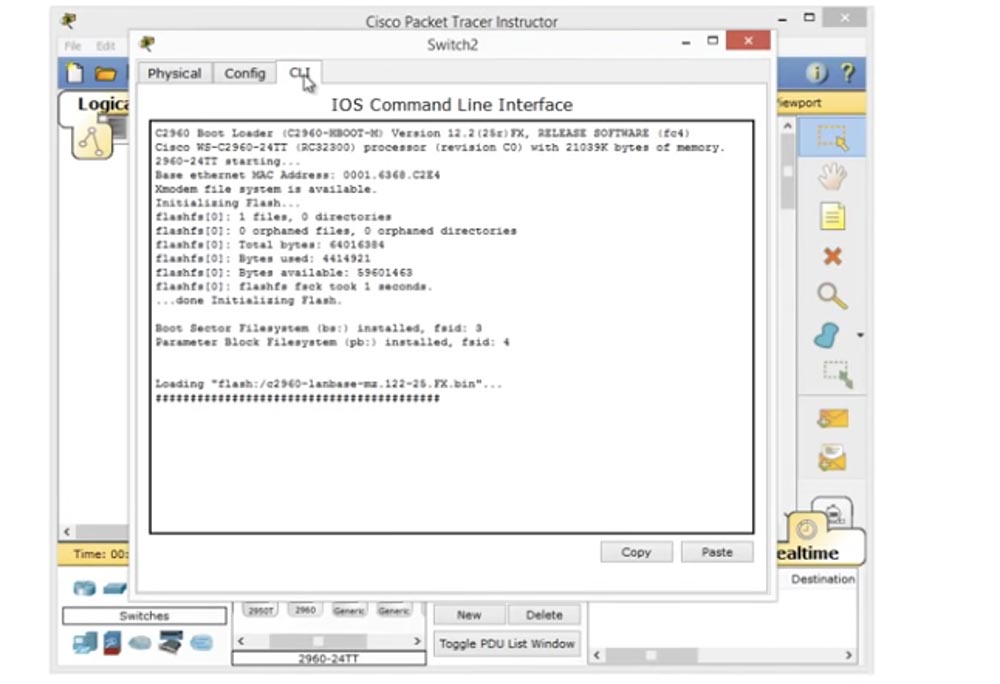
If you take a physical device and connect it to a computer, you will see exactly the same Cisco IOS boot pattern. You can see that the operating system has been unpacked, and you can read some software usage restrictions and license agreement, copyright information ... everything is displayed in this window.
Next, the platform on which the OS is running will be shown, in this case it is the WS-C2690-24TT switch, and all the hardware functions are displayed. The version of the program is also displayed here. Then we go directly to the command line, if you remember, here we have tips for the user. For example, the symbol (>) invites you to enter a command. From the video tutorial "Day 5" you know that this is the initial, lowest access mode to the device settings, the so-called user EXEC mode. This access can be obtained on any Cisco device.
If you use Packet Tracer, then you get out-of-network OOB access to the device and can track how the device is loading. This program simulates access to the switch through the console port. How do you go from user EXEC mode to privileged EXEC mode? You type the “enable” command and press “Enter”, you could also use the hint simply by typing “en” and receiving possible options for the commands starting with these letters. If you simply enter the letter “e”, the device will not understand what you mean, because there are three commands beginning with “e”, but if I type “en”, the system will understand that the only word beginning with these two letters is this is enable. Thus, having entered this command, you will get access to the privileged Exec mode.
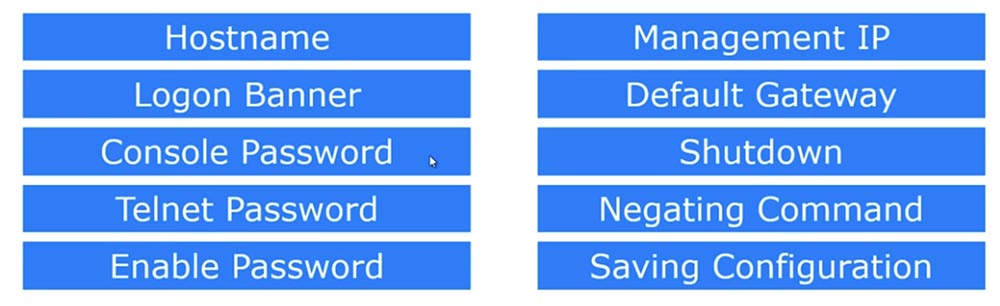
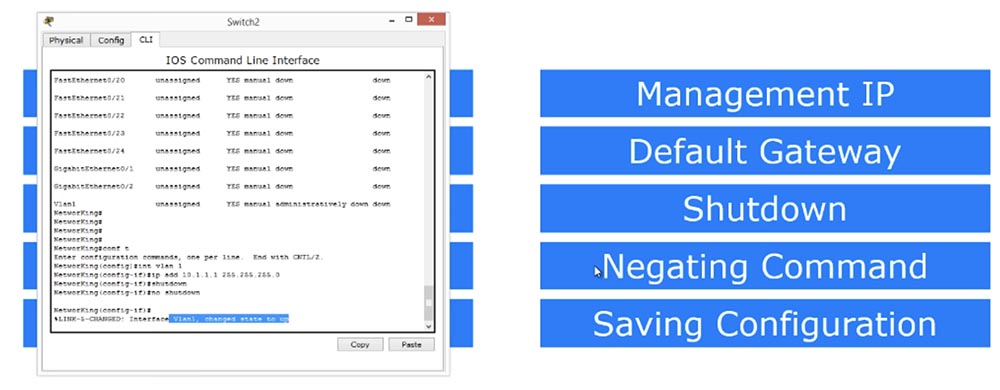
In this mode, we can do everything that was shown on the second slide - change the host name, set the login banner, Telnet password, enable the password, configure the IP address, set the default gateway, give the command to disable the device, cancel the entered previous commands and save configuration changes made.
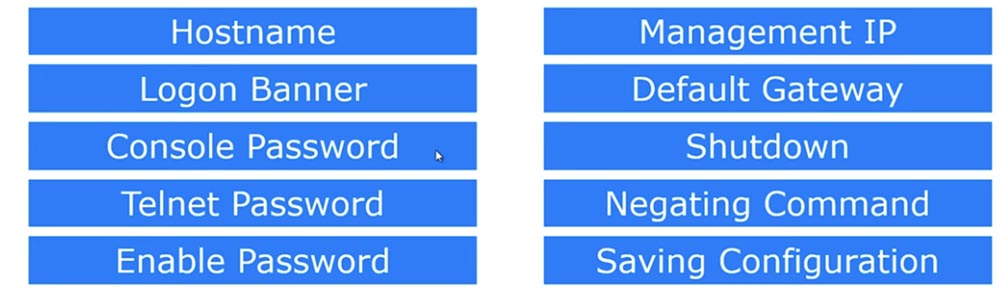
These are the 10 main commands that you use when initiating a device. To enter these parameters, you must use the global configuration mode, which we will now switch to.
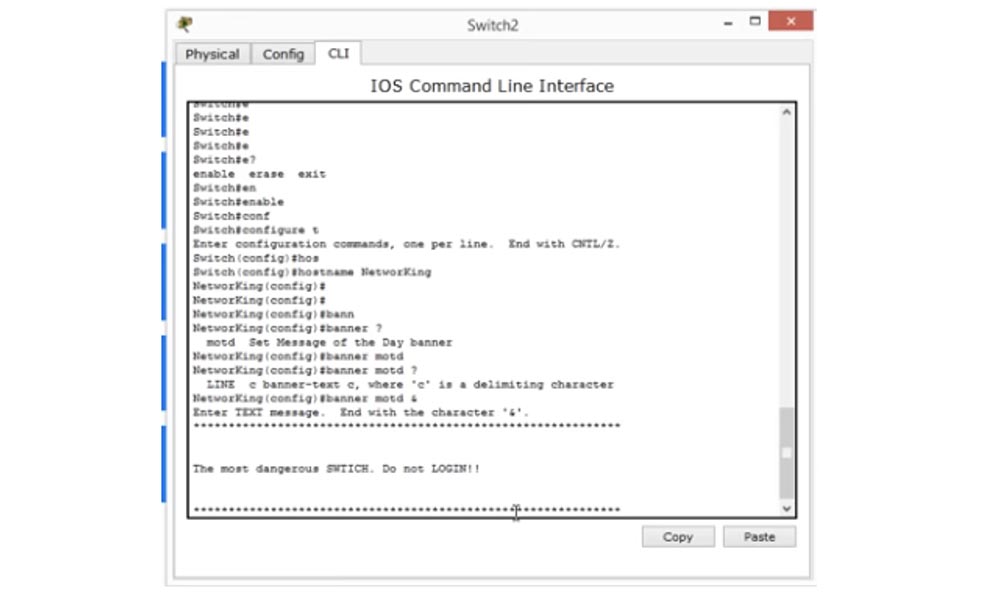
So, the first parameter is the host name, it applies to the entire device, so its change is made in global configuration mode. To do this, we enter the Switch (config) # parameter on the command line. If I want to change the host name, then I enter hostname NetworKing in this line, press Enter, and I see that the Switch device name has changed to NetworKing. If you connect this switch to a network where there are already many other devices, this name will serve as its identifier among other network devices, so try to come up with a unique name for your switch with a meaning. So, if this switch is installed, say, in the administrator’s office, you can call it AdminFloor1Room2. Thus, if you give a device a logical name, it will be very easy for you to determine which switch you are connecting to. This is important, as it will help not to get lost in the devices as the network expands.
Next is the Logon Banner parameter. This is the first thing that anyone who logs into this device with a login will see. This parameter is set using the #banner command. Next, you can enter the abbreviation motd, Message of The Day, or “message of the day.” If I enter a question mark in the line, I will receive a message of the form: LINE with banner-text with.
It looks confusing, but simply means that you can enter text from any character except “c”, which in this case is a separating character. So let's start with ampersand (&). I press "Enter", and the system writes that now you can enter any text for the banner and end it with the same symbol (&) from which the line begins. So I started with an ampersand and have to finish my message with an ampersand.
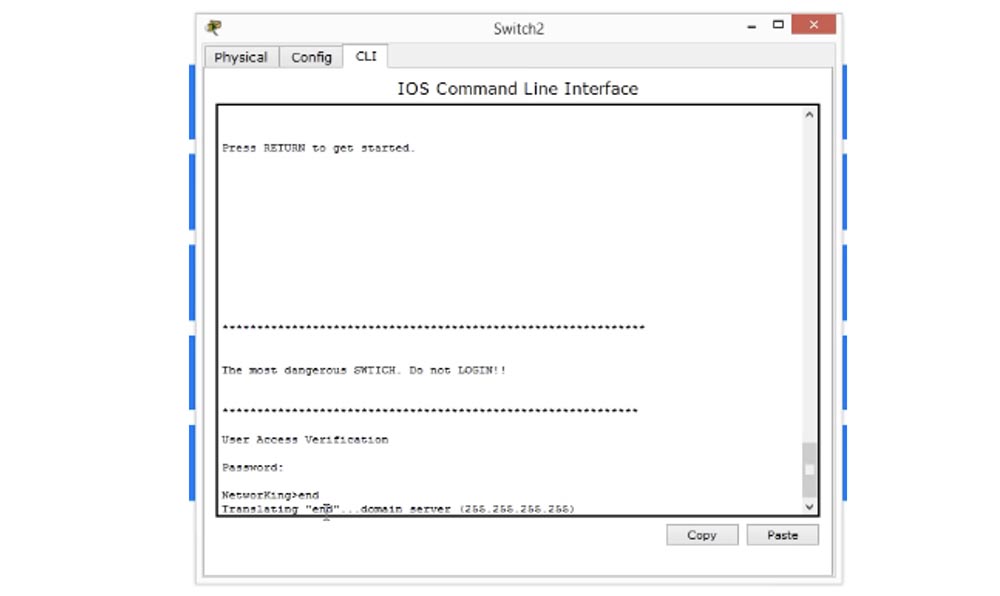
I will start my banner with a string of asterisks (*), and in the next line I will write “The most dangerous switch! Do not enter"! I think it's cool, anyone will get scared when they see such a welcome banner.
That is my “message of the day.” To check how it looks on the screen, I press CTRL + Z to switch from global mode to privileged EXEC mode, from where I can exit the settings mode. This is what my message looks like on the screen and this will be seen by anyone who logs in on this switch. This is what is called a login banner. You can be creative and write anything, but I advise you to approach this with all seriousness. I mean that some people, instead of a sensible text, placed pictures of characters that did not carry any meaning as a welcome banner. Nothing can prevent you from doing such “creativity”, just remember that you overload the device memory (RAM) and the configuration file that is used when the system starts with unnecessary characters. The more characters in this file, the slower the download of the switch, so try to minimize the configuration file, making the banner content clear and precise.
Next we look at the password on the Console Password console. It prevents random people from entering the device. Suppose you left the device open. If I am a hacker, then I connect my laptop using a console cable to the switch, use the console to enter the switch and change the password or do something more malicious. But if you use the password on the console port, then I can only log in with this password. You do not want anyone to just go into the console and change something in the settings of your switch. So let's first look at the current configuration.
Since I am in config mode, I can enter do sh run commands. The show run command is a privileged EXEC command. If I want to enter from global mode into this mode, I have to use the “do” command. If we look at the console line, we see that by default there is no password and line con 0 is displayed. This line is located in one section, and below there is another section of the configuration file.
Since there is nothing in the “line console” section, this means that when I connect to the switch via the console port, I will get direct access to the console. Now, if you enter “end”, you can go back to the privileged mode and switch from it to user mode. If I press Enter now, I’ll go directly to the command prompt mode, because there is no password here, otherwise the program would ask me to enter it to enter the configuration settings.
So, press "Enter" and print in line line con 0, because in Cisco devices it all starts from scratch. Since we have only one console, it is denoted by the abbreviation "son." Now, in order to assign a password, for example, the word “Cisco”, we need to type in the NetworKing line (config-line) # the password cisco command and press “Enter”.
Now we have set the password, but so far we are missing something. Let's try everything one more time and exit the settings. Despite the fact that we have set a password, the system does not request it. Why?
She does not ask for a password, because we do not interrogate her. We set the password, but did not specify the line in which it is checked, if traffic starts flowing to the device. What should we do? We must again return to the line where we have line con 0, and enter the word "login".
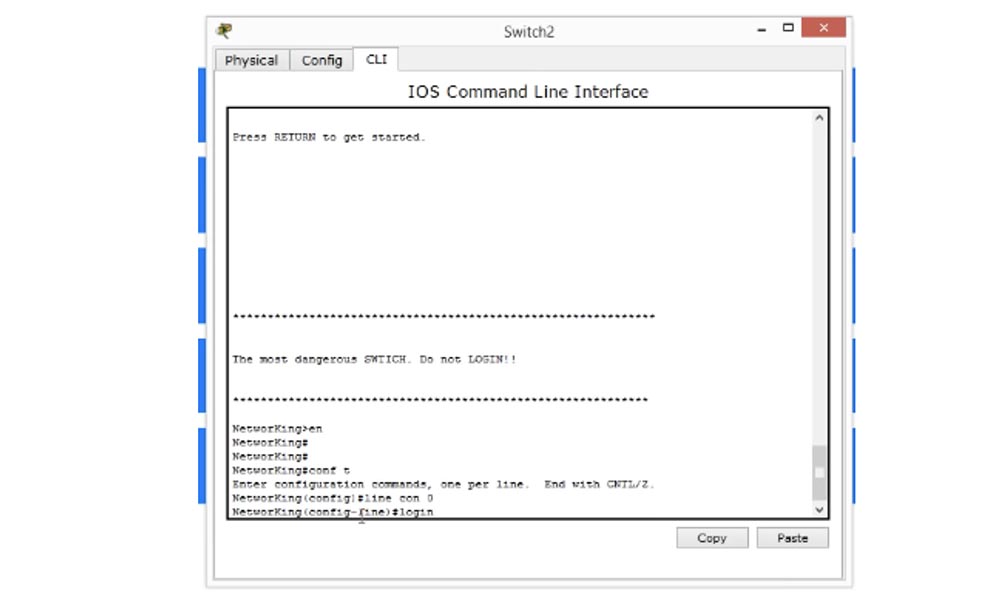
This means that you need to check the password, that is, you need a login to login. Let's check what we got. To do this, exit the settings and go back to the banner window. You see that right under him we had a line that required entering a password.

If I enter the password here, I can enter the device settings. Thus, we effectively prevented access to the device without your permission, and now only those who know the password can log in to the system.
Now you see that we have a little problem. If you are typing something that the system does not understand, it thinks that this is the domain name and is trying to find the domain name of the server, allowing the connection to the IP address 255.255.255.255.
This can happen, and I'll show you how to turn off the appearance of this message. You can simply wait until the request time expires, or use the keyboard shortcut Control + Shift + 6, sometimes it works even on physical devices.
Then we need to make sure that the system does not search for the domain name, for this we enter the command “no IP-domain lookup” and check how it worked.
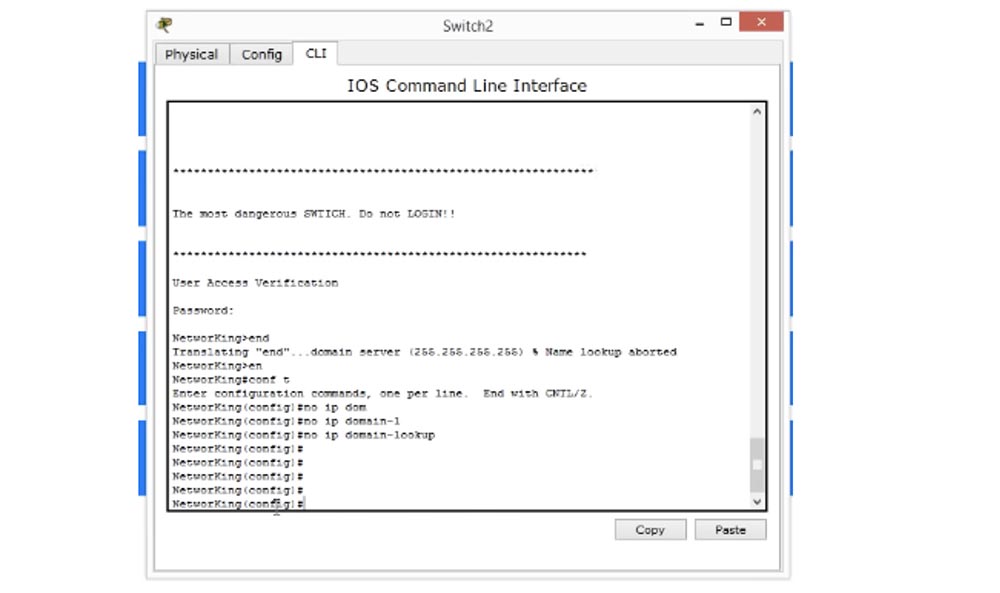
As you can see, now you can work with switch settings without any problems. If we again exit the settings on the welcome screen and make the same error, that is, we enter a blank line, the device will not waste time searching for the domain name, but simply displays the message “unknown command.” So, setting the login password is one of the main things you need to do on the new Cisco device.
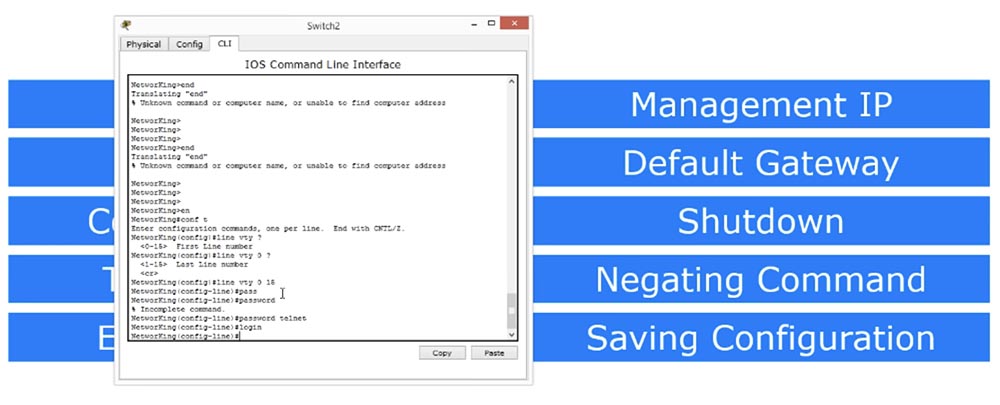
Next we look at the password on the Telnet protocol. If for the console password we had “con 0” in the line, for the Telnet password, the default parameter is “line vty”, that is, the password is set in the virtual terminal mode, because Telnet is not a physical, but a virtual line. The first parameter of line vty is 0, and the last is 15. If we set parameter 15, this will mean that you can create 16 lines to access this device. That is, if we have several devices on the network, when connecting to a switch using the Telnet protocol, the first device will use line 0, the second will use line 1, and so on up to 15 lines. Thus, 16 people can connect to the switch at the same time, and to the seventeenth person, while trying to connect, the switch will report that the connection limit has been reached.
We can set a common password for all 16 virtual lines from 0 to 15, following the same concept as for setting the password on the console, that is, enter the password command in the line and set the password, for example, the word "telnet", and then enter the command "Login". This means that we do not want people to log into the device via Telnet without a password. Therefore, we give instructions to check the login and only then provide access to the system.
At the moment, we cannot use Telnet, because access to the device using this protocol can only be done after setting up an IP address on the switch. Therefore, to check the Telnet settings, let's first go to the management of IP addresses.
As you know, the switch works at OSI model level 2, has 24 ports and therefore cannot have any specific IP address. But we have to assign an IP address to this switch if we want to connect to it from another device in order to manage IP addresses.
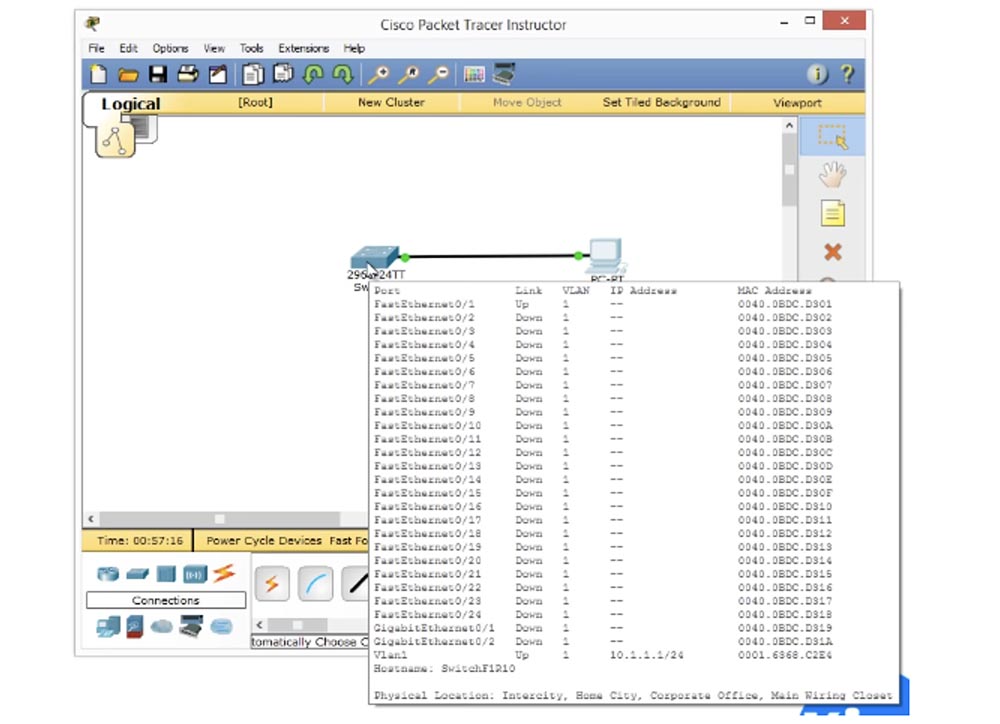
So, we need to assign the switch one IP-address that will be used for IP-management. To do this, we will enter one of my favorite commands “show ip interface brief” and we will be able to see all the interfaces present in this device.
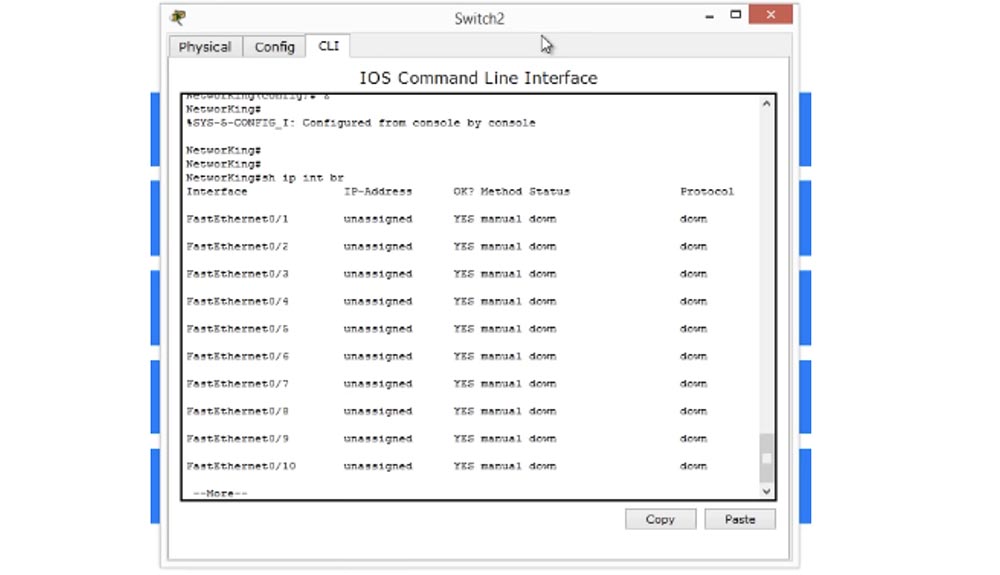
So I see that I have twenty-four FastEthernet ports, two GigabitEthernet ports, and one VLAN interface. VLAN is a virtual network, later we will look at its concept in detail, for now I’ll say that each switch comes with one virtual interface called a VLAN interface. That is what we use to control the switch.
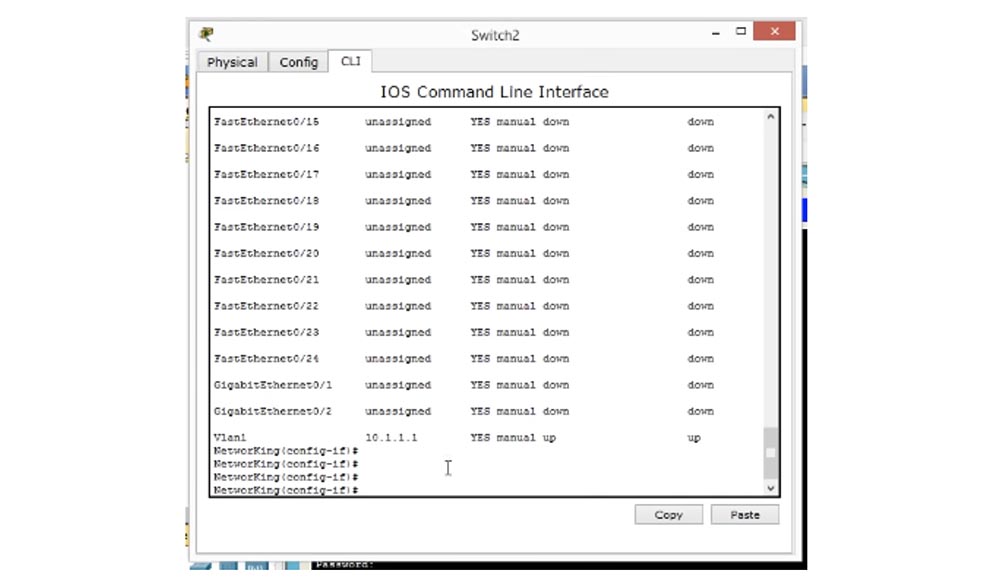
Therefore, we will try to access this interface and enter the vlan 1 parameter on the command line. Now you see that the command line has assumed the form NetworKing (config-if) #, which means that we are in the management interface of the VLAN switch. Now we will enter the command to set the IP address of the following type: Ip add 10.1.1.1 255.255.255.0 and press "Enter".
We see that this interface appeared in the list of interfaces marked “administratively down”. If you see such an inscription, it means that for this interface there is a “shutdown” command that allows you to disable the port, and in this case this port is disabled. You can execute this command for any interface whose characteristics are marked “down”. For example, you can go to the interface FastEthernet0 / 23 or FastEthernet0 / 24, give the command “shutdown”, after which in the list of interfaces this port will be marked as “administratively down”, that is, disabled.
So, we looked at how the shutdown port shutdown command works. In order to enable a port or even include something in a switch, use Negating Command, or “negate command”. For example, in our case, the use of such a command would mean "no shutdown." This is a very simple command from one word “no” - if the command “shutdown” means “turn off the device”, then the command “no shutdown” means “turn on the device”. Thus, by denying any command with the “no” particle, we command the Cisco device to do the exact opposite.
«show ip interface brief», , VLAN, IP- 10.1.1.1, «down» — «» «up» — «», - «down».
VLAN ? , , , , – , . , PC-PT(PC0).
Cisco Packet Tracer, , , .
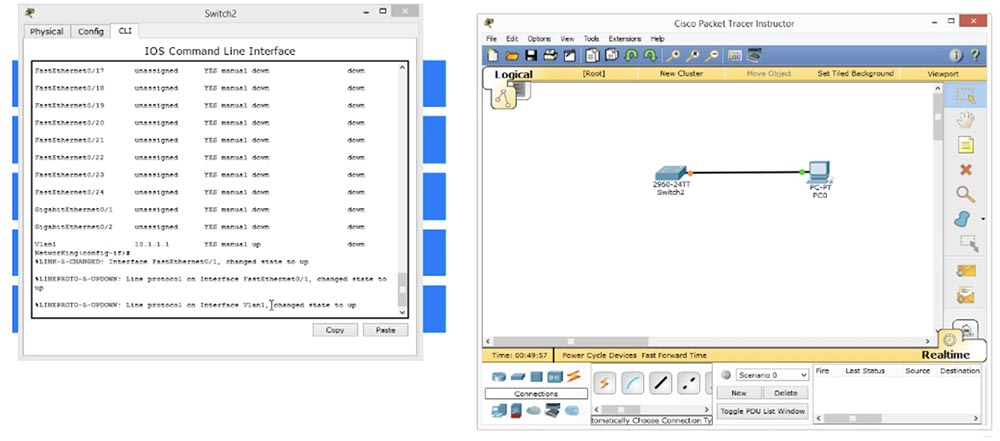
, , . , VLAN1 UP, . , .
«show ip interface brief», , FastEthernet0/1 UP, , . VLAN , «» .
, , . Windows, , IP- 10.1.1.2 255.255.255.0.
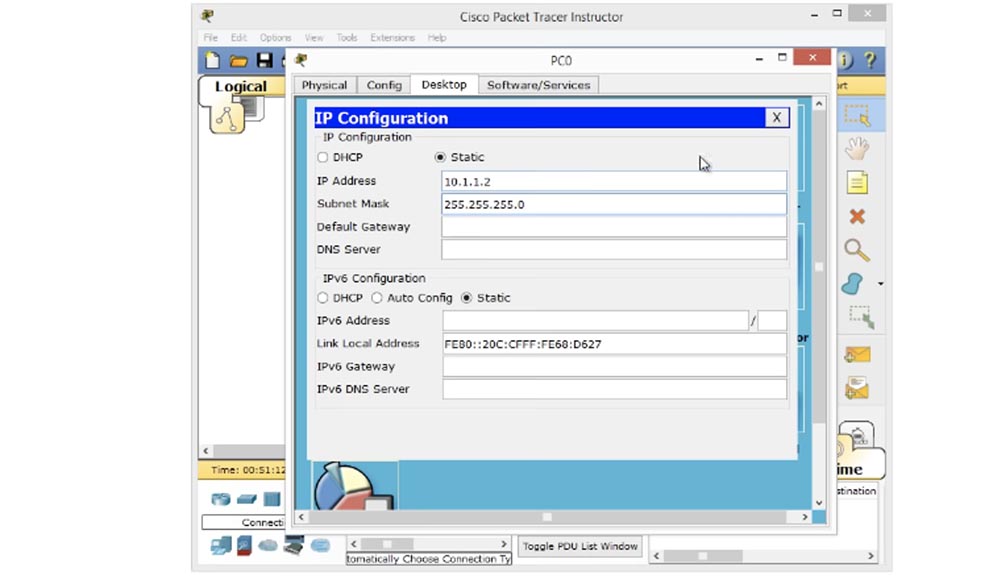
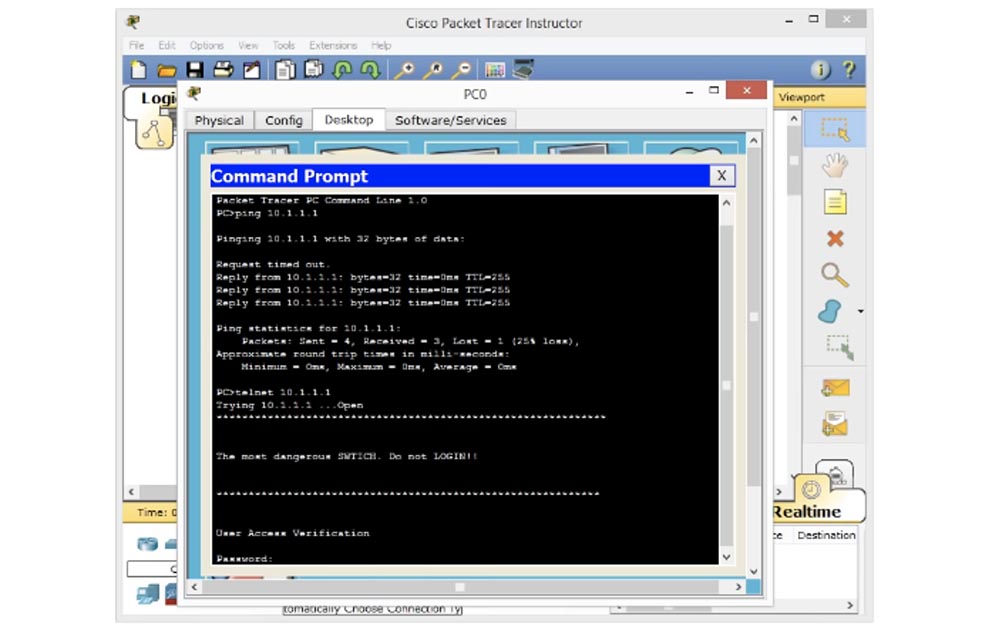
, . «ping 10.1.1.1», , , . , IP- 10.1.1.1, .
, «timeout». - , MAC- ARP- , IP- 10.1.1.1 .
Telnet, «telnet 10.1.1.1». Telnet 10.1.1.1, , . , .
– , Telnet. , . ? – , VTY. «cisco», , . «telnet» VTY, . VTY, line vty password — , Telnet.
«enable», «no password set" — « ». , , . EXEC, , «enable password», . , .
«enable» EXEC EXEC. «enable», , . . , IOS NetworKing (config) # enable «password enable», .
«enable" «», . ? , «enable", EXEC. , . «conf t», . SwitchF1R10, « , 10». , , .
, , , Telnet.
Telnet: , , Telnet. , IP-, «shutdown» .
. , «ip default-gateway 10.1.1.10" «». , , 2- OSI.
, , . , , Telnet, , , IP- 10.1.1.1 – . Telnet , , , . , IP- , .
, , , .
, , , . , . 2 .
«write» EXEC. , «» «Building configuration — OK», . , , « ». . , , .
, , «write» , NVRAM. , NVRAM , , RAM. , «write», NVRAM.
«do write». , «copy». Cisco , : ftp flash, . running-configuration, . , , , startup-configuration. .
, , , . , , . , , , , .
, , . , , , . , , , EXEC, EXEC, , , , .
, Cisco. , .
, . , , , Telnet VTY 15. IP- VLAN. , «enable» , , «no shutdown».
, , «ip default-gateway» IP-. , «write» . , .
Thank you for staying with us. Do you like our articles? Want to see more interesting materials? Support us by placing an order or recommending to friends, 30% discount for Habr's users on a unique analogue of the entry-level servers that we invented for you: The whole truth about VPS (KVM) E5-2650 v4 (6 Cores) 10GB DDR4 240GB SSD 1Gbps from $ 20 or how to share the server? (Options are available with RAID1 and RAID10, up to 24 cores and up to 40GB DDR4).
VPS (KVM) E5-2650 v4 (6 Cores) 10GB DDR4 240GB SSD 1Gbps , .
Dell R730xd 2 times cheaper? Only we have 2 x Intel TetraDeca-Core Xeon 2x E5-2697v3 2.6GHz 14C 64GB DDR4 4x960GB SSD 1Gbps 100 TV from $ 199 in the Netherlands! Dell R420 - 2x E5-2430 2.2Ghz 6C 128GB DDR3 2x960GB SSD 1Gbps 100TB - from $ 99! Read about How to build an infrastructure building. class c using servers Dell R730xd E5-2650 v4 worth 9000 euros for a penny?
So, the manager sends you a new Cisco switch, which is equipped with multiple interfaces. This can be an 8.16 or 24-port switch. In this case, the slide shows a switch that has 48 ports in front, divided into 4 sections with 12 ports each. As we know from previous lessons, there are several other interfaces behind the switch, one of which is the console port. The console port is used for external access to the device and allows you to see how the switch operating system boots.
')
We have already discussed the case when you want to help your colleague and use remote desktop. You connect to his computer, make changes, but if you want your friend to reboot the computer, you will lose access and you will not be able to observe what is happening on the screen at the time of loading. This problem occurs if you do not have external access to this device and you are connected to it only via the network.
But if you have off-network access, you can see the boot screen, unpacking IOS and other processes. Another way to access this device is to connect to any of the front ports. If you set up IP address management on this device, as will be shown in this video, you can access it via Telnet. The problem is that you lose this access as soon as the device turns off.
Let's see how you can perform the initial setup of a new switch. Before we proceed directly to configuring, we need to introduce a few basic rules.
For most video tutorials, I used GNS3, an emulator that allows you to emulate a Cisco IOS operating system. In many cases, I need more than one device, for example, if I show how routing works. In this case, I may need, for example, four devices. Instead of buying physical devices, I can use the operating system of one of my devices, connect it to GNS3, and emulate this IOS on multiple instances of virtual devices.
Therefore, I do not need to physically have five routers, I can have only one router. I can use the operating system on my computer, install the emulator and get 5 copies of devices. In the following video tutorials we will look at how to do this, but for today the problem with using the GNS3 emulator is that it cannot be used to emulate a switch, because the Cisco switch has ASIC hardware chips. This special integrated circuit, which, in fact, makes the switch a switch, so you can not just emulate this hardware function.
In general, the GNS3 emulator helps to work with the switch, but there are some functions that cannot be performed with it. So for this tutorial and some other videos, I used other Cisco software called Cisco Packet Tracer. Do not ask me how to get access to Cisco Packet Tracer, you can find out about it with Google, I can only say that you must be a member of Network Academy.
You can have access to Cisco Packet Tracer, you can have access to a physical device, or to GNS3, you can use any of these tools when learning Cisco ICND. You can use GNS3, if you have a router, an operating system and a switch, and it will work without problems, you can use a physical device, or Packet Tracer - just decide what suits you best.
But in my video tutorials, I’m going to use Packet Tracer, so I’ll have a couple of videos, one exclusively for Packet Tracer and one exclusively for GNS3, I’ll post them soon, in the meantime, we’ll use Packet Tracer. This is how it looks. If you also have access to Network Academy, you can access this program, and if not, you can use other tools.
So, since today we are talking about switches, I will check the Switches item, select the model of the 2960 series switch and drag its icon to the program window. If I double-click on this icon, I will go to the command line interface.
Next, I see how the switch operating system boots.
If you take a physical device and connect it to a computer, you will see exactly the same Cisco IOS boot pattern. You can see that the operating system has been unpacked, and you can read some software usage restrictions and license agreement, copyright information ... everything is displayed in this window.
Next, the platform on which the OS is running will be shown, in this case it is the WS-C2690-24TT switch, and all the hardware functions are displayed. The version of the program is also displayed here. Then we go directly to the command line, if you remember, here we have tips for the user. For example, the symbol (>) invites you to enter a command. From the video tutorial "Day 5" you know that this is the initial, lowest access mode to the device settings, the so-called user EXEC mode. This access can be obtained on any Cisco device.
If you use Packet Tracer, then you get out-of-network OOB access to the device and can track how the device is loading. This program simulates access to the switch through the console port. How do you go from user EXEC mode to privileged EXEC mode? You type the “enable” command and press “Enter”, you could also use the hint simply by typing “en” and receiving possible options for the commands starting with these letters. If you simply enter the letter “e”, the device will not understand what you mean, because there are three commands beginning with “e”, but if I type “en”, the system will understand that the only word beginning with these two letters is this is enable. Thus, having entered this command, you will get access to the privileged Exec mode.
In this mode, we can do everything that was shown on the second slide - change the host name, set the login banner, Telnet password, enable the password, configure the IP address, set the default gateway, give the command to disable the device, cancel the entered previous commands and save configuration changes made.
These are the 10 main commands that you use when initiating a device. To enter these parameters, you must use the global configuration mode, which we will now switch to.
So, the first parameter is the host name, it applies to the entire device, so its change is made in global configuration mode. To do this, we enter the Switch (config) # parameter on the command line. If I want to change the host name, then I enter hostname NetworKing in this line, press Enter, and I see that the Switch device name has changed to NetworKing. If you connect this switch to a network where there are already many other devices, this name will serve as its identifier among other network devices, so try to come up with a unique name for your switch with a meaning. So, if this switch is installed, say, in the administrator’s office, you can call it AdminFloor1Room2. Thus, if you give a device a logical name, it will be very easy for you to determine which switch you are connecting to. This is important, as it will help not to get lost in the devices as the network expands.
Next is the Logon Banner parameter. This is the first thing that anyone who logs into this device with a login will see. This parameter is set using the #banner command. Next, you can enter the abbreviation motd, Message of The Day, or “message of the day.” If I enter a question mark in the line, I will receive a message of the form: LINE with banner-text with.
It looks confusing, but simply means that you can enter text from any character except “c”, which in this case is a separating character. So let's start with ampersand (&). I press "Enter", and the system writes that now you can enter any text for the banner and end it with the same symbol (&) from which the line begins. So I started with an ampersand and have to finish my message with an ampersand.
I will start my banner with a string of asterisks (*), and in the next line I will write “The most dangerous switch! Do not enter"! I think it's cool, anyone will get scared when they see such a welcome banner.
That is my “message of the day.” To check how it looks on the screen, I press CTRL + Z to switch from global mode to privileged EXEC mode, from where I can exit the settings mode. This is what my message looks like on the screen and this will be seen by anyone who logs in on this switch. This is what is called a login banner. You can be creative and write anything, but I advise you to approach this with all seriousness. I mean that some people, instead of a sensible text, placed pictures of characters that did not carry any meaning as a welcome banner. Nothing can prevent you from doing such “creativity”, just remember that you overload the device memory (RAM) and the configuration file that is used when the system starts with unnecessary characters. The more characters in this file, the slower the download of the switch, so try to minimize the configuration file, making the banner content clear and precise.
Next we look at the password on the Console Password console. It prevents random people from entering the device. Suppose you left the device open. If I am a hacker, then I connect my laptop using a console cable to the switch, use the console to enter the switch and change the password or do something more malicious. But if you use the password on the console port, then I can only log in with this password. You do not want anyone to just go into the console and change something in the settings of your switch. So let's first look at the current configuration.
Since I am in config mode, I can enter do sh run commands. The show run command is a privileged EXEC command. If I want to enter from global mode into this mode, I have to use the “do” command. If we look at the console line, we see that by default there is no password and line con 0 is displayed. This line is located in one section, and below there is another section of the configuration file.
Since there is nothing in the “line console” section, this means that when I connect to the switch via the console port, I will get direct access to the console. Now, if you enter “end”, you can go back to the privileged mode and switch from it to user mode. If I press Enter now, I’ll go directly to the command prompt mode, because there is no password here, otherwise the program would ask me to enter it to enter the configuration settings.
So, press "Enter" and print in line line con 0, because in Cisco devices it all starts from scratch. Since we have only one console, it is denoted by the abbreviation "son." Now, in order to assign a password, for example, the word “Cisco”, we need to type in the NetworKing line (config-line) # the password cisco command and press “Enter”.
Now we have set the password, but so far we are missing something. Let's try everything one more time and exit the settings. Despite the fact that we have set a password, the system does not request it. Why?
She does not ask for a password, because we do not interrogate her. We set the password, but did not specify the line in which it is checked, if traffic starts flowing to the device. What should we do? We must again return to the line where we have line con 0, and enter the word "login".
This means that you need to check the password, that is, you need a login to login. Let's check what we got. To do this, exit the settings and go back to the banner window. You see that right under him we had a line that required entering a password.
If I enter the password here, I can enter the device settings. Thus, we effectively prevented access to the device without your permission, and now only those who know the password can log in to the system.
Now you see that we have a little problem. If you are typing something that the system does not understand, it thinks that this is the domain name and is trying to find the domain name of the server, allowing the connection to the IP address 255.255.255.255.
This can happen, and I'll show you how to turn off the appearance of this message. You can simply wait until the request time expires, or use the keyboard shortcut Control + Shift + 6, sometimes it works even on physical devices.
Then we need to make sure that the system does not search for the domain name, for this we enter the command “no IP-domain lookup” and check how it worked.
As you can see, now you can work with switch settings without any problems. If we again exit the settings on the welcome screen and make the same error, that is, we enter a blank line, the device will not waste time searching for the domain name, but simply displays the message “unknown command.” So, setting the login password is one of the main things you need to do on the new Cisco device.
Next we look at the password on the Telnet protocol. If for the console password we had “con 0” in the line, for the Telnet password, the default parameter is “line vty”, that is, the password is set in the virtual terminal mode, because Telnet is not a physical, but a virtual line. The first parameter of line vty is 0, and the last is 15. If we set parameter 15, this will mean that you can create 16 lines to access this device. That is, if we have several devices on the network, when connecting to a switch using the Telnet protocol, the first device will use line 0, the second will use line 1, and so on up to 15 lines. Thus, 16 people can connect to the switch at the same time, and to the seventeenth person, while trying to connect, the switch will report that the connection limit has been reached.
We can set a common password for all 16 virtual lines from 0 to 15, following the same concept as for setting the password on the console, that is, enter the password command in the line and set the password, for example, the word "telnet", and then enter the command "Login". This means that we do not want people to log into the device via Telnet without a password. Therefore, we give instructions to check the login and only then provide access to the system.
At the moment, we cannot use Telnet, because access to the device using this protocol can only be done after setting up an IP address on the switch. Therefore, to check the Telnet settings, let's first go to the management of IP addresses.
As you know, the switch works at OSI model level 2, has 24 ports and therefore cannot have any specific IP address. But we have to assign an IP address to this switch if we want to connect to it from another device in order to manage IP addresses.
So, we need to assign the switch one IP-address that will be used for IP-management. To do this, we will enter one of my favorite commands “show ip interface brief” and we will be able to see all the interfaces present in this device.
So I see that I have twenty-four FastEthernet ports, two GigabitEthernet ports, and one VLAN interface. VLAN is a virtual network, later we will look at its concept in detail, for now I’ll say that each switch comes with one virtual interface called a VLAN interface. That is what we use to control the switch.
Therefore, we will try to access this interface and enter the vlan 1 parameter on the command line. Now you see that the command line has assumed the form NetworKing (config-if) #, which means that we are in the management interface of the VLAN switch. Now we will enter the command to set the IP address of the following type: Ip add 10.1.1.1 255.255.255.0 and press "Enter".
We see that this interface appeared in the list of interfaces marked “administratively down”. If you see such an inscription, it means that for this interface there is a “shutdown” command that allows you to disable the port, and in this case this port is disabled. You can execute this command for any interface whose characteristics are marked “down”. For example, you can go to the interface FastEthernet0 / 23 or FastEthernet0 / 24, give the command “shutdown”, after which in the list of interfaces this port will be marked as “administratively down”, that is, disabled.
So, we looked at how the shutdown port shutdown command works. In order to enable a port or even include something in a switch, use Negating Command, or “negate command”. For example, in our case, the use of such a command would mean "no shutdown." This is a very simple command from one word “no” - if the command “shutdown” means “turn off the device”, then the command “no shutdown” means “turn on the device”. Thus, by denying any command with the “no” particle, we command the Cisco device to do the exact opposite.
«show ip interface brief», , VLAN, IP- 10.1.1.1, «down» — «» «up» — «», - «down».
VLAN ? , , , , – , . , PC-PT(PC0).
Cisco Packet Tracer, , , .
, , . , VLAN1 UP, . , .
«show ip interface brief», , FastEthernet0/1 UP, , . VLAN , «» .
, , . Windows, , IP- 10.1.1.2 255.255.255.0.
, . «ping 10.1.1.1», , , . , IP- 10.1.1.1, .
, «timeout». - , MAC- ARP- , IP- 10.1.1.1 .
Telnet, «telnet 10.1.1.1». Telnet 10.1.1.1, , . , .
– , Telnet. , . ? – , VTY. «cisco», , . «telnet» VTY, . VTY, line vty password — , Telnet.
«enable», «no password set" — « ». , , . EXEC, , «enable password», . , .
«enable» EXEC EXEC. «enable», , . . , IOS NetworKing (config) # enable «password enable», .
«enable" «», . ? , «enable", EXEC. , . «conf t», . SwitchF1R10, « , 10». , , .
, , , Telnet.
Telnet: , , Telnet. , IP-, «shutdown» .
. , «ip default-gateway 10.1.1.10" «». , , 2- OSI.
, , . , , Telnet, , , IP- 10.1.1.1 – . Telnet , , , . , IP- , .
, , , .
, , , . , . 2 .
«write» EXEC. , «» «Building configuration — OK», . , , « ». . , , .
, , «write» , NVRAM. , NVRAM , , RAM. , «write», NVRAM.
«do write». , «copy». Cisco , : ftp flash, . running-configuration, . , , , startup-configuration. .
, , , . , , . , , , , .
, , . , , , . , , , EXEC, EXEC, , , , .
, Cisco. , .
, . , , , Telnet VTY 15. IP- VLAN. , «enable» , , «no shutdown».
, , «ip default-gateway» IP-. , «write» . , .
Thank you for staying with us. Do you like our articles? Want to see more interesting materials? Support us by placing an order or recommending to friends, 30% discount for Habr's users on a unique analogue of the entry-level servers that we invented for you: The whole truth about VPS (KVM) E5-2650 v4 (6 Cores) 10GB DDR4 240GB SSD 1Gbps from $ 20 or how to share the server? (Options are available with RAID1 and RAID10, up to 24 cores and up to 40GB DDR4).
VPS (KVM) E5-2650 v4 (6 Cores) 10GB DDR4 240GB SSD 1Gbps , .
Dell R730xd 2 times cheaper? Only we have 2 x Intel TetraDeca-Core Xeon 2x E5-2697v3 2.6GHz 14C 64GB DDR4 4x960GB SSD 1Gbps 100 TV from $ 199 in the Netherlands! Dell R420 - 2x E5-2430 2.2Ghz 6C 128GB DDR3 2x960GB SSD 1Gbps 100TB - from $ 99! Read about How to build an infrastructure building. class c using servers Dell R730xd E5-2650 v4 worth 9000 euros for a penny?
Source: https://habr.com/ru/post/454644/
All Articles