Forgotten enchantjs + new 1C-Bitrix = Game for customer motivation

Promotions in online stores are different, but how to make them visually interesting for a client is always a question, we tried to turn a common stock in which there are regular client statistics into a game in Dendy styles.
Here we will talk about how marketing ideas on customer motivation can be visualized in a small browser game.
Stage 1. From idea to understanding what is needed
One fine day (before the beginning of the summer), in the marketing department, the idea of organizing a motivating action for the wholesale distribution of customers matured. From the initial data, as usual, we had the following:
')
- Some customer id
- Customer records
- What is the total amount the client purchased for a certain period of time
- What brands were purchased by the client during this period
- How “honestly” and responsibly the client fulfills his obligations to us as to the suppliers of products.
- What are the “special” pricing conditions the client has on the basis of his work with us
- Some set of motivation tools
- A list of “gifts” that we can offer to the client for his cooperation and performance
- “Improvers” of his current price offers
- Some “Super Prize” to the most ... most ... most responsible and active client.
- The point of concentration of customers is a personal account with an online ordering system, where we can offer something and report something important.
- Accounting program (“Yellow”) - where there is general information on each customer identifier and its indicators.
With such a data set it would be possible to organize on the go in your personal account:
- Banner + “Buy this and get this”
- Or a table with client parameters, where once a day you can upload data from the accounting program
- Since the site is on 1C-Bitrix, you can make complex “Basket rules” to apply some discounts, subject to certain conditions, depending on the client ID, or make your logic within the API with some statistics output.
All this we have done and are doing to inform customers. But in this case, I wanted to try something else - to create a game - where the indicators will be visualized into abstract values.
Stage 2. So, we make the game and now the TK will sound like this
Our theme is spare parts and for the most part - wholesale auto parts, so the following structure of game logic was determined:
- In the center of attention - the track on which the car should move
- The track starts somewhere and ends (start and finish), that is, the track has a predetermined length in km.
- Start is the starting point of the indicator - “the distance traveled”
- The finish is the end point by which we can give the client a special privilege or a very valuable prize.
- There should be stopping points on the track (this can be an obstacle, a stop for making a decision).
- The decision point (checkpoint) - should give the client a “bun” and return to the start or rejection of the “bun” and move on.
- Obstacle - must change some indicators.
- Fuel will be used to drive the car.
- Fuel is an abstraction, the liters of which are received by the client for compliance with the terms of sales + for completing the task / quests.
- Fuel consumption per 100 km. the car is also an abstraction which depends on the indicators of the “honesty” and “responsibility” of the client, while respecting their obligations to us as suppliers.
- Fuel consumption should be in some gradation and within reasonable limits.
With the help of the “great and mighty” it turned out to be a big task to divide it into small subtasks and come to an understanding of the choice of implementation tool. In order not to create a “two-wheeled” for the organization of the mechanics of the movement of the car, the choice was made to use the JavaScript framework.
The requirements for the game framework, which we have defined for ourselves, are the following:
- 2D map
- Sprite overlay on the map
- Event model
- "Fast start"
- Documentation
A total of 3-5 well-known solutions were reviewed and tested (including the little-known PointJS). All that was considered were really great engines for creating games, but something easy was needed and enchantjs was chosen.
Enchantjs is a simple engine with the necessary set of tools for creating a simple 2D game.
Stage 3. Technical design
After playing with Enchantjs, it's time to sketch out a small structure of the application.
- Tables and data you need to save (talking about MySQL)
- Summary table of current player data (data that affect the current parameters of the game). Partially this table is modified during the game, partly from the accounting program.
- Changes liters of gasoline. These are the abstractions that the client can fill in his virtual car. This data should come only from the accounting program.
- The history of mileage change. To where the client got in his car, where he ran out of gas, where he took the checkpoint.
- Changes in fuel consumption. For example, today the client consumes a car 9 liters. 100km, and tomorrow there were comments to the client and his car increased consumption to 11 liters. 100 km.
- Information block in 1C-Bitrix, where marketing experts will enter tasks for customers. (Do it ... then ... here it is ..., confirm with a photo or a link and you will get candy or reduced consumption)
- Table with completed tasks of clients.
- Checkpoint table. (Required for drawing sprites with checkboxes on the game map)
- A table of gifts that we can provide to the customer at the checkpoint.
- A table of collected checkpoints. (the client reached the checkpoint, chose a gift and we wrote it down)
- History of consumption / arrival of liters of gasoline. Ie when driving there is an expense, when refueling the cans - there is the arrival of fuel. These data are needed to inform the client.
- Component 1C - Bitrix
- Common component template
- Processing user requests during the game
- Handling of events occurring on the field of the game
- Processing actions performed by the user in the game control interface
- Module 1C - Bitrix
- ORM of all required tables
- Some service operations
- Agents
- API for exchange with the accounting program
Processing requests for data about the game by the accounting program.
Processing requests for the provision of data on players accounting program.
Stage 4. Realization of the game scene
In the implementation I will give an example of only that with regards to enchantjs and scenes with the game.
First we need to create a scene and create a map for the game.
The map is constructed from an array of arrays, where each nested array characterizes the cell number from the original sprite of the map material.
Parts of the map that will be used in building the game scene
Sprite map source
enchant();// var game = new Game(800,700);// 800 700 game.fps = 28; // game.scale = 1; // // (, ) game.preload('red_car.gif'); game.preload('airport.gif'); game.preload('flag.gif'); // game.onload = function() { var scene=new SceneGame();// game.pushScene(scene); }; game.start(); Got the basic syntax for creating a scene with the game and running the game.
The bottom line is that we on the HTML page draw a rectangle on which we will be manipulating sprites.
Immediately I would like to say that when implementing the game, I had to abandon the enchant event model and the concept that all actions take place as part of the scene change under the influence of the fps value.
We define the main scene of the game, draw the map, set the flags and set the machine to the start.
/** * * @type {Scene} */ var SceneGame=Class.create(Scene,{ initialize:function(){ Scene.apply(this); game = Game.instance; var label=new Label(' ');// var map = new Map(32,32);// map.gif 1- var car =new Car();// var points_list=[]; // // for(var point_km in app_user.check_point){ var flag_position=curent_odometr_to_coordinat(point_km);// , x y - . var red_flag=new Redflag();// 1- red_flag.x=flag_position.x;// 1- x red_flag.y=flag_position.y;// 1- y red_flag.rotation=0;// points_list.push(red_flag); delete red_flag; } this.red_flag=red_flag; this.car=car; map.image = game.assets['map.gif'];// // , map.gif var baseMap = [ [24, 24, 24, 24, 24, 24, 24, 24, 24, 24, 24, 24, 24, 24, 24, 24, 24, 24, 24, 24, 24, 24, 24, 24, 24, 24, 24], [ 4, 1, 1, 1, 5, 24, 24, 24, 24, 24, 24, 24, 24, 24, 24, 24, 24, 4, 1, 1, 1, 1, 5, 24, 24, 24, 24], [12, 24, 24, 24, 0, 24, 51, 47, 5, 24, 24, 24, 24, 24, 24, 24, 24, 0, 24, 24, 24, 24, 12, 24, 24, 24, 24], [12, 24, 24, 24, 0, 24, 24, 24, 0, 24, 24, 24, 24, 24, 24, 24, 24, 0, 24, 24, 24, 24, 12, 24, 24, 24, 24], [12, 24, 24, 24, 0, 24, 24, 25, 0, 24, 24, 24, 24, 24, 24, 24, 24, 0, 24, 24, 24, 24, 12, 24, 24, 24, 24], [12, 24, 24, 24, 0, 24, 24, 25, 0, 24, 24, 24, 24, 24, 24, 24, 24, 0, 24, 24, 24, 24, 12, 24, 24, 24, 24], [12, 24, 24, 24, 0, 24, 24, 25, 24, 24, 24, 24, 24, 24, 24, 24, 24, 0, 24, 24, 24, 24, 0, 24, 24, 24, 24], [12, 24, 24, 24, 8, 1, 1, 1, 5, 47, 22, 44, 4, 1, 1, 1, 5, 0, 24, 24, 24, 24, 11, 24, 24, 24, 24], [12, 24, 24, 24, 24, 24, 24, 24, 0, 24, 24, 24, 0, 24, 24, 24, 0, 0, 24, 24, 24, 24, 0, 24, 24, 24, 24], [12, 24, 24, 24, 24, 24, 24, 24, 0, 24, 24, 24, 0, 24, 24, 24, 0, 0, 24, 24, 24, 24, 0, 24, 24, 24, 24], [12, 24, 24, 24, 24, 24, 24, 24, 0, 24, 24, 24, 0, 24, 24, 24, 0, 0, 24, 24, 24, 24, 0, 24, 24, 24, 24], [12, 24, 24, 24, 24, 24, 24, 24, 8, 1, 1, 1, 9, 24, 24, 24, 12, 0, 24, 24, 24, 24, 8, 1, 1, 1, 8], [12, 24, 24, 24, 24, 24, 24, 4, 9, 57, 57, 24, 24, 24, 12, 24, 12, 8, 1, 1, 1, 1, 5, 24, 24, 24, 24], [12, 24, 24, 24, 24, 24, 24, 0, 49, 24, 24, 24, 24, 24, 12, 24, 12, 24, 24, 24, 24, 24, 0, 24, 24, 24, 24], [12, 24, 24, 24, 24, 24, 24, 0, 59, 50, 50, 50, 24, 24, 12, 24, 12, 24, 24, 24, 24, 24, 0, 24, 24, 24, 24], [12, 24, 24, 24, 24, 24, 24, 8, 1, 1, 1, 1, 5, 24, 12, 24, 12, 24, 24, 24, 24, 24, 0, 24, 24, 24, 24], [12, 24, 24, 24, 24, 24, 24, 24, 24, 24, 24, 24, 8, 1, 9, 24, 12, 51, 51, 51, 51, 24, 0, 24, 24, 24, 24], [11, 24, 24, 24, 24, 24, 24, 24, 24, 24, 24, 24, 24, 24, 24, 24, 8, 1, 1, 1, 1, 1, 9, 24, 24, 24, 24] ]; } map.loadData(baseMap); this.addChild(map);// this.addChild(car); for(var index_flag in points_list){// - this.addChild(points_list[index_flag]); } }); Map image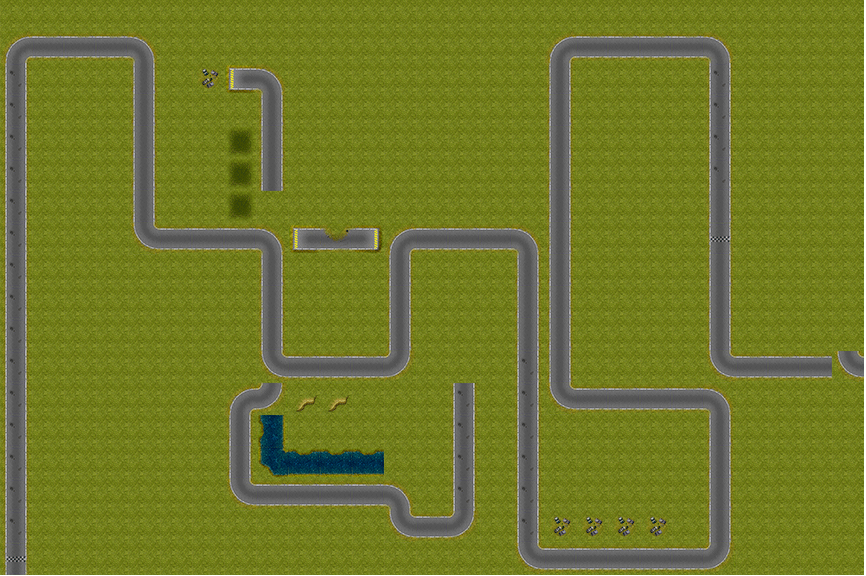
As a result, we get a scene with a map on which there is a road. In the screenshot, the flags are not indicated and the vehicle is not installed at the start (lower left corner).
Each object in the sprite enchantjs at least constantly contains information about the position in the coordinate system, the angle of rotation of the sprite.
Outline map
Those. to implement the movement of the car on the drawn map, it took:
- Describe his actions in space when the track bends.
- Describe the actions of the car and the direction of movement depending on the angle of rotation of the sprite.
Ie if we have a rotation angle of 0 and since our car sprite starts from the bottom up, then we move to the zero point of the coordinate point on the Y axis. Then we meet the bend of route 1 and we must rotate the car sprite by 90 degrees. Further, knowing that we are located at an angle of 90 degrees - we move along the X axis until the bend of the route No. 2, etc.
So we taught the car to move along the drawn coordinate system.
In order to bring the interaction of the car with the road to our usual values - at a distance of km traveled, it was necessary to write an additional function that takes the number of kilometers. 0 to 3000 and returns the coordinates of a point on the road.
To move the car, we used setInterval which increases the values of x or y while the car is moving.
// var start=setInterval(function(){ var position=car.getElementMap(car.x,car.y); position.map_num=map.checkTile(car.x,car.y); var move_result=car.move_car(position); // var fuel_one_km=fuel_consumption(app_user.fuel_road);// 1 app_storage.fuel -=fuel_one_km; app_storage.fuel=parseFloat((app_storage.fuel).toFixed(2)); if(app_storage.fuel<=0){ // clearInterval(start); console.log(' !'); // , } var check_point_km=check_car_checkpoint(app_storage.km) // if(typeof check_point_km.point_km!=='undefined') { console.log('!'); // , } if(position.car_x>780) { clearInterval(start); } },app_conf().game.move_car_fps); Map, typewriter, flags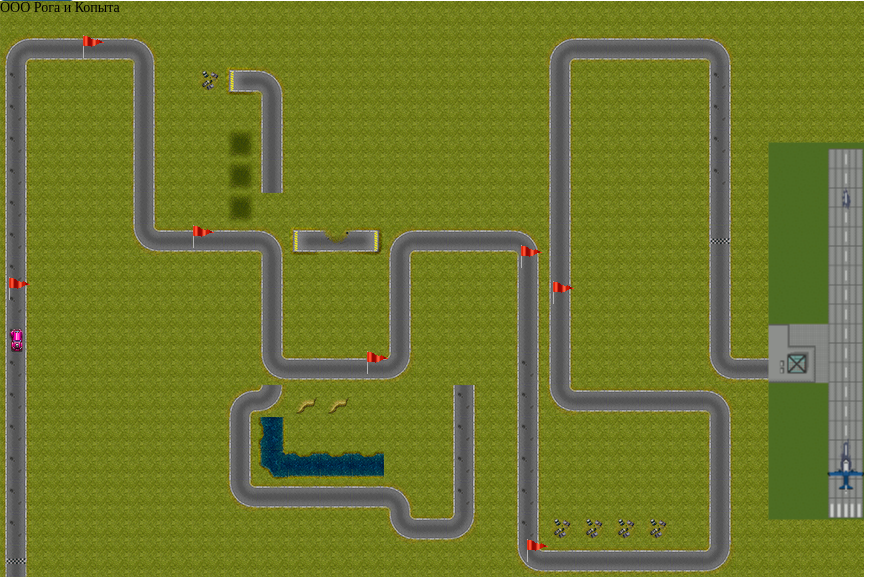
During the movement, on the game scene the following events occur:
- Hitting the flags
- End of fuel
- Reaching the finish
Upon reaching these events, events are created that are processed in the control script of the 1C-Bitrix component.
Next ... next
The following steps to complete the gaming system were:
- Creating an interface with control buttons
- Reaction to events on the field with the game
- Changes of game parameters depending on user actions
- Check car parameters on the back end
The result was this game in LK
Screen lk
And some video
Source: https://habr.com/ru/post/454210/
All Articles