How Yandex.Practicum won the front-end desync: acrobatic number with Redux-Saga, postMessage and Jupyter
My name is Artem Nesmiyanov, I am a full-stack developer at Yandex.Pratikum, I am mainly engaged in frontend. We believe that it is possible and necessary to learn programming, data analytics and other digital crafts with pleasure. And start learning, and continue. Any developer who does not give up on himself is always “continuing.” We, too. Therefore, we perceive work tasks, including as a study format. And one of the recent ones helped me and the guys to better understand in which direction to develop our frontend stack.

Our development team is extremely compact. There are only two people on the back end, four on the front end, including me, full stack. Periodically, the guys from Yandex.Tutorial join us in the gain. We work on Scrum with two-week sprints.
Our frontend is based on React.js in conjunction with Redux / Redux-Saga, and we use Express to communicate with the backend. Backend-part of the stack - in Python (more precisely, Django), DB - PostgreSQL, for individual tasks - Redis. With Redux, we store stor with information, send actions that are processed by Redux and Redux-Saga. All side effects, such as requests to the server, calls to Yandex.Metrica and redirects, are processed just in Redux-Saga. And all data modifications occur in Redux reducers.
')
Now on our platform, open training in three professions: front-end developer, web developer, data analyst. And we are actively sawing tools for each course.
For the semi-annual Data Analyst course, we made an interactive simulator, where we teach users to work with Jupyter Notebook . This is a cool shell for interactive computing that data scientists rightly love. All operations in the environment are performed inside the notebook, it is simply - a notebook (as I will call it later).
Experience prompts, and we are sure: it is important that learning tasks are close to real ones. Including in terms of the working environment. Therefore, it was necessary to make it so that inside the lesson all the code could be written, launched and checked right in the notebook.
There are no difficulties with the basic implementation. The notebook itself was settled in a separate iframe, the logic of its verification was prescribed on the backend.
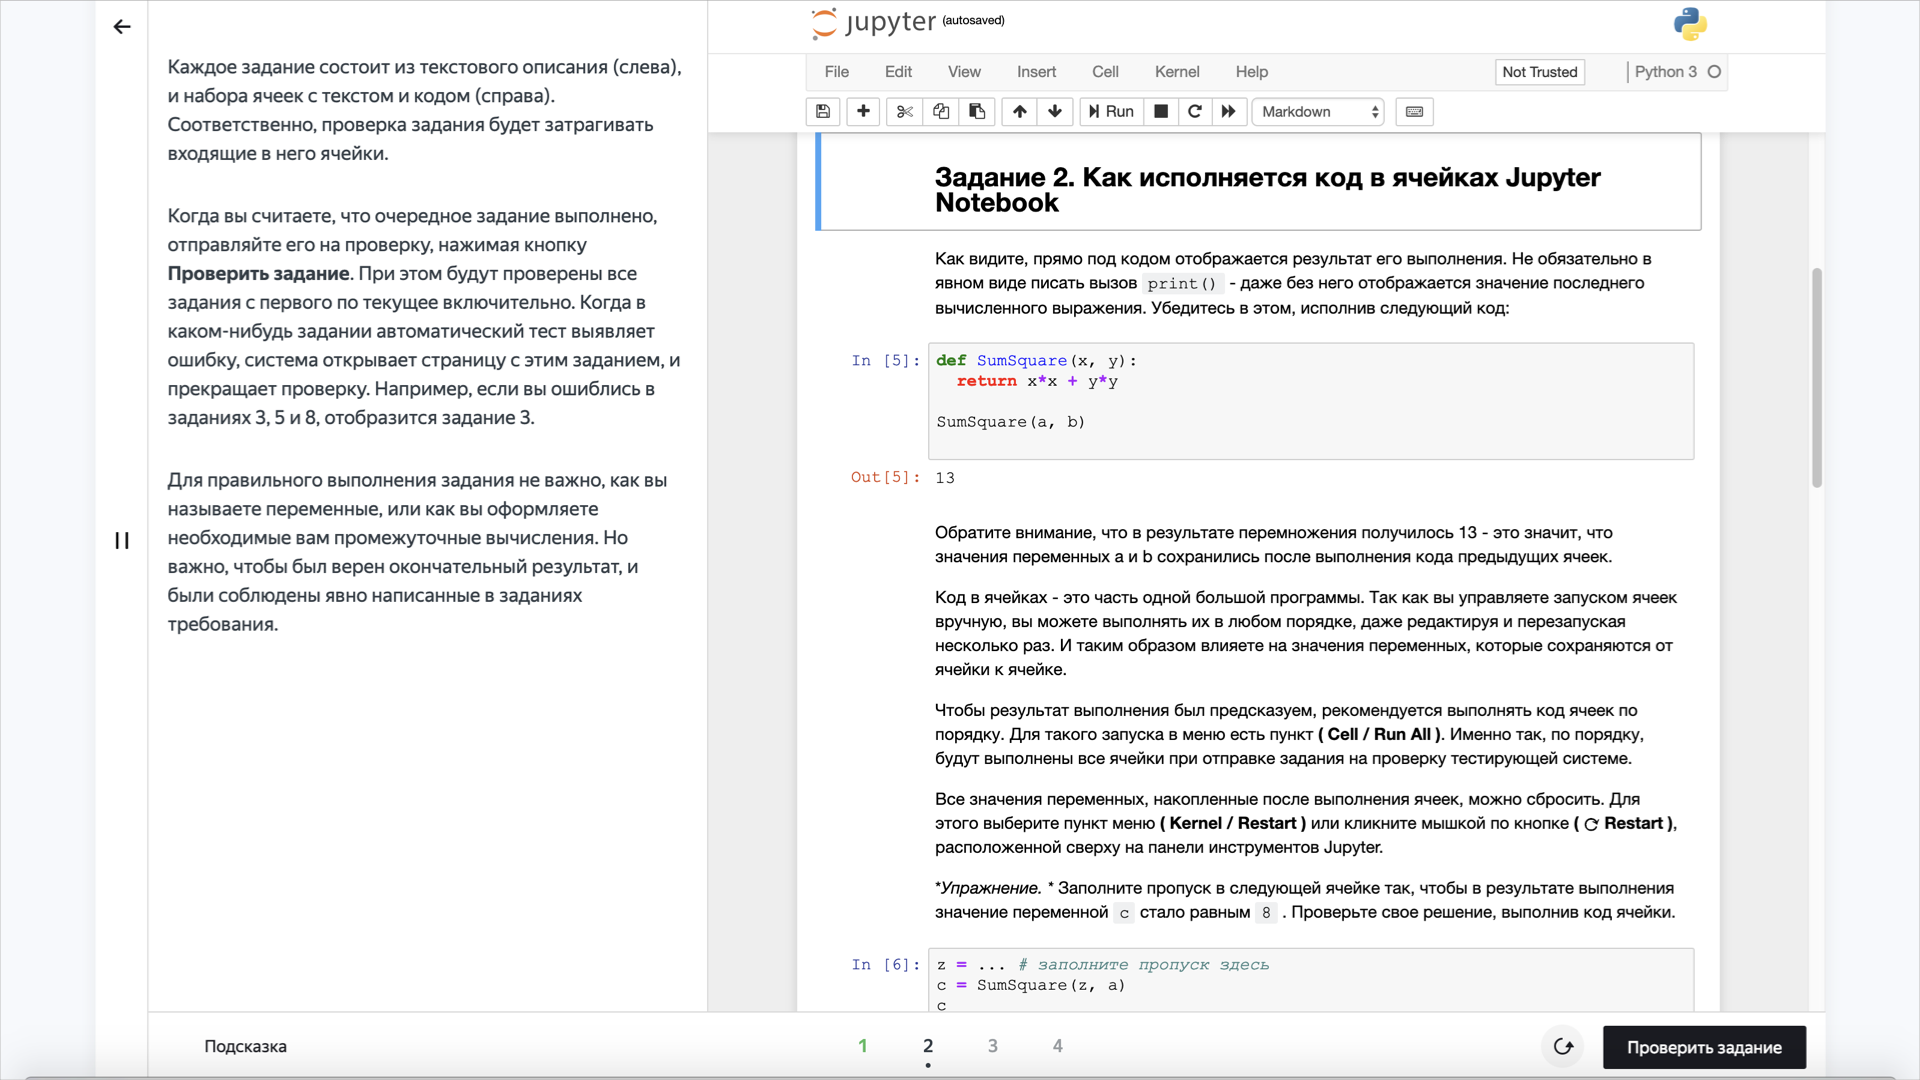
The student's notebook itself (right) is just an iframe, whose URL leads to a specific notebook at JupyterHub.
In the first approximation, everything functioned without a hitch, without a hitch. However, when testing came out absurdities. For example, you drive into a notebook is guaranteed the correct version of the code, but after clicking on the button “Check task” the server responds that the answer is supposedly incorrect. And why - a mystery.
Well, what happens is that we realized the same day when we found the bug: it turned out that the current, just hammered into the Jupyter Notebook form, solution flew to the server, and the previous one, which was already erased. The notebook itself did not have time to survive, and we braked the backend so that he checked the task in it. What he could not do, of course.
We had to get rid of the marshalling between saving the notebook and sending the request to the server to check it. The snag turned out to be that it was required to force the iframe of the notebook to communicate with the parent window, that is, with the front-end, on which the lesson as a whole was spinning. Of course, it was impossible to directly forward some kind of event between them: they live on different domains.
In search of a solution, I learned that Jupyter Notebook allows plug-ins to be connected. There is a Jupiter object - a notebook, - which can be operated. Work with him provides for events, including the preservation of the notebook, as well as the challenge of the corresponding actions. Having understood Jupyter's gut (it was necessary: there is no normal documentation for it), we did so with the guys - we built our own plug-in for it and, using the postMessage mechanism, achieved the coordinated work of the elements from which the Practicum lesson was assembled.
We thought through the workaround taking into account the fact that the already mentioned Redux-Saga was originally included in our stack - to put it simply, the middleware on Redux, which makes it possible to work with side effects more flexibly. For example, saving a notebook is just something like this side effect. We are sending something to the backend, waiting for something, receiving something. All this movement is processed inside Redux-Saga: it is this that throws events to the frontend, dictating to it how to display in the UI.
What is the result? It is created by postMessage and sent to the iframe with a notebook. When the iframe sees that something has come to him from the outside, it parses the resulting string. Realizing that he needs to keep the notebook, he performs this action and, in turn, sends a response postMessage about the execution of the request.
When we click the "Check Task" button, the corresponding event is sent to the Redux Store: "So and so, we went to be checked." Redux-Saga sees the action fly in and make a postMessage in the iframe. Now she is waiting for the iframe to answer. In the meantime, our student sees the download indicator on the “Check Task” button and realizes that the simulator does not hang, but “thinks”. And only when postMessage comes back that the save is complete, Redux-Saga continues to work and sends a request to the backend. On the server, the task is checked - the right decision or not, if mistakes are made, then what, and so on, - and this information is carefully stored in the Redux Store. And from there, the front-end script pulls it into the lesson interface.
Here is the scheme that came out in the end:

(1) We press the button “Check Task” (Check) → (2) We send action CHECK_NOTEBOOK_REQUEST → (3) We catch action check → (4) Accept message → (5) Notebook is saved → (4) We receive an event from the Jupyter API that the notebook has been preserved and send postMessage notebook-saved → (1) Receive an event → (2) We send an action SAVE_NOTEBOOK_SUCCESS → (3) We catch an action and send a request to check the notebook → (6) → (7) Check that this notebook is in the database → (8) → (7) Go behind the code of the notebook → (5) Return the code → (7) Start the code check → (9 ) → (7) We get a cut tat check → (6) → (3) we send action CHECK_NOTEBOOK_SUCCESS → (2) down to verify response sided → (1) Draw result
We will understand how all this is arranged in the context of the code.
We have trainer_type_jupyter.jsx on the frontend - the script of the page where our notebook is drawn.
After clicking the "Check task" button, the callCheckTasks method is called.
In fact, handleCheckTasks is used to call a Redux-action with the parameters passed.
This is a common action intended for Redux-Saga and asynchronous methods. Here, getAsyncActionsFactory generates three actions:
// utils / store-helpers / async.js
Accordingly, getAsyncConstants generates three constants of the form * _REQUEST, * _SUCCESS and * _ERROR.
Now let's see how our Redux-Saga will handle all this farming:
// trainer.saga.js
Magic? Nothing extraordinary. As you can see, createAsyncActionSagaWatcher simply creates a manager that can process the data that gets into the action, make a request at a specific URL, dispatch an action * _REQUEST, and upon a successful response from the server dispatch * _SUCCESS and * _ERROR. In addition, of course, handlers are provided for every variant inside of yesterday.
You probably noticed that in the data preprocessor we call another Redux-Saga, wait until it finishes with SUCCESS, and only then we continue the work. And of course, you do not need to send an iframe to the server, so we only give id.
Take a closer look at the saveNotebook function:
We have reached the most important mechanism in the interaction of the iframe with the frontend - postMessage. The above code snippet sends an action with the type save-notebook, which is processed inside the iframe.
I already mentioned that we needed to write a plugin for Jupyter Notebook, which would be loaded inside the notebook. These plugins look like this:
To create such extensions, you have to deal with the Jupyter Notebook API itself. Unfortunately, there is no intelligible documentation on it. But source codes are available, I also penetrated into them. Well at least that the code is readable there.
The plugin should be taught to communicate with the parent window in the frontend of the lesson: after all, the dissynchronization between them is the cause of the bug with the task verification. First of all, subscribe to all the messages that we receive:
Now we will ensure their processing:
All events that do not fit us in the format, safely ignore.
We see that the event save-notebook arrives, and we cause an action to save the notebook. It remains only to send back a message that the notebook has been preserved:
In other words, simply send {type: 'notebook_saved'} to the top. This means that the notebook has been preserved.
Let's return to our component:
//trainer_type_jupyter.jsx
When the component is mounted, we request a link to the notebook from the server and subscribe to all actions that can fly to us:
This is where the setNotebookSaved action dispatch is called, which will allow Redux-Saga to continue working and save the notebook.
We have mastered the notebook preservation bug. And immediately switched to a new problem. It was necessary to learn how to block tasks (tasks) that the student had not yet reached. In other words, it was necessary to synchronize the navigation between our interactive simulator and the Jupyter Notebook: within one lesson we had one notebook in several iframes with several tasks, the transitions between which had to be coordinated with changes in the interface of the lesson as a whole. For example, so that by clicking on the second task in the interface of the lesson in the notebook, there was a switch to the cell corresponding to the second task. And vice versa: if in the Jupyter Notebook frame you select the cell associated with the third task, the URL in the address bar of the browser should immediately change and, accordingly, the accompanying text with the theory for the third task should appear in the interface of the lesson.
There was also a more difficult task. The fact is that our training program is designed for the consistent passage of lessons and assignments. Meanwhile, by default, in the Jupiter's notebook, nothing prevents the user from opening any cell. And in our case, each cell is a separate task. It turned out that you can solve the first and third task, and skip the second. From the risk of non-linear passage of the lesson had to get rid of.
The basis of the decision was all the same postMessage. Only we had to further delve into the Jupyter Notebook API, more specifically, what the Jupiter object itself can do. And come up with a mechanism for checking which cell is tied to. In the most general form, it is as follows. In the structure of the notebook, the cells go one after another. They may have metadata. The metadata provides the "Tags" field, and the tags are just the task identifiers inside the lesson. In addition, using cell tagging, you can determine whether they should be blocked by the student so far. As a result, in accordance with the current model of the simulator, by sticking into a cell, we start sending postMessage from the iframe to our frontend, which, in turn, goes to the Redux Store and checks, based on the properties of the task, whether it is available to us now. If unavailable, we switch to the previous active cell.
So we have achieved that in the notebook you cannot select a cell that should not be available on the training timeline. True, this gave rise to an uncritical, but a bug: you try to click on a cell with an inaccessible task, and it quickly “blinks”: it is clear that it was activated for a moment, but was immediately blocked. While we have not eliminated this roughness, it does not interfere with the lessons, but in the background we continue to think about how to cope with it (by the way, do you have thoughts?).
A little bit about how we modified our frontend to solve the problem. Turn again to trainer_type_jupyter.jsx - let's focus on app_initialized and select.
With app_initialized, everything is elementary: the notebook has loaded, and we want to do something. For example, select the current cell depending on the task you selected. The plugin is described so that you can pass the taskId and switch to the first cell, this taskId is appropriate.
Namely:
// trainer_type_jupyter.jsx
// trainer.actions.js
// trainer.saga.js
// custom.js (Jupyter plugin)
Now you can switch cells and find out from the iframe that the cell has been switched.
When switching a cell, we change the URL and fall into another task. It remains only to do the opposite - when selecting another task in the interface, switch the cell. Easy:
It would be cool to just brag about how good we are. The solution in the bottom line is effective, although it looks a bit muddled: if we summarize, we have a method that processes any message coming from outside (in our case, from the iframe). But in the system built by us, there are things that I personally, and colleagues, do not really like.
• There is no flexibility in the interaction of elements: whenever we want to add new functionality, we will have to change the plugin to support both the old and the new communication format. There is no single isolated mechanism for working between the iframe and our front-end component, which draws a Jupyter Notebook in the tutorial interface and works with our tasks. Globally - there is a desire to make a more flexible system, so that in the future it will be easy to add new actions, events and process them. And in the case of not only Jupiter's notebook, but with any iframe in the simulators. So we look in the direction of passing the plugin code through postMessage and exchanging (eval) it inside the plugin.
• Code snippets that solve problems are scattered throughout the project. Communication with the iframe is made from both Redux-Saga and the component, which is certainly not optimal.
• The very iframe with Jupyter Notebook rendering is sitting on another service. It is slightly problematic to edit, especially with the observance of the principle of backward compatibility. For example, if we want to change some logic on the front end and in the notebook itself, we have to do double work.
• Much would like to implement easier. Take at least React. He has a lot of lifecycle-methods, and each of them needs to be processed. In addition, I am confused by binding to the React itself. Ideally, I would like to be able to work with our iframe no matter what your frontend framework is. In general, the intersection of the technologies chosen by us imposes restrictions: the same Redux-Saga expects from us Redux-action games, and not postMessage.
So what we’re doing is definitely not going to stop. The textbook dilemma: you can go in the direction of beauty, but sacrifice optimal performance, or vice versa. We have not found the best solution yet.
Perhaps you have ideas?
Who and what made the Workshop
Our development team is extremely compact. There are only two people on the back end, four on the front end, including me, full stack. Periodically, the guys from Yandex.Tutorial join us in the gain. We work on Scrum with two-week sprints.
Our frontend is based on React.js in conjunction with Redux / Redux-Saga, and we use Express to communicate with the backend. Backend-part of the stack - in Python (more precisely, Django), DB - PostgreSQL, for individual tasks - Redis. With Redux, we store stor with information, send actions that are processed by Redux and Redux-Saga. All side effects, such as requests to the server, calls to Yandex.Metrica and redirects, are processed just in Redux-Saga. And all data modifications occur in Redux reducers.
')
How not to overlook the log in your iframe
Now on our platform, open training in three professions: front-end developer, web developer, data analyst. And we are actively sawing tools for each course.
For the semi-annual Data Analyst course, we made an interactive simulator, where we teach users to work with Jupyter Notebook . This is a cool shell for interactive computing that data scientists rightly love. All operations in the environment are performed inside the notebook, it is simply - a notebook (as I will call it later).
Experience prompts, and we are sure: it is important that learning tasks are close to real ones. Including in terms of the working environment. Therefore, it was necessary to make it so that inside the lesson all the code could be written, launched and checked right in the notebook.
There are no difficulties with the basic implementation. The notebook itself was settled in a separate iframe, the logic of its verification was prescribed on the backend.
The student's notebook itself (right) is just an iframe, whose URL leads to a specific notebook at JupyterHub.
In the first approximation, everything functioned without a hitch, without a hitch. However, when testing came out absurdities. For example, you drive into a notebook is guaranteed the correct version of the code, but after clicking on the button “Check task” the server responds that the answer is supposedly incorrect. And why - a mystery.
Well, what happens is that we realized the same day when we found the bug: it turned out that the current, just hammered into the Jupyter Notebook form, solution flew to the server, and the previous one, which was already erased. The notebook itself did not have time to survive, and we braked the backend so that he checked the task in it. What he could not do, of course.
We had to get rid of the marshalling between saving the notebook and sending the request to the server to check it. The snag turned out to be that it was required to force the iframe of the notebook to communicate with the parent window, that is, with the front-end, on which the lesson as a whole was spinning. Of course, it was impossible to directly forward some kind of event between them: they live on different domains.
In search of a solution, I learned that Jupyter Notebook allows plug-ins to be connected. There is a Jupiter object - a notebook, - which can be operated. Work with him provides for events, including the preservation of the notebook, as well as the challenge of the corresponding actions. Having understood Jupyter's gut (it was necessary: there is no normal documentation for it), we did so with the guys - we built our own plug-in for it and, using the postMessage mechanism, achieved the coordinated work of the elements from which the Practicum lesson was assembled.
We thought through the workaround taking into account the fact that the already mentioned Redux-Saga was originally included in our stack - to put it simply, the middleware on Redux, which makes it possible to work with side effects more flexibly. For example, saving a notebook is just something like this side effect. We are sending something to the backend, waiting for something, receiving something. All this movement is processed inside Redux-Saga: it is this that throws events to the frontend, dictating to it how to display in the UI.
What is the result? It is created by postMessage and sent to the iframe with a notebook. When the iframe sees that something has come to him from the outside, it parses the resulting string. Realizing that he needs to keep the notebook, he performs this action and, in turn, sends a response postMessage about the execution of the request.
When we click the "Check Task" button, the corresponding event is sent to the Redux Store: "So and so, we went to be checked." Redux-Saga sees the action fly in and make a postMessage in the iframe. Now she is waiting for the iframe to answer. In the meantime, our student sees the download indicator on the “Check Task” button and realizes that the simulator does not hang, but “thinks”. And only when postMessage comes back that the save is complete, Redux-Saga continues to work and sends a request to the backend. On the server, the task is checked - the right decision or not, if mistakes are made, then what, and so on, - and this information is carefully stored in the Redux Store. And from there, the front-end script pulls it into the lesson interface.
Here is the scheme that came out in the end:
(1) We press the button “Check Task” (Check) → (2) We send action CHECK_NOTEBOOK_REQUEST → (3) We catch action check → (4) Accept message → (5) Notebook is saved → (4) We receive an event from the Jupyter API that the notebook has been preserved and send postMessage notebook-saved → (1) Receive an event → (2) We send an action SAVE_NOTEBOOK_SUCCESS → (3) We catch an action and send a request to check the notebook → (6) → (7) Check that this notebook is in the database → (8) → (7) Go behind the code of the notebook → (5) Return the code → (7) Start the code check → (9 ) → (7) We get a cut tat check → (6) → (3) we send action CHECK_NOTEBOOK_SUCCESS → (2) down to verify response sided → (1) Draw result
We will understand how all this is arranged in the context of the code.
We have trainer_type_jupyter.jsx on the frontend - the script of the page where our notebook is drawn.
<div className="trainer__right-column"> {notebookLinkIsLoading ? ( <iframe className="trainer__jupiter-frame" ref={this.onIframeRef} src={notebookLink} /> ) : ( <Spin size="l" mix="trainer__jupiter-spin" /> )} </div> After clicking the "Check task" button, the callCheckTasks method is called.
handleCheckTasks = () => { const {checkNotebook, lesson} = this.props; checkNotebook({id: lesson.id, iframe: this.iframeRef}); }; In fact, handleCheckTasks is used to call a Redux-action with the parameters passed.
export const checkNotebook = getAsyncActionsFactory(CHECK_NOTEBOOK).request; This is a common action intended for Redux-Saga and asynchronous methods. Here, getAsyncActionsFactory generates three actions:
// utils / store-helpers / async.js
export function getAsyncActionsFactory(type) { const ASYNC_CONSTANTS = getAsyncConstants(type); return { request: payload => ({type: ASYNC_CONSTANTS.REQUEST, payload}), error: (response, request) => ({type: ASYNC_CONSTANTS.ERROR, response, request}), success: (response, request) => ({type: ASYNC_CONSTANTS.SUCCESS, response, request}), } } Accordingly, getAsyncConstants generates three constants of the form * _REQUEST, * _SUCCESS and * _ERROR.
Now let's see how our Redux-Saga will handle all this farming:
// trainer.saga.js
function* watchCheckNotebook() { const watcher = createAsyncActionSagaWatcher({ type: CHECK_NOTEBOOK, apiMethod: Api.checkNotebook, preprocessRequestGenerator: function* ({id, iframe}) { yield put(trainerActions.saveNotebook({iframe})); yield take(getAsyncConstants(SAVE_NOTEBOOK).SUCCESS); return {id}; }, successHandlerGenerator: function* ({response}) { const {completed_tests: completedTests} = response; for (let id of completedTests) { yield put(trainerActions.setTaskSolved(id)); } }, errorHandlerGenerator: function* ({response: error}) { yield put(appActions.setNetworkError(error)); } }); yield watcher(); } Magic? Nothing extraordinary. As you can see, createAsyncActionSagaWatcher simply creates a manager that can process the data that gets into the action, make a request at a specific URL, dispatch an action * _REQUEST, and upon a successful response from the server dispatch * _SUCCESS and * _ERROR. In addition, of course, handlers are provided for every variant inside of yesterday.
You probably noticed that in the data preprocessor we call another Redux-Saga, wait until it finishes with SUCCESS, and only then we continue the work. And of course, you do not need to send an iframe to the server, so we only give id.
Take a closer look at the saveNotebook function:
function* saveNotebook({payload: {iframe}}) { iframe.contentWindow.postMessage(JSON.stringify({ type: 'save-notebook' }), '*'); yield; } We have reached the most important mechanism in the interaction of the iframe with the frontend - postMessage. The above code snippet sends an action with the type save-notebook, which is processed inside the iframe.
I already mentioned that we needed to write a plugin for Jupyter Notebook, which would be loaded inside the notebook. These plugins look like this:
define([ 'base/js/namespace', 'base/js/events' ], function( Jupyter, events ) {...}); To create such extensions, you have to deal with the Jupyter Notebook API itself. Unfortunately, there is no intelligible documentation on it. But source codes are available, I also penetrated into them. Well at least that the code is readable there.
The plugin should be taught to communicate with the parent window in the frontend of the lesson: after all, the dissynchronization between them is the cause of the bug with the task verification. First of all, subscribe to all the messages that we receive:
window.addEventListener('message', actionListener); Now we will ensure their processing:
function actionListener({data: eventString}) { let event = ''; try { event = JSON.parse(eventString); } catch(e) { return; } switch (event.type) { case 'save-notebook': Jupyter.actions.call('jupyter-notebook:save-notebook'); Break; ... default: break; } } All events that do not fit us in the format, safely ignore.
We see that the event save-notebook arrives, and we cause an action to save the notebook. It remains only to send back a message that the notebook has been preserved:
events.on('notebook_saved.Notebook', actionDispatcher); function actionDispatcher(event) { switch (event.type) { case 'select': const selectedCell = Jupyter.notebook.get_selected_cell(); dispatchEvent({ type: event.type, data: {taskId: getCellTaskId(selectedCell)} }); return; case 'notebook_saved': default: dispatchEvent({type: event.type}); } } function dispatchEvent(event) { return window.parent.postMessage( typeof event === 'string' ? event : JSON.stringify(event), '*' ); } In other words, simply send {type: 'notebook_saved'} to the top. This means that the notebook has been preserved.
Let's return to our component:
//trainer_type_jupyter.jsx
componentDidMount() { const {getNotebookLink, lesson} = this.props; getNotebookLink({id: lesson.id}); window.addEventListener('message', this.handleWindowMessage); } When the component is mounted, we request a link to the notebook from the server and subscribe to all actions that can fly to us:
handleWindowMessage = ({data: eventString}) => { const {activeTaskId, history, match: {params}, setNotebookSaved, tasks} = this.props; let event = null; try { event = JSON.parse(eventString); } catch(e) { return; } const {type, data} = event; switch (type) { case 'app_initialized': this.selectTaskCell({taskId: activeTaskId}) return; case 'notebook_saved': setNotebookSaved(); return; case 'select': { const taskId = data && data.taskId; if (!taskId) { return } const task = tasks.find(({id}) => taskId === id); if (task && task.status === TASK_STATUSES.DISABLED) { this.selectTaskCell({taskId: null}) return; } history.push(reversePath(urls.trainerTask, {...params, taskId})); return; } default: break; } }; This is where the setNotebookSaved action dispatch is called, which will allow Redux-Saga to continue working and save the notebook.
Glitches of choice
We have mastered the notebook preservation bug. And immediately switched to a new problem. It was necessary to learn how to block tasks (tasks) that the student had not yet reached. In other words, it was necessary to synchronize the navigation between our interactive simulator and the Jupyter Notebook: within one lesson we had one notebook in several iframes with several tasks, the transitions between which had to be coordinated with changes in the interface of the lesson as a whole. For example, so that by clicking on the second task in the interface of the lesson in the notebook, there was a switch to the cell corresponding to the second task. And vice versa: if in the Jupyter Notebook frame you select the cell associated with the third task, the URL in the address bar of the browser should immediately change and, accordingly, the accompanying text with the theory for the third task should appear in the interface of the lesson.
There was also a more difficult task. The fact is that our training program is designed for the consistent passage of lessons and assignments. Meanwhile, by default, in the Jupiter's notebook, nothing prevents the user from opening any cell. And in our case, each cell is a separate task. It turned out that you can solve the first and third task, and skip the second. From the risk of non-linear passage of the lesson had to get rid of.
The basis of the decision was all the same postMessage. Only we had to further delve into the Jupyter Notebook API, more specifically, what the Jupiter object itself can do. And come up with a mechanism for checking which cell is tied to. In the most general form, it is as follows. In the structure of the notebook, the cells go one after another. They may have metadata. The metadata provides the "Tags" field, and the tags are just the task identifiers inside the lesson. In addition, using cell tagging, you can determine whether they should be blocked by the student so far. As a result, in accordance with the current model of the simulator, by sticking into a cell, we start sending postMessage from the iframe to our frontend, which, in turn, goes to the Redux Store and checks, based on the properties of the task, whether it is available to us now. If unavailable, we switch to the previous active cell.
So we have achieved that in the notebook you cannot select a cell that should not be available on the training timeline. True, this gave rise to an uncritical, but a bug: you try to click on a cell with an inaccessible task, and it quickly “blinks”: it is clear that it was activated for a moment, but was immediately blocked. While we have not eliminated this roughness, it does not interfere with the lessons, but in the background we continue to think about how to cope with it (by the way, do you have thoughts?).
A little bit about how we modified our frontend to solve the problem. Turn again to trainer_type_jupyter.jsx - let's focus on app_initialized and select.
With app_initialized, everything is elementary: the notebook has loaded, and we want to do something. For example, select the current cell depending on the task you selected. The plugin is described so that you can pass the taskId and switch to the first cell, this taskId is appropriate.
Namely:
// trainer_type_jupyter.jsx
selectTaskCell = ({taskId}) => { const {selectCell} = this.props; if (!this.iframeRef) { return; } selectCell({iframe: this.iframeRef, taskId}); }; // trainer.actions.js
export const selectCell = ({iframe, taskId}) => ({ type: SELECT_CELL, iframe, taskId }); // trainer.saga.js
function* selectCell({iframe, taskId}) { iframe.contentWindow.postMessage(JSON.stringify({ type: 'select-cell', data: {taskId} }), '*'); yield; } function* watchSelectCell() { yield takeEvery(SELECT_CELL, selectCell); } // custom.js (Jupyter plugin)
function getCellTaskId(cell) { const notebook = Jupyter.notebook; while (cell) { const tags = cell.metadata.tags; const taskId = tags && tags[0]; if (taskId) { return taskId; } cell = notebook.get_prev_cell(cell); } return null; } function selectCell({taskId}) { const notebook = Jupyter.notebook; const selectedCell = notebook.get_selected_cell(); if (!taskId) { selectedCell.unselect(); return; } if (selectedCell && selectedCell.selected && getCellTaskId(selectedCell) === taskId) { return; } const index = notebook.get_cells() .findIndex(cell => getCellTaskId(cell) === taskId); if (index < 0) { return; } notebook.select(index); const cell = notebook.get_cell(index); cell.element[0].scrollIntoView({ behavior: 'smooth', block: 'start' }); } function actionListener({data: eventString}) { ... case 'select-cell': selectCell(event.data); break; Now you can switch cells and find out from the iframe that the cell has been switched.
When switching a cell, we change the URL and fall into another task. It remains only to do the opposite - when selecting another task in the interface, switch the cell. Easy:
componentDidUpdate({match: {params: {prevTaskId}}) { const {match: {params: {taskId}}} = this.props; if (taskId !== prevTaskId) { this.selectTaskCell({taskId}); Separate perfectionists boiler
It would be cool to just brag about how good we are. The solution in the bottom line is effective, although it looks a bit muddled: if we summarize, we have a method that processes any message coming from outside (in our case, from the iframe). But in the system built by us, there are things that I personally, and colleagues, do not really like.
• There is no flexibility in the interaction of elements: whenever we want to add new functionality, we will have to change the plugin to support both the old and the new communication format. There is no single isolated mechanism for working between the iframe and our front-end component, which draws a Jupyter Notebook in the tutorial interface and works with our tasks. Globally - there is a desire to make a more flexible system, so that in the future it will be easy to add new actions, events and process them. And in the case of not only Jupiter's notebook, but with any iframe in the simulators. So we look in the direction of passing the plugin code through postMessage and exchanging (eval) it inside the plugin.
• Code snippets that solve problems are scattered throughout the project. Communication with the iframe is made from both Redux-Saga and the component, which is certainly not optimal.
• The very iframe with Jupyter Notebook rendering is sitting on another service. It is slightly problematic to edit, especially with the observance of the principle of backward compatibility. For example, if we want to change some logic on the front end and in the notebook itself, we have to do double work.
• Much would like to implement easier. Take at least React. He has a lot of lifecycle-methods, and each of them needs to be processed. In addition, I am confused by binding to the React itself. Ideally, I would like to be able to work with our iframe no matter what your frontend framework is. In general, the intersection of the technologies chosen by us imposes restrictions: the same Redux-Saga expects from us Redux-action games, and not postMessage.
So what we’re doing is definitely not going to stop. The textbook dilemma: you can go in the direction of beauty, but sacrifice optimal performance, or vice versa. We have not found the best solution yet.
Perhaps you have ideas?
Source: https://habr.com/ru/post/453876/
All Articles