Error Handling in Go
Hi, habrovchane! Already today, the “Golang Developer” course starts at OTUS and we consider this to be an excellent occasion to share another useful publication on the topic. Today we will talk about the Go approach to errors. Let's start!


')
This post is part of the “Before Starting Go” series , where we explore the world of Golang, share tips and ideas you need to know when writing code on Go, so you don’t have to stuff your own bumps.
I assume that you already have at least a basic experience with Go, but if you feel that at some point you are faced with an unfamiliar material in question, do not hesitate to pause, explore the topic and come back.
Now that we have cleared our way, let's go!
Go's approach to error handling is one of the most controversial and misused features. In this article you will learn the Go approach to errors, and understand how they work “under the hood”. You will explore several different approaches, review the Go source code and the standard library to learn how errors are handled and how to work with them. You will learn why Type Assertions play an important role in processing them, and you will see upcoming changes in error handling that you plan to introduce in Go 2.
First things first: errors in Go are not exceptions. Dave Cheney wrote an epic blog post about this, so I refer you to him and summarize: in other languages you cannot be sure whether the function can cause an exception or not. Instead of generating exceptions, Go supports multiple return values , and by convention, this feature is usually used to return the result of a function along with an error variable.

If for some reason your function may fail, you should probably return a previously declared
(3 // error handling
5 // continued)
These snippets are very common in Go, and some view them as template code. The compiler treats unused variables as compilation errors, so if you are not going to check for errors, you must assign them to an empty identifier . But no matter how convenient it is, mistakes should not be ignored.
(4 // ignoring errors is not safe, and you should not rely on the result before checking for errors)
the result cannot be trusted until checking for errors
Returning an error along with the results, along with a strict Go type system, makes it much harder to write buggy code. You must always assume that the value of the function is corrupted, unless you have checked the error it returned, and, by assigning an error to an empty identifier, you explicitly ignore that the value of your function may be damaged.
An empty identifier is dark and full of horror.
Go does have
Interface error
Under the hood, the error type is a simple interface with one method , and if you are not familiar with it, I highly recommend viewing this post on the official Go blog.
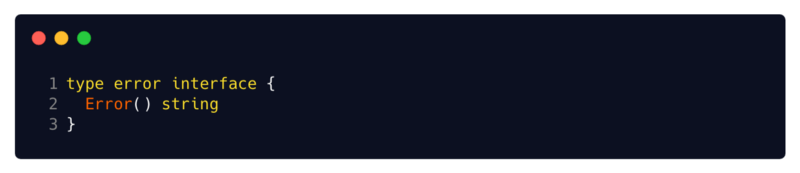
interface error from source code
Your own mistakes are not difficult to implement. There are various approaches to user structures that implement the
Let's look at a few of these approaches.
The most commonly used and widely accepted implementation of the error interface is the built-in structure of
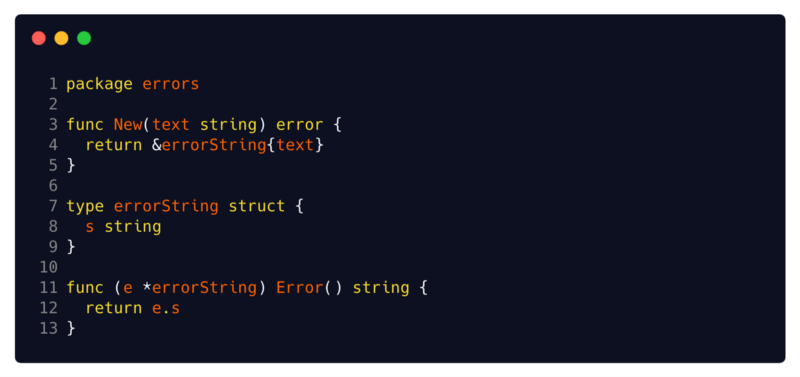
Source: Go source
You can see its simplified implementation here . All it does is contain a
(13 // conclusion :)
try
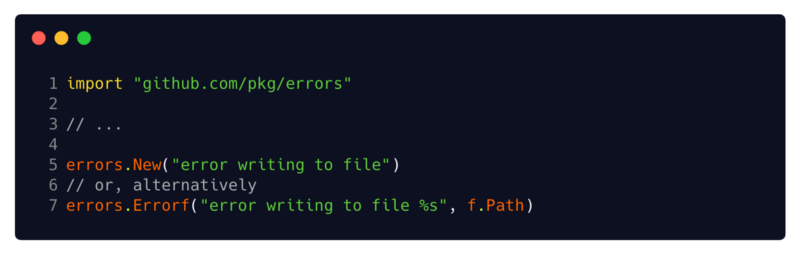
Another simple example is the pkg / errors package. Not to be confused with the built-in

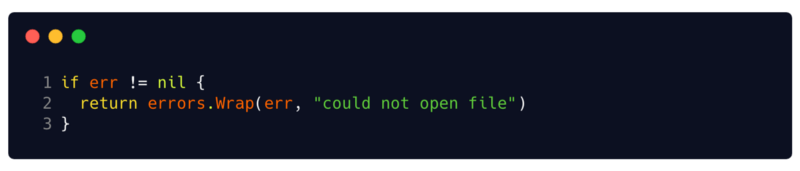
When you need to attach a stack trace or the necessary debugging information to your errors, using the
(// 6 or alternative)
This package also represents the
Error wrappers with other errors support the
Type assertions play an important role when dealing with errors. You will use them to extract information from the interface value, and since error handling is associated with custom implementations of the
Its syntax is the same for all its purposes —
(2 // abbreviated syntax skipping logical variable ok
3 // panic: interface mapping: interface {} is nil, not string
6 // extended syntax with logical variable ok
8 // doesn't panic, instead sets ok false when an assertion is false
9 // now we can safely use s as string)
sandbox: panic with shortened syntax , secure extended syntax
The execution of a type

(5 ... // assert that x implements the resolver interface
6 ... // here we can safely use this method)
To understand how this can be used, let's look at
This function receives an error and extracts the innermost error that it carries (one that no longer serves as a wrapper for another error). This may seem primitive, but there are many great things you can learn from this implementation:

source: pkg / errors
The function receives the value of the error, and it cannot assume that the argument it receives
By creating a simple local interface that contains only the methods you need, and applying a statement to it, your code is separate from other dependencies. The argument you receive does not have to be a known structure, it just has to be a mistake. Any type that implements the
However, there is one minor flaw to keep in mind: the interfaces are subject to change, so you should carefully maintain the code so that your statements are not violated. Remember to define your interfaces where you use them, keep them slim and neat, and you will be fine.
Finally, if you only need one method, it is sometimes more convenient to make a statement on an anonymous interface that contains only the method you rely on, that is,
I anticipate this section by introducing two similar error handling patterns that suffer from several flaws and pitfalls. This does not mean that they are not common. Both can be handy tools in small projects, but they do not scale well.
The first one is the second version of the type statement: the type
(2 // we can use v as mypkg.SomeErrorType)
The other is the Type Switch pattern. The Type Switch combines a switch statement with a type statement using the reserved
(3 // processing ...
5 // processing ...)
The big drawback of both approaches is that they both lead to the binding of code with their dependencies. Both examples should be familiar with the
In both approaches, when handling your errors, you should be familiar with the type and import its package. The situation is exacerbated when you are dealing with errors in the wrappers, where the cause of the error may be an error arising from an internal dependency that you do not know about and should not know about.
(7 // processing ...
9 // processing ...)
Type Switch distinguish between

That's all! You are now familiar with the bugs and must be prepared to eliminate any bugs that your Go application may throw (or actually return) on your way!
Both
When you scale simple errors, the proper use of type assertions can be a great tool for handling various errors. Either by using Type Switch, or by stating the behavior of the error and checking the interfaces that it implements.
Error handling in Go is now very relevant. Now that you have the basics, you may be wondering what will happen to us in the future to handle Go errors!
The next version of Go 2 pays a lot of attention to this, and you can already have a look at the draft . In addition, during dotGo 2019, Marcel van Lohuizen had a great conversation on a topic that I just cannot recommend - “The values of GO 2 errors today . ”
Obviously, there are many more approaches, tips and tricks, and I cannot include them all in one post! Despite this, I hope you like it, and I will see you in the next issue of the “Before I Go Go” series !
And now, traditionally, we are waiting for your comments.
Mastering Pragmatic Error Handling in Your Go Code
')
This post is part of the “Before Starting Go” series , where we explore the world of Golang, share tips and ideas you need to know when writing code on Go, so you don’t have to stuff your own bumps.
I assume that you already have at least a basic experience with Go, but if you feel that at some point you are faced with an unfamiliar material in question, do not hesitate to pause, explore the topic and come back.
Now that we have cleared our way, let's go!
Go's approach to error handling is one of the most controversial and misused features. In this article you will learn the Go approach to errors, and understand how they work “under the hood”. You will explore several different approaches, review the Go source code and the standard library to learn how errors are handled and how to work with them. You will learn why Type Assertions play an important role in processing them, and you will see upcoming changes in error handling that you plan to introduce in Go 2.
Introduction
First things first: errors in Go are not exceptions. Dave Cheney wrote an epic blog post about this, so I refer you to him and summarize: in other languages you cannot be sure whether the function can cause an exception or not. Instead of generating exceptions, Go supports multiple return values , and by convention, this feature is usually used to return the result of a function along with an error variable.
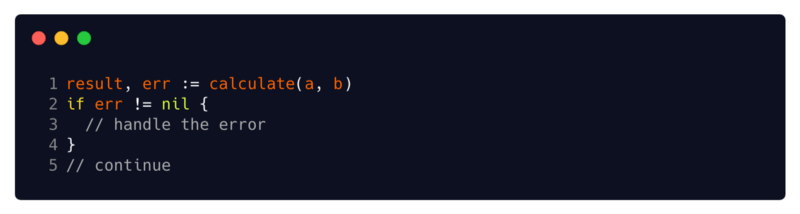
If for some reason your function may fail, you should probably return a previously declared
error type from it. By convention, returning an error signals the problem to the caller, and returning nil is not considered an error. Thus, you will give the caller to understand that a problem has occurred, and he needs to deal with it: whoever calls your function, he knows that he should not rely on the result before checking for an error. If the error is not nil, he is obliged to check it and process it (log, return, maintain, invoke any retry / cleanup mechanism, etc.).(3 // error handling
5 // continued)
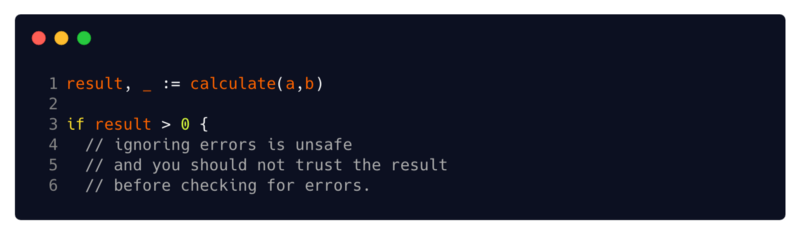
These snippets are very common in Go, and some view them as template code. The compiler treats unused variables as compilation errors, so if you are not going to check for errors, you must assign them to an empty identifier . But no matter how convenient it is, mistakes should not be ignored.
(4 // ignoring errors is not safe, and you should not rely on the result before checking for errors)
the result cannot be trusted until checking for errors
Returning an error along with the results, along with a strict Go type system, makes it much harder to write buggy code. You must always assume that the value of the function is corrupted, unless you have checked the error it returned, and, by assigning an error to an empty identifier, you explicitly ignore that the value of your function may be damaged.
An empty identifier is dark and full of horror.
Go does have
panic and recover mechanisms, which are also described in another detailed blog post Go . But they are not intended to mimic exceptions. According to Dave, "When you panic on Go, you really panic: this is not someone else’s problem, this is already a gamemover." They are fatal and cause your program to crash. Rob Pike came up with the proverb Do not panic, which speaks for itself: you should probably avoid these mechanisms and return errors instead."Errors - values."
“Do not just check for errors, but treat them elegantly.”
"Do not panic"
all sayings of rob pike
Under the hood
Interface error
Under the hood, the error type is a simple interface with one method , and if you are not familiar with it, I highly recommend viewing this post on the official Go blog.
interface error from source code
Your own mistakes are not difficult to implement. There are various approaches to user structures that implement the
Error() string method. Any structure that implements this single method is considered a valid error value and can be returned as such.Let's look at a few of these approaches.
Built-in errorString structure
The most commonly used and widely accepted implementation of the error interface is the built-in structure of
errorString . This is the simplest implementation you can think of.Source: Go source
You can see its simplified implementation here . All it does is contain a
string , and this string is returned by the Error method. This string error can be formatted by us on the basis of some data, say, using fmt.Sprintf . But besides this, it does not contain any other features. If you applied errors.New or fmt.Errorf , then you have already used it .(13 // conclusion :)
try
github.com/pkg/errors
Another simple example is the pkg / errors package. Not to be confused with the built-in
errors package, which you learned about earlier, this package provides additional important features, such as error wrapper, scan, formatting, and stack-trace writing. You can install the package by running go get github.com/pkg/errors .When you need to attach a stack trace or the necessary debugging information to your errors, using the
New or Errorf this package provides errors that are already written to your stack trace, and you can also attach simple metadata using it formatting options. Errorf implements the fmt.Formatter interface, that is, you can format it using the runes of the fmt package ( %s , %v , %+v , etc.).(// 6 or alternative)
This package also represents the
errors.Wrap and errors.Wrapf . These functions add context to the error using the message and stack trace at the place where they were called. Thus, instead of simply returning an error, you can wrap it with context and important debugging data.Error wrappers with other errors support the
Cause() error method, which returns their internal error. In addition, they can be used by the errors.Cause(err error) error function, which extracts the underlying internal error in the wrapping error.Work with errors
Type approval
Type assertions play an important role when dealing with errors. You will use them to extract information from the interface value, and since error handling is associated with custom implementations of the
error interface, implementing statements on errors is a very convenient tool.Its syntax is the same for all its purposes —
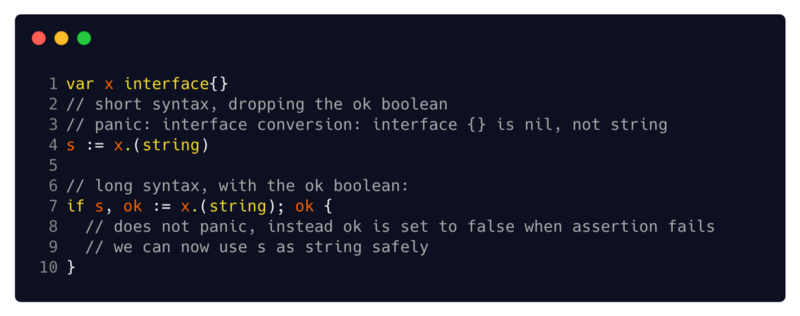
x.(T) , if x has an interface type. x.(T) states that x not equal to nil and that the value stored in x is of type T In the next few sections, we will look at two ways to use type assertions — with a specific type T and with an interface like T(2 // abbreviated syntax skipping logical variable ok
3 // panic: interface mapping: interface {} is nil, not string
6 // extended syntax with logical variable ok
8 // doesn't panic, instead sets ok false when an assertion is false
9 // now we can safely use s as string)
sandbox: panic with shortened syntax , secure extended syntax
Additional syntax note: Type assertion can be used with either a short syntax (which panics if an assertion fails) or an extended syntax (which uses the logical value OK to indicate success or failure). I always recommend taking the extended one instead of the shortened one, since I prefer to check the variable OK, rather than deal with panic.
Type T Approval
The execution of a type
x.(T) statement with an interface of type T confirms that x implements the interface T Thus, you can ensure that the interface value implements the interface, and only if it is, can you use its methods.(5 ... // assert that x implements the resolver interface
6 ... // here we can safely use this method)
To understand how this can be used, let's look at
pkg/errors again. You already know this error batch, so let's delve into the errors.Cause(err error) error function.This function receives an error and extracts the innermost error that it carries (one that no longer serves as a wrapper for another error). This may seem primitive, but there are many great things you can learn from this implementation:
source: pkg / errors
The function receives the value of the error, and it cannot assume that the argument it receives
err is a wrapper error (supported by the Cause method). Therefore, before calling the Cause method, you must make sure that you are dealing with an error that implements this method. By performing a type statement in each iteration of the for loop, you can verify that the cause variable supports the Cause method, and can continue to extract internal errors from it until you find an error that does not have Cause .By creating a simple local interface that contains only the methods you need, and applying a statement to it, your code is separate from other dependencies. The argument you receive does not have to be a known structure, it just has to be a mistake. Any type that implements the
Error and Cause methods will do. Thus, if you implement the Cause method in your type of error, you can use this function with it without slowing down.However, there is one minor flaw to keep in mind: the interfaces are subject to change, so you should carefully maintain the code so that your statements are not violated. Remember to define your interfaces where you use them, keep them slim and neat, and you will be fine.
Finally, if you only need one method, it is sometimes more convenient to make a statement on an anonymous interface that contains only the method you rely on, that is,
v, ok := x.(interface{ F() (int, error) }) . Using anonymous interfaces can help separate your code from possible dependencies and protect it from possible changes in interfaces.Approval with a specific type T and Type Switch
I anticipate this section by introducing two similar error handling patterns that suffer from several flaws and pitfalls. This does not mean that they are not common. Both can be handy tools in small projects, but they do not scale well.
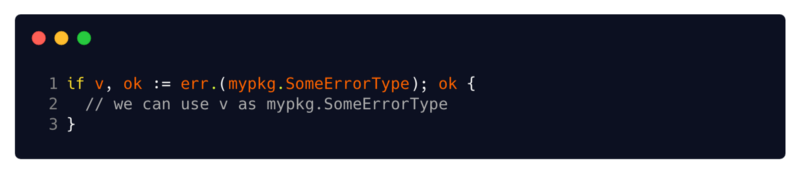
The first one is the second version of the type statement: the type
x.(T) statement is fulfilled x.(T) with a specific type T He claims that the value of x is of type T , or it can be converted to type T(2 // we can use v as mypkg.SomeErrorType)
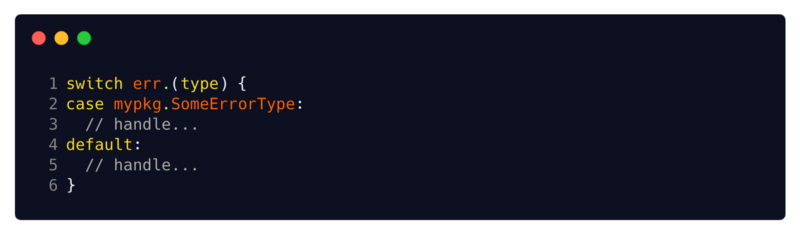
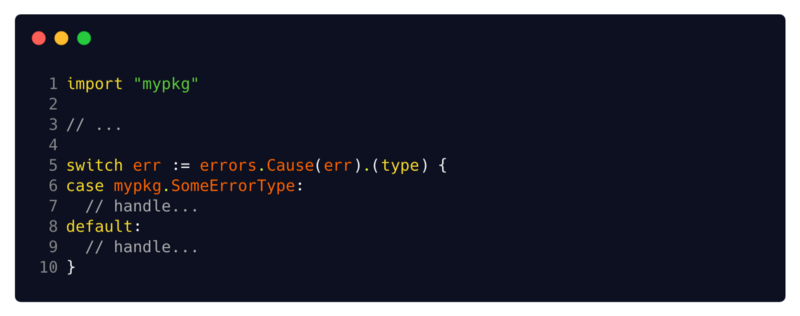
The other is the Type Switch pattern. The Type Switch combines a switch statement with a type statement using the reserved
type keyword. They are especially common in error handling, where knowledge of the basic type of error variable can be very useful.(3 // processing ...
5 // processing ...)
The big drawback of both approaches is that they both lead to the binding of code with their dependencies. Both examples should be familiar with the
SomeErrorType structure (which obviously should be exported) and should import the mypkg package.In both approaches, when handling your errors, you should be familiar with the type and import its package. The situation is exacerbated when you are dealing with errors in the wrappers, where the cause of the error may be an error arising from an internal dependency that you do not know about and should not know about.
(7 // processing ...
9 // processing ...)
Type Switch distinguish between
*MyStruct and MyStruct . Therefore, if you are not sure whether you are dealing with a pointer or an actual instance of the structure, you will have to provide both options. Moreover, as with conventional switches, the cases in the Type Switch do not fail, but unlike the usual Type Switch, the use of fallthrough forbidden in the Type Switch, so you have to use a comma and provide both options, which is easy to forget.Summarize
That's all! You are now familiar with the bugs and must be prepared to eliminate any bugs that your Go application may throw (or actually return) on your way!
Both
errors packages represent simple but important approaches to errors in Go, and if they suit your needs, they are an excellent choice. You can easily implement your own error structures and take advantage of Go error handling by combining them with pkg/errors .When you scale simple errors, the proper use of type assertions can be a great tool for handling various errors. Either by using Type Switch, or by stating the behavior of the error and checking the interfaces that it implements.
What's next?
Error handling in Go is now very relevant. Now that you have the basics, you may be wondering what will happen to us in the future to handle Go errors!
The next version of Go 2 pays a lot of attention to this, and you can already have a look at the draft . In addition, during dotGo 2019, Marcel van Lohuizen had a great conversation on a topic that I just cannot recommend - “The values of GO 2 errors today . ”
Obviously, there are many more approaches, tips and tricks, and I cannot include them all in one post! Despite this, I hope you like it, and I will see you in the next issue of the “Before I Go Go” series !
And now, traditionally, we are waiting for your comments.
Source: https://habr.com/ru/post/453806/
All Articles