Need a small keyboard - make it yourself

If you need a keyboard, you can purchase it. If you need a small keyboard, then everything is more complicated. In addition to the options with the alteration of the keyboard from Blackberry or fussing with tiny tactile switches, there are no normal solutions for getting small, thin and specialized keyboards. However, there is one option: silicone keyboards. So far no one has done this, so I decided - why not try it.
Unfortunately, there is no ready information on designing, creating or producing your own silicone keyboards. Documentation is extremely small, and all the factories manufacturing them, apparently, copy information from each other. Asking the Chinese company how this is done is the same as playing a “spoiled phone”. But, despite all this, I managed to make my own silicone keyboard, and now I am sharing information about how this is done.
The goal of the project is to create a very small computer keyboard for wearable devices, electronic badges, playing Fortnite on a portable computer, or simply for use as a USB keyboard. This has been done before. The badge for the 2018 Hackaday Belgrade Conference used 55 standard tactile switches, built in the form of a keyboard. Another project with Hackaday.io called (Pi) QWERTY also used several dozen standard clock switches. However, these devices have their drawbacks.
')
PiMiniQWERTY - the best of homemade miniature keyboards
First, the standard tactile buttons for 4 mm are quite expensive. This is not a problem if you use a small number of them for one project, but if you need 60-70 buttons per device, the cost starts to grow. The cheapest of the ones I found cost $ 70 per roll of 4,000, or a couple of cents apiece. Take 70 pieces and get $ 1.25 per device - just for the buttons. It may happen that the buttons will cost more than the microcontroller.
Secondly, tactile buttons must be assembled together. The number of failures may not be very large, but if you assemble the whole boards from the switches, it will be more than if they were single devices. Compared with SMD resistors and caps, the buttons are large and thick, which increases the number of defects when they are placed. Also, since a lot of time is spent on assembling such a keyboard, one has to pay more for the assembly of buttons than for installing a ready-made device. This increases the cost of the keyboard based on tactile switches.
Finally, the buttons are not labeled. If you assemble a keyboard of 4 mm buttons, you will have to mark the board. At the Belgrade conference, this was done quite well, and the mini (Pi) QWERTY - brilliantly, because they used two boards, one for electronics, one for signatures. You can imagine writing on the buttons, but their surface is already very small.
Solution: use silicone keypads made by injection molding. Such keyboards can be found in almost all remote controls, they were used in old Nokia brick-like phones. Silicone keyboards are everywhere, and there are factories making them to order.
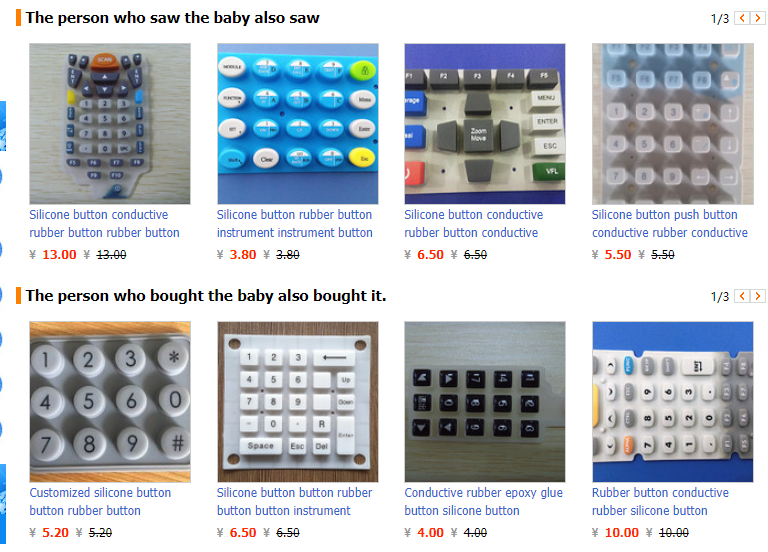
Silicone Keyboard with TaoBao and AliExpress. The companies selling them make them and to order.
There are many advantages to using silicone keyboards. First, most of them use labels on buttons. Secondly, you are not limited to 4 mm buttons. The buttons can be of any size and any shape. Easy to assemble; to use such a keyboard with a board, you just need to put it on the board; everything else has been done for you. Finally, the silicone keyboard looks cooler than any buttons. So why not use them? Mainly due to the cost, however, there are some engineering problems.
Various types of silicone and membrane switches
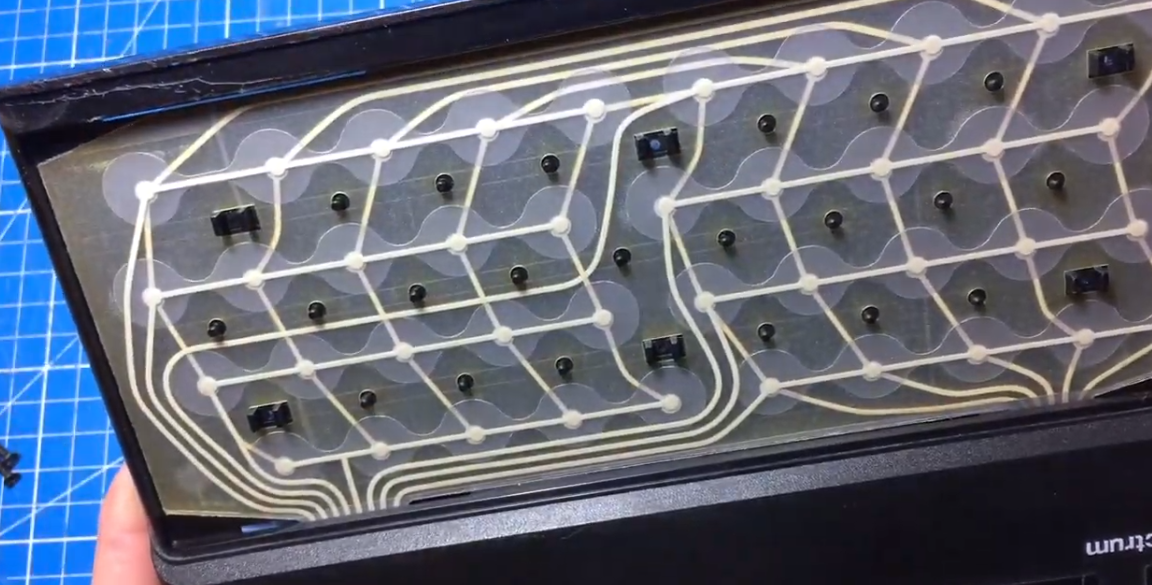
Membrane Keyboard ZX Spectrum
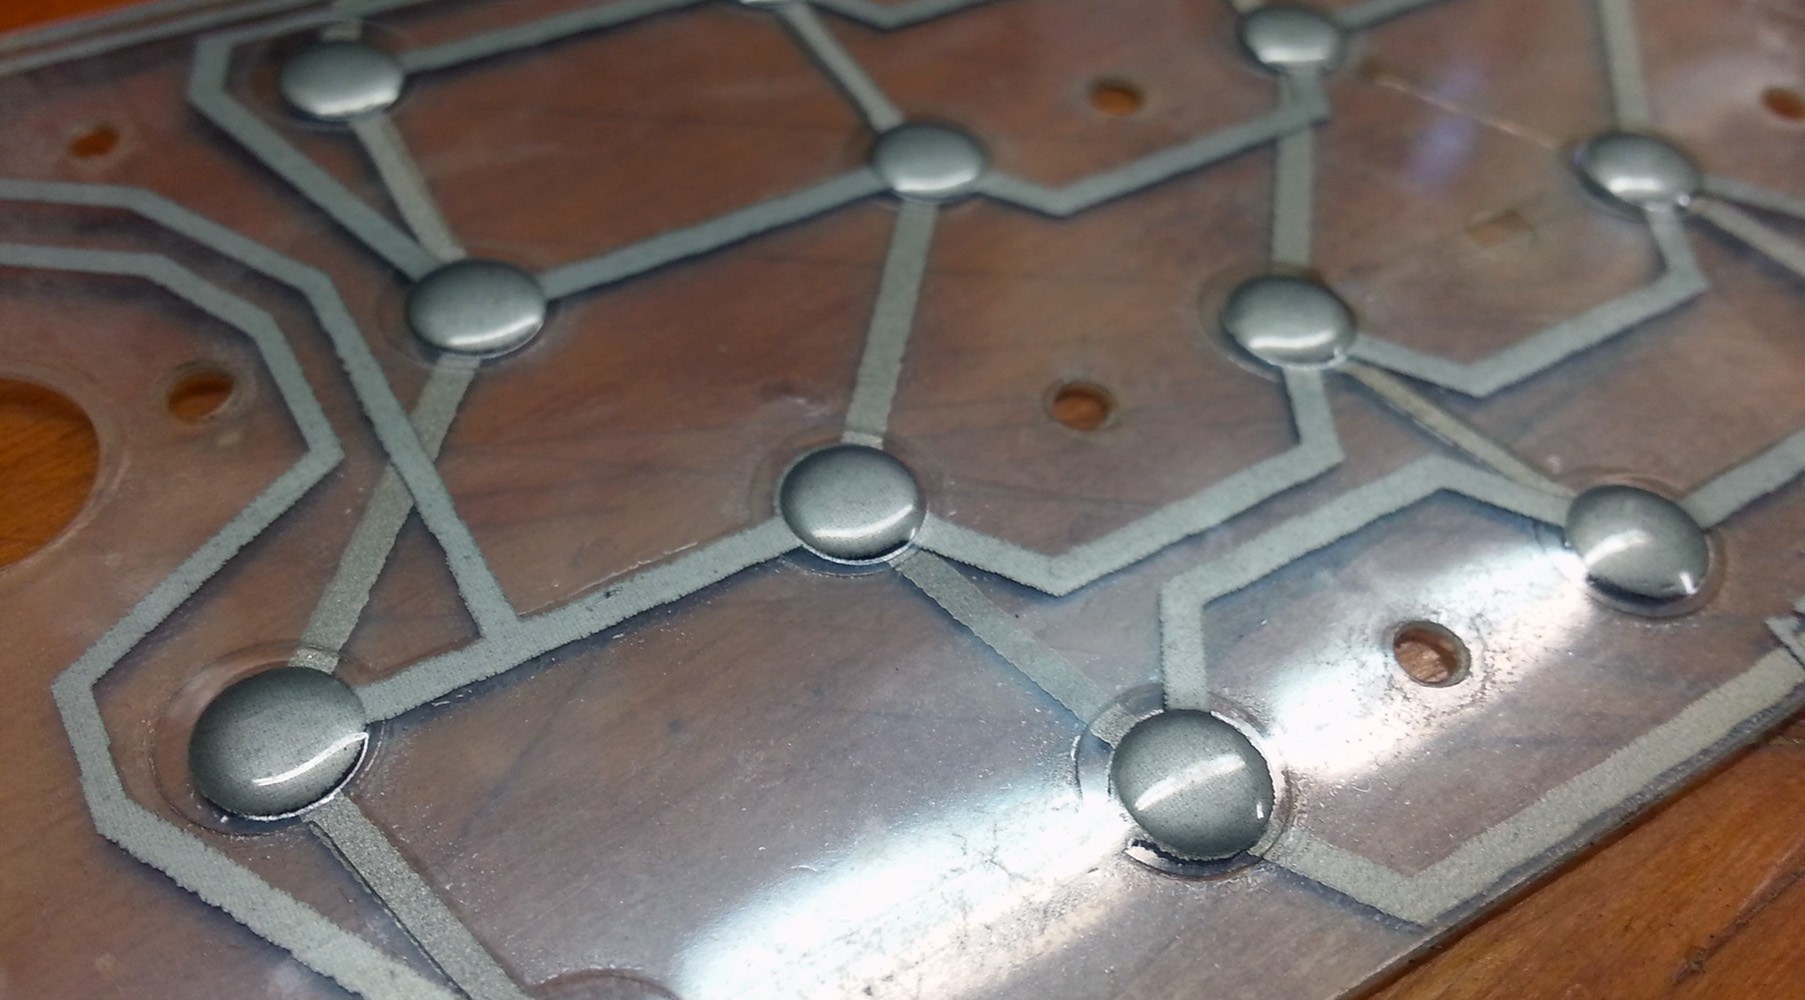
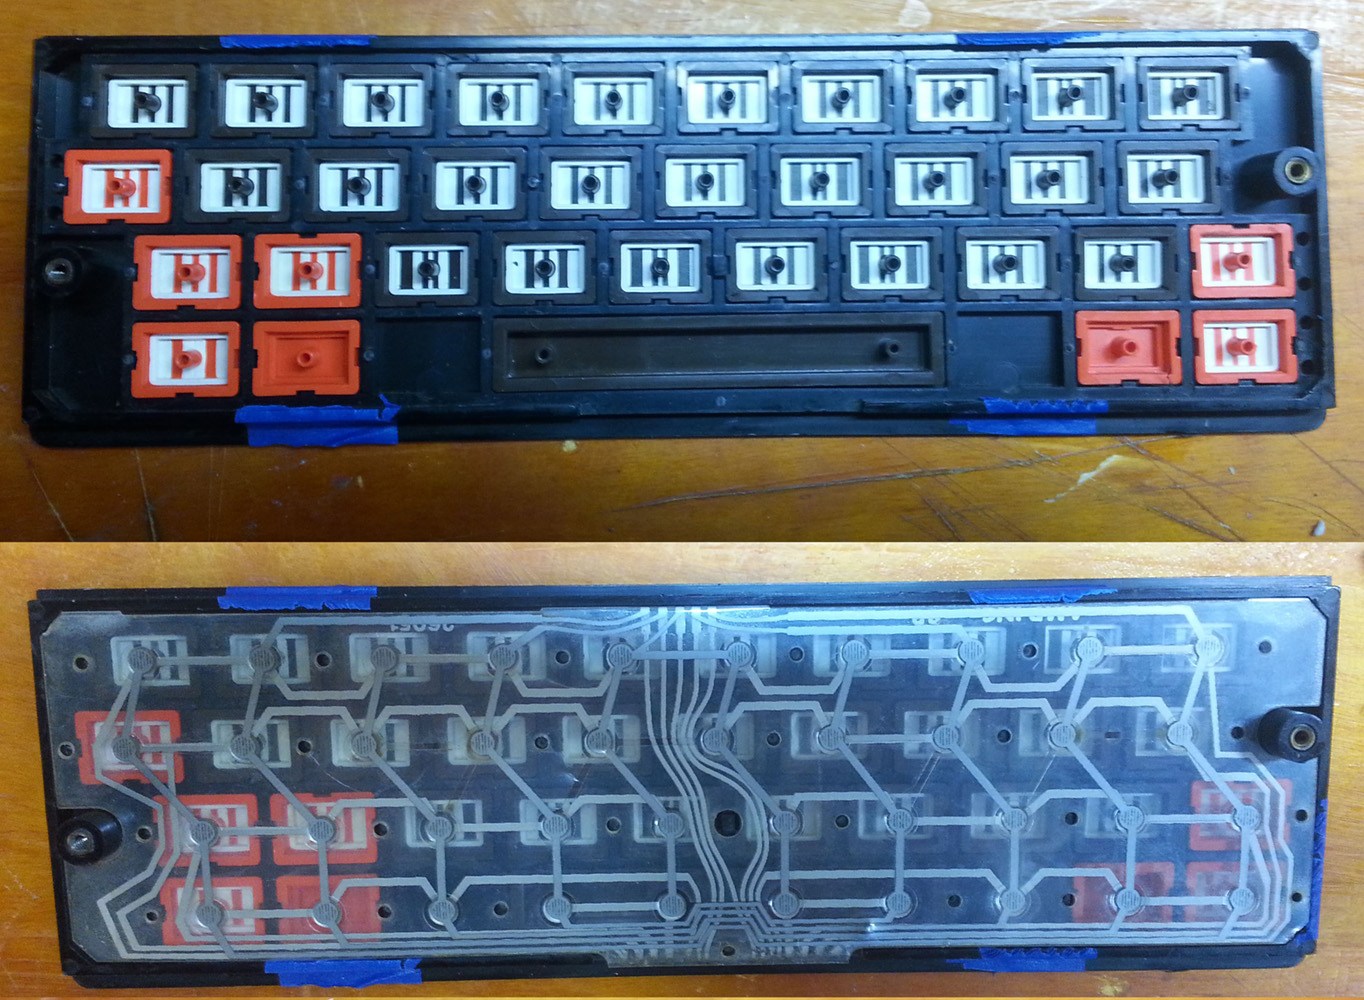
Before you delve into the design of silicone keyboards, you need to discuss the scheme of small keyboards and key sets. The first is the Metal Dome, or membrane keyboards. The best examples of such tactile membrane buttons are keyboards from popular home computers of the 1980s, ZX Spectrum or Atari 400. If you look elsewhere in the apartment, perhaps this keyboard is on your microwave.
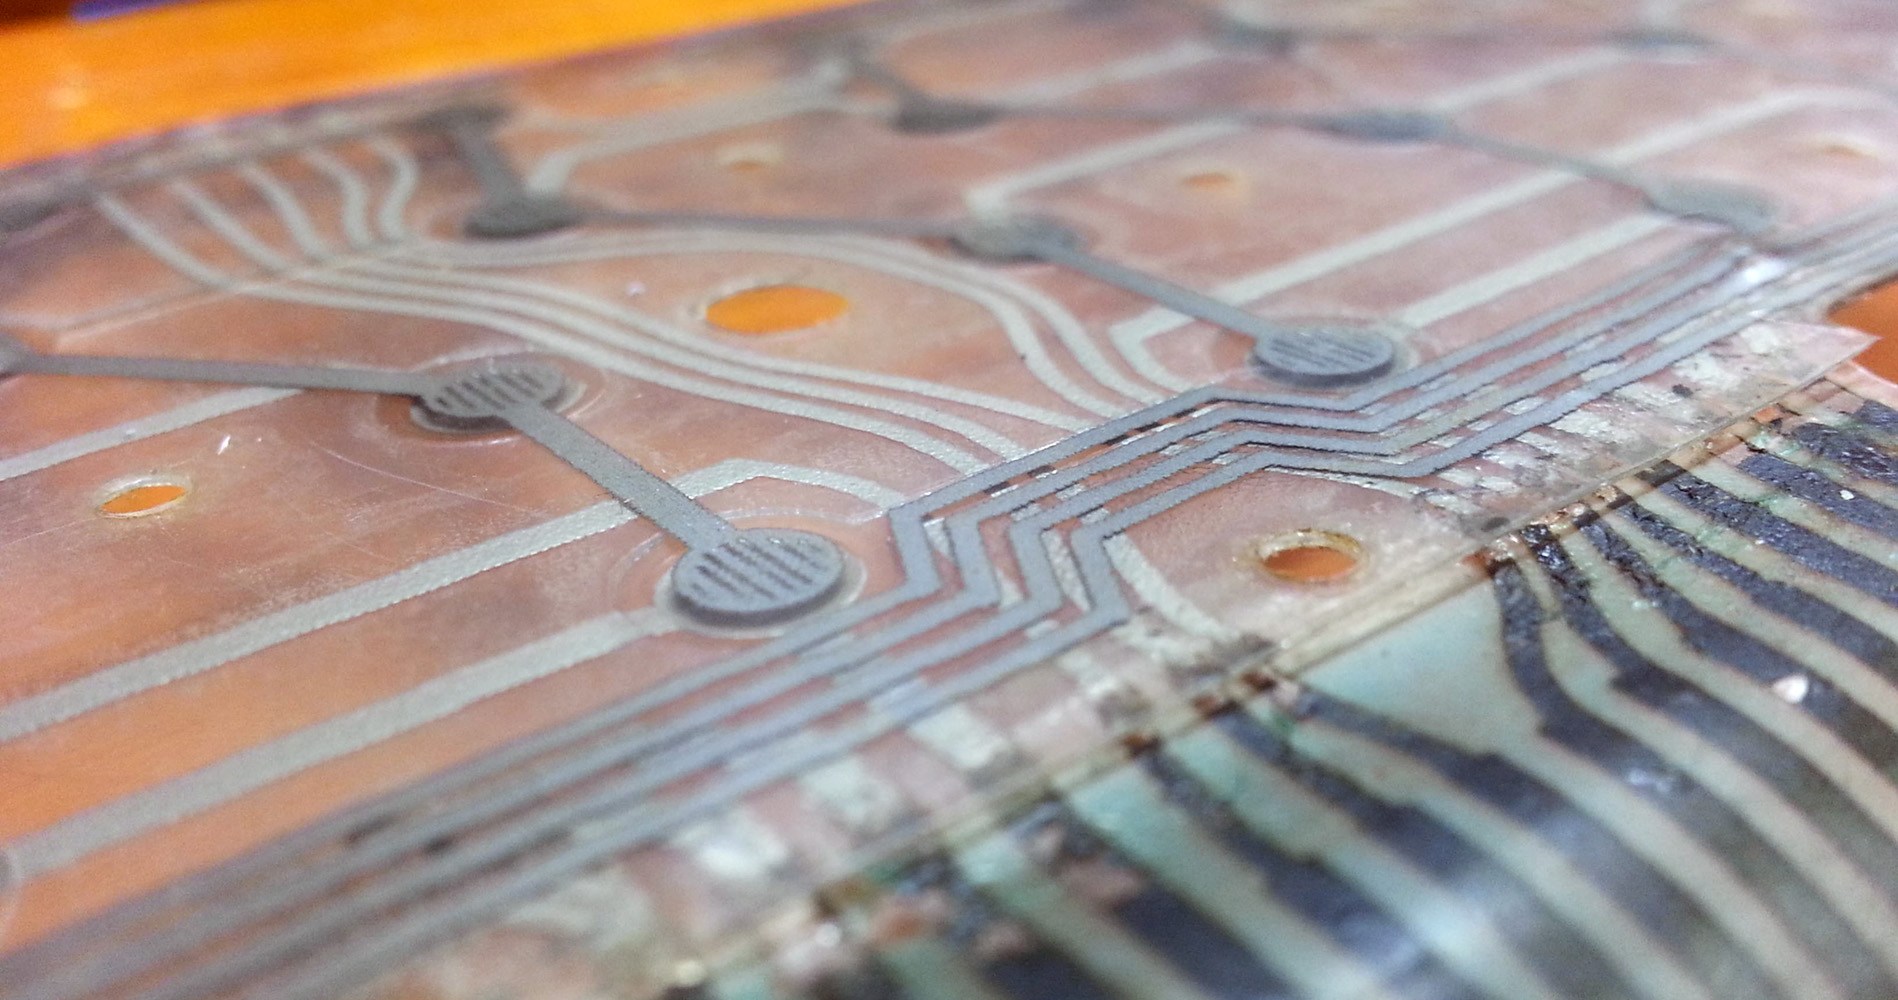
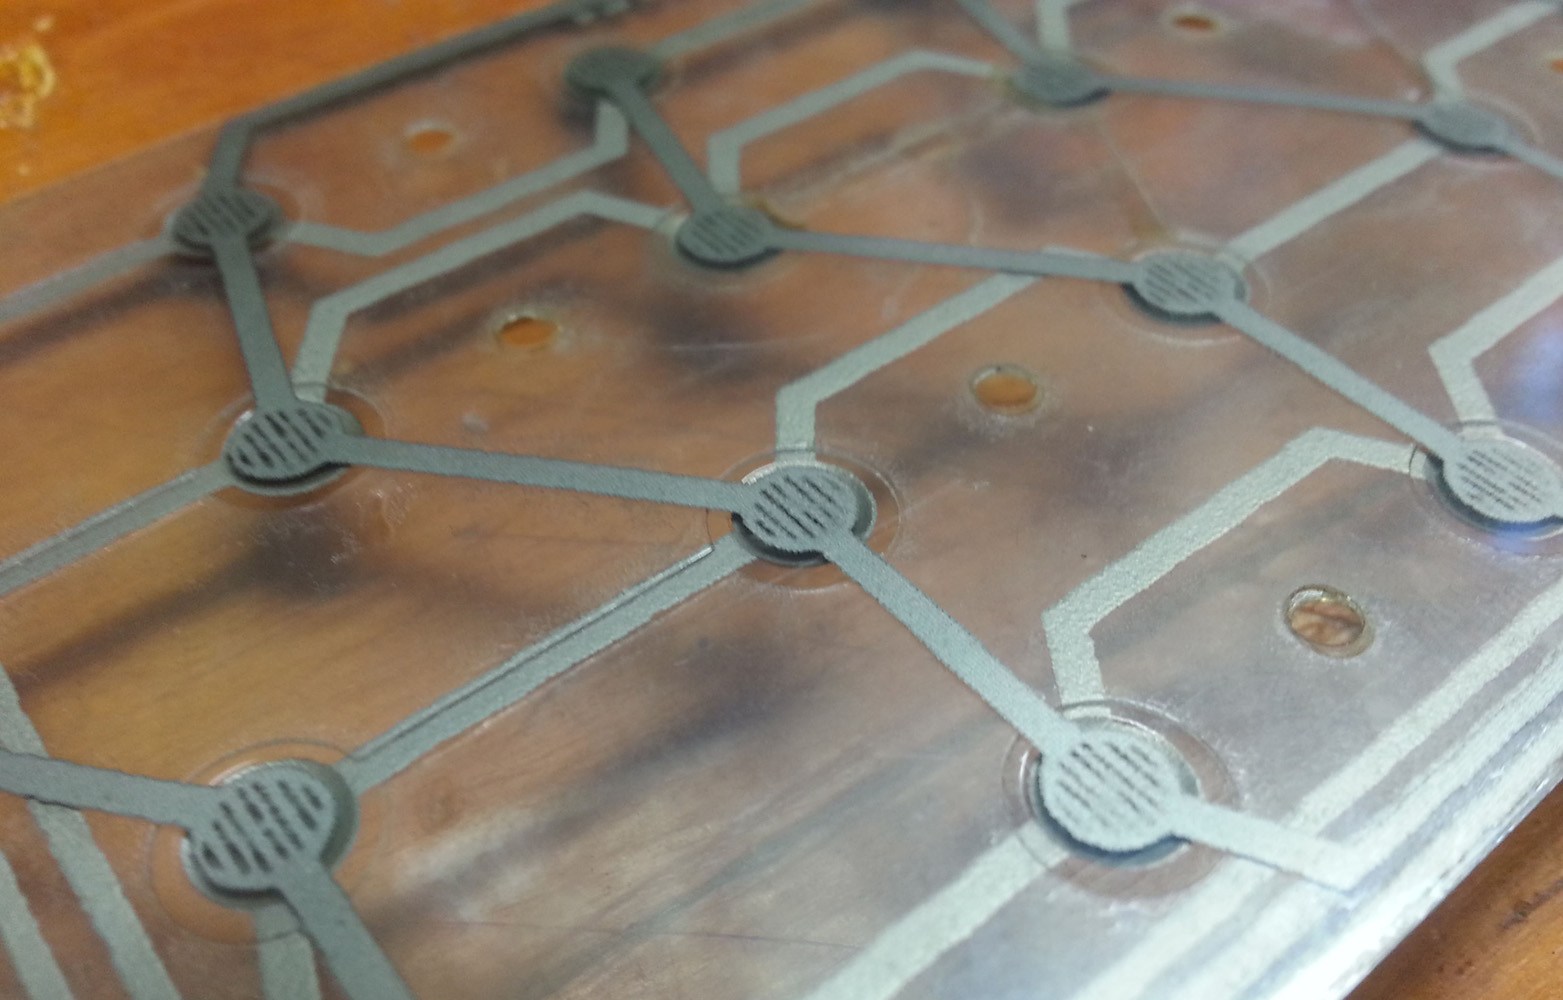
These keyboards have buttons matrix. The electrical circuit consists of tracks drawn with conductive ink on two sheets of polyester. Stainless steel dome located under each button. Pressing the button compresses the dome, and closes the two layers of polyester.
The best membrane keyboard images can be taken from one of their projects . Such membranes don't care how the metal dome was pressed. The simplest option is to position the buttons and letters directly on top of the membrane. A piece of plastic can be glued to the array of tactile switches. That is how the keyboards are made in the toys Speak N Spell and Big Trak [in the USSR there was an analogue of such a toy, "Lunokhod" / approx. trans.]. That is how you can make a keyboard for a three-year-old baby, protected from peanut butter.
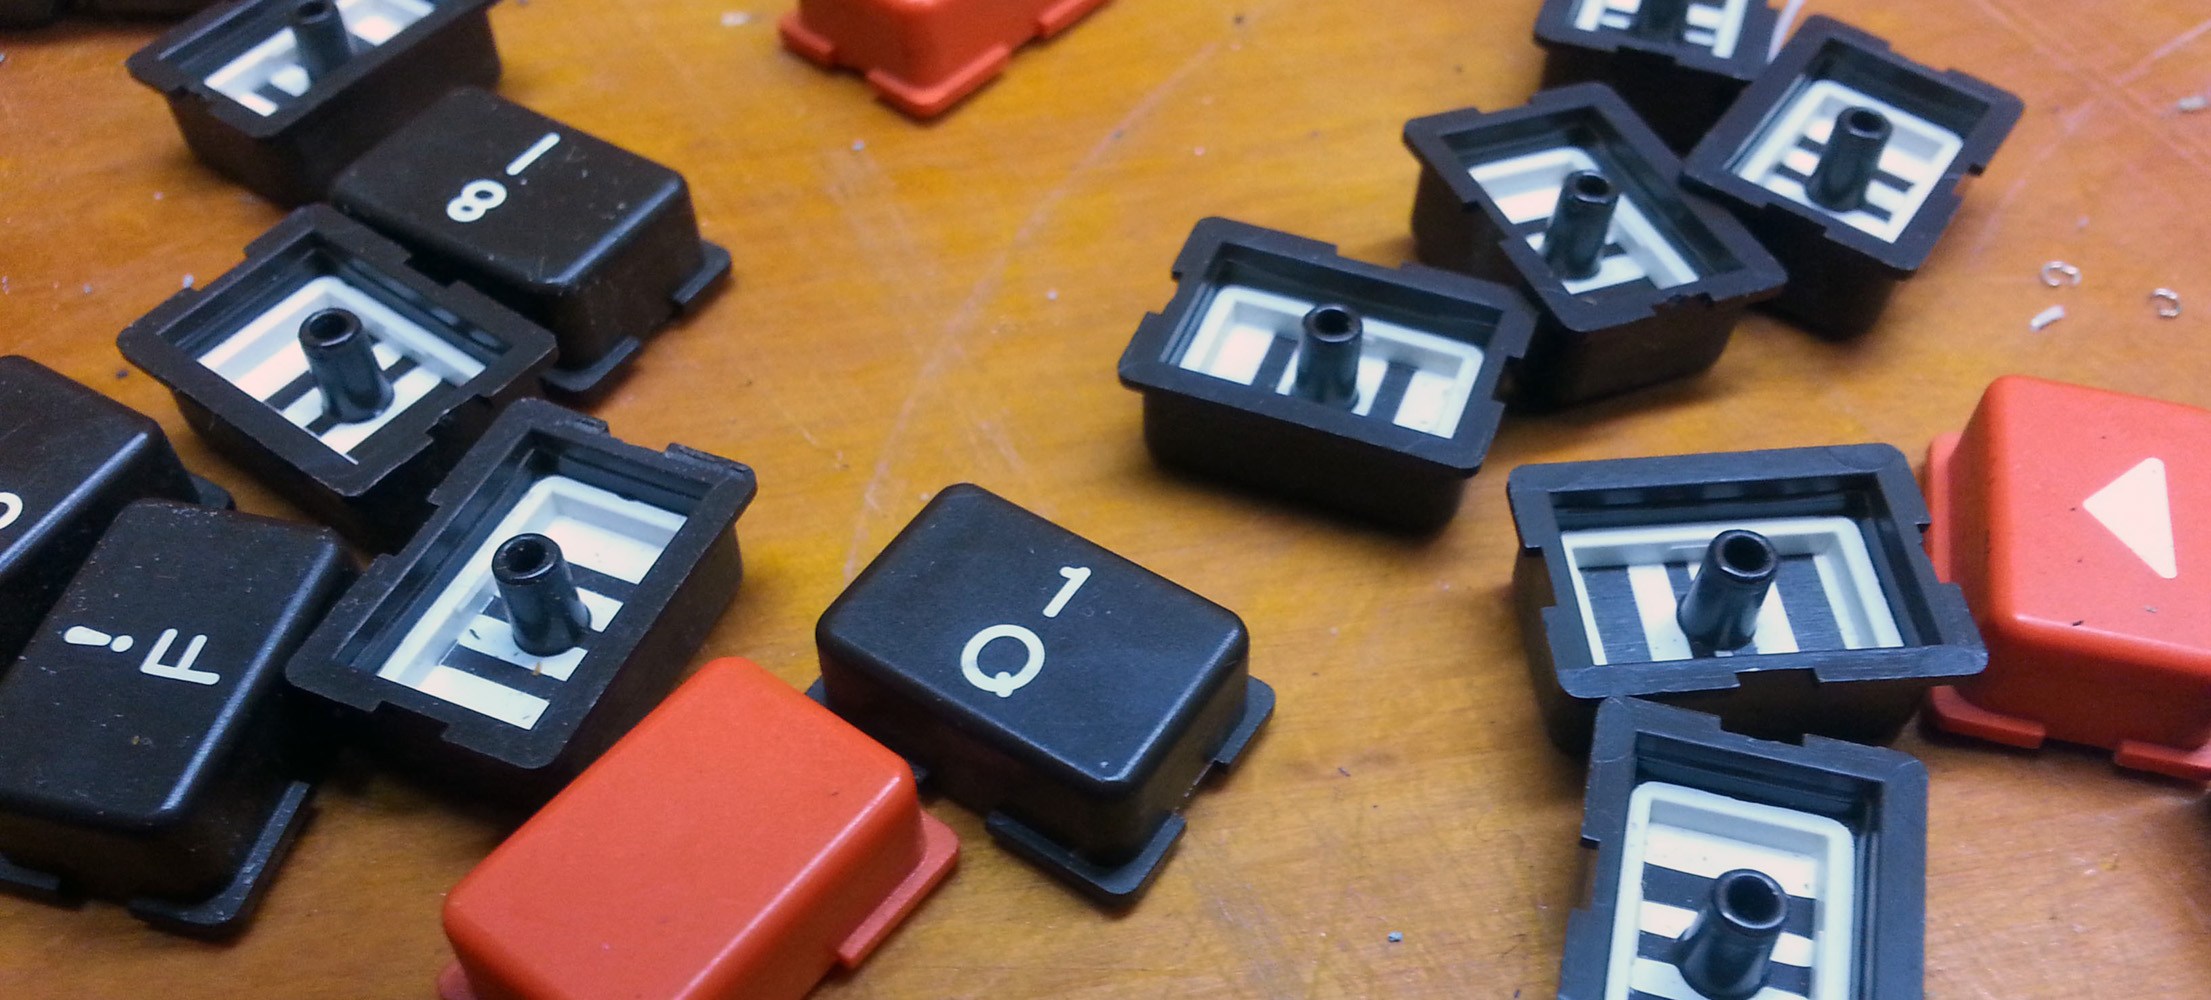
However, clean membrane switches are very cheap to the touch and do not give back tactile feedback. One option is to position the plastic buttons above the membrane switch. Metal Dome keyboards (with a metal dome) use hard plastic keys that push small metal domes sandwiched between two layers of polyester with conductive ink:
But membrane keyboards do not need hard plastic buttons. You can use soft silicone, on top of the membrane keyboard, as done on the ZX Spectrum. Instead of hard plastic rectangles, as in my project Metal Dome, Speccy used a single canvas of silicone buttons. ZX Spectrum used silicone buttons on its keyboard, but it still had a membrane keyboard. There is no difference how to press a metal dome - through a sheet of plastic with printed symbols, or silicone rectangles.
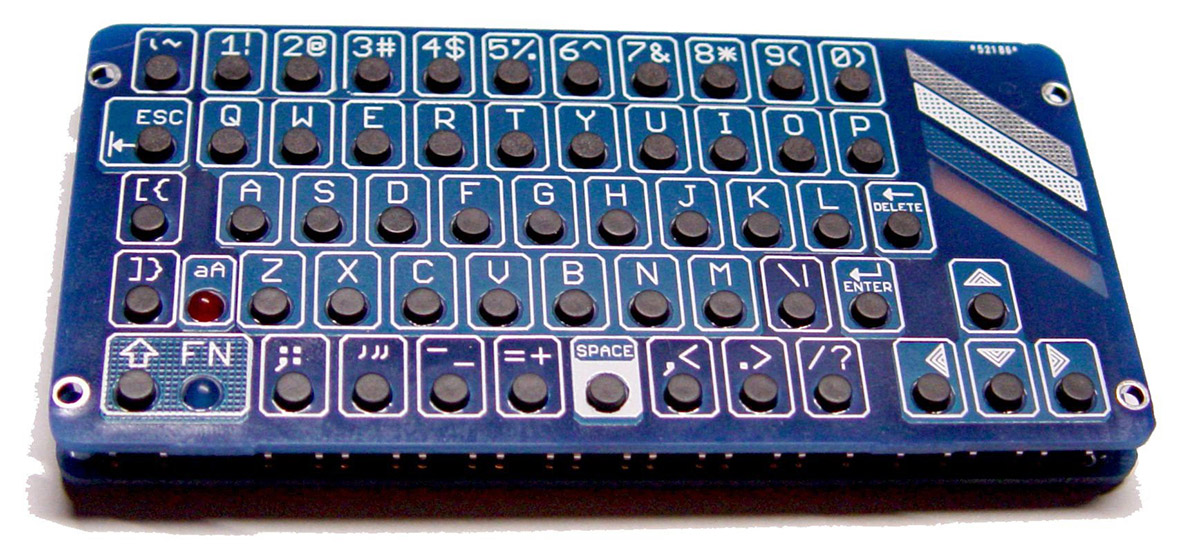
Another type of keyboard - the one I made for this article - is a silicone or rubber keyboard .
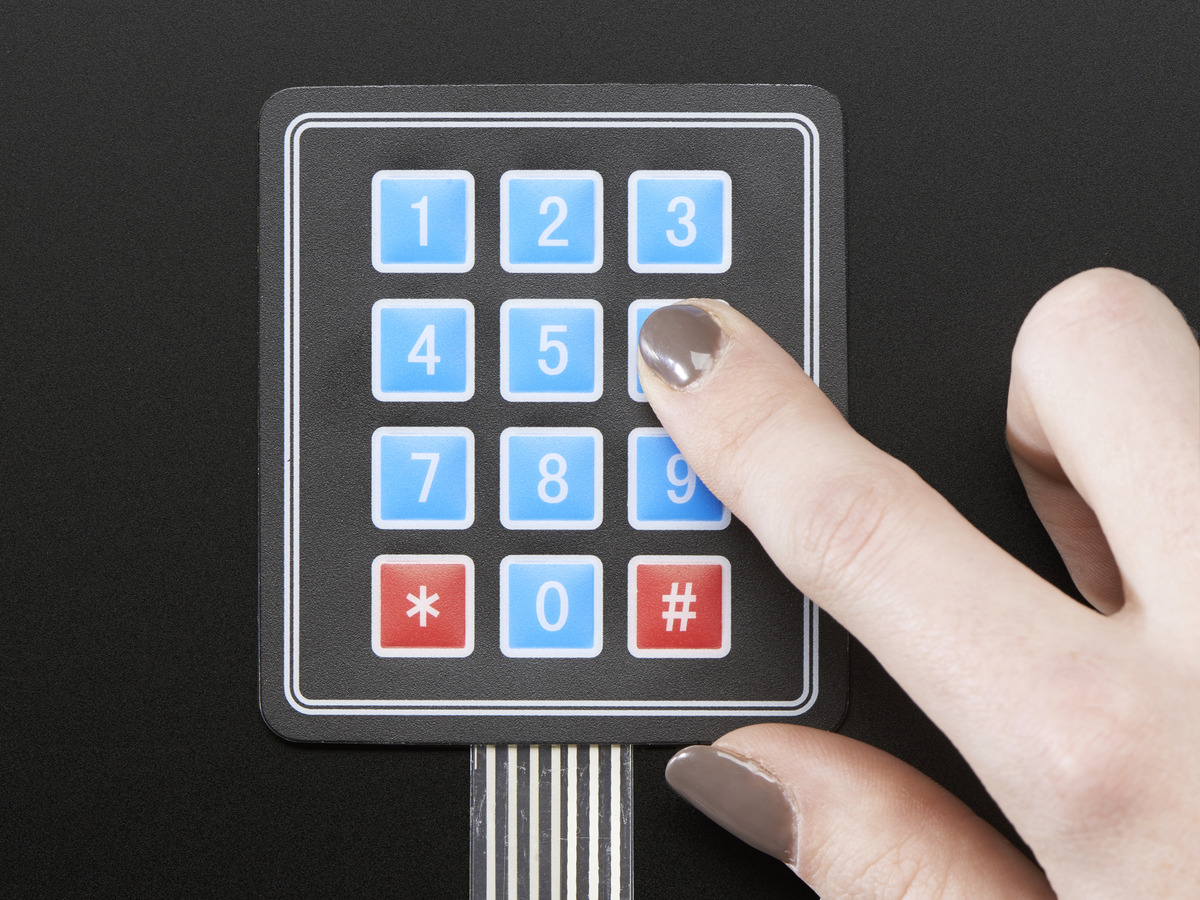
Ubiquitous Megaphone Keypad for Arduino
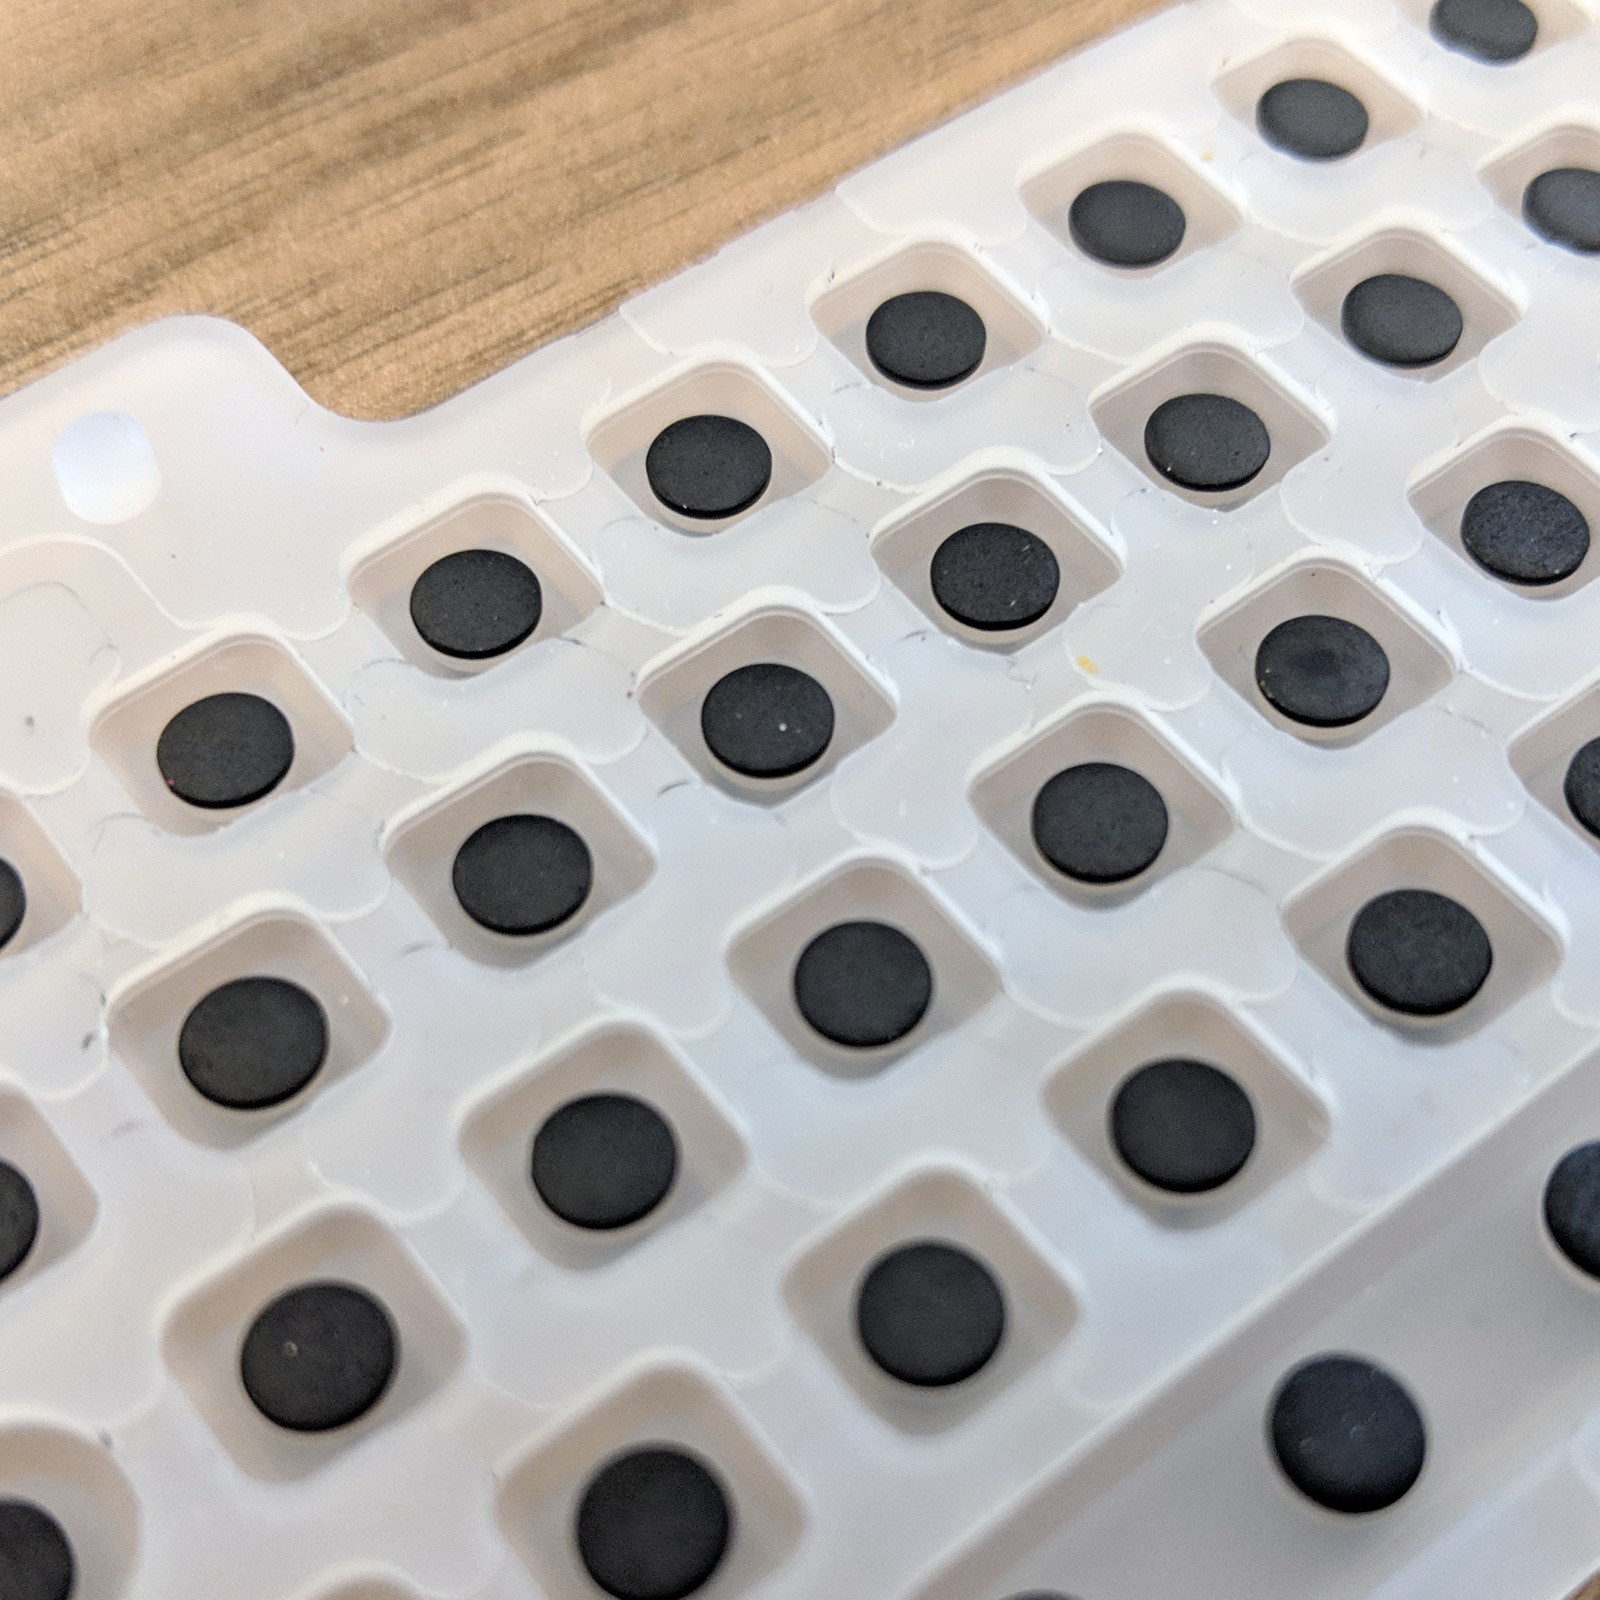
The rubber keypad uses injection molded silicone buttons that push the contacts. The carbon contact (“tablet”) is embedded in the silicone button, and the contacts for the keyboard matrix are created from the tracks on the printed circuit board. Contacts can be integrated into the board (recommended technology ENIG) or printed over conductive ink. In any case, the keyboard consists of a printed circuit board, silicone buttons with conductive contacts under each button, small conductive carbon contacts in each button, and sockets for fixing silicone on the board.
Choosing between the membrane and rubber keyboard, it is worth considering a few points, and many of them are able to outweigh the balance in favor of the membrane. Although rubber keyboards can be made in many colors, the characters on the membrane keyboard are, in fact, typed; On the membrane keyboard, you can make any symbols of any color. Membrane keyboards are cheaper because they do not need a mold for casting. Rubber keyboards require a strip containing a monolithic block of silicone keys, which means the additional cost of the second mold for casting. And wins the rubber keyboard only for tactile sensations. If you have ever tried using Atari 400, you will agree: it is much easier to type on rubber keyboards. And they are more stylish than membrane.
Current projects
Non-specialized rubber keyboard that can be used right now.
Today, I do not know the cases of using specialized rubber keyboards in small editions. They, of course, exist in the DIY community: Adafruit sells 4x4 keyboards (Sparkfun has the same thing ), and similar buttons can be ordered on AliExpress and eBay. Yes, of course, Sparkfun and Adafruit spent on the development of boards, but the buttons themselves, most likely, do somewhere far, far away. These are not specialized keyboards; These are standard ready-made keyboards for specialized projects.
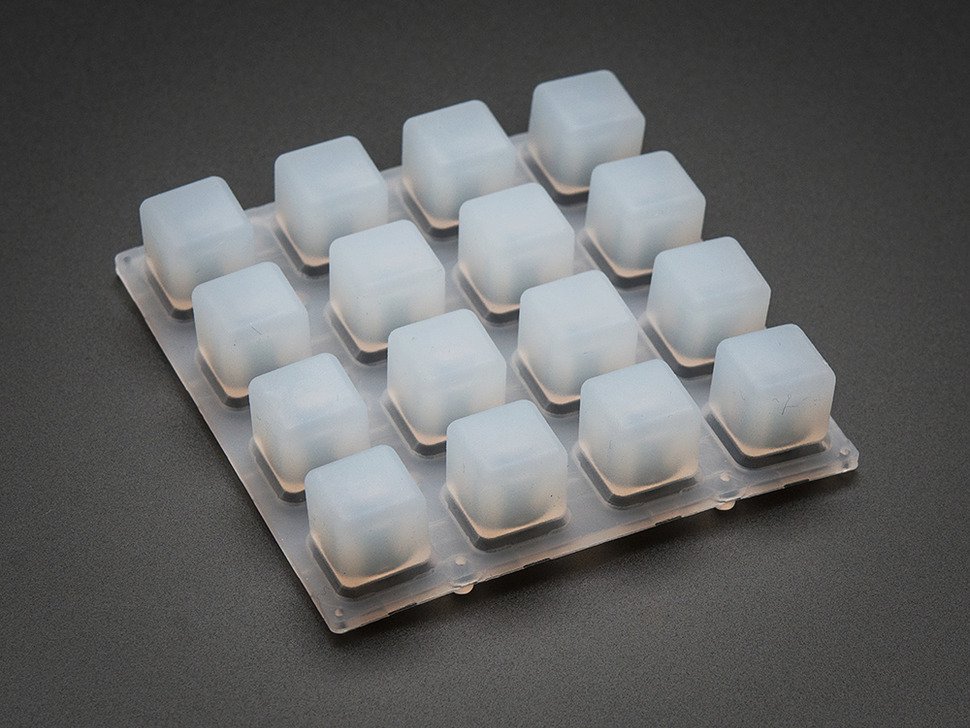
And these rubber buttons were used a lot where: to create a Monome clone , a step sequencer , a MIDI device . For this purpose, the illuminated silicone buttons were developed: they make cool MIDI controllers. But since there are no tags on them, they are not suitable for anything else.
And these are the only, as far as I know, DIY-projects that use 4x4 silicone keyboards. People, of course, are trying to do something else. Some of them are looking for rubber keyboards on the forums , and some are experimenting with aluminum molds for casting, but so far no one has been successful. Dave Jones rejected the idea of rubber keyboards for his uSupply project and switched to specialized membrane switches.
Keyboard, lug and air hole design
So from what is the creation of a rubber keyboard? In essence, we are developing a steel or aluminum casting mold. The form is sent to an injection molding machine, where it is filled with carbon balls, poured with hot silicone, which is then vulcanized. Further processing of the buttons is possible - laser marking, silk-screen printing or epoxy coating. Designing a rubber keyboard is designing a mold for casting, but the basic components are fairly simple. Below is an example - the keyboard from a single key - which I made in Fusion360 in a few minutes.
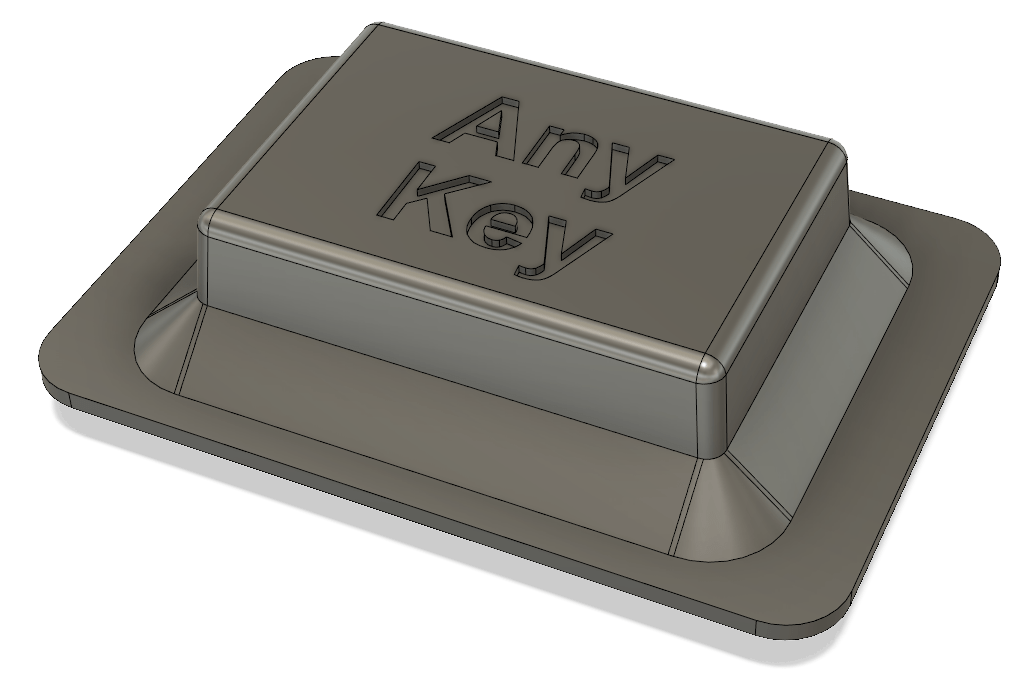
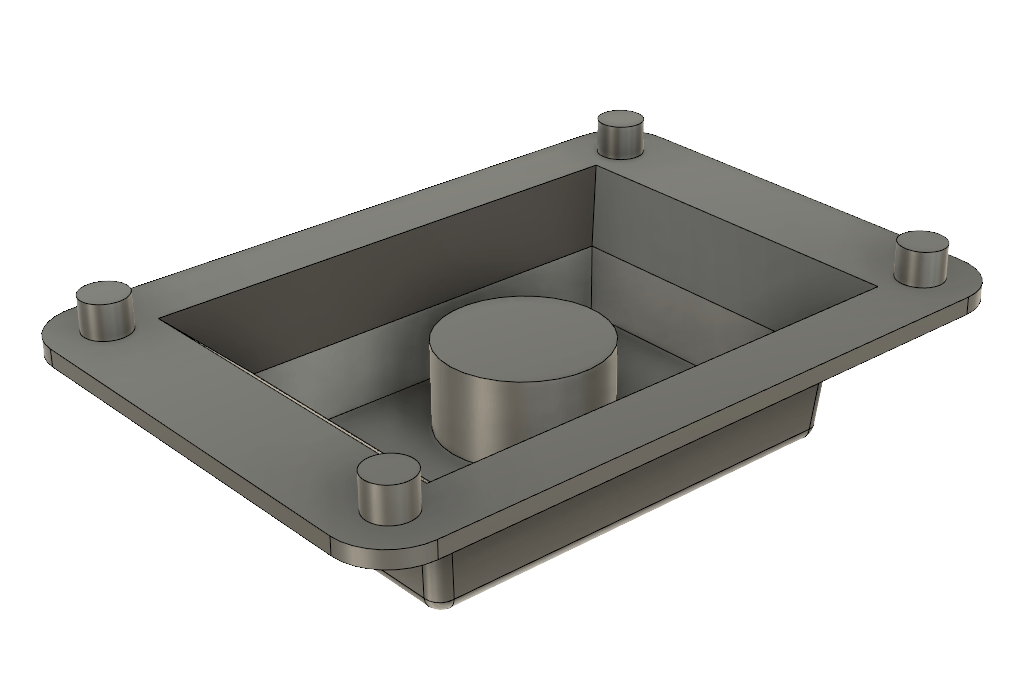
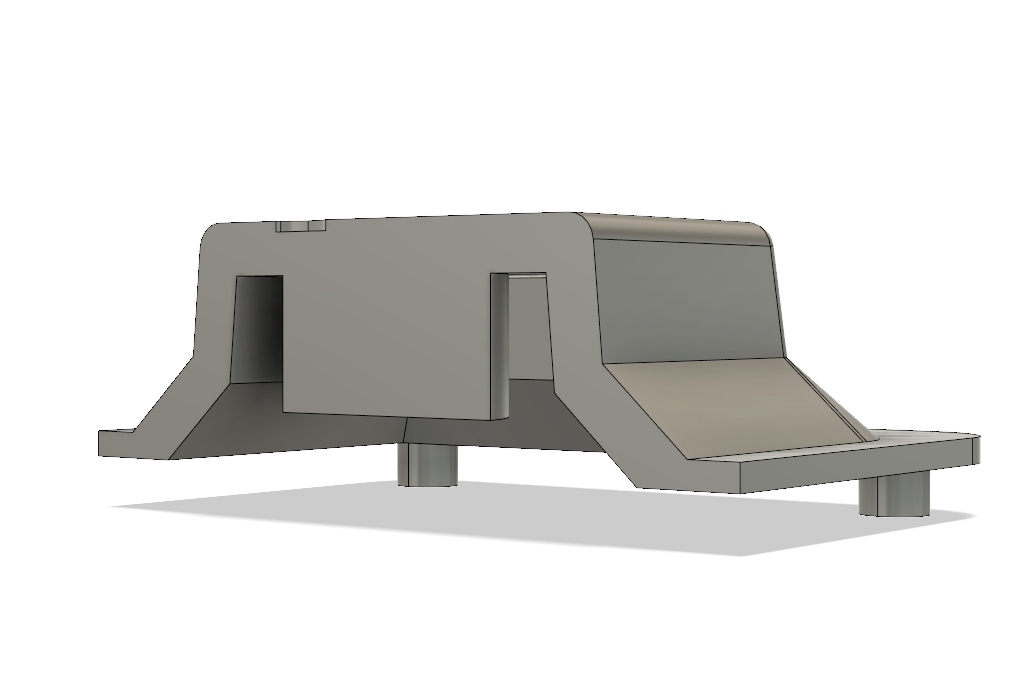
The external shape of the keyboard depends on the destination, and the base is a layer of silicone. At the corners of the base there are four bosses for mounting on the board. They are needed to align the button and prevent it from slipping.
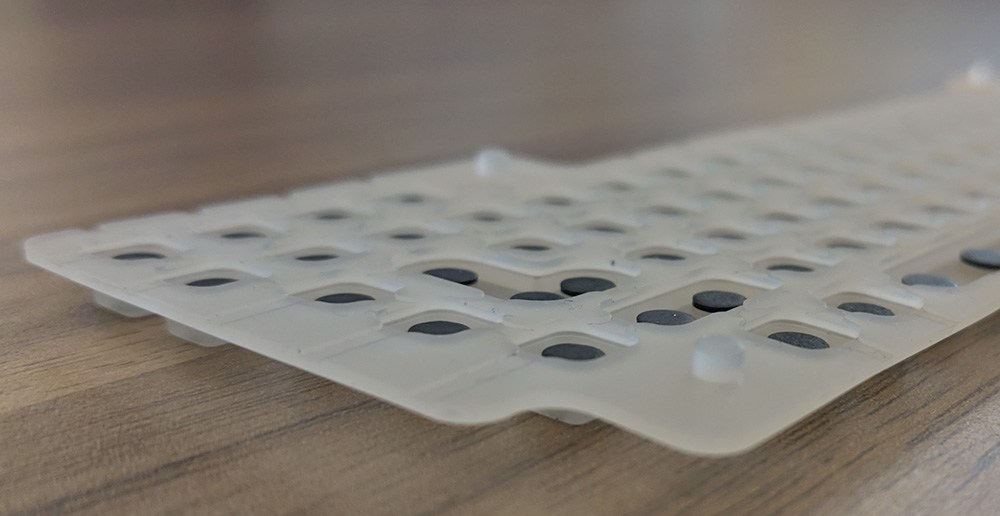
The internal structure of the key consists of a large carbon pill, the contact that will click on the board. More keys are simply located on the keyboard, but the shape of a single key is essentially the same. Mark the gaps at the bottom of the key, allowing air to pass under it. If they are not done, the keyboard will podkukivat when pressed.
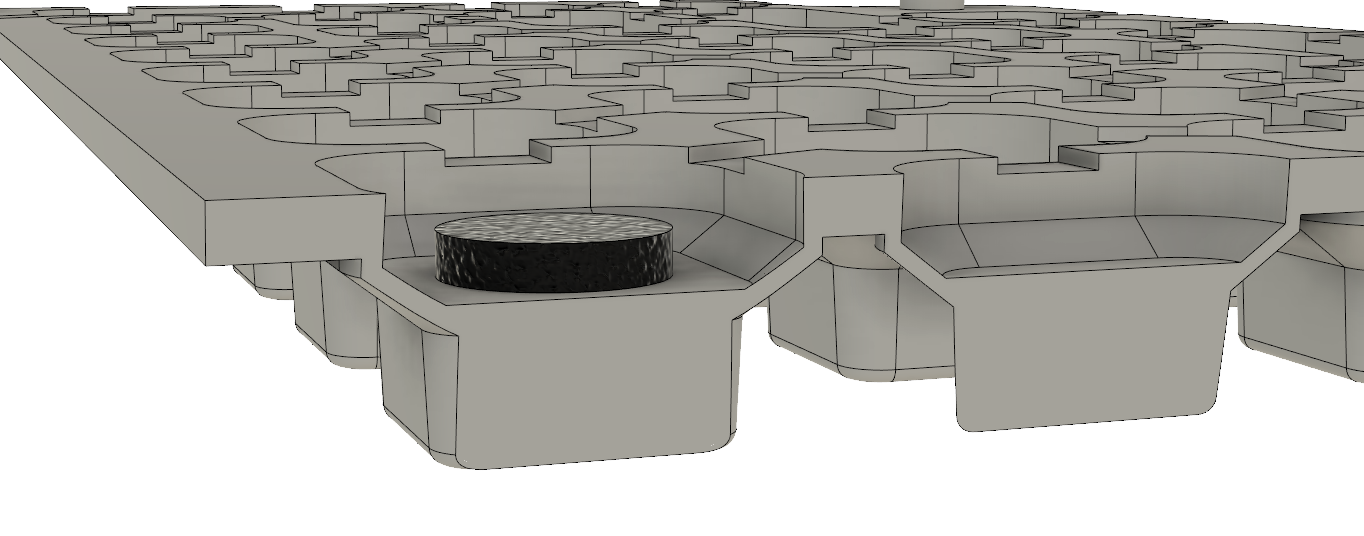
Silicone key in the cut. The black object is a carbon tablet that serves as a bridge between two pins on the board.
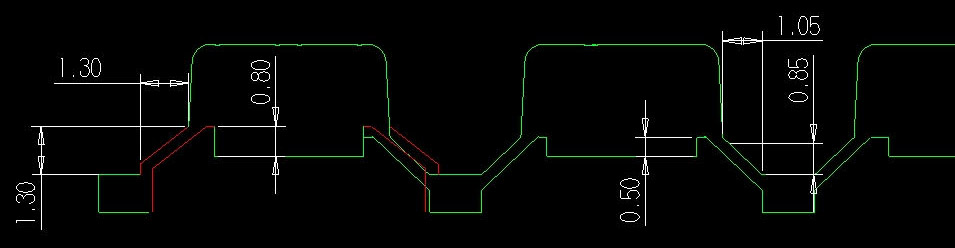
The size of my keyboard, in mm.
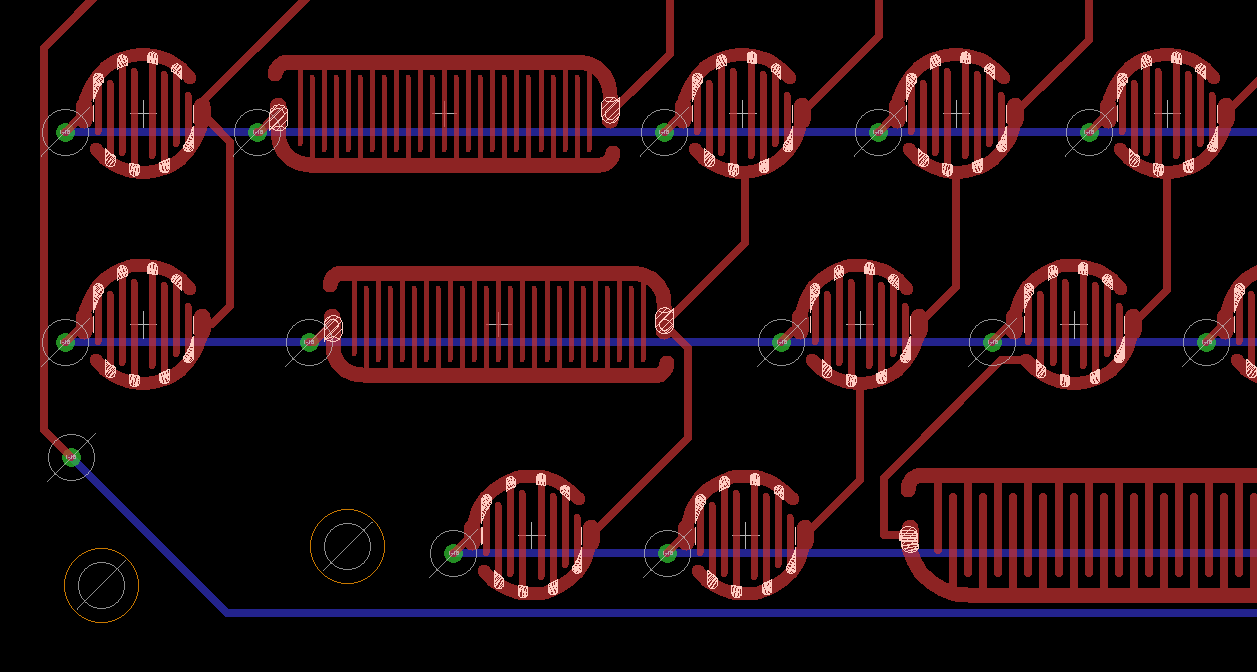
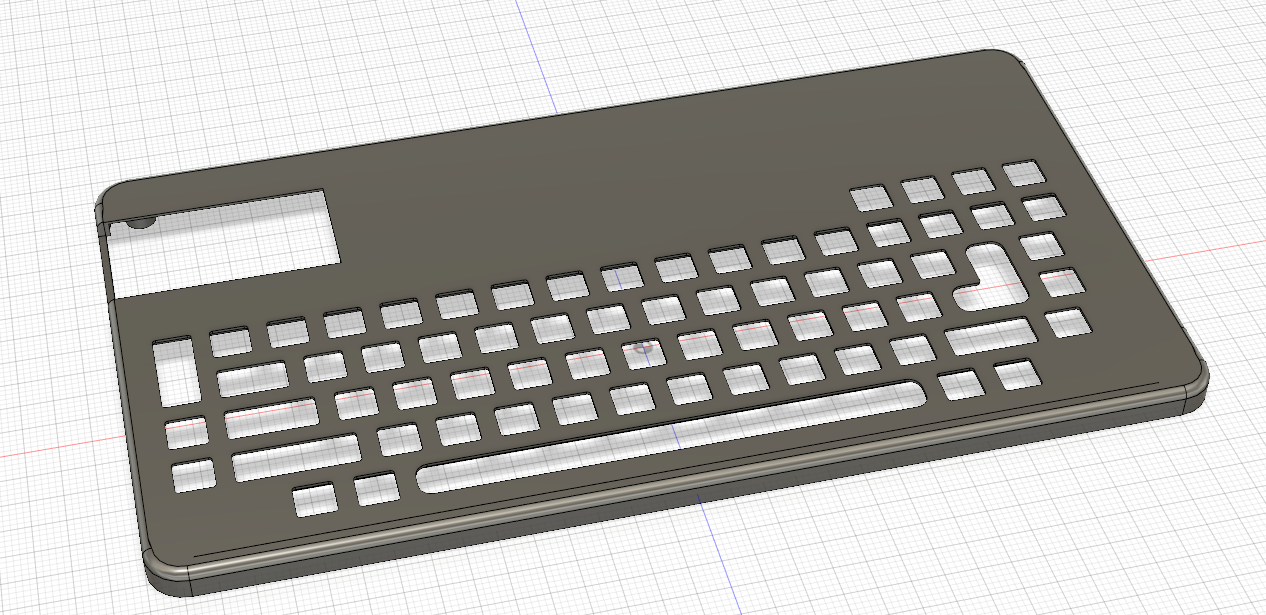
After the keyboard project was ready, and the files were sent to the factory for making molds and producing several test samples, it was time to develop a printed circuit board. For my project, the scheme didn’t have a special meaning - the main thing is that the board should have two tracks close together, connected to opposite sides of the keyboard matrix. For this, ENIG technology is recommended. There are also production limitations: the standard minimum width of the track and the distance between them is 0.15 - 0.20 mm, and I developed a board with tracks of 0.25 mm and the same distance between them.
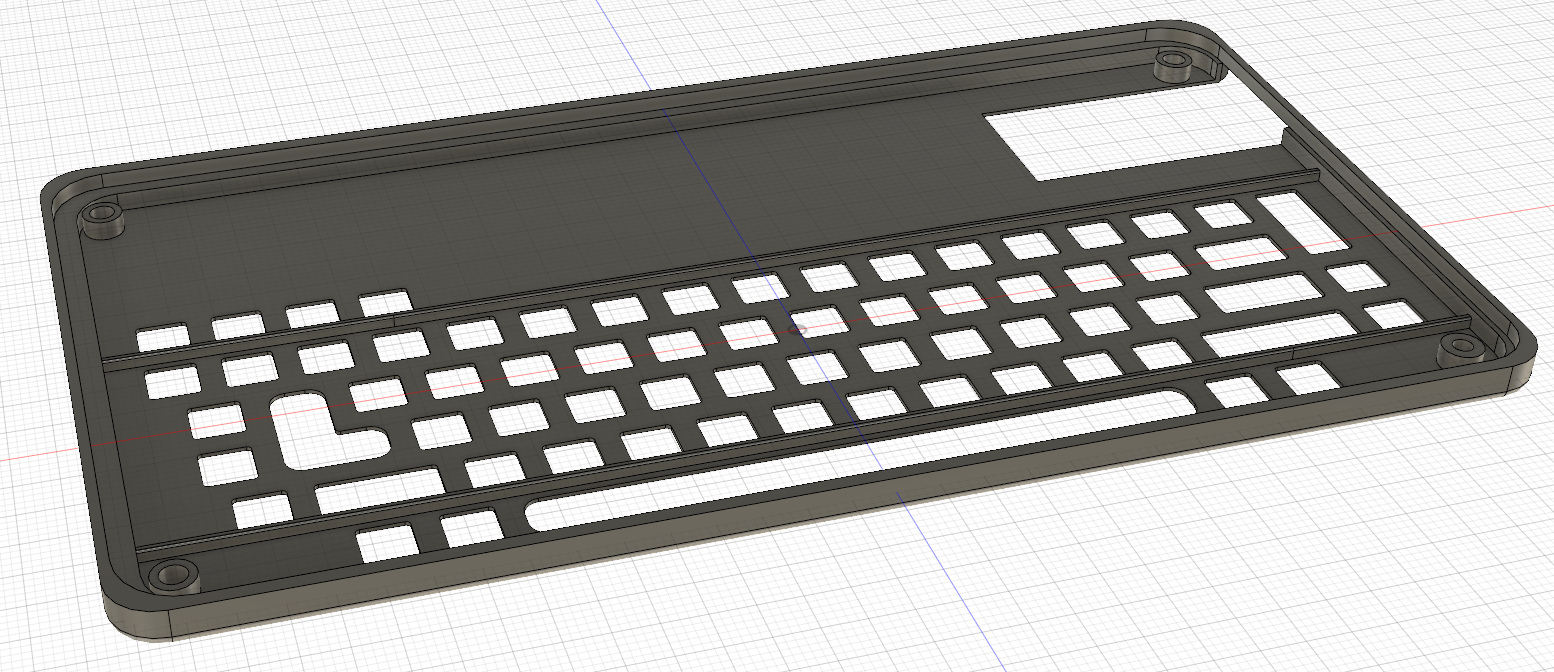
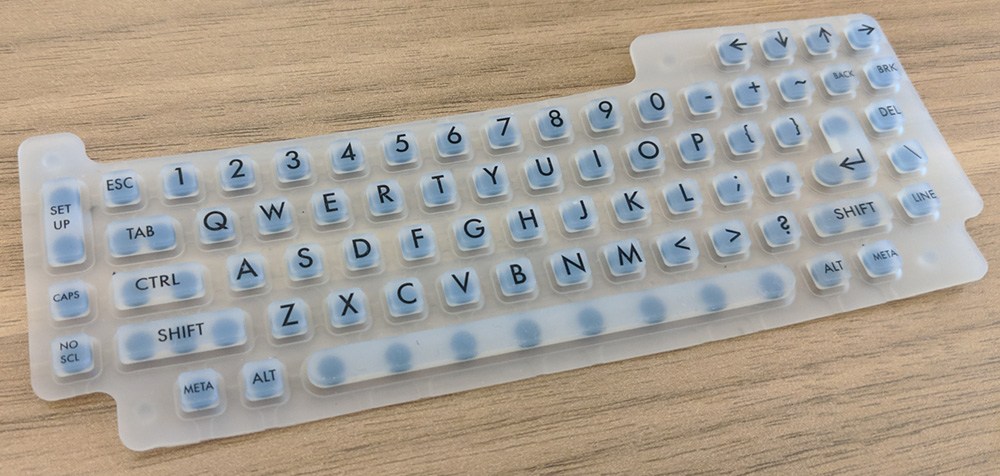
After finishing the keyboard and board, you can go to the mounting strip. This is perforated plastic, screwed to the board. The rubber keyboard is clamped between it and the board. I made the following prototype, just to test the keyboard. Electronics is just a Teensy LC (I was on hand), with a cutout giving access to the prototype board:
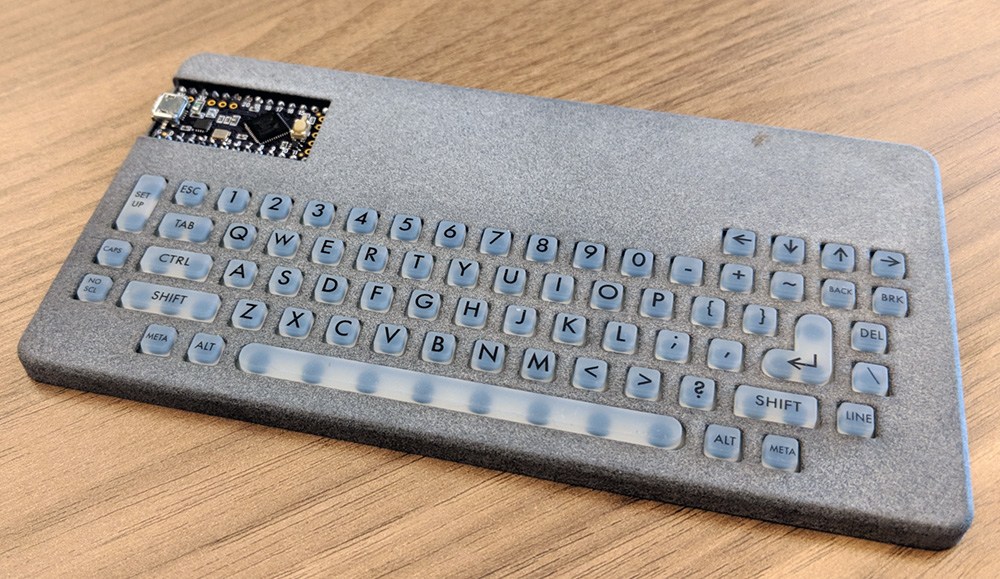
I sent this model to Shapeways, and the keyboard was assembled. Teensy firmware uses the standard Keypad library and is presented to the computer as a USB HID device. It turned out specialized rubber keyboard exactly the form that I need. This is not the final choice, since the USB keyboard is just a working concept for testing rubber keys, but it really works.


I will reveal the cost of the project; It should be borne in mind that the sample here is very small - I turned to only one manufacturer with only one model. However, due to strong competition in the market, I think that these prices will be fairly representative of the average cost of a specialized rubber keyboard.
The cost was as follows:
| Manufacturing | $ 2 219 |
| Design | $ 600 |
| Banking Commission | $ 58 |
| TOTAL | $ 2 877 |
From an economic point of view, all this makes sense with a circulation of about 10,000
The total cost of a small number of samples turned out to be $ 2,877. This is the cost of a mold for casting and checking by an engineer of CAD files. Ten keyboards for three thousand bucks.
However, after all the design and preparation stages, the factory is able to produce keyboards in batches. After that, the cost of one piece becomes equal to $ 1.3 with a draw of 1,000 to $ 0.79 with a draw of 5,000. So a total of one thousand keyboards cost me $ 4,177, that is, $ 4.18 each. Five thousand keyboards cost $ 6,827, or $ 1.36 apiece. This price, less than $ 1.5, makes this technology viable for small-scale production.
Rubber keyboards are suitable for major manufacturers: Samsung sells millions of televisions, and all of them have one d / y remote. The issue of making a rubber keyboard for a DIY project has always remained open. Small-scale projects do not use this technology, so there was no one to ask if specialized silicone switches make sense. I say that it makes sense if you make a thousand keyboards. On a draw of five thousand, the cost of a rubber keyboard and plastic fasteners may drop less than the cost of a microcontroller.
→ All project sources are available on GitHub
Source: https://habr.com/ru/post/453546/
All Articles