Raise code readability in iOS development
Imagine a book in which there is no division into chapters, and everything goes without logical and semantic breakdown, a book with no paragraphs, no points and commas, a book where the first line tells about one thing, the second about the other, and the third again about the first.
Submitted?
Could you understand what the book is about?
')
How quickly could you find the passage you are interested in?
Your code, as well as the content of the book, needs to be structured so that the code is easily readable and conveys its meaning.
In this article, I will show examples on the organization of code in which classes will have the same sequence of basic blocks and their breakdown.
For convenience, I will use the word class (class), but imply any kind of type (class, struct, enum).
Thanks to the use of these tips, your code will become readable, which will further ensure the convenience and speed of working with it.
Of course, the described tips can be upgraded to your liking, observing the basic principles.
To begin with, let's compare the same code in two versions.
This code is similar to a dump of methods, variables and outlets, in which everything merges together, it is difficult to understand what is related to what and in what place.
Empty line 38 - indent one line from the last method so that you can see where the last closing method bracket ends and where the class itself ends.
In both examples, the same functionality is given, but the difference is that the second option has a clear structure, due to which the logic is more obvious, the code is easy to read, you can quickly find what you are looking for, and besides, it is just nice to look at it.
For readability, the book is divided into chapters, and so it will be more comfortable for us to work if we create a table of contents for the class using // MARK: - .
This label is not only well distinguished from the entire code, but also automatically creates a table of contents - it highlights the sections in the code in bold in the list of elements of this file.
You can view the file's contents by clicking on the button after the arrow to the right (>) at the very top of the file after the name of this file or ctr + 6 (document items menu).
Below are the main labels for breaking the code into logically related blocks and their sequence:
When using this method of grouping, you can easily navigate the code of any class.
The logic inside the ViewController'a life cycle methods must be moved to separate methods, even if you have to create a method with one line of code. Today is one, and tomorrow is ten.
Due to the fact that the implementation details are made to third-party methods, the logic of the life cycle becomes clearer.
Take out the implementation of the protocols in the extension marked // MARK: - SomeProtocol :
On this label everything that is connected with this protocol will lie - all that is only here and there is no need to go anywhere else, otherwise the methods and properties of the protocol will be scattered throughout the class.
To increase visibility, it is necessary to select logically related elements using an empty string:
Do not leave unnecessary comments (default), empty methods or dead functionality - this is littering the code. Pay attention to the class AppDelegate, most likely you will find there empty methods with comments inside.
In order not to write manually in each class // MARK: - SomeMark , use Code Snippet .
We write the label, select it, then Editor -> Create Code Snippet, give it a name and call it shortcuts.
I wish you all success in developing applications and let your class become cleaner!
// MARK: - Help in writing an article
Sergey Pchelyakov
Alexey Pleshkov medium/@AlekseyPleshkov
// MARK: - Links
Ray Wenderlich code style
Submitted?
Could you understand what the book is about?
')
How quickly could you find the passage you are interested in?
Your code, as well as the content of the book, needs to be structured so that the code is easily readable and conveys its meaning.
In this article, I will show examples on the organization of code in which classes will have the same sequence of basic blocks and their breakdown.
For convenience, I will use the word class (class), but imply any kind of type (class, struct, enum).
Thanks to the use of these tips, your code will become readable, which will further ensure the convenience and speed of working with it.
Of course, the described tips can be upgraded to your liking, observing the basic principles.
To begin with, let's compare the same code in two versions.
An example of a messy class:
This code is similar to a dump of methods, variables and outlets, in which everything merges together, it is difficult to understand what is related to what and in what place.
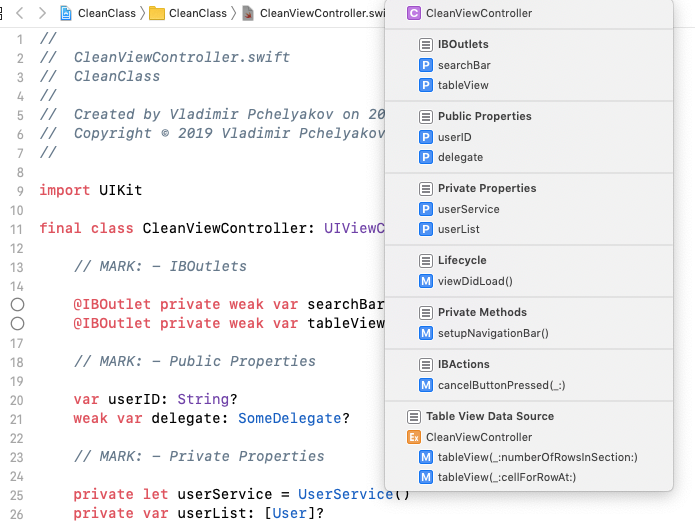
An example of a pure class:
Empty line 38 - indent one line from the last method so that you can see where the last closing method bracket ends and where the class itself ends.
In both examples, the same functionality is given, but the difference is that the second option has a clear structure, due to which the logic is more obvious, the code is easy to read, you can quickly find what you are looking for, and besides, it is just nice to look at it.
The basic principles for the formation of a pure class structure:
- Always use // MARK: -
- Give names of tags and set their order.
- Moving logic out of lifecycle methods to individual methods
- We use extension for implementation of protocols
- Select logically related elements.
- We remove the unused
- Automating routine
1. Always use // MARK: -
For readability, the book is divided into chapters, and so it will be more comfortable for us to work if we create a table of contents for the class using // MARK: - .
This label is not only well distinguished from the entire code, but also automatically creates a table of contents - it highlights the sections in the code in bold in the list of elements of this file.
You can view the file's contents by clicking on the button after the arrow to the right (>) at the very top of the file after the name of this file or ctr + 6 (document items menu).
2. We give the names of the tags and set their order.
Below are the main labels for breaking the code into logically related blocks and their sequence:
When using this method of grouping, you can easily navigate the code of any class.
3. We carry out the logic of the life cycle methods into separate methods
The logic inside the ViewController'a life cycle methods must be moved to separate methods, even if you have to create a method with one line of code. Today is one, and tomorrow is ten.
Due to the fact that the implementation details are made to third-party methods, the logic of the life cycle becomes clearer.
4. Use extension to implement protocols
Take out the implementation of the protocols in the extension marked // MARK: - SomeProtocol :
On this label everything that is connected with this protocol will lie - all that is only here and there is no need to go anywhere else, otherwise the methods and properties of the protocol will be scattered throughout the class.
5. Select the logically related elements.
To increase visibility, it is necessary to select logically related elements using an empty string:
6. We remove the unused
Do not leave unnecessary comments (default), empty methods or dead functionality - this is littering the code. Pay attention to the class AppDelegate, most likely you will find there empty methods with comments inside.
7. Automate the routine
In order not to write manually in each class // MARK: - SomeMark , use Code Snippet .
We write the label, select it, then Editor -> Create Code Snippet, give it a name and call it shortcuts.
// MARK: - Bonus
- Mark a class with the final keyword if the given class has no successors - the project compiles faster, and the code works faster.
- Mark properties, outlets and methods with the private keyword - they will be available only inside the class and will not be in the public list of properties and methods if they are not needed there.
I wish you all success in developing applications and let your class become cleaner!
// MARK: - Help in writing an article
Sergey Pchelyakov
Alexey Pleshkov medium/@AlekseyPleshkov
// MARK: - Links
Ray Wenderlich code style
Source: https://habr.com/ru/post/453428/
All Articles