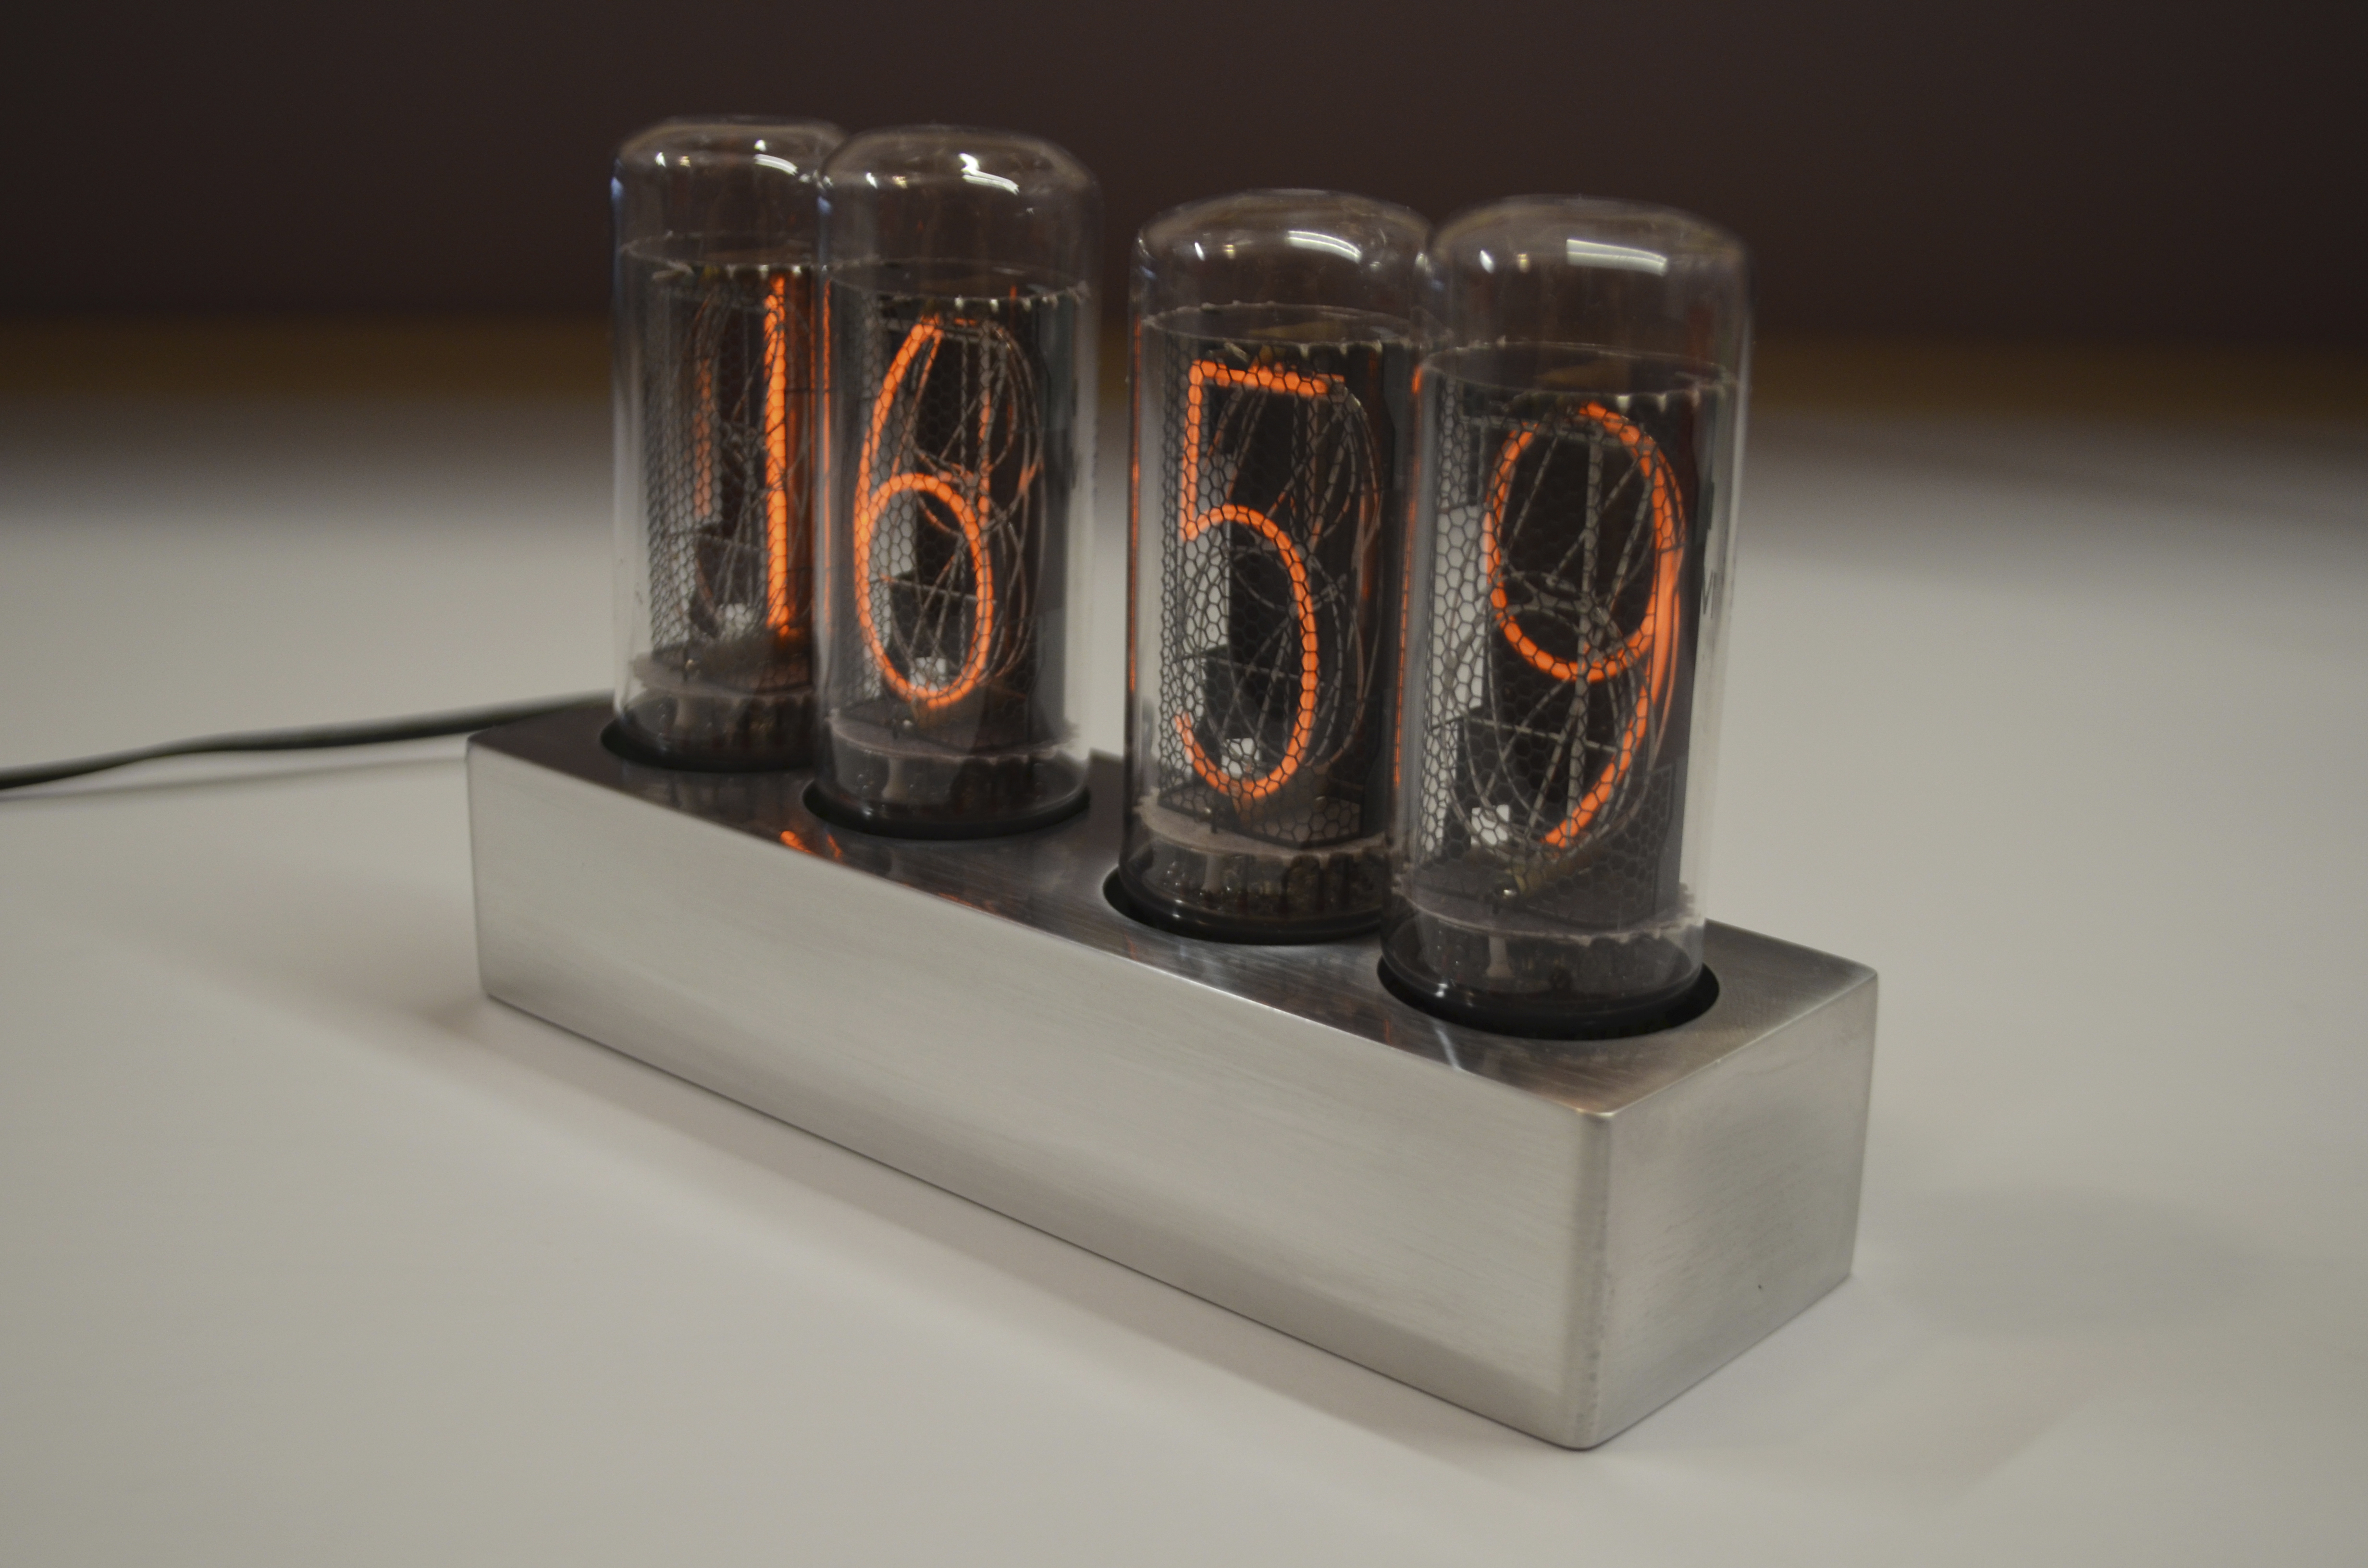
Nixie clock on indicators IN-18
Hello.
Probably, many have heard about watches on gas-discharge indicators. In this article I will try to tell you about the process of making such watches with your own hands.

')

You can make your own using LUT method or photoresist. There is a lot of information on the Internet with step-by-step descriptions of the process of manufacturing boards using these methods. I would not waste time, although I myself made payments like this for those hours. If there is no experience, it will not turn out the first time and not the best quality. You will also need to buy PCB, reagents, paper for LUT (or buy a photoresist with a film for the projector and an ultraviolet lamp). Then you need to zaludit, drill, apply a mask, make silk-screen printing for convenience, all this is not cheap.
Therefore, it is better to order factory manufacturing of multilayer boards with a mask and silk screen printing. This can be done in Russia, but it will be expensive.
Can be ordered on AliExpress. It's not difficult to do, you need to find such a service on the site and send your file to the mail (indicated in the description of the product). In response will invoice. You need to pay on AliExpress as a normal product, but the cost will need to be increased in accordance with the invoice, increasing the number of items in the order. Wait and track as usual order. The cost of sellers is different, for 11 cards with delivery I got about 2500r.
I think the cheapest option is to order it on the JLCPCB website. You will need to register, upload to the order page an archive with a gerber file, select the necessary parameters (or leave everything by default), pay and wait).
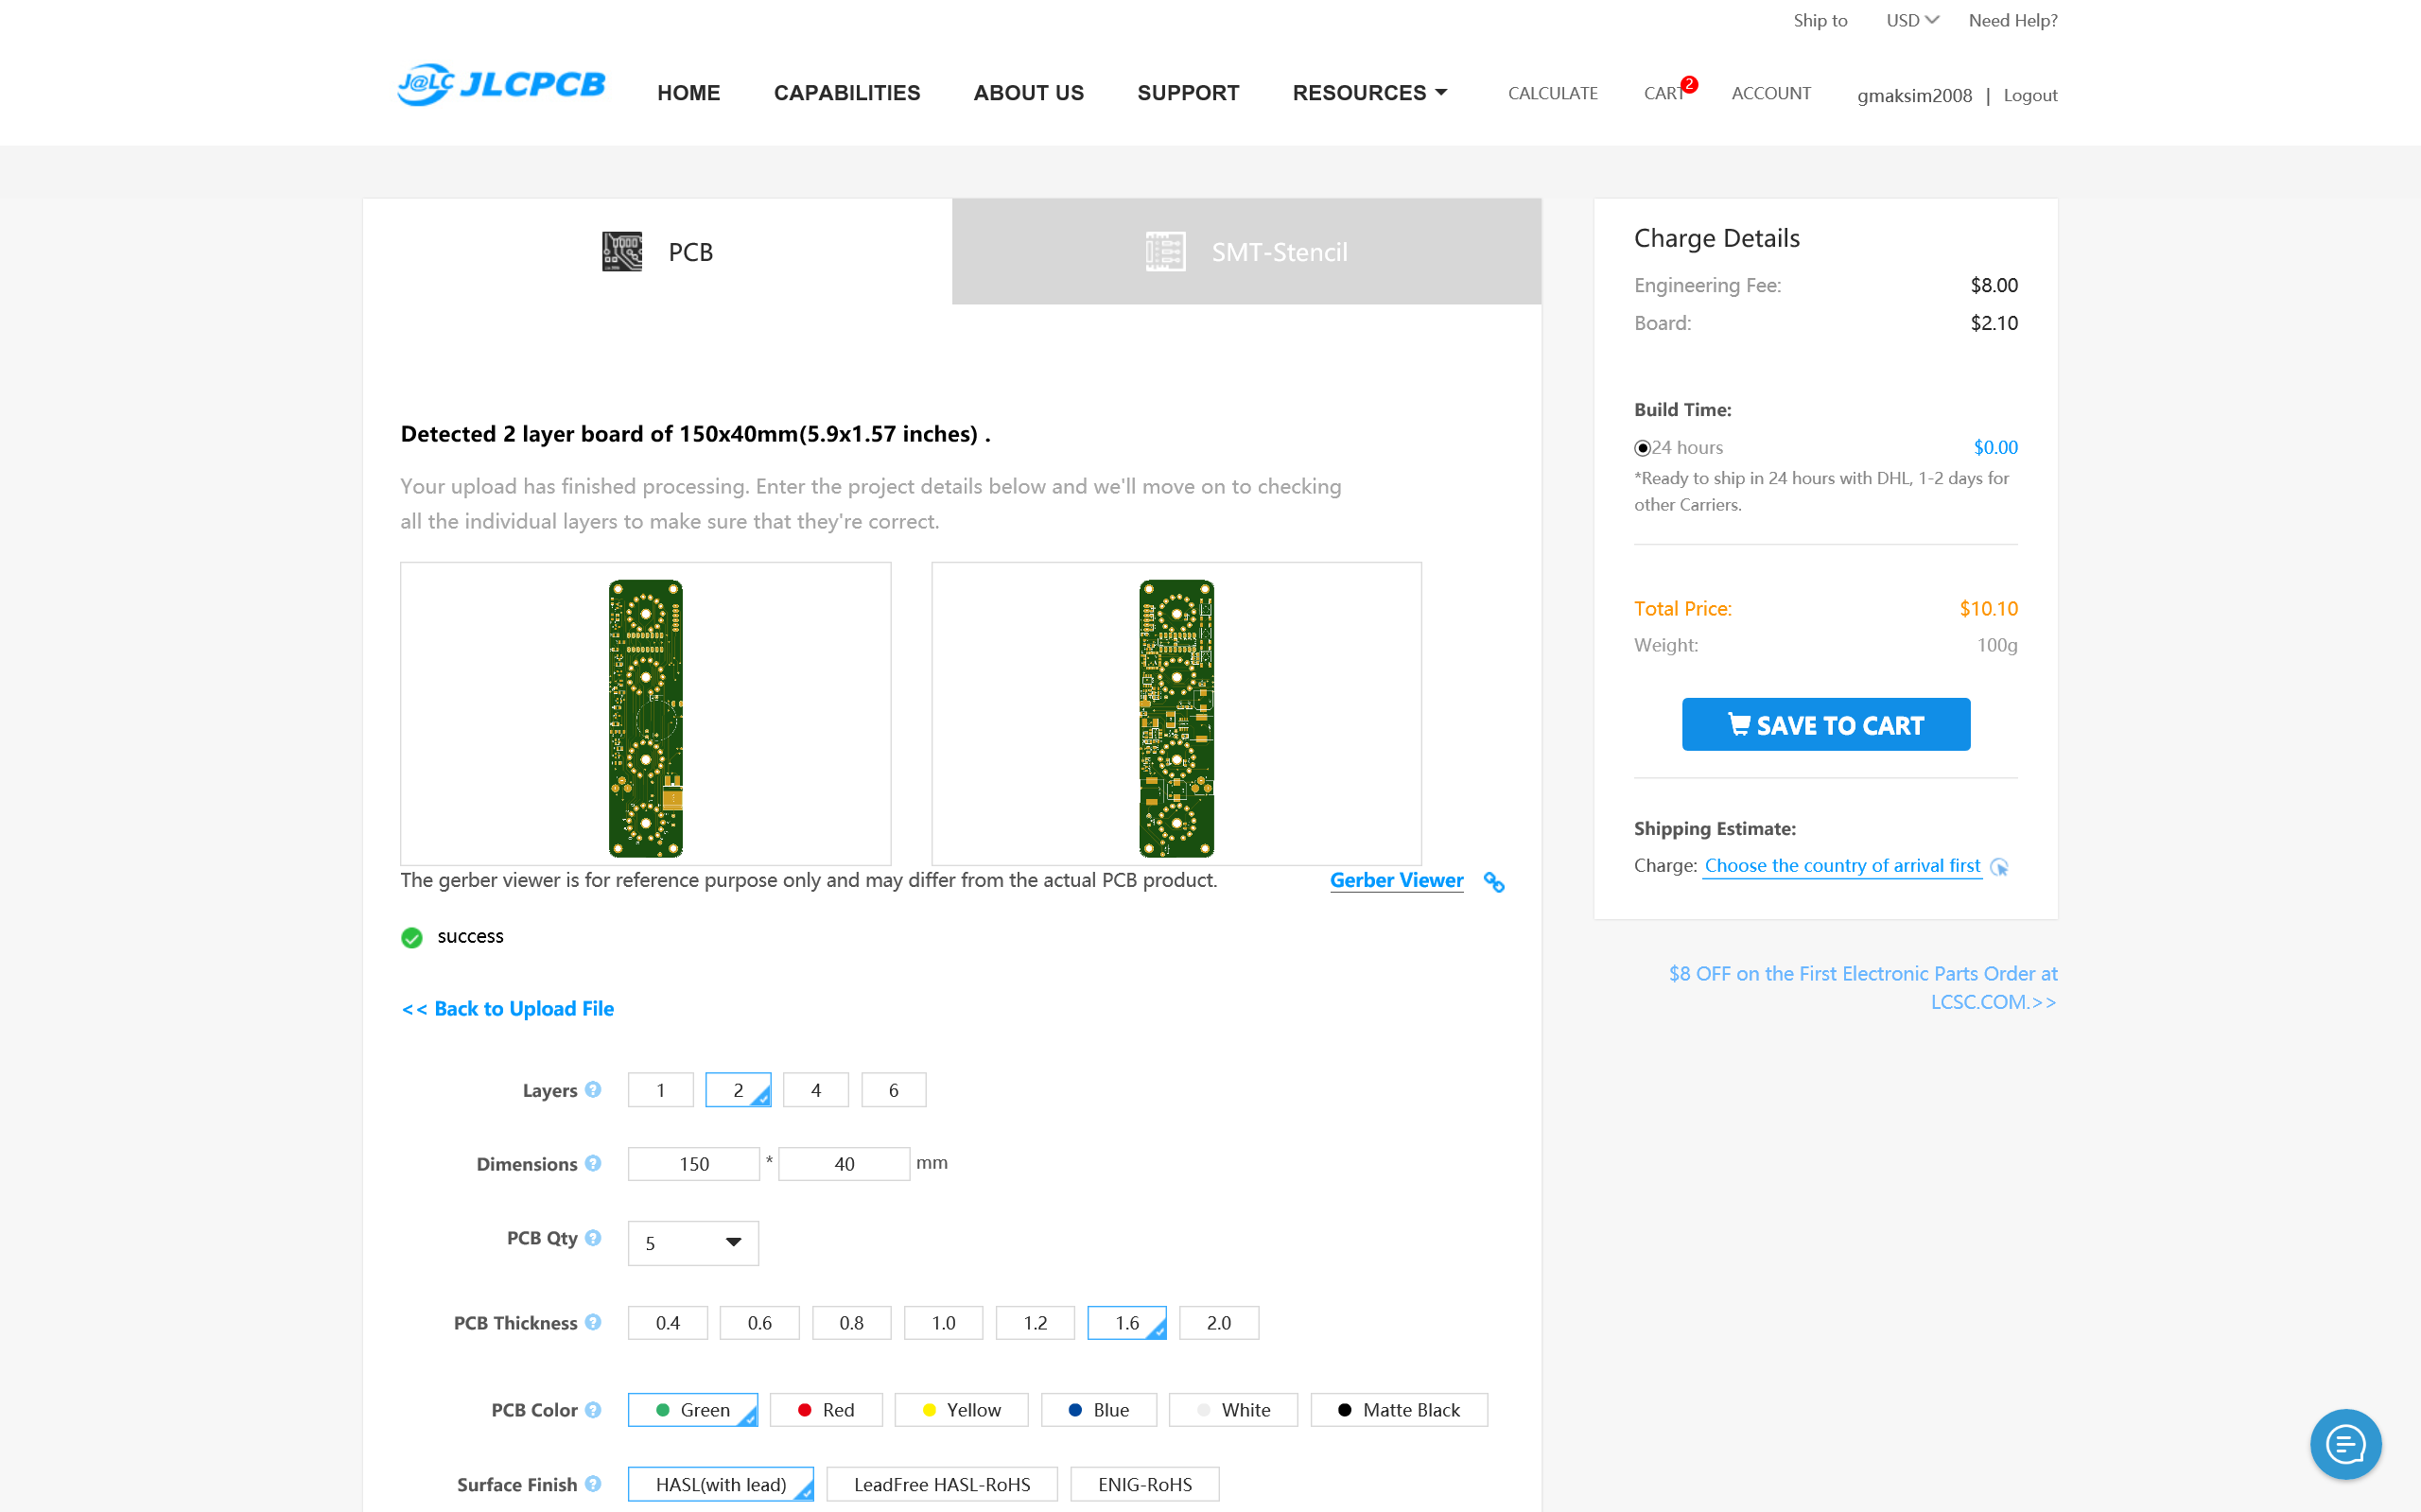
The price of five boards for hours with delivery will be about 1000r. (200 rubles for 1 piece), 10 boards about 1200 rubles. (120 rubles for 1 item). And it will be high-quality factory-made double-layer boards with silk-screen printing, mask and with metallization of holes.
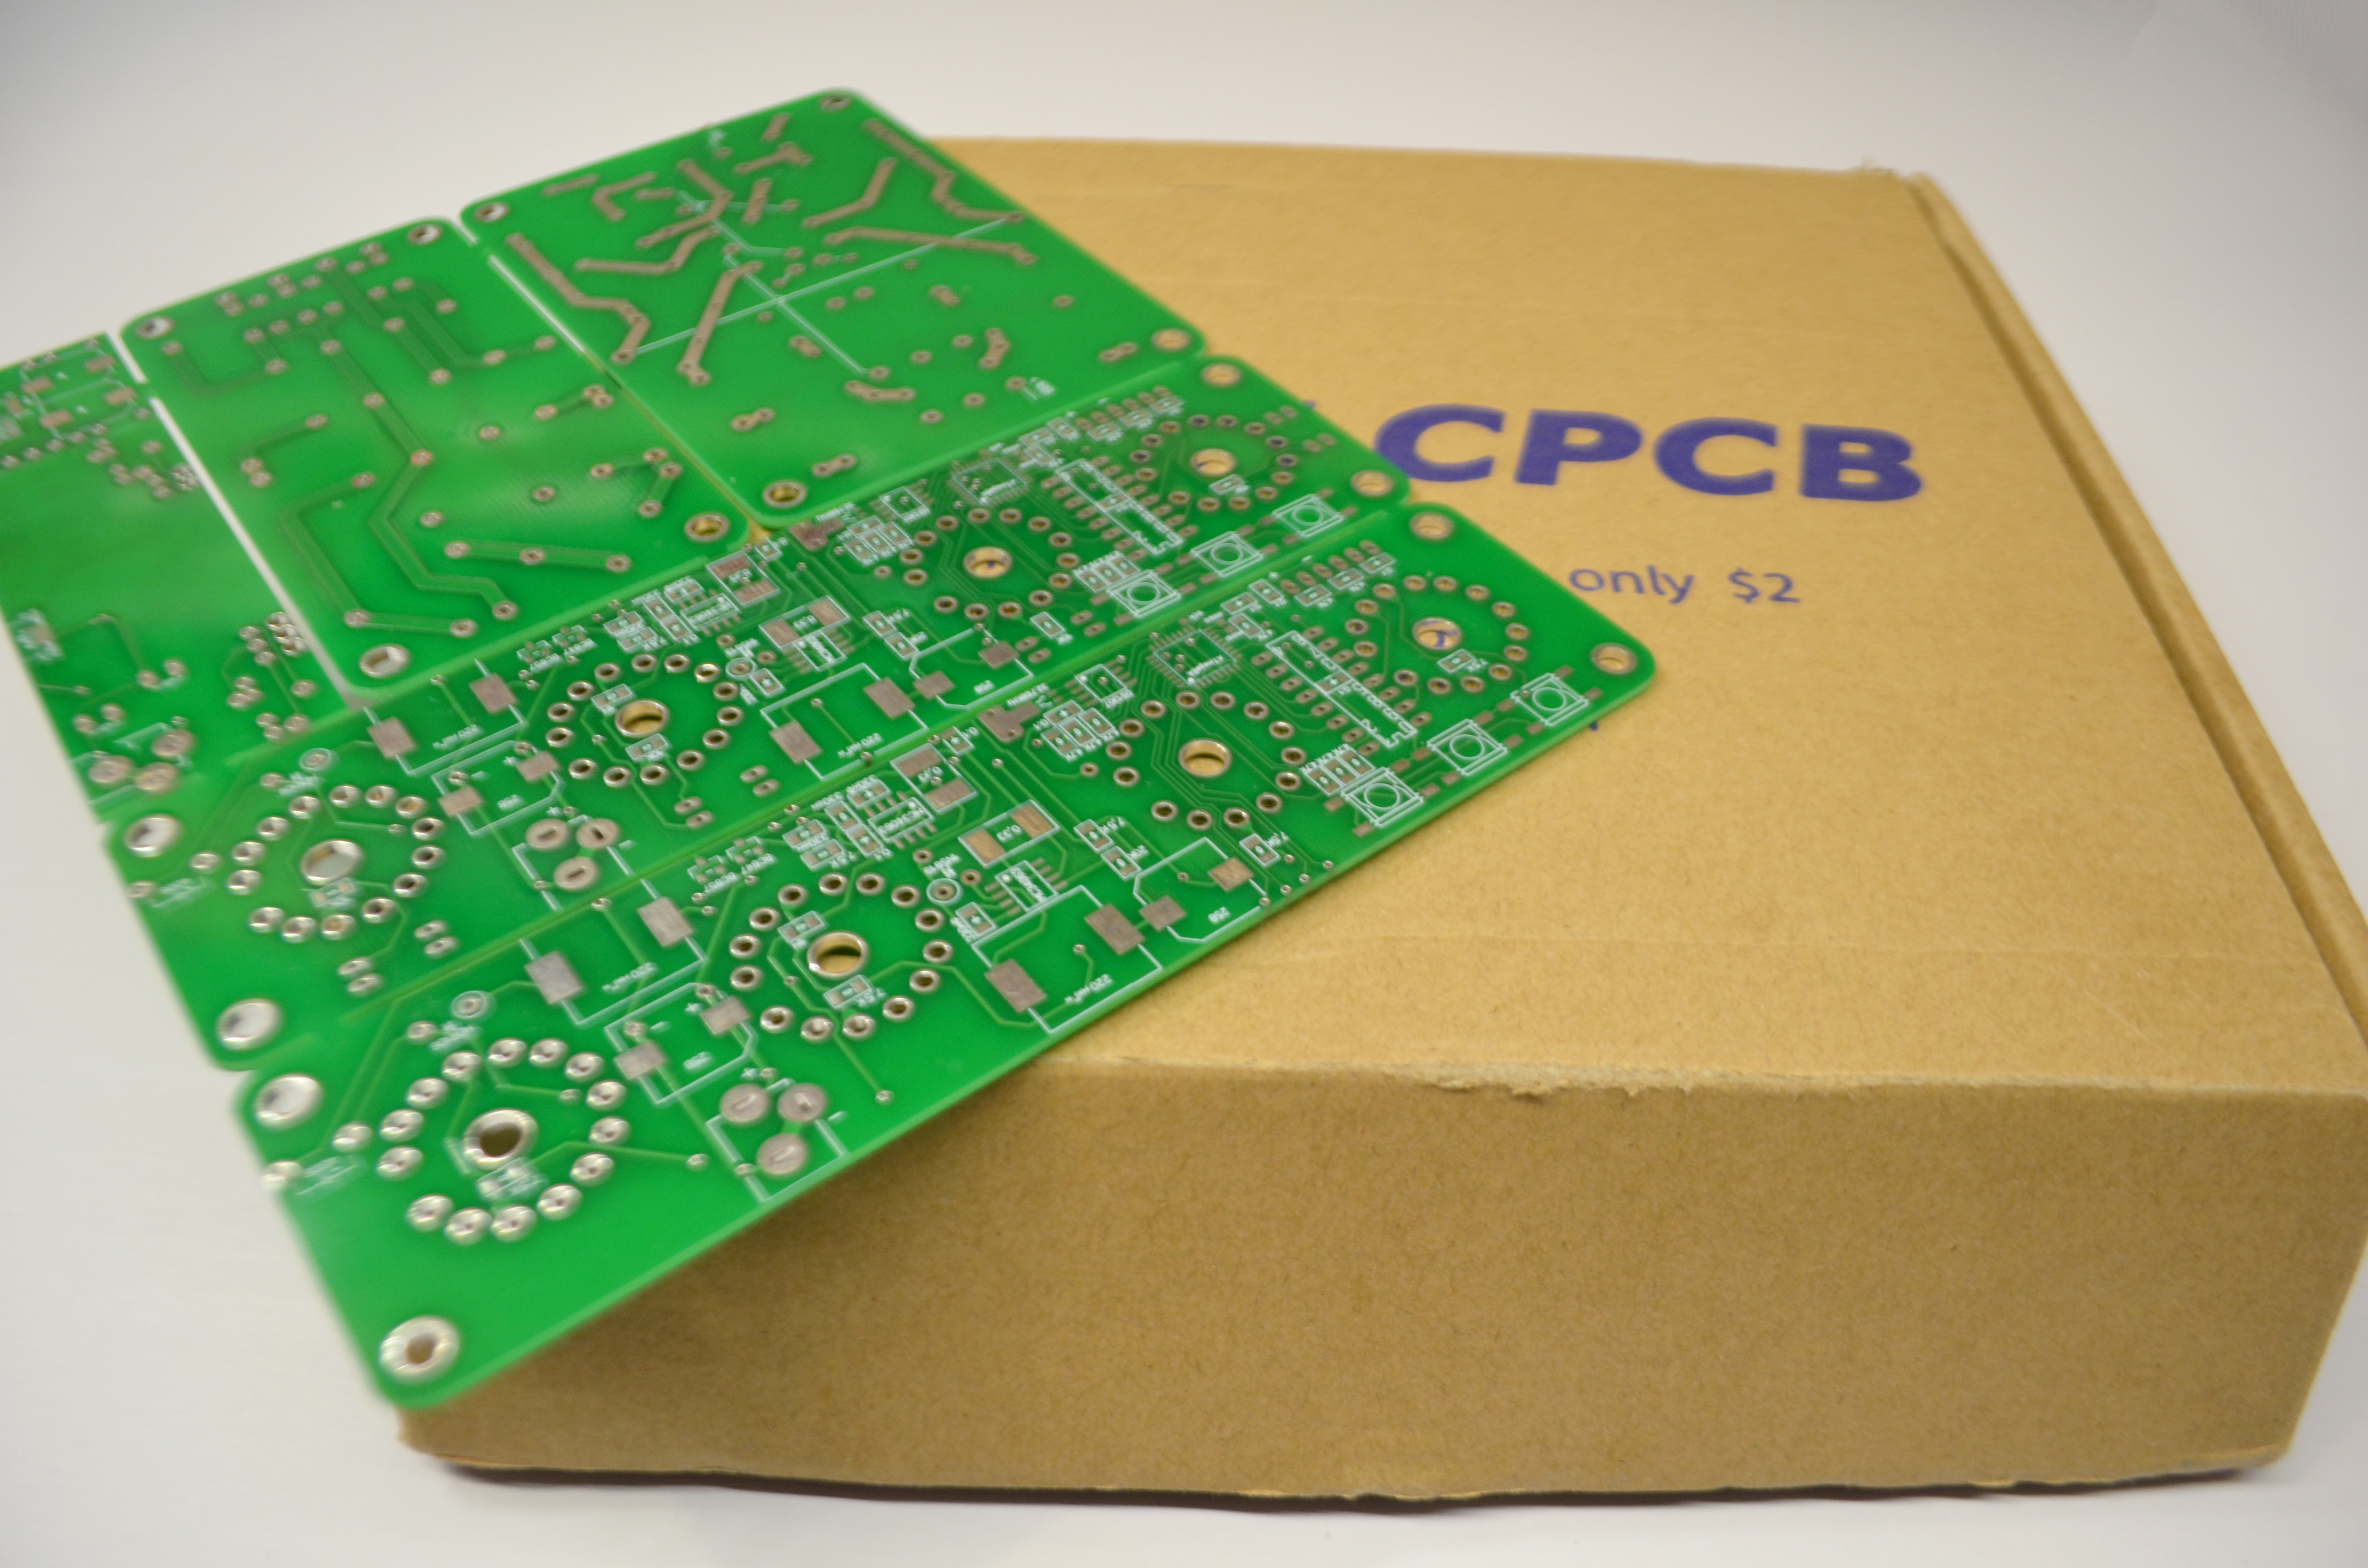
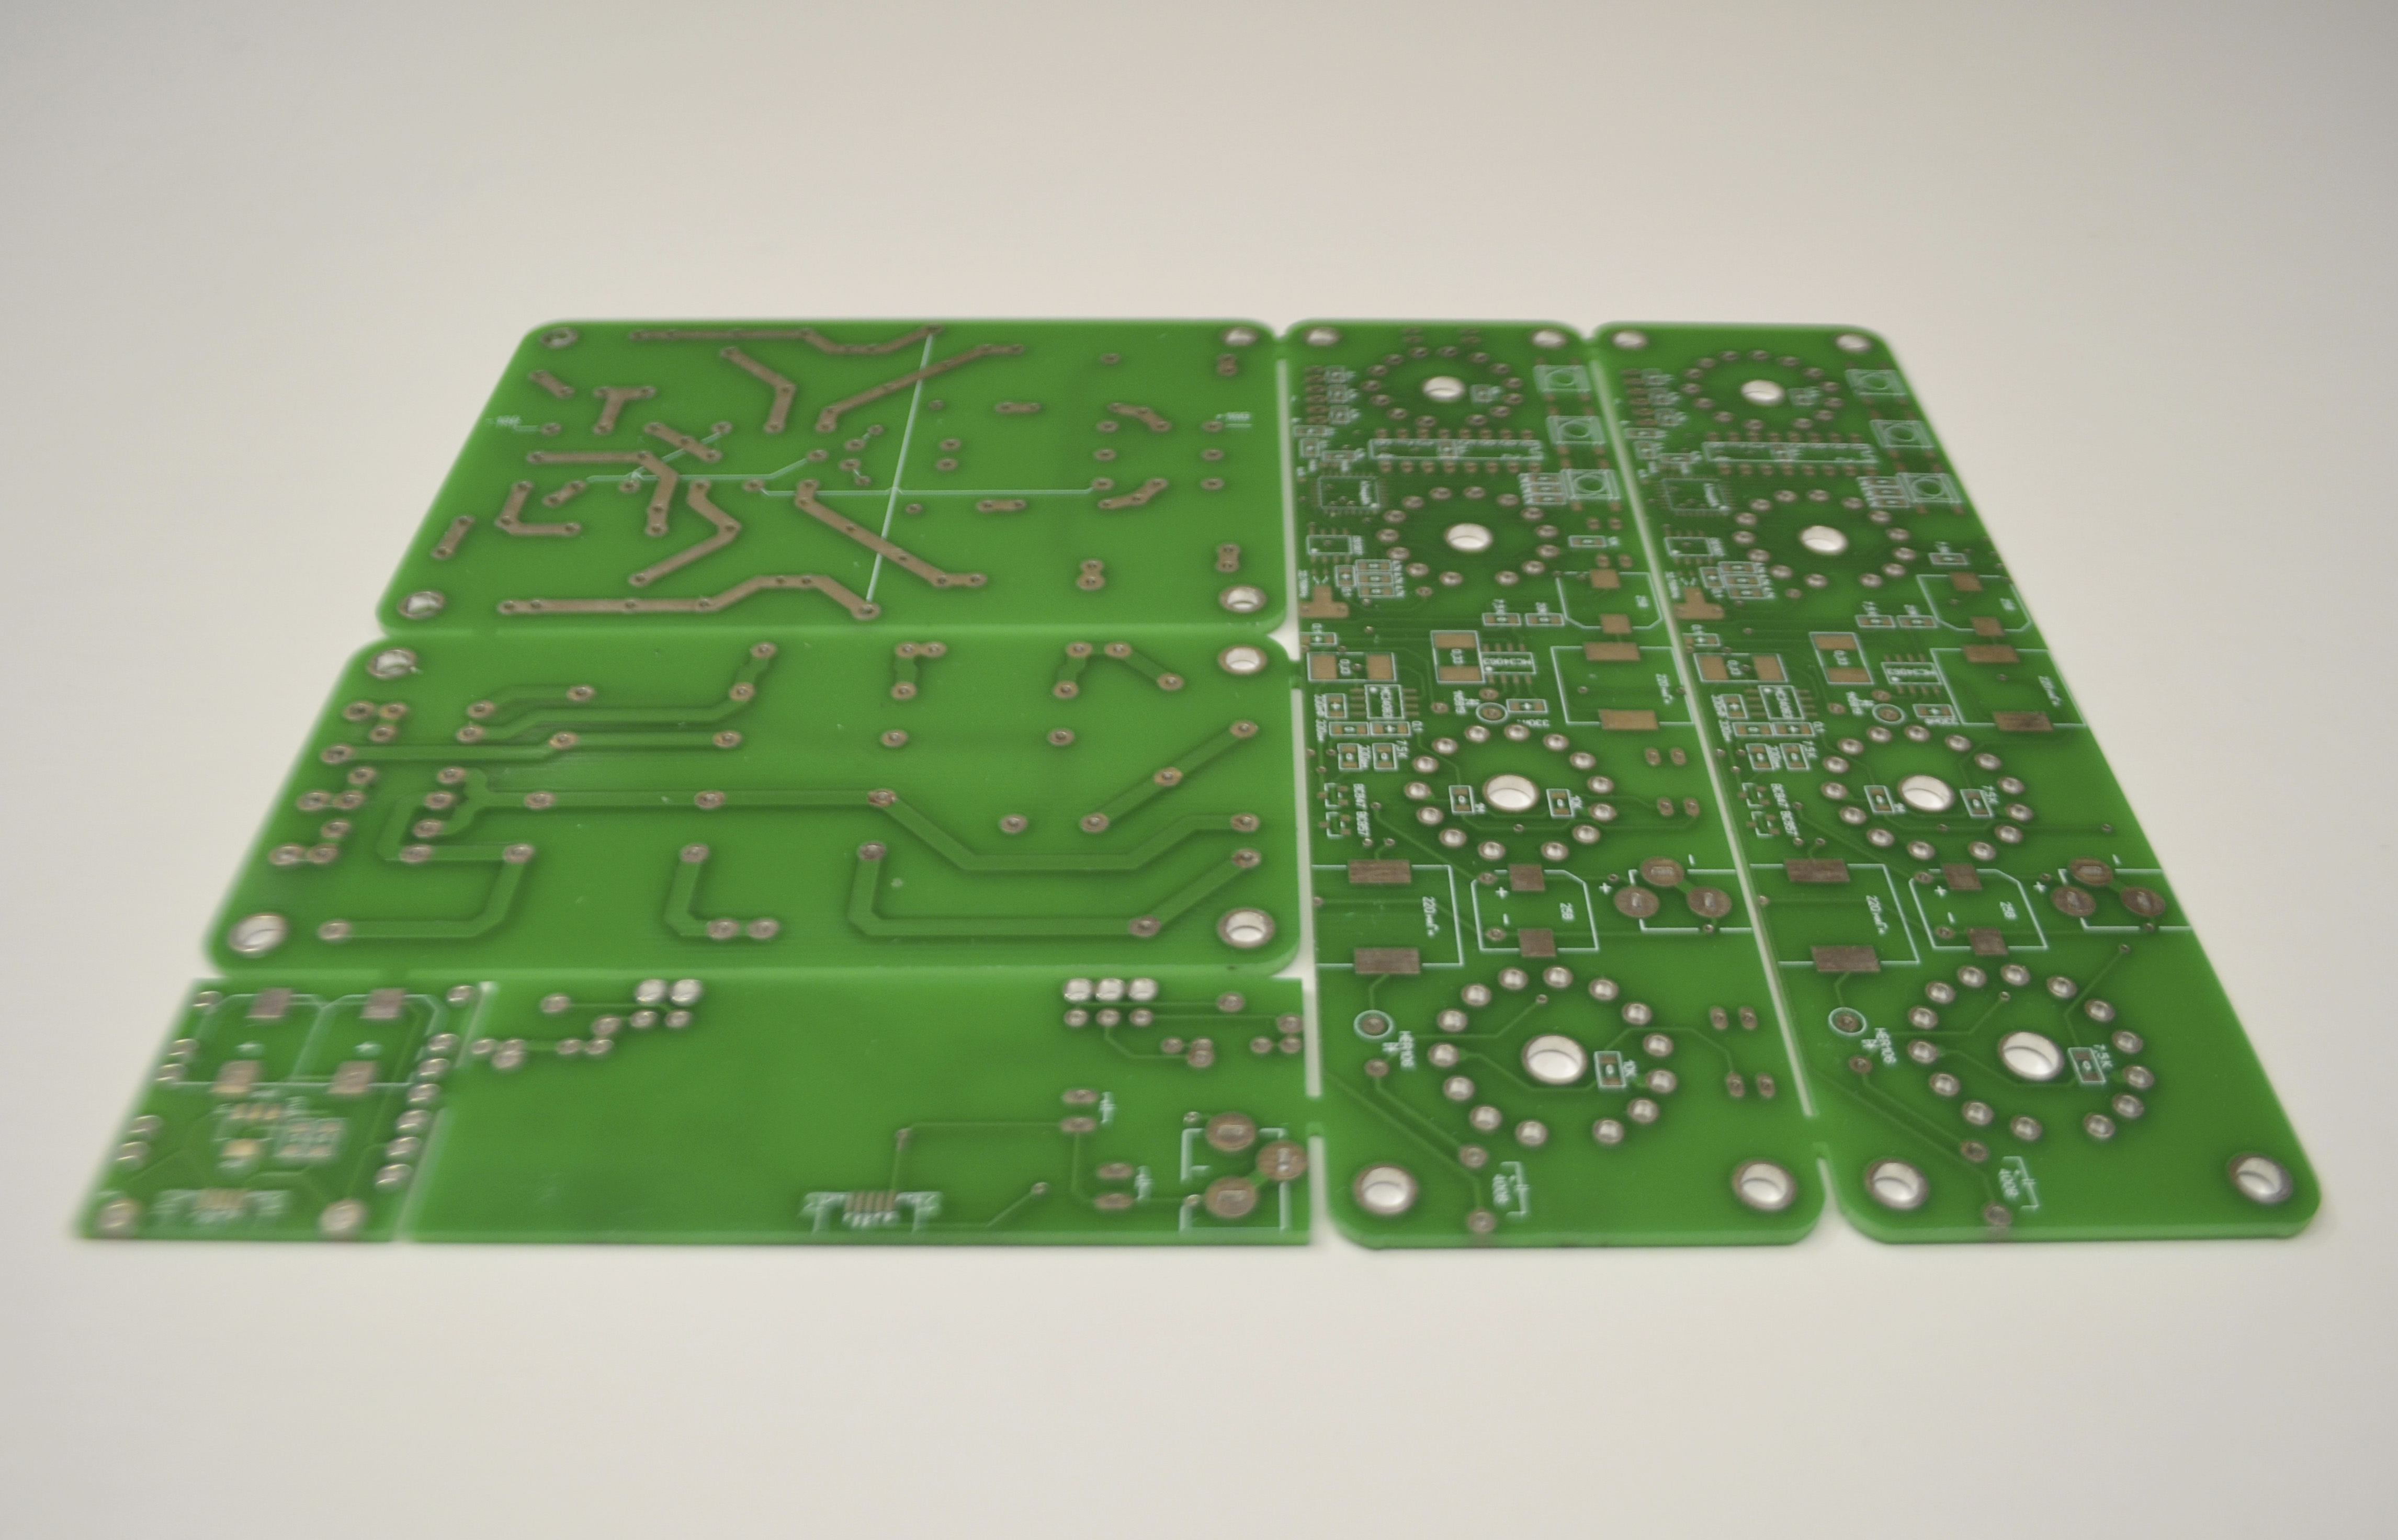
I have in order two versions of the clock (one with the anode keys on conventional transistors and the other on optocouplers) and the board for assembling the phono-corrector for 6n9s.
The most expensive is the gas-discharge indicators IN-18, the average cost of 2000 rubles, you can buy on Avito. About 5-7 years ago, the price for them was 200-350 rubles (judging by the forums).
Searching, found the manufacturer of gas-discharge indicators daliborfarny.com, the cost is similar to in-18 lamps - $ 145.
On his YouTube channel Dalibor Farný there are interesting videos with the full process of lamp production.
The remaining radio components are not uncommon and you can buy them at any radio shop. I bought the chip resistors and capacitors on AliExpress. I bought a real-time chip, also on AliExpress, as a module with quartz and a battery.

As a solder for the microcontroller and some components, I used HK-MECHANIC-XG-Z40 (also bought on AliExpress) and a soldering dryer.

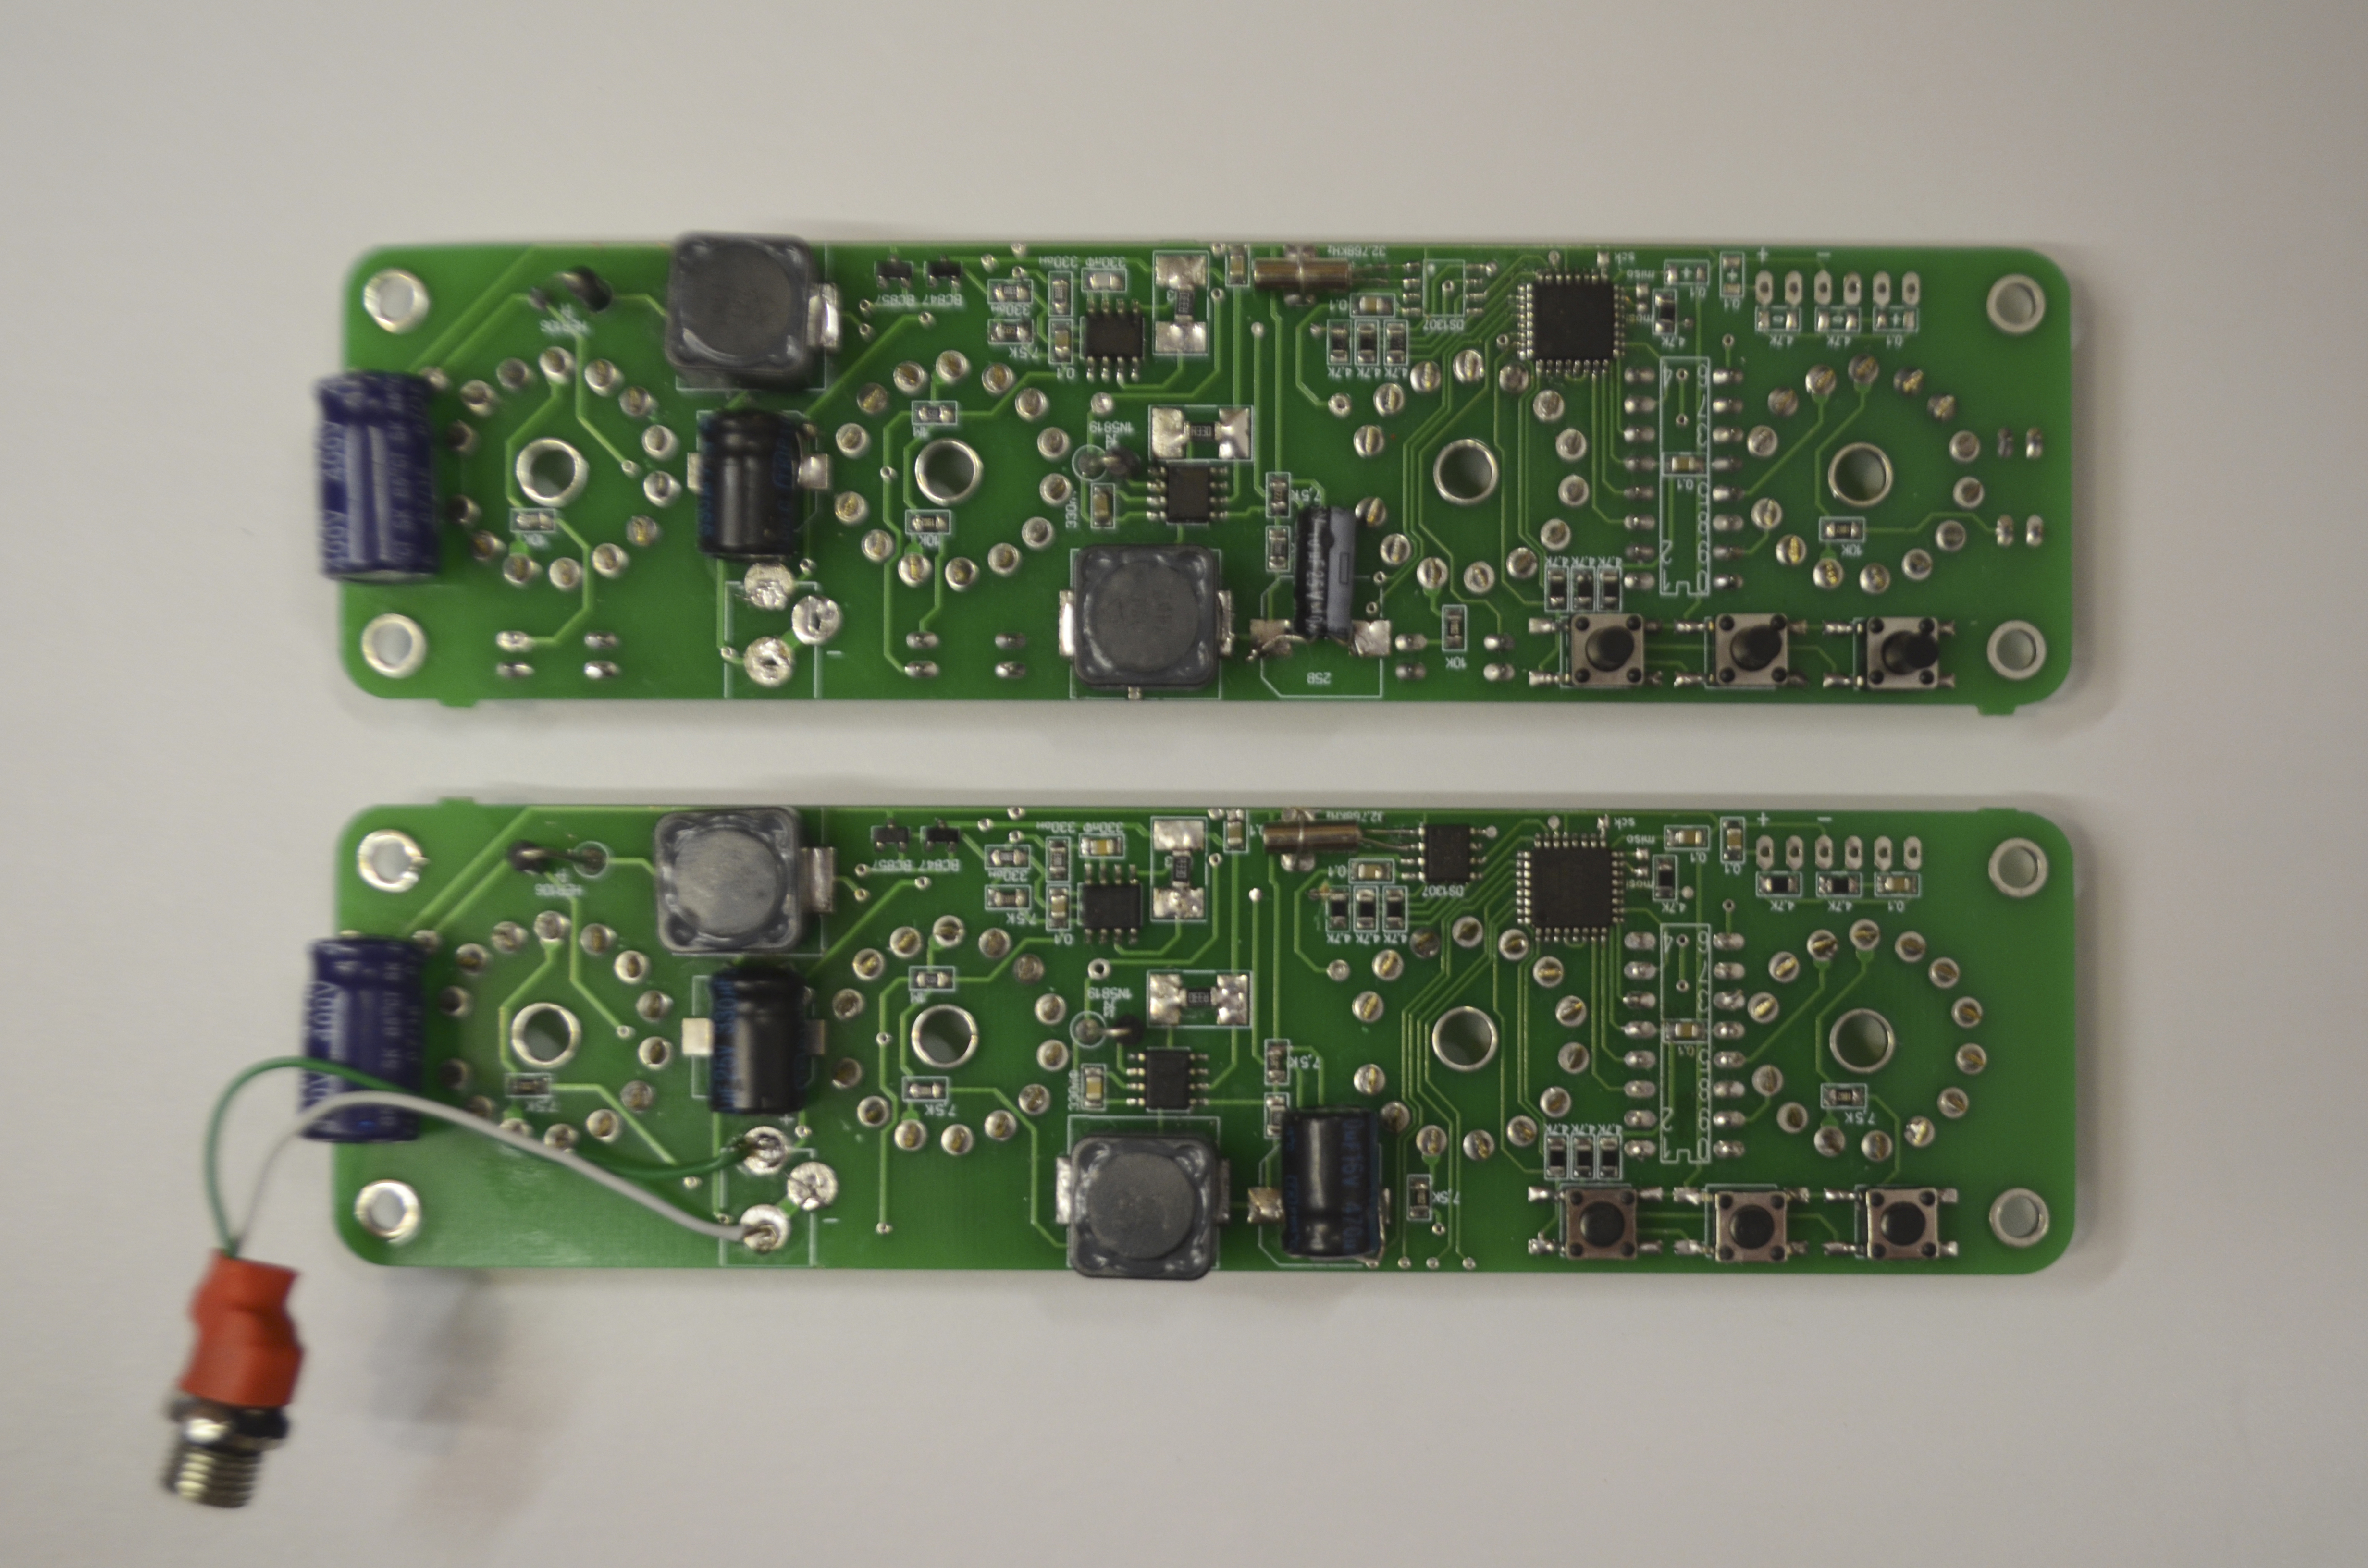
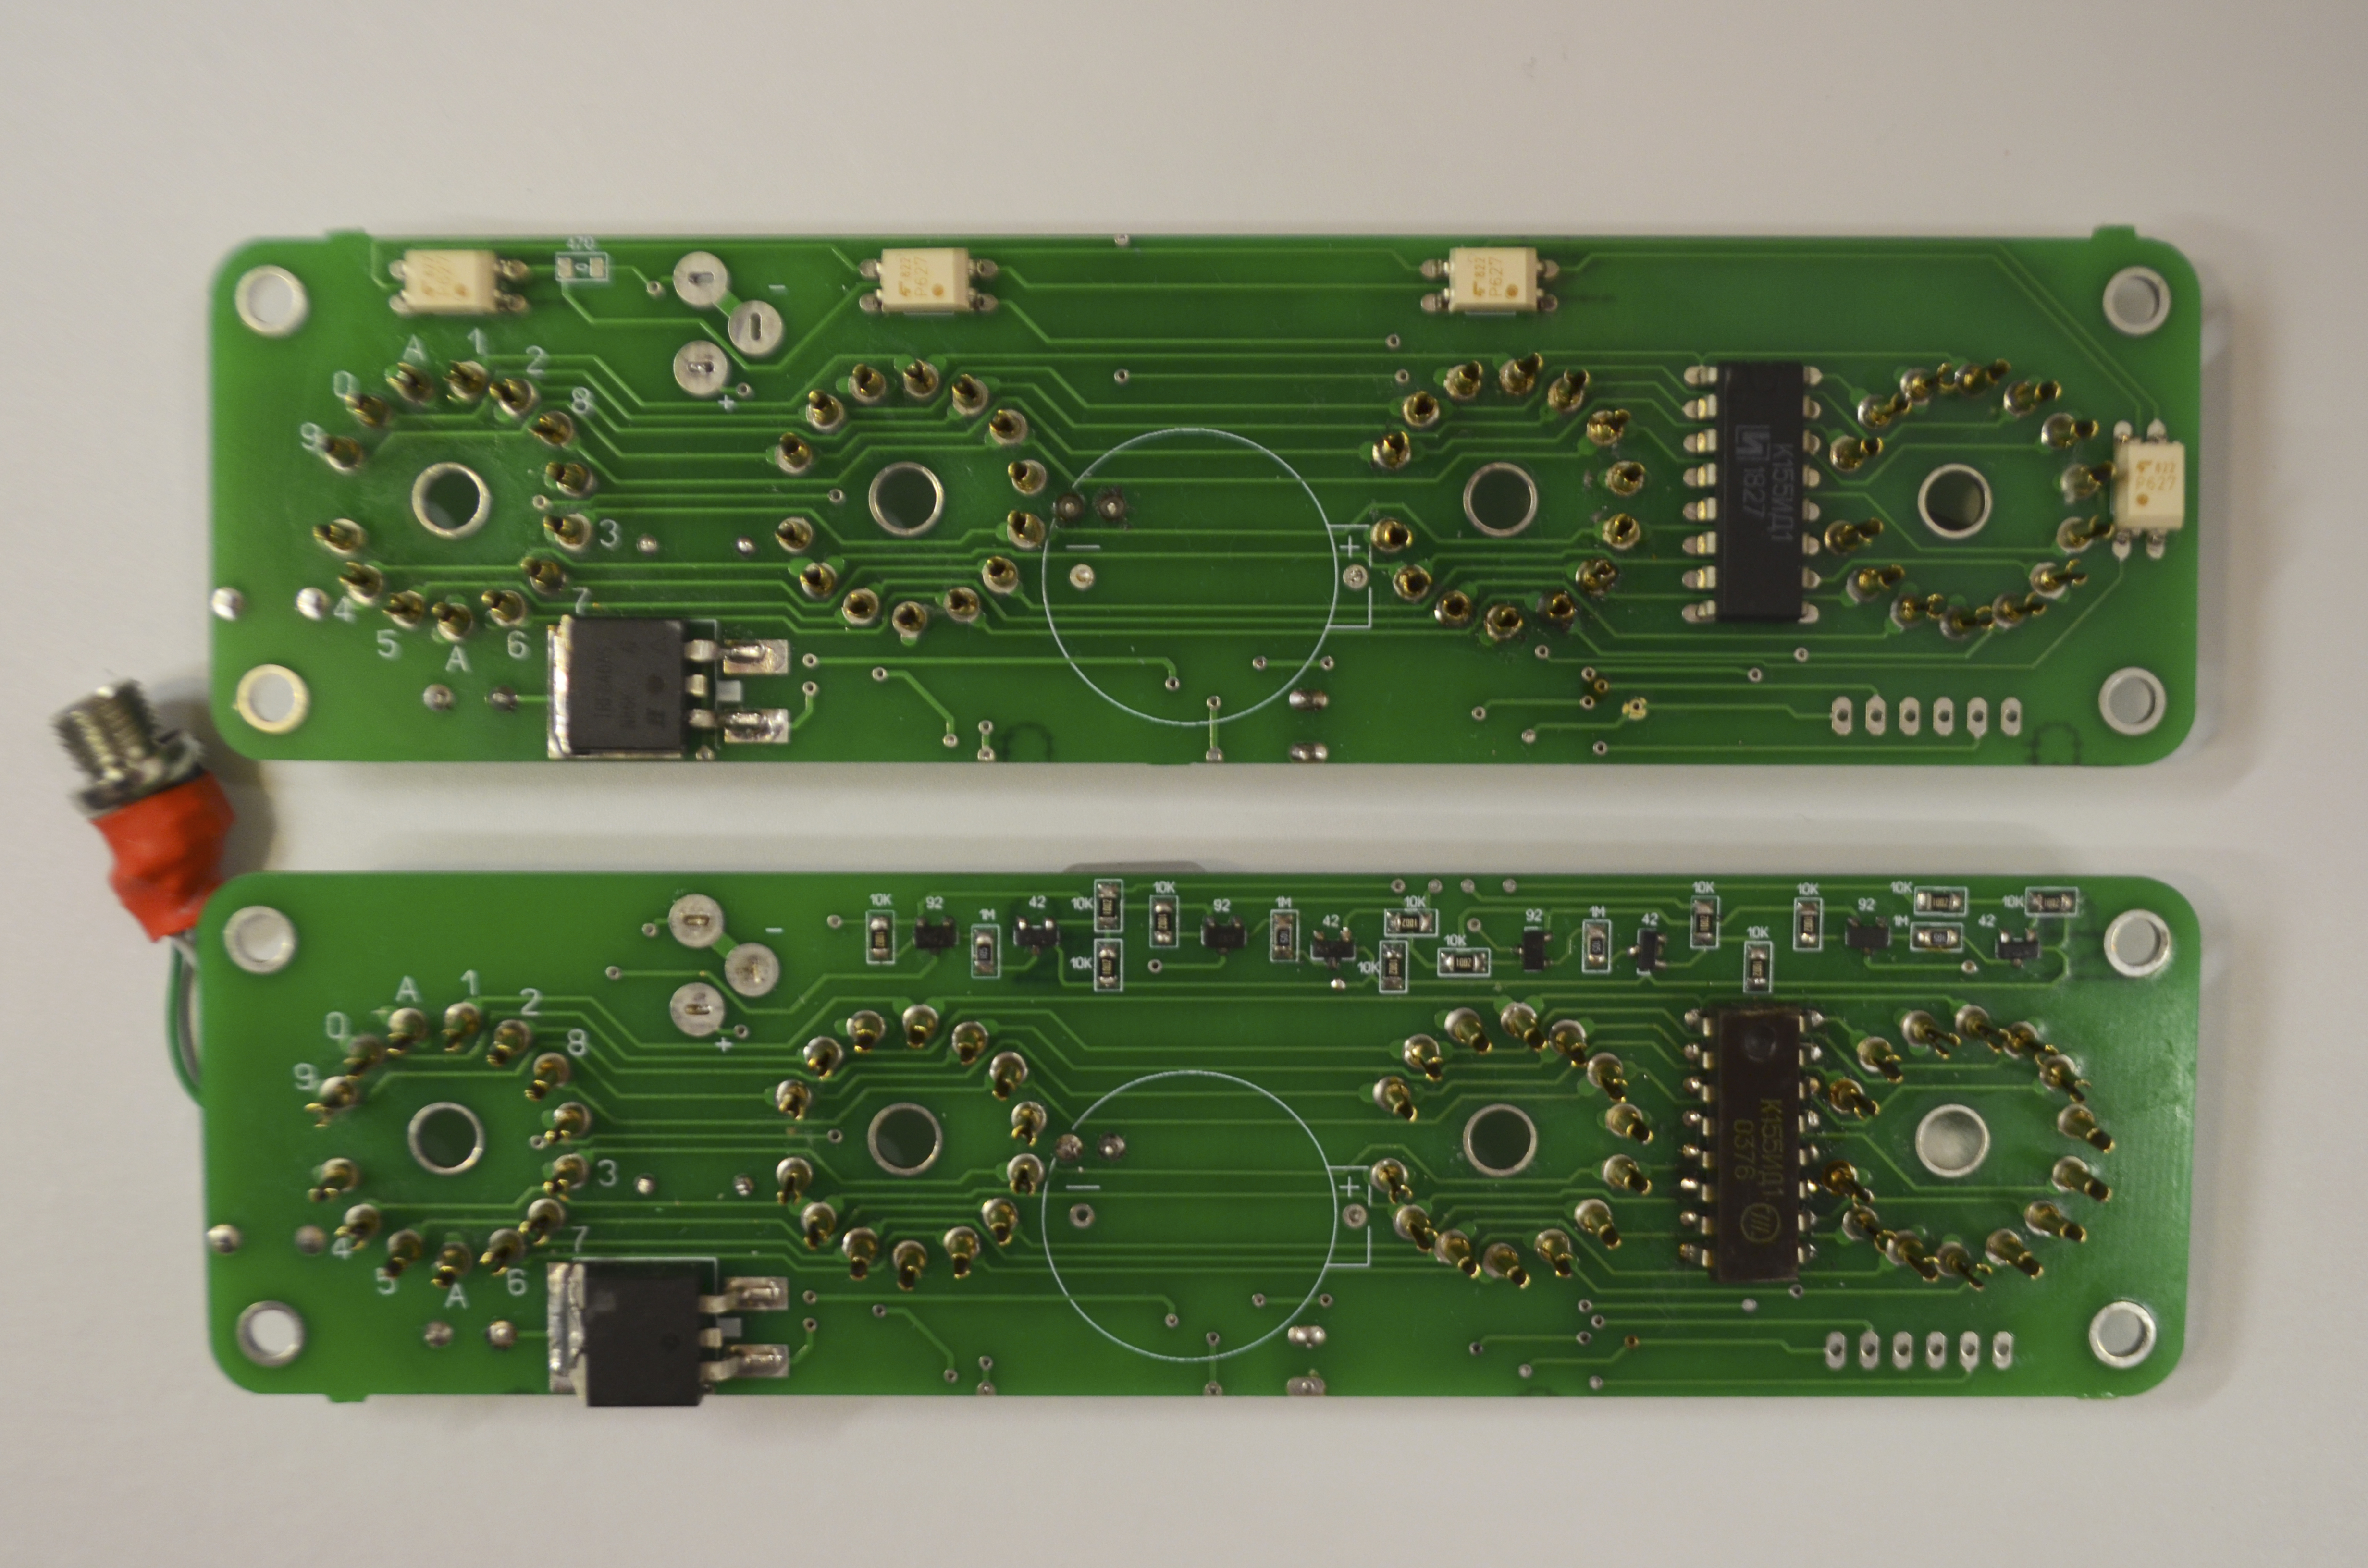
Connectors for lamps can be made, for example, from the contacts DPBS-25F. The microcontroller and the DS1307 clock should be soldered after the assembly and testing of the 5V and 170V power supplies. You can set the voltage by changing the resistance values

The process is not very complicated, the components on the board are all signed. I took the assembly about 3h.
At this stage, you need a programmer, you can also buy it on AliExpress for 120 rubles or at a radio store, but it will be more expensive.
To the assembled board we solder the contacts of the programmer (miso, mosi, rst, sck, gnd, + 5V).

Then you can use for example avrdudeprog, this is a software shell for firmware MK.
Run the program. On the program tab, select the atmega 8 microcontroller, select the firmware, usbars programmer. On the fuses tab, install the D9xD4 fuses
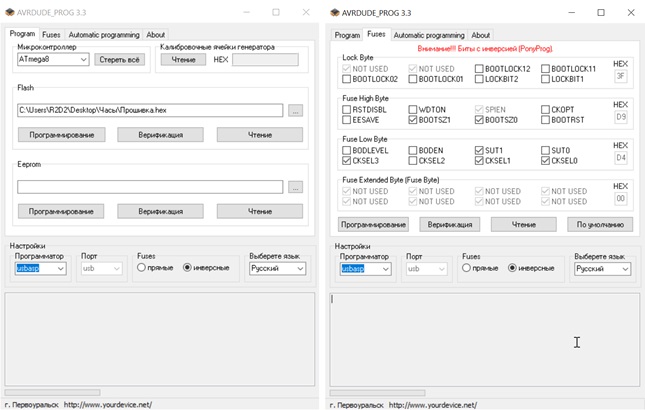
We press the button programming.
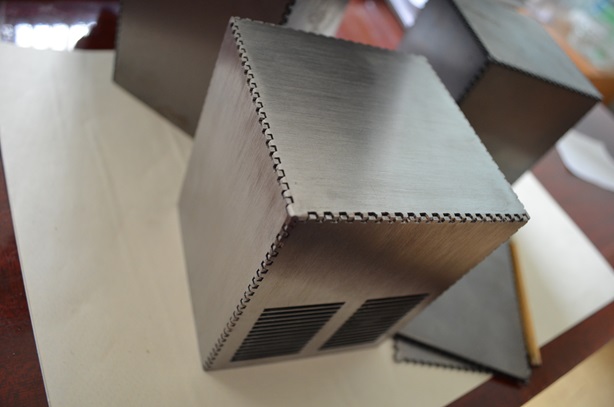
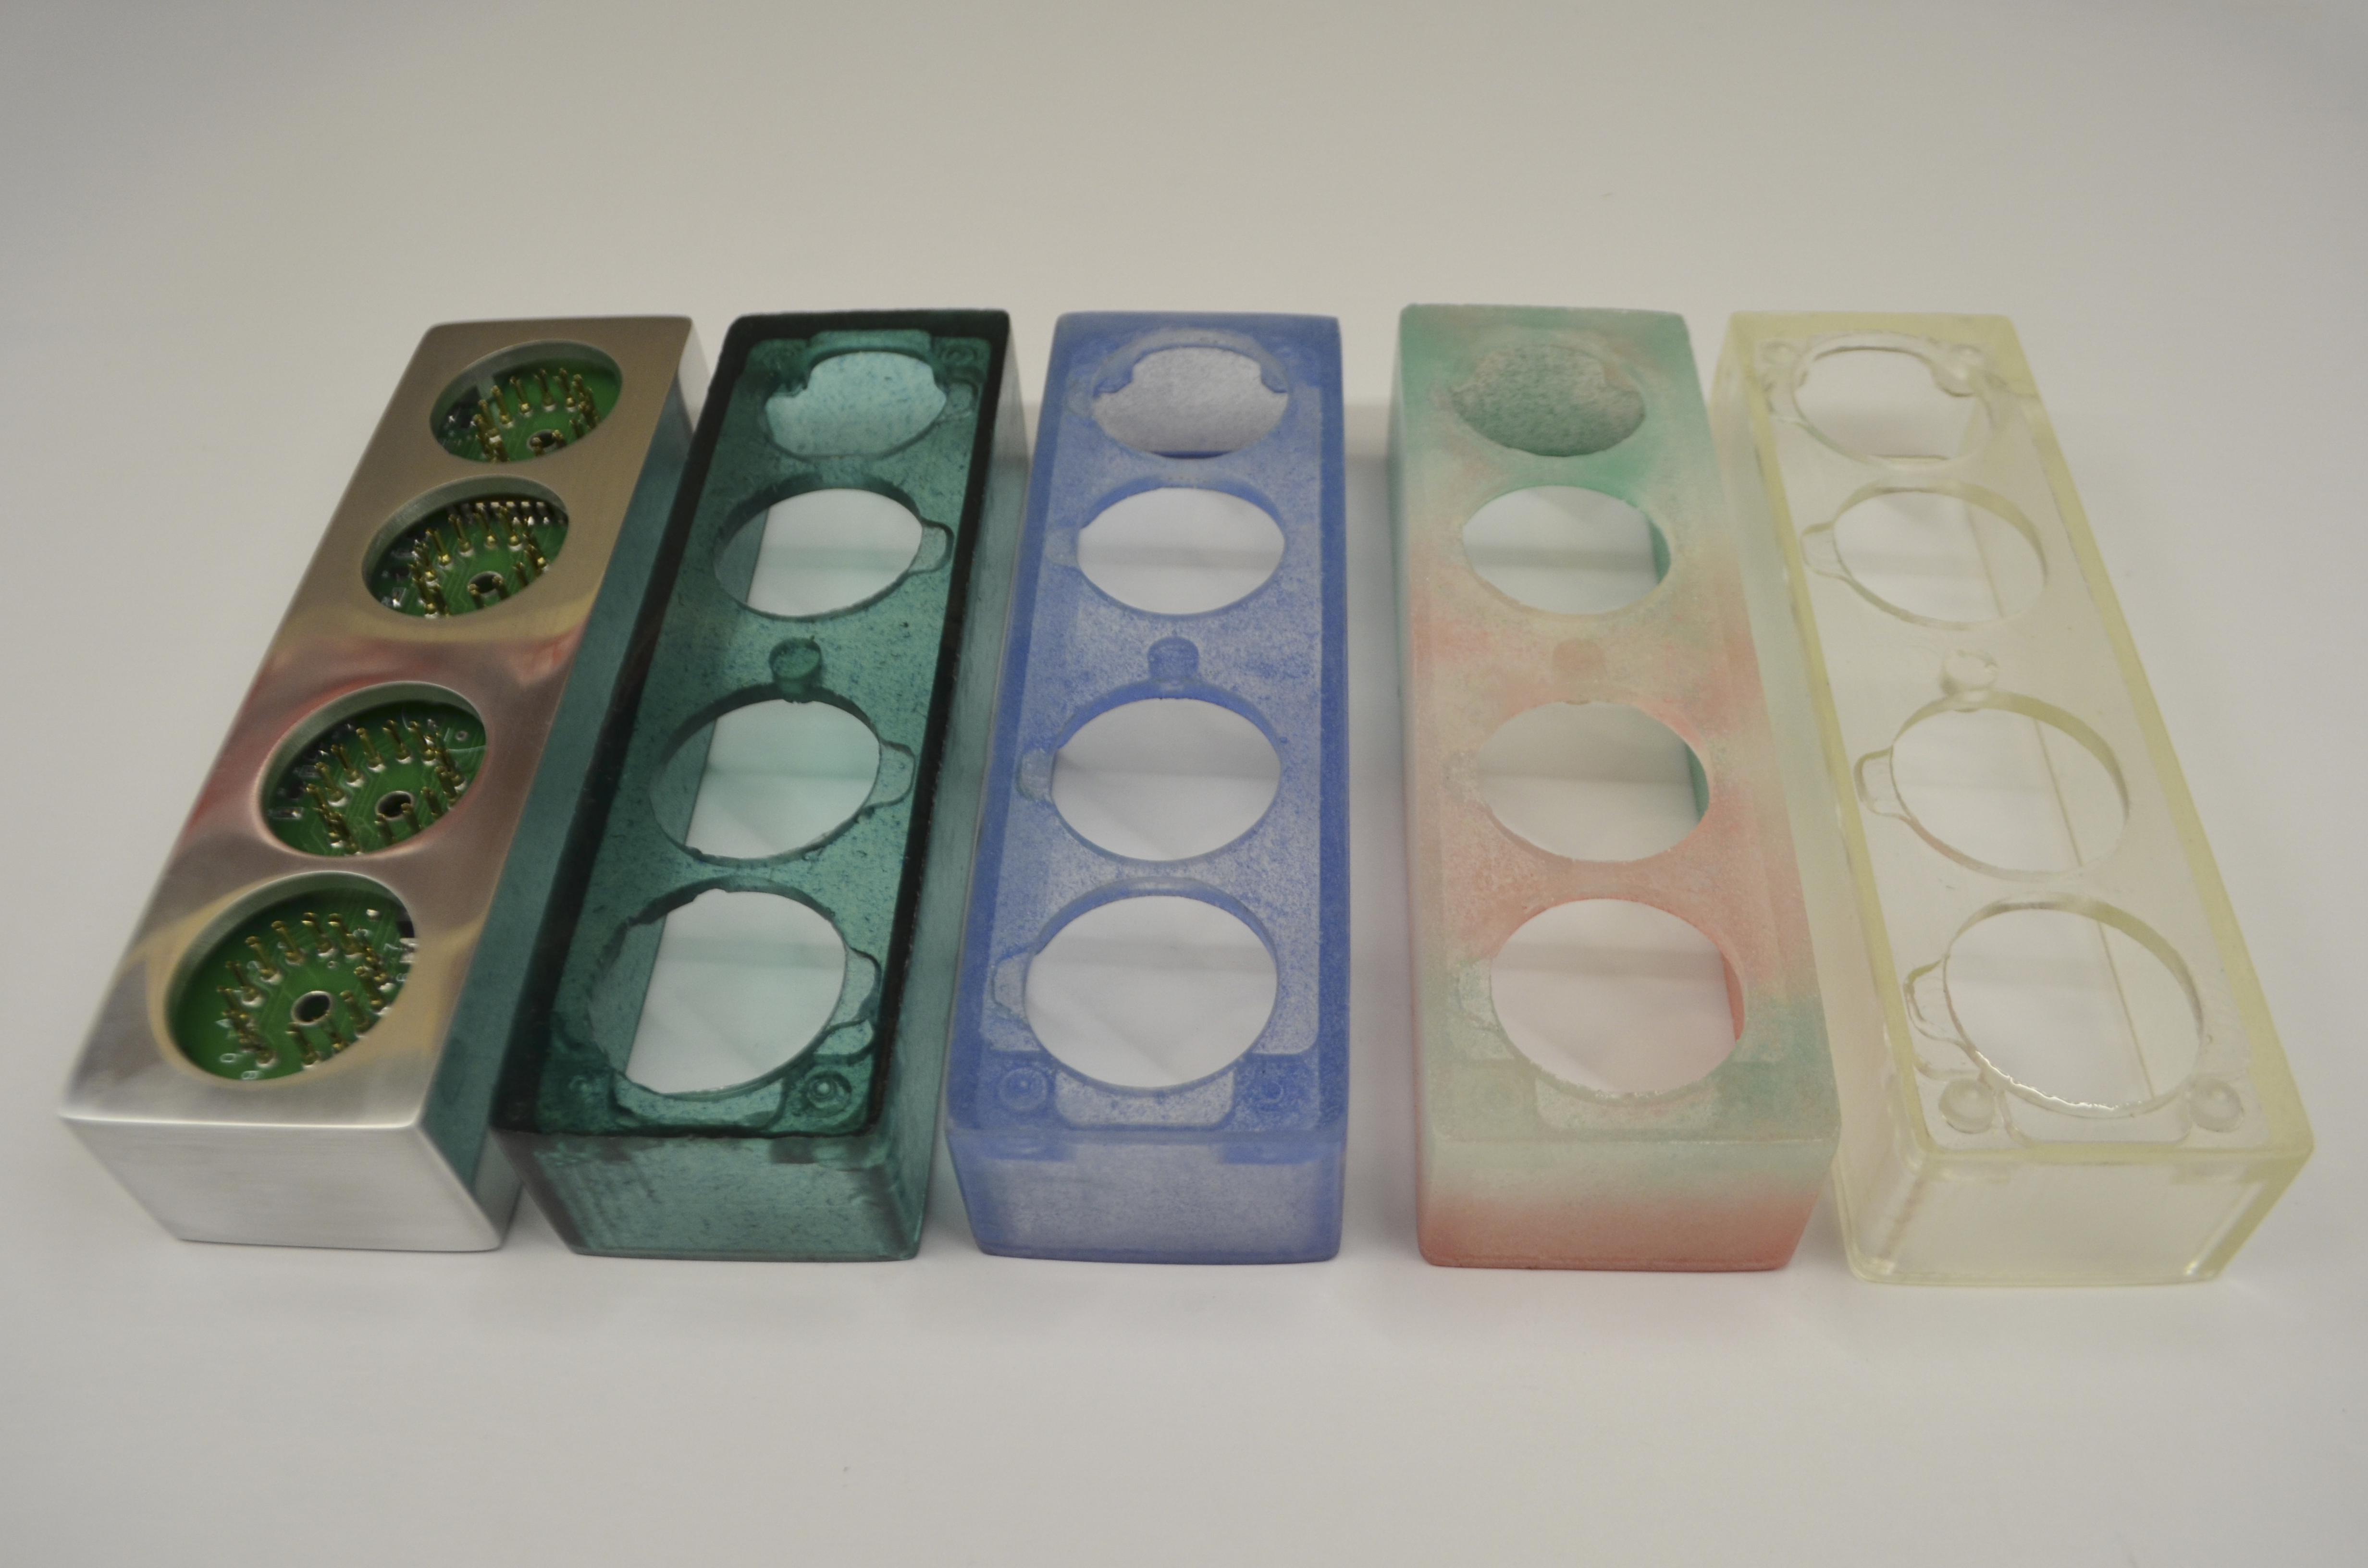
The first case. Made of aluminum, but you can use any material. It is assembled from 6 plates cut by a laser. Interconnected "in the spike."
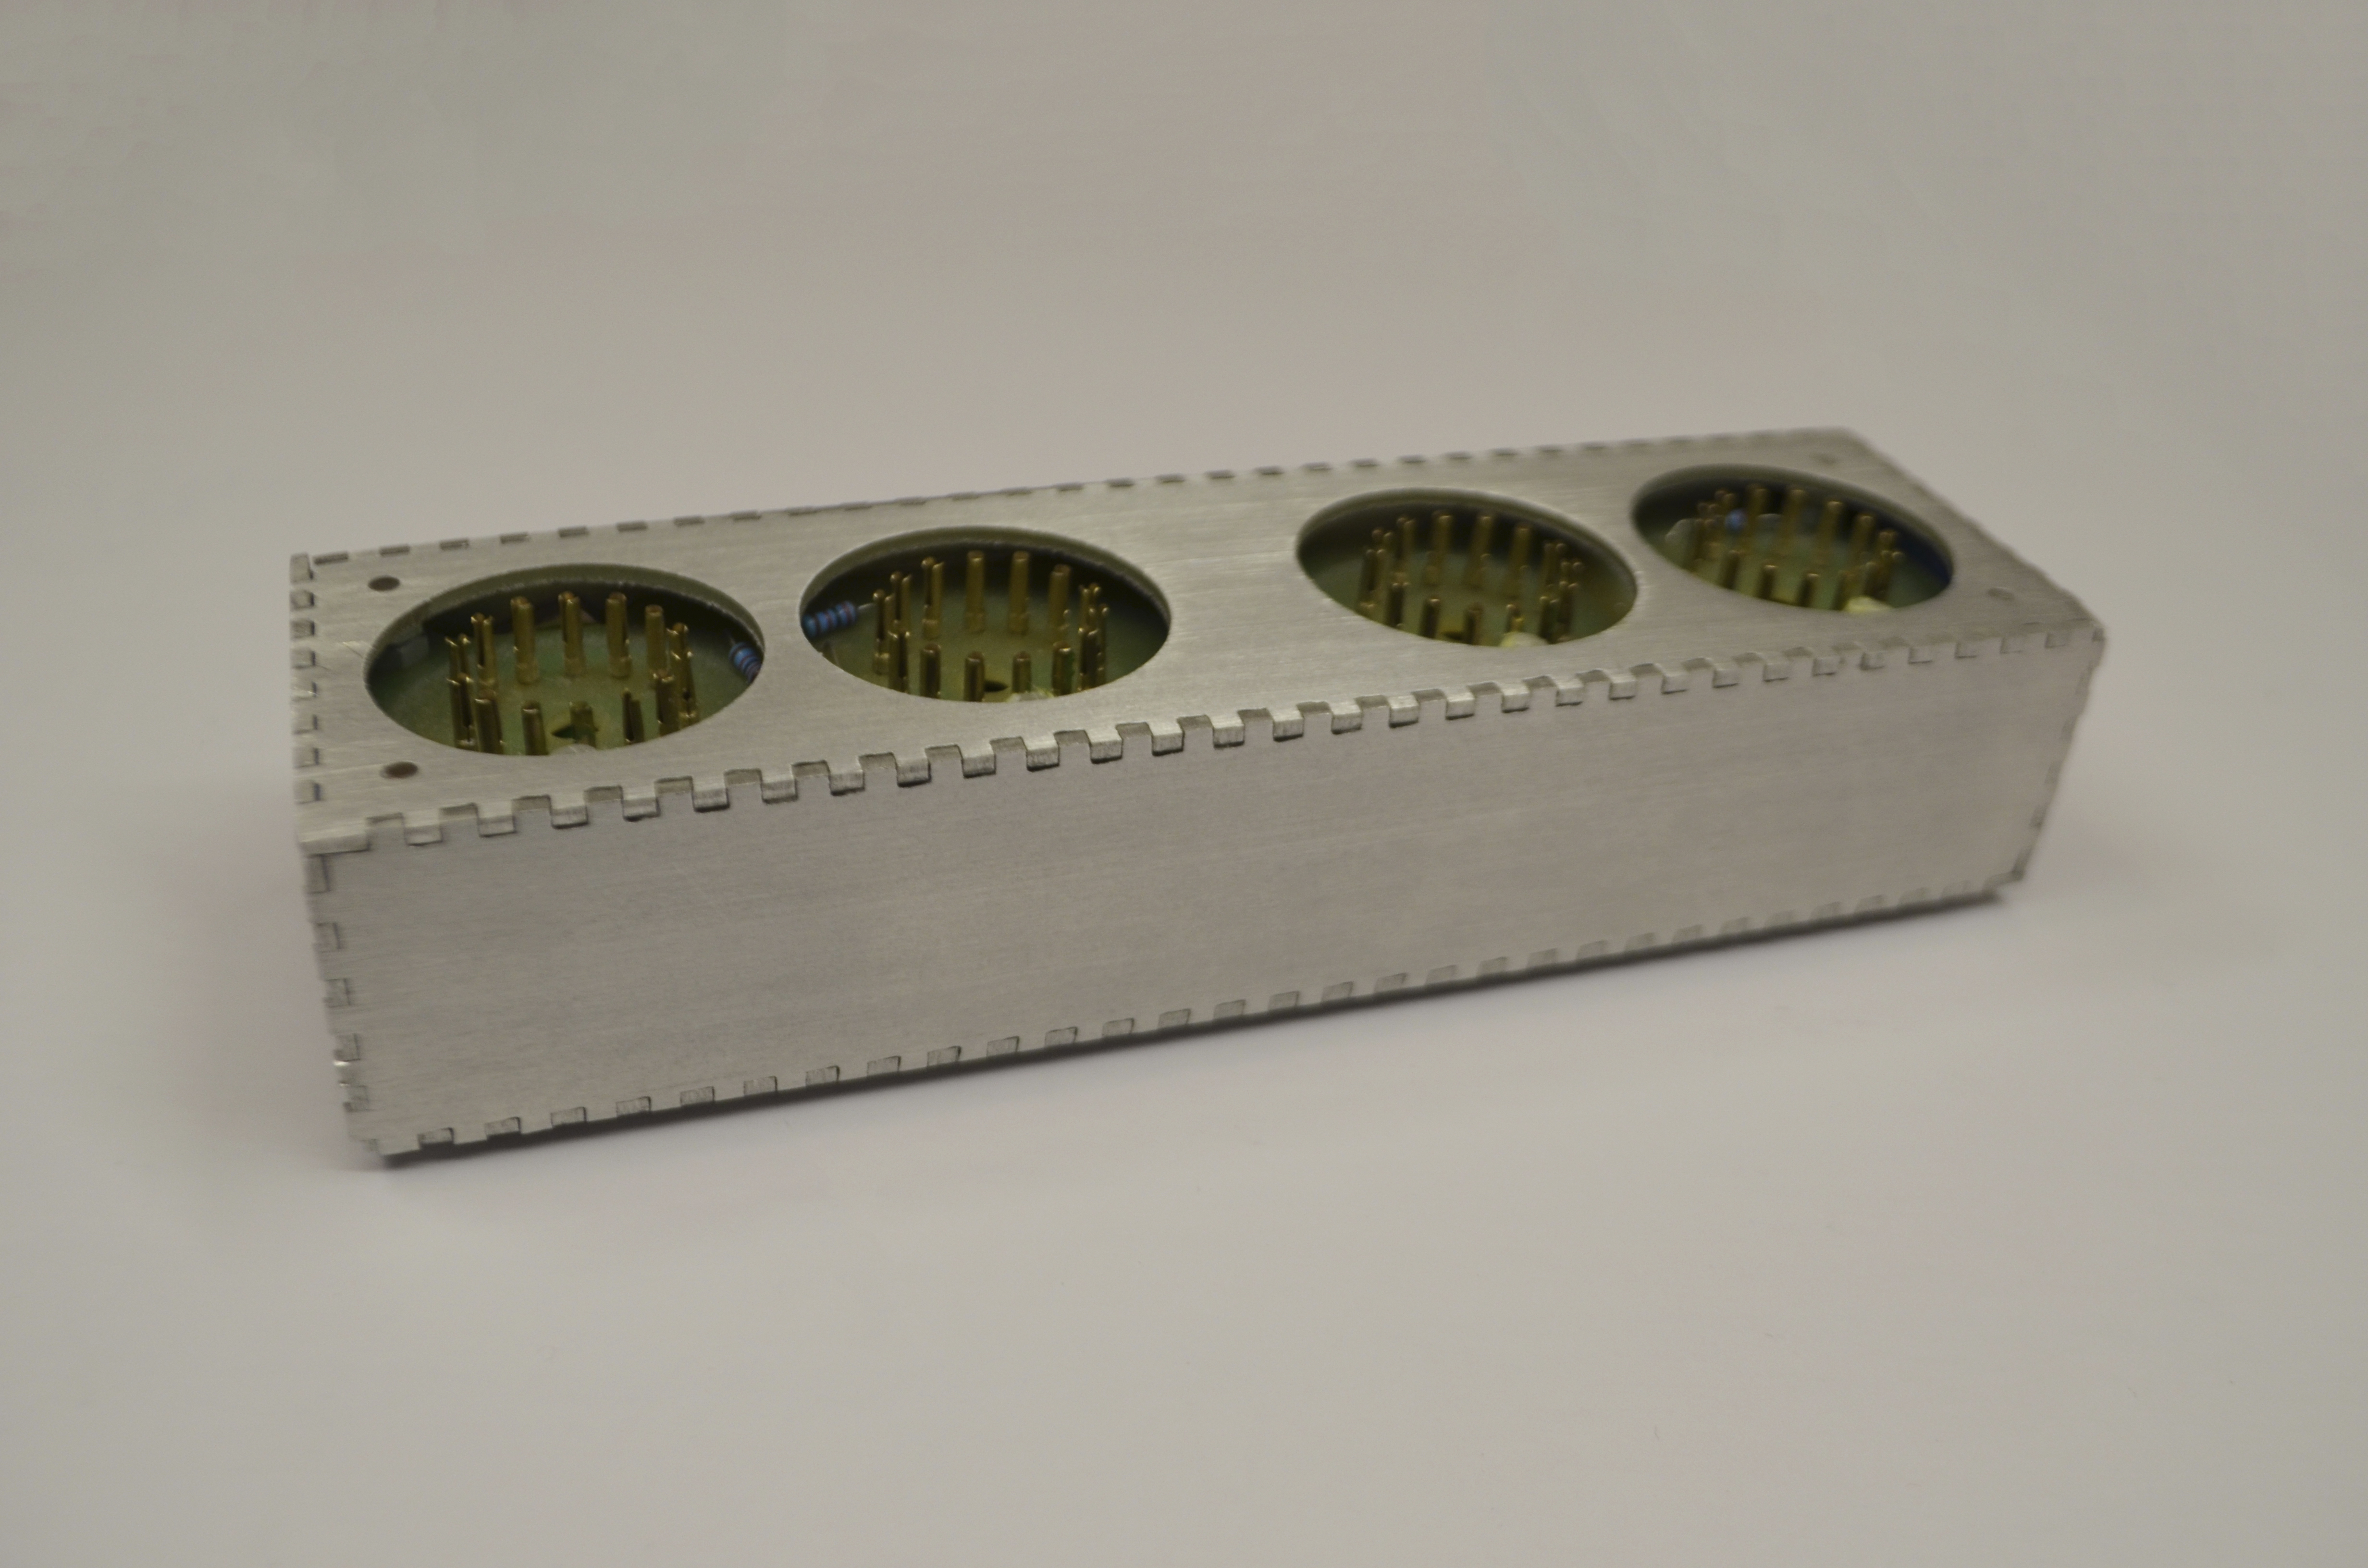
Then you can polish or grind along the guide, as in the photo. Cutting with a laser and the material will cost about 1500R. There are a lot of companies engaged in laser cutting; it is not difficult to find. I made similar enclosures from steel and used them as screens for the output and power transformers of the amplifier.

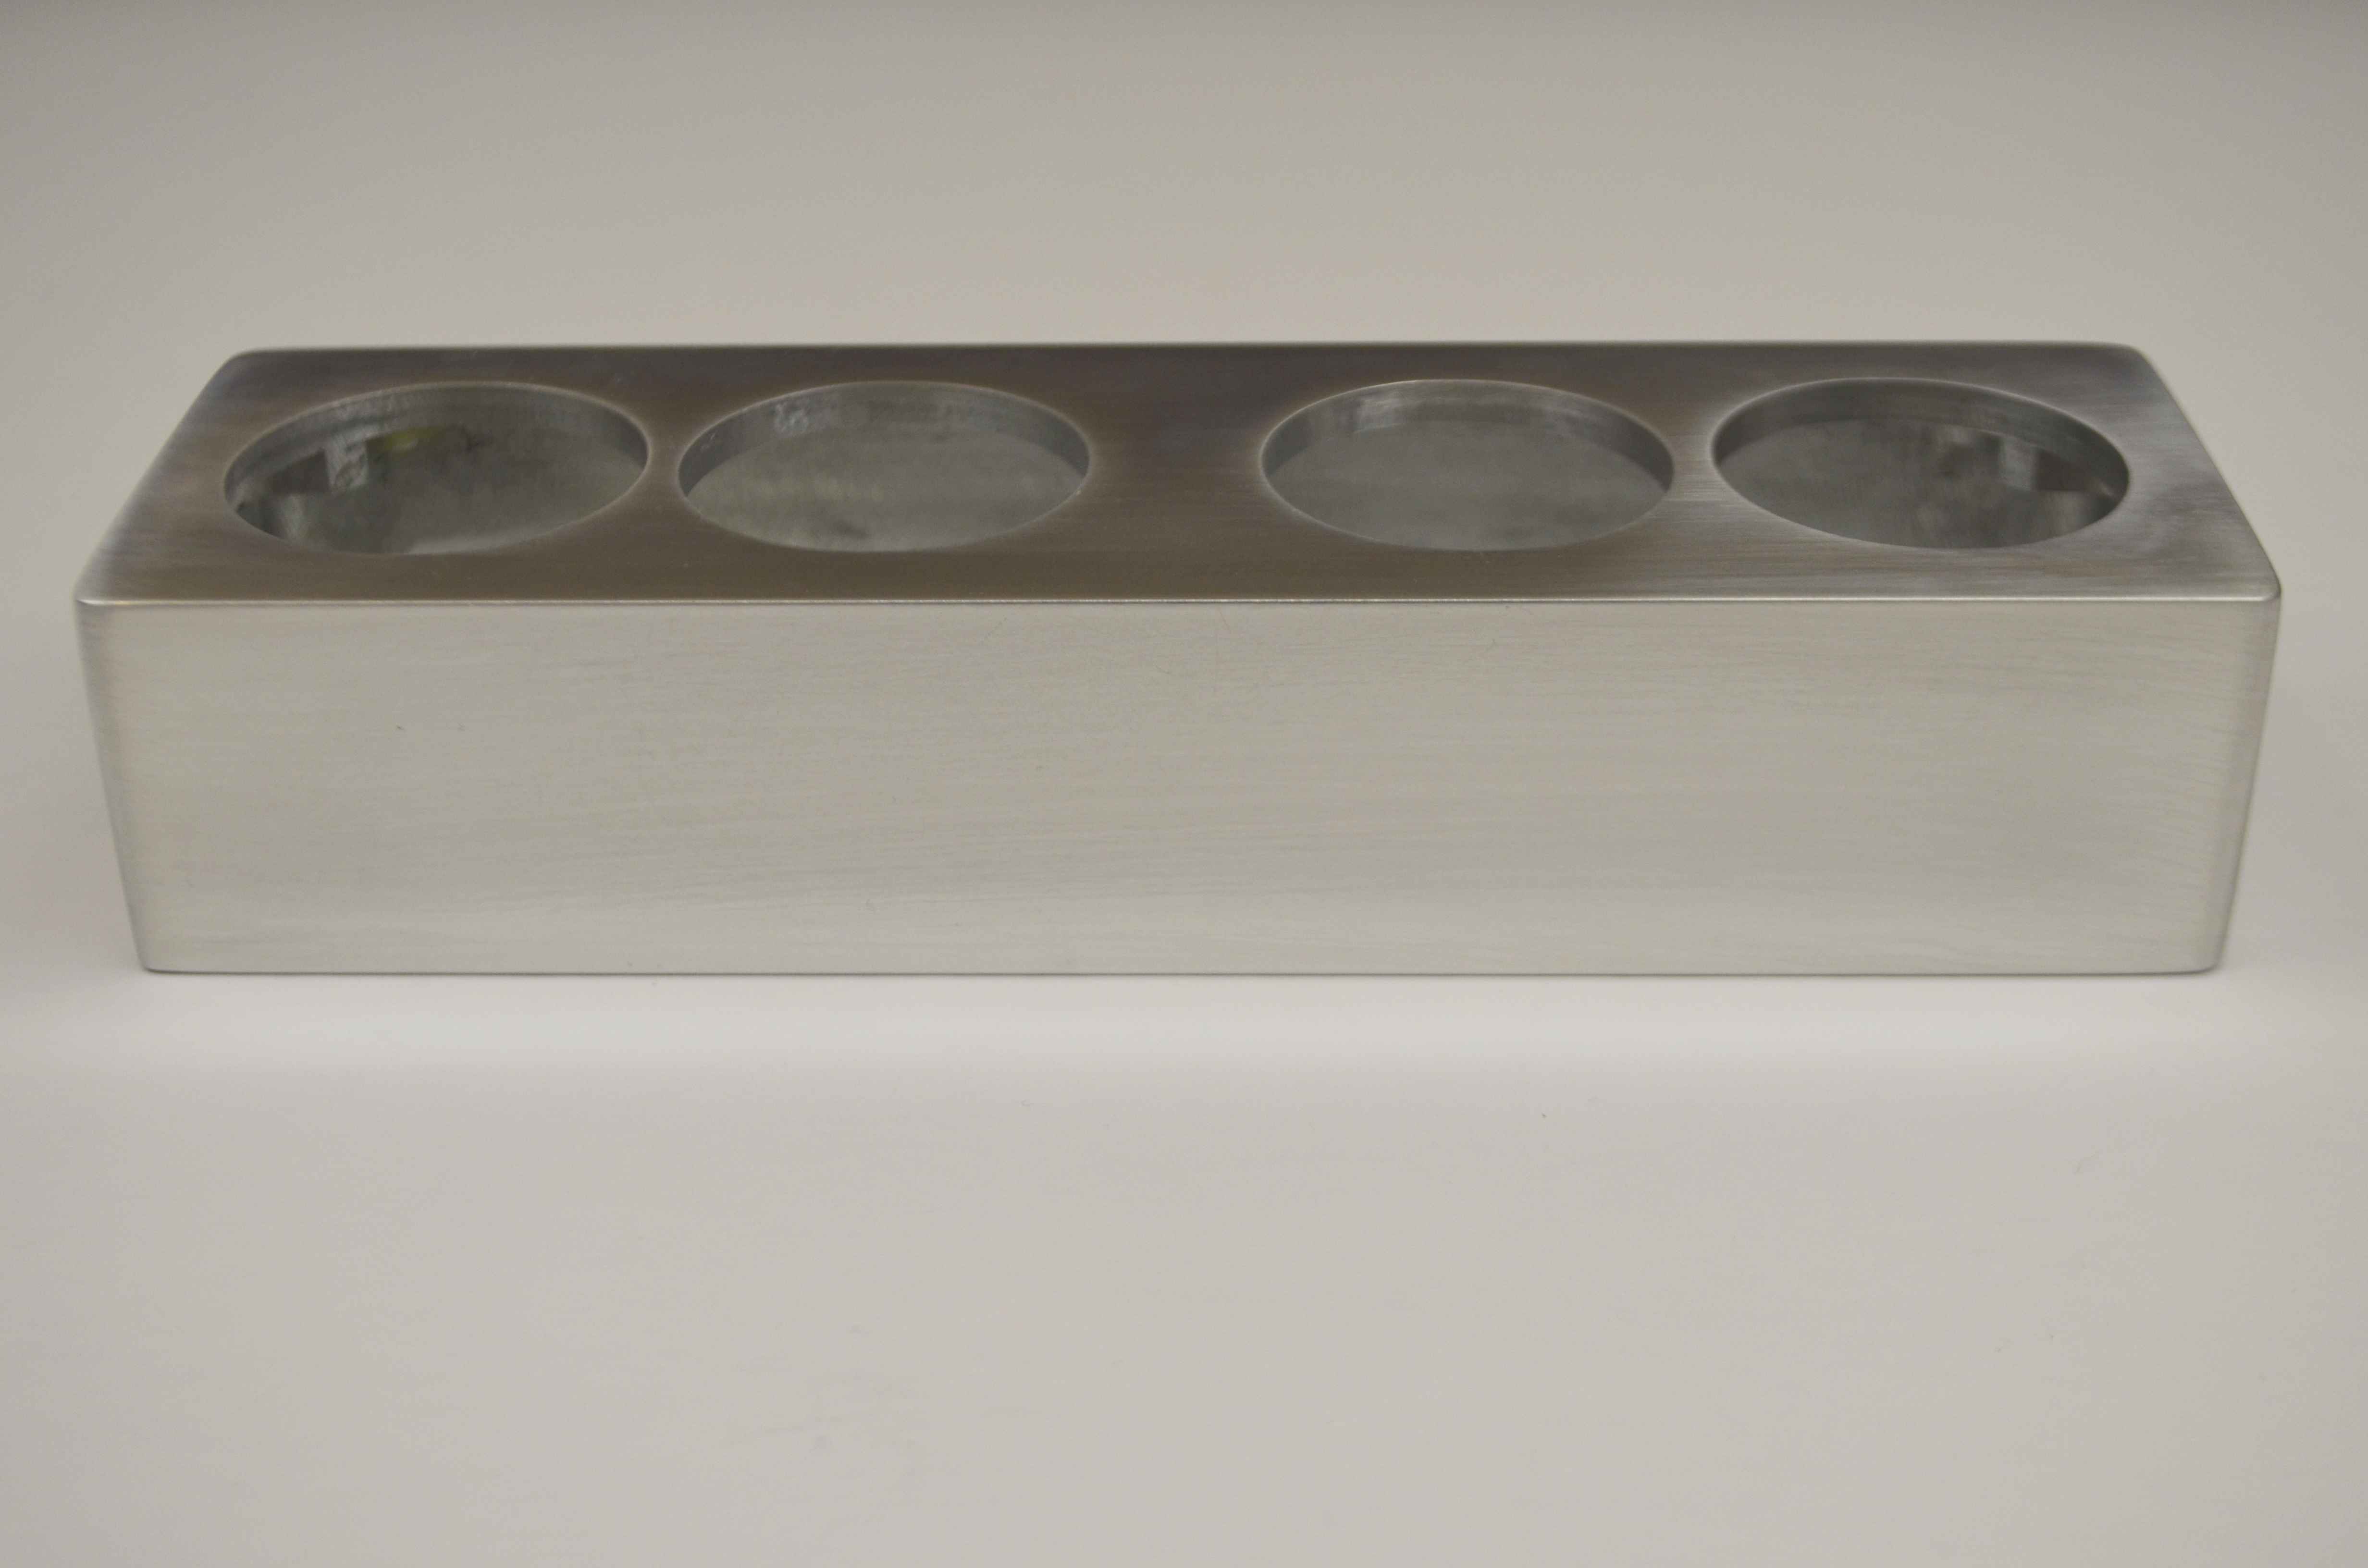
The second option. Also made from aluminum, by milling from a single piece, but you can probably make a wooden one.

Consists of two parts. You can change the design and size, add a file for AutoCAD (the case file for the previous version of the board, the holes for the buttons and the battery do not match).
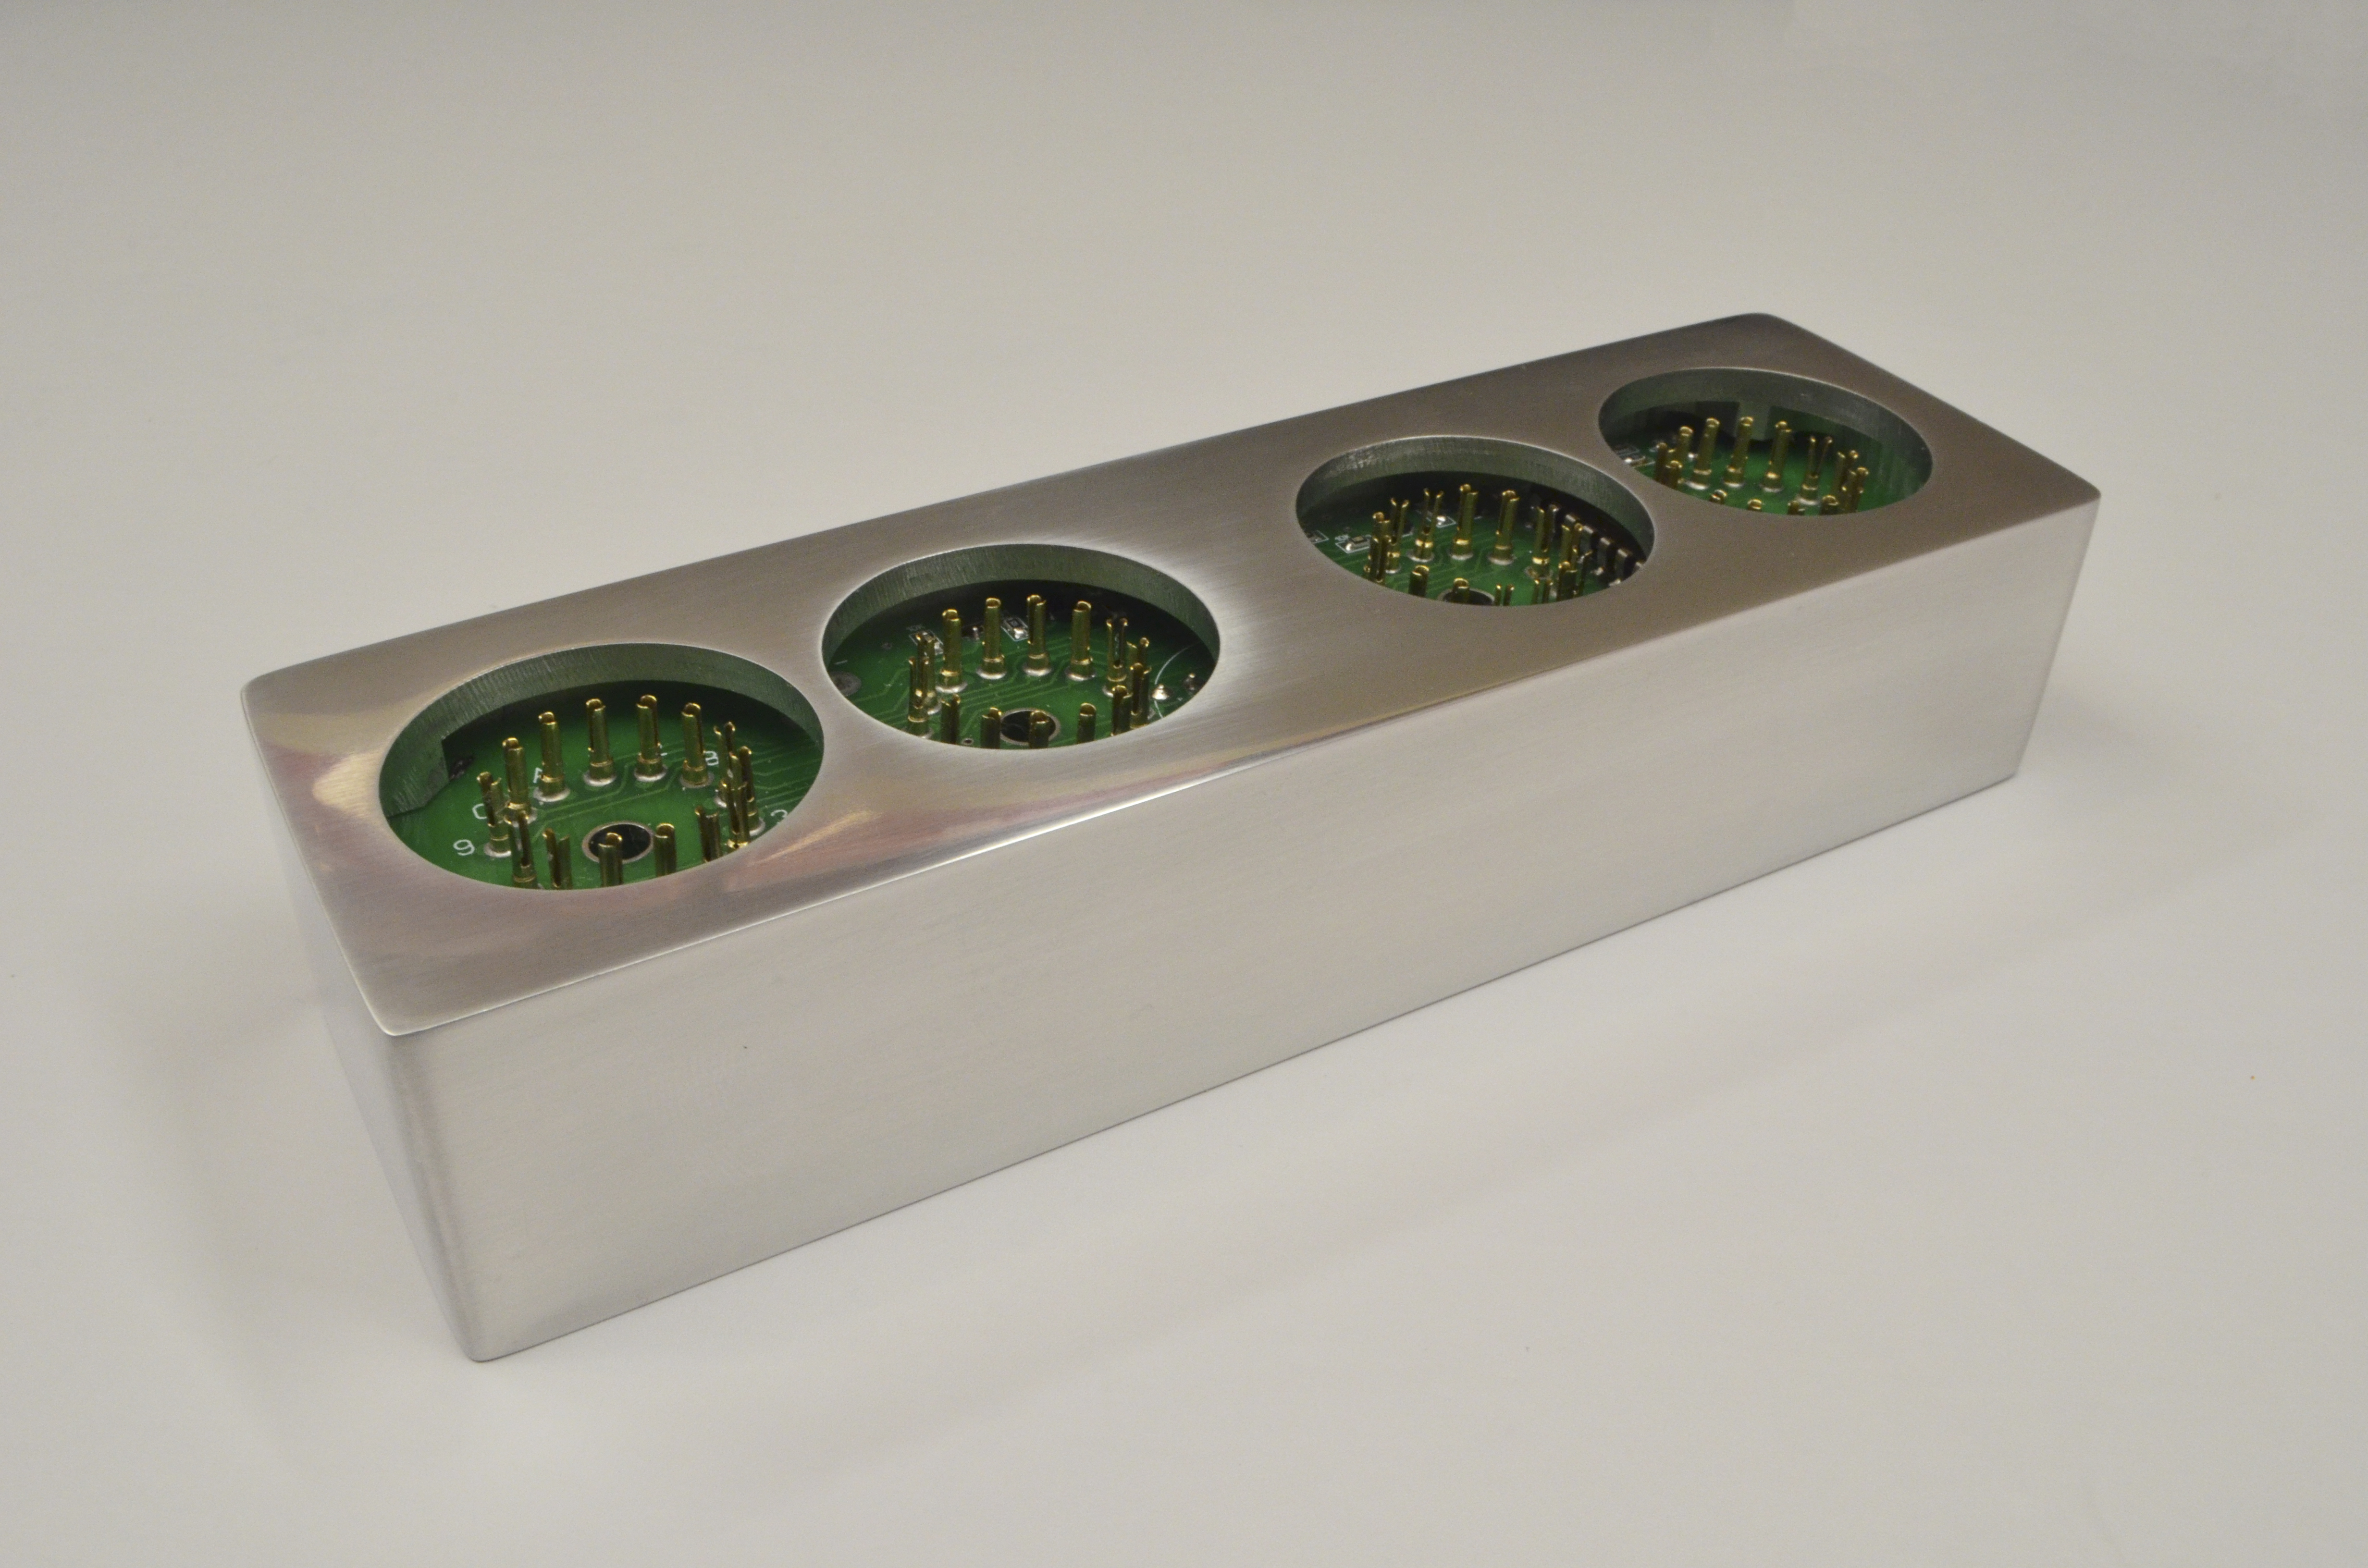
This is the most expensive option, and as for me, the most beautiful. The cost of such work is very different from different companies, ranging from 28000r. up to 7000r. for one piece
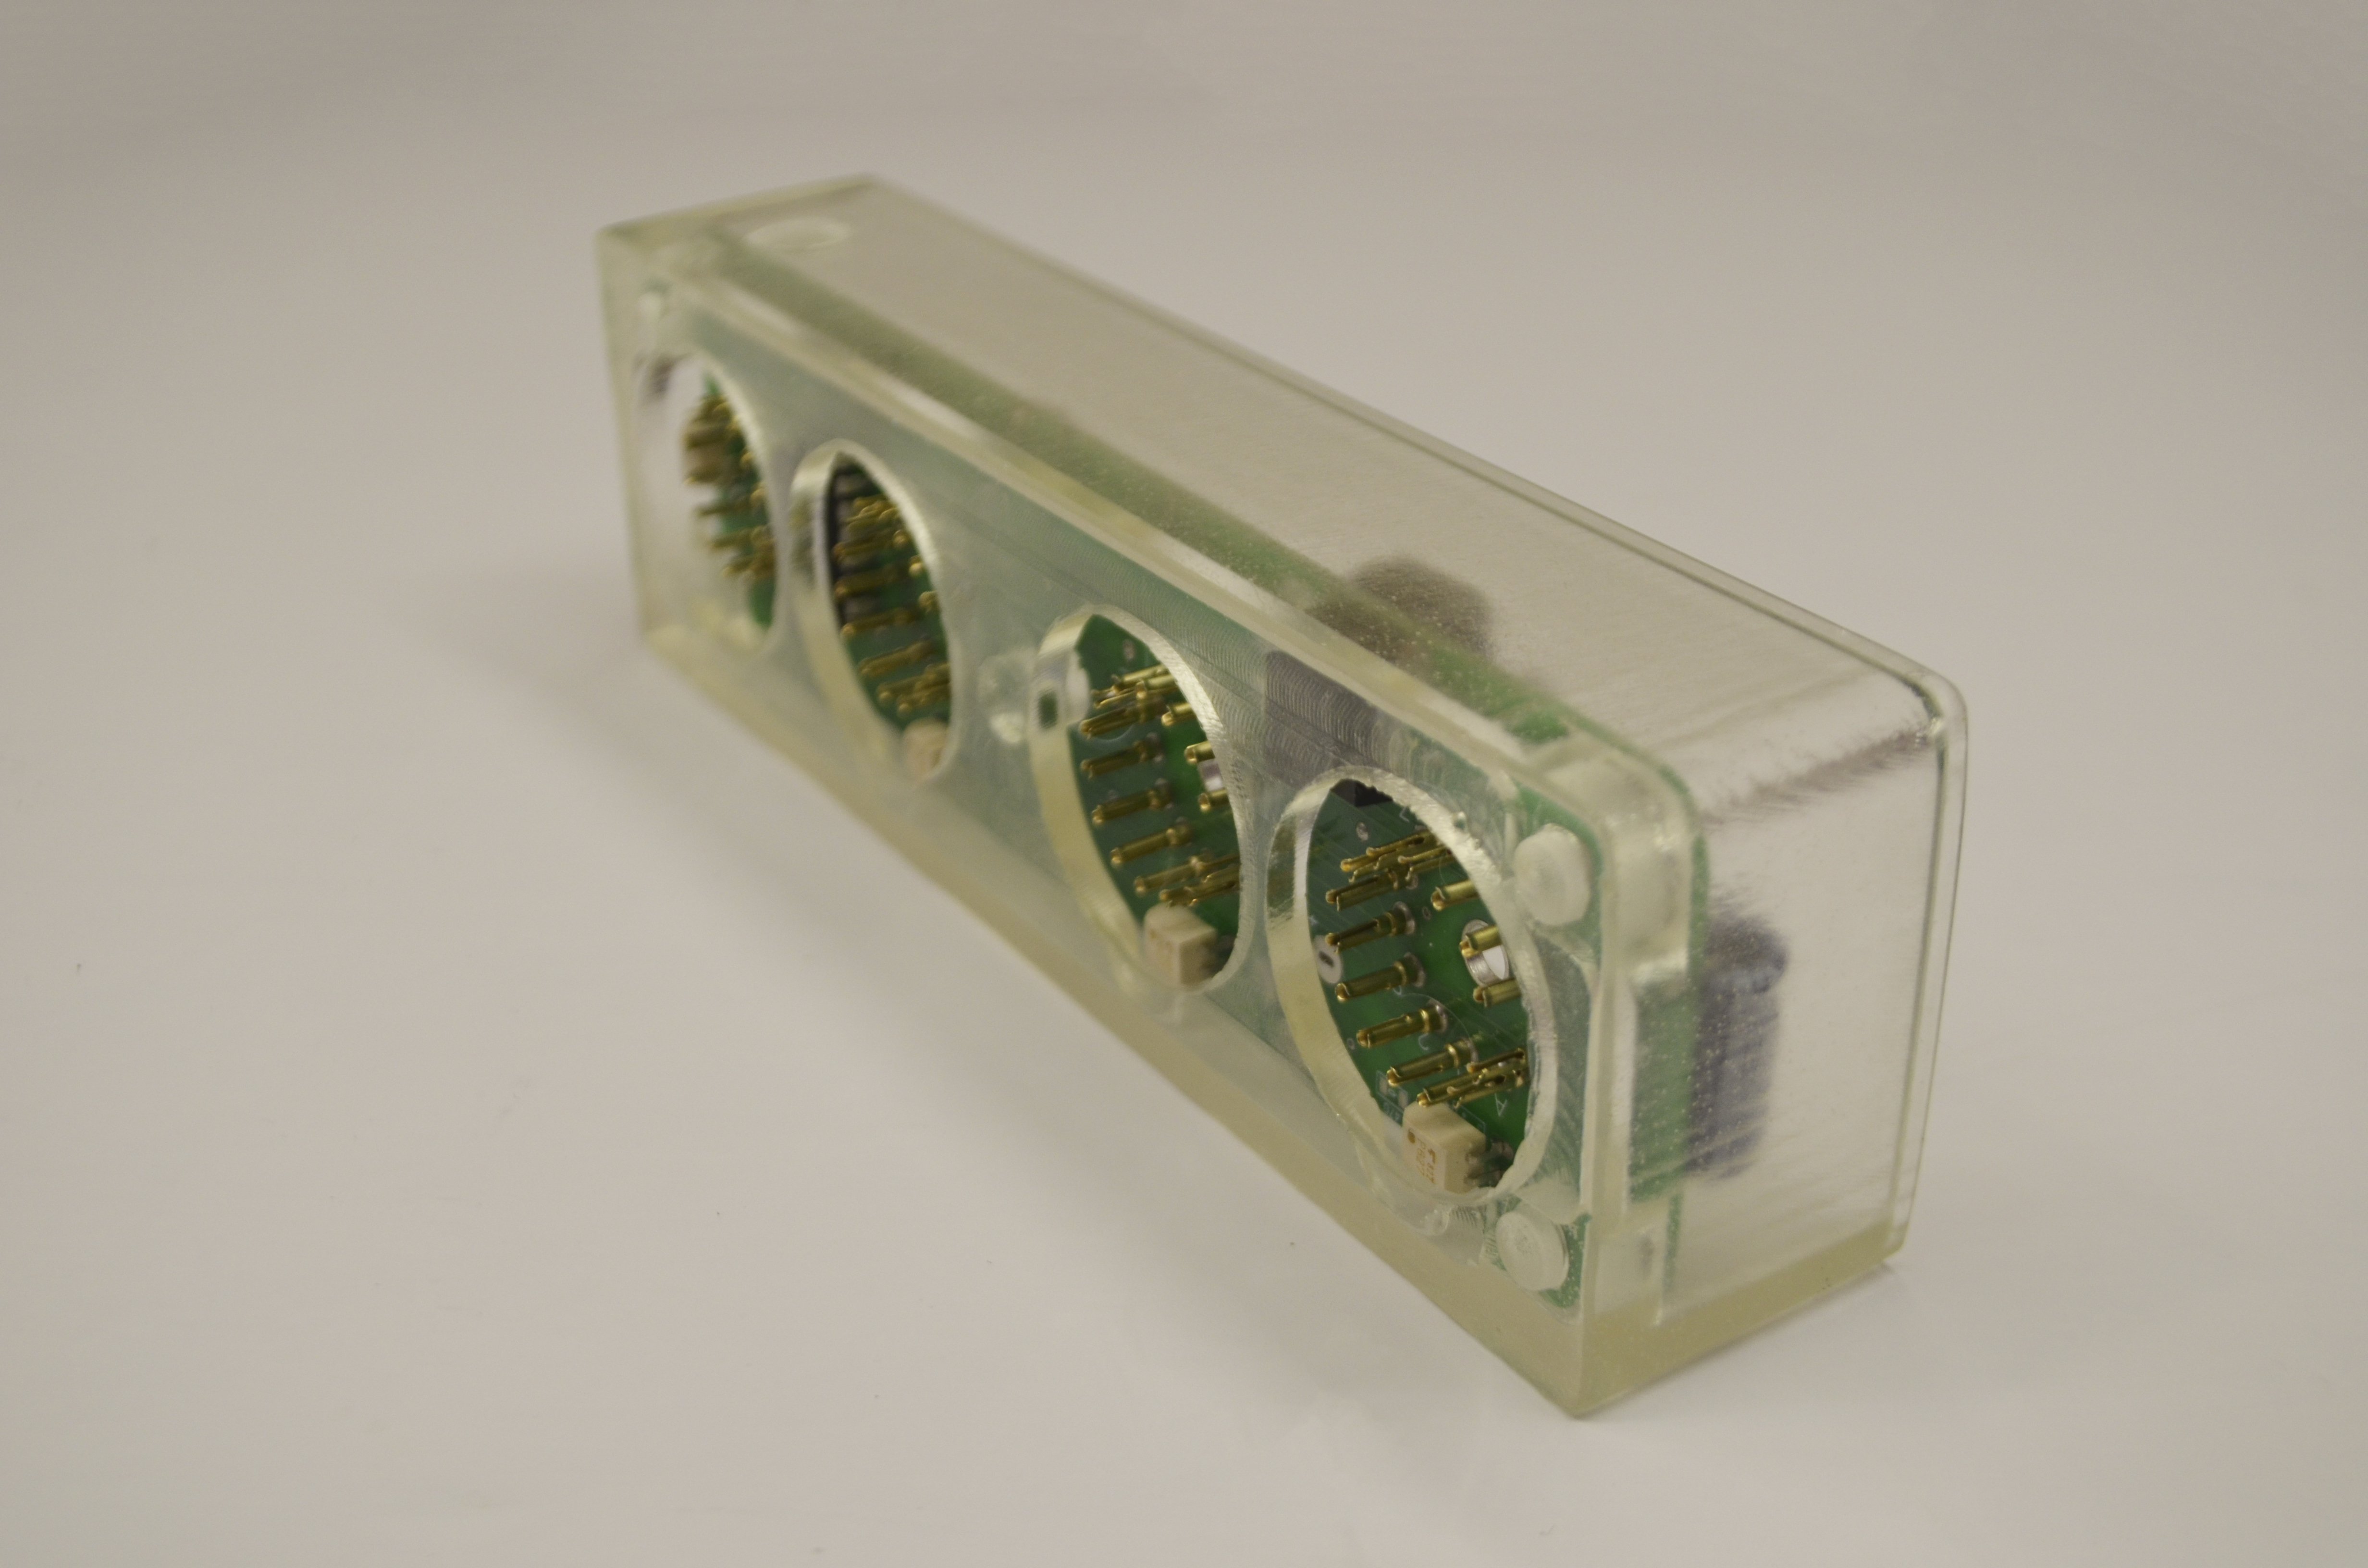
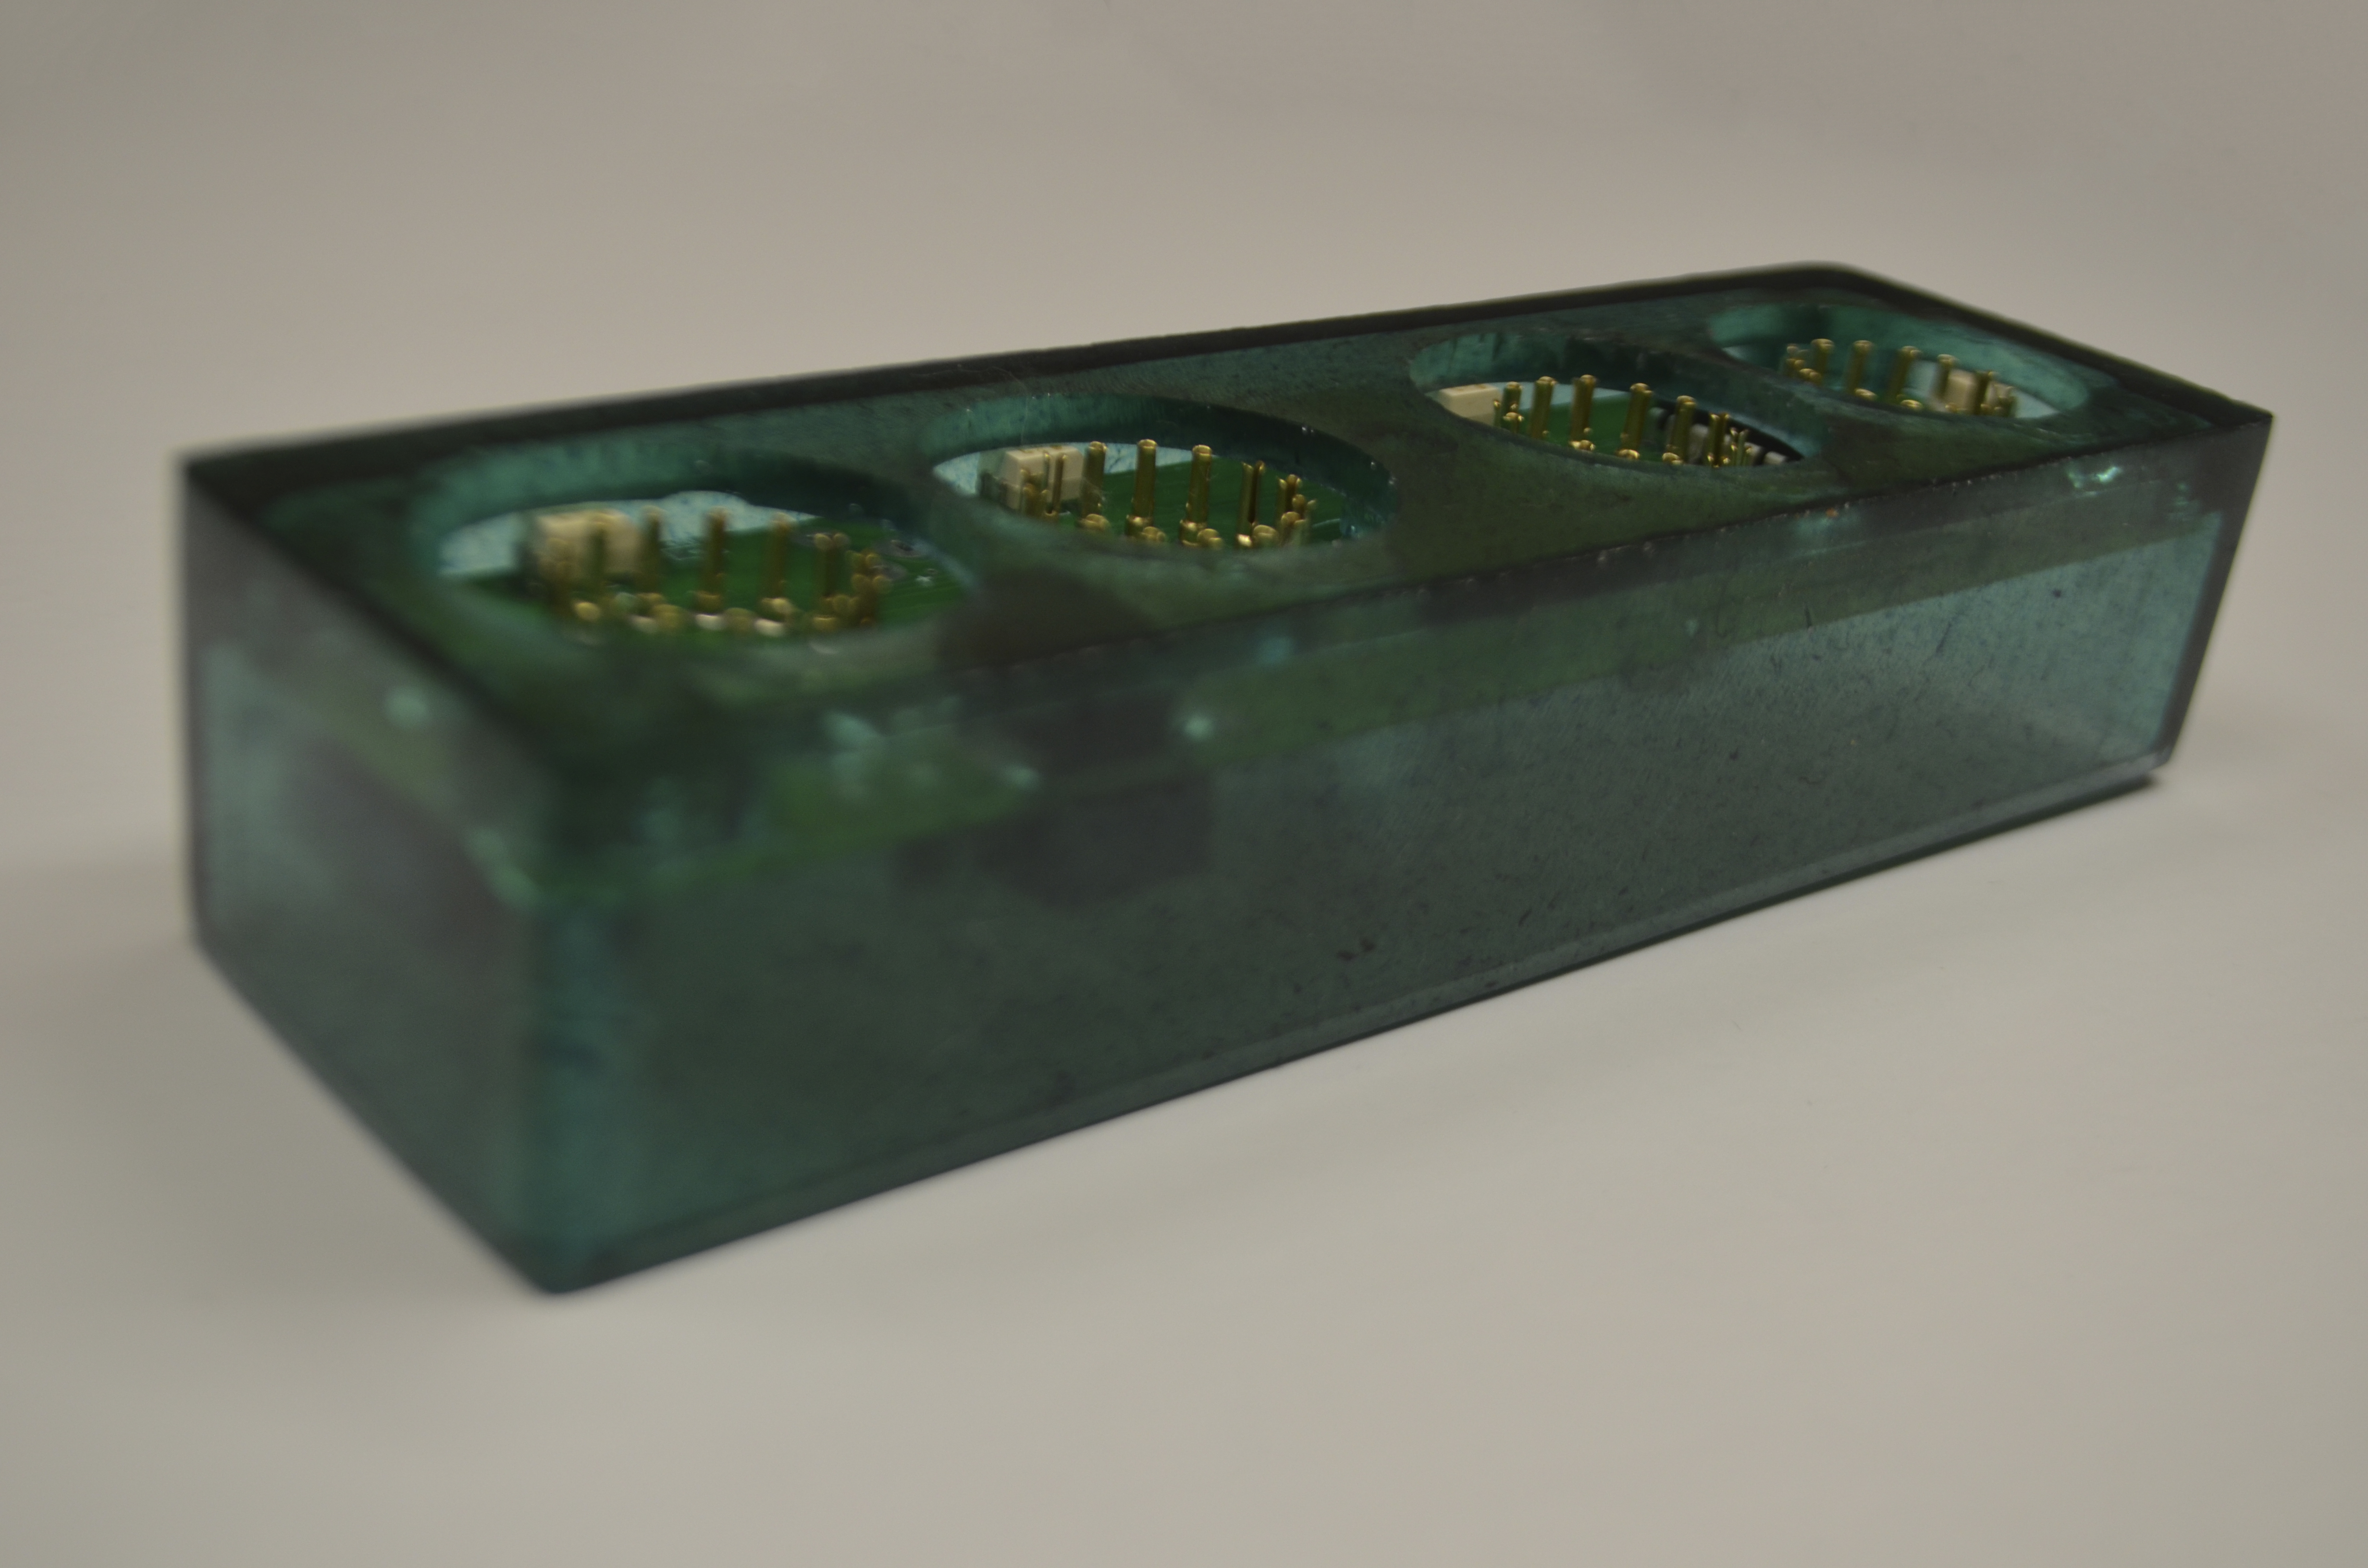
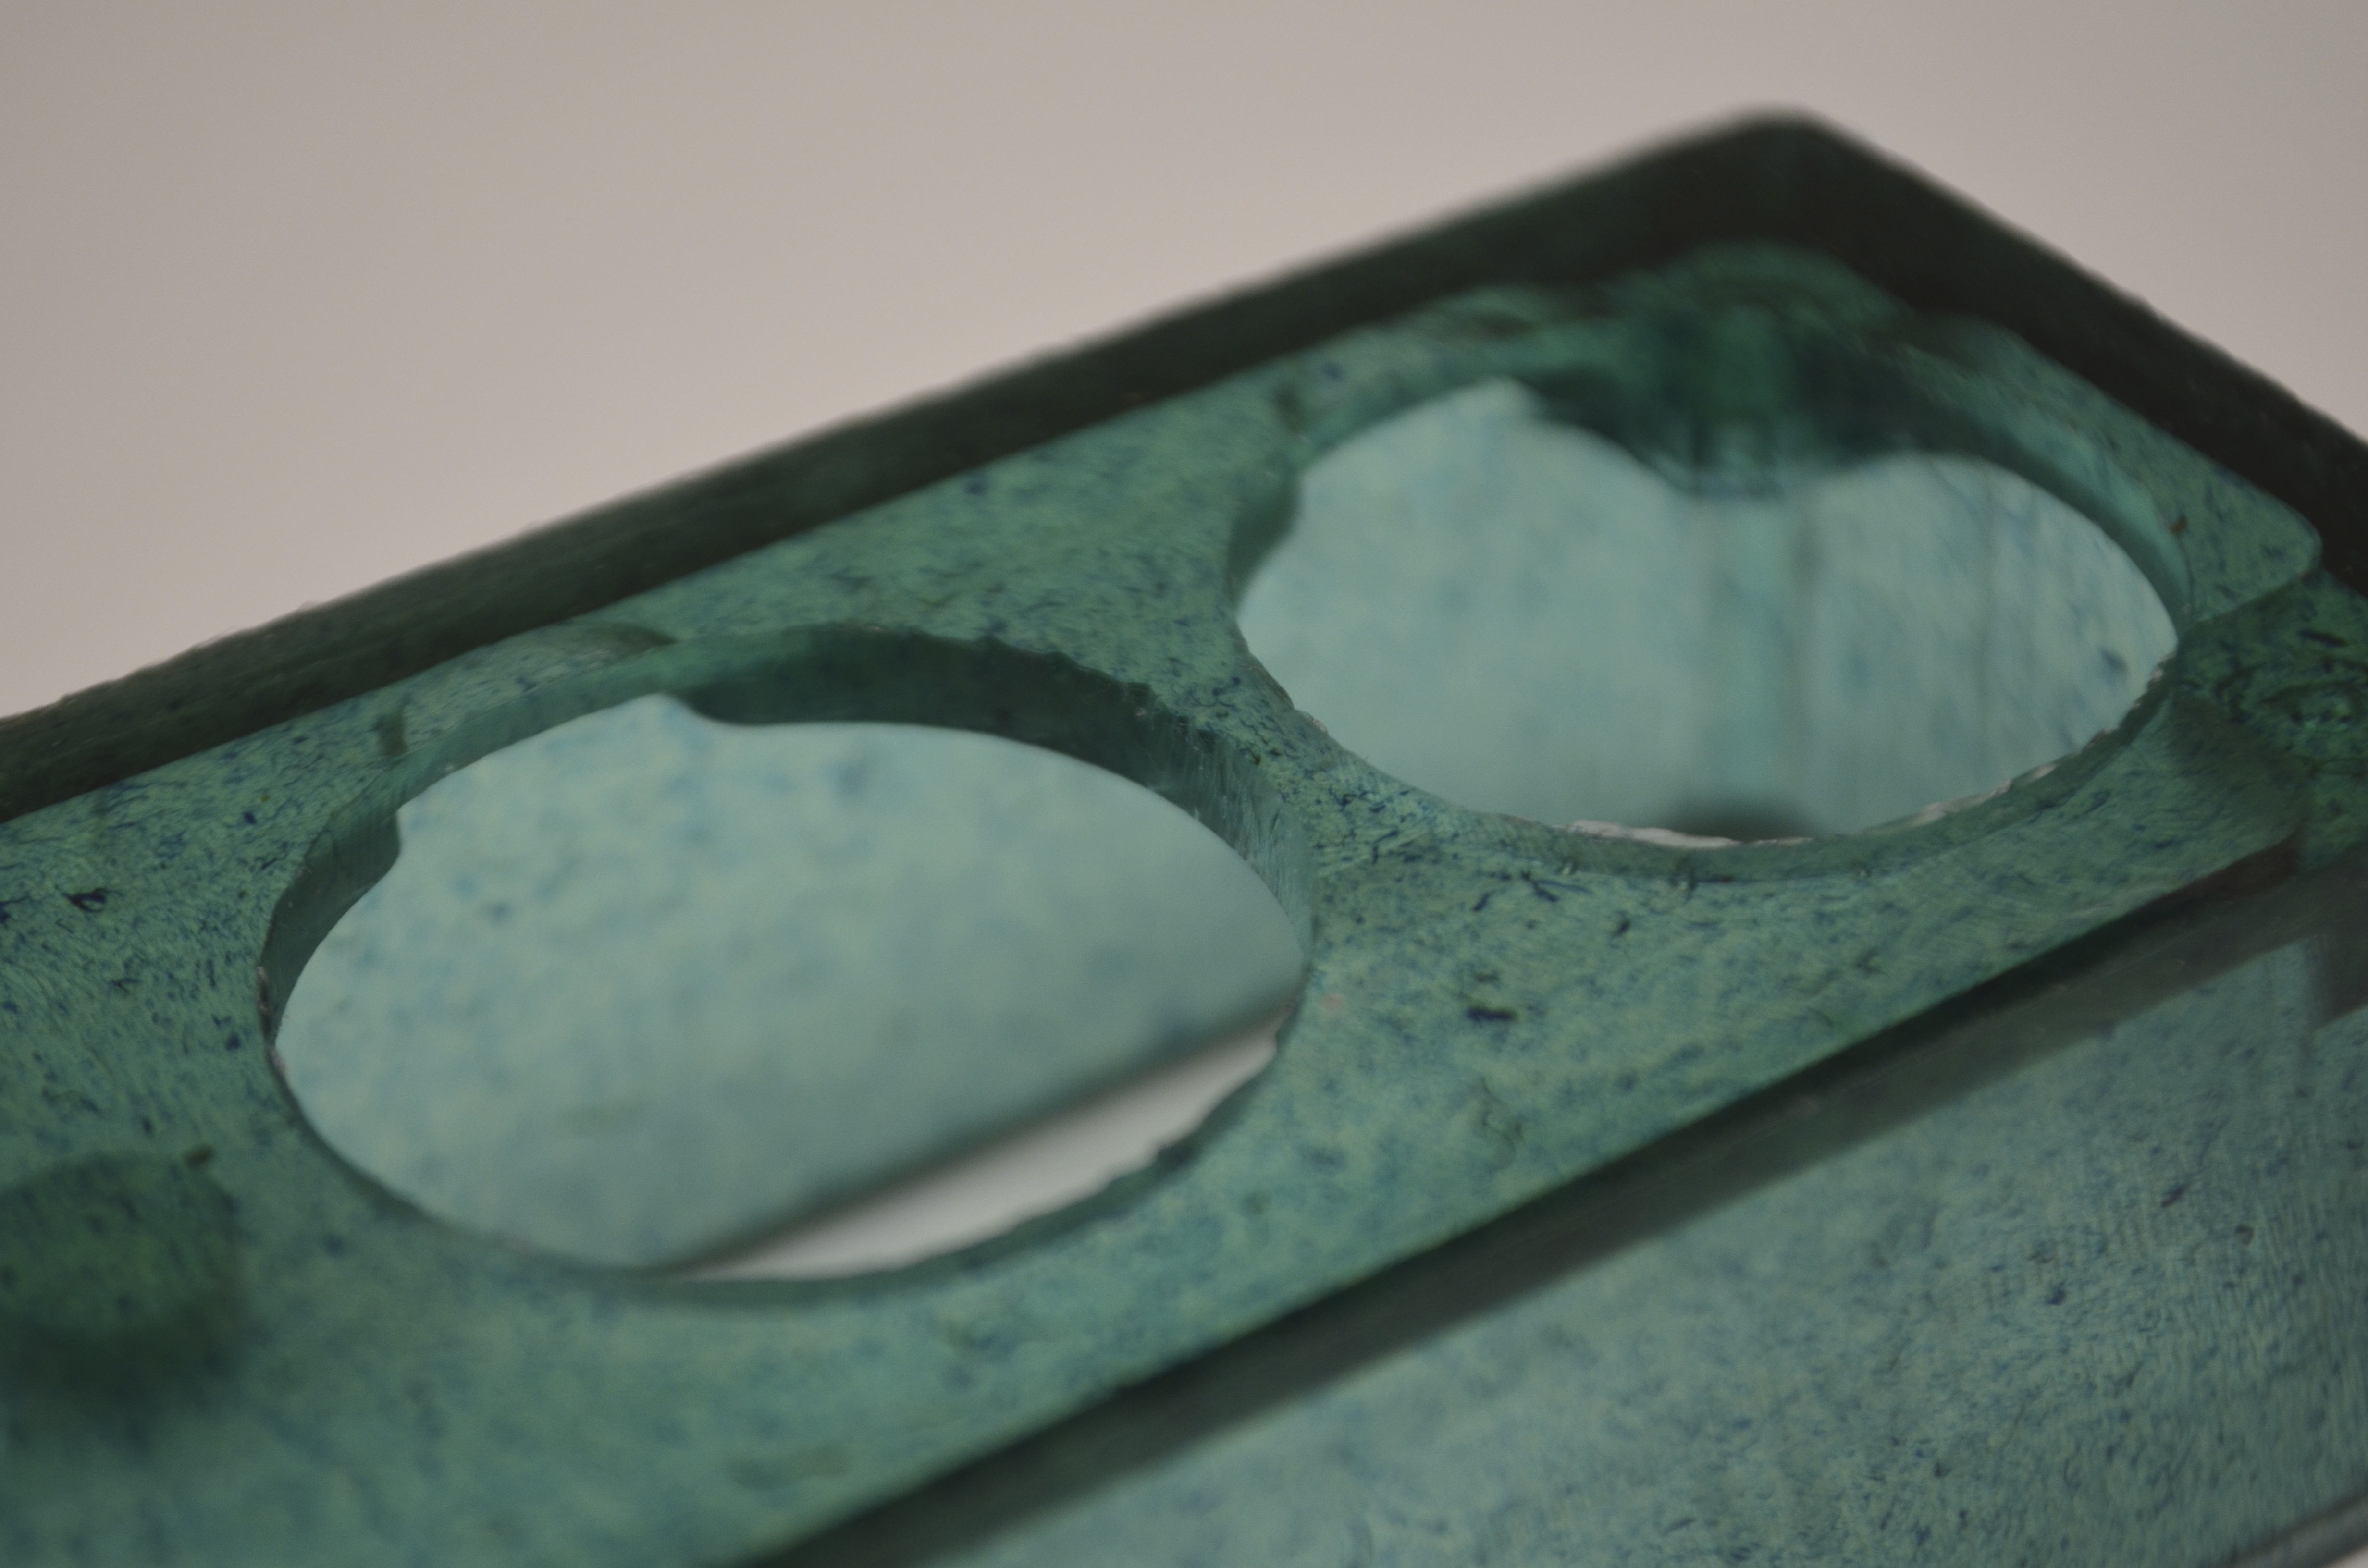
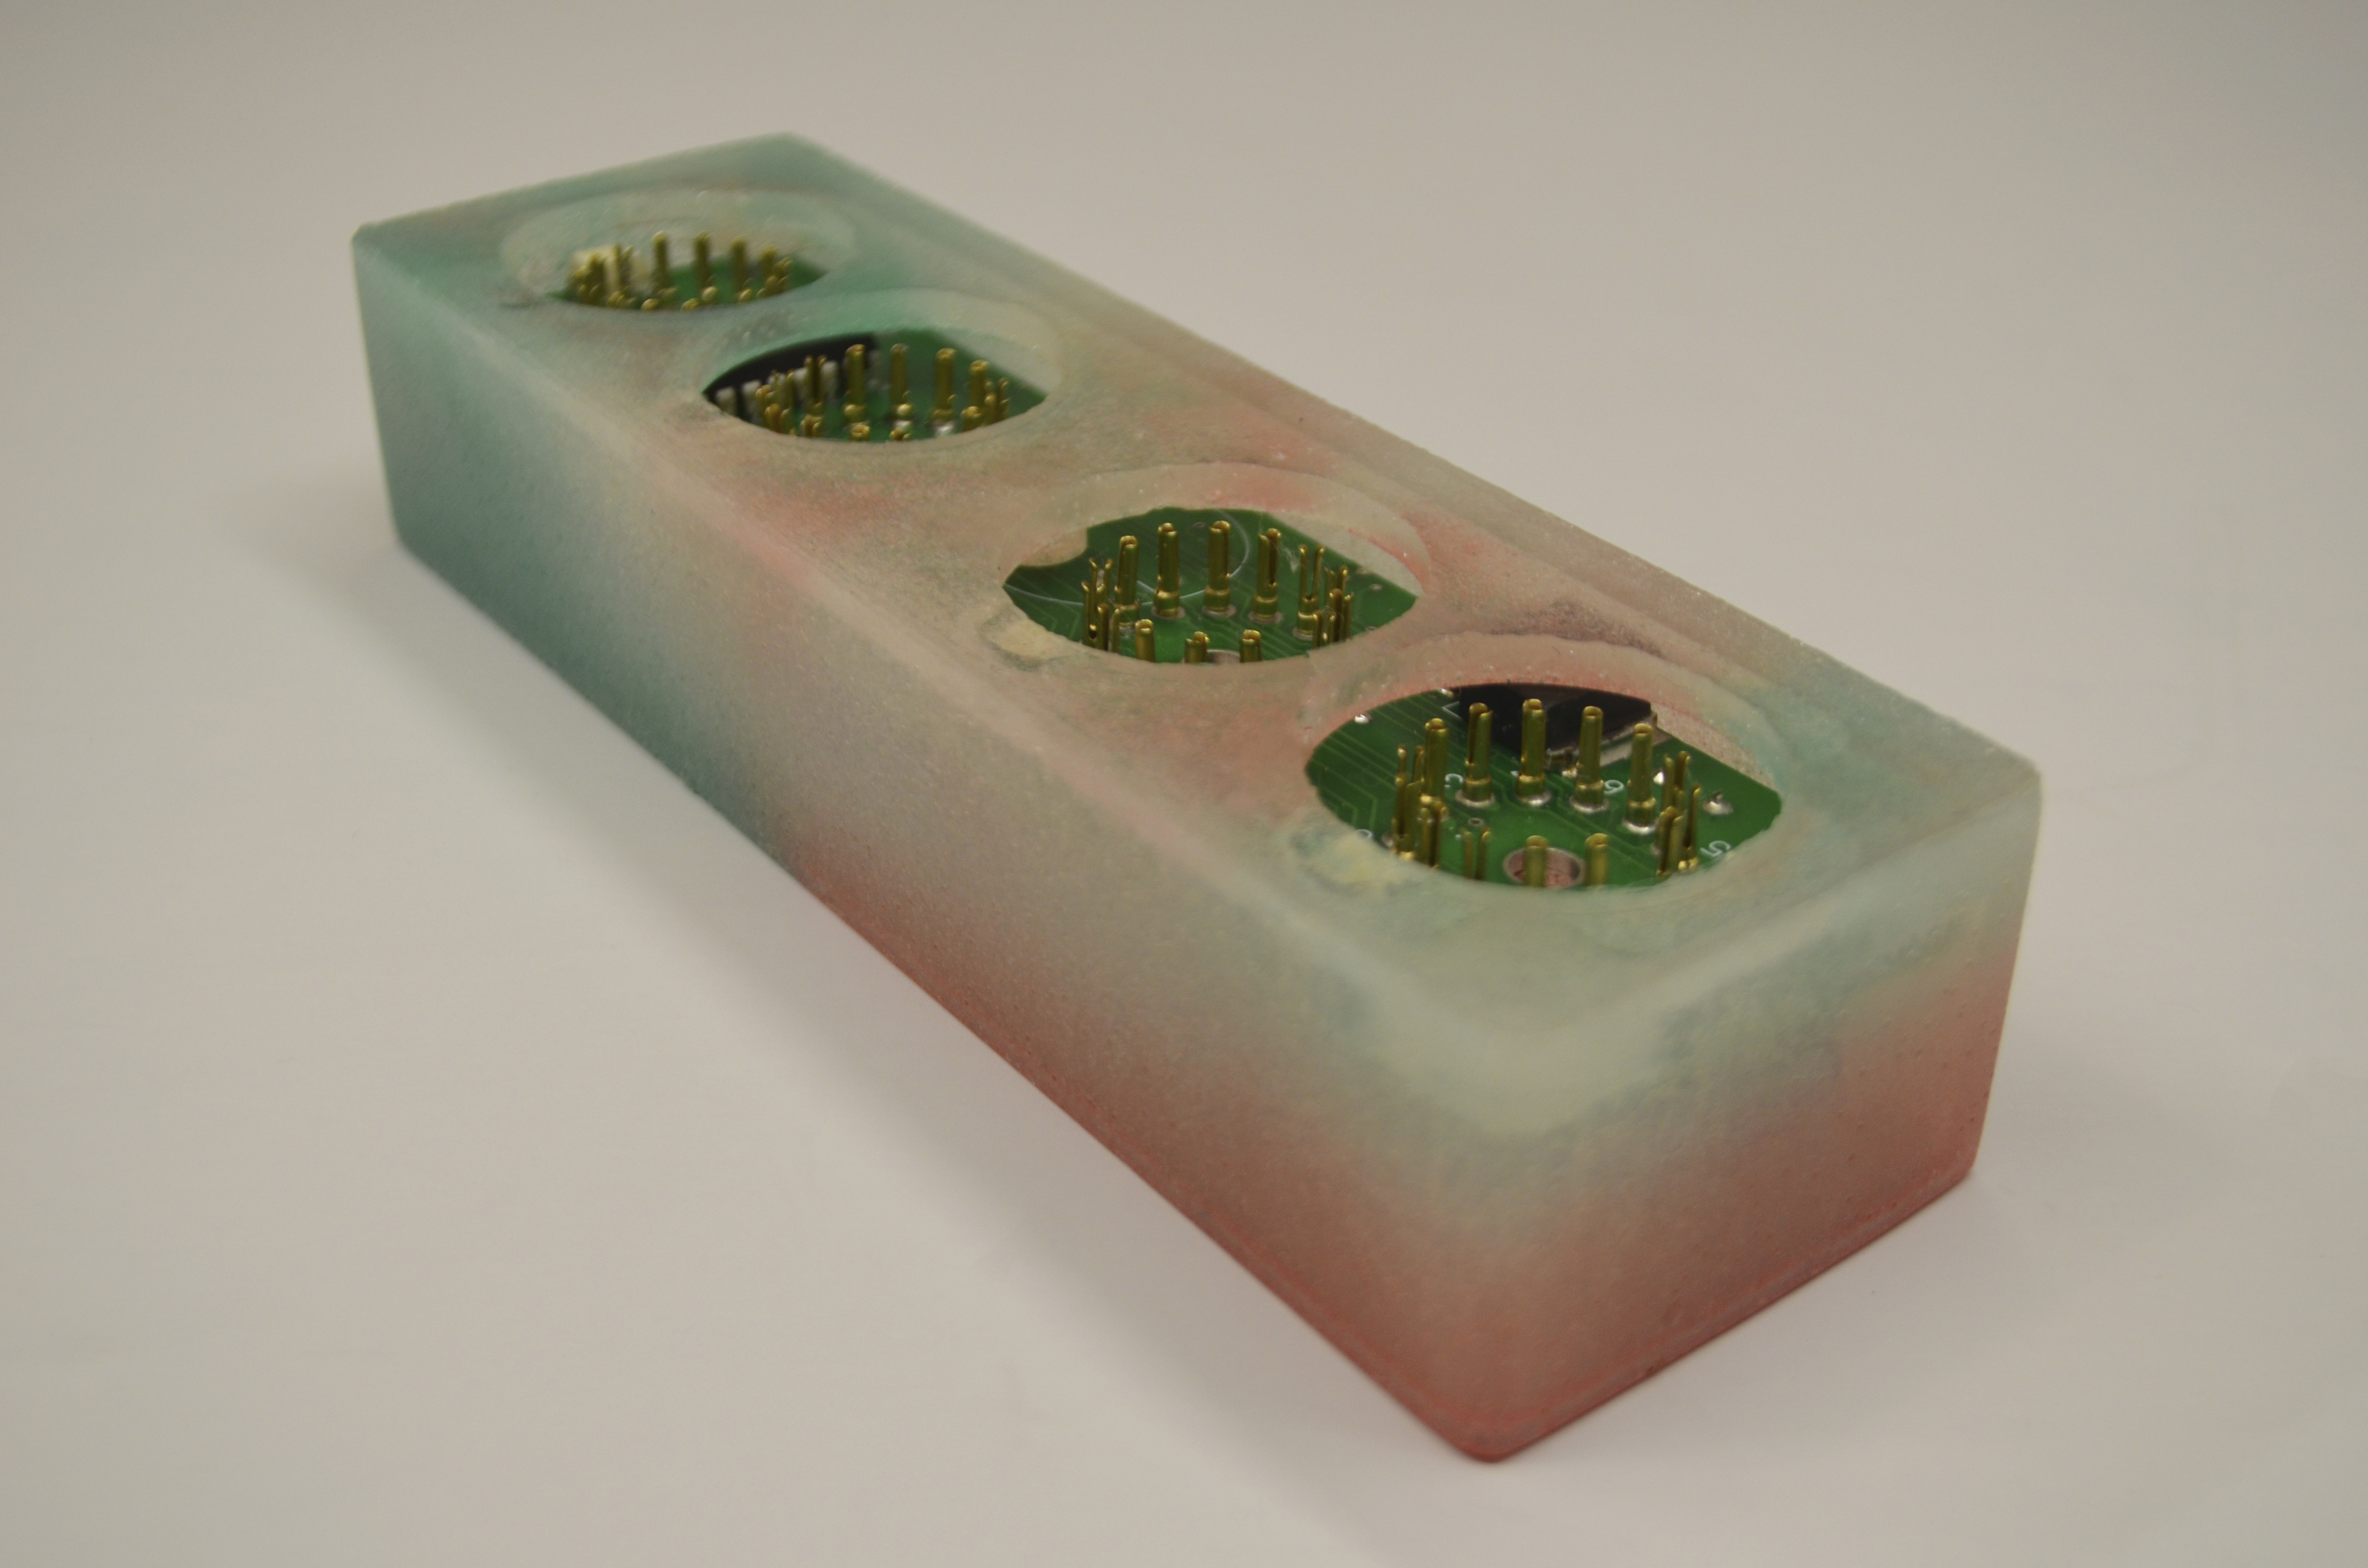
The third option. Epoxy resin housing. This option is the hardest. I used super mold 10 silicone and artline epoxy.
First you need to make a silicone mold body milled from aluminum. Glue the aluminum model to the base do the bumpers, grease all joints with sealant.

After we part silicone according to the instruction and we fill in model.

Next, we dilute the epoxy resin and pour the resulting form. The next day the corps is ready.

If desired, you can add a variety of dyes for the resin. For the manufacture of body quality above, it is better to use a vacuum chamber and a pump.

Goals to organize mass production was not set. Made a gift.
I don’t have much experience, there are borrowings from other similar projects and maybe there are mistakes.
Archive with files
instagram
Video
All thanks for your attention!
Probably, many have heard about watches on gas-discharge indicators. In this article I will try to tell you about the process of making such watches with your own hands.
')
First step. Printed circuit board
You can make your own using LUT method or photoresist. There is a lot of information on the Internet with step-by-step descriptions of the process of manufacturing boards using these methods. I would not waste time, although I myself made payments like this for those hours. If there is no experience, it will not turn out the first time and not the best quality. You will also need to buy PCB, reagents, paper for LUT (or buy a photoresist with a film for the projector and an ultraviolet lamp). Then you need to zaludit, drill, apply a mask, make silk-screen printing for convenience, all this is not cheap.
Therefore, it is better to order factory manufacturing of multilayer boards with a mask and silk screen printing. This can be done in Russia, but it will be expensive.
Can be ordered on AliExpress. It's not difficult to do, you need to find such a service on the site and send your file to the mail (indicated in the description of the product). In response will invoice. You need to pay on AliExpress as a normal product, but the cost will need to be increased in accordance with the invoice, increasing the number of items in the order. Wait and track as usual order. The cost of sellers is different, for 11 cards with delivery I got about 2500r.
I think the cheapest option is to order it on the JLCPCB website. You will need to register, upload to the order page an archive with a gerber file, select the necessary parameters (or leave everything by default), pay and wait).
The price of five boards for hours with delivery will be about 1000r. (200 rubles for 1 piece), 10 boards about 1200 rubles. (120 rubles for 1 item). And it will be high-quality factory-made double-layer boards with silk-screen printing, mask and with metallization of holes.
I have in order two versions of the clock (one with the anode keys on conventional transistors and the other on optocouplers) and the board for assembling the phono-corrector for 6n9s.
The second step. Deal with the boards. It is necessary to order radio components
The most expensive is the gas-discharge indicators IN-18, the average cost of 2000 rubles, you can buy on Avito. About 5-7 years ago, the price for them was 200-350 rubles (judging by the forums).
Searching, found the manufacturer of gas-discharge indicators daliborfarny.com, the cost is similar to in-18 lamps - $ 145.
On his YouTube channel Dalibor Farný there are interesting videos with the full process of lamp production.
The remaining radio components are not uncommon and you can buy them at any radio shop. I bought the chip resistors and capacitors on AliExpress. I bought a real-time chip, also on AliExpress, as a module with quartz and a battery.
The third step. Board assembly
As a solder for the microcontroller and some components, I used HK-MECHANIC-XG-Z40 (also bought on AliExpress) and a soldering dryer.
Connectors for lamps can be made, for example, from the contacts DPBS-25F. The microcontroller and the DS1307 clock should be soldered after the assembly and testing of the 5V and 170V power supplies. You can set the voltage by changing the resistance values
The process is not very complicated, the components on the board are all signed. I took the assembly about 3h.
Fourth step. Firmware
At this stage, you need a programmer, you can also buy it on AliExpress for 120 rubles or at a radio store, but it will be more expensive.
To the assembled board we solder the contacts of the programmer (miso, mosi, rst, sck, gnd, + 5V).
Then you can use for example avrdudeprog, this is a software shell for firmware MK.
Run the program. On the program tab, select the atmega 8 microcontroller, select the firmware, usbars programmer. On the fuses tab, install the D9xD4 fuses
We press the button programming.
Fifth step. Housing
The first case. Made of aluminum, but you can use any material. It is assembled from 6 plates cut by a laser. Interconnected "in the spike."
Then you can polish or grind along the guide, as in the photo. Cutting with a laser and the material will cost about 1500R. There are a lot of companies engaged in laser cutting; it is not difficult to find. I made similar enclosures from steel and used them as screens for the output and power transformers of the amplifier.
The second option. Also made from aluminum, by milling from a single piece, but you can probably make a wooden one.
Consists of two parts. You can change the design and size, add a file for AutoCAD (the case file for the previous version of the board, the holes for the buttons and the battery do not match).
This is the most expensive option, and as for me, the most beautiful. The cost of such work is very different from different companies, ranging from 28000r. up to 7000r. for one piece
The third option. Epoxy resin housing. This option is the hardest. I used super mold 10 silicone and artline epoxy.
First you need to make a silicone mold body milled from aluminum. Glue the aluminum model to the base do the bumpers, grease all joints with sealant.
After we part silicone according to the instruction and we fill in model.
Next, we dilute the epoxy resin and pour the resulting form. The next day the corps is ready.
If desired, you can add a variety of dyes for the resin. For the manufacture of body quality above, it is better to use a vacuum chamber and a pump.
Goals to organize mass production was not set. Made a gift.
I don’t have much experience, there are borrowings from other similar projects and maybe there are mistakes.
Archive with files
Video
All thanks for your attention!
Source: https://habr.com/ru/post/453228/
All Articles