PKCS # 11 cryptographic tokens. Graphic utility "with the function of signing and adding the timestamp." Part 1
 In the comments to the article “Using PKCS # 11 cryptographic token mechanisms in scripting languages,” the kovserg reader wrote :
“We are looking forward to an article with the function of signing a document and adding a timestamp.”Earlier, another participant, Habra Pas, wrote that it would be great for PKCS # 11 tokens, "which everyone can count," (meaning, above all, cryptographic operations for generating keys, generating and checking e-mail), get rid of all possible layers and have one utility that could, using the mechanisms of the token itself, generate a certificate request, sign documents, verify the signature of documents, verify the signature and validity of certificates.
Introduction to the utility
As a result, we present to the users a utility.

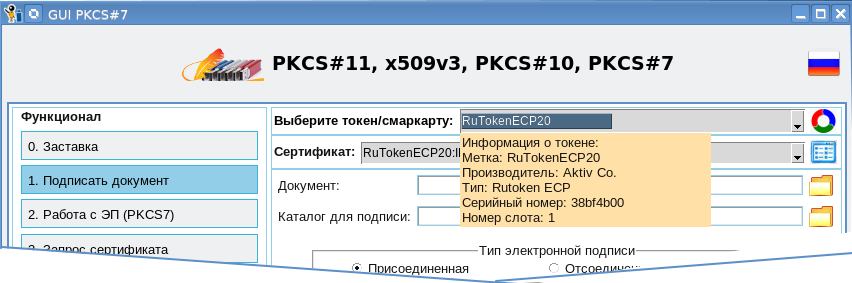
The driving force of this utility is the cryptographic token PKCS # 11 with the support of Russian cryptography at least GOST R 34.10-2012. If you are going to use public services , etc., then you need to purchase a token that has passed the certified tests in the certification system of the Federal Security Service of Russia. If this is your internal electronic document management, then it is, of course, at your discretion. PKCS # 11 tokens can be different: software, hardware, and even cloud . The utility is written in the Tcl / Tk scripting language. When you purchase a PKCS # 11 token, do not forget to get or ask about where you can download libraries for the token to be purchased for various platforms. Libraries are generally freely available. To access the cryptographic and other features of the token, the utility uses the TclPKCS11 package. The utility starts with choosing a library that supports your tokens. Note that the library can support simultaneous work with several tokens (combobox “select token / smarkartu”):
')

A question may arise: what to do if the token is not initialized or is it necessary to change PIN codes, etc.? The answer is simple - use the configuration utility tokens p11conf .
To update the list of tokens (disable the token, add a new one), just click
by icon
 to the right of the “Select a token / smartcard” combobox
In the "Certificate" combox, there are labels of all certificates stored on the selected (current) token:

If you click on the icon
 , to the right of the “Certificate” combobox, a window will appear with the contents of the certificate:
If you click on the “Save / Save” button in the viewing window, the contents of the parsed certificate in text format will be saved in the file you specified.
To view information on the current token, you can click the "6. Information on token" button or move the cursor to the token label:
In order to find out which cryptographic mechanisms are supported by the current token, just click on the button "5. List of mechanisms":

Create a certificate request
Go to the main functions of the utility. And the first such function is to create a certificate request (button “3. Request for a certificate”):
The message “Token does not support keys ...” appears if the selected token does not support generation of this type of key. In this case, you must select a different type of key or another token. In this example, you can use the token RuToken ECP 2.0 (see the second screenshot). Combobox “Certificate Holder” allows you to specify who the certificate will belong to: an individual, a legal entity or an individual entrepreneur. Depending on this, fields on the following pages will be filled in.
The significant field here is the field "Name of SKZI". It is an integral part of a qualified certificate and indicates how SKZI will generate a key pair. You can find out the name of SKPI in the form on the product or at the time of purchase of the token. Whether the type field in the information about the token matches the name of the SKZI, I find it difficult to say. So it is better to look at the form. Click the Next button and fill in the required fields:

When filling in, the utility tries to control the correctness of filling in the fields (email, OGRN, etc.), issuing appropriate warnings. After filling in the main fields, you will be asked to decide on the format and location of the certificate request on your computer. You will also be required to enter the PIN of your token:

After clicking the “Next” button, you will be asked to take another look at what you have entered and approve your decision by pressing the “Finish” key:

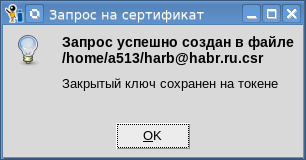
And, if you click the “Finish” button, then a key pair will be generated on your token, a request will be created and signed:
And you can make sure that the keys are generated and stored on the token? Yes. Press the "7. Token Objects" button, enter the PIN code to access the token and look for the SKO_PRIVATE_KEY and CKO_PUBLIV_KEY objects whose labels match the COMMON NANE (CN) field that you filled in when creating the certificate request. In our example, it was the “Almighty Habr”:

We looked and immediately go to another page. The best proof that the key pair has been successfully created is the presence of the signed request itself. In order to make sure of this, click the button “View request / certificate”, select the saved request, click the button “View certificate request” and look at the information on the key pair:

After making sure that the request has been successfully created, we securely hide the token with the private key or put it closer to the heart (older people know how they kept the party or Komsomol cards), copy the request to the flash drive, take the necessary documents (passport, etc.) and go to the CA to obtain a certificate. Yes, if this is not a departmental CA, then you still have to pay money. Just like with a passport .
Go for a certificate in CA
In this case, to issue a certificate to the Honorable Habra, we will use the CA from the Habr pages too. CA starts reviewing our application:

After the application has entered the CA database, the authorized administrator reviews it and either rejects or approves:

After approval of the application, the applicant, together with an authorized person from the CA, determines the purpose of using the certificate:

And after that, nothing prevents the issuance of a certificate:

After the application has entered the CA database, the authorized administrator reviews it and either rejects or approves:
After approval of the application, the applicant, together with an authorized person from the CA, determines the purpose of using the certificate:
And after that, nothing prevents the issuance of a certificate:
After issuing the certificate, the CA employee exports the issued certificate to the Venerable Habr's flash drive:

We put the certificate on the token
And now the happy owner of the certificate returns to his native lands and first of all he decides to put the certificate on the token next to the key pair. To do this, on the main utility window, click the "4. View request / certificate" button, select the file with the certificate and the "View certificate" operation, and click the button to perform the operation:

We can also check the validity of the certificate (but we have not yet had time to revoke it) or the correctness of its signature by selecting the appropriate operation:

Certificate Signature Verification Utility Code
#!/usr/bin/env tclsh package require pki load ./tclpkcs11.so Tclpkcs11 # PKCS#11 #set pkcs11_module "/usr/local/lib64/librtpkcs11ecp_2.0.so" set pkcs11_module "/usr/local/lib64/libls11sw2016.so" puts "Connect the Token and press Enter" gets stdin yes set handle [pki::pkcs11::loadmodule $pkcs11_module] set slots [pki::pkcs11::listslots $handle] set i 0 foreach slotinfo $slots { set slotid [lindex $slotinfo 0] set slotlabel [lindex $slotinfo 1] set slotflags [lindex $slotinfo 2] if {[lsearch -exact $slotflags TOKEN_PRESENT] != -1} { set token_slotlabel $slotlabel set token_slotid $slotid # incr i break } } if {$i == 0} { puts " . ." exit } # PEM DER proc ::cert_to_der {data} { if {[string first "-----BEGIN CERTIFICATE-----" $data] != -1} { set data [string map {"\r\n" "\n"} $data] } array set parsed_cert [::pki::_parse_pem $data "-----BEGIN CERTIFICATE-----" "-----END CERTIFICATE-----"] if {[string range $parsed_cert(data) 0 0 ] == "0" } { # DER- "0" == 0x30 set asnblock $parsed_cert(data) } else { set asnblock "" } return $asnblock } proc usage {use error} { puts "Copyright(C) Orlov Vladimir (http://museum.lissi-crypto.ru/) 2019" if {$use == 1} { puts $error puts "Usage:\nverify_cert_with_pkcs11 <file with certificate> \[<file with CA certificate>\]\n" } } set countcert [llength $argv] if { $countcert < 1 || $countcert > 2 } { usage 1 "Bad usage!" exit } set file [lindex $argv 0] if {![file exists $file]} { usage 1 "File $file not exist" exit } # cert_user puts "Loading user certificate: $file" set fd [open $file] chan configure $fd -translation binary set cert_user [read $fd] close $fd if {$cert_user == "" } { usage 1 "Bad file with certificate user: $file" exit } set cert_user [cert_to_der $cert_user] if {$cert_user == ""} { puts "User certificate bad" exit } catch {array set cert_parse [::pki::x509::parse_cert $cert_user]} if {![info exists cert_parse]} { puts "User certificate bad" exit } #parray cert_parse if {$countcert == 1} { if {$cert_parse(issuer) != $cert_parse(subject)} { puts "Bad usage: not self signed certificate" } else { set cert_CA $cert_user } } else { set fileca [lindex $argv 1] if {![file exists $fileca]} { usage 1 "File $fileca not exist" exit } # cert_CA puts "Loading CA certificate: $fileca" set fd [open $fileca] chan configure $fd -translation binary set cert_CA [read $fd] close $fd if {$cert_CA == "" } { usage 1 "Bad file with certificate CA=$fileca" exit } set cert_CA [cert_to_der $cert_CA] if {$cert_CA == ""} { puts "CA certificate bad" exit } } foreach slotinfo $slots { set slotid [lindex $slotinfo 0] set slotlabel [lindex $slotinfo 1] set slotflags [lindex $slotinfo 2] if {[lsearch -exact $slotflags TOKEN_PRESENT] != -1} { set token_slotlabel $slotlabel set token_slotid $slotid } } # catch {array set cert_parse_CA [::pki::x509::parse_cert $cert_CA]} if {![info exists cert_parse_CA]} { puts "CA certificate bad" exit } # if {$cert_parse(issuer) != $cert_parse_CA(subject)} { puts "Bad issuer" exit } set aa [dict create pkcs11_handle $handle pkcs11_slotid $token_slotid] set tbs_cert [binary format H* $cert_parse(cert)] catch {set signature_algo_number [::pki::_oid_name_to_number $cert_parse(signature_algo)]} if {![info exists signature_algo_number]} { set signature_algo_number $cert_parse(signature_algo) } switch -- $signature_algo_number { "1.2.643.2.2.3" - "1 2 643 2 2 3" { # "GOST R 34.10-2001 with GOST R 34.11-94" set digest_algo "gostr3411" } "1.2.643.7.1.1.3.2" - "1 2 643 7 1 1 3 2" { # "GOST R 34.10-2012-256 with GOSTR 34.11-2012-256" set digest_algo "stribog256" } "1.2.643.7.1.1.3.3" - "1 2 643 7 1 1 3 3" { # "GOST R 34.10-2012-512 with GOSTR 34.11-2012-512" set digest_algo "stribog512" } default { puts " :$signature_algo_number" exit } } # tbs-!!!! set digest_hex [pki::pkcs11::digest $digest_algo $tbs_cert $aa] # asn- # binary scan $cert_CA H* cert_CA_hex array set infopk [pki::pkcs11::pubkeyinfo $cert_CA_hex [list pkcs11_handle $handle pkcs11_slotid $token_slotid]] set lpk [dict create pkcs11_handle $handle pkcs11_slotid $token_slotid] # pybkeyinfo lappend lpk "pubkeyinfo" lappend lpk $infopk(pubkeyinfo) array set lpkar $lpk puts "Enter PIN user for you token \"$token_slotlabel\":" gets stdin password if { [pki::pkcs11::login $handle $token_slotid $password] == 0 } { puts "Bad PIN" exit } if {[catch {set verify [pki::pkcs11::verify $digest_hex $cert_parse(signature) $lpk]} res] } { puts " =$res" exit } if {$verify != 1} { puts "BAD SIGNATURE=$verify" } else { puts "SIGNATURE OK=$verify" } But we are now interested in the operation of importing the received certificate to our token. Select the operation “Import certificate to token” and click the button “Perform operation”. The utility will verify the electronic signature of the certificate. To do this, you will be required to enter the PIN to the token. And if everything goes well, the certificate will be imported to the token:

The label (nickname) of the certificate can be seen in the list of certificates:

This is our personal certificate, the certificate for which there is a key pair. And if we look through the list of objects on the token again, we will find three objects labeled “All-powerful Habr from CA 12_512” and the same CKA_ID. These three objects are the certificate itself (CKO_CERTIFICATE), public (CKO_PUBLIC_KEY) and private (CKO_PRIVATE_KEY) keys. The label for this triple of objects is set as follows:
<CN certificate holder> from <CN certificate issuer>.
Below we show how to change the label.
Now that we have put the certificate on the token, how to access it? In order to gain access to the functions of working with certificates that are on the token, just move the cursor to the “Certificate” label and press the right mouse button:

Digitally sign the first document.
Let's wait for the next article. Have to wait a couple of days. What else will be considered can be understood from the screenshot:

Source: https://habr.com/ru/post/453164/
All Articles