Software Defined Radio - how does it work? Part 4
Hi, Habr.
In the third part, it was explained how to access the SDR receiver via the Python language. Now we will get acquainted with the program GNU Radio - a system that allows you to create a fairly complex radio configuration without writing a single line of code.

')
For example, consider the problem of parallel reception of several FM-stations on one receiver. As the receiver, we will use the same RTL SDR V3.
Continued under the cut.
To get started, GNU Radio must be installed, the distribution for Windows can be downloaded here . This system is cross-platform, there are also versions under Linux and under OSX (it seems that GNU Radio was successfully launched on Raspberry Pi, but I cannot give a 100% guarantee).
In fact, GNU Radio is a whole framework for digital signal processing, in which the program is “assembled” from separate modules. There are a large number of ready-made blocks, if you wish, you can also create your own. The modules themselves are written in C ++, and Python is used to communicate the blocks with each other. Those interested can look at the API in more detail , but in practice this is most likely not useful - all actions can be done visually in the GNU Radio Companion program.
The system is focused on processing data streams, so each block usually has an input and an output. Next, connecting the blocks in the editor, we get the finished system. The GNU Radio interface itself is fairly simple, the difficulty is in understanding what a block does. As mentioned earlier, low-level SDR work has a high entry threshold and requires some knowledge of DSP and math. But we will consider a simple task for which no special knowledge is required. So let's get started.
We start GNU Radio Companion, create a new project, choose the project type WX GUI, add it to the screen and connect two blocks, as shown in the screenshot.
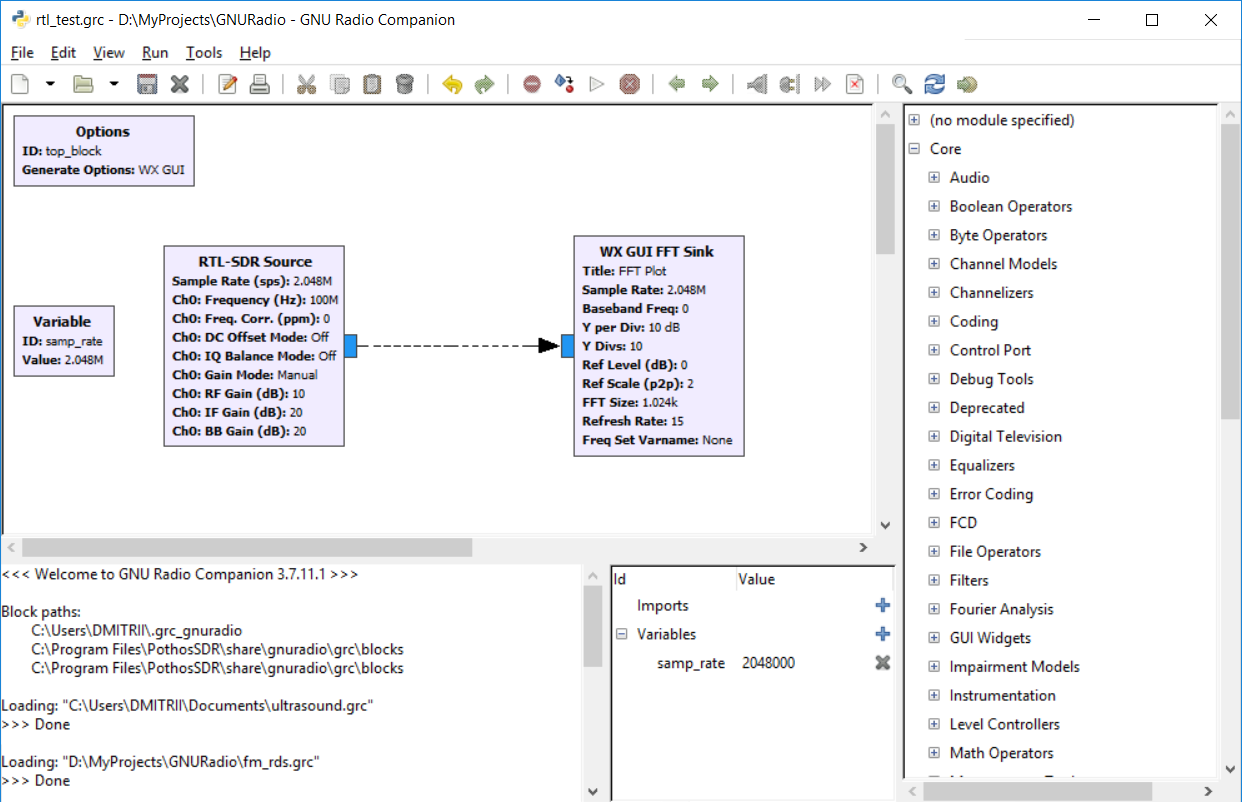
We see two types of blocks - Source (source) and Sink (output, “drain”). RTL-SDR is our receiver, FFT GUI is a virtual spectrum analyzer.
The Sample Rate variable is set to 2048000, this is the sampling rate of our receiver. The RTL-SDR frequency is left at the default of 100 MHz.
We start the project - everything works, we see the spectrum of FM stations. The first program for GNU Radio is ready!
If we look at the log, we will see such lines.
Generating: 'D: \\ MyProjects \\ GNURadio \\ top_block.py'
Executing: C: \ Python27 \ python.exe -u D: \ MyProjects \ GNURadio \ top_block.py
Yes, we can see the top_block.py file that the GNU Radio Companion generated for us. True Jedi can write directly in Python, but the required code, as we can see, is quite large. We created it in 1 minute.
However, if we remove the cumbersome initialization, we will see that there are not so many key lines of code.
So basically, you can write it manually. But the mouse is still faster. Although the ability to change the code can sometimes come in handy if you want to add some kind of non-standard logic.
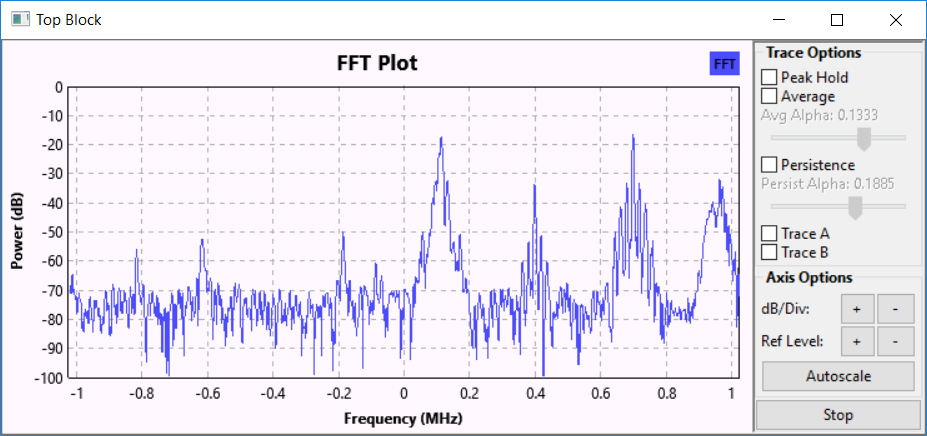
Now try to take one of the stations. As was seen from the screenshots, the center frequency of the receiver is 100 MHz and the bandwidth is about 2 MHz. On the spectrum, we see two stations, at 100.1 MHz and 100.7 MHz, respectively.
The first step is to transfer the station spectrum to the center, now it is 100 KHz to the right. To do this, we recall the school cosine multiplication formula - as a result, there will be two frequencies, a sum and a difference - the desired station will move to the center, which is what we need (and then we will filter the excess).
We create two variables for storing the freq_center = 100000000 and freq_1 = 100100000 frequencies, and also add a signal generator with the freq_center frequency - freq_1.
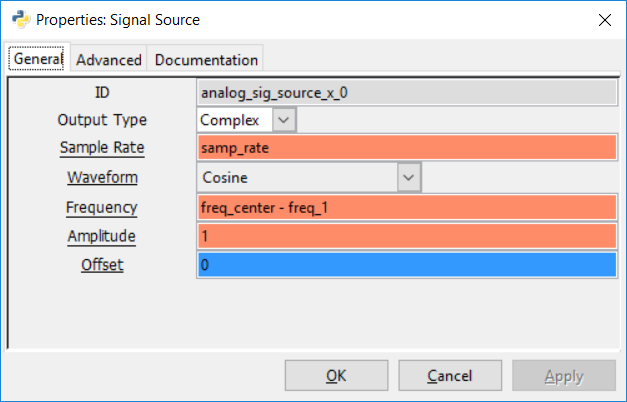
Because Since the system is based on Python, we can use expressions in the parameter input fields, which is quite convenient.
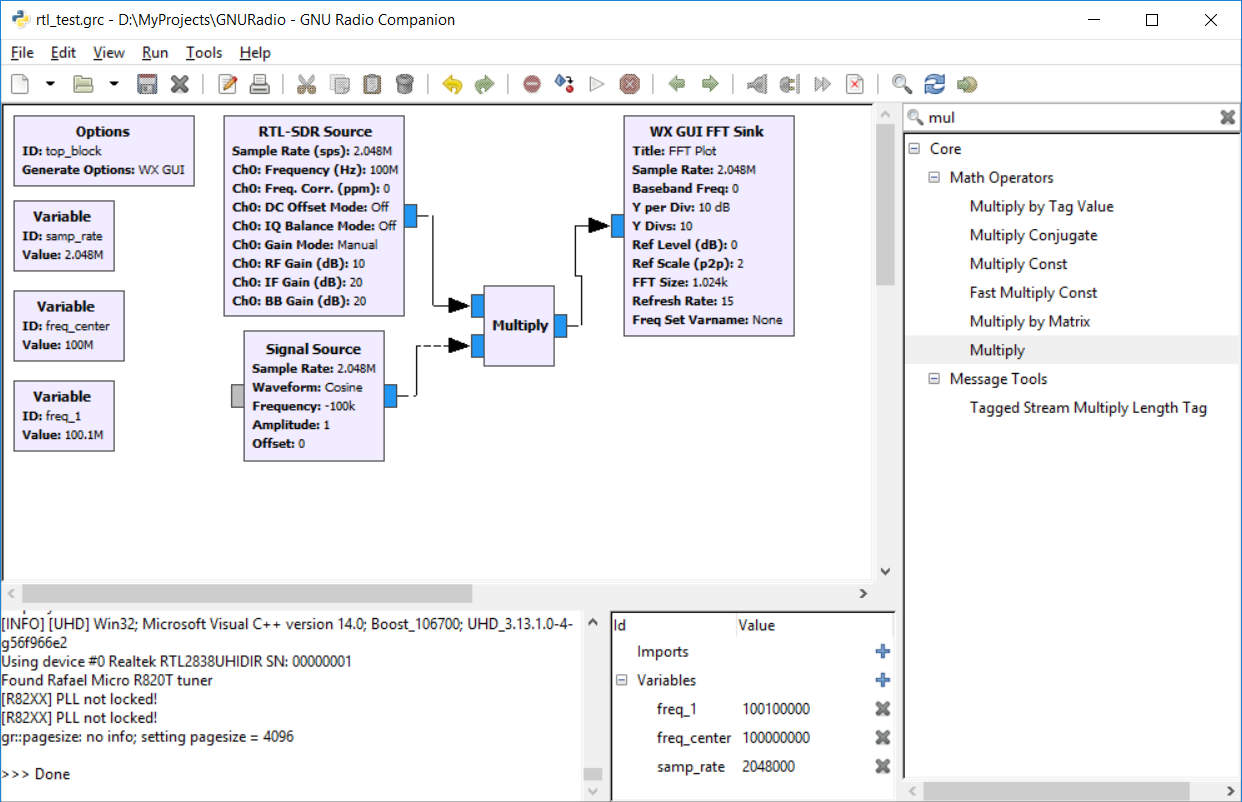
The scheme in the end should look like this:
Now you need to add several blocks at once - reduce the clock frequency of the input signal (it is equal to 2048 KHz), filter the signal, feed it to the FM decoder, then again reduce the clock frequency to 48 KHz.
The result is shown in the picture:
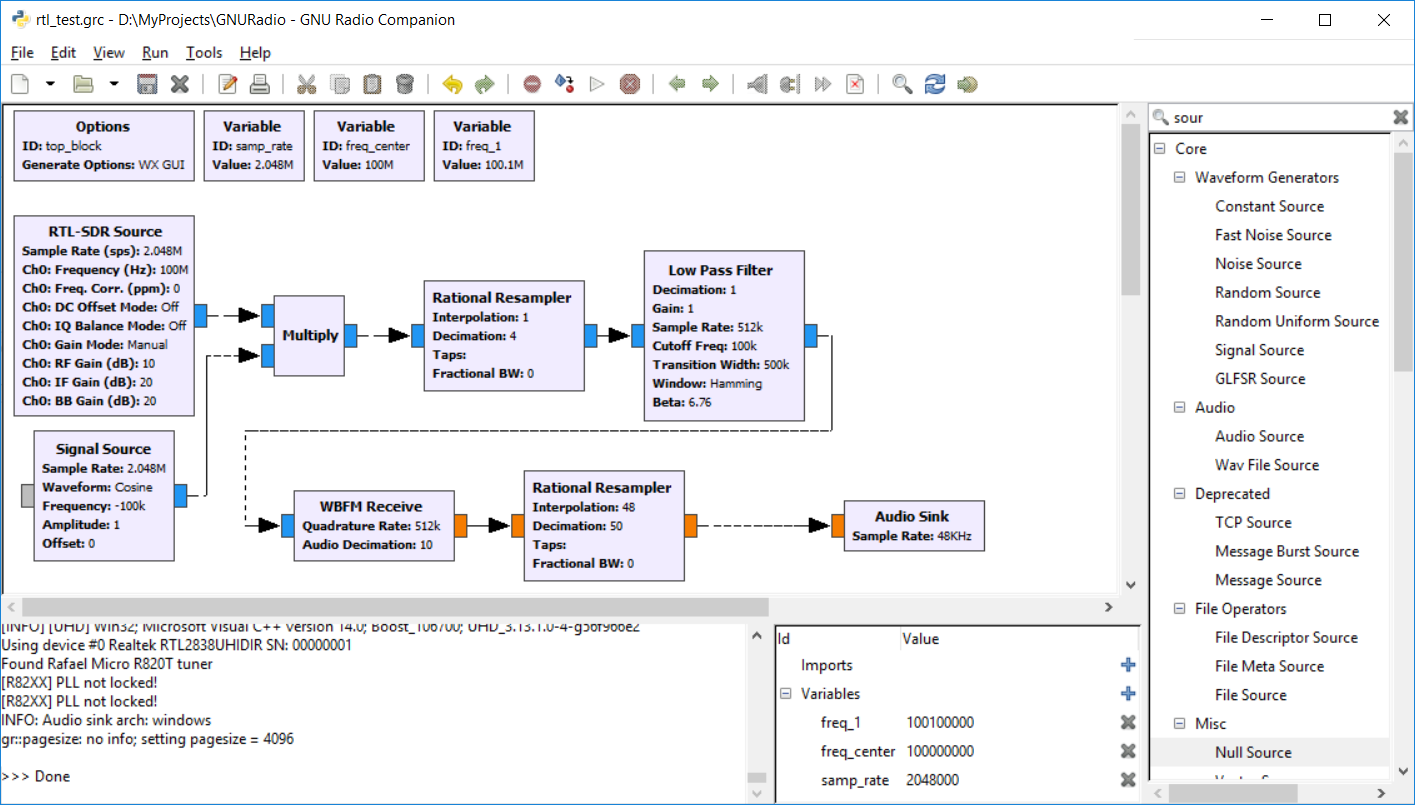
We consider carefully. We divide the clock frequency of 2048 KHz by 4 times with the Rational Resampler unit (we get 512 KHz), then after the Low Pass filter we have a WBFM decoder with decimation 10 (we get 51.2 KHz). In principle, this signal can already be sent to the sound card, but the pitch will be slightly different. Once again, we change the clock frequency to 48/51, as a result, the clock frequency will be 48.2KHz, the difference can already be neglected.
The second important point is the type of inputs. The receiver receives a complex IQ signal (inputs-outputs are blue), a real signal comes out of the FM decoder - inputs and outputs are yellow. If confused, it will not work. More was already on Habré , it is enough for us to understand the general principle.
In general, we start, we are convinced that everything works. You can run the program and listen to the radio. We will go further - we still have Software Defined radio - we will add simultaneous reception of the second station.
The second receiver is added by a favorite programmer method - Ctrl + C / Ctrl + V. Add the freq_2 variable, copy the blocks and connect them in the same way.
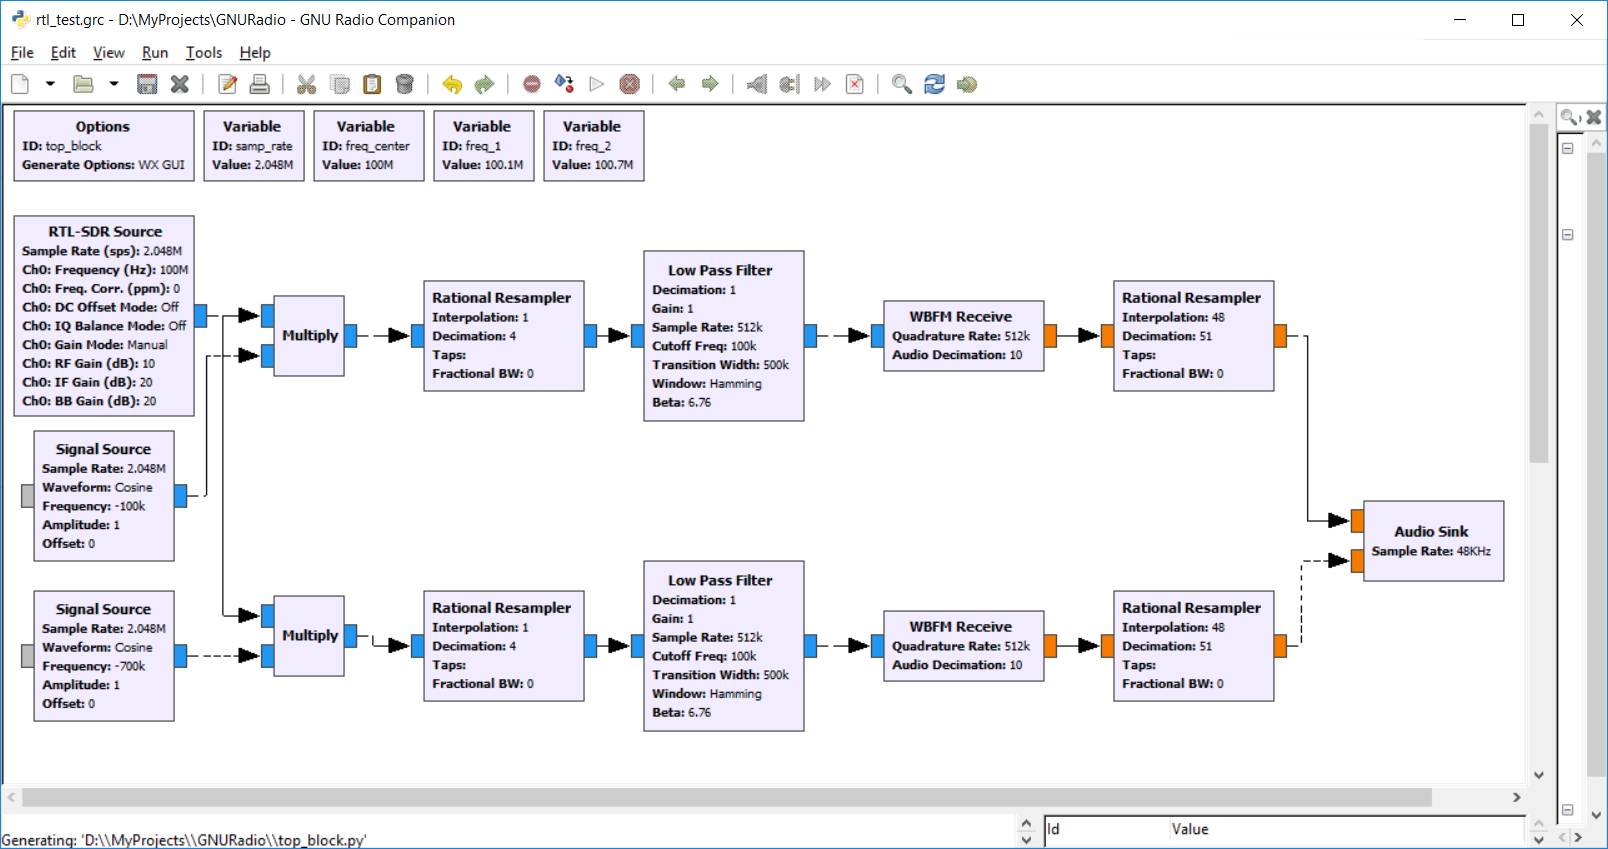
The result is quite surreal - you can listen to two FM stations simultaneously. By the same method (Ctrl + V) you can add a third station.
Listening to two stations is original, but in practice it is of little use. Let's do something more necessary, for example, add a sound recording to separate files. This can be quite convenient - several channels can be recorded in parallel from one physical receiver.
Add a File Sink component to each output, as shown in the screenshot.

For some reason, the Windows version requires absolute file paths, otherwise the recording does not work. We start, we are convinced that everything is normal. The size of the saved files is quite large, because The default format is float. Record in int format leave readers as homework.
The resulting files can be opened in Cool Edit and make sure that the sound is recorded normally.

Of course, the number of recorded channels can be increased, it is limited only by the receiver bandwidth and computer power. In addition to File Sink, you can also use UDP Sink, so the program can be used for broadcasting over the network.
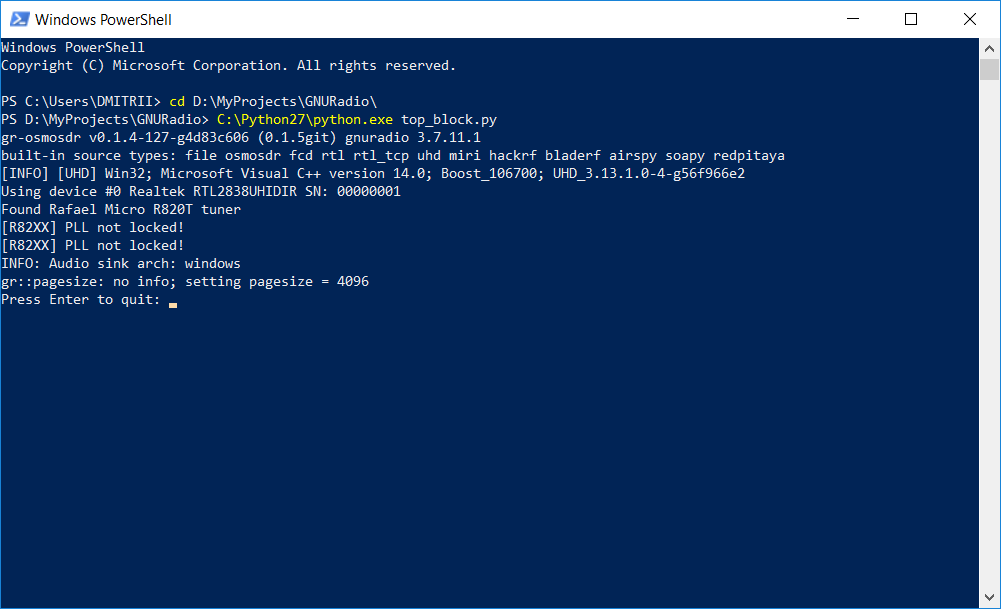
And the last. If you use the program offline, for example for multichannel recording, the UI is not needed in principle. In the upper left Options block, change the Run Options parameter to No UI. Run the program again, make sure everything works. Now save the generated file top_block.py - we can simply run it from the command line, for example from a bat-file or from the console.
If anyone is interested, the generated file is saved under the spoiler.
Conveniently, the system is cross-platform, and the resulting program can run on Linux, Windows and OSX.
We can say that GNU Radio is a rather complicated system, not in terms of drawing blocks, of course, but in terms of understanding how it all works. But some simple things to do quite feasible and interesting. GNU Radio is also convenient to use as a “virtual lab” for learning - you can connect a virtual oscilloscope or a spectrum analyzer to any part of the circuit and see what the signal looks like.
If there are no individual wishes, the topic of the SDR reception can probably be closed - all the main points have already been considered, and the number of views from the first to the third part falls almost exponentially (although you can still write about the program, but it requires more expensive " gland "for tests than RTL SDR). I hope, nevertheless, that some understanding of how this works, the readers have left. Well, all successful experiments.
In the third part, it was explained how to access the SDR receiver via the Python language. Now we will get acquainted with the program GNU Radio - a system that allows you to create a fairly complex radio configuration without writing a single line of code.
')
For example, consider the problem of parallel reception of several FM-stations on one receiver. As the receiver, we will use the same RTL SDR V3.
Continued under the cut.
Installation
To get started, GNU Radio must be installed, the distribution for Windows can be downloaded here . This system is cross-platform, there are also versions under Linux and under OSX (it seems that GNU Radio was successfully launched on Raspberry Pi, but I cannot give a 100% guarantee).
In fact, GNU Radio is a whole framework for digital signal processing, in which the program is “assembled” from separate modules. There are a large number of ready-made blocks, if you wish, you can also create your own. The modules themselves are written in C ++, and Python is used to communicate the blocks with each other. Those interested can look at the API in more detail , but in practice this is most likely not useful - all actions can be done visually in the GNU Radio Companion program.
The system is focused on processing data streams, so each block usually has an input and an output. Next, connecting the blocks in the editor, we get the finished system. The GNU Radio interface itself is fairly simple, the difficulty is in understanding what a block does. As mentioned earlier, low-level SDR work has a high entry threshold and requires some knowledge of DSP and math. But we will consider a simple task for which no special knowledge is required. So let's get started.
Beginning of work
We start GNU Radio Companion, create a new project, choose the project type WX GUI, add it to the screen and connect two blocks, as shown in the screenshot.
We see two types of blocks - Source (source) and Sink (output, “drain”). RTL-SDR is our receiver, FFT GUI is a virtual spectrum analyzer.
The Sample Rate variable is set to 2048000, this is the sampling rate of our receiver. The RTL-SDR frequency is left at the default of 100 MHz.
We start the project - everything works, we see the spectrum of FM stations. The first program for GNU Radio is ready!
If we look at the log, we will see such lines.
Generating: 'D: \\ MyProjects \\ GNURadio \\ top_block.py'
Executing: C: \ Python27 \ python.exe -u D: \ MyProjects \ GNURadio \ top_block.py
Yes, we can see the top_block.py file that the GNU Radio Companion generated for us. True Jedi can write directly in Python, but the required code, as we can see, is quite large. We created it in 1 minute.
top_blocks.py
#!/usr/bin/env python2 # -*- coding: utf-8 -*- ################################################## # GNU Radio Python Flow Graph # Title: Top Block # Generated: Wed May 22 22:05:14 2019 ################################################## if __name__ == '__main__': import ctypes import sys if sys.platform.startswith('linux'): try: x11 = ctypes.cdll.LoadLibrary('libX11.so') x11.XInitThreads() except: print "Warning: failed to XInitThreads()" from gnuradio import eng_notation from gnuradio import gr from gnuradio import wxgui from gnuradio.eng_option import eng_option from gnuradio.fft import window from gnuradio.filter import firdes from gnuradio.wxgui import fftsink2 from grc_gnuradio import wxgui as grc_wxgui from optparse import OptionParser import osmosdr import time import wx class top_block(grc_wxgui.top_block_gui): def __init__(self): grc_wxgui.top_block_gui.__init__(self, title="Top Block") ################################################## # Variables ################################################## self.samp_rate = samp_rate = 2048000 ################################################## # Blocks ################################################## self.wxgui_fftsink2_0 = fftsink2.fft_sink_c( self.GetWin(), baseband_freq=0, y_per_div=10, y_divs=10, ref_level=0, ref_scale=2.0, sample_rate=samp_rate, fft_size=1024, fft_rate=15, average=False, avg_alpha=None, title='FFT Plot', peak_hold=False, ) self.Add(self.wxgui_fftsink2_0.win) self.rtlsdr_source_0 = osmosdr.source( args="numchan=" + str(1) + " " + '' ) self.rtlsdr_source_0.set_sample_rate(samp_rate) self.rtlsdr_source_0.set_center_freq(100e6, 0) self.rtlsdr_source_0.set_freq_corr(0, 0) self.rtlsdr_source_0.set_dc_offset_mode(0, 0) self.rtlsdr_source_0.set_iq_balance_mode(0, 0) self.rtlsdr_source_0.set_gain_mode(False, 0) self.rtlsdr_source_0.set_gain(10, 0) self.rtlsdr_source_0.set_if_gain(20, 0) self.rtlsdr_source_0.set_bb_gain(20, 0) self.rtlsdr_source_0.set_antenna('', 0) self.rtlsdr_source_0.set_bandwidth(0, 0) ################################################## # Connections ################################################## self.connect((self.rtlsdr_source_0, 0), (self.wxgui_fftsink2_0, 0)) def get_samp_rate(self): return self.samp_rate def set_samp_rate(self, samp_rate): self.samp_rate = samp_rate self.wxgui_fftsink2_0.set_sample_rate(self.samp_rate) self.rtlsdr_source_0.set_sample_rate(self.samp_rate) def main(top_block_cls=top_block, options=None): tb = top_block_cls() tb.Start(True) tb.Wait() if __name__ == '__main__': main() However, if we remove the cumbersome initialization, we will see that there are not so many key lines of code.
from gnuradio import gr from gnuradio.wxgui import fftsink2 import osmosdr class top_block(grc_wxgui.top_block_gui): def __init__(self): grc_wxgui.top_block_gui.__init__(self, title="Top Block") self.samp_rate = samp_rate = 2048000 self.wxgui_fftsink2_0 = fftsink2.fft_sink_c(...) self.Add(self.wxgui_fftsink2_0.win) self.rtlsdr_source_0 = osmosdr.source(args="numchan=" + str(1) + " " + '' ) self.connect((self.rtlsdr_source_0, 0), (self.wxgui_fftsink2_0, 0)) def main(top_block_cls=top_block, options=None): tb = top_block_cls() tb.Start(True) tb.Wait() So basically, you can write it manually. But the mouse is still faster. Although the ability to change the code can sometimes come in handy if you want to add some kind of non-standard logic.
We accept FM radio
Now try to take one of the stations. As was seen from the screenshots, the center frequency of the receiver is 100 MHz and the bandwidth is about 2 MHz. On the spectrum, we see two stations, at 100.1 MHz and 100.7 MHz, respectively.
The first step is to transfer the station spectrum to the center, now it is 100 KHz to the right. To do this, we recall the school cosine multiplication formula - as a result, there will be two frequencies, a sum and a difference - the desired station will move to the center, which is what we need (and then we will filter the excess).
We create two variables for storing the freq_center = 100000000 and freq_1 = 100100000 frequencies, and also add a signal generator with the freq_center frequency - freq_1.
Because Since the system is based on Python, we can use expressions in the parameter input fields, which is quite convenient.
The scheme in the end should look like this:
Now you need to add several blocks at once - reduce the clock frequency of the input signal (it is equal to 2048 KHz), filter the signal, feed it to the FM decoder, then again reduce the clock frequency to 48 KHz.
The result is shown in the picture:
We consider carefully. We divide the clock frequency of 2048 KHz by 4 times with the Rational Resampler unit (we get 512 KHz), then after the Low Pass filter we have a WBFM decoder with decimation 10 (we get 51.2 KHz). In principle, this signal can already be sent to the sound card, but the pitch will be slightly different. Once again, we change the clock frequency to 48/51, as a result, the clock frequency will be 48.2KHz, the difference can already be neglected.
The second important point is the type of inputs. The receiver receives a complex IQ signal (inputs-outputs are blue), a real signal comes out of the FM decoder - inputs and outputs are yellow. If confused, it will not work. More was already on Habré , it is enough for us to understand the general principle.
In general, we start, we are convinced that everything works. You can run the program and listen to the radio. We will go further - we still have Software Defined radio - we will add simultaneous reception of the second station.
Multi-channel reception
The second receiver is added by a favorite programmer method - Ctrl + C / Ctrl + V. Add the freq_2 variable, copy the blocks and connect them in the same way.
The result is quite surreal - you can listen to two FM stations simultaneously. By the same method (Ctrl + V) you can add a third station.
Record
Listening to two stations is original, but in practice it is of little use. Let's do something more necessary, for example, add a sound recording to separate files. This can be quite convenient - several channels can be recorded in parallel from one physical receiver.
Add a File Sink component to each output, as shown in the screenshot.
For some reason, the Windows version requires absolute file paths, otherwise the recording does not work. We start, we are convinced that everything is normal. The size of the saved files is quite large, because The default format is float. Record in int format leave readers as homework.
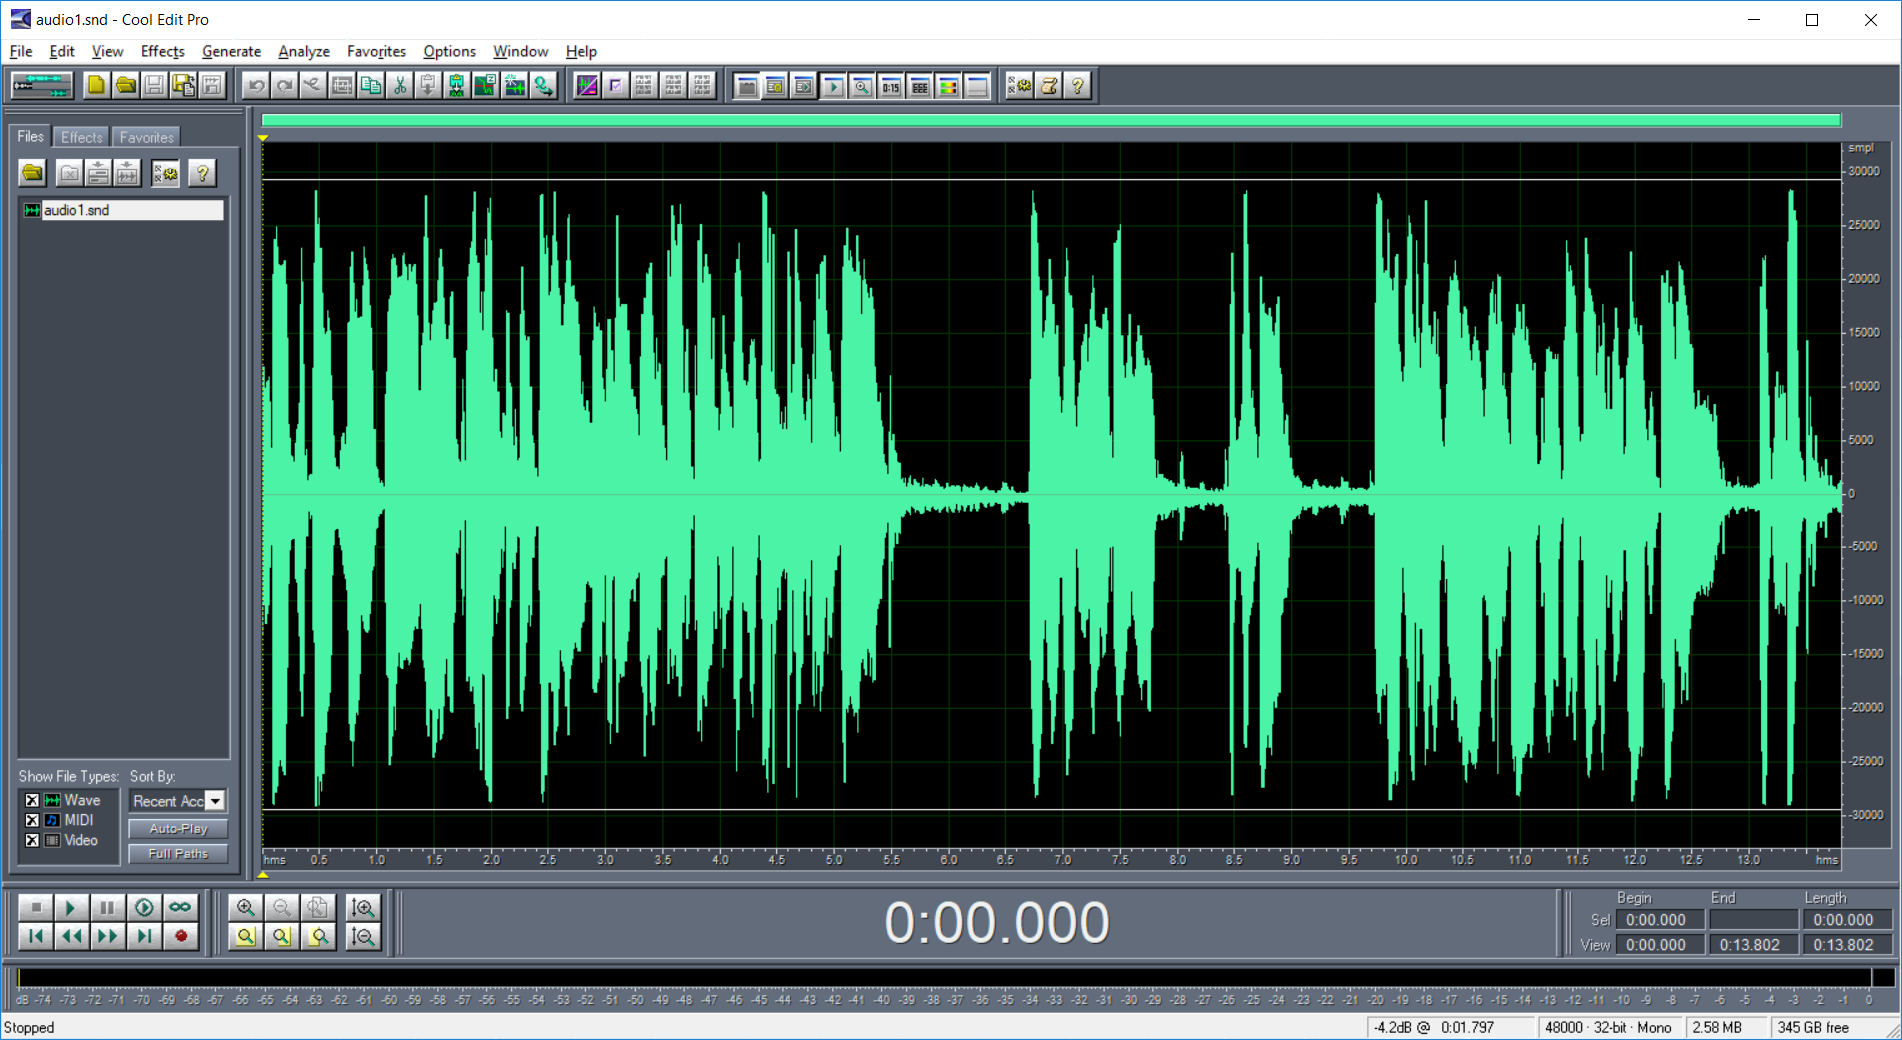
The resulting files can be opened in Cool Edit and make sure that the sound is recorded normally.
Of course, the number of recorded channels can be increased, it is limited only by the receiver bandwidth and computer power. In addition to File Sink, you can also use UDP Sink, so the program can be used for broadcasting over the network.
Run from the command line
And the last. If you use the program offline, for example for multichannel recording, the UI is not needed in principle. In the upper left Options block, change the Run Options parameter to No UI. Run the program again, make sure everything works. Now save the generated file top_block.py - we can simply run it from the command line, for example from a bat-file or from the console.
If anyone is interested, the generated file is saved under the spoiler.
recorder.py
#!/usr/bin/env python2 # -*- coding: utf-8 -*- ################################################## # GNU Radio Python Flow Graph # Title: Top Block # Generated: Fri May 24 21:47:03 2019 ################################################## from gnuradio import analog from gnuradio import audio from gnuradio import blocks from gnuradio import eng_notation from gnuradio import filter from gnuradio import gr from gnuradio.eng_option import eng_option from gnuradio.filter import firdes from optparse import OptionParser import osmosdr import time class top_block(gr.top_block): def __init__(self): gr.top_block.__init__(self, "Top Block") ################################################## # Variables ################################################## self.samp_rate = samp_rate = 2048000 self.freq_center = freq_center = 100000000 self.freq_2 = freq_2 = 100700000 self.freq_1 = freq_1 = 100100000 ################################################## # Blocks ################################################## self.rtlsdr_source_0 = osmosdr.source( args="numchan=" + str(1) + " " + '' ) self.rtlsdr_source_0.set_sample_rate(samp_rate) self.rtlsdr_source_0.set_center_freq(freq_center, 0) self.rtlsdr_source_0.set_freq_corr(0, 0) self.rtlsdr_source_0.set_dc_offset_mode(0, 0) self.rtlsdr_source_0.set_iq_balance_mode(0, 0) self.rtlsdr_source_0.set_gain_mode(False, 0) self.rtlsdr_source_0.set_gain(10, 0) self.rtlsdr_source_0.set_if_gain(20, 0) self.rtlsdr_source_0.set_bb_gain(20, 0) self.rtlsdr_source_0.set_antenna('', 0) self.rtlsdr_source_0.set_bandwidth(0, 0) self.rational_resampler_xxx_1_0 = filter.rational_resampler_fff( interpolation=48, decimation=51, taps=None, fractional_bw=None, ) self.rational_resampler_xxx_1 = filter.rational_resampler_fff( interpolation=48, decimation=51, taps=None, fractional_bw=None, ) self.rational_resampler_xxx_0_0 = filter.rational_resampler_ccc( interpolation=1, decimation=4, taps=None, fractional_bw=None, ) self.rational_resampler_xxx_0 = filter.rational_resampler_ccc( interpolation=1, decimation=4, taps=None, fractional_bw=None, ) self.low_pass_filter_0_0 = filter.fir_filter_ccf(1, firdes.low_pass( 1, samp_rate/4, 100000, 500000, firdes.WIN_HAMMING, 6.76)) self.low_pass_filter_0 = filter.fir_filter_ccf(1, firdes.low_pass( 1, samp_rate/4, 100000, 500000, firdes.WIN_HAMMING, 6.76)) self.blocks_multiply_xx_0_0 = blocks.multiply_vcc(1) self.blocks_multiply_xx_0 = blocks.multiply_vcc(1) self.blocks_file_sink_0_0 = blocks.file_sink(gr.sizeof_float*1, 'D:\\Temp\\1\\audio2.snd', False) self.blocks_file_sink_0_0.set_unbuffered(False) self.blocks_file_sink_0 = blocks.file_sink(gr.sizeof_float*1, 'D:\\Temp\\1\\audio1.snd', False) self.blocks_file_sink_0.set_unbuffered(False) self.audio_sink_0 = audio.sink(48000, '', True) self.analog_wfm_rcv_0_0 = analog.wfm_rcv( quad_rate=samp_rate/4, audio_decimation=10, ) self.analog_wfm_rcv_0 = analog.wfm_rcv( quad_rate=samp_rate/4, audio_decimation=10, ) self.analog_sig_source_x_0_0 = analog.sig_source_c(samp_rate, analog.GR_COS_WAVE, freq_center - freq_2, 1, 0) self.analog_sig_source_x_0 = analog.sig_source_c(samp_rate, analog.GR_COS_WAVE, freq_center - freq_1, 1, 0) ################################################## # Connections ################################################## self.connect((self.analog_sig_source_x_0, 0), (self.blocks_multiply_xx_0, 1)) self.connect((self.analog_sig_source_x_0_0, 0), (self.blocks_multiply_xx_0_0, 1)) self.connect((self.analog_wfm_rcv_0, 0), (self.rational_resampler_xxx_1, 0)) self.connect((self.analog_wfm_rcv_0_0, 0), (self.rational_resampler_xxx_1_0, 0)) self.connect((self.blocks_multiply_xx_0, 0), (self.rational_resampler_xxx_0, 0)) self.connect((self.blocks_multiply_xx_0_0, 0), (self.rational_resampler_xxx_0_0, 0)) self.connect((self.low_pass_filter_0, 0), (self.analog_wfm_rcv_0, 0)) self.connect((self.low_pass_filter_0_0, 0), (self.analog_wfm_rcv_0_0, 0)) self.connect((self.rational_resampler_xxx_0, 0), (self.low_pass_filter_0, 0)) self.connect((self.rational_resampler_xxx_0_0, 0), (self.low_pass_filter_0_0, 0)) self.connect((self.rational_resampler_xxx_1, 0), (self.audio_sink_0, 0)) self.connect((self.rational_resampler_xxx_1, 0), (self.blocks_file_sink_0, 0)) self.connect((self.rational_resampler_xxx_1_0, 0), (self.audio_sink_0, 1)) self.connect((self.rational_resampler_xxx_1_0, 0), (self.blocks_file_sink_0_0, 0)) self.connect((self.rtlsdr_source_0, 0), (self.blocks_multiply_xx_0, 0)) self.connect((self.rtlsdr_source_0, 0), (self.blocks_multiply_xx_0_0, 0)) def get_samp_rate(self): return self.samp_rate def set_samp_rate(self, samp_rate): self.samp_rate = samp_rate self.rtlsdr_source_0.set_sample_rate(self.samp_rate) self.low_pass_filter_0_0.set_taps(firdes.low_pass(1, self.samp_rate/4, 100000, 500000, firdes.WIN_HAMMING, 6.76)) self.low_pass_filter_0.set_taps(firdes.low_pass(1, self.samp_rate/4, 100000, 500000, firdes.WIN_HAMMING, 6.76)) self.analog_sig_source_x_0_0.set_sampling_freq(self.samp_rate) self.analog_sig_source_x_0.set_sampling_freq(self.samp_rate) def get_freq_center(self): return self.freq_center def set_freq_center(self, freq_center): self.freq_center = freq_center self.rtlsdr_source_0.set_center_freq(self.freq_center, 0) self.analog_sig_source_x_0_0.set_frequency(self.freq_center - self.freq_2) self.analog_sig_source_x_0.set_frequency(self.freq_center - self.freq_1) def get_freq_2(self): return self.freq_2 def set_freq_2(self, freq_2): self.freq_2 = freq_2 self.analog_sig_source_x_0_0.set_frequency(self.freq_center - self.freq_2) def get_freq_1(self): return self.freq_1 def set_freq_1(self, freq_1): self.freq_1 = freq_1 self.analog_sig_source_x_0.set_frequency(self.freq_center - self.freq_1) def main(top_block_cls=top_block, options=None): tb = top_block_cls() tb.start() try: raw_input('Press Enter to quit: ') except EOFError: pass tb.stop() tb.wait() if __name__ == '__main__': main() Conveniently, the system is cross-platform, and the resulting program can run on Linux, Windows and OSX.
Conclusion
We can say that GNU Radio is a rather complicated system, not in terms of drawing blocks, of course, but in terms of understanding how it all works. But some simple things to do quite feasible and interesting. GNU Radio is also convenient to use as a “virtual lab” for learning - you can connect a virtual oscilloscope or a spectrum analyzer to any part of the circuit and see what the signal looks like.
If there are no individual wishes, the topic of the SDR reception can probably be closed - all the main points have already been considered, and the number of views from the first to the third part falls almost exponentially (although you can still write about the program, but it requires more expensive " gland "for tests than RTL SDR). I hope, nevertheless, that some understanding of how this works, the readers have left. Well, all successful experiments.
Source: https://habr.com/ru/post/453038/
All Articles