Skeletal animation on the side of the video card
Not long ago, Unity introduced ECS. In the process of studying, I became interested in how to make friends with animation and ECS. And in the process of searching, I came across an interesting technique that was used by the guys from NORDVEUS in their demo for the Unite Austin 2017 report.
Unite Austin 2017 - Massive Battle in the Spellsouls Universe.
The report contains many interesting solutions, but today we will talk about the preservation of skeletal animation in the texture with a view to its further application.
Why such difficulties, you ask?
The guys from NORDVEUS simultaneously painted on the screen a large number of similar animated objects: skeletons, swordsmen. In the case of using the traditional approach: SkinnedMeshRenderers and Animation \ Animator , it will entail an increase in draw calls and an additional load on the CPU for rendering animations. And in order to solve these problems, the animation was moved to the side of the GPU, or rather to the vertex shader.
I was very interested in the approach and decided to sort it out in more detail, and since I did not find articles on this topic I got into the code. In the process of studying the issue and this article was born, and my vision for solving this problem.
So let's cut the elephant into pieces:
- Getting animation keys from clips
- Saving data to texture
- Mesh Preparation
- Shader
- Putting it all together
Retrieving animation keys from animation clips
From the SkinnedMeshRenderers component we get an array of bones and a mesh. The Animation component provides a list of available animations. So for each clip we need to preserve the transformation matrixes for all the bones of the mesh frame by frame. In other words, we save the character's pose in a unit of time.
Select the two-dimensional array in which the data will be saved. One measurement of which has the number of frames multiplied by the length of the clip in seconds. Another is the total number of bones in the mesh:
var boneMatrices = new Matrix4x4[Mathf.CeilToInt(frameRate * clip.length), renderer.bones.Length]; In the following example, alternately change frames for a clip and save matrices:
// for (var frameIndex = 0; frameIndex < totalFramesInClip; ++frameIndex) { // : 0 - , 1 - . var normalizedTime = (float) frameIndex / totalFramesInClip; // animationState.normalizedTime = normalizedTime; animation.Sample(); // for (var boneIndex = 0; j < renderer.bones.Length; boneIndex++) { // var matrix = renderer.bones[boneIndex].localToWorldMatrix * renderer.sharedMesh.bindposes[boneIndex]; // boneMatrices[i, j] = matrix; } } Matrices have a dimension of 4 by 4, but the last row always looks like (0, 0, 0, 1). Therefore for the sake of small optimization, you can skip it Which in turn will reduce the cost of data transfer between the processor and the video card.
a00 a01 a02 a03 a10 a11 a12 a13 a20 a21 a22 a23 0 0 0 1 Saving data to texture
To calculate the size of the texture multiply the total number of frames in all animation clips by the number of bones and the number of rows in the matrix (we agreed that we save the first 3 rows).
var dataSize = numberOfBones * numberOfKeyFrames * MATRIX_ROWS_COUNT); // var size = NextPowerOfTwo((int) Math.Sqrt(dataSize)); var texture = new Texture2D(size, size, TextureFormat.RGBAFloat, false) { wrapMode = TextureWrapMode.Clamp, filterMode = FilterMode.Point, anisoLevel = 0 }; Write the data to the texture. For each clip, we save transformation matrices frame by frame. The data format is as follows. Clips are recorded sequentially one by one and consist of a set of frames. Which in turn consist of a set of bones. Each bone contains 3 rows of the matrix.
Clip0[Frame0[Bone0[row0,row1,row2]...BoneN[row0,row1,row2].]...FramM[bone0[row0,row1,row2]...ClipK[...] Below is the data storage code:
var textureColor = new Color[texture.width * texture.height]; var clipOffset = 0; for (var clipIndex = 0; clipIndex < sampledBoneMatrices.Count; clipIndex++) { var framesCount = sampledBoneMatrices[clipIndex].GetLength(0); for (var keyframeIndex = 0; keyframeIndex < framesCount; keyframeIndex++) { var frameOffset = keyframeIndex * numberOfBones * 3; for (var boneIndex = 0; boneIndex < numberOfBones; boneIndex++) { var index = clipOffset + frameOffset + boneIndex * 3; var matrix = sampledBoneMatrices[clipIndex][keyframeIndex, boneIndex]; textureColor[index + 0] = matrix.GetRow(0); textureColor[index + 1] = matrix.GetRow(1); textureColor[index + 2] = matrix.GetRow(2); } } } texture.SetPixels(textureColor); texture.Apply(false, false); Mesh Preparation
Add an additional set of texture coordinates, in which we will save for each vertex the bone indices associated with it and the weight of the influence of the bone on this vertex.
Unity provides a data structure in which up to 4 bones are possible for a single vertex. Below is the code to write this data to uv. Maintain bone indices in UV1, weights in UV2.
var boneWeights = mesh.boneWeights; var boneIds = new List<Vector4>(mesh.vertexCount); var boneInfluences = new List<Vector4>(mesh.vertexCount); for (var i = 0; i < mesh.vertexCount; i++) { boneIds.Add(new Vector4(bw.boneIndex0, bw.boneIndex1, bw.boneIndex2, bw.boneIndex3); boneInfluences.Add(new Vector4(bw.weight0, bw.weight1, bw.weight2, bw.weight3)); } mesh.SetUVs(1, boneIds); mesh.SetUVs(2, boneInfluences); Shader
The main task of the shader is to find the transformation matrix for the bone associated with the vertex and multiply the coordinates of the vertex by this matrix. To do this, we need an additional set of coordinates with indices and bone weights. We also need the index of the current frame, it will change over time and will be transmitted from the CPU.
// frameOffset = clipOffset + frameIndex * clipLength * 3 - CPU // boneIndex - , UV1 int index = frameOffset + boneIndex * 3; So we got the index of the first row of the matrix, the index of the second and third will be +1, +2, respectively. It remains to translate the one-dimensional index into the normalized coordinates of the texture and for this we need the size of the texture.
inline float4 IndexToUV(int index, float2 size) { return float4(((float)((int)(index % size.x)) + 0.5) / size.x, ((float)((int)(index / size.x)) + 0.5) / size.y, 0, 0); } Subtracting the rows we collect the matrix without forgetting about the last row, which is always equal (0, 0, 0, 1).
float4 row0 = tex2Dlod(frameOffset, IndexToUV(index + 0, animationTextureSize)); float4 row1 = tex2Dlod(frameOffset, IndexToUV(index + 1, animationTextureSize)); float4 row2 = tex2Dlod(frameOffset, IndexToUV(index + 2, animationTextureSize)); float4 row3 = float4(0, 0, 0, 1); return float4x4(row0, row1, row2, row3); Simultaneously several bones can influence one vertex at once. The resulting matrix will be the sum of all matrices affecting the vertex multiplied by the weight of their influence.
float4x4 m0 = CreateMatrix(frameOffset, bones.x) * boneInfluences.x; float4x4 m1 = CreateMatrix(frameOffset, bones.y) * boneInfluences.y; float4x4 m2 = CreateMatrix(frameOffset, bones.z) * boneInfluences.z; float4x4 m3 = CreateMatrix(frameOffset, bones.w) * boneInfluences.w; return m0 + m1 + m2 + m3; Having obtained the matrix we multiply it by the coordinates of the vertex. Therefore, all the vertices will be moved to the character pose that corresponds to the current frame. Changing the frame, we will animate the character.
Putting it all together
To display the objects, we will use Graphics.DrawMeshInstancedIndirect, into which we will transfer the prepared mesh and material. Also in the material we have to transfer a texture with animations the size of the texture and an array with pointers to the frame for each object at the current time. As additional information, we transfer the position for each object and turn. How to change the position and rotation on the shader side can be found in [article] .
In the Update method, we increase the time passed from the beginning of the animation to Time.deltaTime.
In order to calculate the frame index, we must normalize the time by dividing it by the length of the clip. Therefore, the frame index in the clip will be the product of the normalized time and the number of frames. And the frame index in texture will be the sum of the shift of the beginning of the current clip and the product of the current frame and the amount of data stored in this frame.
var offset = clipStart + frameIndex * bonesCount * 3.0f That's probably all and transferring all the data to the shader, call Graphics.DrawMeshInstancedIndirect with the prepared mesh and material.
findings
Testing this technique on a machine with a 1050 video card showed a performance gain of about 2 times.
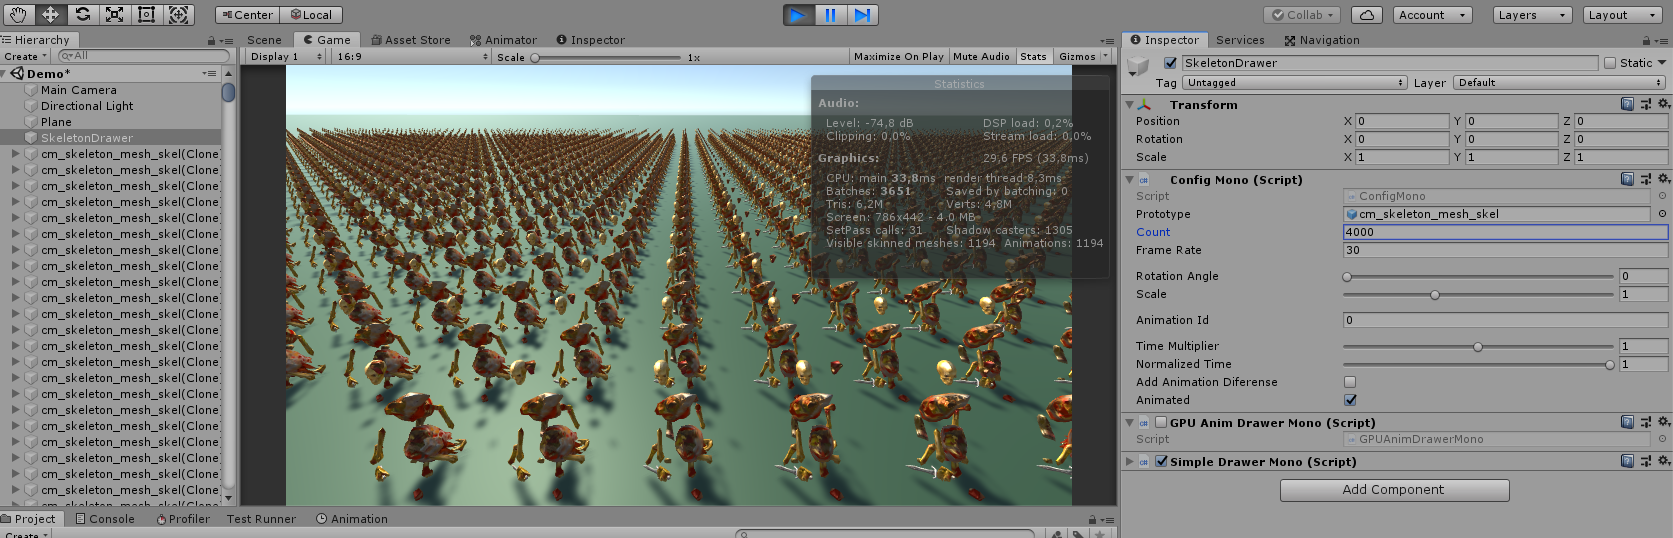
Animate 4000 same objects on a CPU
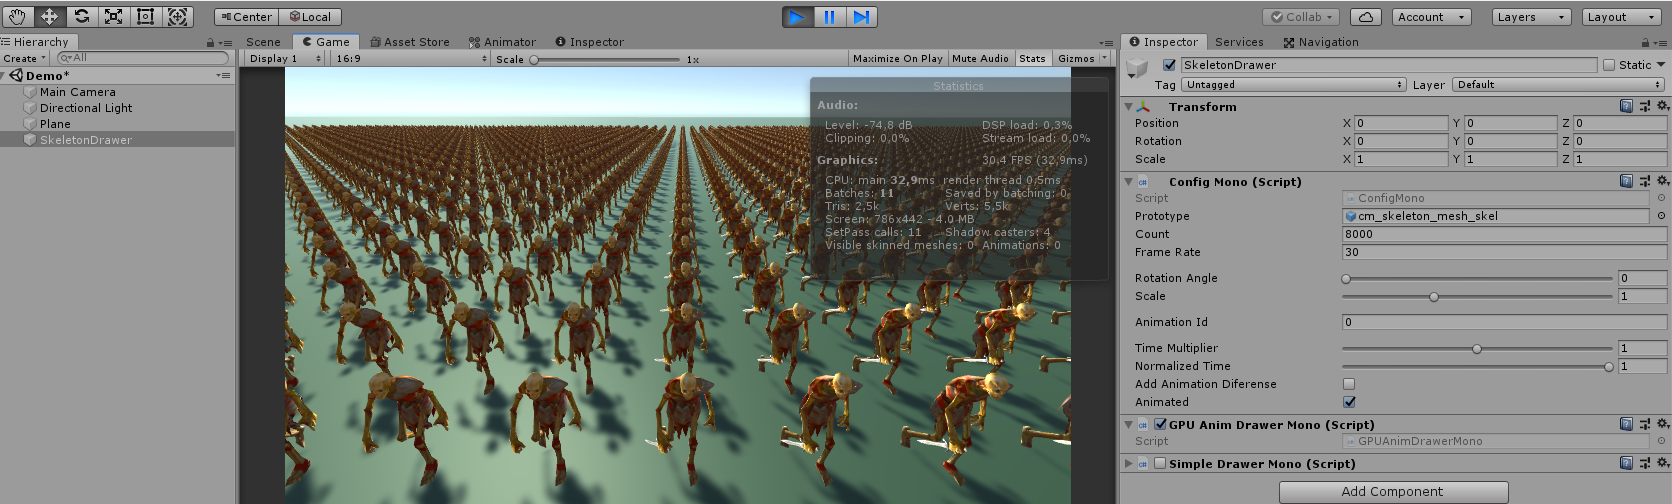
Animating 8000 GPU-like Objects
At the same time, testing this scene on macbook pro 15 with an integrated video card shows the opposite result. The GPU shamelessly loses (about 2-3 times), which is not surprising.
Video card animation is another tool that can be used in your application. But like all tools it should be used wisely and to the point.
Links
')
- Animation Instancing - Instancing for SkinnedMeshRenderer
- GPUSkinning - improve performance.
- UniteAustinTechnicalPresentation - ECS demo
[GitHub project code]
Thanks for attention.
PS: I am new to Unity and I do not know all the subtleties, the article may contain inaccuracies. I hope to fix them with your help and understand the topic better.
Source: https://habr.com/ru/post/452416/
All Articles