Writing a secure browser extension

In contrast to the common "client-server" architecture, for decentralized applications it is typical:
- No need to store a database with usernames and passwords. Information for access is stored solely with the users themselves, and confirmation of their authenticity occurs at the protocol level.
- No need to use a server. Application logic can run in a blockchain network, where it is possible to store the necessary amount of data.
There are 2 relatively safe storages for user keys - hardware wallets and browser extensions. Hardware wallets for the most part are as safe as possible, but difficult to use and far from free, but browser extensions are the perfect combination of security and ease of use, and can still be completely free for end users.
Considering all this, we wanted to make the most secure extension that simplifies the development of decentralized applications by providing a simple API for working with transactions and signatures.
We will tell you about this experience below.
The article will be step by step instructions on how to write a browser extension, with code examples and screenshots. All code can be found in the repository . Each commit logically corresponds to the section of this article.
Brief history of browser extensions
Browser extensions have been around for a long time. In Internet Explorer, they appeared in 1999, in Firefox - in 2004. However, for a very long time there was no single standard for extensions.
We can say that it appeared along with extensions in the fourth version of Google Chrome. Of course, there was no specification at that time, but it was the Chrome API that became its basis: having conquered most of the browser market and having a built-in application store, Chrome actually set the standard for browser extensions.
Mozilla had its own standard, but, seeing the popularity of extensions for Chrome, the company decided to make a compatible API. In 2015, on the initiative of Mozilla, the World Wide Web Consortium (W3C) created a special group to work on the specifications of cross-browser extensions.
The basis was taken already existing API extensions for Chrome. The work was conducted with the support of Microsoft (Google refused to participate in the development of the standard), and as a result a draft specification appeared.
Formally, the specification is supported by Edge, Firefox and Opera (note that Chrome is missing from this list). But in fact, the standard is largely compatible with Chrome, since it is actually written on the basis of its extensions. Learn more about the WebExtensions API here .
Expansion structure
The only file that is necessary for the extension is the manifest (manifest.json). It is also the “entry point” to the extension.
Manifesto
According to the specification, the manifest file is a valid JSON file. A full description of the manifest keys with information about which keys are supported in which browser can be found here .
Keys that are not in the specification can “be” ignored (both Chrome and Firefox write errors, but the extensions continue to work).
And I would like to draw attention to some points.
- background - an object that includes the following fields:
- scripts - an array of scripts that will be executed in a background context (let's talk about this a bit later);
- page - instead of scripts that will be executed in a blank page, you can specify html with content. In this case, the script field will be ignored, and the scripts will need to be inserted into the content page;
- persistent - a binary flag, if not specified, the browser will "kill" the background-process when it considers that it does nothing, and restart if necessary. Otherwise, the page will be unloaded only when the browser is closed. Not supported in Firefox.
- content_scripts - an array of objects that allows you to upload different scripts to different web pages. Each object contains the following important fields:
- matches - the url pattern by which it is determined whether a specific content script will be included or not.
- js - list of scripts to be loaded into this match;
- exclude_matches - excludes from the
matchfield URLs that match this field.
- page_action is actually an object that is responsible for the icon that is displayed next to the address bar in the browser, and interaction with it. Allows you to also show the popup window, which is set using your HTML, CSS and JS.
- default_popup - the path to the HTML file with a popup interface, may contain CSS and JS.
- permissions is an array for managing extension rights. There are 3 types of rights, which are described in detail here.
- web_accessible_resources - extension resources that a web page can request, for example, images, JS, CSS, HTML files.
- externally_connectable - here you can explicitly specify the ID of other extensions and domains of web pages from which you can connect. Domain can be of the second level and higher. It does not work in Firefox.
Execution context
The extension has three contexts of code execution, that is, the application consists of three parts with different levels of access to the browser's API.
Extension context
Most of the API is available here. In this context, "live":
- The background page is the “backend” part of the extension. The file is indicated in the manifest by the key “background”.
- Popup page - a popup page that appears when you click on the extension icon. In the
browser_actionmanifest ->default_popup. - Custom page - the extension page, "living" in a separate tab of the form
chrome-extension://<id_>/customPage.html.
This context exists independently of browser windows and tabs. The background page exists in a single copy and always works (the exception is the event page, when the background script runs on an event and "dies" after its execution). A popup page exists when the popup window is open, and a Custom page page is open with it. There is no access to other tabs and their contents from this context.
Content script context
The content script file is launched with each browser tab. It has access to parts of the extension API and to the web page's DOM tree. Content scripts are responsible for interacting with the page. Extensions that manipulate the DOM tree do so in content scripts — for example, ad blockers or translators. Also the content script can communicate with the page via standard postMessage .
Web page context
This is the actual webpage itself. It has nothing to do with the extension and does not have access there, except when the domain of this page is not explicitly indicated in the manifest (see below).
Message exchange
Different parts of the application should exchange messages with each other. For this, there is an API runtime.sendMessage for sending a message background and tabs.sendMessage for sending a message to a page (content script, popup or web page if externally_connectable ). Below is an example when accessing the Chrome API.
// JSON const msg = {a: 'foo', b: 'bar'}; // extensionId , '' ( ui ) chrome.runtime.sendMessage(extensionId, msg); // chrome.runtime.onMessage.addListener((msg) => console.log(msg)) // id chrome.tabs.sendMessage(tabId, msg) // id , , chrome.tabs.query( {currentWindow: true, active : true}, function(tabArray){ tabArray.forEach(tab => console.log(tab.id)) } ) For full communication, you can create connections via runtime.connect . In response, we get a runtime.Port , in which, while it is open, you can send any number of messages. On the client side, for example, contentscript , it looks like this:
// extensionId . const port = chrome.runtime.connect({name: "knockknock"}); port.postMessage({joke: "Knock knock"}); port.onMessage.addListener(function(msg) { if (msg.question === "Who's there?") port.postMessage({answer: "Madame"}); else if (msg.question === "Madame who?") port.postMessage({answer: "Madame... Bovary"}); Server or background:
// '' . , popup chrome.runtime.onConnect.addListener(function(port) { console.assert(port.name === "knockknock"); port.onMessage.addListener(function(msg) { if (msg.joke === "Knock knock") port.postMessage({question: "Who's there?"}); else if (msg.answer === "Madame") port.postMessage({question: "Madame who?"}); else if (msg.answer === "Madame... Bovary") port.postMessage({question: "I don't get it."}); }); }); // . , chrome.runtime.onConnectExternal.addListener(function(port) { ... }); There is also an onDisconnect event and a disconnect method.
Application schema
Let's make a browser extension that stores private keys, provides access to public information (address, public key communicates with the page and allows third-party applications to request transaction signatures.
Application development
Our application must both interact with the user and provide an API page for calling methods (for example, for signing transactions). It will not be possible to do only contentscript , since it has access only to the DOM, but not to the JS page. We cannot connect via runtime.connect , because the API is needed on all domains, and only specific ones can be specified in the manifest. As a result, the scheme will look like this:

There will be another script - inpage , which we will inject into the page. It will run in its context and provide an API for working with the extension.
Start
All browser extension code is available on GitHub . During the description there will be links to commits.
Let's start with the manifest:
{ // , . chrome://extensions/?id=<id > "name": "Signer", "description": "Extension demo", "version": "0.0.1", "manifest_version": 2, // , background, "background": { "scripts": ["background.js"] }, // html popup "browser_action": { "default_title": "My Extension", "default_popup": "popup.html" }, // . // : url http https // contenscript context contentscript.js. "content_scripts": [ { "matches": [ "http://*/*", "https://*/*" ], "js": [ "contentscript.js" ], "run_at": "document_start", "all_frames": true } ], // localStorage idle api "permissions": [ "storage", // "unlimitedStorage", //"clipboardWrite", "idle" //"activeTab", //"webRequest", //"notifications", //"tabs" ], // , . fetche' xhr "web_accessible_resources": ["inpage.js"] } Create empty background.js, popup.js, inpage.js and contentscript.js. Add popup.html - and our application can already be downloaded to Google Chrome and make sure that it works.
To verify this, you can get the code from here . In addition to what we did, the link is configured to build the project using a webpack. To add an application to the browser, in chrome: // extensions you need to select load unpacked and a folder with the appropriate extension - in our case dist.

Now our extension is installed and working. You can launch developer tools for different contexts as follows:
popup ->

Access to the content script console is through the console of the page itself, on which it is running. 
Message exchange
So, we need to establish two communication channels: inpage <-> background and popup <-> background. You can, of course, just send messages to the port and invent your own protocol, but I prefer the approach that I spied in the open source metamask project.
This is a browser extension for working with the Ethereum network. In it, different parts of the application communicate via RPC using the dnode library. It allows you to quickly and conveniently organize an exchange if you provide nodejs stream as the transport (meaning an object that implements the same interface):
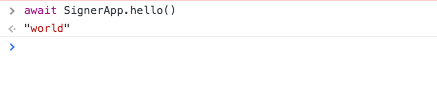
import Dnode from "dnode/browser"; // , // C // API, const dnode = Dnode({ hello: (cb) => cb(null, "world") }) // , dnode. nodejs . 'readable-stream' connectionStream.pipe(dnode).pipe(connectionStream) // const dnodeClient = Dnode() // API // world dnodeClient.once('remote', remote => { remote.hello(((err, value) => console.log(value))) }) Now we will create an application class. It will create API objects for popup and web pages, and also create dnode for them:
import Dnode from 'dnode/browser'; export class SignerApp { // API ui popupApi(){ return { hello: cb => cb(null, 'world') } } // API pageApi(){ return { hello: cb => cb(null, 'world') } } // popup ui connectPopup(connectionStream){ const api = this.popupApi(); const dnode = Dnode(api); connectionStream.pipe(dnode).pipe(connectionStream); dnode.on('remote', (remote) => { console.log(remote) }) } // connectPage(connectionStream, origin){ const api = this.popupApi(); const dnode = Dnode(api); connectionStream.pipe(dnode).pipe(connectionStream); dnode.on('remote', (remote) => { console.log(origin); console.log(remote) }) } } Hereinafter, instead of the global Chrome object, we use extentionApi, which accesses Chrome in a browser from Google and browser in others. This is done for cross-browser compatibility, but within the framework of this article one could use just 'chrome.runtime.connect'.
Create an application instance in the background script:
import {extensionApi} from "./utils/extensionApi"; import {PortStream} from "./utils/PortStream"; import {SignerApp} from "./SignerApp"; const app = new SignerApp(); // onConnect '' (contentscript, popup, ) extensionApi.runtime.onConnect.addListener(connectRemote); function connectRemote(remotePort) { const processName = remotePort.name; const portStream = new PortStream(remotePort); // , , ui if (processName === 'contentscript'){ const origin = remotePort.sender.url app.connectPage(portStream, origin) }else{ app.connectPopup(portStream) } } Since dnode works with streams, and we get a port, we need an adapter class. It is made using the readable-stream library, which implements nodejs streams in the browser:
import {Duplex} from 'readable-stream'; export class PortStream extends Duplex{ constructor(port){ super({objectMode: true}); this._port = port; port.onMessage.addListener(this._onMessage.bind(this)); port.onDisconnect.addListener(this._onDisconnect.bind(this)) } _onMessage(msg) { if (Buffer.isBuffer(msg)) { delete msg._isBuffer; const data = new Buffer(msg); this.push(data) } else { this.push(msg) } } _onDisconnect() { this.destroy() } _read(){} _write(msg, encoding, cb) { try { if (Buffer.isBuffer(msg)) { const data = msg.toJSON(); data._isBuffer = true; this._port.postMessage(data) } else { this._port.postMessage(msg) } } catch (err) { return cb(new Error('PortStream - disconnected')) } cb() } } Now we create a connection in the UI:
import {extensionApi} from "./utils/extensionApi"; import {PortStream} from "./utils/PortStream"; import Dnode from 'dnode/browser'; const DEV_MODE = process.env.NODE_ENV !== 'production'; setupUi().catch(console.error); async function setupUi(){ // , , stream, dnode const backgroundPort = extensionApi.runtime.connect({name: 'popup'}); const connectionStream = new PortStream(backgroundPort); const dnode = Dnode(); connectionStream.pipe(dnode).pipe(connectionStream); const background = await new Promise(resolve => { dnode.once('remote', api => { resolve(api) }) }); // API if (DEV_MODE){ global.background = background; } } Then we create a connection in the content script:
import {extensionApi} from "./utils/extensionApi"; import {PortStream} from "./utils/PortStream"; import PostMessageStream from 'post-message-stream'; setupConnection(); injectScript(); function setupConnection(){ const backgroundPort = extensionApi.runtime.connect({name: 'contentscript'}); const backgroundStream = new PortStream(backgroundPort); const pageStream = new PostMessageStream({ name: 'content', target: 'page', }); pageStream.pipe(backgroundStream).pipe(pageStream); } function injectScript(){ try { // inject in-page script let script = document.createElement('script'); script.src = extensionApi.extension.getURL('inpage.js'); const container = document.head || document.documentElement; container.insertBefore(script, container.children[0]); script.onload = () => script.remove(); } catch (e) { console.error('Injection failed.', e); } } Since we need the API not in the content script, but directly on the page, we do two things:
- Create two streams. One - in the side of the page, on top of postMessage. For this we use this package from the creators of metamask. The second stream - to the background on top of the port received from
runtime.connect. Paypim them. Now the page will stream to the background. - Inject a script into the DOM. We extort the script (access to it was allowed in the manifest) and create a
scripttag with its contents inside:
import PostMessageStream from 'post-message-stream'; import {extensionApi} from "./utils/extensionApi"; import {PortStream} from "./utils/PortStream"; setupConnection(); injectScript(); function setupConnection(){ // const backgroundPort = extensionApi.runtime.connect({name: 'contentscript'}); const backgroundStream = new PortStream(backgroundPort); // const pageStream = new PostMessageStream({ name: 'content', target: 'page', }); pageStream.pipe(backgroundStream).pipe(pageStream); } function injectScript(){ try { // inject in-page script let script = document.createElement('script'); script.src = extensionApi.extension.getURL('inpage.js'); const container = document.head || document.documentElement; container.insertBefore(script, container.children[0]); script.onload = () => script.remove(); } catch (e) { console.error('Injection failed.', e); } } Now create an api object in inpage and set it to global:
import PostMessageStream from 'post-message-stream'; import Dnode from 'dnode/browser'; setupInpageApi().catch(console.error); async function setupInpageApi() { // const connectionStream = new PostMessageStream({ name: 'page', target: 'content', }); const dnode = Dnode(); connectionStream.pipe(dnode).pipe(connectionStream); // API const pageApi = await new Promise(resolve => { dnode.once('remote', api => { resolve(api) }) }); // window global.SignerApp = pageApi; } We have a Remote Procedure Call (RPC) with a separate API for the page and UI . When you connect a new page to the background, we can see it:
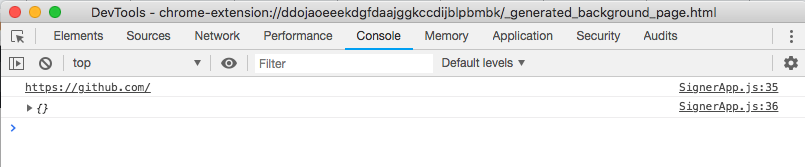
Empty API and origin. On the side of the page, we can call the hello function like this:

Working with callback functions in modern JS is a moveton, so we will write a small helper to create a dnode, which allows you to pass an API to the utils.
API objects will now look like this:
export class SignerApp { popupApi() { return { hello: async () => "world" } } ... } Getting the object from the remote like this:
import {cbToPromise, transformMethods} from "../../src/utils/setupDnode"; const pageApi = await new Promise(resolve => { dnode.once('remote', remoteApi => { // callback promise resolve(transformMethods(cbToPromise, remoteApi)) }) }); And the function call returns a promise:
A version with asynchronous functions is available here .
In general, the approach with RPC and streams seems to be quite flexible: we can use steam multiplexing and create several different APIs for different tasks. In principle, dnode can be used anywhere, the main thing is to wrap the transport in the form of nodejs stream.
An alternative is the JSON format, which implements the JSON RPC 2 protocol. However, it works with specific transports (TCP and HTTP (S)), which is not applicable in our case.
Internal state and localStorage
We will need to store the internal state of the application - at least the keys for the signature. We can quite easily add a state to the application and methods to change it in the popup API:
import {setupDnode} from "./utils/setupDnode"; export class SignerApp { constructor(){ this.store = { keys: [], }; } addKey(key){ this.store.keys.push(key) } removeKey(index){ this.store.keys.splice(index,1) } popupApi(){ return { addKey: async (key) => this.addKey(key), removeKey: async (index) => this.removeKey(index) } } ... } In the background, let's wrap everything into a function and write the application object to the window so that you can work with it from the console:
import {extensionApi} from "./utils/extensionApi"; import {PortStream} from "./utils/PortStream"; import {SignerApp} from "./SignerApp"; const DEV_MODE = process.env.NODE_ENV !== 'production'; setupApp(); function setupApp() { const app = new SignerApp(); if (DEV_MODE) { global.app = app; } extensionApi.runtime.onConnect.addListener(connectRemote); function connectRemote(remotePort) { const processName = remotePort.name; const portStream = new PortStream(remotePort); if (processName === 'contentscript') { const origin = remotePort.sender.url; app.connectPage(portStream, origin) } else { app.connectPopup(portStream) } } } Add a few keys from the UI console and see what happened with the state:

The state needs to be made persistent, so that when restarting, the keys are not lost.
We will store in localStorage, overwriting with each change. Subsequently, access to it will also be necessary for the UI, and I also want to subscribe to changes. Based on this, it will be convenient to make observable storage and subscribe to its changes.
We will use the mobx library ( https://github.com/mobxjs/mobx ). The choice fell on her, because she did not have to work with her, but really wanted to study her.
Add initialization of the initial state and make the store observable:
import {observable, action} from 'mobx'; import {setupDnode} from "./utils/setupDnode"; export class SignerApp { constructor(initState = {}) { // store , proxy, this.store = observable.object({ keys: initState.keys || [], }); } // , observable @action addKey(key) { this.store.keys.push(key) } @action removeKey(index) { this.store.keys.splice(index, 1) } ... } "Under the hood" mobx replaced all fields of the store with a proxy and intercepts all calls to them. You can subscribe to these requests.
In the following, I will often use the term “under change”, although this is not entirely correct. Mobx tracks access to the fields. The getters and setters of the proxy objects that the library creates are used.
Action decorators serve two purposes:
- In strict mode with the enforceActions flag, mobx prohibits changing the state directly. It is considered a good form to work in strict mode.
- Even if the function changes the state several times - for example, we change several fields in several lines of code, - the observers are notified only after its completion. This is especially important for the frontend, where unnecessary updates to the state lead to unnecessary rendering of elements. In our case, neither the first nor the second is particularly relevant, but we will follow the best practices. Decorators decided to hang on all functions that change the state of the observed fields.
In the background we add initialization and saving the state in localStorage:
import {reaction, toJS} from 'mobx'; import {extensionApi} from "./utils/extensionApi"; import {PortStream} from "./utils/PortStream"; import {SignerApp} from "./SignerApp"; // . / / localStorage JSON 'store' import {loadState, saveState} from "./utils/localStorage"; const DEV_MODE = process.env.NODE_ENV !== 'production'; setupApp(); function setupApp() { const initState = loadState(); const app = new SignerApp(initState); if (DEV_MODE) { global.app = app; } // Setup state persistence // reaction , . , const localStorageReaction = reaction( () => toJS(app.store), // - saveState // , , ); extensionApi.runtime.onConnect.addListener(connectRemote); function connectRemote(remotePort) { const processName = remotePort.name; const portStream = new PortStream(remotePort); if (processName === 'contentscript') { const origin = remotePort.sender.url app.connectPage(portStream, origin) } else { app.connectPopup(portStream) } } } The reaction function is interesting here. She has two arguments:
- Data selector
- The handler that will be called with this data every time it changes.
Unlike redux, where we explicitly get the state as an argument, mobx remembers which observable we are accessing inside the selector, and only when they change it calls the handler.
It is important to understand exactly how mobx decides which observable we subscribe to. If in the code I wrote a selector like this () => app.store , then the reaction will never be called, since the storage itself is not observable, only its fields are.
If I wrote like this () => app.store.keys , then again nothing would have happened, since when adding / deleting elements of an array, the link to it will not change.
Mobx performs the function of a selector for the first time and monitors only those observables to which we have accessed. Made it through proxy getters. toJS . , . – , .
popup . localStorage:

background- .
: , , . localStorage .
locked, . locked .
Mobx , . — computed properties. view :
import {observable, action} from 'mobx'; import {setupDnode} from "./utils/setupDnode"; // . crypto-js import {encrypt, decrypt} from "./utils/cryptoUtils"; export class SignerApp { constructor(initState = {}) { this.store = observable.object({ // . null - locked password: null, vault: initState.vault, // . view . get locked(){ return this.password == null }, get keys(){ return this.locked ? undefined : SignerApp._decryptVault(this.vault, this.password) }, get initialized(){ return this.vault !== undefined } }) } // @action initVault(password){ this.store.vault = SignerApp._encryptVault([], password) } @action lock() { this.store.password = null } @action unlock(password) { this._checkPassword(password); this.store.password = password } @action addKey(key) { this._checkLocked(); this.store.vault = SignerApp._encryptVault(this.store.keys.concat(key), this.store.password) } @action removeKey(index) { this._checkLocked(); this.store.vault = SignerApp._encryptVault([ ...this.store.keys.slice(0, index), ...this.store.keys.slice(index + 1) ], this.store.password ) } ... // api // private _checkPassword(password) { SignerApp._decryptVault(this.store.vault, password); } _checkLocked() { if (this.store.locked){ throw new Error('App is locked') } } // / static _encryptVault(obj, pass){ const jsonString = JSON.stringify(obj) return encrypt(jsonString, pass) } static _decryptVault(str, pass){ if (str === undefined){ throw new Error('Vault not initialized') } try { const jsonString = decrypt(str, pass) return JSON.parse(jsonString) }catch (e) { throw new Error('Wrong password') } } } . . locked . API .
rypto-js :
import CryptoJS from 'crypto-js' // . 5000 function strengthenPassword(pass, rounds = 5000) { while (rounds-- > 0){ pass = CryptoJS.SHA256(pass).toString() } return pass } export function encrypt(str, pass){ const strongPass = strengthenPassword(pass); return CryptoJS.AES.encrypt(str, strongPass).toString() } export function decrypt(str, pass){ const strongPass = strengthenPassword(pass) const decrypted = CryptoJS.AES.decrypt(str, strongPass); return decrypted.toString(CryptoJS.enc.Utf8) } idle API, — . , , idle , active locked . idle , locked , . localStorage:
import {reaction, toJS} from 'mobx'; import {extensionApi} from "./utils/extensionApi"; import {PortStream} from "./utils/PortStream"; import {SignerApp} from "./SignerApp"; import {loadState, saveState} from "./utils/localStorage"; const DEV_MODE = process.env.NODE_ENV !== 'production'; const IDLE_INTERVAL = 30; setupApp(); function setupApp() { const initState = loadState(); const app = new SignerApp(initState); if (DEV_MODE) { global.app = app; } // , , reaction reaction( () => ({ vault: app.store.vault }), saveState ); // , extensionApi.idle.setDetectionInterval(IDLE_INTERVAL); // extensionApi.idle.onStateChanged.addListener(state => { if (['locked', 'idle'].indexOf(state) > -1) { app.lock() } }); // Connect to other contexts extensionApi.runtime.onConnect.addListener(connectRemote); function connectRemote(remotePort) { const processName = remotePort.name; const portStream = new PortStream(remotePort); if (processName === 'contentscript') { const origin = remotePort.sender.url app.connectPage(portStream, origin) } else { app.connectPopup(portStream) } } } Transactions
, : . WAVES waves-transactions .
, , — , :
import {action, observable, reaction} from 'mobx'; import uuid from 'uuid/v4'; import {signTx} from '@waves/waves-transactions' import {setupDnode} from "./utils/setupDnode"; import {decrypt, encrypt} from "./utils/cryptoUtils"; export class SignerApp { ... @action newMessage(data, origin) { // id, , . const message = observable.object({ id: uuid(), // , uuid origin, // Origin data, // status: 'new', // : new, signed, rejected failed timestamp: Date.now() }); console.log(`new message: ${JSON.stringify(message, null, 2)}`); this.store.messages.push(message); // mobx . return new Promise((resolve, reject) => { reaction( () => message.status, // (status, reaction) => { // reaction, switch (status) { case 'signed': resolve(message.data); break; case 'rejected': reject(new Error('User rejected message')); break; case 'failed': reject(new Error(message.err.message)); break; default: return } reaction.dispose() } ) }) } @action approve(id, keyIndex = 0) { const message = this.store.messages.find(msg => msg.id === id); if (message == null) throw new Error(`No msg with id:${id}`); try { message.data = signTx(message.data, this.store.keys[keyIndex]); message.status = 'signed' } catch (e) { message.err = { stack: e.stack, message: e.message }; message.status = 'failed' throw e } } @action reject(id) { const message = this.store.messages.find(msg => msg.id === id); if (message == null) throw new Error(`No msg with id:${id}`); message.status = 'rejected' } ... } , observable store.messages .
observable , mobx messages. , , .
, . reaction, "" .
approve reject : , , .
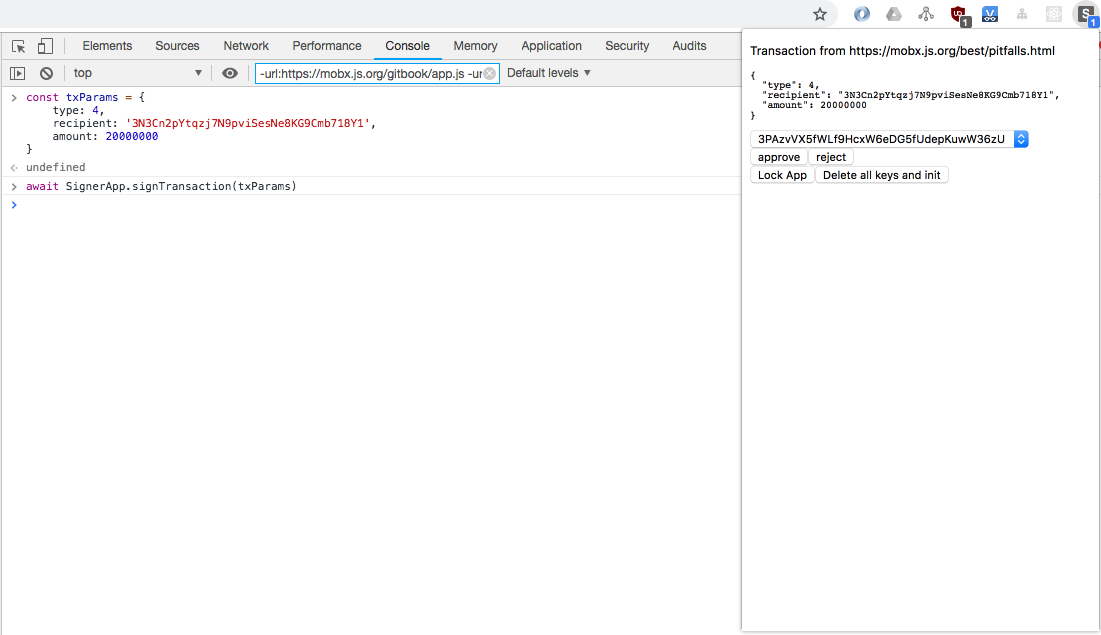
Approve reject API UI, newMessage — API :
export class SignerApp { ... popupApi() { return { addKey: async (key) => this.addKey(key), removeKey: async (index) => this.removeKey(index), lock: async () => this.lock(), unlock: async (password) => this.unlock(password), initVault: async (password) => this.initVault(password), approve: async (id, keyIndex) => this.approve(id, keyIndex), reject: async (id) => this.reject(id) } } pageApi(origin) { return { signTransaction: async (txParams) => this.newMessage(txParams, origin) } } ... } :

, UI .
UI
. UI observable API , . observable API, background:
import {observable} from 'mobx' import {extensionApi} from "./utils/extensionApi"; import {PortStream} from "./utils/PortStream"; import {cbToPromise, setupDnode, transformMethods} from "./utils/setupDnode"; import {initApp} from "./ui/index"; const DEV_MODE = process.env.NODE_ENV !== 'production'; setupUi().catch(console.error); async function setupUi() { // , const backgroundPort = extensionApi.runtime.connect({name: 'popup'}); const connectionStream = new PortStream(backgroundPort); // observable background'a let backgroundState = observable.object({}); const api = { // , observable updateState: async state => { Object.assign(backgroundState, state) } }; // RPC const dnode = setupDnode(connectionStream, api); const background = await new Promise(resolve => { dnode.once('remote', remoteApi => { resolve(transformMethods(cbToPromise, remoteApi)) }) }); // background observable background.state = backgroundState; if (DEV_MODE) { global.background = background; } // await initApp(background) } . react-. Background- props. , , store , :
import {render} from 'react-dom' import App from './App' import React from "react"; // background props export async function initApp(background){ render( <App background={background}/>, document.getElementById('app-content') ); } mobx . observer mobx-react , observable, . mapStateToProps connect, redux. " ":
import React, {Component, Fragment} from 'react' import {observer} from "mobx-react"; import Init from './components/Initialize' import Keys from './components/Keys' import Sign from './components/Sign' import Unlock from './components/Unlock' @observer // render, observable export default class App extends Component { // , // observable background , render() { const {keys, messages, initialized, locked} = this.props.background.state; const {lock, unlock, addKey, removeKey, initVault, deleteVault, approve, reject} = this.props.background; return <Fragment> {!initialized ? <Init onInit={initVault}/> : locked ? <Unlock onUnlock={unlock}/> : messages.length > 0 ? <Sign keys={keys} message={messages[messages.length - 1]} onApprove={approve} onReject={reject}/> : <Keys keys={keys} onAdd={addKey} onRemove={removeKey}/> } <div> {!locked && <button onClick={() => lock()}>Lock App</button>} {initialized && <button onClick={() => deleteVault()}>Delete all keys and init</button>} </div> </Fragment> } } UI .
UI UI. getState reaction , remote.updateState :
import {action, observable, reaction} from 'mobx'; import uuid from 'uuid/v4'; import {signTx} from '@waves/waves-transactions' import {setupDnode} from "./utils/setupDnode"; import {decrypt, encrypt} from "./utils/cryptoUtils"; export class SignerApp { ... // public getState() { return { keys: this.store.keys, messages: this.store.newMessages, initialized: this.store.initialized, locked: this.store.locked } } ... // connectPopup(connectionStream) { const api = this.popupApi(); const dnode = setupDnode(connectionStream, api); dnode.once('remote', (remote) => { // reaction , ui const updateStateReaction = reaction( () => this.getState(), (state) => remote.updateState(state), // . fireImmediatly reaction . // , . Delay debounce {fireImmediately: true, delay: 500} ); // dnode.once('end', () => updateStateReaction.dispose()) }) } ... } remote reaction , UI.
— :
function setupApp() { ... // Reaction . reaction( () => app.store.newMessages.length > 0 ? app.store.newMessages.length.toString() : '', text => extensionApi.browserAction.setBadgeText({text}), {fireImmediately: true} ); ... } , . - :

Conclusion
')
Source: https://habr.com/ru/post/451796/
All Articles