Lab: set up lvm, raid on linux
A small digression: this l \ r is synthetic.
Some tasks that are described here can be made much easier, but since the task of the l / r is to get acquainted with the functional raid, lvm, some operations are artificially complicated.
Requirements for tools to perform l \ r:
- Virtualization tools, such as Virtualbox
- A linux installation image, for example Debian9
- Internet availability for downloading multiple packages
- Connect via ssh to the installed VM (optional)
ATTENTION
This laboratory work is associated with such delicate matter as data integrity - this is an area that allows you to lose all your data because of the smallest error - one extra letter or digit.
Since you are doing laboratory work, nothing threatens you, unless you have to start doing it again.
In real life, everything is much more serious, so you should very carefully enter the names of the disks, understanding what you are doing with the current command and what disks you are working with.
The second important point is the naming of disks and partitions: depending on the situation, the disk numbers may differ from the values presented in the teams in the laboratory work.
So, for example, if you remove the sda disk from the array and then add a new disk, the new disk will be displayed in the system with the name sda. If you reboot before adding a new disk, the new disk will have the name sdb, and the old one will become sda
Lab work must be performed under the superuser (root) since most commands require elevated privileges and it does not make sense to constantly raise privileges through sudo.
Materials for study
- RAID
- Lvm
- Disk naming in Linux
- What is a section
- What is a partition table and where is it stored
- What is grub
Utilities Used
- View disk information:
- lsblk -o NAME, SIZE, FSTYPE, TYPE, MOUNTPOINT
- fdisk -l
- View information and work with LVM
- pvs
- pvextend
- pvcreate
- pvresize
- vgs
- vgreduce
- lvs
- lvextend
- View information and work with RAID:
- at / proc / mdstat
- mdadm
- Mount points:
- mount
- umount
- cat / etc / fstab
- cat / etc / mtab
- Disk re-partitioning:
- fdisk / dev / XXX
- Copying sections:
- dd if = / dev / xxx of = / dev / yyy
- Work with partition table:
- partx
- sfdisk
- mkfs.ext4
- Work with the loader:
- grub-install / dev / XXX
- update-grub
- misc
- lsof
- apt
- rsync
Laboratory work consists of 3 parts:
- Setting up a working system using lvm, raid.
- Emulation of one disk failure.
- Replacing disks on the fly, with the addition of new disks and transfer partitions.
Task 1 (Installing the OS and configure LVM, RAID)
Create a new virtual machine with the following characteristics:
- 1 gb ram
- 1 cpu
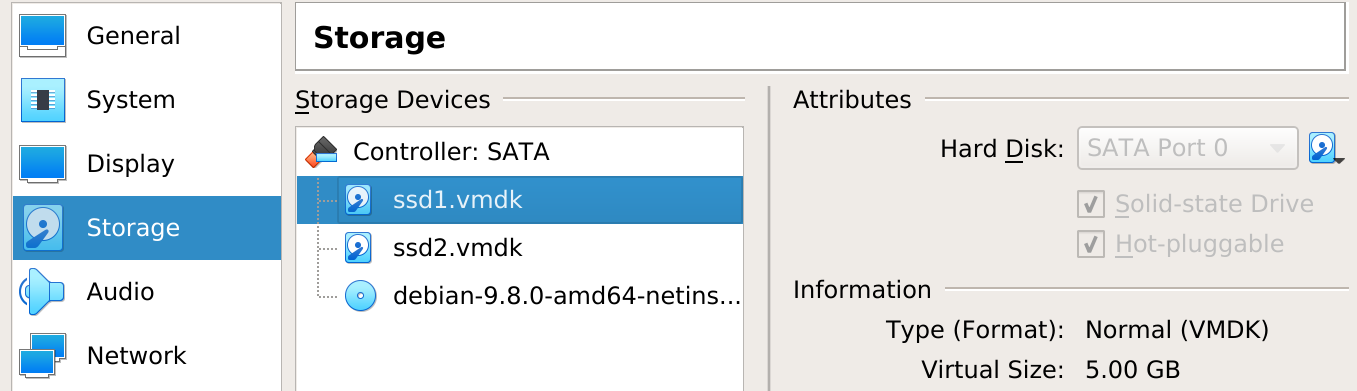
- 2 hdd (call them ssd1, ssd2 and assign an equal size, tick hot swap and ssd)
- The SATA controller is configured for 4 ports:
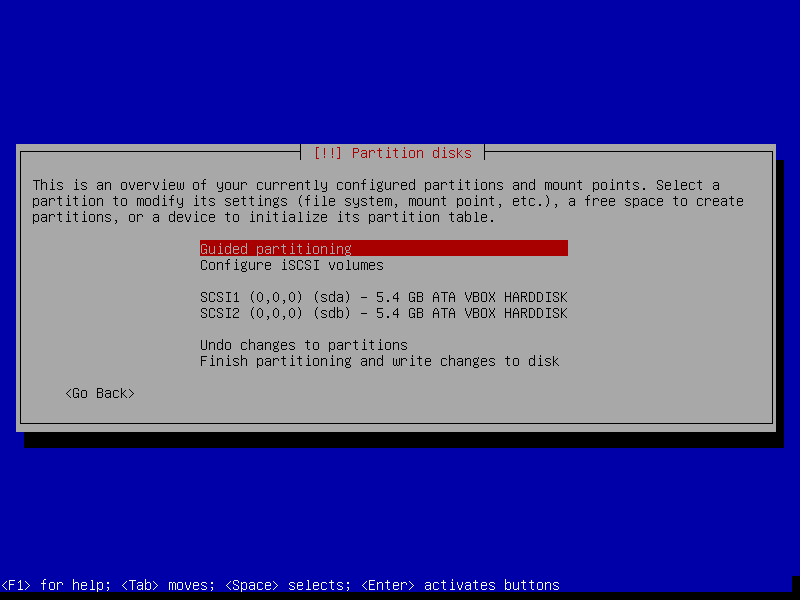
Start installing Linux and go to the choice of hard drives to do the following:
- Partitioning method: manual, after which you should see this picture:
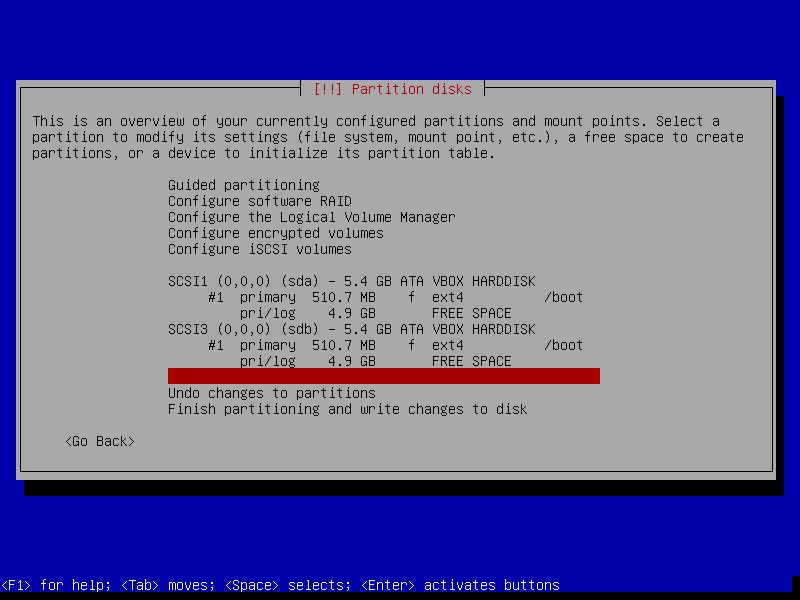
- Setting up a separate partition under / boot: Select the first disk and create a new partition table on it:
- Partition size: 512M
- Mount point: / boot
- Repeat the setup for the second disk, but since you cannot mount / boot 2 times at the same time, select mount point: none as a result having received the following (picture with a joint, redoing laziness):
')
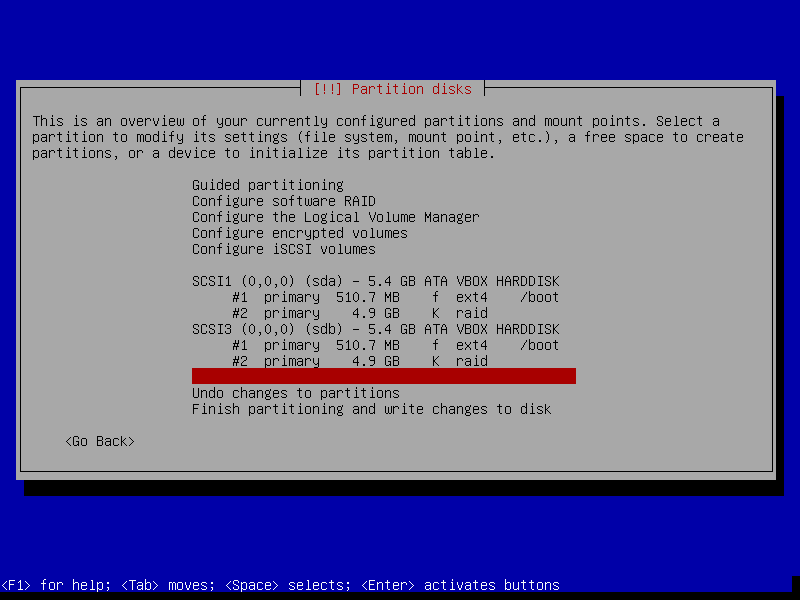
- RAID configuration:
- Select the free space on the first disk and set the partition type as physical volume for RAID
- Select "Done setting up the partition"
- Repeat the exact same setup for the second disk, resulting in the following:
- Select "Configure software RAID"
- Create MD device
- Software RAID device type: Choose a mirror array
- Active devices for the RAID XXXX array: select both drives
- Spare devices: Leave 0 by default
- Active devices for the RAID XX array: select partitions that you created under the raid
- Finish
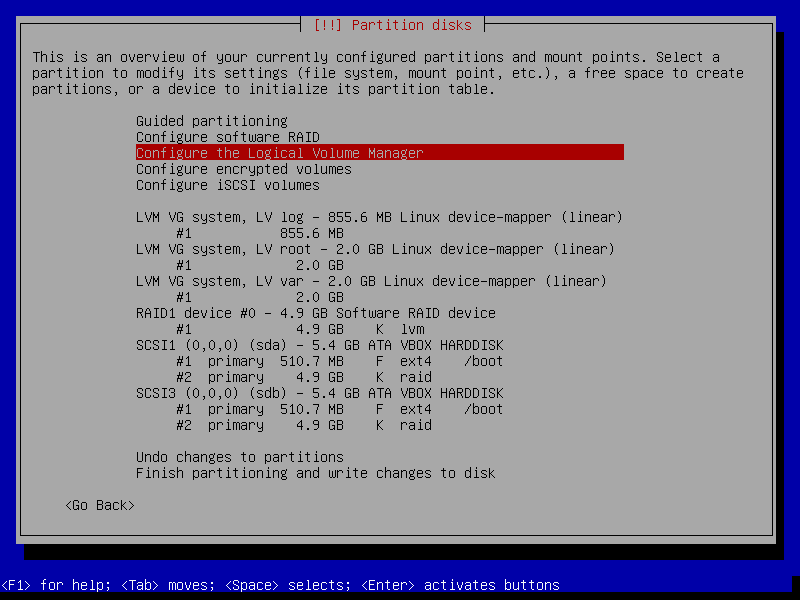
- As a result, you should get this picture:

- LVM Setup: Select Configure the Logical Volume Manager
- Keep current partition layout and configure LVM: Yes
- Create volume group
- Volume group name: system
- Devices for the new volume group: Choose your created RAID
- Create logical volume
- logical volume name: root
- logical volume size: 2 \ 5 of the size of your disk
- Create logical volume
- logical volume name: var
- logical volume size: 2 \ 5 of the size of your disk
- Create logical volume
- logical volume name: log
- logical volume size: 1 \ 5 of the size of your disk
- Selecting the Display configuration details you should get the following picture:

- After completing the LVM setup, you should see the following:
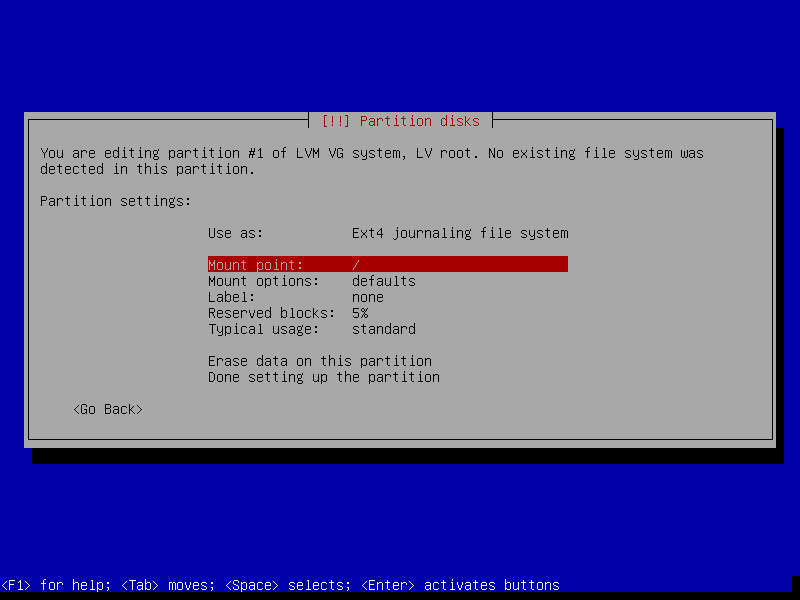
- Partition partitioning: in turn, select each volume created in LVM and mark them up, for example, for root like this:
- Use as: ext4
- mount point: /
- The result of the markup of the root partition should be:
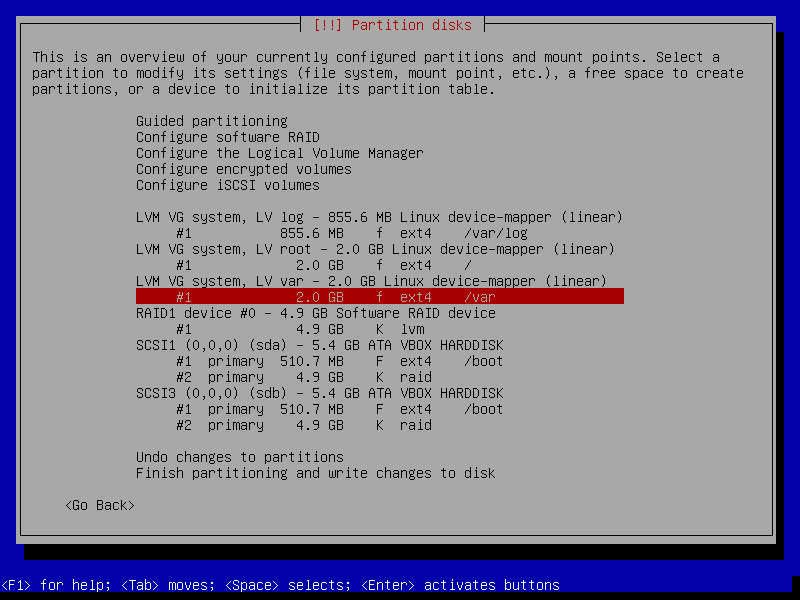
- Repeat the markup operation for var and log by selecting the appropriate mount points (/ var / log / log manually enter), obtaining the following result:
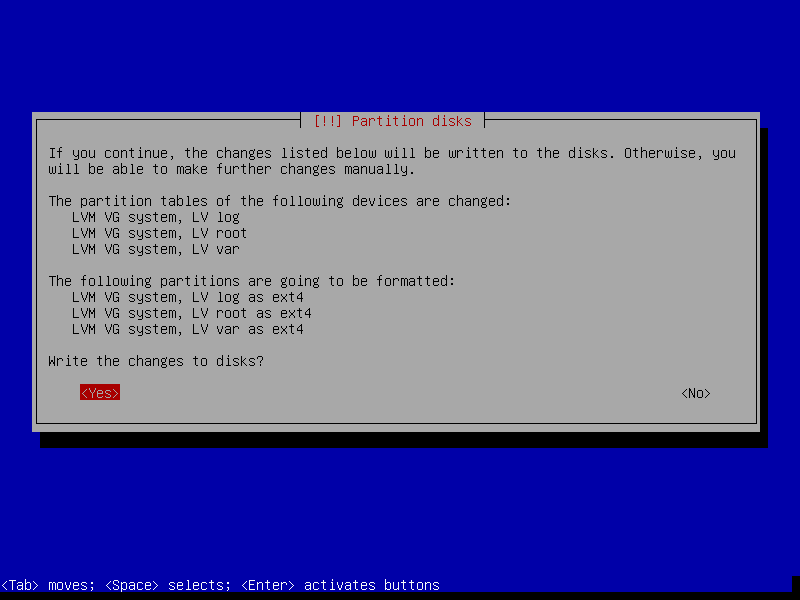
- Select Finish Partitioning
- You will be asked a few questions about the fact that you have an unmounted partition and not set up swap. It is necessary to answer negatively to both questions.
- The final result should be like this:
- Partitioning method: manual, after which you should see this picture:
Finish the OS installation by installing grub on the first device (sda) and boot the system.
Copy the contents of the / boot partition from the sda disk (ssd1) to the sdb disk (ssd2)
dd if=/dev/sda1 of=/dev/sdb1Install grub on the second device:
View drives in the system:
fdisk -l lsblk -o NAME,SIZE,FSTYPE,TYPE,MOUNTPOINT- List all the disks that the previous command issued to you and describe what kind of disk it is.
Find the disk on which grub was not installed and perform this installation:
grub-install /dev/sdb- View the current raid information with cat / proc / mdstat and record what you see.
- Look at the conclusions of the commands: pvs, vgs, lvs, mount and write down exactly what you saw.
Describe in your own words what you have done and what result you received as a result of the task done.
After completing this task, it is recommended to save a backup of the folder with the virtual machine or make a vagrant box .
Result: Virtual machine with ssd1, ssd2 disks.
Task 2 (Emulation of failure of one of the disks)
- If you tick the hot swap, then you can delete disks on the fly:
- Delete the ssd1 drive in the properties of the machine.
- Locate the directory where your virtual machine files are stored and delete ssd1.vmdk.
- Make sure your virtual machine is still running.
- Restart the virtual machine and make sure it is still working.
- Check the status of the RAID:
cat /proc/mdstat - Add a new disk of the same size in the VM interface and name it ssd3.
- Perform operations:
- See that the new disk came to the system with the
fdisk -l - Copy the partition table from the old disk to the new one:
sfdisk -d /dev/XXXX | sfdisk /dev/YYYsfdisk -d /dev/XXXX | sfdisk /dev/YYY - See the result with
fdisk -l - Add a new disk to the raid array:
mdadm --manage /dev/md0 --add /dev/YYY - See the result:
cat /proc/mdstat. You should see the sync start.
- See that the new disk came to the system with the
Now you need to manually synchronize non-RAID partitions. To do this, use the dd utility, copying it from a live disk to a new one, which you recently installed:
dd if=/dev/XXX of=/dev/YYY- After synchronization is complete, install grub to the new disk.
- Reboot the VM to make sure everything works.
Describe in your own words what you have done and what result you received as a result of the task done.
Result: the ssd1 disk is deleted, the ssd2 disk is saved, the ssd3 disk is added.
Task 3 (Adding New Disks and Transfer Partitions)
This is the most difficult and voluminous task of all presented. Very carefully check what you are doing and with what disks and partitions. It is recommended to make a copy before making it. This task, regardless of task number 2, can be performed after task number 1, adjusted for the names of the disks.
The second part of the task of this laboratory should bring in exactly the same condition that was after the first part.
In order to make it easier for you to work, I can recommend not to remove the physical disks from the host machine, but only to disconnect them in the properties of the machine. From the point of view of the OS in the VM, it will look exactly the same, but in case of anything, you can connect the disk back and continue the work by rolling back a couple of points if you have problems. For example, you might have done wrong or forgot to copy the / boot partition to a new disk. I can only advise you to recheck several times with which disks and partitions you are working, and even better to write out on a piece of paper the correspondence of disks, partitions and the "physical" disk number. The lsblk command draws a beautiful and clear tree, use it as often as possible to analyze what you have done and what you need to do.
To the story ...
Imagine that your server worked for a long time on 2 ssd disks, when suddenly ...
Emulate ssd2 disk failure by removing the disk from the properties of the VM and rebooting.
View the current status of disks and RAID:
cat /proc/mdstat fdisk -l lsblk -o NAME,SIZE,FSTYPE,TYPE,MOUNTPOINTYou were lucky - the authorities allowed to buy several new CDs:
2 SATA large volume for the long overdue task of making a partition with logs on a separate disk. 2 SSD for the replacement of the deceased, as well as the replacement is still functioning.
It should be noted that the server cart supports the installation of only 4 discs. at the same time, therefore it is impossible to add all the disks at once
HDD volume to choose 2 times more than SSD.
SSD volume to choose 1.25 times the former SSD.Add one new ssd disk, calling it ssd4, and after adding, check what happened:
fdisk -l lsblk -o NAME,SIZE,FSTYPE,TYPE,MOUNTPOINTFirst of all, you should take care to preserve the data of the old disk. This time we will transfer data using LVM:
First of all, you need to copy the file table from the old disk to the new one:
sfdisk -d /dev/XXX | sfdisk /dev/YYYSubstitute the correct disks instead of x, y and disassemble what this command does.
- Run the lsblk -o NAME, SIZE, FSTYPE, TYPE, MOUNTPOINT command and compare its output with the previous call. What has changed?
Using the dd command, copy the / boot data to a new disk:
dd if=/dev/XXX of=/dev/YYYIf / boot remains mounted on the old disk, it should be remounted on a live disk:
mount | grep boot # lsblk # , umount /boot # /boot mount -a # /etc/fstab. # /dev/sda,Install the bootloader on a new ssd disk:
grub-install /dev/YYYWhy do we perform this operation?
Create a new raid array with the inclusion of only one new ssd disk:
mdadm --create --verbose /dev/md63 --level=1 --raid-devices=1 /dev/YYYThe command above will not work without a special key. Read the help and add this key to the command.
- Use the cat / proc / mdstat command to verify the result of your operation. What has changed?
- Run the lsblk -o NAME, SIZE, FSTYPE, TYPE, MOUNTPOINT command and compare its output with the previous call. What has changed?
The next step is to configure LVM
- Run the pvs command to view information about current physical volumes.
Create a new physical volume to include a previously created RAID array:
pvcreate /dev/md63- Run the lsblk -o NAME, SIZE, FSTYPE, TYPE, MOUNTPOINT command and compare its output with the previous call. What has changed?
- Run the pvs command again. What has changed?
Increase the size of the Volume Group system using this command:
vgextend system /dev/md63Execute commands and write down what you see and what has changed.
vgdisplay system -v pvs vgs lvs -a -o+devicesOn which physical disk are LV var, log, root now?
Move the data from the old disk to the new one by substituting the correct device names.
pvmove -i 10 -n /dev/system/root /dev/md0 /dev/md63Repeat the operation for all logical volume.
Execute commands and write down what you see and what has changed.
vgdisplay system -v pvs vgs lvs -a -o+devices lsblk -o NAME,SIZE,FSTYPE,TYPE,MOUNTPOINTChange our VG by removing the old raid disk from it. Substitute the correct raid name.
vgreduce system /dev/md0Execute commands and write down what you see and what has changed.
lsblk -o NAME,SIZE,FSTYPE,TYPE,MOUNTPOINT pvs vgs- For the beauty of the picture, remount / boot to the second ssd disk (ssd4) and execute lsblk. As a result, nothing should be mounted on the ssd3 disk. Carefully check that the / boot partition is not empty!
ls /bootshould show multiple files and folders. Examine what is stored in this section and write down what file \ directory for what is responsible.
Remove the ssd3 disk and add ssd5, hdd1, hdd2 according to the above TK, eventually getting:
- ssd4 - the first new ssd
- ssd5 - second new ssd
- hdd1 - the first new hdd
- hdd2 - second new hdd
Check what happened after adding the disks:
fdisk -l lsblk -o NAME,SIZE,FSTYPE,TYPE,MOUNTPOINTRestore the operation of the main raid array:
Copy the partition table, substituting the correct disks:
sfdisk -d /dev/XXX | sfdisk /dev/YYYPlease note that when we copied the partition table from the old disk, it was said that the new size does not use the entire volume of the hard disk. Therefore, soon we will need to change the size of this section and expand the raid. See for yourself by entering the command:
lsblk -o NAME,SIZE,FSTYPE,TYPE,MOUNTPOINT
Copy the boot partition from the ssd4 disk to ssd5:
dd if=/dev/XXX of=/dev/YYYInstall grub to a new disk (ssd5).
Change the size of the second partition of the ssd5 drive.
Run the disk layout utility:
fdisk /dev/XXX- Enter key d to delete the existing partition (select 2).
- Enter the key n to create a new partition.
- Enter the p key to specify the primary partition type.
- Enter key 2 for the new partition to have a second number.
- First sector: press enter to accept the automatically calculated size of the beginning of the section.
- Last sector: press enter to accept the automatically calculated end-of-partition size.
- Enter the key l to see a list of all possible partition types and find the Linux raid auto in it.
- Enter the key t to change the type of the created partition (2) and enter the number found in the previous step.
- Enter the key w to write the change to the disk.
Re-read the partition table and check the result:
partx -u /dev/XXX lsblk -o NAME,SIZE,FSTYPE,TYPE,MOUNTPOINTAdd a new disk to the current raid array (do not forget to substitute the correct disks):
mdadm --manage /dev/md63 --add /dev/sda2Expand the number of disks in our array to 2 pieces:
mdadm --grow /dev/md63 --raid-devices=2See the result: we have 2 arrays marked up, but both sections included in this array have different sizes:
lsblk -o NAME,SIZE,FSTYPE,TYPE,MOUNTPOINT
Increase partition size on ssd4 disk
Run the disk layout utility:
fdisk /dev/XXX- Enter key d to delete the existing partition (select 2).
- Enter the key n to create a new partition.
- Enter the p key to specify the primary partition type.
- Enter key 2 for the new partition to have a second number.
- First sector: press enter to accept the automatically calculated size of the beginning of the section.
- Last sector: press enter to accept the automatically calculated end-of-partition size.
- At the end of the markup, select No to leave the signature of the partition belonging to the array.
- Enter the key w to write the change to the disk.
Re-read the partition table and check the result.
partx -u /dev/XXX lsblk -o NAME,SIZE,FSTYPE,TYPE,MOUNTPOINTNotice that now the sda2, sdc2 partitions are larger than the size of the raid device.
At this stage, the raid size can now be expanded:
mdadm --grow /dev/md63 --size=max lsblk -o NAME,SIZE,FSTYPE,TYPE,MOUNTPOINT # check resultView lsblk and write down what has changed.
However, even though we changed the raid size, the sizes of vg root, var, log themselves have not changed
Look at what size PV equals:
pvsExpand the size of our PV:
pvresize /dev/md63Look at what size PV equals:
pvs
Add the newly appeared place VG var, root:
lvs # lvextend -l +50%FREE /dev/system/root lvextend -l +100%FREE /dev/system/var lvs #At this stage, you have completed the migration of the main array to new disks. Work with ssd1, ssd2 is over.
Our next task is to move / var / log to new disks, for this we will create a new array and lvm on hdd disks.
Let's see what names the new hdd drives have:
fdisk -lCreate a raid array:
mdadm --create /dev/md127 --level=1 --raid-devices=2 /dev/sdc /dev/sddCreate a new PV on the raid of large disks:
pvcreate data /dev/md127Create a group in this PV called data:
vgcreate data /dev/md127Create a logical volume the size of the entire free space and call it val_log:
lvcreate -l 100%FREE -n var_log data # lvs #Format the created partition in ext4:
mkfs.ext4 /dev/mapper/data-var_logLet's see the result:
lsblk
Transfer the log data from the old section to the new one
Mount temporarily new log repository:
mount /dev/mapper/data-var_log /mntPerform partition synchronization:
apt install rsync rsync -avzr /var/log/ /mnt/Find out what processes are currently working with / var / log:
apt install lsof lsof | grep '/var/log'We stop these processes:
systemctl stop rsyslog.service syslog.socketPerform the final synchronization of partitions (the data that may have changed since the last synchronization):
rsync -avzr /var/log/ /mnt/Swap the sections:
umount /mnt umount /var/log mount /dev/mapper/data-var_log /var/logChecking what happened:
lsblk
Rule / etc / fstab
fstab is a file in which the rules are written according to which partitions will be mounted at boot time. Our task is to find the line in which the / var / log is mounted and fix the
system-logdevice on thedata-var_log.The most important thing at this stage is to remember to change the table of the sections (ext4, for example). Since no matter how we change any raid, lvm, until the file system on the partition is notified that the partition size has now changed, we will not be able to use the new space. Use the
resize2fscommand to change the file system.Final chord
- Perform a reboot. If you did everything correctly, you will again get into your OS (this is necessary in order to make sure that everything works. There is no point other than self-checking that this step does not carry)
Perform checks that all we wanted to do was really done:
pvs lvs vgs lsblk cat /proc/mdstat
[OPTIONAL] Perform actions
- Reboot by pressing F12 to specify different disks when loading, in order to make sure that you can boot from any of the ssd disks, so that we do not fear the failure of one of them.
You now have an unnecessary LV log in the VG system. Distribute this space between root or var, but instead of using the 100% FREE construction, specify the size with your hands using the -L switch:
-L 500M- Correct the problem with the fact that / boot is on two partitions without synchronization, you don’t need to do this properly, here it is added as an example. Do not forget to copy somewhere the contents of / boot.
- Create a new raid and include sda1, sda2.
- Include these partitions in the existing raid and restore / boot to the main raid, but not mounting it anymore.
Source: https://habr.com/ru/post/450896/
All Articles