Add dependencies with DITranquility
Dependency Injection is a fairly popular pattern that allows the system to be flexibly configured and the dependencies of the components of this system to be built on each other correctly. Thanks to typing, Swift allows you to use convenient frameworks with which you can very briefly describe the dependency graph. Today I want to talk a bit about one of these frameworks - DITranquillity .
In this tutorial, the following library features will be considered:
- Type Registration
- Implementation using an initializer
- Variable injection
- Cyclic dependencies of components
- Using the library with
UIStoryboard
Component Description
The application will consist of the following main components: ViewController , Router , Presenter , Networking - these are fairly common components in any iOS application.

ViewController and Router will be rotated into each other cyclically.
Training
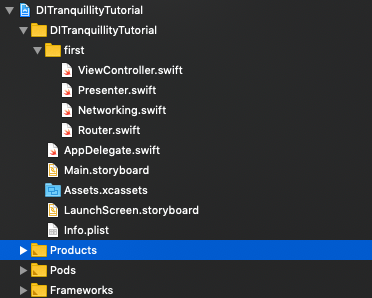
To begin, create a Single View Application in XCode, add DITranquility using CocoaPods . Create the necessary hierarchy of files, then add a second controller to the Main.storyboard and connect it with StoryboardSegue . The result should be the following file structure:
Create dependencies in classes as follows:
protocol Presenter: class { func getCounter(completion: @escaping (Int) -> Void) } class MyPresenter: Presenter { private let networking: Networking init(networking: Networking) { self.networking = networking } func getCounter(completion: @escaping (Int) -> Void) { // Implementation } } protocol Networking: class { func fetchData(completion: @escaping (Result<Int, Error>) -> Void) } class MyNetworking: Networking { func fetchData(completion: @escaping (Result<Int, Error>) -> Void) { // Implementation } } protocol Router: class { func presentNewController() } class MyRouter: Router { unowned let viewController: ViewController init(viewController: ViewController) { self.viewController = viewController } func presentNewController() { // Implementation } } class ViewController: UIViewController { var presenter: Presenter! var router: Router! } Restrictions
Unlike other classes, ViewController is not created by us, but by the UIKit library inside the UIStoryboard.instantiateViewController implementation, therefore, using a storyboard, we cannot inject dependencies into the heirs of the UIViewController using an initializer. The same is UIView heirs of UIView and UITableViewCell .
Notice that objects hidden behind protocols are embedded in all classes. This is one of the main tasks of dependency injection - to make dependencies not on implementations, but on interfaces. This will help in the future to provide different implementations of protocols for reusing or testing components.
Dependency injection
After all the components of the system are created, we proceed to the connection of objects with each other. In DITranquility, the starting point is DIContainer , which adds registrations using the container.register(...) method. To separate dependencies into parts, DIFramework and DIPart , which must be implemented. For convenience, we will create only one ApplicationDependency class that will implement DIFramework and will serve as a place for registering all dependencies. The DIFramework interface requires only one method to be implemented - load(container:) .
class ApplicationDependency: DIFramework { static func load(container: DIContainer) { // registrations will be placed here } } Let's start with the simplest registration, which has no dependencies - MyNetworking
container.register(MyNetworking.init) This registration uses embedding via an initializer. Although the component itself has no dependencies, the initializer must be provided to let the library know how to create the component.
Similarly, register MyPresenter and MyRouter .
container.register1(MyPresenter.init) container.register1(MyRouter.init) Note: Note that not register , but register1 . Unfortunately, it is necessary to specify this if the object has one and only one dependency in the initializer. That is, if the dependencies are 0 or two or more, you just need to use register . This restriction is a Swift version 4.0 bug and more.
It's time to register our ViewController . It does not inject objects through the initializer, but directly into the variable, so the description of the registration will be slightly more.
container.register(ViewController.self) .injection(cycle: true, \.router) .injection(\.presenter) The syntax for the \.presenter is SwiftKeyPath, through which you can concisely inject a dependency. Since Router and ViewController cyclically dependent on each other, you must explicitly specify this using cycle: true . The library itself can resolve these dependencies without explicit indication, but this requirement was introduced so that the person reading the graph would immediately understand that there are cycles in the dependency chain. Also note that NOT ViewController.init , but ViewController.self . This was written above in the Restrictions section.
You must also register the UIStoryboard using a special method.
container.registerStoryboard(name: "Main") Now we have described the entire dependency graph for one screen. But access to this column yet. You need to create a DIContainer that allows you to access objects in it.
static let container: DIContainer = { let container = DIContainer() // 1 container.append(framework: ApplicationDependency.self) // 2 assert(container.validate(checkGraphCycles: true)) // 3 return container }() - We initialize the container
- Add a description of the graph to it
- We check that we did everything right. If an error is made, the application will fall not during the dependency rezolv, but immediately when creating the graph
Then you need to make the container the starting point for starting the application. To do this, in AppDelegate implement the didFinishLaunchingWithOptions method instead of specifying Main.storyboard as a launch point in the project settings.
func application(_ application: UIApplication, didFinishLaunchingWithOptions launchOptions: [UIApplication.LaunchOptionsKey: Any]?) -> Bool { window = UIWindow(frame: UIScreen.main.bounds) let storyboard: UIStoryboard = ApplicationDependency.container.resolve() window?.rootViewController = storyboard.instantiateInitialViewController() window?.makeKeyAndVisible() return true } Launch
At the first launch, a crash will occur and validation will not work for the following reasons:
- The container will not find the types
Router,Presenter,Networking, because we have registered only objects. If we want to give access not to implementations, but to interfaces, we must explicitly specify interfaces - The container does not understand how to allow a cyclic dependency, because it is necessary to explicitly indicate which objects should not be re-created each time during the rezolve graph.
To fix the first error is simple - there is a special method that allows you to specify under which protocols the method is available in the container.
container.register(MyNetworking.init) .as(check: Networking.self) {$0} Describing the registration in this way, we say: the MyNetworking object is accessible via the Networking protocol. So you need to do for all objects hidden under the protocols. {$0} added for proper type checking by the compiler.
The second error is a bit more complicated. You must use the so-called scope , which describe how often the object is created and how long the object lives. For each registration involved in a circular dependency, you must specify scope equal to objectGraph . This will make it clear to the container that it is necessary to reuse the same created objects during a resolv, and not to create them each time. Thus, it turns out:
container.register(ViewController.self) .injection(cycle: true, \.router) .injection(\.presenter) .lifetime(.objectGraph) container.register1(MyRouter.init) .as(check: Router.self) {$0} .lifetime(.objectGraph) After restarting, the container successfully passes validation and our ViewController opens with the dependencies created. You can put a breakpoint in viewDidLoad and make sure.
Transition between screens
Next, create two small classes, SecondViewController and SecondPresenter , add a SecondViewController to the storyboard and create a Segue between them with the identifier "RouteToSecond" , which allows you to open a second controller from the first.
Add two more registrations for our new classes to our ApplicationDependency :
container.register(SecondViewController.self) .injection(\.secondPresenter) container.register(SecondPresenter.init) .as no need to specify .as , because we did not hide SecondPresenter behind the protocol, but use the implementation directly. Then in the viewDidAppear method of the first controller, call performSegue(withIdentifier: "RouteToSecond", sender: self) , start, open the second controller, in which the secondPresenter dependency should be secondPresenter . As you can see, the container saw the creation of a second controller from the UIStoryboard and successfully UIStoryboard dependencies.
Conclusion
This library allows you to conveniently work with cyclic dependencies, storyboard and fully uses auto-typing in Swift, which gives a very short and flexible syntax for describing the dependency graph.
Links
Full sample code in the library on github
DITranquility on github
')
Source: https://habr.com/ru/post/450788/
All Articles