Qualified macOS e-signature
According to RBC and Tenzor , in 2019, 4.6 million certificates of qualified electronic signatures (CEP) will be issued in Russia that meet the requirements of 63-FZ. It turns out that out of 8 million registered IP and LLC, every second entrepreneur uses an electronic signature. In addition to CEP for USAIS and cloud CEP for the delivery of reports issued by banks and accounting services, universal CEP on protected tokens are of particular interest. Such certificates allow you to log in to state portals and sign any documents, making them legally significant.
Thanks to the CEP certificate on the USB-token, you can remotely conclude an agreement with a contractor or a remote employee, send documents to the court; register an online cash register, settle tax arrears and submit a declaration in your personal account on nalog.ru; find out about debts and upcoming checks on state services.
The manual presented below will help to work with CEP under macOS - without studying the CryptoPro forums and installing a Windows virtual machine.
What you need to work with CEP under macOS:
Install and configure CEP for macOS
- Installing CryptoPro CSP
- Installing Rutoken Drivers
- Installing certificates
3.1. Remove all old GOST certificates
3.2. Installing root certificates
3.3. Download certification center certificates
3.4. Installing a certificate with Rutoken - Install a special browser Chromium-GOST
- Install browser extensions
5.1 CryptoPro EDS Browser plug-in
5.2. Plugin for state services
5.3. Customize plugin for Gosuslug
5.4. Activate extensions
5.5. Configuring the CryptoPro extension. DS Browser plug-in - We check that everything works
6.1. Go to the test page CryptoPro
6.2. Go to your account on nalog.ru
6.3. Go to the state services - What to do if it stopped working
Change PIN container
- Finding the name of the CEP container
- Change PIN command from terminal
Sign files in macOS
- Figure out the CEP certificate hash
- Sign the file with the command from terminal
- Installing Apple Automator Script
Check the signature on the document
All the information below is obtained from authoritative sources (CryptoPro # 1 , # 2 and # 3 , Rutoken , Korus-Consulting , Ural Federal District Ministry of Communications and Mass Communications ), and it is suggested to download software from trusted sites. The author is an independent consultant and is not affiliated with any of the companies mentioned. Following this instruction, all responsibility for any actions and consequences you assume.
What you need to work with CEP under macOS:
- CEP on USB-token Rutoken Lite or Rutoken EDS
- cryptocontainer in CryptoPro format
- with built-in license for CryptoPro CSP
- the open certificate must be stored in the container of the private key
The eToken and JaCarta carriers in conjunction with CryptoPro under macOS are not supported. Rukoken Lite media is an optimal choice, it costs 500..1000 = rubles. It works smartly and allows you to store up to 15 keys.
VipNet, Signal-COM and LISSI crypto providers are not supported on macOS. There is no way to convert containers. CryptoPro is the optimal choice, the certificate cost should be about 1300 = rub. for PI and 1600 = rub. for YuL.
Usually the annual license for CryptoPro CSP is already registered in the certificate and many CAs are provided free of charge. If this is not the case, then it is necessary to purchase and activate a perpetual license for CryptoPro CSP strictly version 4 worth 2700 =. CryptoPro CSP version 5 under macOS is currently not working.
Usually, the public certificate is stored in the container of the private key, but this needs to be clarified when the CEP is issued and asked to be done as needed. If it fails, then you can import the public key into a closed container yourself using CryptoPro CSP tools under Windows.
Install and configure CEP for macOS
- All downloaded files are downloaded to the default directory: ~ / Downloads /;
- we do not change anything in all installers, we leave everything by default;
- if macOS displays a warning that the software being run is from an uninstalled developer - you need to confirm the launch in the system settings: System Preferences -> Security & Privacy -> Open Anyway ;
- If macOS asks for a user password and permission to control a computer, you need to enter a password and agree with everything.
1. Install CryptoPro CSP
We are registering on the CryptoPro website and downloading and installing the version of CryptoPro CSP 4.0 R4 for macOS from the download page .
2. Install Rutoken drivers
The site says that it is optional, but better to put. From the download page on the Rutoken website we download and install the Keychain Support Module (KeyChain) - download .
Next, connect the usb-token, start the terminal and execute the command:
/opt/cprocsp/bin/csptest -card -enum -v The answer should be:
Aktiv Rutoken ...
Card present ...
[ErrorCode: 0x00000000]
3. Install certificates
3.1. Remove all old GOST certificates
If there were previously attempts to run CEP under macOS, then all previously installed certificates should be cleaned. These commands in the terminal will delete only CryptoPro certificates and will not affect the usual certificates from Keychain in macOS.
sudo /opt/cprocsp/bin/certmgr -delete -all -store mroot sudo /opt/cprocsp/bin/certmgr -delete -all -store uroot /opt/cprocsp/bin/certmgr -delete -all The response of each team should be:
No certificate matching the criteria
or
Deleting complete
3.2. Installing root certificates
Root certificates are common to all CEPs issued by any certification authority. Download from the UFD Ministry of Communications and Mass Media Communications download page :
- https://e-trust.gosuslugi.ru/Shared/DownloadCert?thumbprint=4BC6DC14D97010C41A26E058AD851F81C842415A
- https://e-trust.gosuslugi.ru/Shared/DownloadCert?thumbprint=8CAE88BBFD404A7A53630864F9033606E1DC45E2
- https://e-trust.gosuslugi.ru/Shared/DownloadCert?thumbprint=0408435EB90E5C8796A160E69E4BFAC453435D1D
Install the commands in the terminal:
sudo /opt/cprocsp/bin/certmgr -inst -store mroot -f ~/Downloads/4BC6DC14D97010C41A26E058AD851F81C842415A.cer sudo /opt/cprocsp/bin/certmgr -inst -store mroot -f ~/Downloads/8CAE88BBFD404A7A53630864F9033606E1DC45E2.cer sudo /opt/cprocsp/bin/certmgr -inst -store mroot -f ~/Downloads/0408435EB90E5C8796A160E69E4BFAC453435D1D.cer Each team should return:
Installing:
...
[ErrorCode: 0x00000000]
3.3. Download certification center certificates
Next, you need to install certificates of the certification center in which you issued the CEP. Typically, the root certificates of each CA are located on its website in the download section.
Alternatively, certificates of any CA can be downloaded from the UFD website of the Ministry of Communications and Mass Media . To do this, in the search form, you need to find the CA by name, go to the page with certificates and download all valid certificates - that is, those that have not yet reached the second date in the 'Effective' field. Download the link from the field 'Fingerprint' .
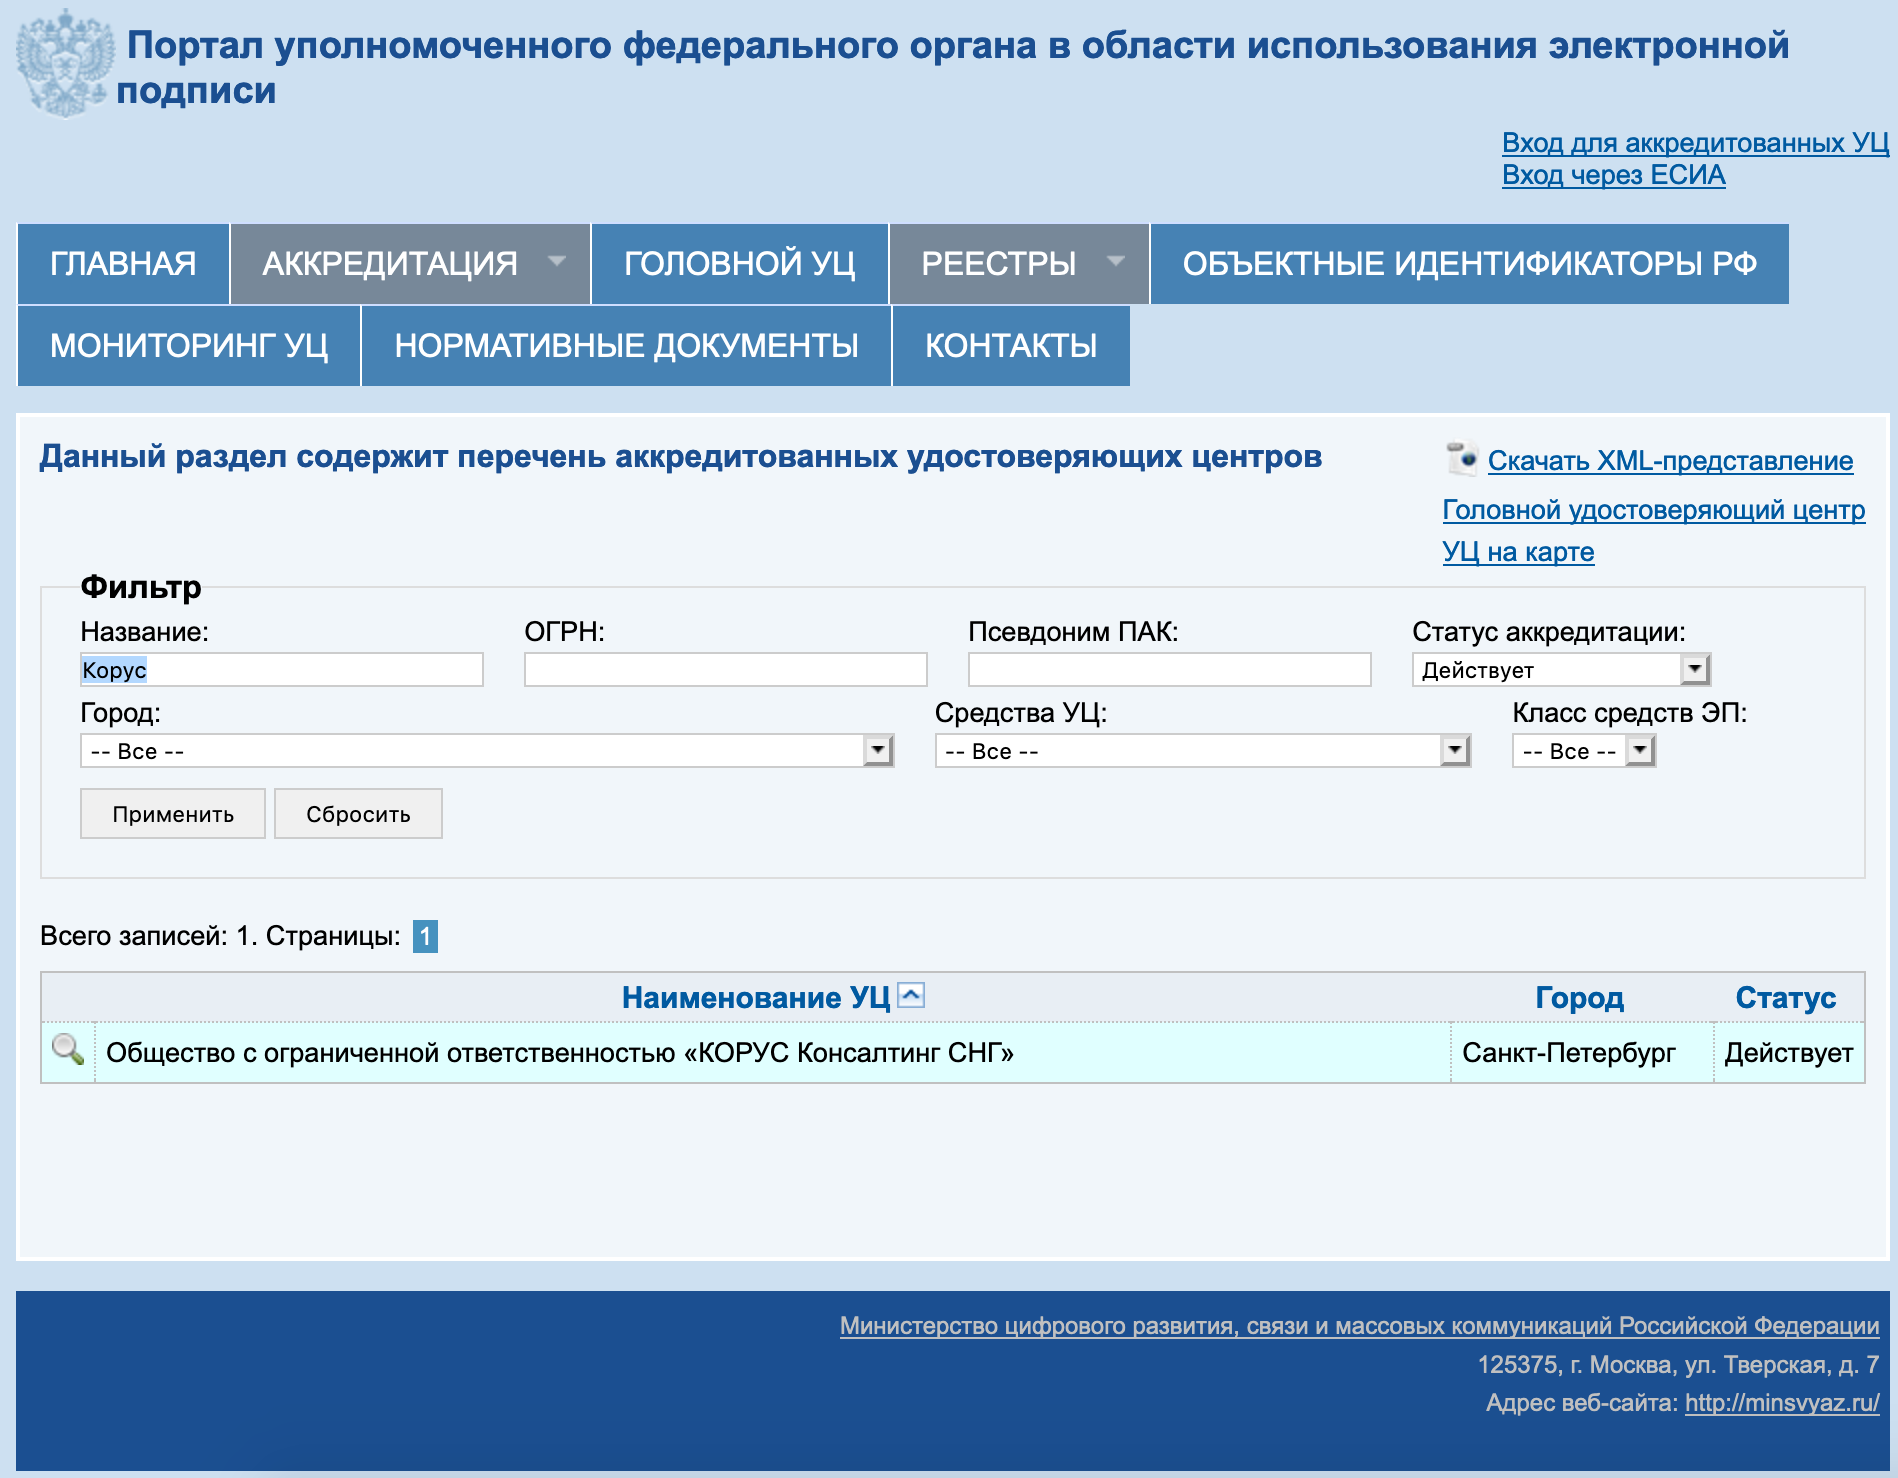

Using the example of Corus-Consulting TC: you need to download 4 certificates from the download page :
- https://e-trust.gosuslugi.ru/Shared/DownloadCert?thumbprint=15EB064ABCB96C5AFCE22B9FEA52A1964637D101
- https://e-trust.gosuslugi.ru/Shared/DownloadCert?thumbprint=B9F1D3F78971D48C34AA73786CDCD138477FEE3F
- https://e-trust.gosuslugi.ru/Shared/DownloadCert?thumbprint=55EC48193B6716D38E80BD9D1D2D827BC8A07DE3
- https://e-trust.gosuslugi.ru/Shared/DownloadCert?thumbprint=A0D19D700E2A5F1CAFCE82D3EFE49A0D882559DF
The downloaded CA certificates are installed with commands from terminal:
sudo /opt/cprocsp/bin/certmgr -inst -store mroot -f ~/Downloads/B9F1D3F78971D48C34AA73786CDCD138477FEE3F.cer sudo /opt/cprocsp/bin/certmgr -inst -store mroot -f ~/Downloads/A0D19D700E2A5F1CAFCE82D3EFE49A0D882559DF.cer sudo /opt/cprocsp/bin/certmgr -inst -store mroot -f ~/Downloads/55EC48193B6716D38E80BD9D1D2D827BC8A07DE3.cer sudo /opt/cprocsp/bin/certmgr -inst -store mroot -f ~/Downloads/15EB064ABCB96C5AFCE22B9FEA52A1964637D101.cer where after ~ / Downloads / the names of the downloaded files go, for each CA they will be their own.
Each team should return:
Installing:
...
[ErrorCode: 0x00000000]
3.4. Installing a certificate with Rutoken
Command in terminal:
/opt/cprocsp/bin/csptestf -absorb -certs The team must return:
OK.
[ErrorCode: 0x00000000]
4. Install the special browser Chromium-GOST
To work with state portals, you will need a special chromium browser assembly - Chromium-GOST . The source code of the project is open, the link to the repository on GitHub is provided on the CryptoPro website . By experience, other CryptoFox and Yandex Browser browsers are not suitable for working with public portals under macOS. It should be noted that in some assemblies of the Chromium-GOST the personal account on nalog.ru may hang or the scroll stops working altogether, therefore the old proven build 71.0.3578.98 is suggested - download .
Download and unpack the archive, install the browser by copying or drag & drop into the Applications directory. After installation, we forcibly close Chromium-Gost with a command from terminal and are not opening yet (working from Safari):
killall Chromium-Gost 5. Install browser extensions
5.1 CryptoPro EDS Browser plug-in
From the downloads page on the CryptoPro website, we download and install the CryptoPro EDS Browser plug-in version 2.0 for users - download .
5.2. Plugin for state services
From the downloads page on the Gosuslug portal we download and install the Plugin to work with the state services portal (version for macOS) - download .
5.3. Customize plugin for Gosuslug
Download the correct configuration file for the expansion of public services to support macOS and new EDS in the standard GOST2012 - download .
Execute the commands in the terminal:
sudo rm /Library/Internet\ Plug-Ins/IFCPlugin.plugin/Contents/ifc.cfg sudo cp ~/Downloads/ifc.cfg /Library/Internet\ Plug-Ins/IFCPlugin.plugin/Contents sudo cp /Library/Google/Chrome/NativeMessagingHosts/ru.rtlabs.ifcplugin.json /Library/Application\ Support/Chromium/NativeMessagingHosts 5.4. Activate extensions
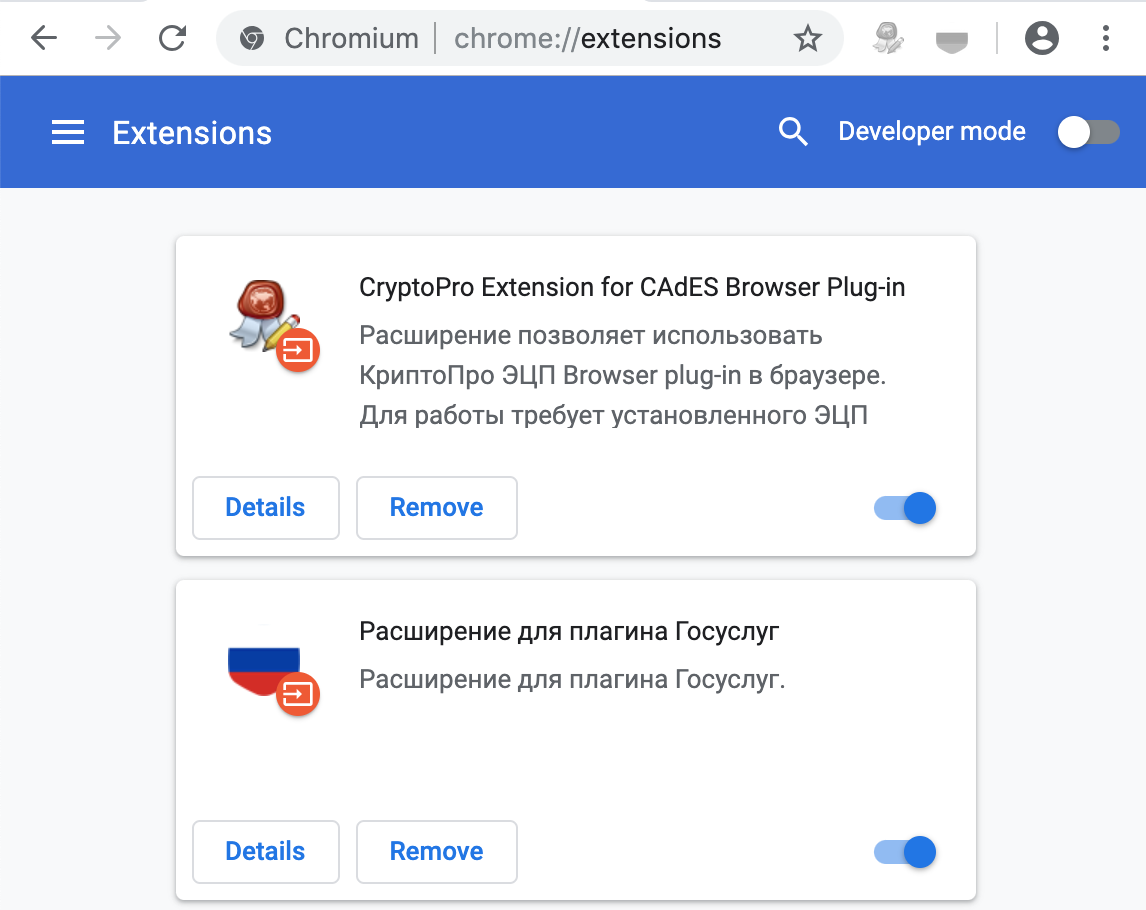
Launch the Chromium-Gost browser and in the address bar type:
chrome://extensions/ We include both installed extensions:
- CryptoPro Extension for CAdES Browser Plug-in
- Expansion for state services plugin
5.5. Configuring the CryptoPro extension. DS Browser plug-in
In the Chromium-Gost address bar, type:
/etc/opt/cprocsp/trusted_sites.html On the page that appears, in the queue of trusted nodes we add the following sites:
https://*.cryptopro.ru https://*.nalog.ru https://*.gosuslugi.ru Click “Save”. A green dot should appear:
The list of trusted sites was saved successfully.

6. Check that everything works
6.1. Go to the test page CryptoPro
In the Chromium-Gost address bar, type:
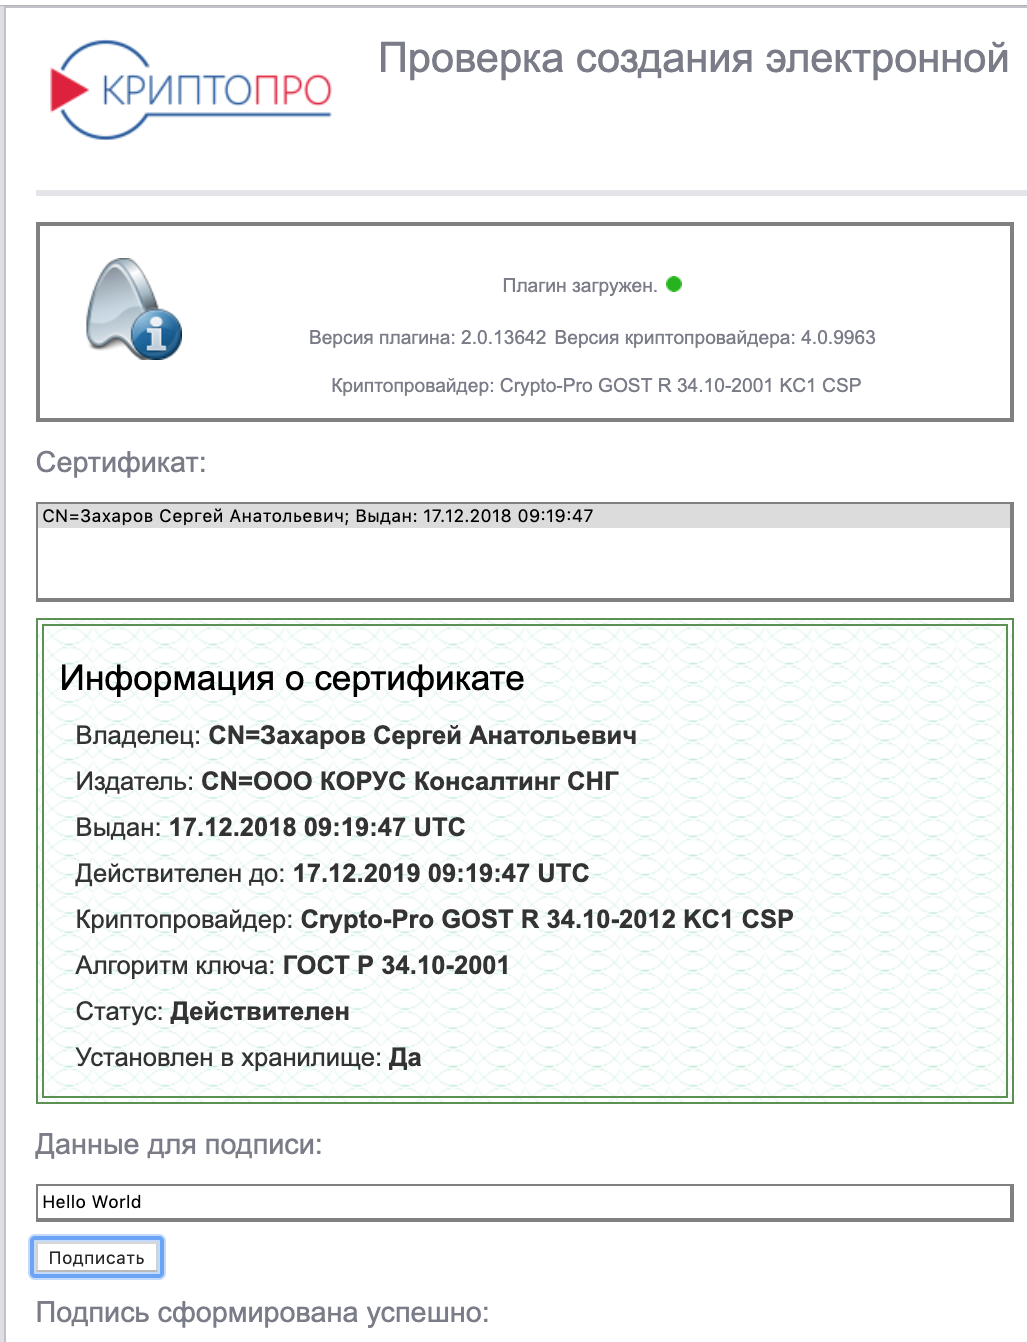
https://www.cryptopro.ru/sites/default/files/products/cades/demopage/cades_bes_sample.html The “Plugin loaded” should be displayed, and your certificate will appear in the list below.
Choose a certificate from the list and click “Sign”. The certificate PIN will be requested. The result should display
Signature successfully generated
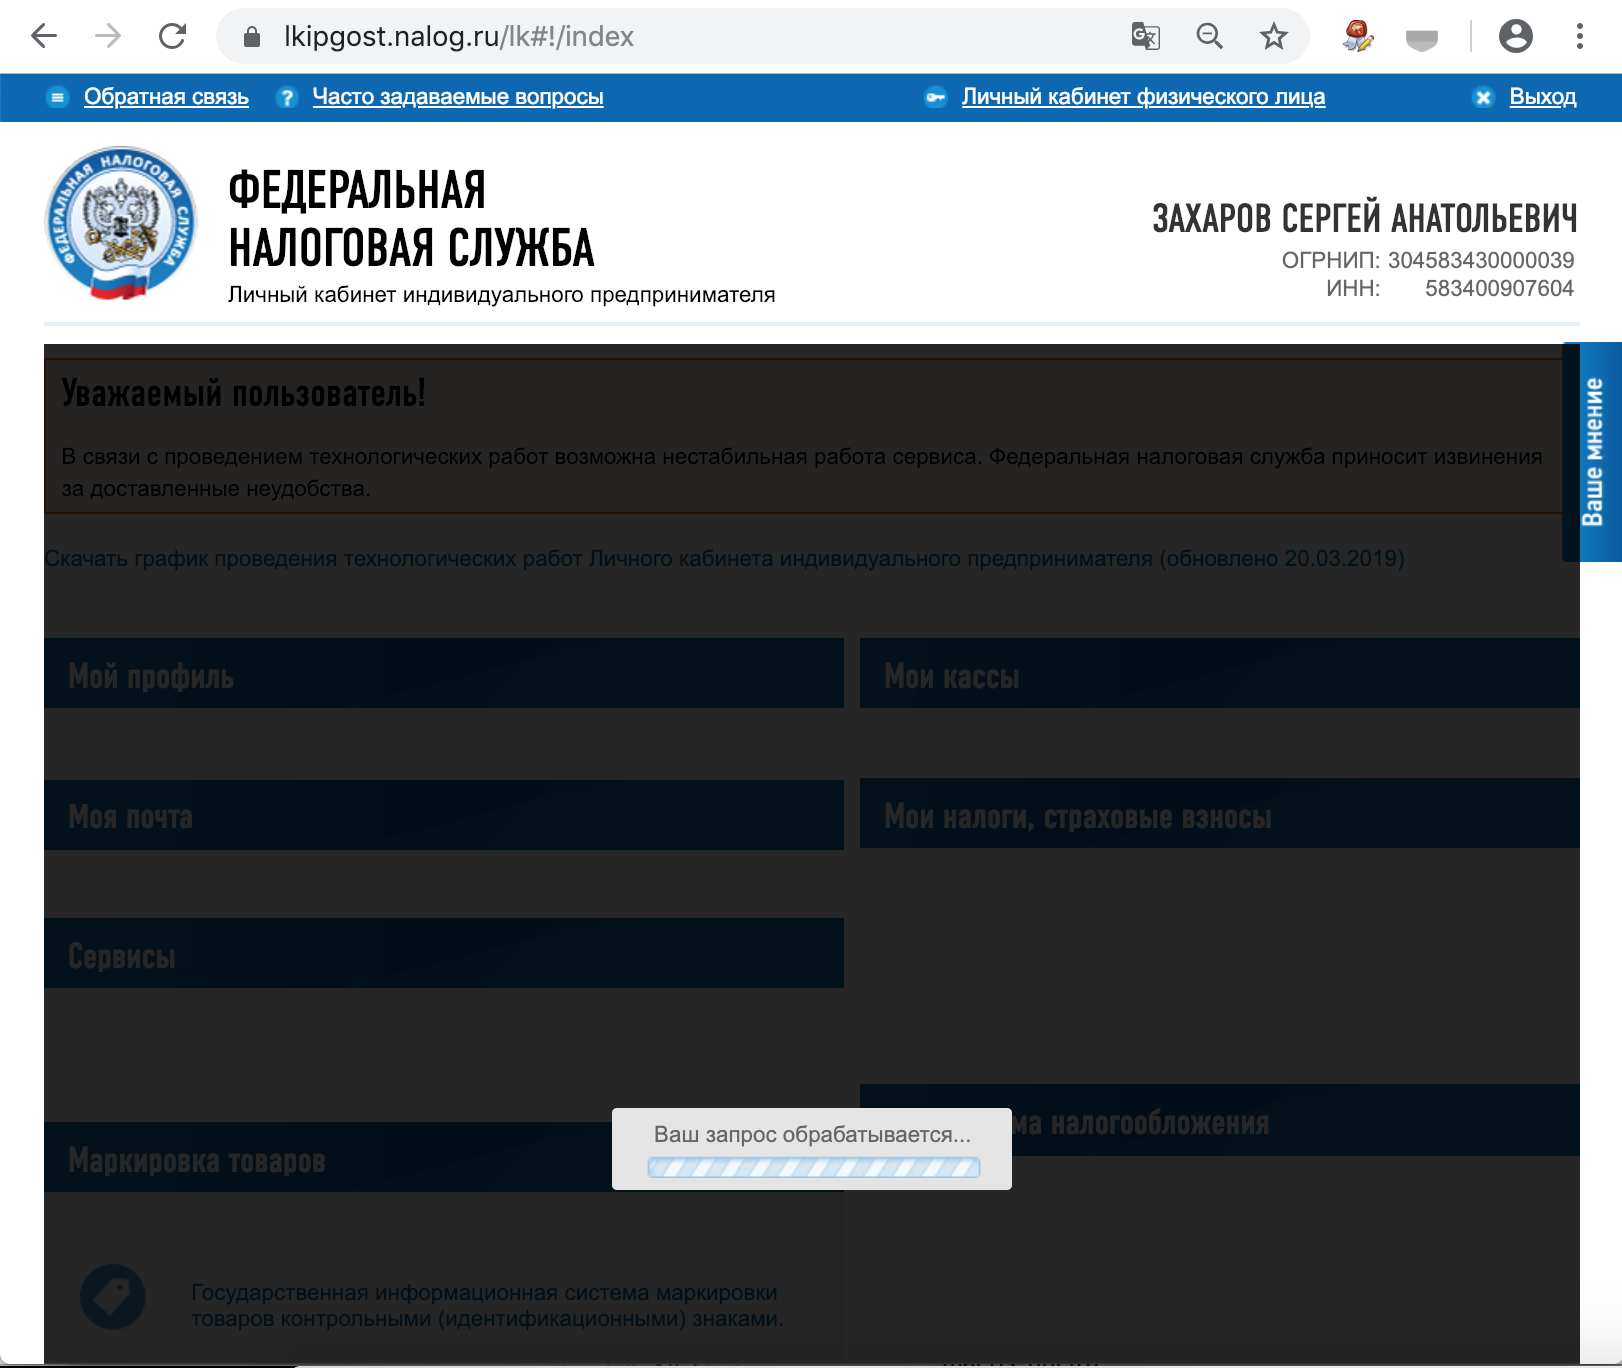
6.2. Go to your account on nalog.ru
You may not be able to log in via links from nalog.ru, because Will not pass checks. You need to go through direct links:
- Private office IP : https://lkipgost.nalog.ru/lk
- Personal account LE : https://lkul.nalog.ru
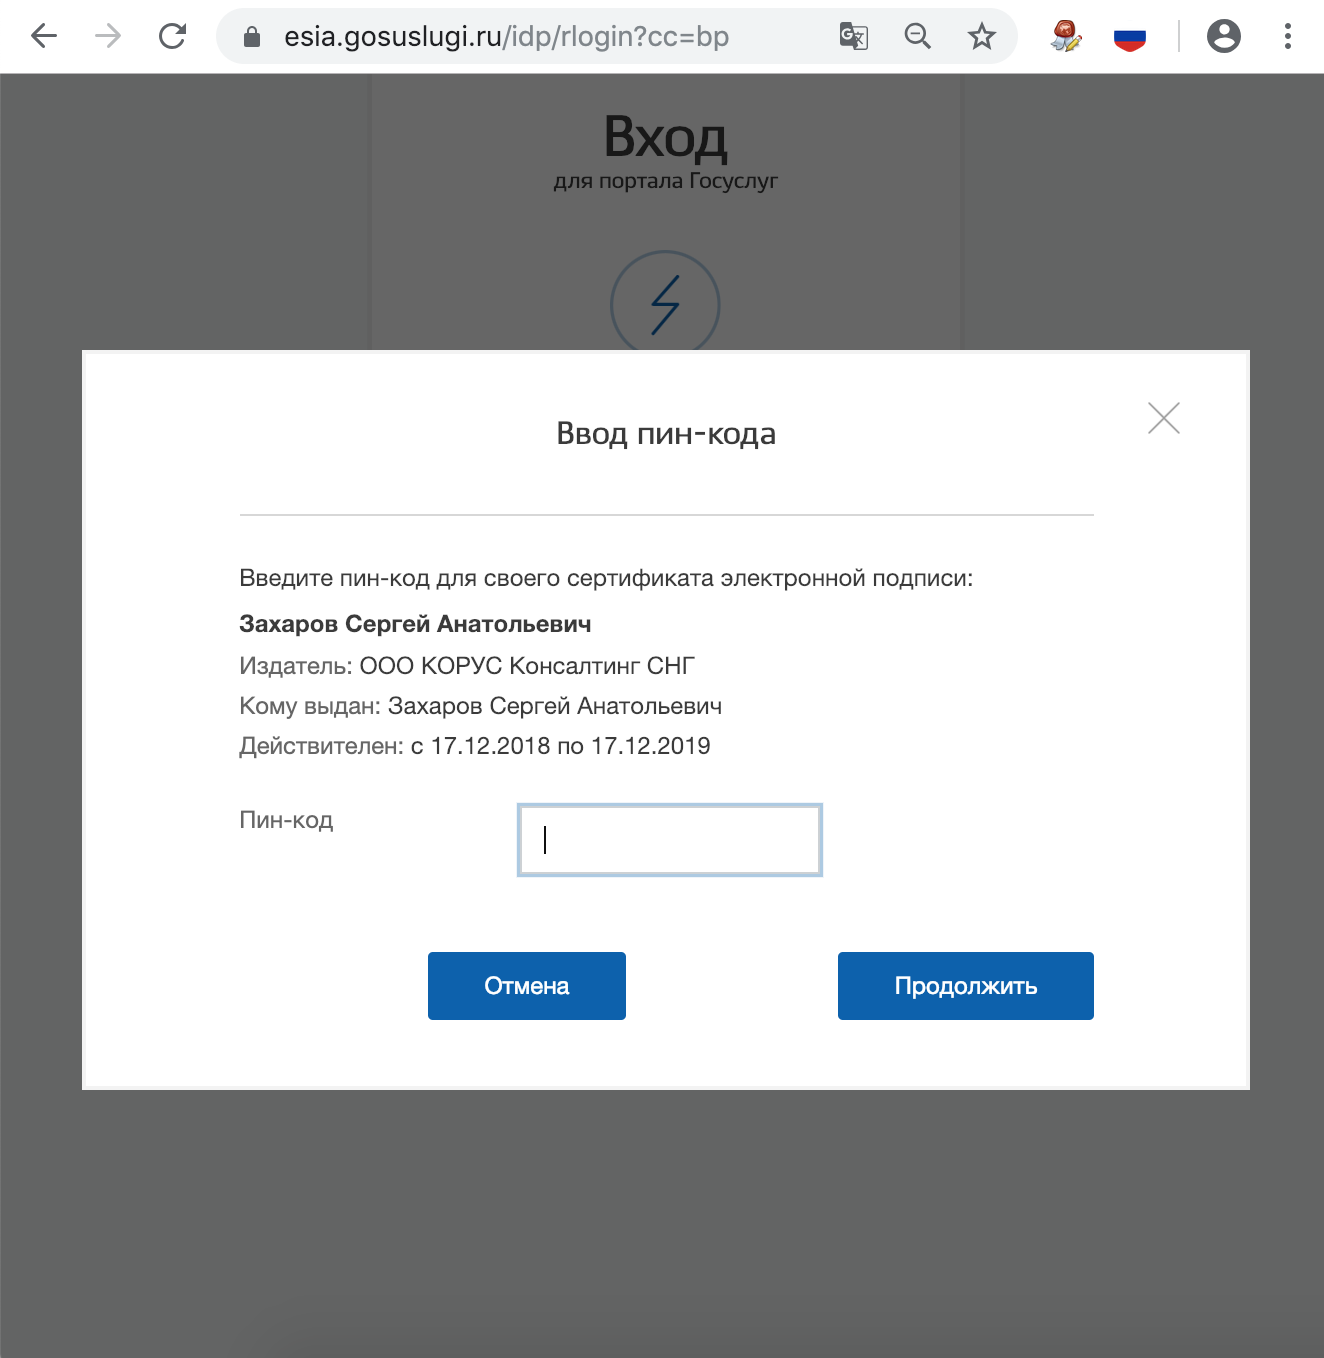
6.3. Go to the state services
When authorizing, select "Sign in with an electronic signature." In the list that appears, select the certificate of the electronic signature verification key, all certificates, including root and CA, will be displayed, you need to choose your one with a usb token and enter the PIN.

7. What to do if it stopped working
Reconnect the usb token and check that it is visible using the command in terminal:
sudo /opt/cprocsp/bin/csptest -card -enum -vWe clear the browser's cache for all the time, for which we type in the Chromium-Gost address bar:
chrome://settings/clearBrowserDataReinstall the CEP certificate using the command in terminal:
/opt/cprocsp/bin/csptestf -absorb -certs
Change PIN container
User PIN-code on Rutoken by default 12345678 , and leave it in this form can not be. Requirements for PIN-code Rutoken: 16 characters max., May contain letters and numbers.
1. Find out the name of the CEP container
On the usb-token and in other storages several certificates can be stored, and you need to choose the right one. When a usb-token is inserted, we get a list of all containers in the system with a command in terminal:
/opt/cprocsp/bin/csptest -keyset -enum_cont -fqcn -verifycontext The team must withdraw at least 1 container and return
[ErrorCode: 0x00000000]
The container we need is
\. \ Aktiv Rutoken lite \ XXXXXXXX
If there are several such containers, it means that several certificates are written on the token, and you are aware of which one you need. The value XXXXXXXX after the slash must be copied and substituted into the command below.
2. Change PIN command from terminal
/opt/cprocsp/bin/csptest -passwd -qchange -container "XXXXXXXX" where XXXXXXXX is the container name obtained in step 1 (required in quotes).
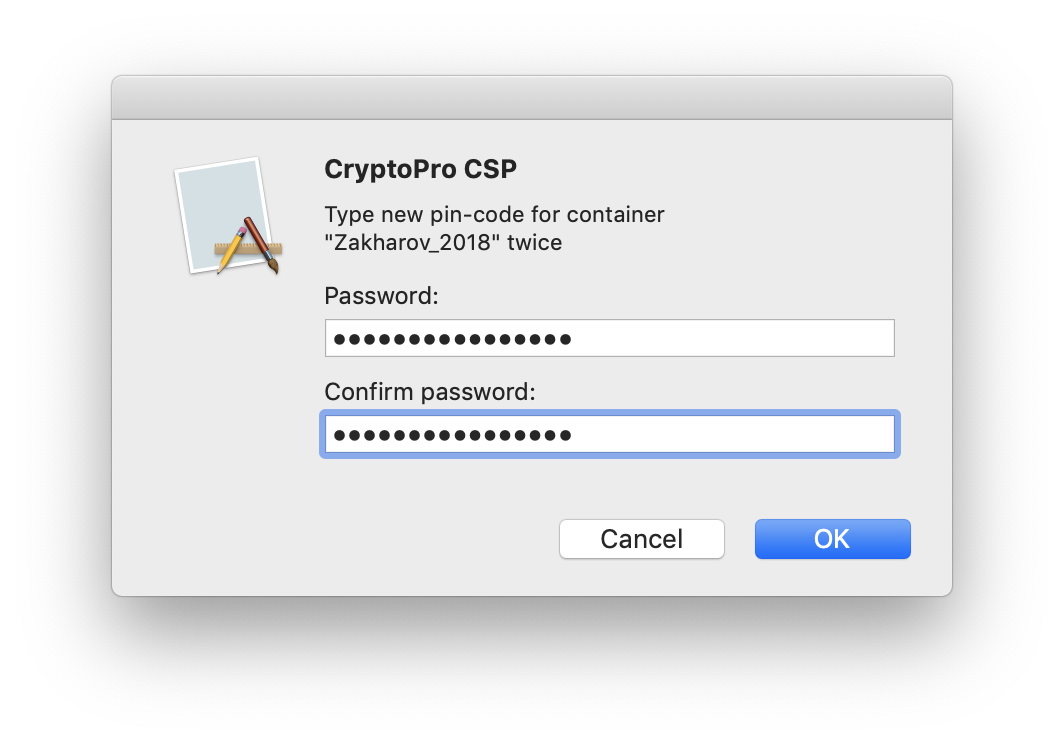
A CryptoPro dialog will appear, asking for the old PIN to access the certificate, then another dialog to enter the new PIN. Is done.
Sign files in macOS
In macOS files, you can sign in CryptoArm software (license price 2500 = rub.), Or by a simple command via terminal - for free.
1. Find out the CEP certificate hash
There may be several certificates on a token and in other repositories. It is necessary to uniquely identify the one with which we will continue to sign documents. It is done once.
The token must be inserted. Get the list of certificates in the repositories with the command from terminal:
/opt/cprocsp/bin/certmgr -list The team must display at least 1 type certificate:
Certmgr 1.1 © "Crypto-Pro", 2007-2018.
program for managing certificates, CRLs and stores
= = = = = = = = = = = = = = = = = = = = =
one-------
Issuer: E = help @ esphere.ru, ... CN = LLC KORUS Consulting CIS ...
Subject: E = sergzah @ gmail.com, ... CN = Zakharov Sergey Anatolyevich ...
Serial: 0x00000000000000000000000000000000
SHA1 Hash: XXXXXXXXXXXXXXXXXXXXXXXXXXXXXXXXXXXXXXXXXXXXX
...
Container: SCARD \ rutoken_lt_00000000 \ 0000 \ 0000
...
= = = = = = = = = = = = = = = = = = = = =
[ErrorCode: 0x00000000]
The certificate we need in the Container parameter must have a value of the type SCARD \ rutoken .... If there are several certificates with such values, then several certificates are written on the token, and you know exactly which one you need. The value of the SHA1 Hash parameter (40 characters) must be copied and substituted into the command below.
2. Sign the file with the command from terminal
In terminal, go to the directory with the file for signing and execute the command:
/opt/cprocsp/bin/cryptcp -signf -detach -cert -der -strict -thumbprint FILE where XXXX ... is the certificate hash obtained in step 1, and FILE is the name of the file to be signed (with all extensions but no path).
The team must return:
Signed message is created.
[ErrorCode: 0x00000000]
An electronic signature file with the * .sgn extension will be created - this is the detached signature in the CMS format with the DER encoding.
3. Installing Apple Automator Script
In order not to work with the terminal each time, you can install Automator Script once, with which you can sign documents from the Finder context menu. To do this, download the archive - download .
- Unpacking the archive 'Sign with CryptoPro.zip'
- Launch Automator
- Find and open the unzipped 'Sign with CryptoPro.workflow' file
- In the Run Shell Script block, we change the text XXXXXXXXXXXXXXXXXXXXXXXXXXXXXXXXXXXXXXXX by the value of the SHA1 Hash parameter of the CEP certificate obtained above.
- Save the script: ⌘Command + S
- Run the 'Sign with CryptoPro.workflow' file and confirm the installation.
- Go to System Preferences -> Extensions -> Finder and check that Sign with CryptoPro quick action is checked.
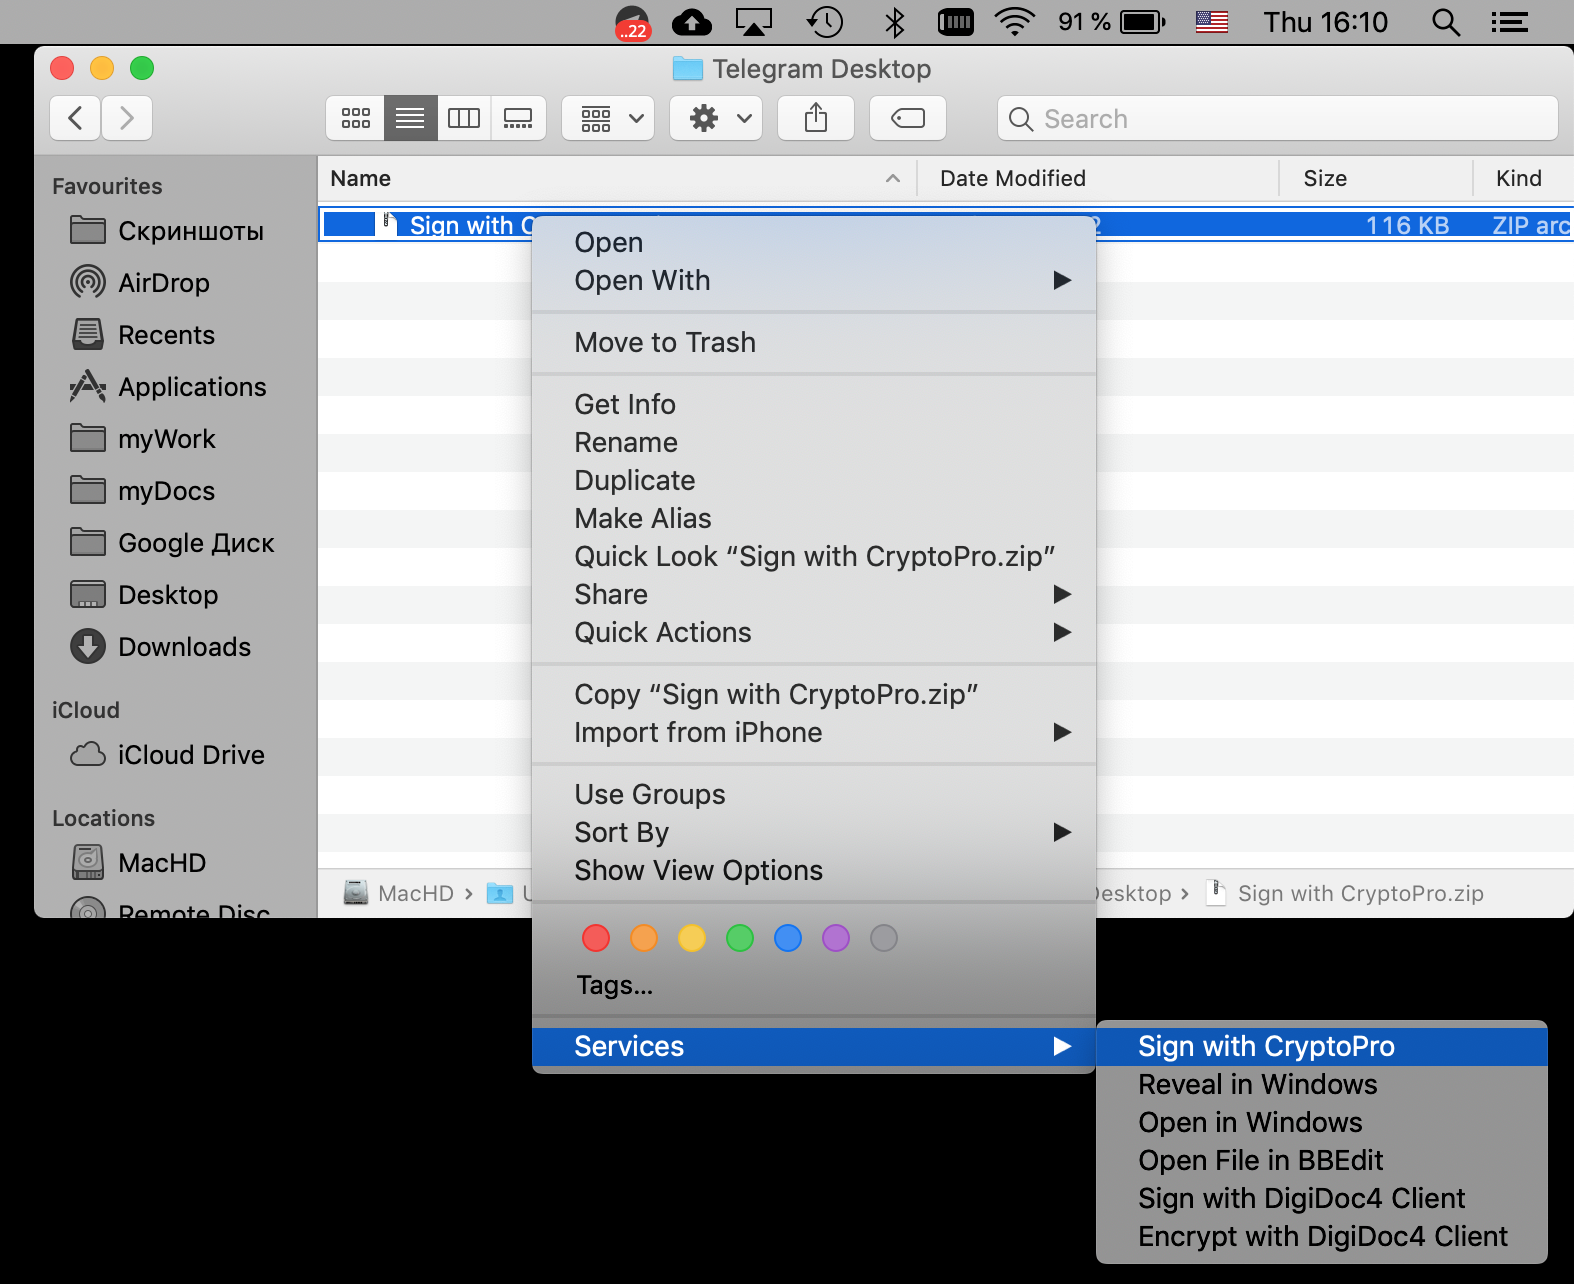
- In the Finder, we call the context menu of any file, and in the section Quick Actions and / or Services select the item Sign with CryptoPro
- In the CryptoPro dialog that appears, enter the user PIN from CEP
- A file with the * .sgn extension will appear in the current directory - disconnected signature in the CMS format with the DER encoding.
Apple Automator window: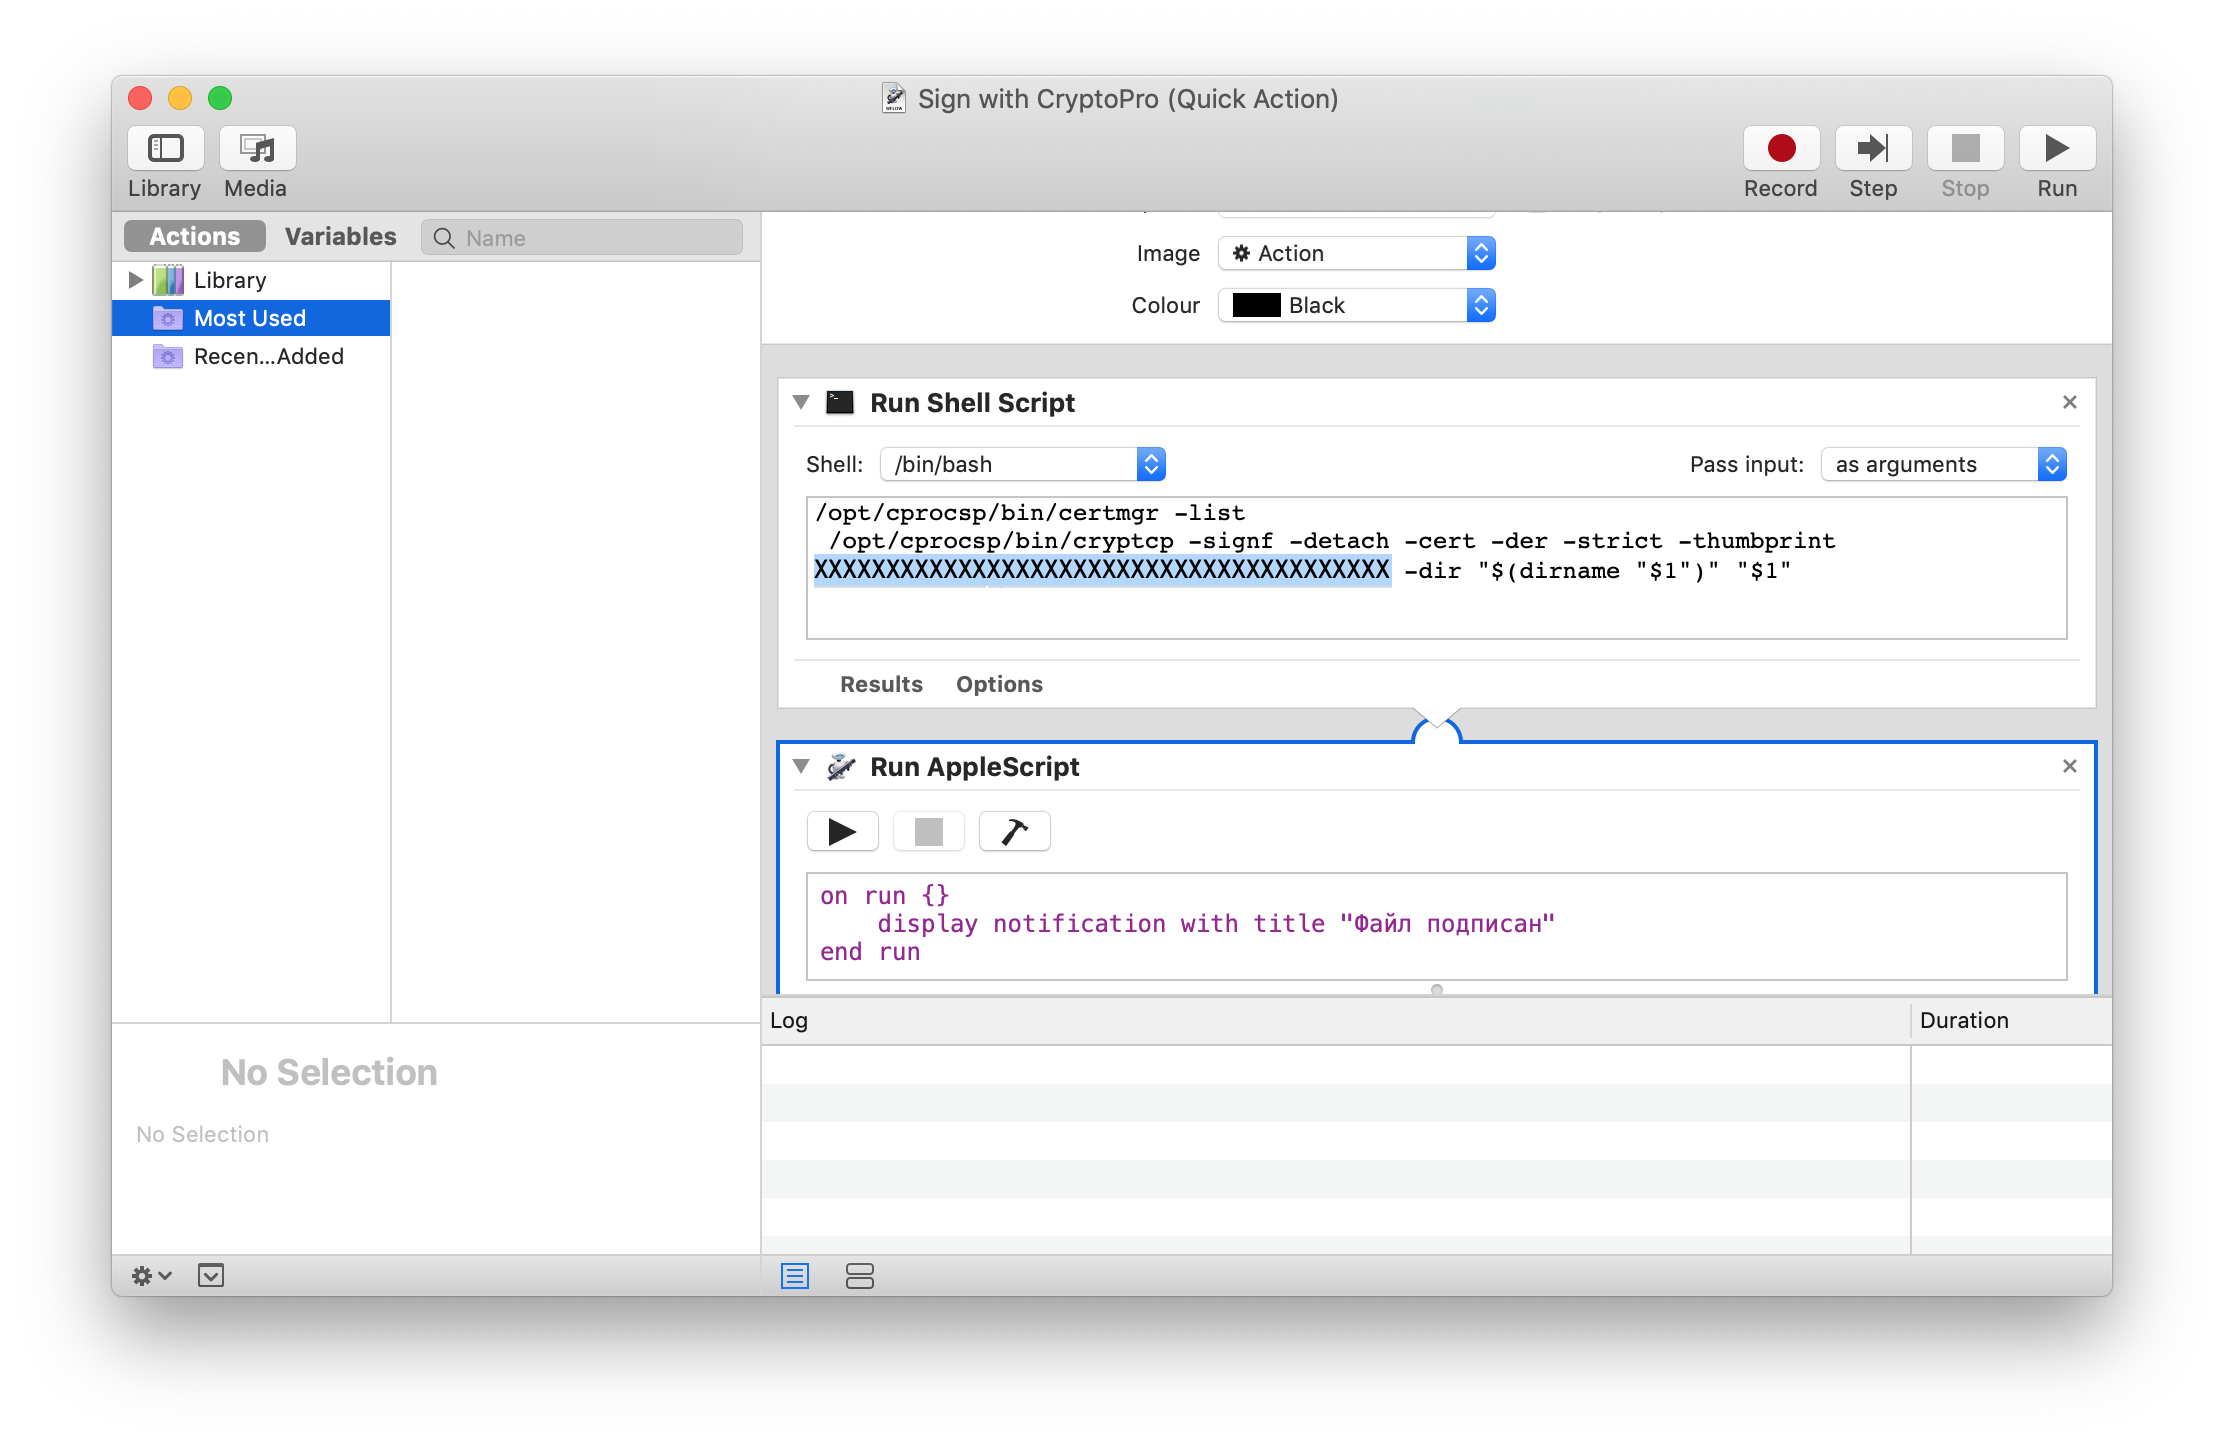
System Preferences: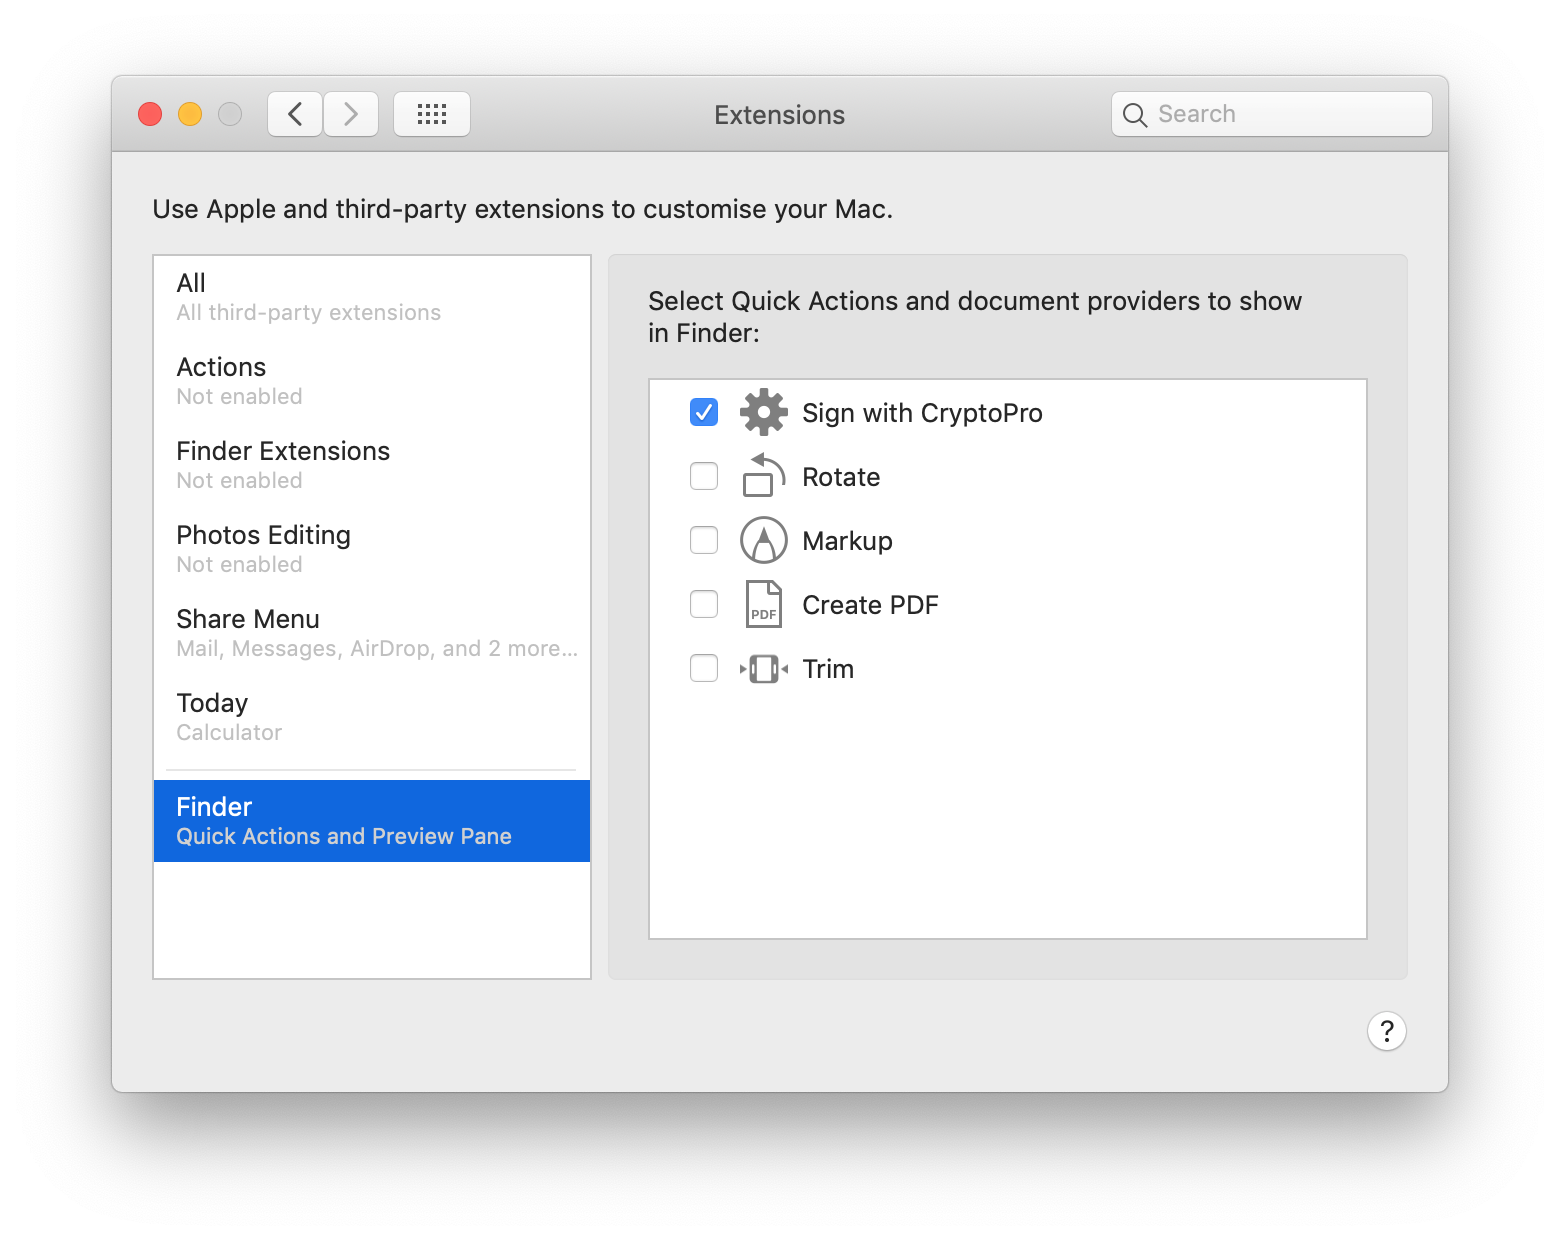
Finder context menu:
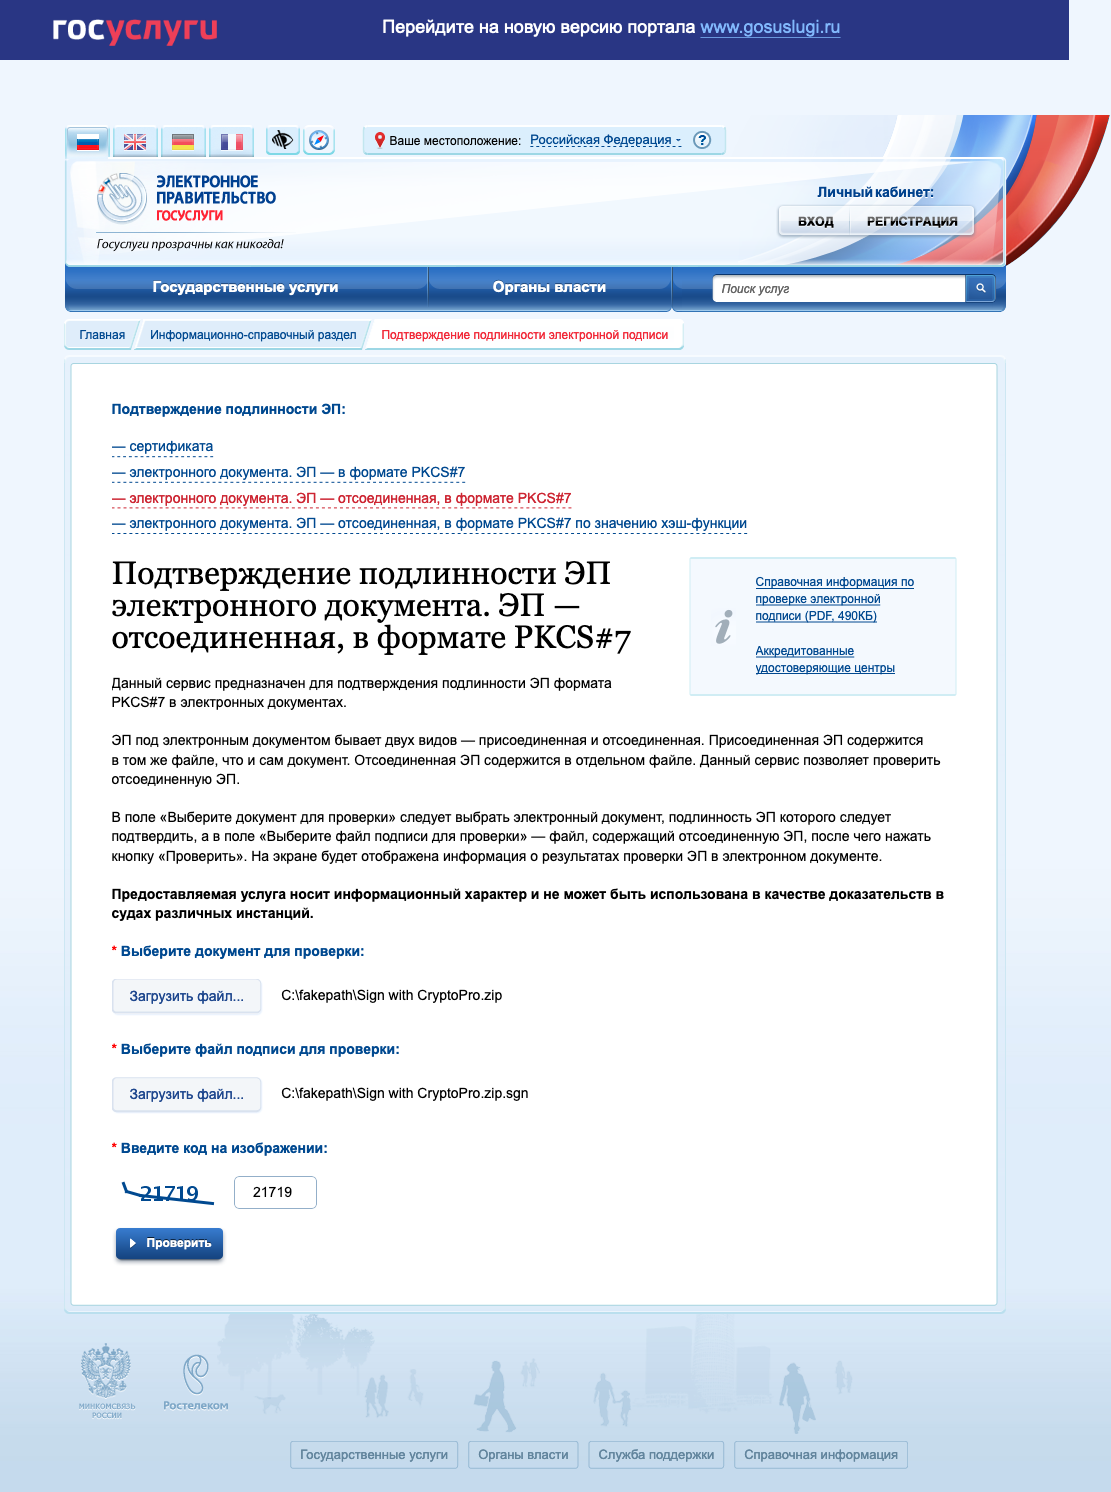
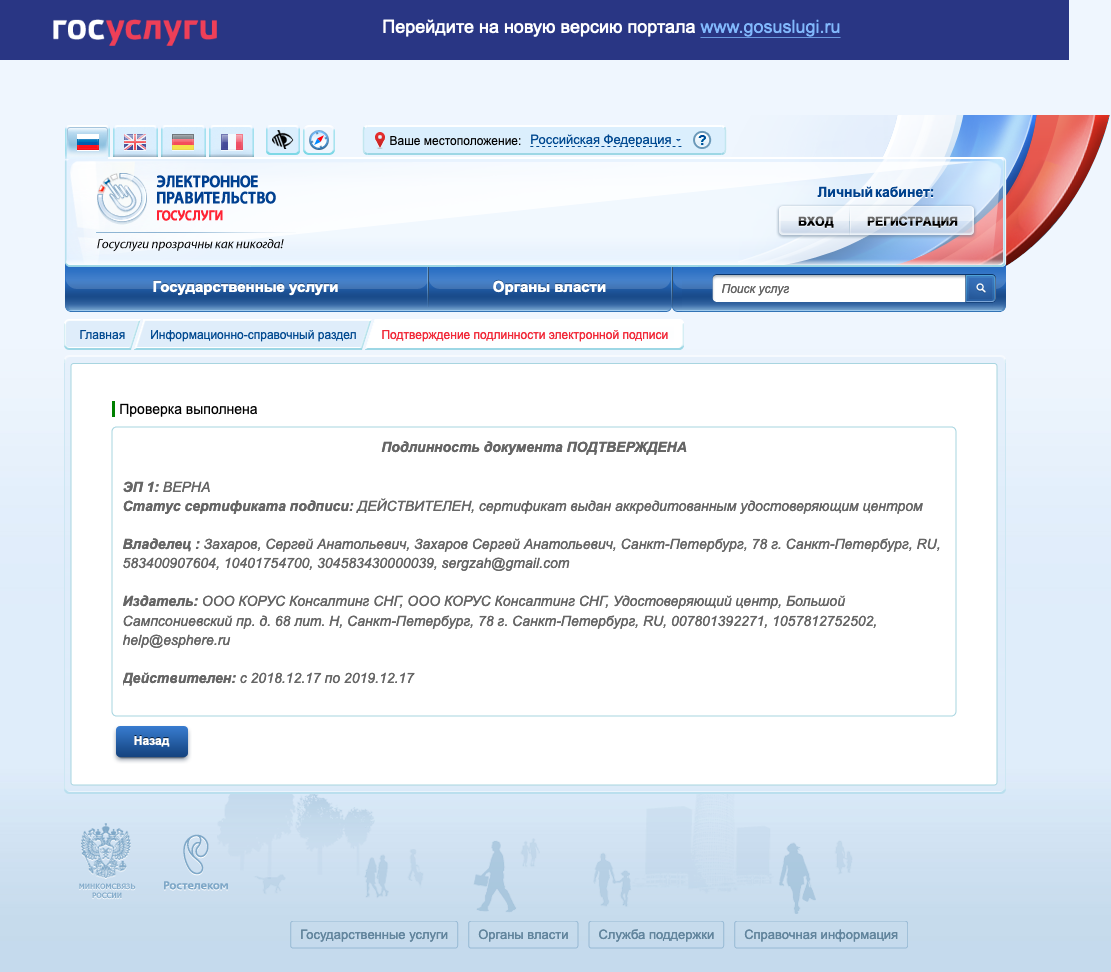
Check the signature on the document
If the content of the document does not contain secrets and secrets, then the easiest way is to use the web service on the portal of state services - https://www.gosuslugi.ru/pgu/eds . So you can take a screenshot from a reputable resource and be sure that everything is OK with the signature.
')
Source: https://habr.com/ru/post/450516/
All Articles