How to make an application out of the site and put it on Google Play in a few hours. Part 2/2: Trusted Web Activity
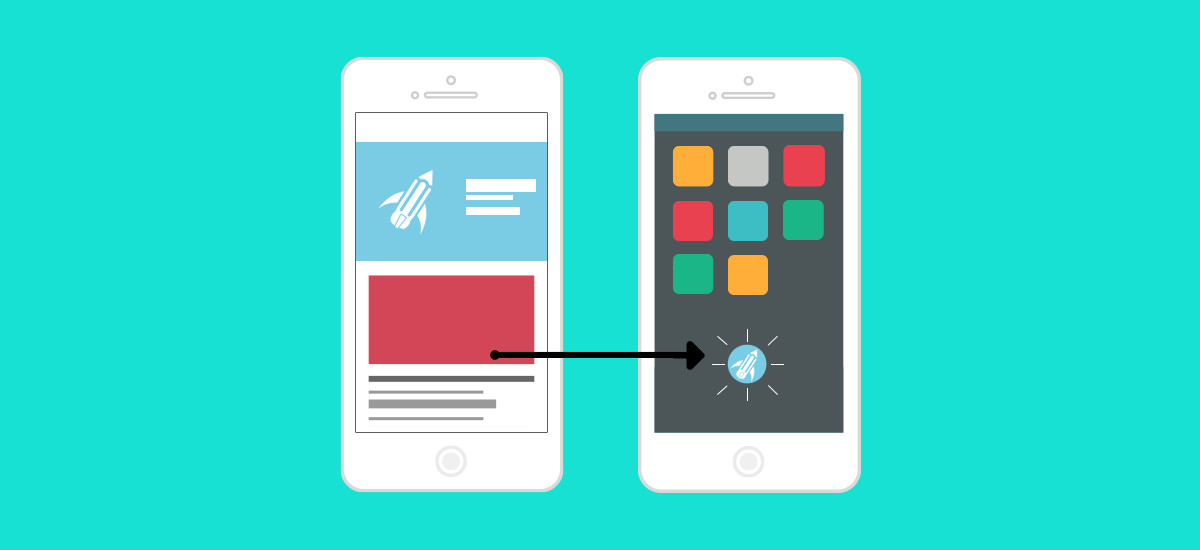
In the first part, we turned our website into a Progressive Web App. It was also said there that quite recently, on February 6, 2019, Google provided a simple opportunity to upload PWA to Google Play using Trusted Web Activity. All you need to do is write a small wrapper for Android, which can be put on Google Play. When a user downloads such a wrapper application, it will simply open our PWA inside Chrome. Of course, the Chrome interface will be hidden and everything will look beautiful.
If you, like me, have never written applications for Android, then further you should also seem like a series of magical manipulations. But to what you will not resort only to lay out the application. Go!
Android Studio
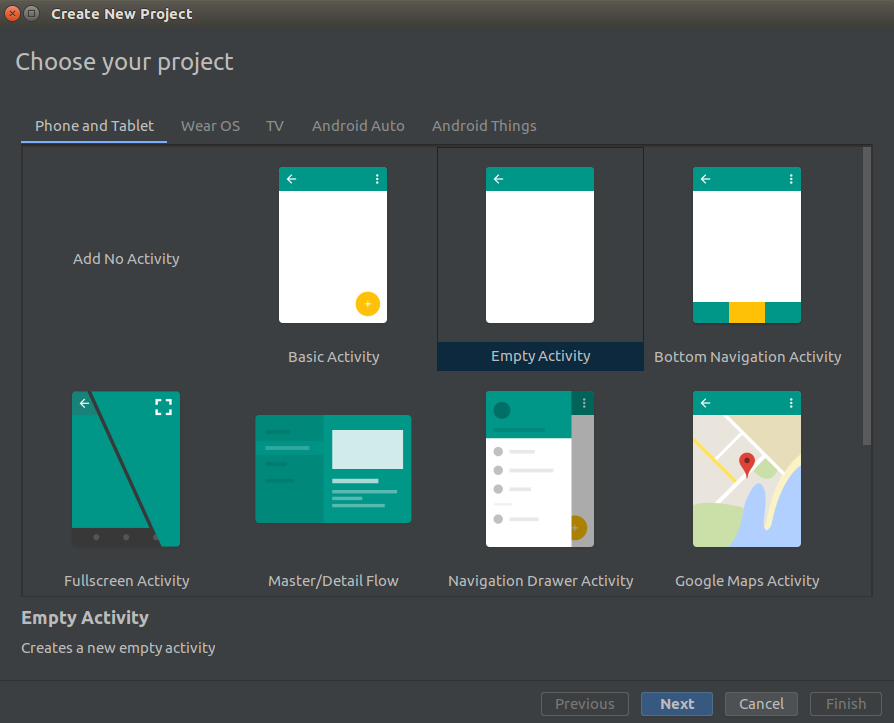
First, download Android Studio for the first time. Create a new project and at the same time select “Add No Activity”.
')
Next, configure your project:

For the Package name, it is recommended to form the name as follows: the start page of skorochtec.ru/app turns into ru.skorochtec.app.
Application Configuration and Dependencies
The created project has the following structure:

We will need to change AndroidManifest.xml, styles.xml (res / values folder) and both build.gradle files.
I also recommend setting the application icon in the res / drawable and res / mipmap folders, otherwise your application will have a standard Android icon.
build.gradle(Project: AndroidStudioProjects) // Top-level build file where you can add configuration options common to all sub-projects/modules. buildscript { repositories { google() jcenter() } dependencies { classpath 'com.android.tools.build:gradle:3.3.1' // NOTE: Do not place your application dependencies here; they belong // in the individual module build.gradle files } } allprojects { repositories { google() jcenter() maven { url "https://jitpack.io" } } } task clean(type: Delete) { delete rootProject.buildDir } No time to explain, just copy it to yourself :)
build.gradle(Module: app) apply plugin: 'com.android.application' android { compileSdkVersion 28 defaultConfig { applicationId "ru.skorochtec.app" minSdkVersion 19 targetSdkVersion 28 versionCode 5 versionName "1.0.0" testInstrumentationRunner "android.support.test.runner.AndroidJUnitRunner" manifestPlaceholders = [ hostName: "skorochtec.ru", defaultUrl: "https://skorochtec.ru/app/", launcherName: "", assetStatements: '[{ "relation": ["delegate_permission/common.handle_all_urls"], ' + '"target": {"namespace": "web", "site": "https://skorochtec.ru"}}]' ] } buildTypes { release { minifyEnabled false proguardFiles getDefaultProguardFile('proguard-android-optimize.txt'), 'proguard-rules.pro' } } compileOptions { sourceCompatibility JavaVersion.VERSION_1_8 targetCompatibility JavaVersion.VERSION_1_8 } } dependencies { implementation fileTree(dir: 'libs', include: ['*.jar']) implementation 'com.github.GoogleChrome.custom-tabs-client:customtabs:e849e45c90' } And here you need to give some explanations:
versionCodewill need to be changed with each new build, butversionCodeneed not be changed;defaultUrlmatchesstart_urlfrom the Web App Manifest;- in
assetStatementsshould be the base url (“ skorochtec.ru ” in my case); - All the magic is provided by connecting custom-tabs in the last line, use this version, since it is 100% tested on Google Play.
AndroidManifest.xml
<manifest xmlns:android="http://schemas.android.com/apk/res/android" package="ru.skorochtec.app"> <application android:allowBackup="true" android:icon="@mipmap/ic_launcher" android:label="${launcherName}" android:roundIcon="@mipmap/ic_launcher_round" android:supportsRtl="true" android:theme="@style/AppTheme"> <meta-data android:name="asset_statements" android:value="${assetStatements}" /> <activity android:name="android.support.customtabs.trusted.LauncherActivity" android:label="${launcherName}"> <meta-data android:name="android.support.customtabs.trusted.DEFAULT_URL" android:value="${defaultUrl}" /> <intent-filter> <action android:name="android.intent.action.MAIN" /> <category android:name="android.intent.category.LAUNCHER" /> </intent-filter> <intent-filter> <action android:name="android.intent.action.VIEW"/> <category android:name="android.intent.category.DEFAULT" /> <category android:name="android.intent.category.BROWSABLE"/> <data android:scheme="https" android:host="${hostName}"/> </intent-filter> </activity> </application> </manifest> Copy this by changing the
package in the <mnifest> (at the very top).styles.xml
<resurces> <!-- Base application theme. --> <style name="AppTheme" parent="Theme.AppCompat.Light.NoActionBar"> <!-- Customize your theme here. --> <item name="colorPrimary">@color/colorPrimary</item> <item name="colorPrimaryDark">@color/colorPrimaryDark</item> <item name="colorAccent">@color/colorAccent</item> <item name="android:windowNoTitle">true</item> <item name="android:backgroundDimEnabled">false</item> </style> </resurces> Just copy.
Creating a signed application
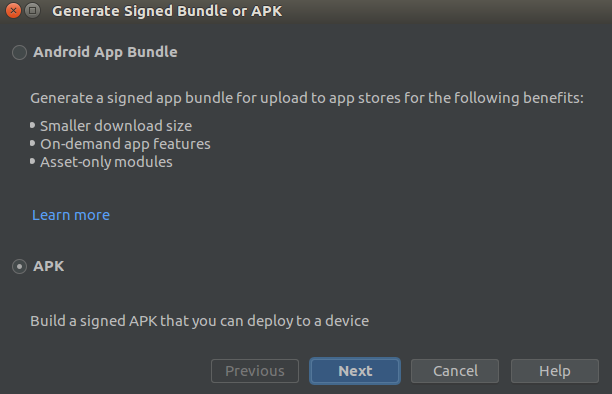
Everything is ready to release the application. But it still needs to be signed. To do this, find in the toolbar build -> Generate Signed Boundle / APK ... Select the APK:
Click Create new ...
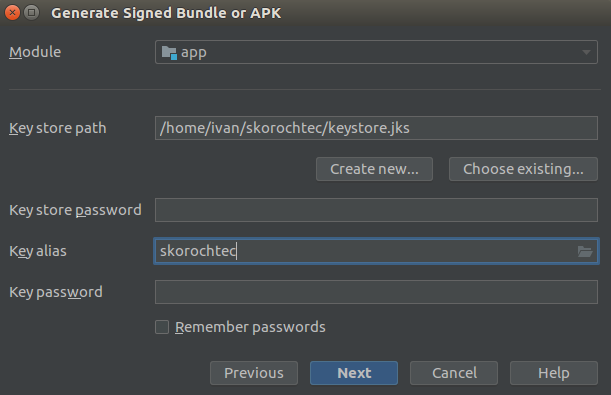
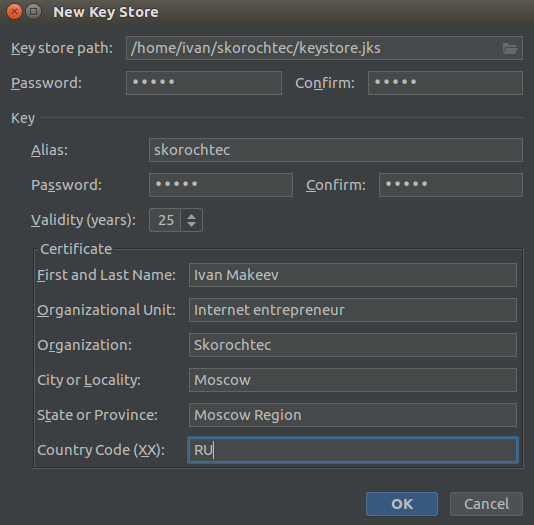
Create a new keystore and the key itself in it:
Finally, collect and sign the application:

Hooray! Our APK is ready for release!
Google Play Console
To lay out the application, you must have a developer account that costs $ 25. After the purchase you will have access to Google Play Console. It is easy to understand, but I will clarify one thing. At the stage of loading your APK into the developer console, you will see the following:
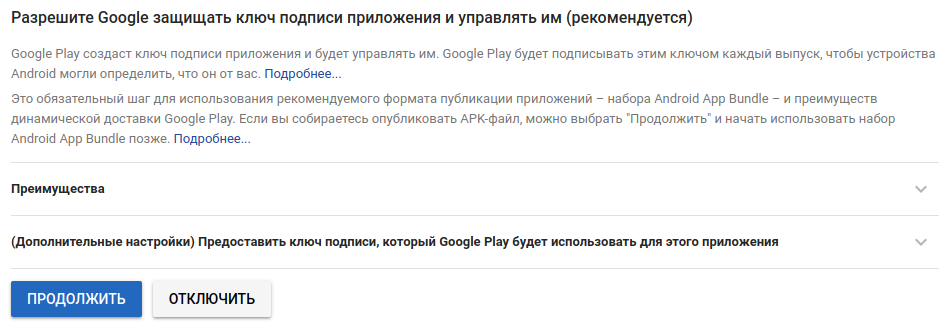
Google seems to hint that we are crooked and most likely will lose our signature key, which means we will not be able to update the application later. So, they suggest that we sign our APK, but the final application has already been signed by Google itself. I recommend to accept this condition.
Digital link link
Did you notice anything suspicious in previous actions? To create an application, we essentially used only the address of our website ... Then what prevents us from releasing an application right now, for example, Twitter?
But Digital Asset Link, which we have to place on our website, prevents us from proving that the application and the website have one owner (based on the application signature key).
This is done very easily: find in the Google Play Console, Release Management -> Application Signatures. There will be a certificate for signing applications generated by Google (if you followed my recommendation and accepted the condition). You need to copy the SHA-256 Certificate Digital Print .
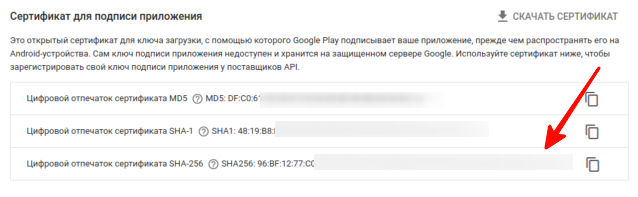
And paste it into the digital asset links tool . And put them generated in assetlinks.json file, which should be available on the server of your site along the path .well-known / assetlinks.json.
Is done
That's all! We release our application, wait a few hours until Google approves it and, finally, enjoy its presence on the Google Play Market!

By the way, beautiful screen pictures can be done at https://apptoolkit.io/ .
Conclusion
Well, we went the full way from the site to the application, it was not very easy, but not very difficult. The PWA and TWA technologies are still very young and have several disadvantages. For example, an application released in this way will not open to the user if Google Chrome version 72+ is not the default browser on his smartphone. So get ready to sacrifice a part of users for the sake of release speed.
In the App Store to lay out the application in this way is impossible. Well, in general, Apple is lagging behind in terms of supporting these technologies (we hope that it is not intentional). But the area of Progressive Web App is rapidly developing and improving, so it is hoped that soon all mobile browsers will support it, and the existing shortcomings will be corrected.
Be that as it may, I believe that the future is in Progressive Web App and encourage you to become early adopters of this technology. Benefit instructions for this you now have.
useful links
Source: https://habr.com/ru/post/450506/
All Articles