It's like riding a bike
Disclaimer
This manual does not claim to be complete and true, but is merely an attempt to summarize the personal experience of the author. If the information presented is useful to someone and helps save time, so much the better. If something is wrong - well, nobody's perfect ...
Comments / suggestions / constructive criticism - certainly welcome.
Comments / suggestions / constructive criticism - certainly welcome.
Cycling is the art of balance. The sense of balance is given to us all by nature itself, it remains only to extend it beyond the body, on a bicycle. And it must be done carefully - the first experience is the most important. This undoubtedly pleasant and useful skill is easiest to acquire in childhood. The child is literally easier (to support an adult in an unstable equilibrium while riding a bicycle, oh, how difficult it is), and it is easier to train. Less risk of injury when falling.
It would seem - small wisdom ...
')
The way it is!
The balance when riding a bike depends on the following factors:
- the position of the center of gravity of the system SV (rider + bicycle) relative to the bearing area,
- the angle of inclination of the SV relative to the vertical,
- steering angle,
- turning radius,
- speed,
- weight CB,
- type of track covering, i.e. friction forces, and, especially - from its uniformity,
- wind speed and direction,
- the presence of obstacles and their type,
- add your option.
Factors are interrelated and when going beyond the result the result is predictably painful.
But we will not tell all this to the child. No need to complicate.
Fortunately, the child is still able to learn to ride intuitively.
The artist from me is not very good, I found an animation on the theme of the connection of the steering angle with a tilt
In view of the upcoming holidays, I suggest that you take time to train your children.
You will need:
1. Chado. His or any child who trusts you and trusts you enough. Not all children are the same. Once a boy from the start began to pedal intensely, while randomly turning the wheel and deflecting its center of gravity. But. Almost all children can be taught to stay in the saddle. The main thing is to try to drop them as little as possible; trust is a fragile thing. Watch when your child loses interest or becomes afraid. Take a break. Be interested in the opinion of the child. Do not be distructed. The main one is he.
2. Bicycle. Here it is more difficult - not any will do. Which one do you think is better?


But in my opinion - this one: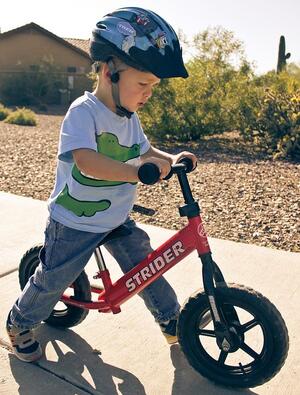
The advantages of running a bike over the "children's bike" when training:
- Minimalism - weight, height, design - nothing distracts from the learning process.
- The child feels much more confident without losing contact with the ground. You can always lean on one or two legs, stop quickly, due to low weight and inertia. And most importantly - does not lose the sense of balance, which greatly simplifies the learning process.
In fact, a child who has just learned how to run can ride a runbike.
When riding a bike, the legs do not reach the ground and the balance has to be kept consciously by tilting the center of gravity and turning the steering wheel.
A runbike, by the way, can be made from a bicycle. It is enough to remove the excess - pedals / connecting rods / axle / chain (at the same time you will learn a lot about the design of the “children's bicycle”). Difficulty, rather, psychological - “how to break a working bicycle?” If everything goes according to plan, you will soon need to collect everything back - the child will be ready to move from running to bicycle.
There is a nuance - with the saddle lowered as much as possible, the child should be well kicked to the floor, otherwise the alteration does not make sense.
Despite the fact that the runbike can significantly simplify learning to ride a bike, reduce the time required and reduce your efforts, you can learn right away on the bike.
Bicycle
Remove these terrible extra wheels. With them, the bike turns into a stool. Learning to ride with them is the worst thing you can think of. It’s like learning to fly while being tied to a kite: formally, you fly, but you don’t manage and learn the process. The wheels inhibit movement, but do not give a feeling of complete stability - there is still a gap of a couple of centimeters, the bike sways and the child, rolling from side to side, constantly feels discomfort and is waiting for a fall.
Design ... All these ryushechki invented by adult uncles and aunts. Heavy frame, welded from water pipes and painted with cute pink paint. Bike layout. Sometimes with the layout of the front and rear brakes, and even with the layout of the speed switch. All this does not work, and can not, because on children's bicycles, the mounted equipment is usually installed below the lower class, and only the price of a bicycle is similar to the real one. Bearings? No, not heard.
Quality children's bicycles are few and expensive. For example, Specialized produces light, high-quality children's bicycles, but their price may surprise you unpleasantly. In addition, the child quickly grows out of the bike, and buying a “firm” every year or two is expensive. On the other hand, almost everything that is sold under the guise of children's bicycles, such is, at best, only externally.
What can you want:
- Light frame (Specialized). A light bike is needed if the child can carry / carry the bike himself (1st floor or private house). Usually, parents endure bicycles, which dramatically reduces the number of trips the child.
- Brakes. It is advisable that the front brake works well - it is more efficient than the rear brake, and due to low weight, low fit and low speed, the child’s chances of ripping a hand through the steering wheel are few. Rear brake is optional. Brake in the hub (pedal reverse) is harmful - it distracts from maintaining balance and acts more slowly than the front one, since the pedals must be in a certain position so that the brake can be used. But usually he is.
- High-quality tires are not needed / expensive. The child does not blow rubber - not the mileage, and most likely it will not drive through mud / prickles / glass. The main thing that is not too quickly let down, otherwise parents will have to pump up before each use. And yes, do not be lazy to check / pump up - the more heavily inflated tires (especially the rear), the easier and more fun to drive (but without fanaticism).
- Helmet. I think redundant, except that you will teach the child immediatelydownhill
- Wings / step / flashlight / reflectors / trunk / bag - not necessary. Neither at night nor in the rain you, most likely, will not roll. The lighter it is, the less weight to put in / take out for a walk.
As an option, pay attention to the used offers. The same Specialized from Europe is an order of magnitude cheaper than the new, but used, but previously bought new in our stores are cheaper by only 50%.
During the use of one child bike resource does not suffer. Maximum - scratches. Do not fight to scratch the bike and do not need to scold the child for it - just discourage him from wanting to touch the bike.
It is impossible to bend / break the frame of a children's bicycle - due to its miniature proportions and low load, it has a huge margin of safety. Here I mean bicycles; their 1: 1 scale layouts should be beautifully placed on supermarket shelves. If you are unlucky, and the relatives gave the child such a layout for his birthday - do not be discouraged. You can ride it too, though not so easily and quickly. But in a year or two you will know exactly what to look for.
You can also rent a bike, but you need to keep in mind that the lesson is unlikely to last more than half an hour, so it is better to borrow from friends / neighbors first. When learning to run a few lessons for two days, the child will be enough so that you can no longer keep up with him. Then it will take another couple of days on the bike to fully get comfortable with self-driving. If you learn right away on a bicycle, get ready to support your child for a week until he no longer fears a fall.
(Not) Fall, by the way, also needs to be taught. Choose a suitable place, away from the curbs, better on the ground. It is desirable that the frame of the bike was understated - it is easier both physiologically and psychologically. Make sure you hold the child with the bike while tilting / falling - you will probably need to hold the saddle at the same time with one hand and the other with the wheel, leaning slightly toward the bike and resting your legs. Accelerate, ask your child to slow down by braking, set his left foot, help tilt the bike to the left and stop completely. Repeat to the right. Show that you can stop with your foot on the curb to maintain a vertical position; without taking off the bike, rest and continue driving.
Make sure that the bike / runbike is working properly: try to load the frame, you can stand with your knee on the saddle, or even slightly sit down - if you don’t break the bike under you, it means that your child will master it. Check that the wheels spin easily and freely, tires are inflated. otherwise it will be much harder and less interesting to drive. Check that the brake is working. The stroke of the brake handle should be small (under a small children's handle), braking should be gradually increased as you press the handle and almost block the wheel at the end of pressing. You can start!
Your task is to help the child keep the balance while keeping the child as low and symmetrical as possible, ideally behind the center of gravity of the child-bike system, this is somewhere near the bottom of the back. Not exactly behind the wheel! Too high and asymmetrical, your influence on the center of gravity is too great. You can keep the bottom of the seat, but then you have to bend over, and this is inconvenient (especially run on half-bent). As an option - "parental handle", attached to the seatpost. Another option is to hold the child by the back of the child's clothes, if only he would not slip out, or not to fasten his father's belt with the child's armpits and support him by the belt.
It is necessary to support, i.e. to insure against falling, but by giving the child enough freedom to manipulate his center of gravity - this way he will quickly learn to keep balance.
The higher the speed and sharper the turn, the greater the slope in the direction of the turn.
First, to push the bike forward slightly, push the bike, and later, after mastering the balance, the child must pedal himself.
The next step is finding the right track. Horizontal stretch of smooth asphalt, at least 3 meters wide and 6 meters long. Preferably without high curbs and other obstacles. Preferably without pedestrians. Of course, not on the roadway. Park / playground in the yard / wide sidewalk ... A wide section is needed for learning turns - so the child learns to keep the balance much faster than being towed in a straight line. It is convenient to install a disposable glass with a pebble at the beginning and end of the plot (for weighting, so that the wind does not blow away). The cups will show the child (and passers) a flight plan.
Tell your child that you are planning a smooth left turn in a wide arc. Tilt the bike slightly to the left while turning the steering wheel slightly to the left and make a 180-degree turn around the intended point (cup) with a smooth exit to the line. Then the same to the right. Allow the child to correct the center of gravity position and turn the steering wheel a little, show that keeping the balance depends on these two factors (and more on speed, but now it doesn't matter). Keep the minimum, trying not to interfere with the child's attempts to control the bike, reducing only sharp jerks of the steering wheel and tilt, but always be ready to keep the weight of the child and the bike, do not let the child fall.
If there are pedestrians on the sidewalk - choose points for movement, while the sidewalk is free, when it is busy - you can relax and explain to the child the plan for the next stage. After the start of the stage, the less distractions there are - the more effective the training. A verbal altercation with pedestrians who believe that the pavement is made for them (and they are right!) Can spoil the mood for you, and most importantly - for the child. Therefore, be mutually polite on the chosen sidewalk.
The program for running
- Saddle lowered to minimum. We go on foot, not sitting down, we drive a little right / left.
- Saddle above. Sit down, go, rule, accelerate, brake (brake or legs)
- With support, we are trying to steer more actively, to make wide smooth circles right / left.
- We learn to accelerate strongly, to go by inertia and slow down.
- We learn to make turns to the right / left by 180/360 degrees only on inertia, without touching the ground with their feet.
Bicycle program
If the child already has the experience of driving a running bike, he will only have to transfer the existing experience of maintaining balance and add the skill of maintaining speed by pedaling
0. The child independently drives the bike, holding the steering wheel with the two hands, the child on the left. We try to slow down. Show your child that a vertically oriented bike is easier to drive than a tilted one.
1. Sit, sit, get used to the saddle. Rulim little by little.
2. We touch. Steer the car. We twist the pedals. We are going a little faster
3. We try to slow down. We are going to stop, repeat several times, gradually increasing the acceleration. There is only one start to brake - in order not to overload the child with information, preferably the front one, as the most effective.
3. With support, we are trying to steer more actively, to make wide smooth circles right / left.
4. We learn to accelerate strongly, to go by inertia and slow down.
5. We learn to make turns to the right / left by 180/360 degrees only on inertia.
6. Gradually reduce the stiffness of the hold, giving the child more freedom.
7. We master independent landing and getting off the bike. Depends on the frame of the bike.
If it is high - hold the steering wheel with two hands, put the left foot on the pedal, with the right slightly push off and throw it through the frame. The child must simultaneously maintain balance and start pedaling quickly, so as not to stop or fall. This is the most traumatic moment at this stage. While supporting the child, repeat as many times as necessary to make him comfortable to sit / stand up independently.
8. Raise the saddle so that the feet of the child are almost straightened, passing the lowest point when pedaling. By this time, the child should be able to confidently sit / get up from the bike and not be afraid to fall.
9. We teach the child to use the speed switch, independently selecting the speed depending on the descent / rise / wind in such a way as to maintain a constant comfortable cadence (pedaling frequency). This will allow the child to move quickly and far enough without exerting excessive effort and without getting tired.
10. On the move we rise, moving by inertia. Repeat trying to pedal while standing
11. Carefully try to overcome the fossa and small curbs, getting up and using bent legs to soften the bumpiness. Somewhere here you can add a helmet to your equipment.
12. Complicate the track, overcoming several small obstacles at once. For this we need a stock of inertia, since kicking and pedaling with feet at the same time is difficult, and the lack / excess of inertia is fraught with a fall.
The next stage - skating together. A child will quickly learn to ride faster than you walk, and some of you will have to constantly wait or catch up, or wind circles, if the path is convenient enough for this. Better to ride bikes together. You are in the back to see the child, but he must know exactly where to stop (intersections and other obstacles). We need a long sidewalk / bike path a couple of kilometers long. In the second case, tell the child that he should move in the right lane and stick to it yourself. Do not make left turns without making sure that it is safe. If necessary, stop - make sure that you do not block the path. There are enough locks there - rows of pedestrians, moms with two or three wheelchairs, handfuls of students from left-hand countries who rent bicycles, skiers with sticks ...
At this stage, the child will need yes, a ringing bell, and you - a lot of patience. Do not be nervous - you walk and relax ... Grab a bicycle lock and a thermos with your favorite drink / cookies - and you can increase the length of the walk.
A few more animations to fix attention
Thanks to those who read. It's time to go ride!
The list of manufacturers of children's bicycles that deserve attention from the point of view of the authors of comments (replenish, filed as in the original, without checking and adjusting):
Vitus, KuBikes, Woom, Lisaped, Frog, Shulz, Kubi, Stern ...
Links: Runbike on wikipedia .
Source: https://habr.com/ru/post/449886/
All Articles