Creating a Tower Defense game in Unity, part 1
Field
- Creating a tile field.
- Search for paths using a wide search.
- Realization of support of empty and final tiles, and also tiles of walls.
- Editing content in game mode.
- Optional display of field grid and paths.
This is the first part of a series of tutorials dedicated to creating a simple tower defense game. In this section we will look at creating the playing field, finding the path and placing the end tiles and walls.
Tutorial was created in Unity 2018.3.0f2.
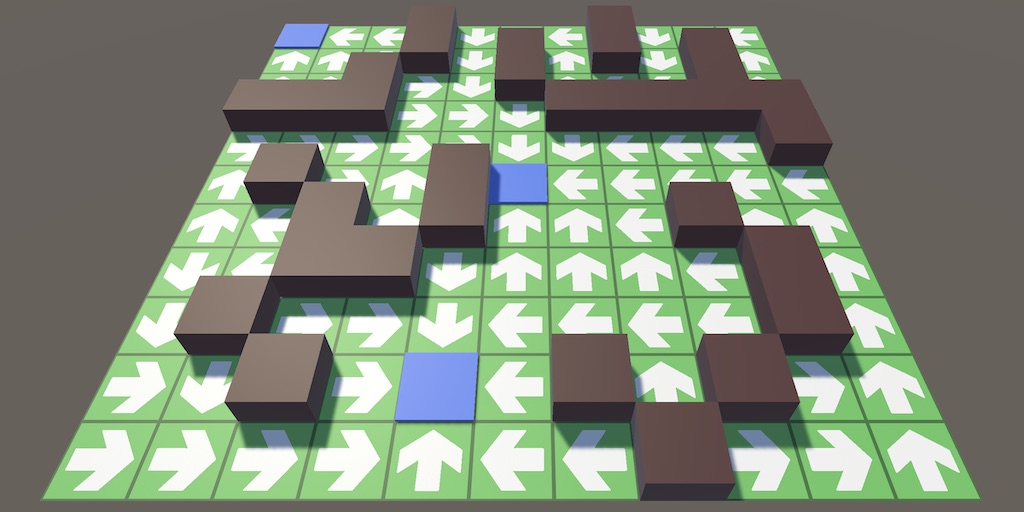
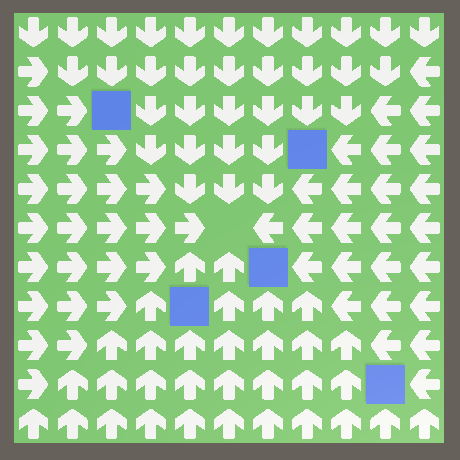
The field, ready to use in the tile game of the genre tower defense.
')
Tower Defense game
Tower defense is a genre in which the player’s goal is to destroy the crowds of enemies until they reach their final point. The player accomplishes his goal by building towers that attack enemies. This genre has a lot of variations. We will create a game with a tile field. Enemies will move across the field towards their end point, and the player will create obstacles for them.
I will assume that you have already studied a series of object management tutorials.
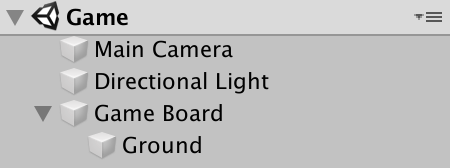
Field
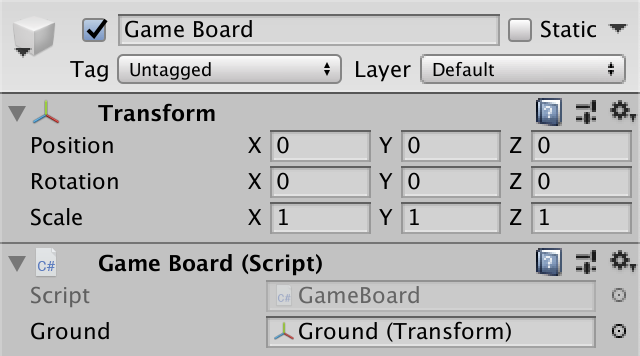
The playing field is the most important part of the game, so we will create it first. This will be a game object with its own
GameBoard component, which can be initialized by setting the size in two dimensions, for which we can use the value of Vector2Int . The field should work with any size, but we will choose the size somewhere else, so we will create a common Initialize method for this.In addition, we visualize the field with one quad (quad), which will denote the earth. We will not make a quad object itself a field object, but add a child object quad to it. During initialization, we will make the ground XY scale equal to the field size. That is, each tile will have a size of one square unit of measurement of the engine.
using UnityEngine; public class GameBoard : MonoBehaviour { [SerializeField] Transform ground = default; Vector2Int size; public void Initialize (Vector2Int size) { this.size = size; ground.localScale = new Vector3(size.x, size.y, 1f); } } Why explicitly set the ground default value?
The idea is that everything customizable through the Unity editor is accessible through serialized hidden fields. It is necessary that these fields can be changed only in the inspector. Unfortunately, the Unity editor will continually show a compiler warning that the value is never assigned. We can suppress this warning by explicitly setting the field a default value. You can also assign
null , but I did so explicitly to show that we simply use the default value, which is not a true reference to ground, so we use default .Create a field object in a new scene and add a child quad with a material that looks like earth. Since we are creating a simple prototype game, a uniform green material will be enough. Rotate the quad 90 ° along the X axis so that it lies on the XZ plane.
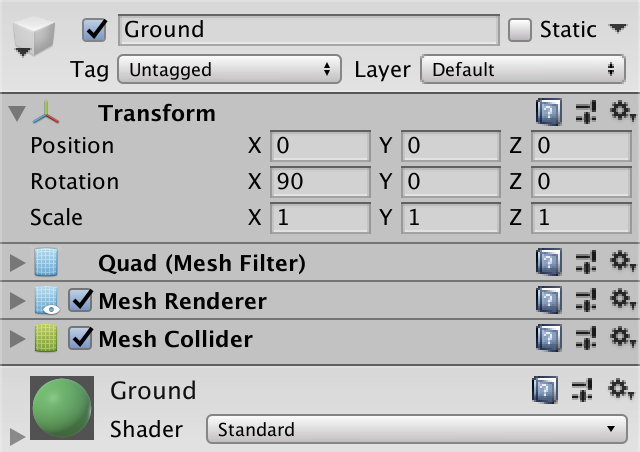
Game field
Why not place the game on the XY plane?
Although the game will take place in 2D space, we will render it in 3D, with 3D enemies and a camera that can be moved relative to a certain point. The XZ plane is more convenient for this and complies with the standard orientation of the skybox used for ambient lighting.
A game
Next, create a component
Game , which will be responsible for the entire game. At this stage, this will mean that it initializes the field. We simply make the size customizable through the inspector and force the component to initialize the field when it wakes up. Let's use the default size of 11 × 11. using UnityEngine; public class Game : MonoBehaviour { [SerializeField] Vector2Int boardSize = new Vector2Int(11, 11); [SerializeField] GameBoard board = default; void Awake () { board.Initialize(boardSize); } } The size of the field can only be positive and it does not make much sense to create a field with a single tile. So let's limit the minimum size to 2 × 2. This can be done by adding the
OnValidate method, which forcibly limits minimum values. void OnValidate () { if (boardSize.x < 2) { boardSize.x = 2; } if (boardSize.y < 2) { boardSize.y = 2; } } When is Onvalidate called?
If it exists, the Unity editor invokes it for components after they are modified. Including when adding them to the game object, after loading the scene, after recompilating, after changing the editor, after canceling / repeating and after resetting the component.
OnValidate is the only place in the code where values can be assigned to the component configuration fields.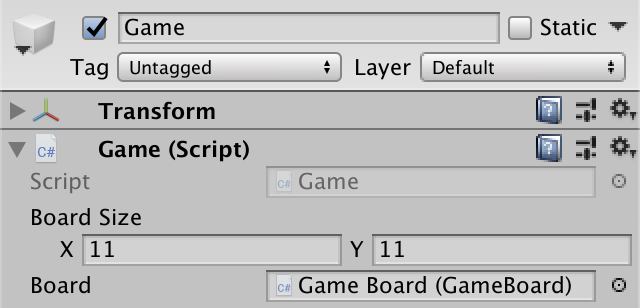
Game object.
Now when you start the game mode, we will receive a field with the correct size. During the game, position the camera so that the entire board is visible, copy its transformation component, exit the play mode and insert the component values. In the case of an 11 × 11 field located at the origin, for a convenient top view, you can position the camera at position (0.10.0) and rotate it 90 ° along the X axis. We will leave the camera at this fixed position, but maybe change it in the future.

Camera over the field.
How to copy and paste component values?
Through the drop-down menu that appears when you click on the button with the gear in the upper right corner of the component.
Tile prefab
The field consists of square tiles. Enemies will be able to move from the tile to the tile, crossing the edges, but not diagonally. Movement will always occur towards the nearest end point. Let's graphically designate the direction of movement on the tile with an arrow. Download the arrow texture here .

Arrow on a black background.
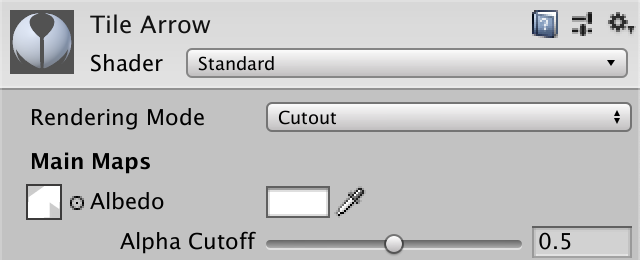
Place the arrow texture in your design and turn on the Alpha As Transparency option. Then create a material for the arrow, which can be a standard material (default material) for which the cutout mode is selected, and select the arrow as the main texture.
Arrow material.
Why use the cutout rendering mode?
It allows you to shade the arrow when using the standard Unity rendering pipeline.
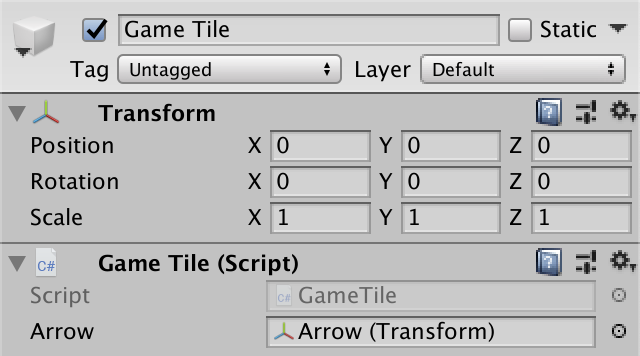
To indicate each tile in the game, we will use the game object. Each of them will have its quad with the arrow material, just as the field has a quad earth. We will also add a GameTile component
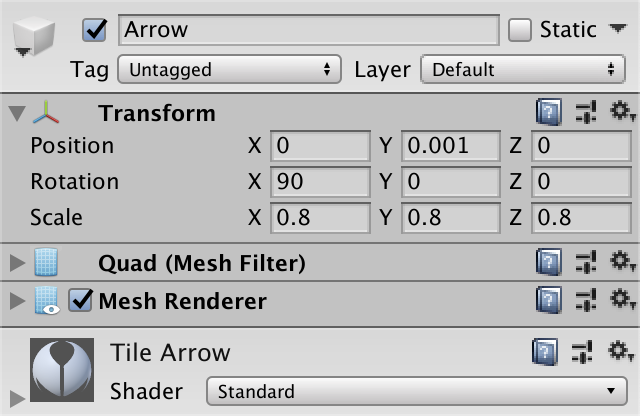
GameTile with a link to their arrow. using UnityEngine; public class GameTile : MonoBehaviour { [SerializeField] Transform arrow = default; } Create a tile object and turn it into a prefab. The tiles will be flush with the ground, so lift the arrow up a bit to avoid depth problems when rendering. Also scale down the arrow a bit so that there is a bit of space between the adjacent arrows. A Y offset of 0.001 and a scale of 0.8 equal for all axes will do.

Prefab tile
Where is the hierarchy of the prefab tile?
The prefab editing mode can be opened by double clicking on the prefab asset, or by selecting the prefab and clicking the Open Prefab button in the inspector. You can exit the prefab editing mode by clicking on the button with the arrow in the upper left corner of its hierarchy header.
Note that the tiles themselves do not have to be game objects. They are needed only to track the status of the field. We could use the same approach as for the behavior in the Object Management tutorial series. But in the early stages of simple games or prototypes of game objects, we are completely satisfied. In the future it can be changed.
We have tiles
To create a tile, the
GameBoard must have a link to the tile prefab. [SerializeField] GameTile tilePrefab = default; 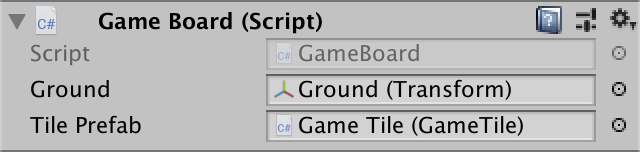
Link to the prefab tile.
Then he can create his copies using a double loop in two grid dimensions. Although the size is expressed as X and Y, we will place tiles on the XZ plane, just like the field itself. Since the field is centered relative to the point of origin, we need to subtract from the components of the tile position the corresponding size minus one, divided into two. Note that this should be a floating point division, otherwise it will not work for even sizes.
public void Initialize (Vector2Int size) { this.size = size; ground.localScale = new Vector3(size.x, size.y, 1f); Vector2 offset = new Vector2( (size.x - 1) * 0.5f, (size.y - 1) * 0.5f ); for (int y = 0; y < size.y; y++) { for (int x = 0; x < size.x; x++) { GameTile tile = Instantiate(tilePrefab); tile.transform.SetParent(transform, false); tile.transform.localPosition = new Vector3( x - offset.x, 0f, y - offset.y ); } } } 
Created instances of tiles.
Later we will need access to these tiles, so we will track them in an array. We do not need a list, because after initialization the size of the field will not change.
GameTile[] tiles; public void Initialize (Vector2Int size) { … tiles = new GameTile[size.x * size.y]; for (int i = 0, y = 0; y < size.y; y++) { for (int x = 0; x < size.x; x++, i++) { GameTile tile = tiles[i] = Instantiate(tilePrefab); … } } } How does this assignment work?
This is a chained assignment. In this case, this means that we assign a link to the tile instance and to the array element and local variable. These operations do the same as the code below.
GameTile t = Instantiate(tilePrefab); tiles[i] = t; GameTile tile = t; Finding the way
At this stage, each tile has an arrow, but they all point in the positive direction of the Z axis, which we will interpret as north. The next step is to determine the correct direction for the tile. We realize this by finding the way in which enemies must follow to the end point.
Neighbors Tiles
The paths go from tile to tile in the north, east, south or west direction. To simplify the search, let
GameTile track links to its four neighbors. GameTile north, east, south, west; Relations between neighbors are symmetrical. If the tile is the eastern neighbor of the second tile, then the second one is the western neighbor of the first one. Add a generic static method to
GameTile to define this relationship between two tiles. public static void MakeEastWestNeighbors (GameTile east, GameTile west) { west.east = east; east.west = west; } Why use a static method?
We can also make it with an instance method with a single parameter, and in this case we will call it as
eastTile.MakeEastWestNeighbors(westTile) or something like that. But in cases where it is not clear which of the tiles the method should be called, it is better to use static methods. Examples are the Distance and Dot methods of the Vector3 class.Once connected, it should never change. If this happens, we made a mistake in the code. You can check this by comparing both links before assigning values to
null , and displaying an error to the console if this is incorrect. For this you can use the Debug.Assert method. public static void MakeEastWestNeighbors (GameTile east, GameTile west) { Debug.Assert( west.east == null && east.west == null, "Redefined neighbors!" ); west.east = east; east.west = west; } What does Debug.Assert do?
If the first argument is
false , then it displays a condition error, using the second argument for this, if it is specified. Such a call is included only in test builds, but not in release builds. Therefore, it is a good way to add checks during the development process that will not affect the final release.Add a similar method to create a relationship between northern and southern neighbors.
public static void MakeNorthSouthNeighbors (GameTile north, GameTile south) { Debug.Assert( south.north == null && north.south == null, "Redefined neighbors!" ); south.north = north; north.south = south; } We can establish this relationship when creating tiles in the
GameBoard.Initialize . If the X coordinate is greater than zero, then we can create an east-west relationship between the current and the previous tile. If the Y coordinate is greater than zero, then we can create a north-south relationship between the current tile and the tile from the previous line. for (int i = 0, y = 0; y < size.y; y++) { for (int x = 0; x < size.x; x++, i++) { … if (x > 0) { GameTile.MakeEastWestNeighbors(tile, tiles[i - 1]); } if (y > 0) { GameTile.MakeNorthSouthNeighbors(tile, tiles[i - size.x]); } } } Note that the tiles at the edges of the field do not have four neighbors. One or two references to neighbors will remain
null .Distance and direction
We will not force all enemies to constantly look for a way. This should be done only once per tile. Then the enemies will be able to request from the tile in which they are located, where to go further. We will store this information in
GameTile by adding a link to the next tile path. In addition, we will also save the distance to the end point, expressed as the number of tiles that must be visited before the enemy reaches the end point. This information is useless for enemies, but we will use it to find the shortest paths. GameTile north, east, south, west, nextOnPath; int distance; Every time we decide to look for paths, we will need to initialize the path data. Until the path is found, there is no next tile and the distance can be considered infinite. We can represent this as the maximum possible integer value
int.MaxValue . Add a generic ClearPath method to reset GameTile to this state. public void ClearPath () { distance = int.MaxValue; nextOnPath = null; } Ways can only be searched if we have an end point. This means that the tile should be the end point. Such a tile has a distance equal to zero, and it does not have the last tile, because the path ends on it. Add a generic method that turns a tile into an endpoint.
public void BecomeDestination () { distance = 0; nextOnPath = null; } In the end, all the tiles should turn into a path, so their distance will no longer be equal to
int.MaxValue . Add a convenient getter property to check if the tile currently has a path. public bool HasPath => distance != int.MaxValue; How does this property work?
This is a shortened record of a getter property job containing only one expression. It does the same as the code shown below.
The arrow operator
public bool HasPath { get { return distance != int.MaxValue; } } The arrow operator
=> can also be used separately for a getter and a setter of properties, for method bodies, constructors, and in some other places.Grow the way
If we have a tile with a path, then we can allow it to grow a path towards one of its neighbors. Initially, the only tile with the path is the end point, so we start from zero distance and increase it from here, moving in the opposite direction of the enemy's movement. That is, all the immediate neighbors of the end point will have a distance of 1, and all the neighbors of these tiles will have a distance of 2, and so on.
Let's add
GameTile hidden method for growing the path to one of its neighbors, which is set via a parameter. The distance to the neighbor becomes one more than that of the current tile, and the path of the neighbor points to the current tile. This method should only be called for those tiles that already have a path, so let's check this with assert. void GrowPathTo (GameTile neighbor) { Debug.Assert(HasPath, "No path!"); neighbor.distance = distance + 1; neighbor.nextOnPath = this; } The idea is that we call this method once for each of the four neighbors of the tile. Since some of these links will be
null , we will check this and stop execution if it is. In addition, if the neighbor already has a path, then we should not do anything and also stop the execution. void GrowPathTo (GameTile neighbor) { Debug.Assert(HasPath, "No path!"); if (neighbor == null || neighbor.HasPath) { return; } neighbor.distance = distance + 1; neighbor.nextOnPath = this; } The way
GameTile tracks its neighbors is unknown to the rest of the code. Therefore, GrowPathTo is hidden. We will add general methods that tell the tile to grow its path in a certain direction, indirectly causing GrowPathTo . But the code that searches across the entire field must keep track of which tiles have been visited. Therefore, we will make it return a neighbor or null if execution is terminated. GameTile GrowPathTo (GameTile neighbor) { if (!HasPath || neighbor == null || neighbor.HasPath) { return null; } neighbor.distance = distance + 1; neighbor.nextOnPath = this; return neighbor; } Now add methods for growing paths in specific directions.
public GameTile GrowPathNorth () => GrowPathTo(north); public GameTile GrowPathEast () => GrowPathTo(east); public GameTile GrowPathSouth () => GrowPathTo(south); public GameTile GrowPathWest () => GrowPathTo(west); Search wide
To ensure that all tiles contain valid path data, the
GameBoard must. We implement this by performing a breadth-first search. We start with the end point tile, and then grow the path to its neighbors, then to the neighbors of these tiles, and so on. With each step, the distance increases by one, and the paths never grow in the direction of tiles, which already have paths. This ensures that all tiles as a result will point along the shortest path to the end point.What about finding a way with A *?
Algorithm A * is an evolutionary development of search wide. It is useful when we are looking for the only shortest path. But we need all the shortest paths, so A * does not give any advantages. Examples of search in width and A * on a grid of hexagons with animation, see in the series of tutorials about maps of hexagons .
To perform a search, we need to keep track of the tiles that we added to the path, but of which we have not yet grown a path. This collection of tiles is often called the search border (search frontier). It is important that tiles are processed in the same order in which they are added to the border, so let's use the queue
Queue . Later we will have to perform a search several times, so we will set it as a GameBoard field. using UnityEngine; using System.Collections.Generic; public class GameBoard : MonoBehaviour { … Queue<GameTile> searchFrontier = new Queue<GameTile>(); … } For the state of the playing field to always be correct, we must find the paths at the end of
Initialize , but put the code in a separate FindPaths method. First of all, you need to clear the path of all the tiles, then make one tile the end point and add it to the border. Let's first select the first tile. Since tiles an array, we can use the foreach without fear of memory pollution. If we later move from an array to a list, then we will also need to replace the foreach cycles with for loops. public void Initialize (Vector2Int size) { … FindPaths(); } void FindPaths () { foreach (GameTile tile in tiles) { tile.ClearPath(); } tiles[0].BecomeDestination(); searchFrontier.Enqueue(tiles[0]); } Next, we need to take one tile from the border and grow a path to all its neighbors, adding them all to the border. First we move north, then east, south and finally west.
public void FindPaths () { foreach (GameTile tile in tiles) { tile.ClearPath(); } tiles[0].BecomeDestination(); searchFrontier.Enqueue(tiles[0]); GameTile tile = searchFrontier.Dequeue(); searchFrontier.Enqueue(tile.GrowPathNorth()); searchFrontier.Enqueue(tile.GrowPathEast()); searchFrontier.Enqueue(tile.GrowPathSouth()); searchFrontier.Enqueue(tile.GrowPathWest()); } Repeat this stage while there are tiles in the border.
while (searchFrontier.Count > 0) { GameTile tile = searchFrontier.Dequeue(); searchFrontier.Enqueue(tile.GrowPathNorth()); searchFrontier.Enqueue(tile.GrowPathEast()); searchFrontier.Enqueue(tile.GrowPathSouth()); searchFrontier.Enqueue(tile.GrowPathWest()); } Growing a path does not always lead us to a new tile. Before adding to the queue, we need to check the value for
null , but we can also postpone checking for null until after we leave the queue. GameTile tile = searchFrontier.Dequeue(); if (tile != null) { searchFrontier.Enqueue(tile.GrowPathNorth()); searchFrontier.Enqueue(tile.GrowPathEast()); searchFrontier.Enqueue(tile.GrowPathSouth()); searchFrontier.Enqueue(tile.GrowPathWest()); } Showing the way
Now we have a field containing the right paths, but so far we have not seen it. You must configure the arrows so that they point along the path through their tiles. This can be done by turning them. Since these turns are always the same, we will add to the
GameTile one Quaternion static field for each of the directions. static Quaternion northRotation = Quaternion.Euler(90f, 0f, 0f), eastRotation = Quaternion.Euler(90f, 90f, 0f), southRotation = Quaternion.Euler(90f, 180f, 0f), westRotation = Quaternion.Euler(90f, 270f, 0f); Also add the generic
ShowPath method. If the distance is zero, the tile is the end point and there’s nothing to point to, so deactivate its arrow. Otherwise, activate the arrow and set its rotation. The desired direction can be determined by comparing nextOnPath with its neighbors. public void ShowPath () { if (distance == 0) { arrow.gameObject.SetActive(false); return; } arrow.gameObject.SetActive(true); arrow.localRotation = nextOnPath == north ? northRotation : nextOnPath == east ? eastRotation : nextOnPath == south ? southRotation : westRotation; } Call this method for all tiles at the end
GameBoard.FindPaths. public void FindPaths () { … foreach (GameTile tile in tiles) { tile.ShowPath(); } } 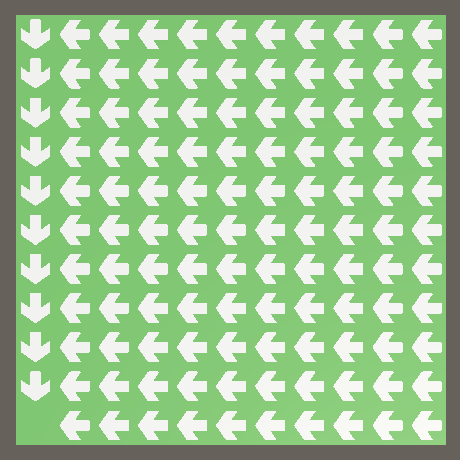
Found paths.
Why don't we turn the arrow directly into GrowPathTo?
To separate the logic and visualization of the search. Later we will make the rendering disabled. If the arrows are not displayed, we do not need to rotate them every time we call
FindPaths.Change search priority
It turns out that when the end point is the south-west corner, all paths go exactly west until they reach the edge of the field, then turn south. Here everything is true, because there are no shorter paths to the end point, because diagonal movements are impossible. However, there are many other shortest paths that may look more beautiful.
To better understand why there are such paths, move the end point to the center of the map. With an odd field size, this is just a tile in the middle of the array.
tiles[tiles.Length / 2].BecomeDestination(); searchFrontier.Enqueue(tiles[tiles.Length / 2]); 
The end point in the center.
The result seems logical if you remember how the search works. As we add neighbors in the north-east-south-west order, the north has the highest priority. Since we perform the search in the reverse order, this means that the last direction passed is south. That is why only a few arrows point to the south and many point to the east.
You can change the result by setting the priorities of the directions. Let's swap the east and south. So we have to get the north-south and east-west symmetry.
searchFrontier.Enqueue(tile.GrowPathNorth()); searchFrontier.Enqueue(tile.GrowPathSouth()); searchFrontier.Enqueue(tile.GrowPathEast()); searchFrontier.Enqueue(tile.GrowPathWest()) 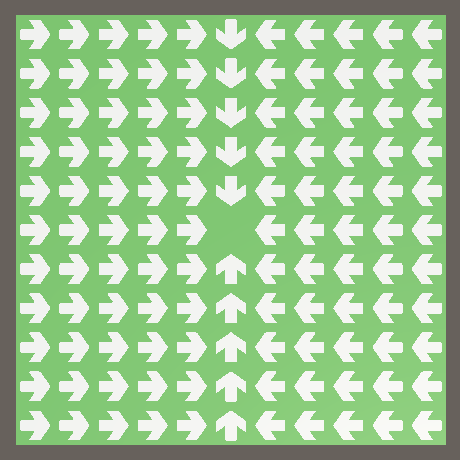
Search procedure "north-south-east-west."
It looks prettier, but it’s better that the paths change direction, approaching movement diagonally where it will look natural. We can do this by flipping the priorities of finding neighboring tiles in a checkerboard pattern.
Instead of figuring out which type of tile we are processing during the search, we add it to a
GameTilecommon property indicating whether the current tile is an alternative one. public bool IsAlternative { get; set; } This property we will set in
GameBoard.Initialize. First we mark tiles as alternative if their X coordinate is even. for (int i = 0, y = 0; y < size.y; y++) { for (int x = 0; x < size.x; x++, i++) { … tile.IsAlternative = (x & 1) == 0; } } What does the operation (x & 1) == 0 do?
— (AND). . 1, 1. 10101010 00001111 00001010.
. 0 1. 1, 2, 3, 4 1, 10, 11, 100. , .
AND , , . , .
. 0 1. 1, 2, 3, 4 1, 10, 11, 100. , .
AND , , . , .
Secondly, we change the sign of the result if their Y coordinate is even. So we will create a chess pattern.
tile.IsAlternative = (x & 1) == 0; if ((y & 1) == 0) { tile.IsAlternative = !tile.IsAlternative; } FindPaths , . . if (tile != null) { if (tile.IsAlternative) { searchFrontier.Enqueue(tile.GrowPathNorth()); searchFrontier.Enqueue(tile.GrowPathSouth()); searchFrontier.Enqueue(tile.GrowPathEast()); searchFrontier.Enqueue(tile.GrowPathWest()); } else { searchFrontier.Enqueue(tile.GrowPathWest()); searchFrontier.Enqueue(tile.GrowPathEast()); searchFrontier.Enqueue(tile.GrowPathSouth()); searchFrontier.Enqueue(tile.GrowPathNorth()); } } 
.
. , , . .
— . . . .
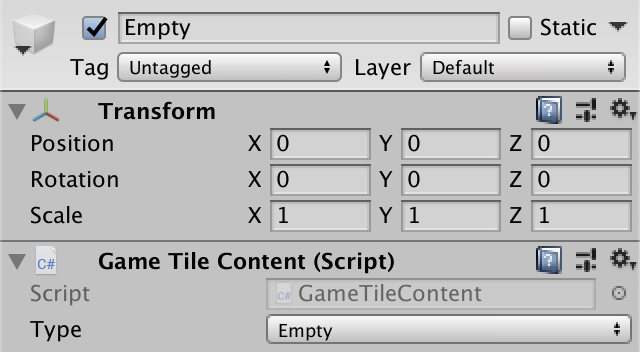
GameTileContentType . public enum GameTileContentType { Empty, Destination } Next, create a type of component
GameTileContentthat allows you to specify the type of its contents through the inspector, and access to it will be done through the common property-getter. using UnityEngine; public class GameTileContent : MonoBehaviour { [SerializeField] GameTileContentType type = default; public GameTileContentType Type => type; } Then create prefabs for two types of content, each of which has a component
GameTileContentwith the corresponding specified type. Let's use the blue flattened cube to designate endpoint tiles. Since it is almost flat, it does not need a collider. For the prefab of empty content, use an empty game object.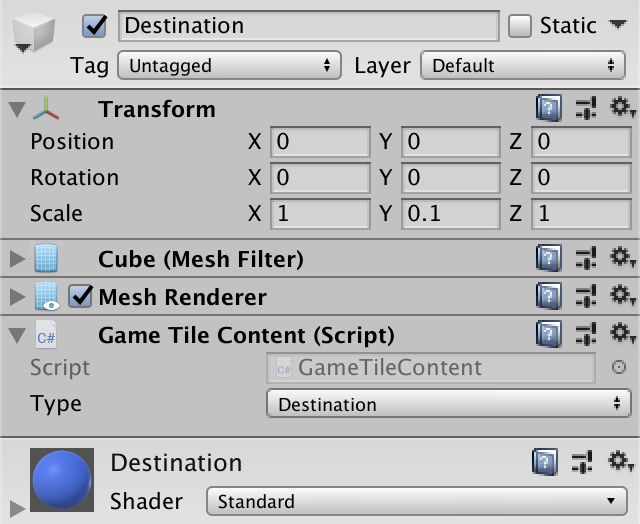
Endpoint Prefabs and Empty Content.
We will give an empty tile a content object, because then all tiles will always have content, which means we will not need to check the references to the content for equality
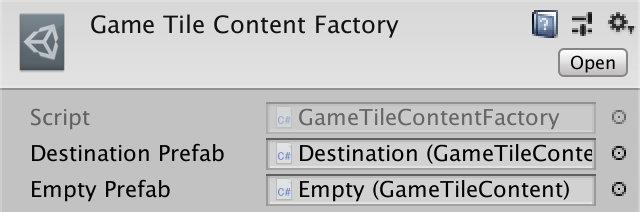
null.Content factory
To make the content editable, we will also create a factory for this, using the same approach as in the Object Management tutorial . This means that you
GameTileContentmust track your original factory, which should only be set once, and send yourself back to the factory in the method Recycle. GameTileContentFactory originFactory; … public GameTileContentFactory OriginFactory { get => originFactory; set { Debug.Assert(originFactory == null, "Redefined origin factory!"); originFactory = value; } } public void Recycle () { originFactory.Reclaim(this); } This presupposes existence
GameTileContentFactory, so we will create a scriptable object type for this with a required method Recycle. At this stage, we are not going to bother creating a fully functional factory that disposes the contents, so we’ll make it just destroy the contents. Later it will be possible to add object reuse to the factory without changing the rest of the code. using UnityEngine; using UnityEngine.SceneManagement; [CreateAssetMenu] public class GameTileContentFactory : ScriptableObject { public void Reclaim (GameTileContent content) { Debug.Assert(content.OriginFactory == this, "Wrong factory reclaimed!"); Destroy(content.gameObject); } } Let's add to the factory a hidden method
Getwith a prefab as a parameter. Here we again miss the multiple use of objects. It creates an instance of the object, sets its original factory, moves it to the factory stage, and returns it. GameTileContent Get (GameTileContent prefab) { GameTileContent instance = Instantiate(prefab); instance.OriginFactory = this; MoveToFactoryScene(instance.gameObject); return instance; } The instance is moved to the factory content scene, which can be created as needed. If we are in the editor, then before creating the scene, we need to check whether it exists, in case we lose sight of it during a hot restart.
Scene contentScene; … void MoveToFactoryScene (GameObject o) { if (!contentScene.isLoaded) { if (Application.isEditor) { contentScene = SceneManager.GetSceneByName(name); if (!contentScene.isLoaded) { contentScene = SceneManager.CreateScene(name); } } else { contentScene = SceneManager.CreateScene(name); } } SceneManager.MoveGameObjectToScene(o, contentScene); } We have only two types of content, so just add two prefab configuration fields for them.
[SerializeField] GameTileContent destinationPrefab = default; [SerializeField] GameTileContent emptyPrefab = default; The last thing you need to do to work the factory is to create a common method
Getwith a parameter GameTileContentTypethat receives an instance of the corresponding prefab. public GameTileContent Get (GameTileContentType type) { switch (type) { case GameTileContentType.Destination: return Get(destinationPrefab); case GameTileContentType.Empty: return Get(emptyPrefab); } Debug.Assert(false, "Unsupported type: " + type); return null; } Do I have to add each tile its own copy of the empty content?
, . . , - , , , , . , . , , .
Create an factory asset and configure its links to prefabs.
Content factory
And then give the
Gamelink to the factory. [SerializeField] GameTileContentFactory tileContentFactory = default; 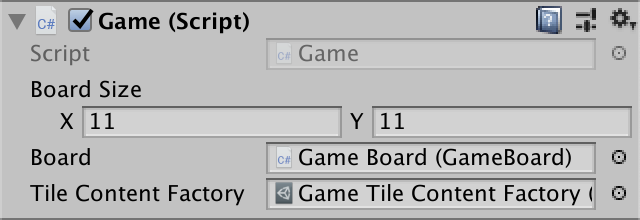
Game with a factory.
Tile touch
, . , . , . , , .
Game , , , GameBoard ., .
GameBoard GetTile , null ( , ). public GameTile GetTile (Ray ray) { return null; } To determine whether the ray has crossed the tile, we need to call
Physics.Raycast, specifying the ray as an argument. It returns information about whether there was an intersection. If so, then we will be able to return the tile, even though we still don’t know which one, so for now we’ll return it null. public GameTile TryGetTile (Ray ray) { if (Physics.Raycast(ray) { return null; } return null; } To find out if there was an intersection with a tile, we need more information about the intersection.
Physics.Raycastcan provide this information using the second parameter RaycastHit. This is an output parameter, which is indicated by the word outin front of it. This means that a method call can assign a value to a variable that we pass to it. RaycastHit hit; if (Physics.Raycast(ray, out hit) { return null; } We can embed a variable declaration used for output parameters, so let's do it.
if (Physics.Raycast(ray, out RaycastHit hit) { return null; } We don’t care about which particular collider the intersection occurred with, we simply use the XZ intersection position to determine the tile. We obtain the coordinates of the tile by adding the half of the field size to the coordinates of the intersection point, and then converting the results into integer values. The final tile index will result in its X coordinate plus Y coordinate multiplied by the width of the field.
if (Physics.Raycast(ray, out RaycastHit hit)) { int x = (int)(hit.point.x + size.x * 0.5f); int y = (int)(hit.point.z + size.y * 0.5f); return tiles[x + y * size.x]; } But this is possible only when the coordinates of the tile are within the field, so we will check it. If it is not, then the tile does not return.
int x = (int)(hit.point.x + size.x * 0.5f); int y = (int)(hit.point.z + size.y * 0.5f); if (x >= 0 && x < size.x && y >= 0 && y < size.y) { return tiles[x + y * size.x]; } Content change
So that you can change the contents of the tile, add to the
GameTilecommon property Content. Its getter simply returns the content, and the setter recycles the previous content, if it was, and places the new content. GameTileContent content; public GameTileContent Content { get => content; set { if (content != null) { content.Recycle(); } content = value; content.transform.localPosition = transform.localPosition; } } This is the only place where you need to check the content for
null, because initially we have no content. To ensure we run assert so that the setter is not called from null. set { Debug.Assert(value != null, "Null assigned to content!"); … } And finally, we need player input. Converting a mouse click to a ray can be done by calling
ScreenPointToRaywith Input.mousePositionas an argument. The call must be made for the main camera, access to which can be obtained through Camera.main. Add for this property in Game. Ray TouchRay => Camera.main.ScreenPointToRay(Input.mousePosition); Then we add a method
Updatethat checks whether the primary mouse button was pressed during the update. To do this, call Input.GetMouseButtonDownwith zero as an argument. If the key was pressed, we process the player's touch, that is, we take the tile from the field, and set the end point as its content, taking it from the factory. void Update () { if (Input.GetMouseButtonDown(0)) { HandleTouch(); } } void HandleTouch () { GameTile tile = GetTile(TouchRay); if (tile != null) { tile.Content = tileContentFactory.Get(GameTileContentType.Destination); } } Now we can turn any tile into the end point by pressing the cursor.
Multiple end points.
Making the field correct
Although we can turn tiles into end points, this does not affect the path yet. In addition, we have not yet set empty content for tiles. Preserving the correctness and integrity of the field is a task
GameBoard, so let's pass on to it the duty of defining the contents of the tile. To do this, give it a link to the content factory through its method Intialize, and use it to give all tiles an instance of empty content. GameTileContentFactory contentFactory; public void Initialize ( Vector2Int size, GameTileContentFactory contentFactory ) { this.size = size; this.contentFactory = contentFactory; ground.localScale = new Vector3(size.x, size.y, 1f); tiles = new GameTile[size.x * size.y]; for (int i = 0, y = 0; y < size.y; y++) { for (int x = 0; x < size.x; x++, i++) { … tile.Content = contentFactory.Get(GameTileContentType.Empty); } } FindPaths(); } Now I
Gamemust transfer my factory to the field. void Awake () { board.Initialize(boardSize, tileContentFactory); } Why not add a factory configuration field to the GameBoard?
, , . , .
Since we now have several endpoints, we change it
GameBoard.FindPathsso that it calls BecomeDestinationfor each one and adds them all to the border. And that's all it takes to support multiple endpoints. All other tiles are cleared as usual. Then we remove the hard end point in the center. void FindPaths () { foreach (GameTile tile in tiles) { if (tile.Content.Type == GameTileContentType.Destination) { tile.BecomeDestination(); searchFrontier.Enqueue(tile); } else { tile.ClearPath(); } } //tiles[tiles.Length / 2].BecomeDestination(); //searchFrontier.Enqueue(tiles[tiles.Length / 2]); … } But if we can turn tiles into end points, then we should be able to perform the reverse operation, turn end points into empty tiles. But then we can have a field with absolutely no end points. In this case,
FindPathswill not be able to perform its task. This happens when the border is empty after initializing the paths for all cells. We denote this as an invalid state of the field, returning falseand terminating the execution; otherwise return at the end true. bool FindPaths () { foreach (GameTile tile in tiles) { … } if (searchFrontier.Count == 0) { return false; } … return true; } The easiest way to implement support for deleting endpoints is to make it a switch operation. Clicking on the empty tiles, we will turn them into end points, and clicking on the end points, we will delete them. But now he is engaged in changing the content
GameBoard, so we will give him a general method ToggleDestination, the parameter of which is a tile. If the tile is the end point, then we make it empty and call it FindPaths. Otherwise, make it the end point and also call FindPaths. public void ToggleDestination (GameTile tile) { if (tile.Content.Type == GameTileContentType.Destination) { tile.Content = contentFactory.Get(GameTileContentType.Empty); FindPaths(); } else { tile.Content = contentFactory.Get(GameTileContentType.Destination); FindPaths(); } } Adding an endpoint can never create an invalid field state, and deleting an endpoint can. Therefore, we will check if we were able to successfully complete
FindPathsafter we made the tile empty. If not, then cancel the change, turning the tile into the end point again, and calling again FindPathsto return to the previous correct state. if (tile.Content.Type == GameTileContentType.Destination) { tile.Content = contentFactory.Get(GameTileContentType.Empty); if (!FindPaths()) { tile.Content = contentFactory.Get(GameTileContentType.Destination); FindPaths(); } } Is it possible to make validation more efficient?
, . , . , .
FindPaths , .Now at the end
Initializewe can call ToggleDestinationwith the central tile as an argument, instead of explicitly calling FindPaths. This is the only time we start with the wrong state of the field, but we are guaranteed to end with the correct state. public void Initialize ( Vector2Int size, GameTileContentFactory contentFactory ) { … //FindPaths(); ToggleDestination(tiles[tiles.Length / 2]); } Finally, let's make the
Gamecall ToggleDestinationinstead of setting the content of the tile itself. void HandleTouch () { GameTile tile = board.GetTile(TouchRay); if (tile != null) { //tile.Content = //tileContentFactory.Get(GameTileContentType.Destination); board.ToggleDestination(tile); } } 
Multiple end points with correct paths.
Shouldn't we prevent Game from setting the content of the tile directly?
. . ,
Game . , .Walls
The goal of tower defense is not to allow enemies to reach the end point. This goal is achieved in two ways. First, we kill them, second, we slow them down so that there is more time to kill them. On the tile field, time can be stretched, increasing the distance that enemies need to go. This can be done by placing obstacles on the field. Usually these are towers that also kill enemies, but in this tutorial we will limit ourselves only to walls.
Content
Walls are another type of content, so add
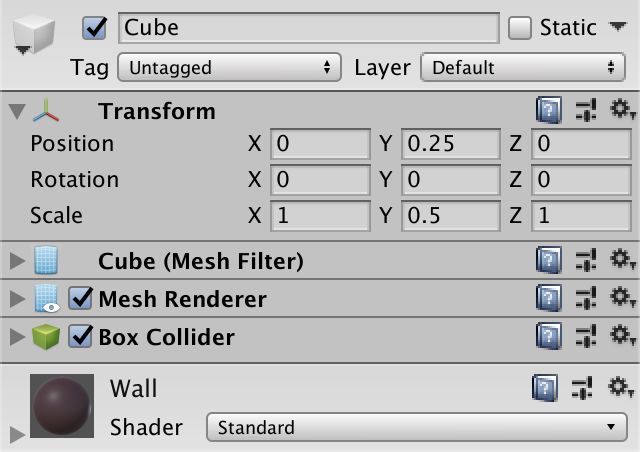
GameTileContentTypean element to them. public enum GameTileContentType { Empty, Destination, Wall } Then create a prefab wall. This time we will create a game object of the tile content and add a child cube to it, which will be on top of the field and fill in the entire tile. We will make it half the height of the unit and save the collider, because the walls can visually overlap some of the tiles behind it. Therefore, when a player touches a wall, he will affect the corresponding tile.
Prefab wall.
Add the prefab wall to the factory, both in the code and in the inspector.
[SerializeField] GameTileContent wallPrefab = default; … public GameTileContent Get (GameTileContentType type) { switch (type) { case GameTileContentType.Destination: return Get(destinationPrefab); case GameTileContentType.Empty: return Get(emptyPrefab); case GameTileContentType.Wall: return Get(wallPrefab); } Debug.Assert(false, "Unsupported type: " + type); return null; } 
Factory prefab walls.
Turning on and off walls
Add to
GameBoardthe on / off method for walls, as we did for the end point. Initially, we will not check the invalid state of the field. public void ToggleWall (GameTile tile) { if (tile.Content.Type == GameTileContentType.Wall) { tile.Content = contentFactory.Get(GameTileContentType.Empty); FindPaths(); } else { tile.Content = contentFactory.Get(GameTileContentType.Wall); FindPaths(); } } We will provide support for switching only between empty tiles and wall tiles, not allowing walls to directly replace end points. Therefore, we will create a wall only when the tile is empty. In addition, the walls should block the search path. But each tile must have a path to the end point, otherwise the enemies will be stuck. To do this, we again need to use validation
FindPaths, and discard changes if they created an invalid field state. else if (tile.Content.Type == GameTileContentType.Empty) { tile.Content = contentFactory.Get(GameTileContentType.Wall); if (!FindPaths()) { tile.Content = contentFactory.Get(GameTileContentType.Empty); FindPaths(); } } Turning on / off walls will be used much more often than on / off end points, so we will make it so that the switching of walls in the
Gamemain touch is performed. The end points can be switched by an additional touch (usually the right mouse button), which can be recognized by transferring to the Input.GetMouseButtonDownvalue 1. void Update () { if (Input.GetMouseButtonDown(0)) { HandleTouch(); } else if (Input.GetMouseButtonDown(1)) { HandleAlternativeTouch(); } } void HandleAlternativeTouch () { GameTile tile = board.GetTile(TouchRay); if (tile != null) { board.ToggleDestination(tile); } } void HandleTouch () { GameTile tile = board.GetTile(TouchRay); if (tile != null) { board.ToggleWall(tile); } } 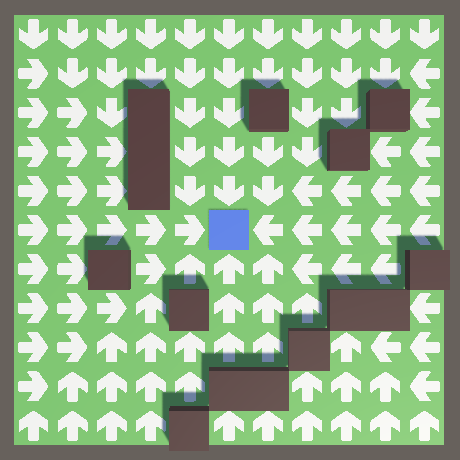
Now we have walls.
Why do I get large gaps between the shadows of neighboring diagonal walls?
, , , . , , far clipping plane . , far plane 20 . , MSAA, .
Let's also make sure that endpoints cannot directly replace walls.
public void ToggleDestination (GameTile tile) { if (tile.Content.Type == GameTileContentType.Destination) { … } else if (tile.Content.Type == GameTileContentType.Empty) { tile.Content = contentFactory.Get(GameTileContentType.Destination); FindPaths(); } } Block path finding
In order for walls to block the search for a path, it is enough for us not to add tiles with walls to the search boundary. This can be done by forcing
GameTile.GrowPathTonot to return tiles with walls. But the path should still grow in the direction of the wall so that all tiles on the field have a path. This is necessary because there is a possibility that the tile with the enemies will suddenly turn into a wall. GameTile GrowPathTo (GameTile neighbor) { if (!HasPath || neighbor == null || neighbor.HasPath) { return null; } neighbor.distance = distance + 1; neighbor.nextOnPath = this; return neighbor.Content.Type != GameTileContentType.Wall ? neighbor : null; } To ensure that all tiles have a path,
GameBoard.FindPathsmust check this after the search is completed. If this is not the case, then the state of the field is incorrect and must be returned false. You do not need to update the path visualization for invalid states, because the field will return to the previous state. bool FindPaths () { … foreach (GameTile tile in tiles) { if (!tile.HasPath) { return false; } } foreach (GameTile tile in tiles) { tile.ShowPath(); } return true; } 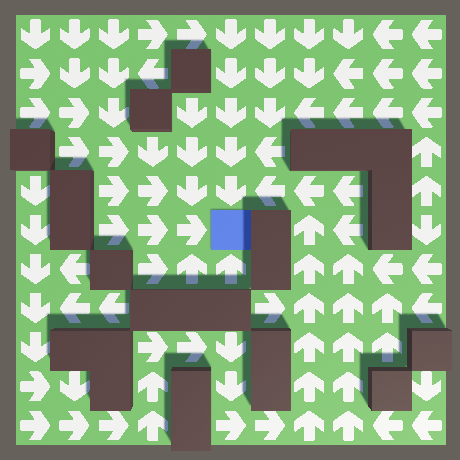
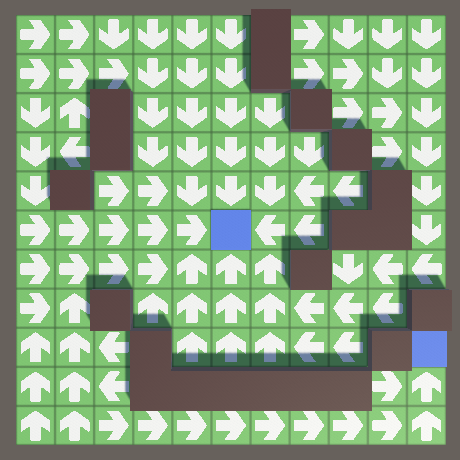
Walls affect the path.
To make sure that the walls really have the right paths, you need to make the cubes translucent.
Transparent walls.
Consider that the requirement of correctness of all paths does not allow to insulate with walls a part of the field in which there is no end point. We can split the map, but only if there is at least one end point in each part. In addition, each wall must be adjacent to an empty tile or end point, otherwise it will not be able to have a path itself. For example, it is impossible to make a solid block of 3 × 3 walls.
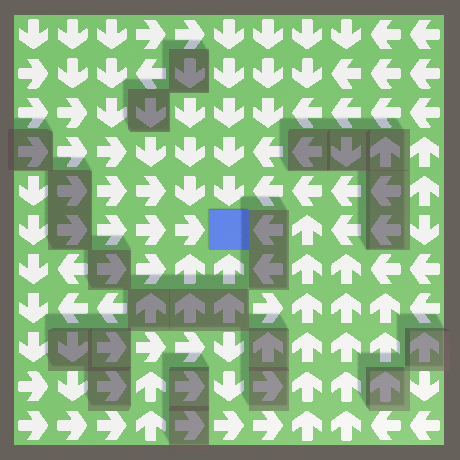
Hide the way
The path visualization allows us to see how the path search works and to make sure that it is indeed correct. But it does not need to be shown to the player, or at least optional. So let's provide the ability to disable the arrows. This can be done by adding a
GameTilegeneric method HidePaththat simply disables its arrow. public void HidePath () { arrow.gameObject.SetActive(false); } The display state of the paths is part of the state of the field. Add a
GameBoardboolean field, equal by default false, to track its status, as well as a common property as a getter and setter. Setter must show or hide paths on all tiles. bool showPaths; public bool ShowPaths { get => showPaths; set { showPaths = value; if (showPaths) { foreach (GameTile tile in tiles) { tile.ShowPath(); } } else { foreach (GameTile tile in tiles) { tile.HidePath(); } } } } Now the method
FindPathsshould show updated paths only if visualization is enabled. bool FindPaths () { … if (showPaths) { foreach (GameTile tile in tiles) { tile.ShowPath(); } } return true; } By default, path visualization is disabled. Disable the arrow in the prefab tile.
The prefab arrow is inactive by default.
Let's make it so that it
Gameswitches the rendering state when the key is pressed. It would be logical to use the P key, but it is also a hot key to enable or disable the game mode in the Unity editor. As a result, the visualization will switch when the hot key to exit the game mode is used, which does not look very nice. So let's use the V key (short for visualization).
Without arrows.
Grid display
When the arrows are hidden, it becomes difficult to see the location of each tile. Let's add grid lines. Download from here the grid texture with a square border, which can be used as a contour of a separate tile.

Grid texture.
We will not add this texture separately to each tile, but apply it to the ground. But we will make this grid optional, as well as visualization of paths. Therefore, we add in
GameBoardthe configuration field Texture2Dand select a grid texture for it. [SerializeField] Texture2D gridTexture = default; 
Field with mesh texture.
Add another boolean field and property to control the rendering state of the grid. In this case, the setter must change the material of the earth, which can be realized by calling
GetComponent<MeshRenderer>for the earth and gaining access to the materialresult property . If the mesh needs to be displayed, then assign a mainTexturemesh texture to the material property . Otherwise, assign him null. Note that when you change the texture of the material, duplicate copies of the material will be created, so it becomes independent of the asset of the material. bool showGrid, showPaths; public bool ShowGrid { get => showGrid; set { showGrid = value; Material m = ground.GetComponent<MeshRenderer>().material; if (showGrid) { m.mainTexture = gridTexture; } else { m.mainTexture = null; } } } Let's make it so that it
Gameswitches the visualization of the grid with the G key. void Update () { … if (Input.GetKeyDown(KeyCode.G)) { board.ShowGrid = !board.ShowGrid; } } In addition, add a default mesh visualization in
Awake. void Awake () { board.Initialize(boardSize, tileContentFactory); board.ShowGrid = true; } 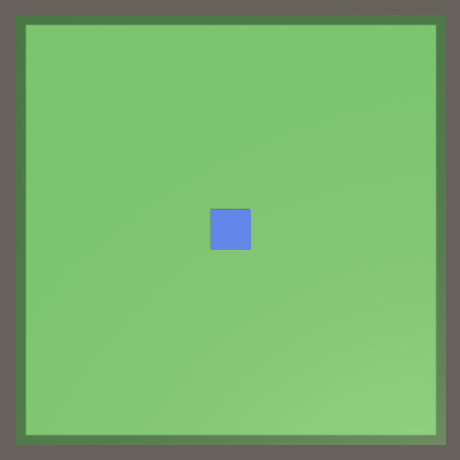
Unscaled mesh.
So far we have got the border around the whole field. It matches the texture, but this is not what we need. We need to scale the main texture of the material to match the size of the grid. You can do this by calling a
SetTextureScalematerial method with the name of the texture property ( _MainTex ) and a two-dimensional size. We can directly use the size of the field, which is indirectly converted to a value Vector2. if (showGrid) { m.mainTexture = gridTexture; m.SetTextureScale("_MainTex", size); } 
Scaled grid with paths disabled and enabled.
So, at this stage we got a functioning field for the tile game of the tower defense genre. In the next tutorial we will add enemies.
Repository
Source: https://habr.com/ru/post/449798/
All Articles