Product Development Visual Aid: Design
This is the second part of a series of four articles on the development of physical products. If you missed Part 1 : Forming an idea, be sure to read it. Soon you will be able to proceed to Part 3: Design and Part 4: Validation. Posted by: Ben Einstein. The original translation is made by the teams of the FABLKA fab lab and the project ARM .
Part 2: Design
Each step at the design stage - customer study, wireframe modeling (wireframing, more in Russian ), a visual prototype - is needed to test hypotheses, how the product will look and how users will interact with it.
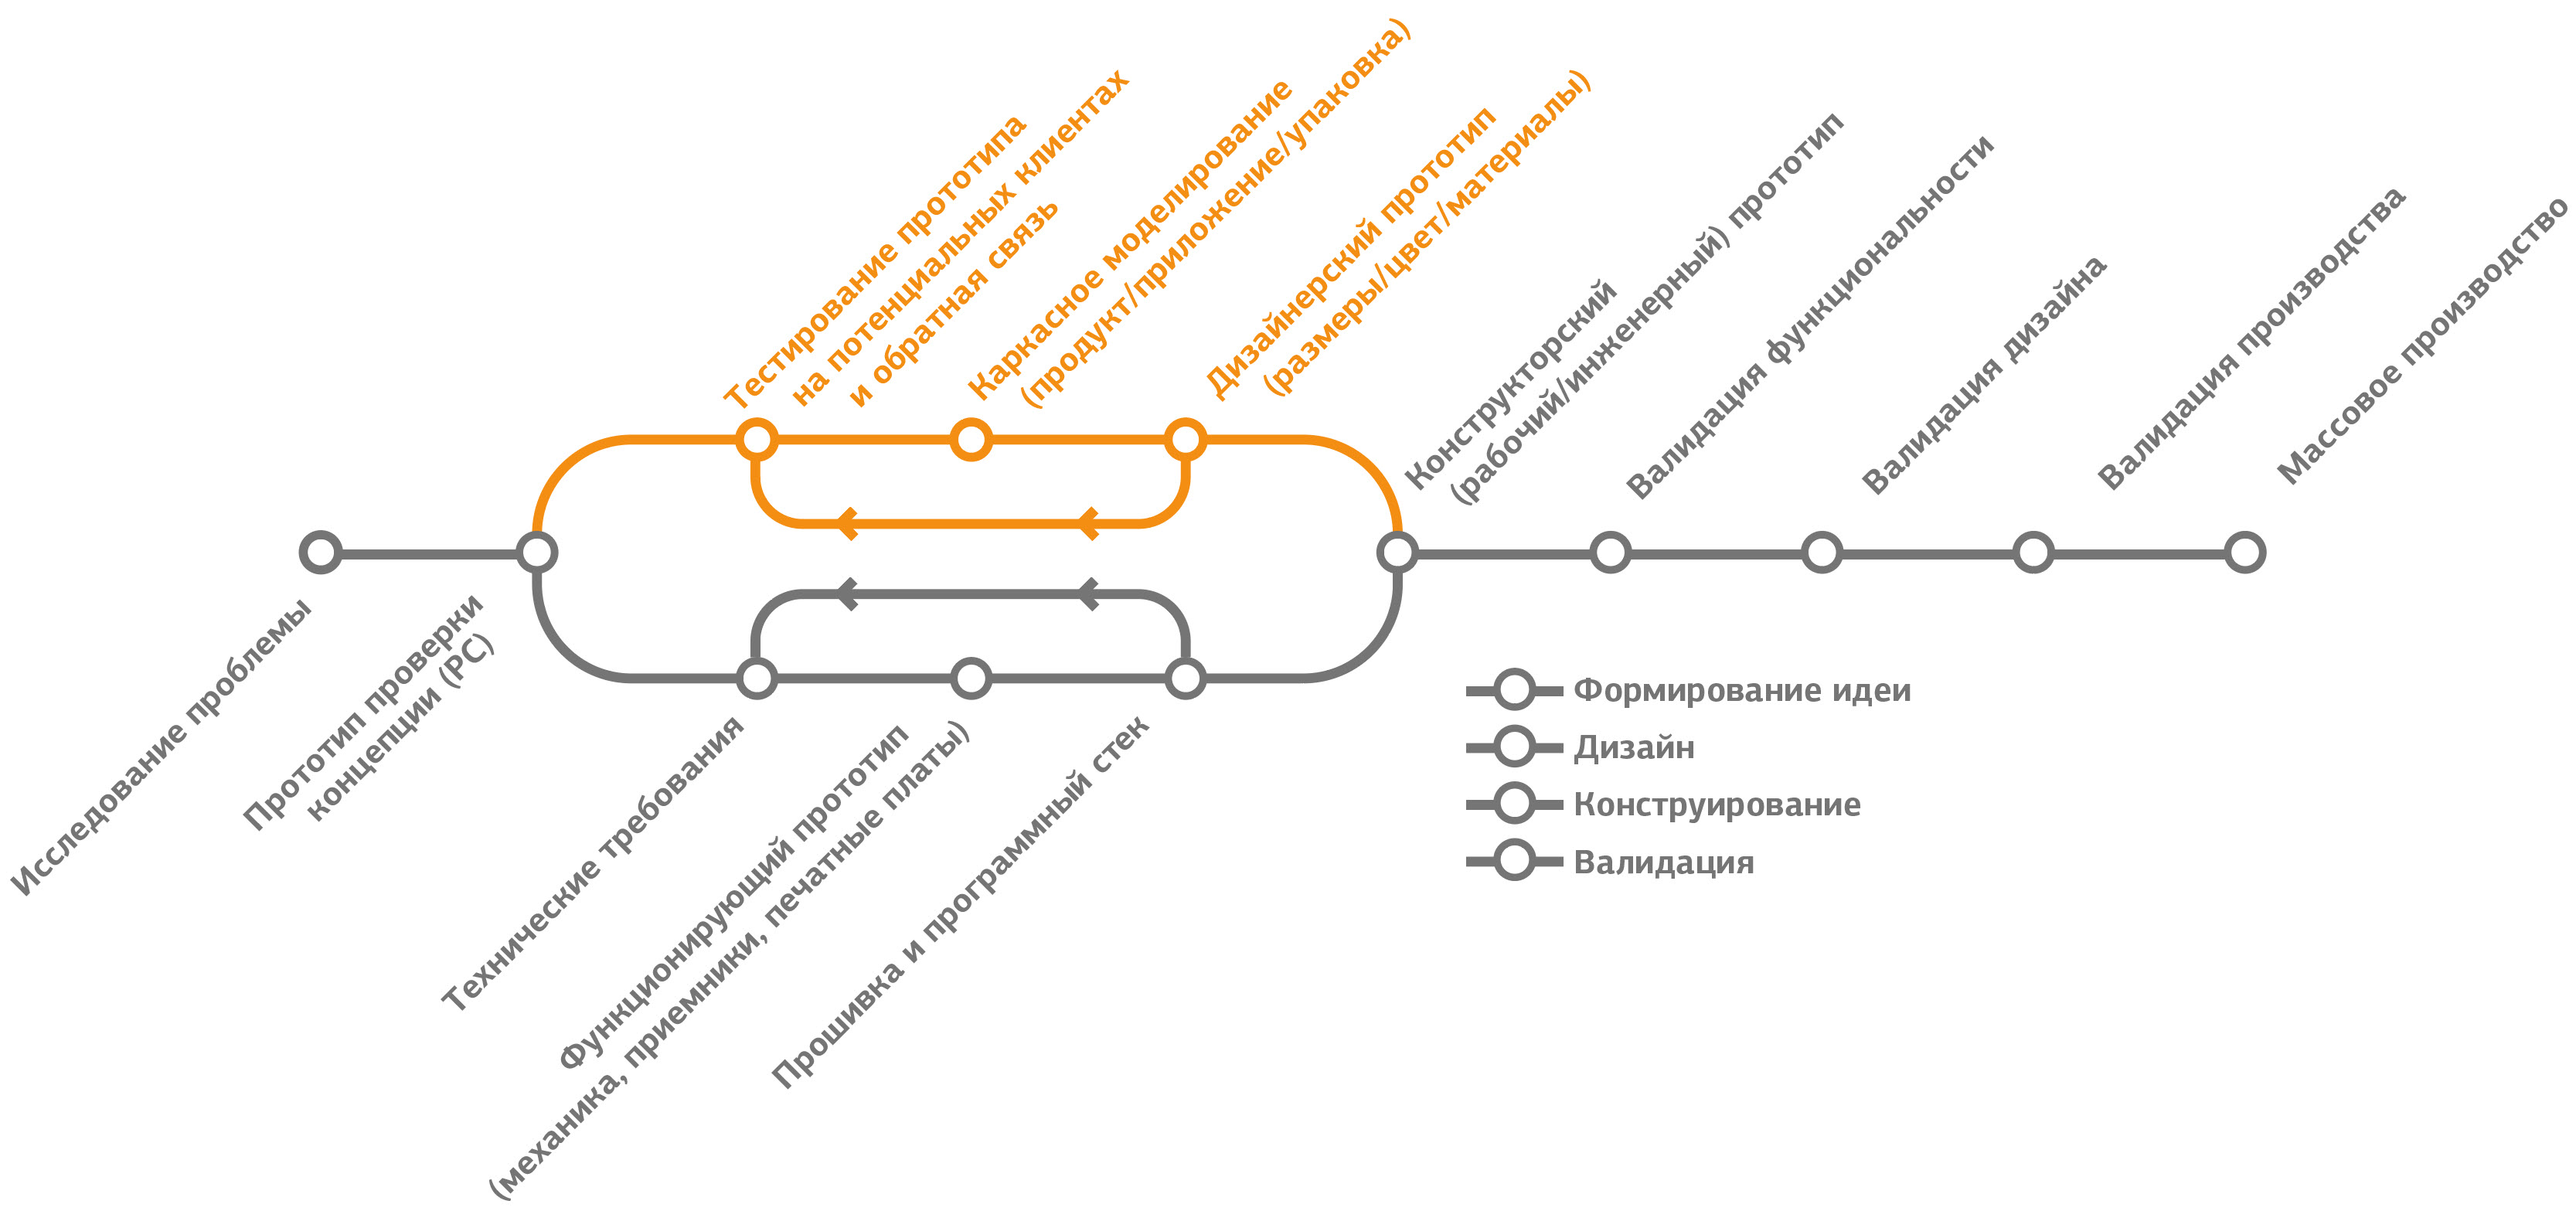
Figure 2.1 Product Design Stages
Customer research and feedback
')
Companies with a focus on customer feedback will be much more successful than those that sit endlessly in the studio and develop. This most often affects companies that produce material products. And if it is always useful to communicate with customers, it is extremely important at the early development stage.
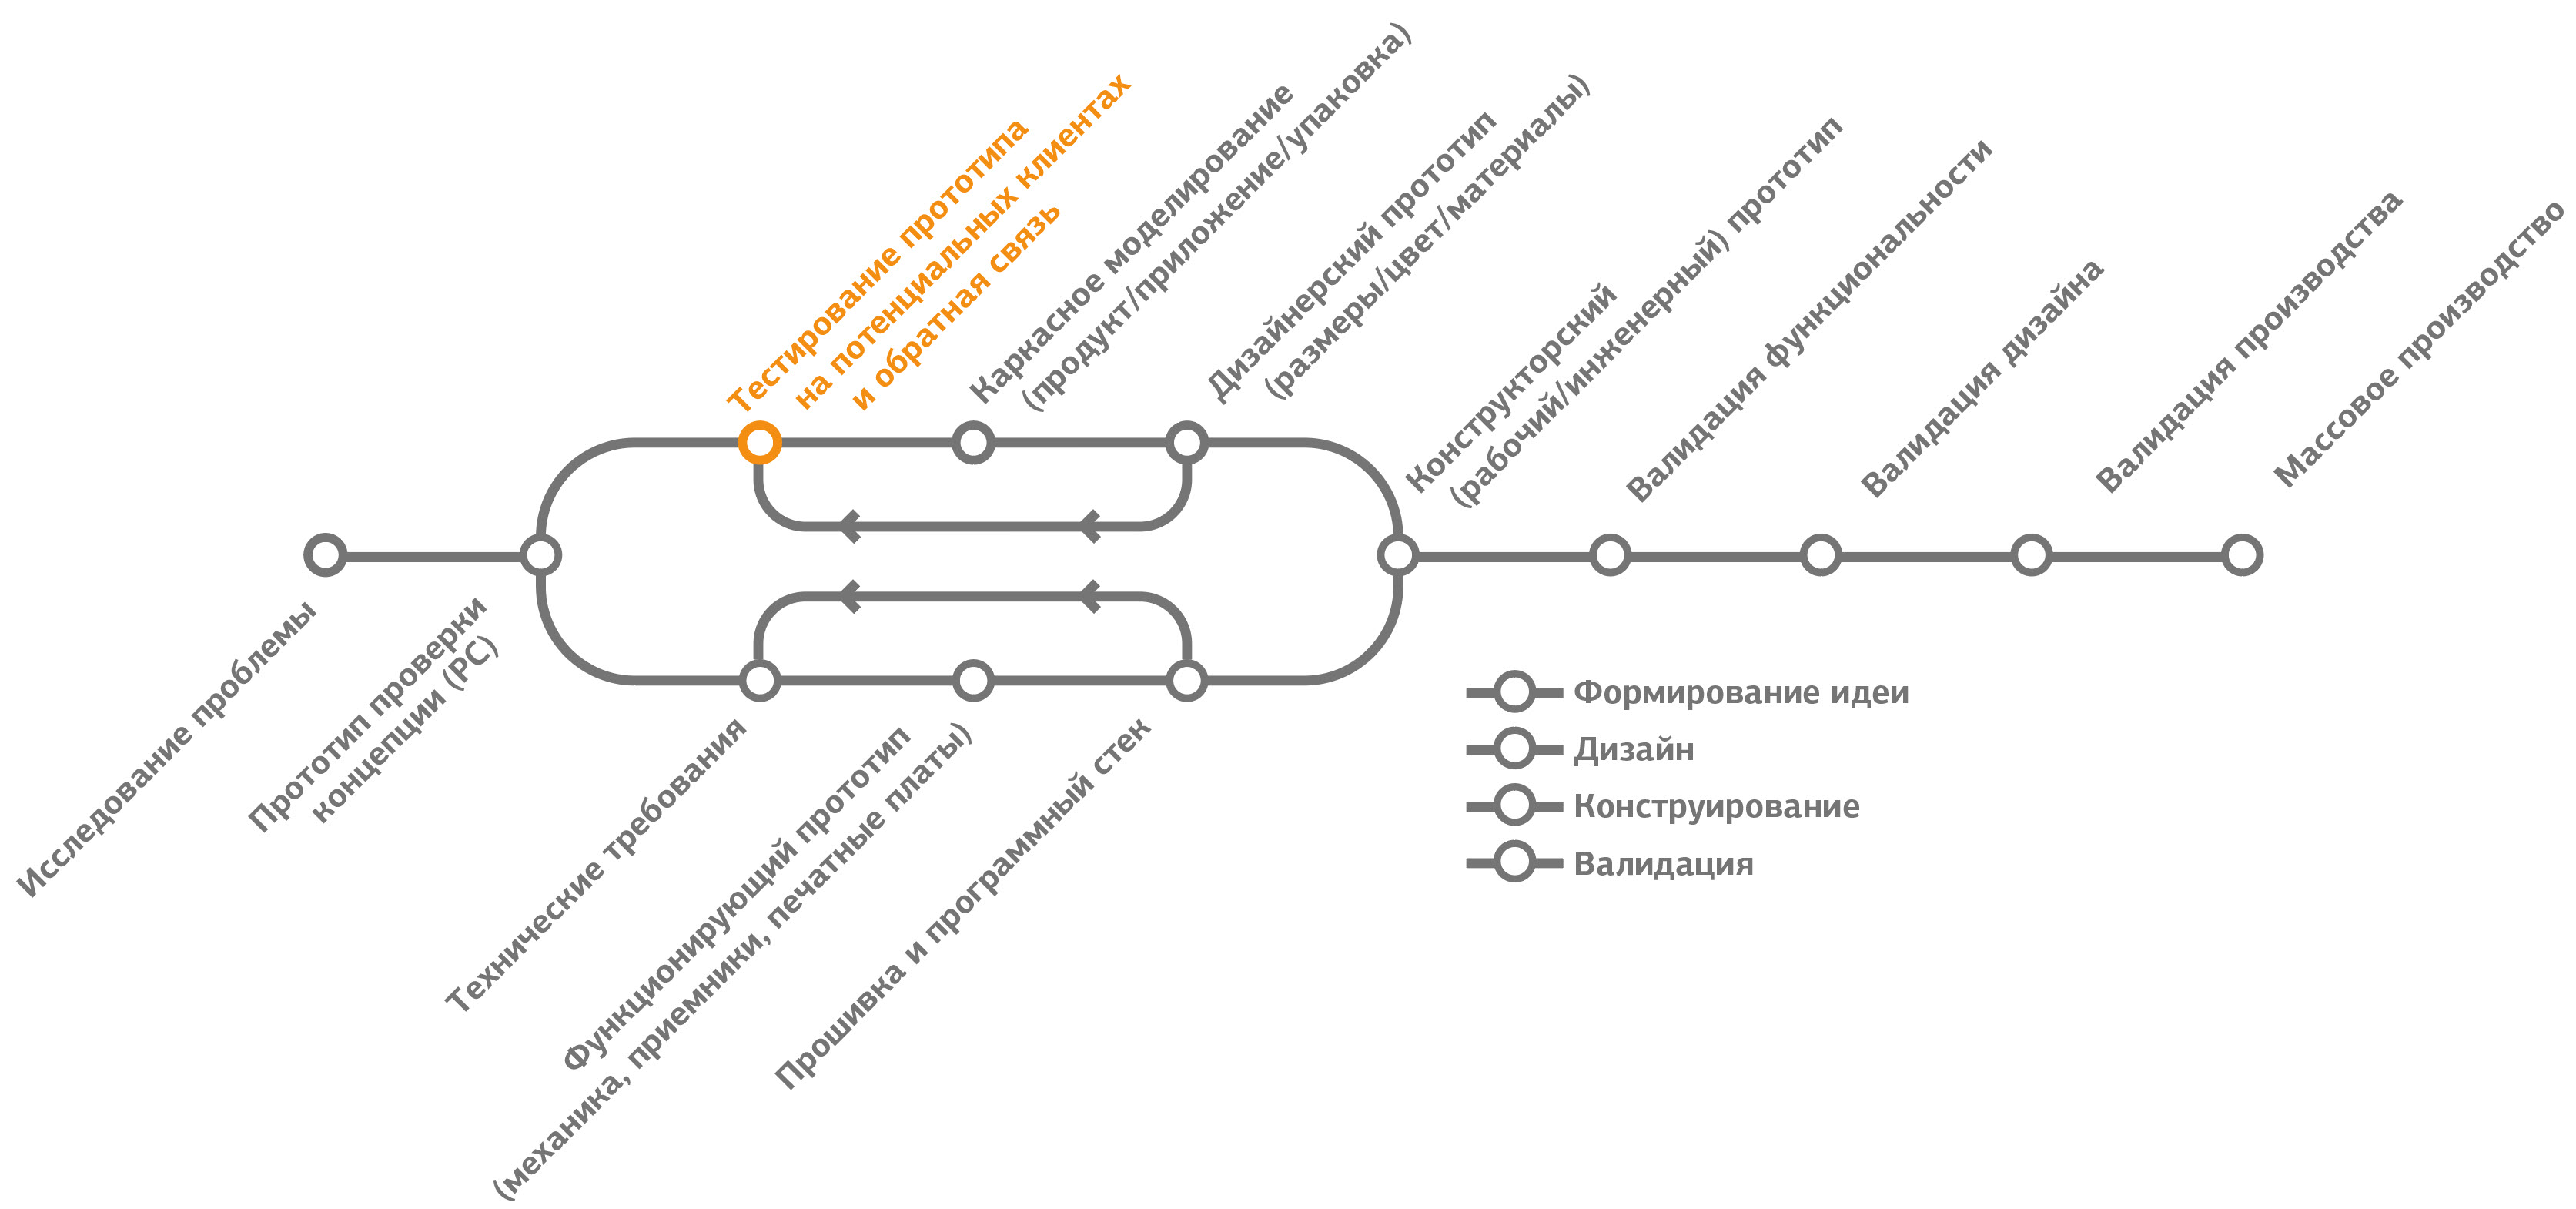
Figure 2.2. Customer research and feedback
For DipJar, it was always very important to test and validate our hypotheses on clients. After creating a prototype concept verification ( PoC ), banks released into the real world.
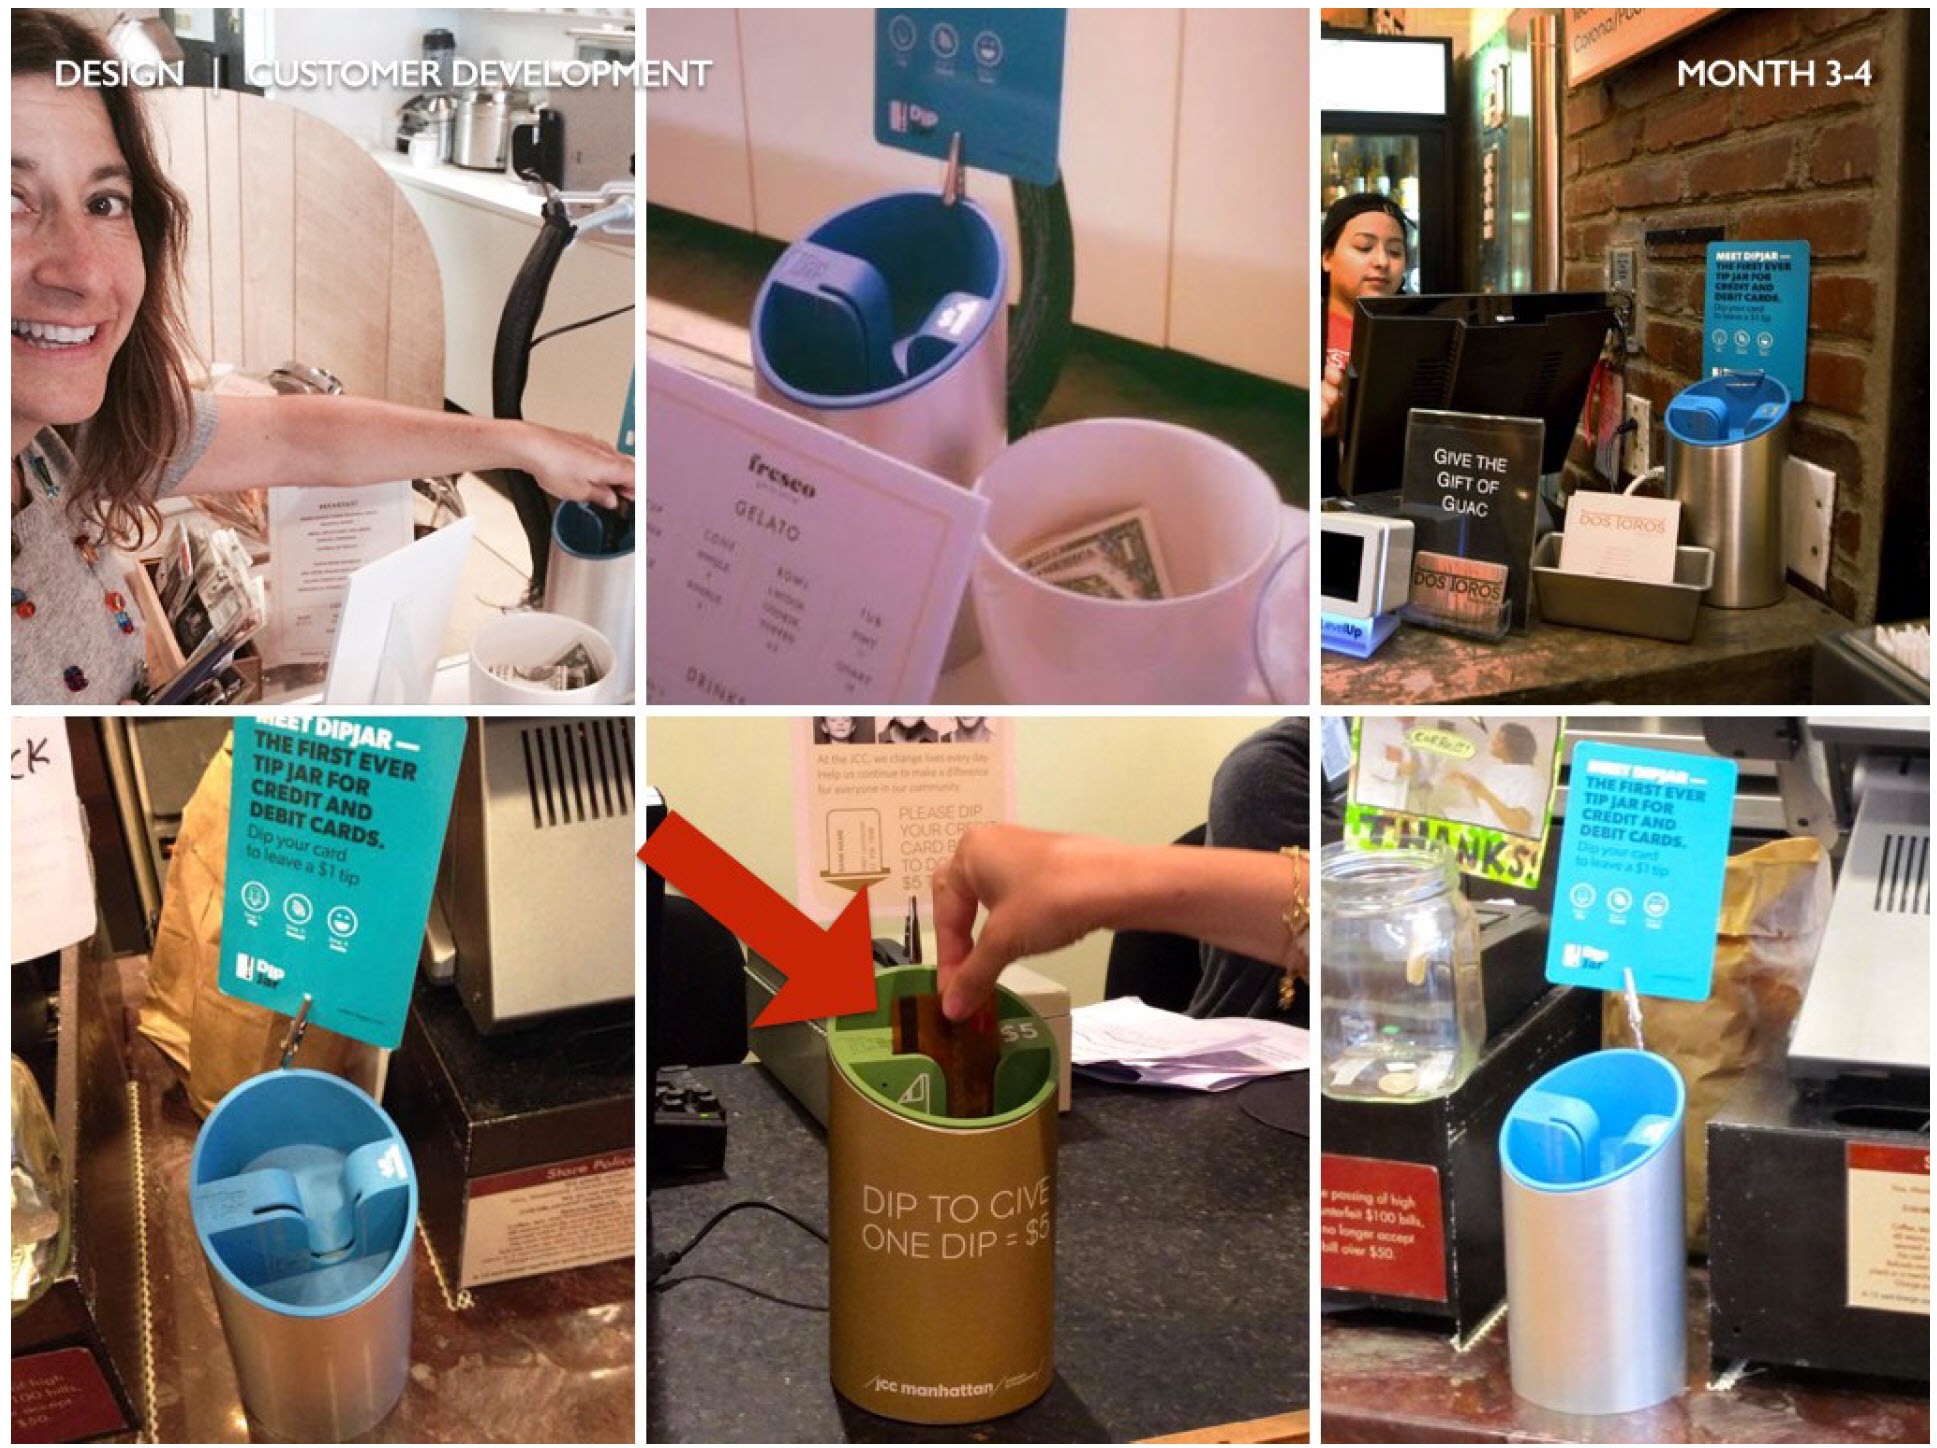
Figure 2.3. Real customer photos taken at the early testing stage
One of my mentors once said: “Do you know how to understand how bad the design of your product is? See how people use it. ” The DipJar team constantly observed the same problem (the red arrow in the photo): users tried to insert the card incorrectly. It became clear that this is the main constructive restriction.
Recommendations for communicating with clients at this stage (as opposed to the problem research stage):
Frame Modeling
After a detailed feedback on the prototype of the concept check, it's time to do an iteration of the product design.
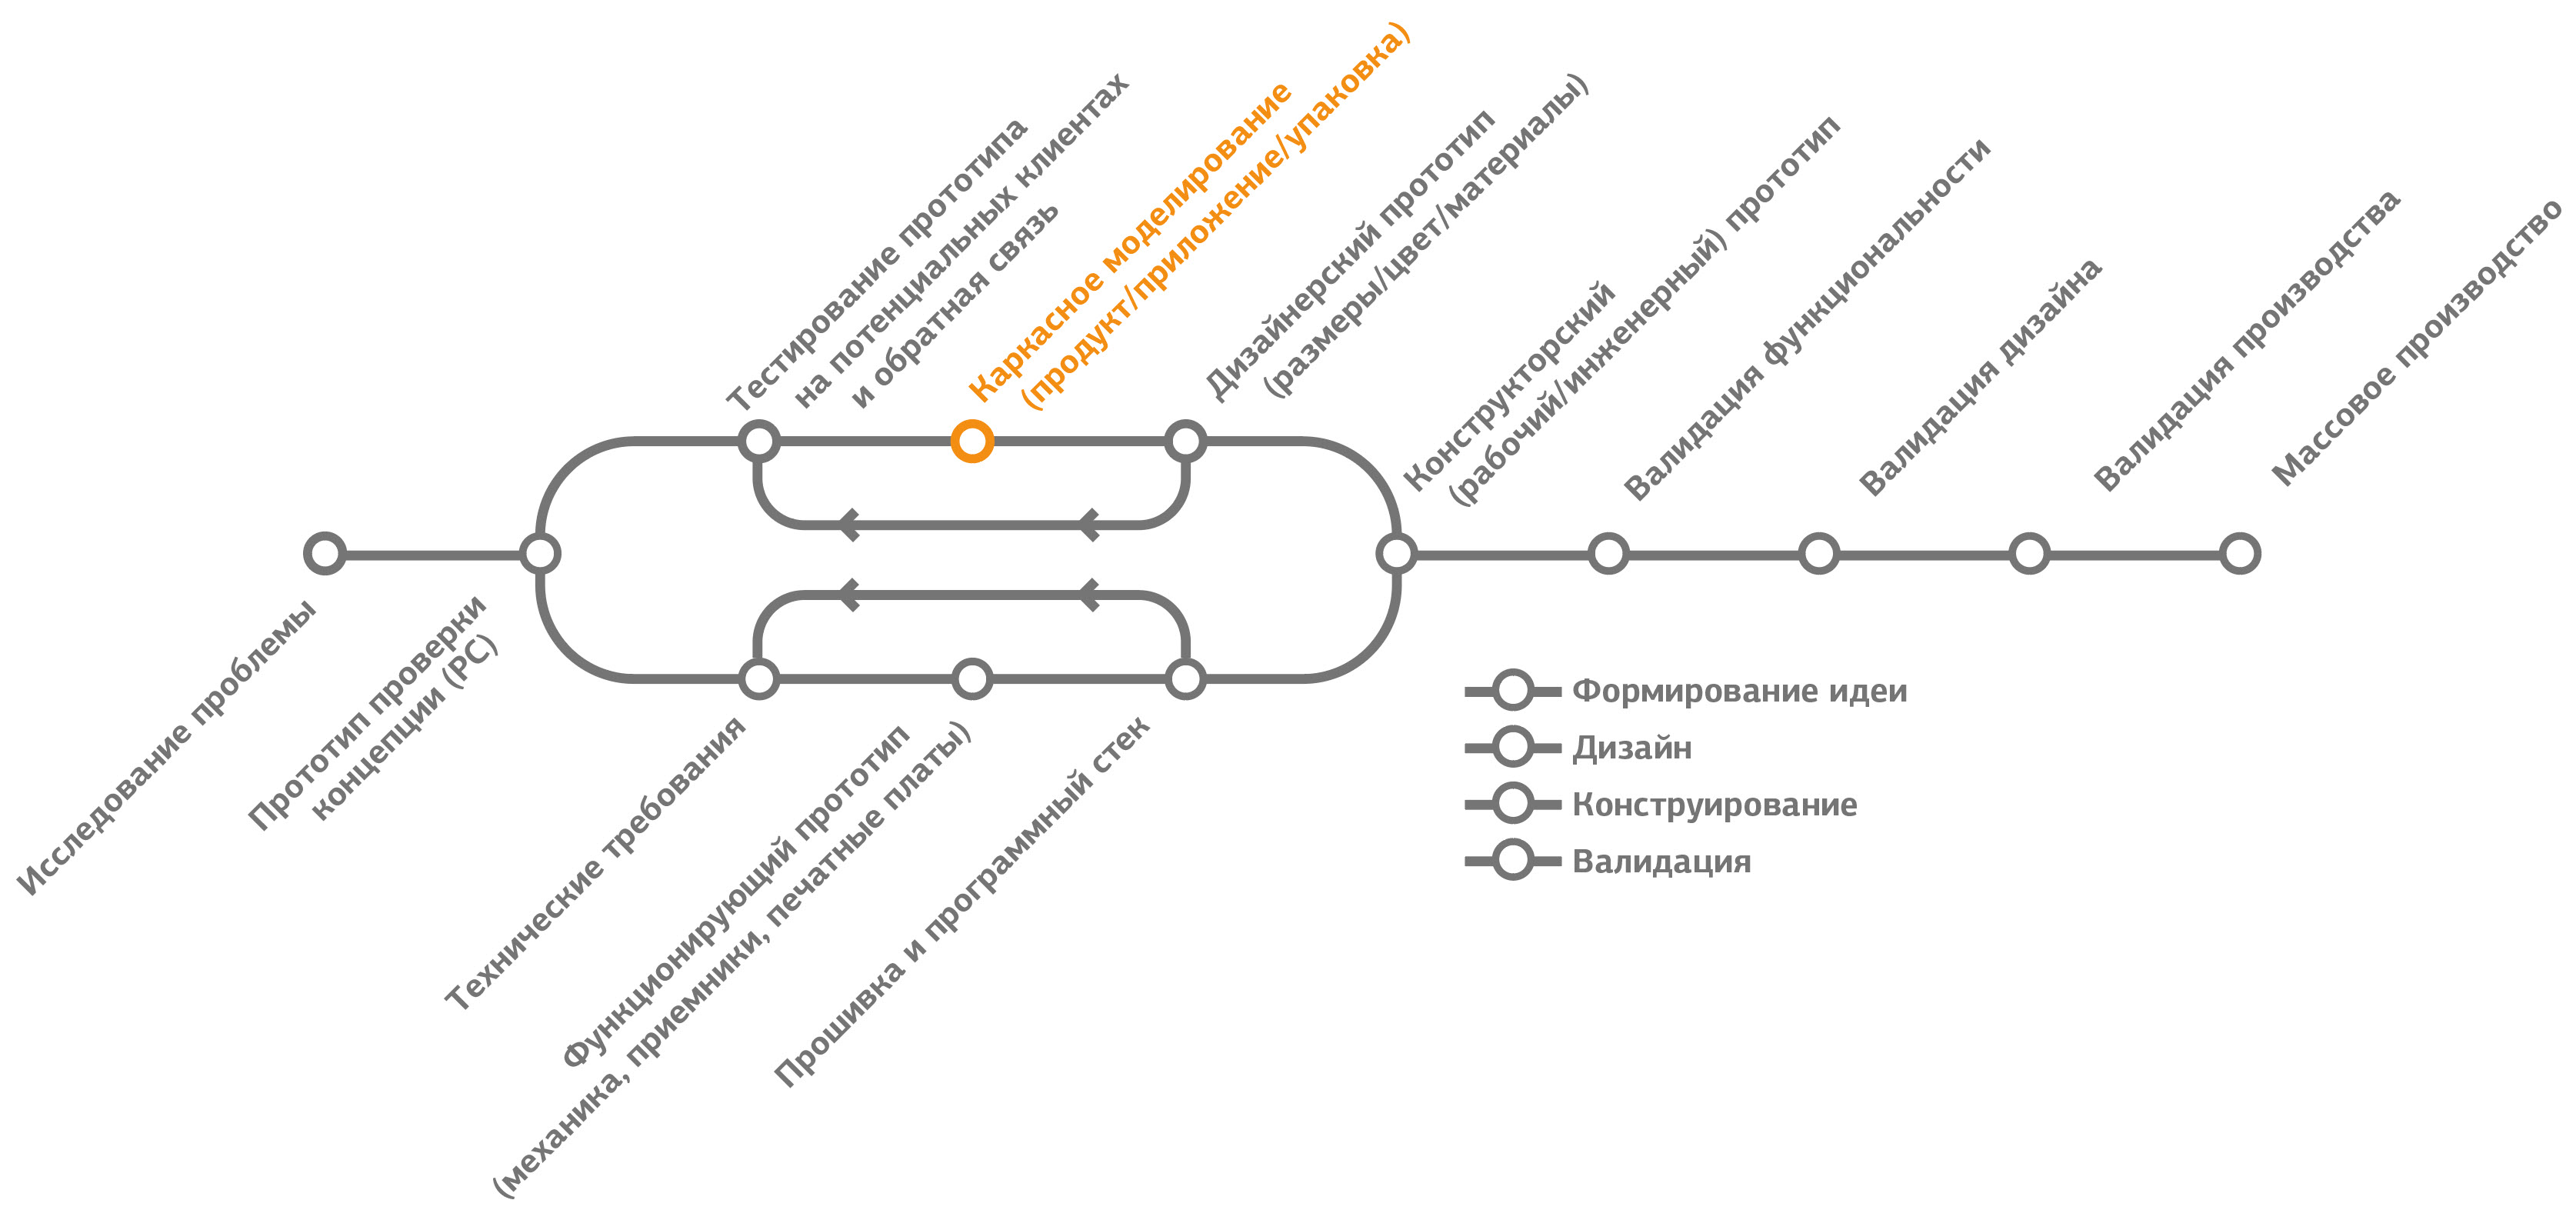
Figure 2.4. Frame Modeling Stage
The process of frame modeling begins with the creation of high-level sketches that fully describe the experience of using the product. We call this process storyboards.
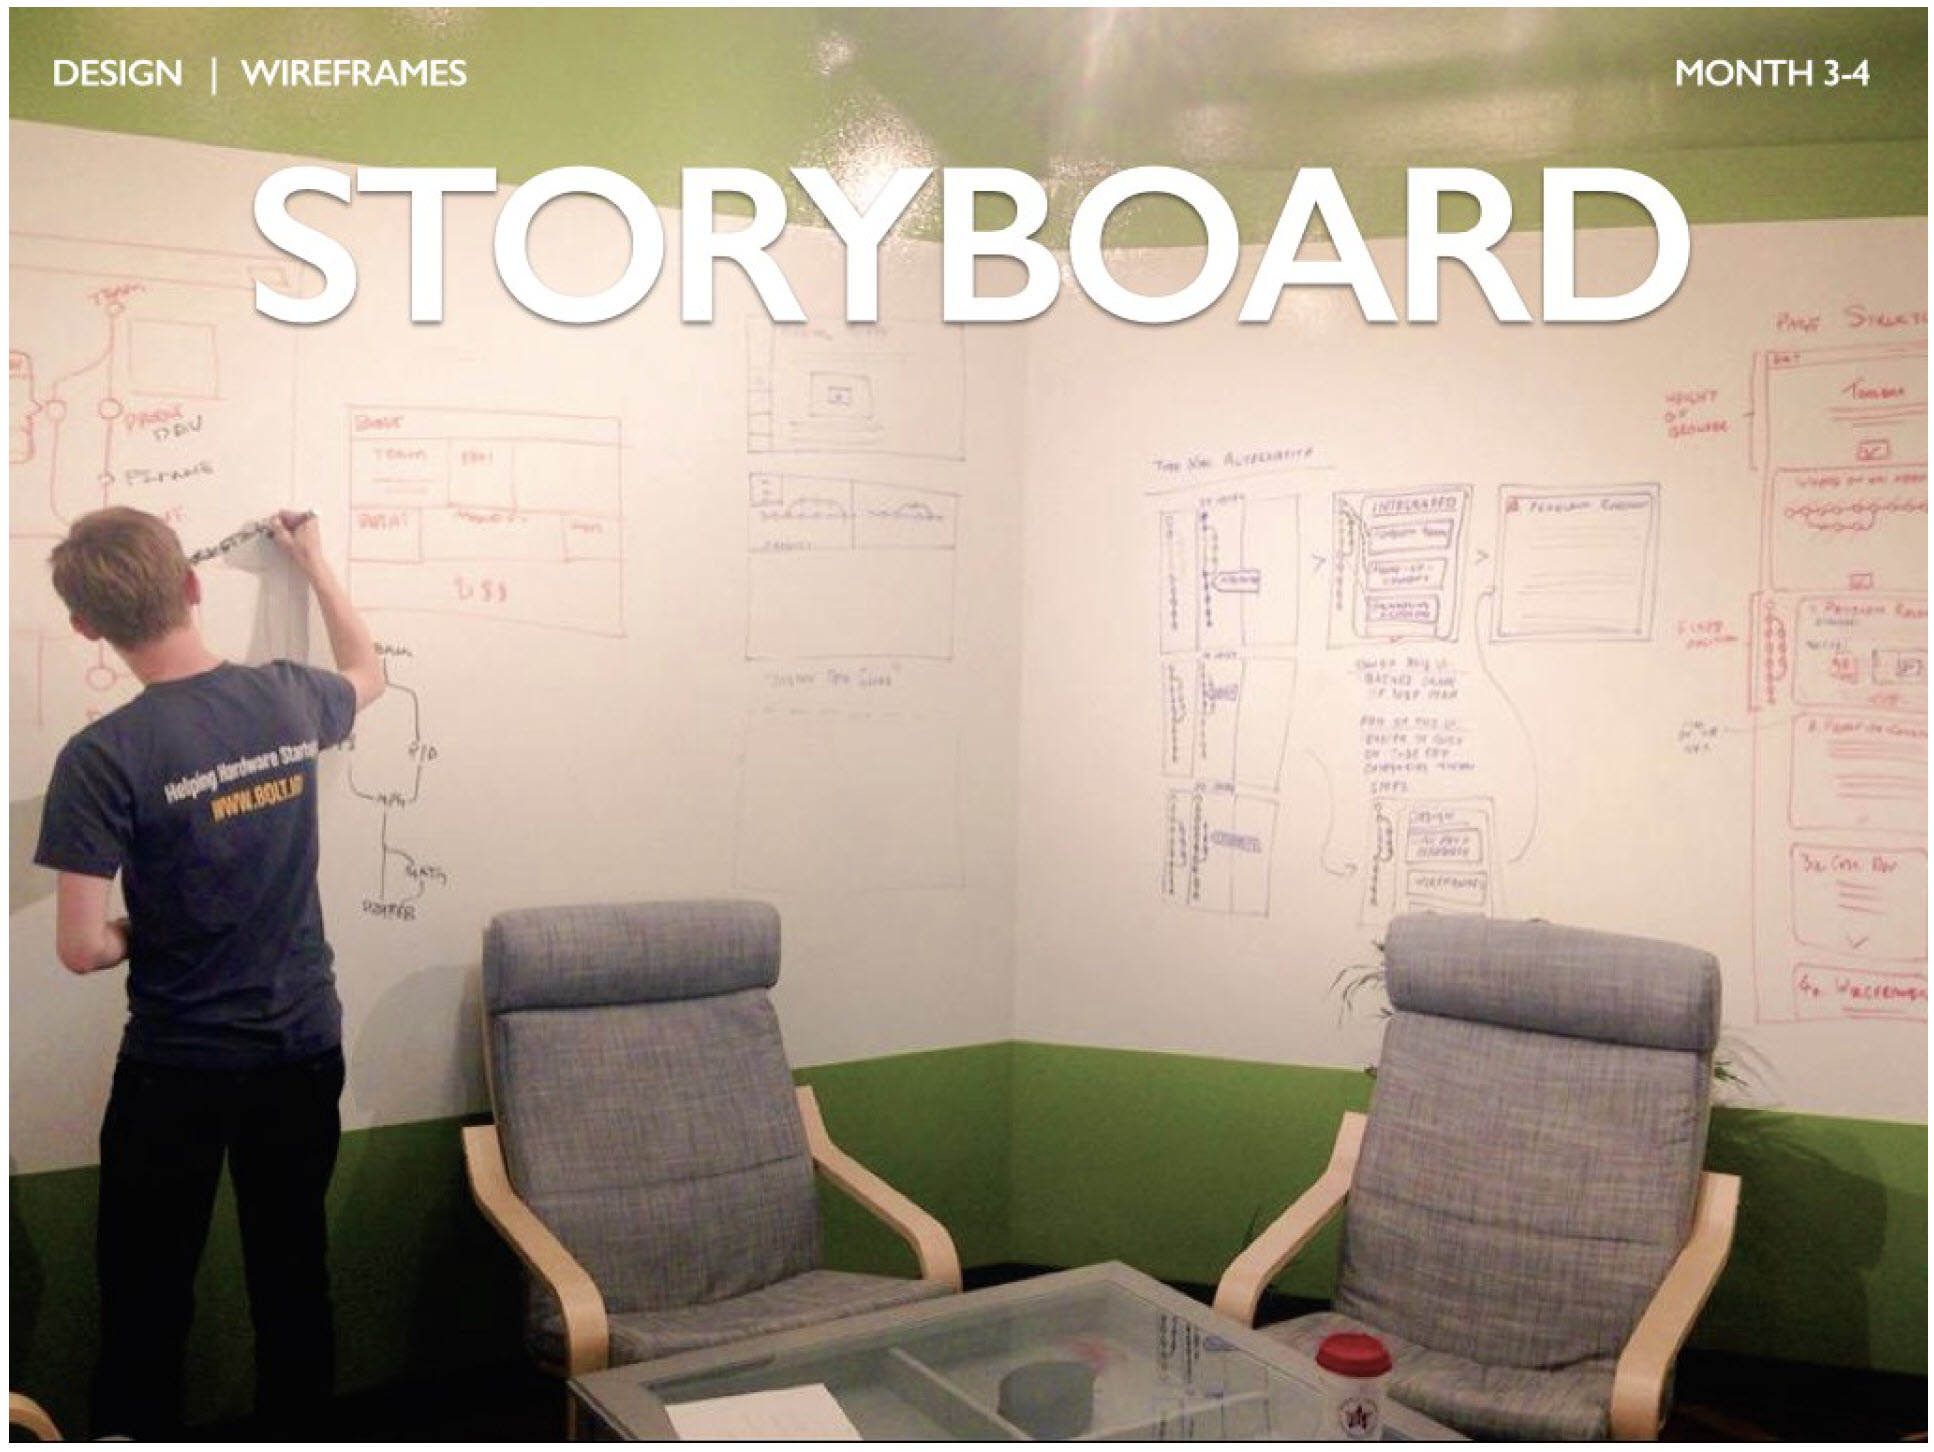
Figure 2.5. Storyboard
The storyboard helps the founders of the company think through the entire path of the product. It is described with its help:
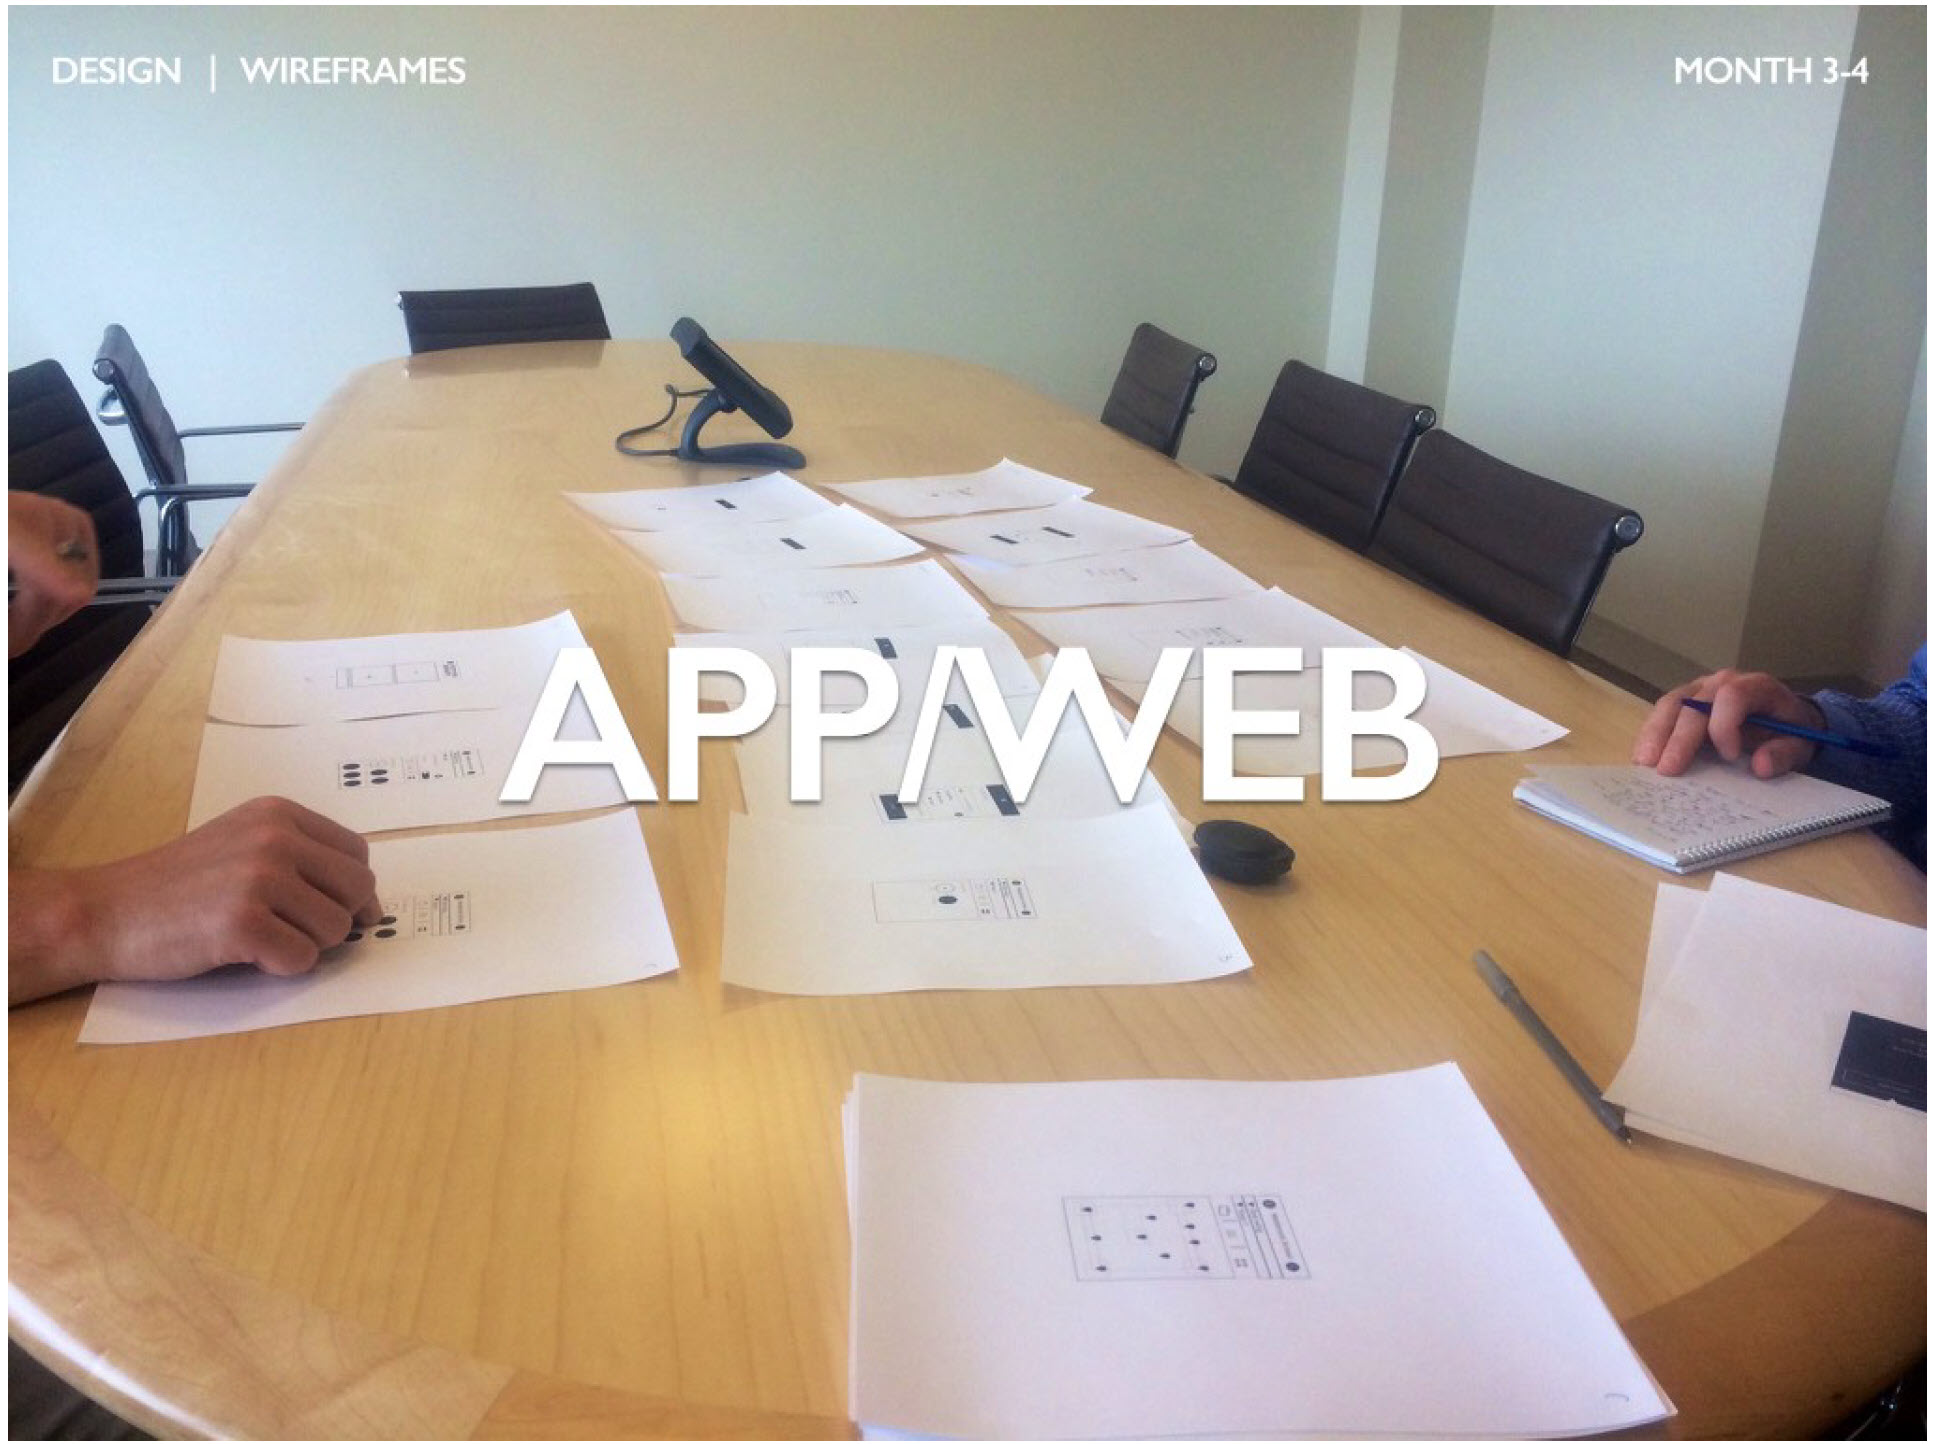
Figure 2.6. Work with the future user of the application or web interface
Wireframe modeling is also useful if your product has a digital interface (embedded interface, web interface, smartphone app). These are usually simple black and white drawings, although digital tools can also be used. In the photo above (2.6) you can see the founder of the company (on the right). He polls a potential client (left) and makes notes while he is using the application on the paper "screen" of the smartphone. And although such testing of digital workflows may seem quite primitive, it is very effective.
By completing the wireframe modeling, you should have a detailed understanding of how users will interact with each part of your product.
Visual prototype.
A visual prototype is a model that represents the final, but not functioning product. As in the other stages, the creation of such a model (and associated frameworks) involves iterative interaction with users.
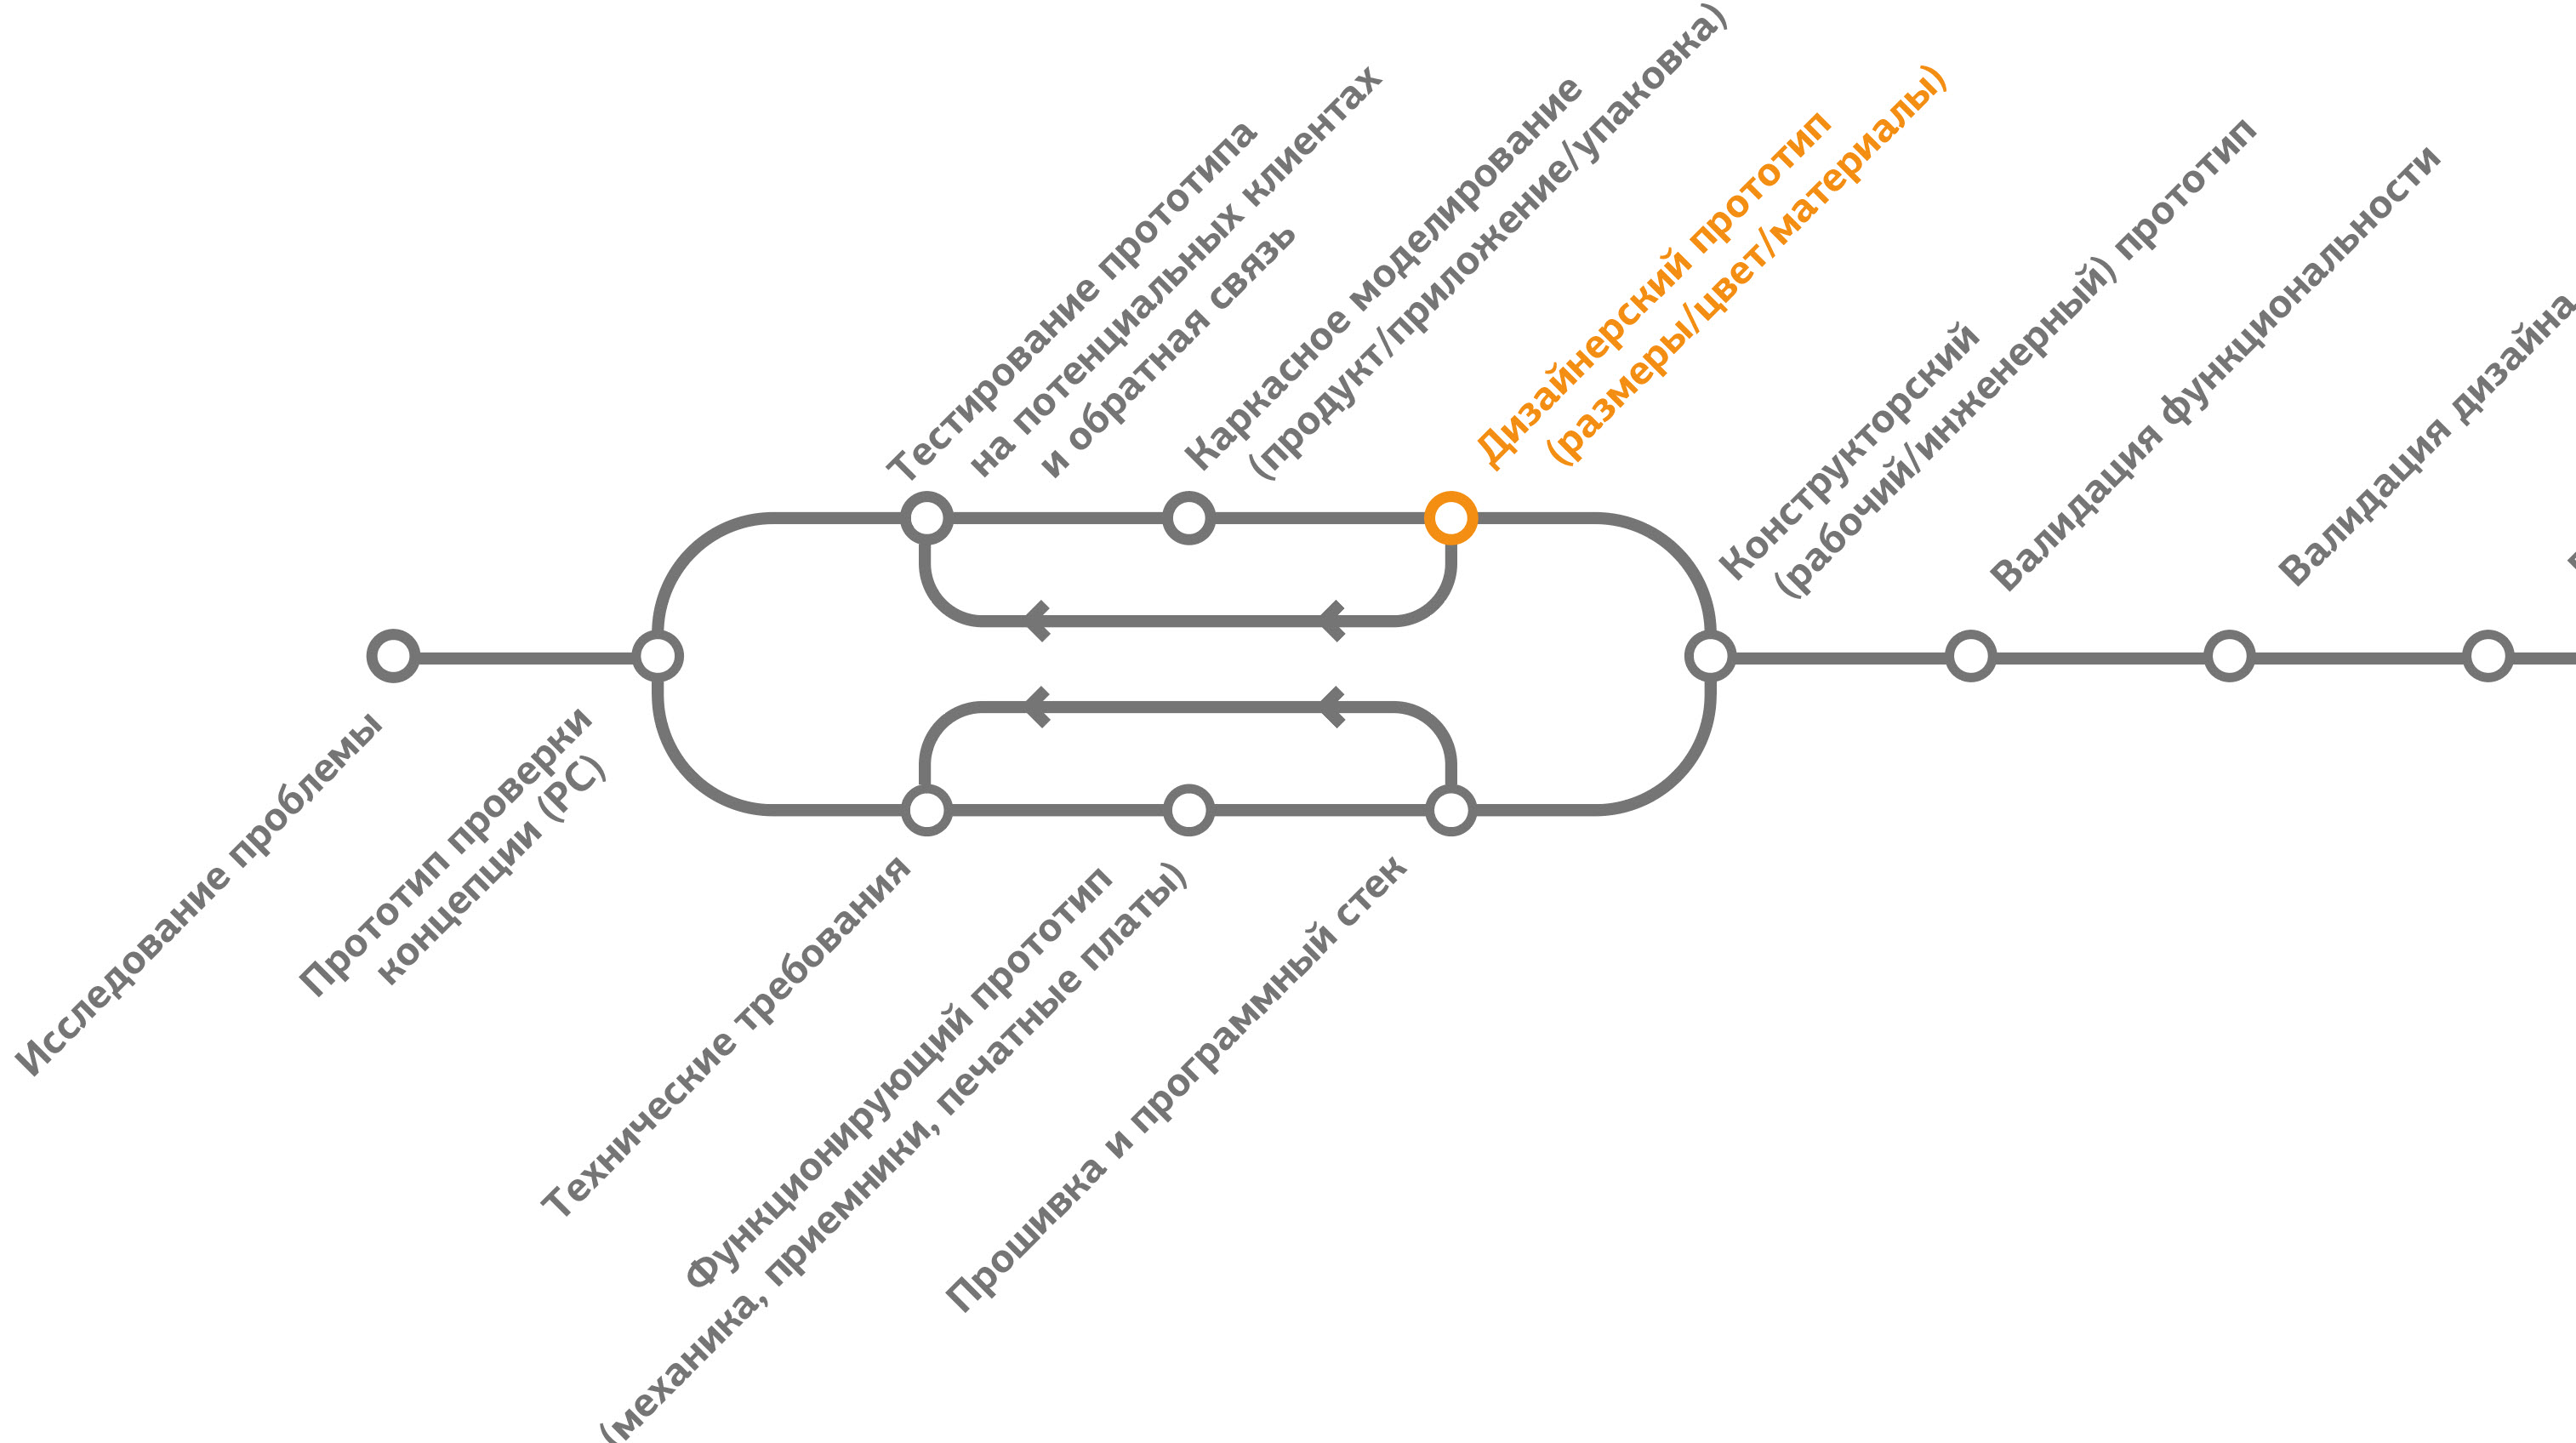
Figure 2.7. The stage of the visual prototype
Start with a wide range of ideas and work on the choice of several concepts that best meet the criteria of users.

Figure 2.8 Sketch
The design of a visual prototype almost always begins with the high-level sketches of the product itself (as opposed to the storyboard, which describes the experience of using the product). Most industrial designers first do a preliminary search for related forms and products. Designer DipJar studied a lot of other products and made sketches based on their forms.
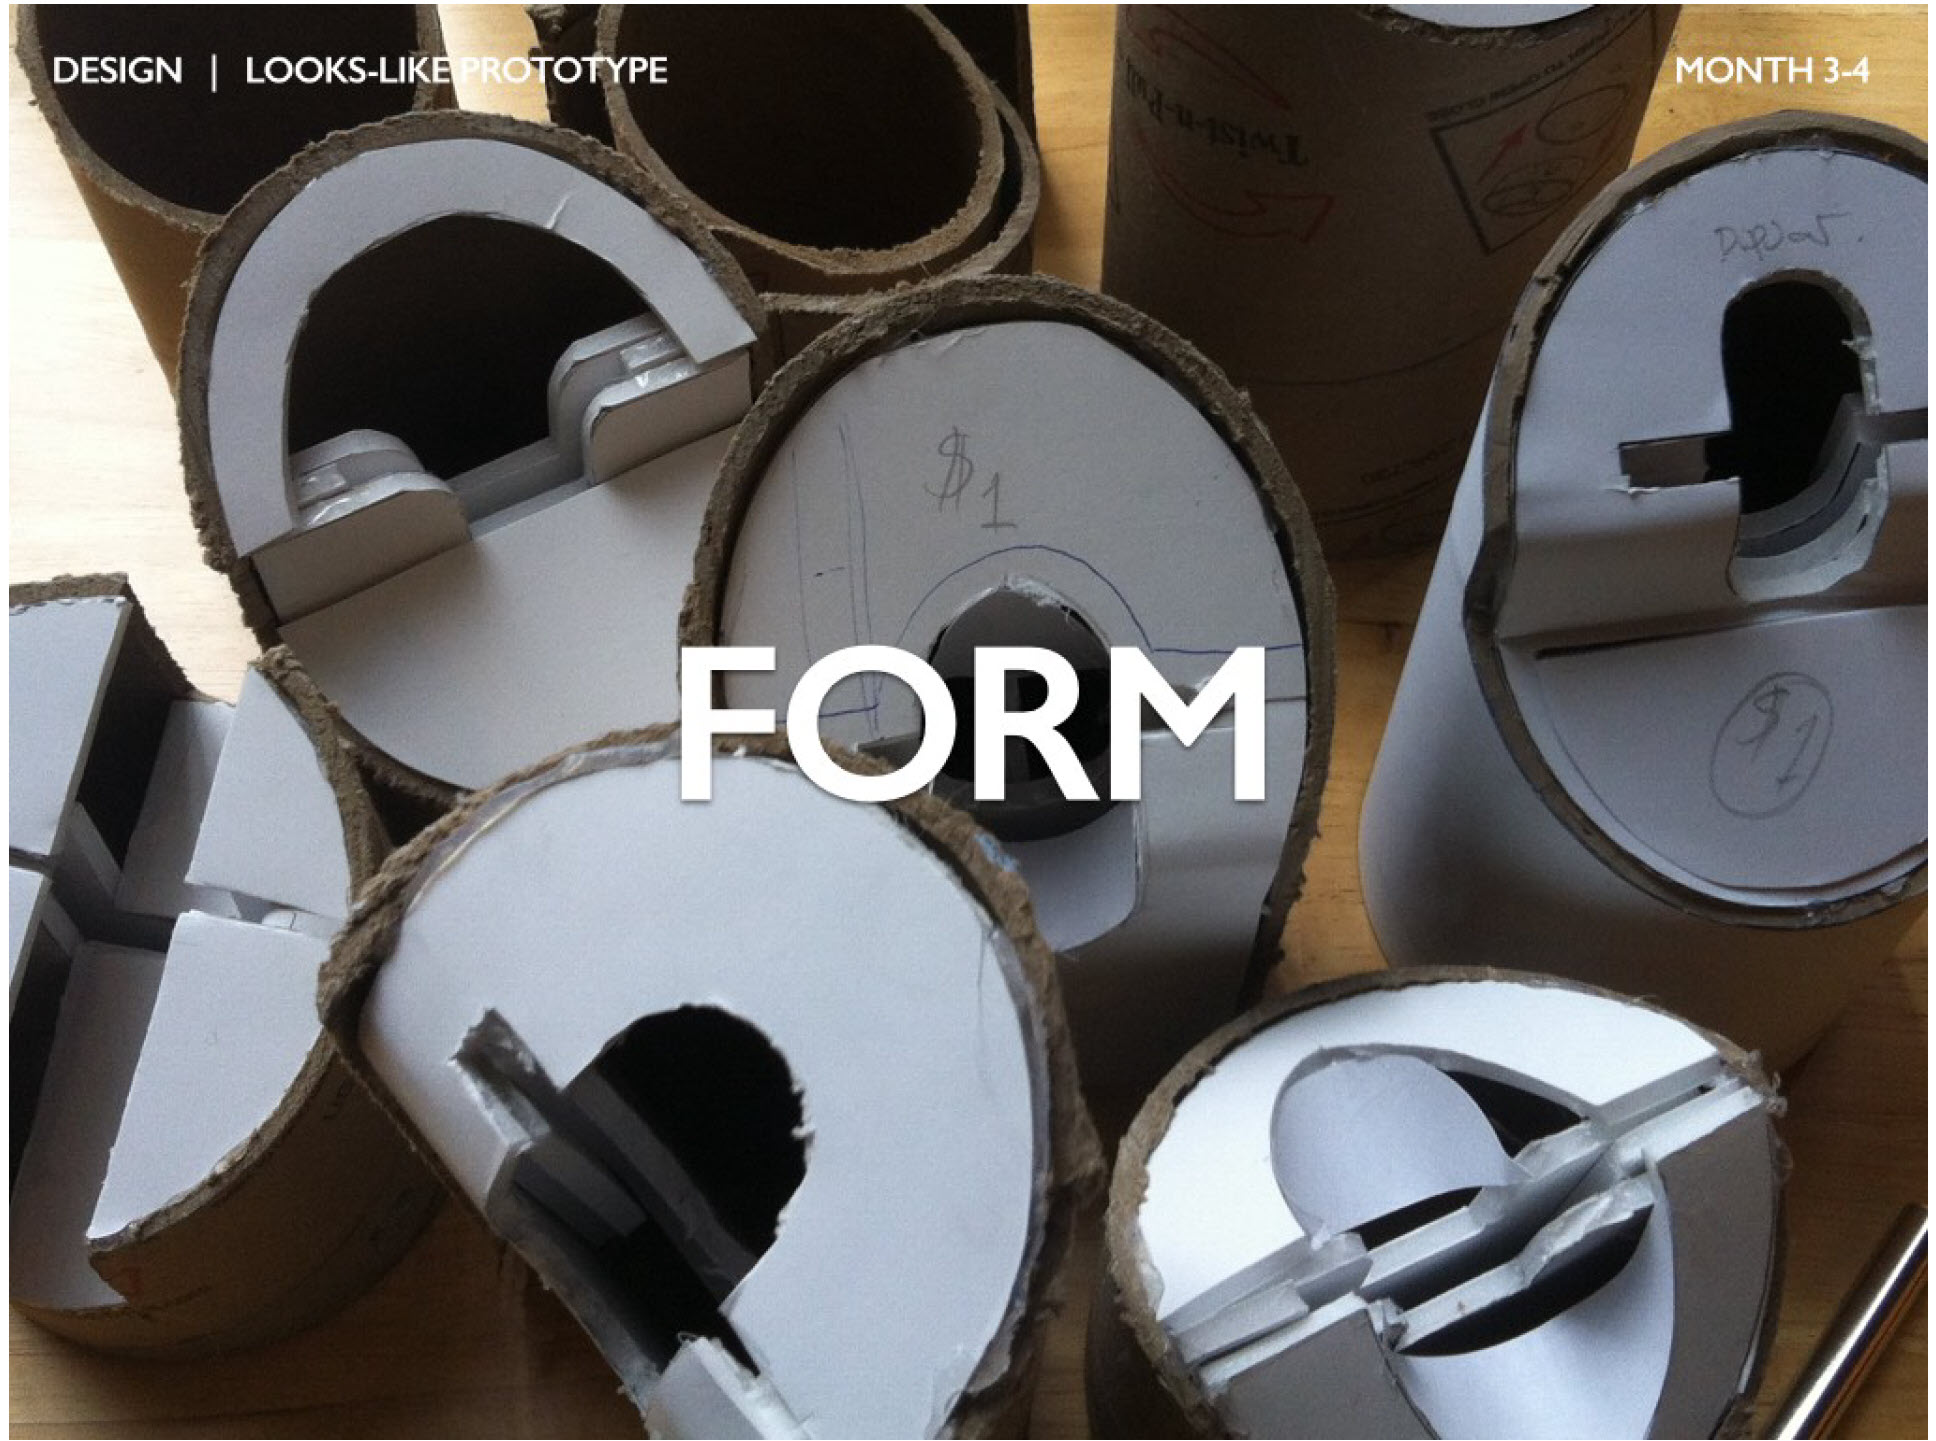
Figure 2.9. Shape selection
As soon as you select a few draft concepts, you will need to check how they will look in the real world. In the photo you can see the draft forms of DipJar from foam base and tube. It takes several minutes to create each one, and as a result one can understand how the form will be perceived in the real world. I made these models of all sorts of things: from clay and Lego to foam plastic and toothpicks. There is one important rule: make models quickly and cheaply.

Figure 2.10. Sizing
After selecting the main form, you need to work on the size of the model and the scale of the individual parts. Usually there are two or three parameters that are important for the “right feel” of the product. In the case of the DipJar, it was the height of the can itself, the diameter of the front part and the geometry of the slot for a finger. For this, more accurate models are made with small differences in the parameters (of cardboard and foam).
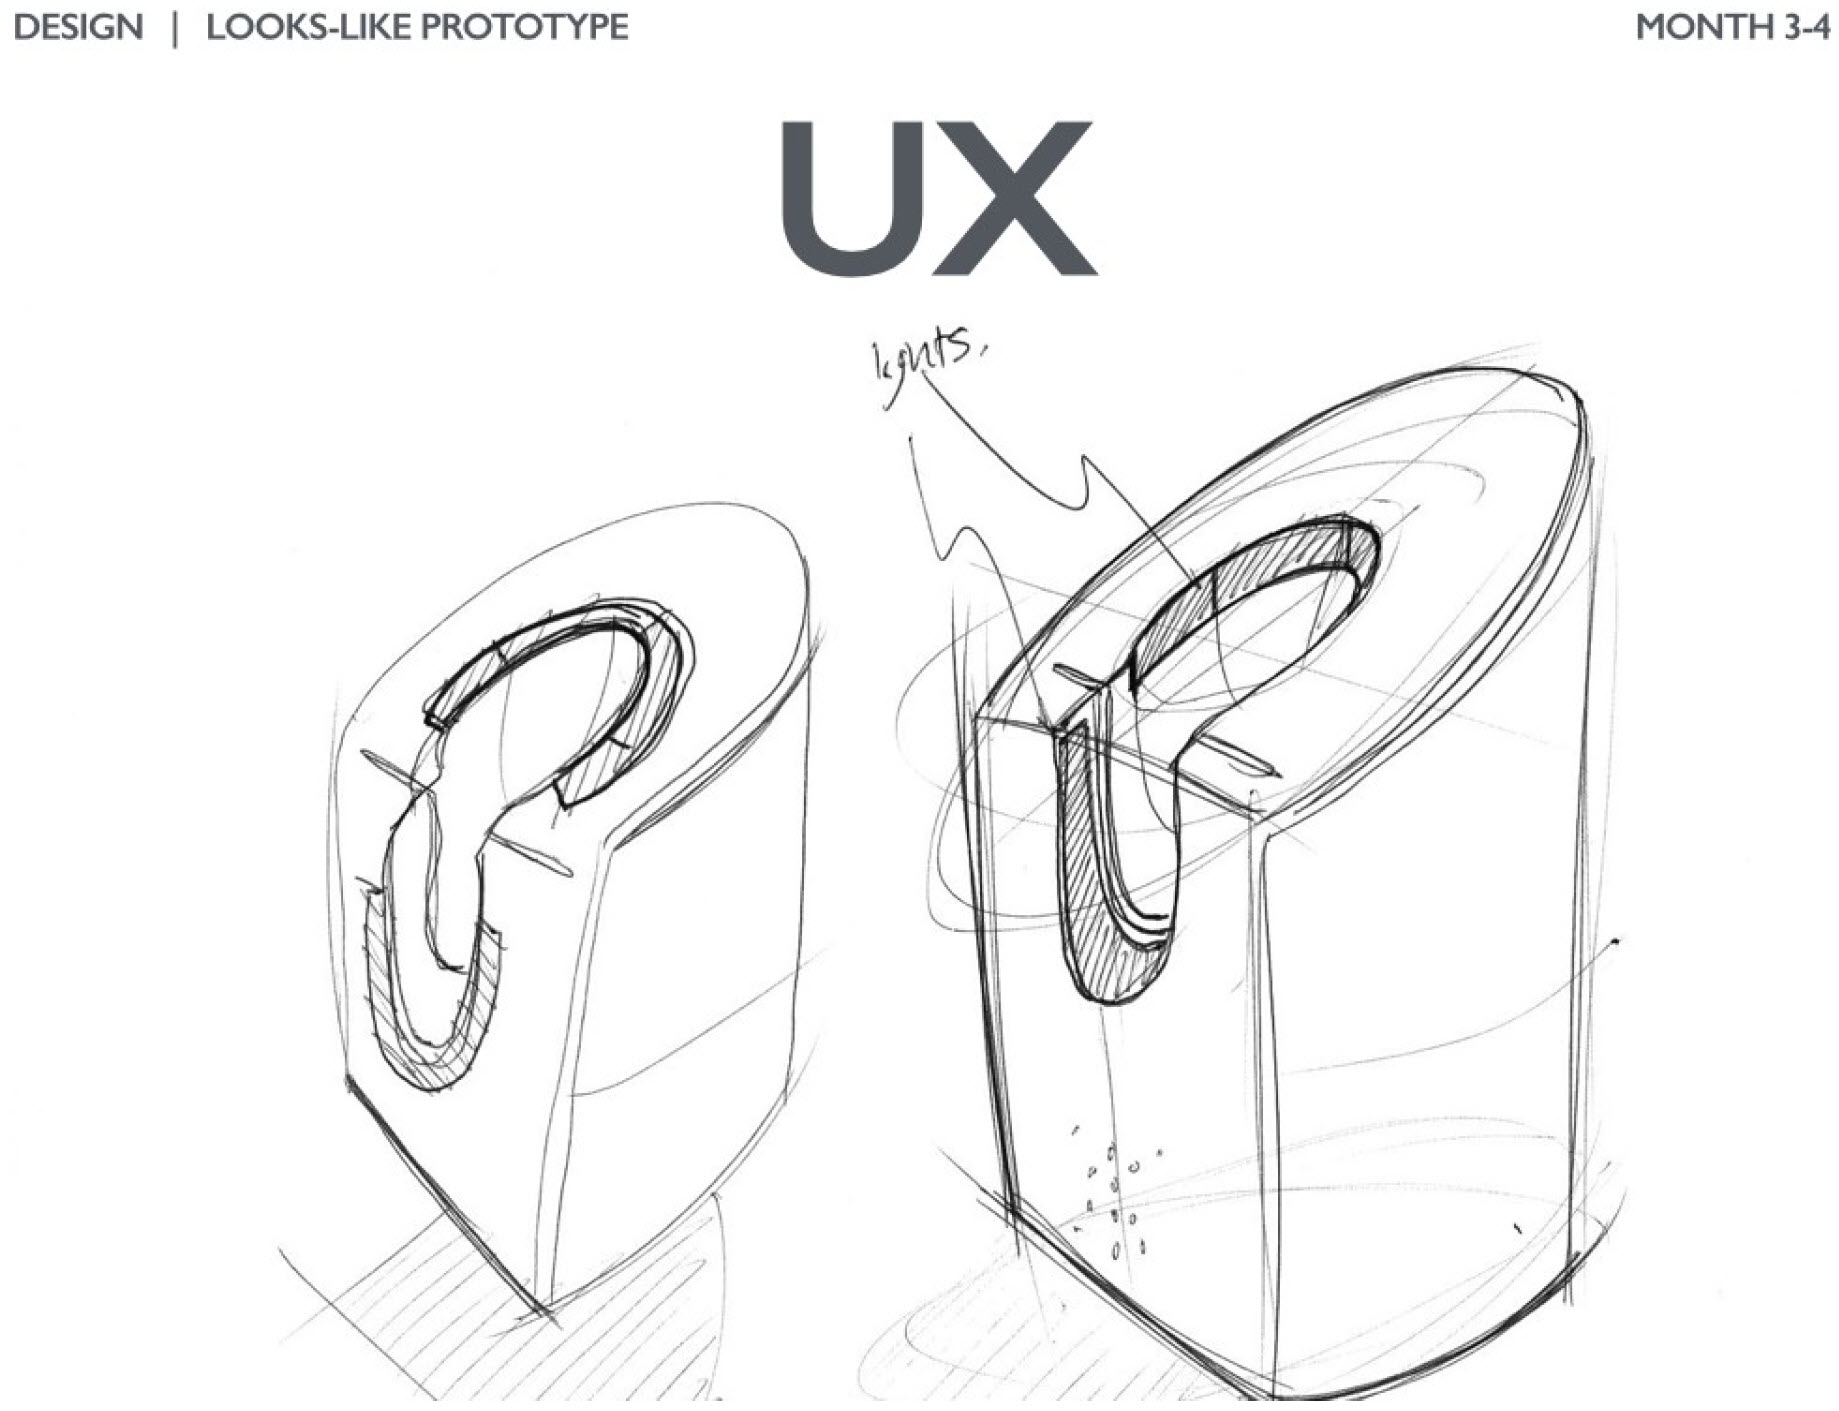
Figure 2.11. Understanding of user experience
In parallel with form development, it often becomes apparent that certain features of user behavior (UX) need to be clarified. The DipJar team discovered that the likelihood of being generous increases when the tip leaves ahead of them in line. We found that the sound and light signal is a very effective way of attracting people in the queue and thereby increasing the frequency and size of the tip. As a result, we have done a lot to choose the most successful arrangement of LEDs and to design communications using light.
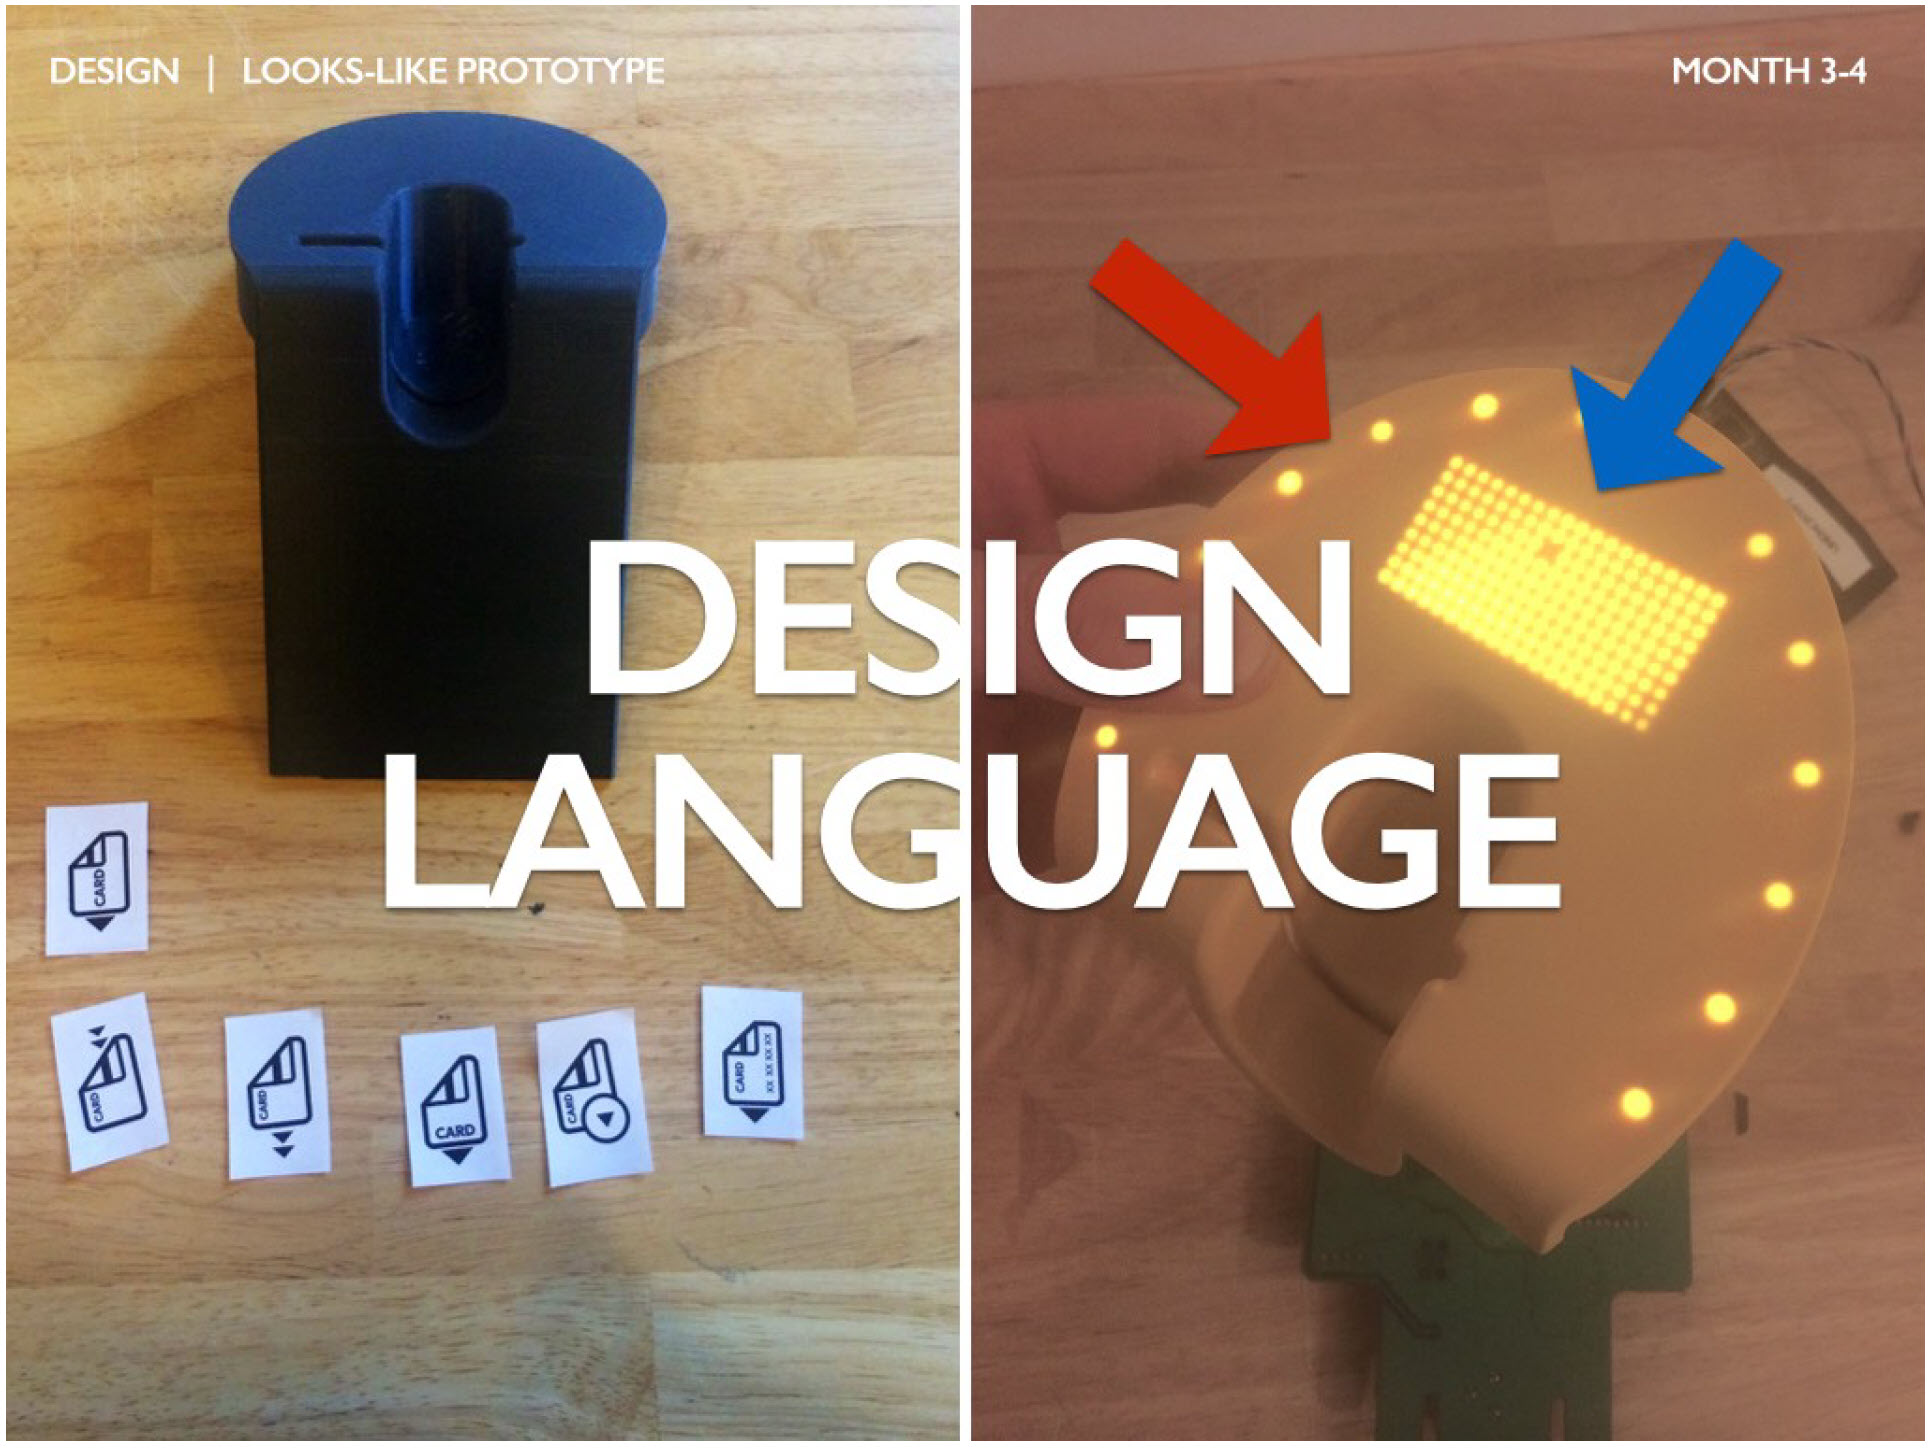
Figure 2.12. Design Language
Each product has a “design language”, through which there is a visual or empirical communication with the user. For DipJar it was important to quickly convey to the user how to insert a card. The team spent a lot of time optimizing the logo of the card (photo on the left) so that users can clearly understand how to insert the card correctly.
The DipJar team also worked on optimizing LED backlight patterns. The red arrow shows on the LED on the edge of the front, which playfully signal the manifestation of an act of generosity. The blue arrow indicates the result of a long discussion of the team - the ability of bank owners to change the amounts collected. Custom digital LED-display allows the owner DipJar easily change the size of the tip.
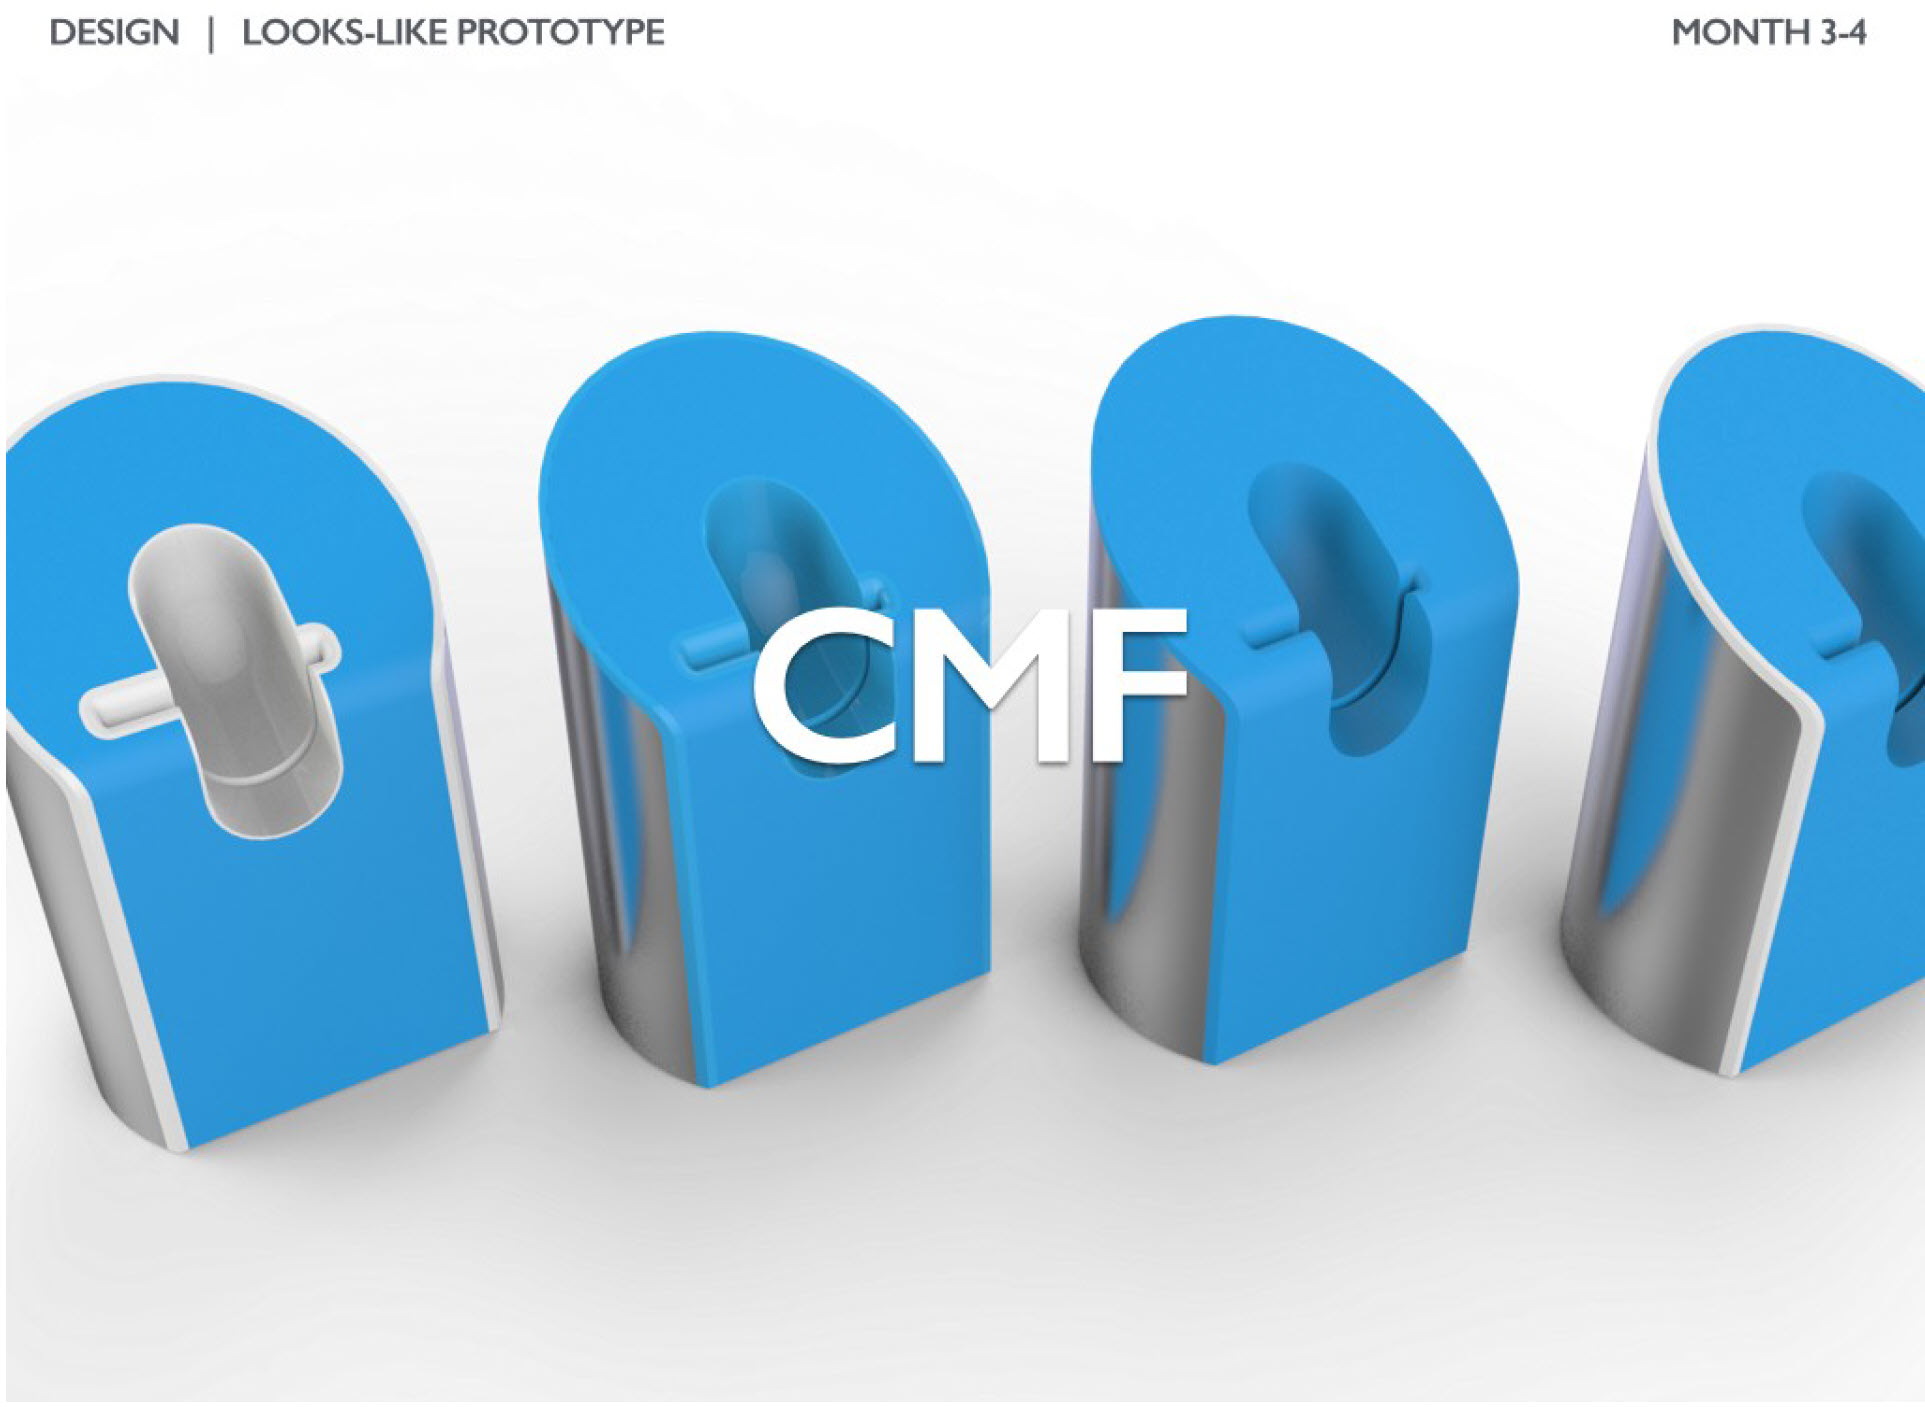
Figure 2.13. Colors, materials, finish
In order to quickly determine the final appearance of the product, designers choose colors, materials and finishes (colors, materials, finishes - CMF). This is often done digitally (as shown above), and then transformed into physical samples and models. DipJar tested various styles of metal cases, polishes and colors of plastics.
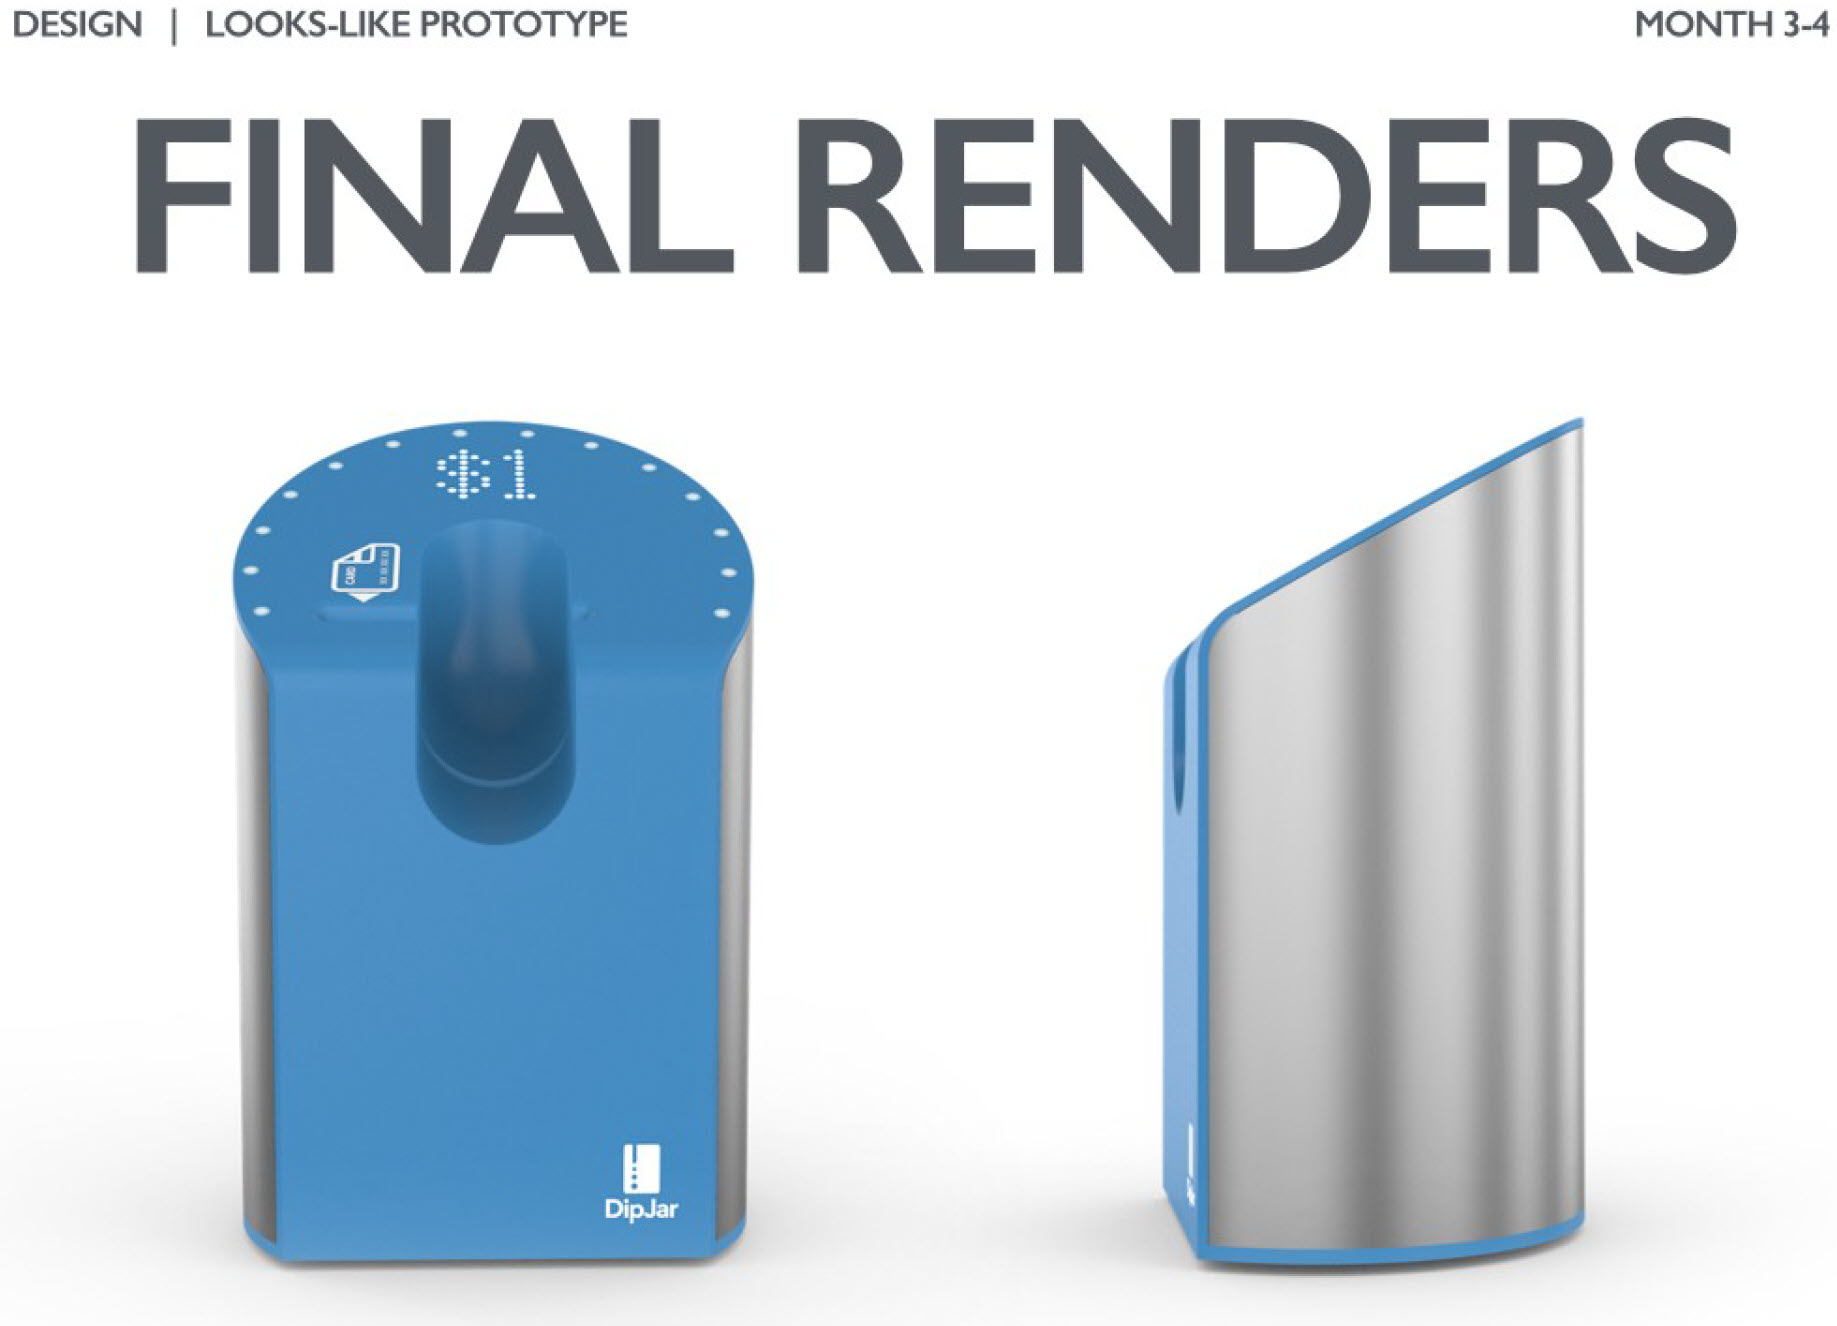
Figure 2.14. Final renders
The result of the initial selection of CMF is a high-quality digital product model. It typically includes all of the elements from the preceding steps: shape, size, symbols, user experience (UX), backlight (LED), colors, textures, and materials. Such high-quality visualizations, renders, are also the basis for virtually all marketing materials (even Apple’s marketing gods use renders for everything).
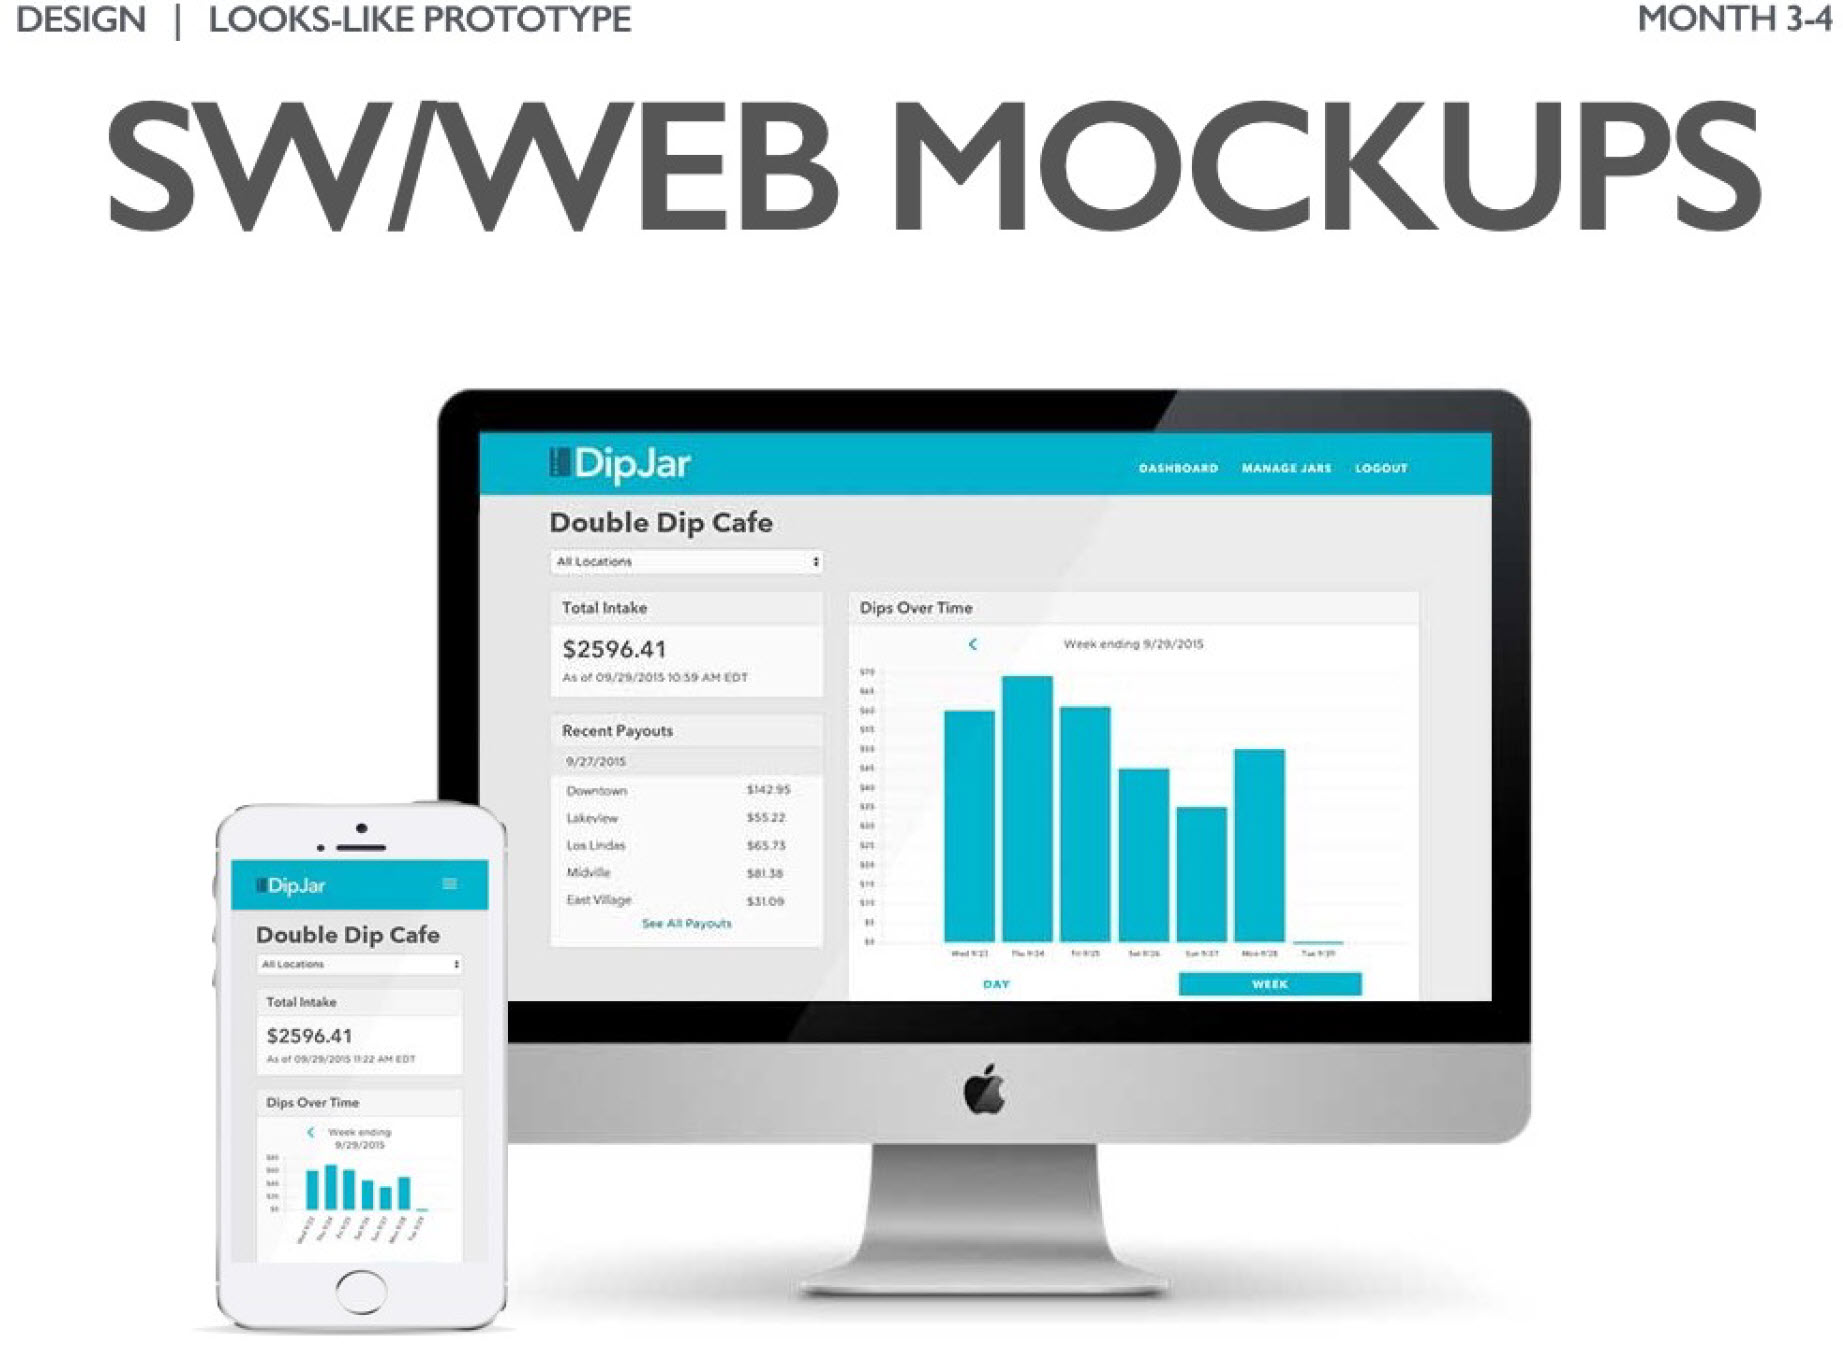
Figure 2.15. Web application design
If your product has a digital interface, creating more accurate layouts will be extremely useful for determining your product experience. DipJar's main digital asset is a web-based management dashboard for store owners and charitable organizations. Plans are also to launch a mobile app for employees and tipping people.
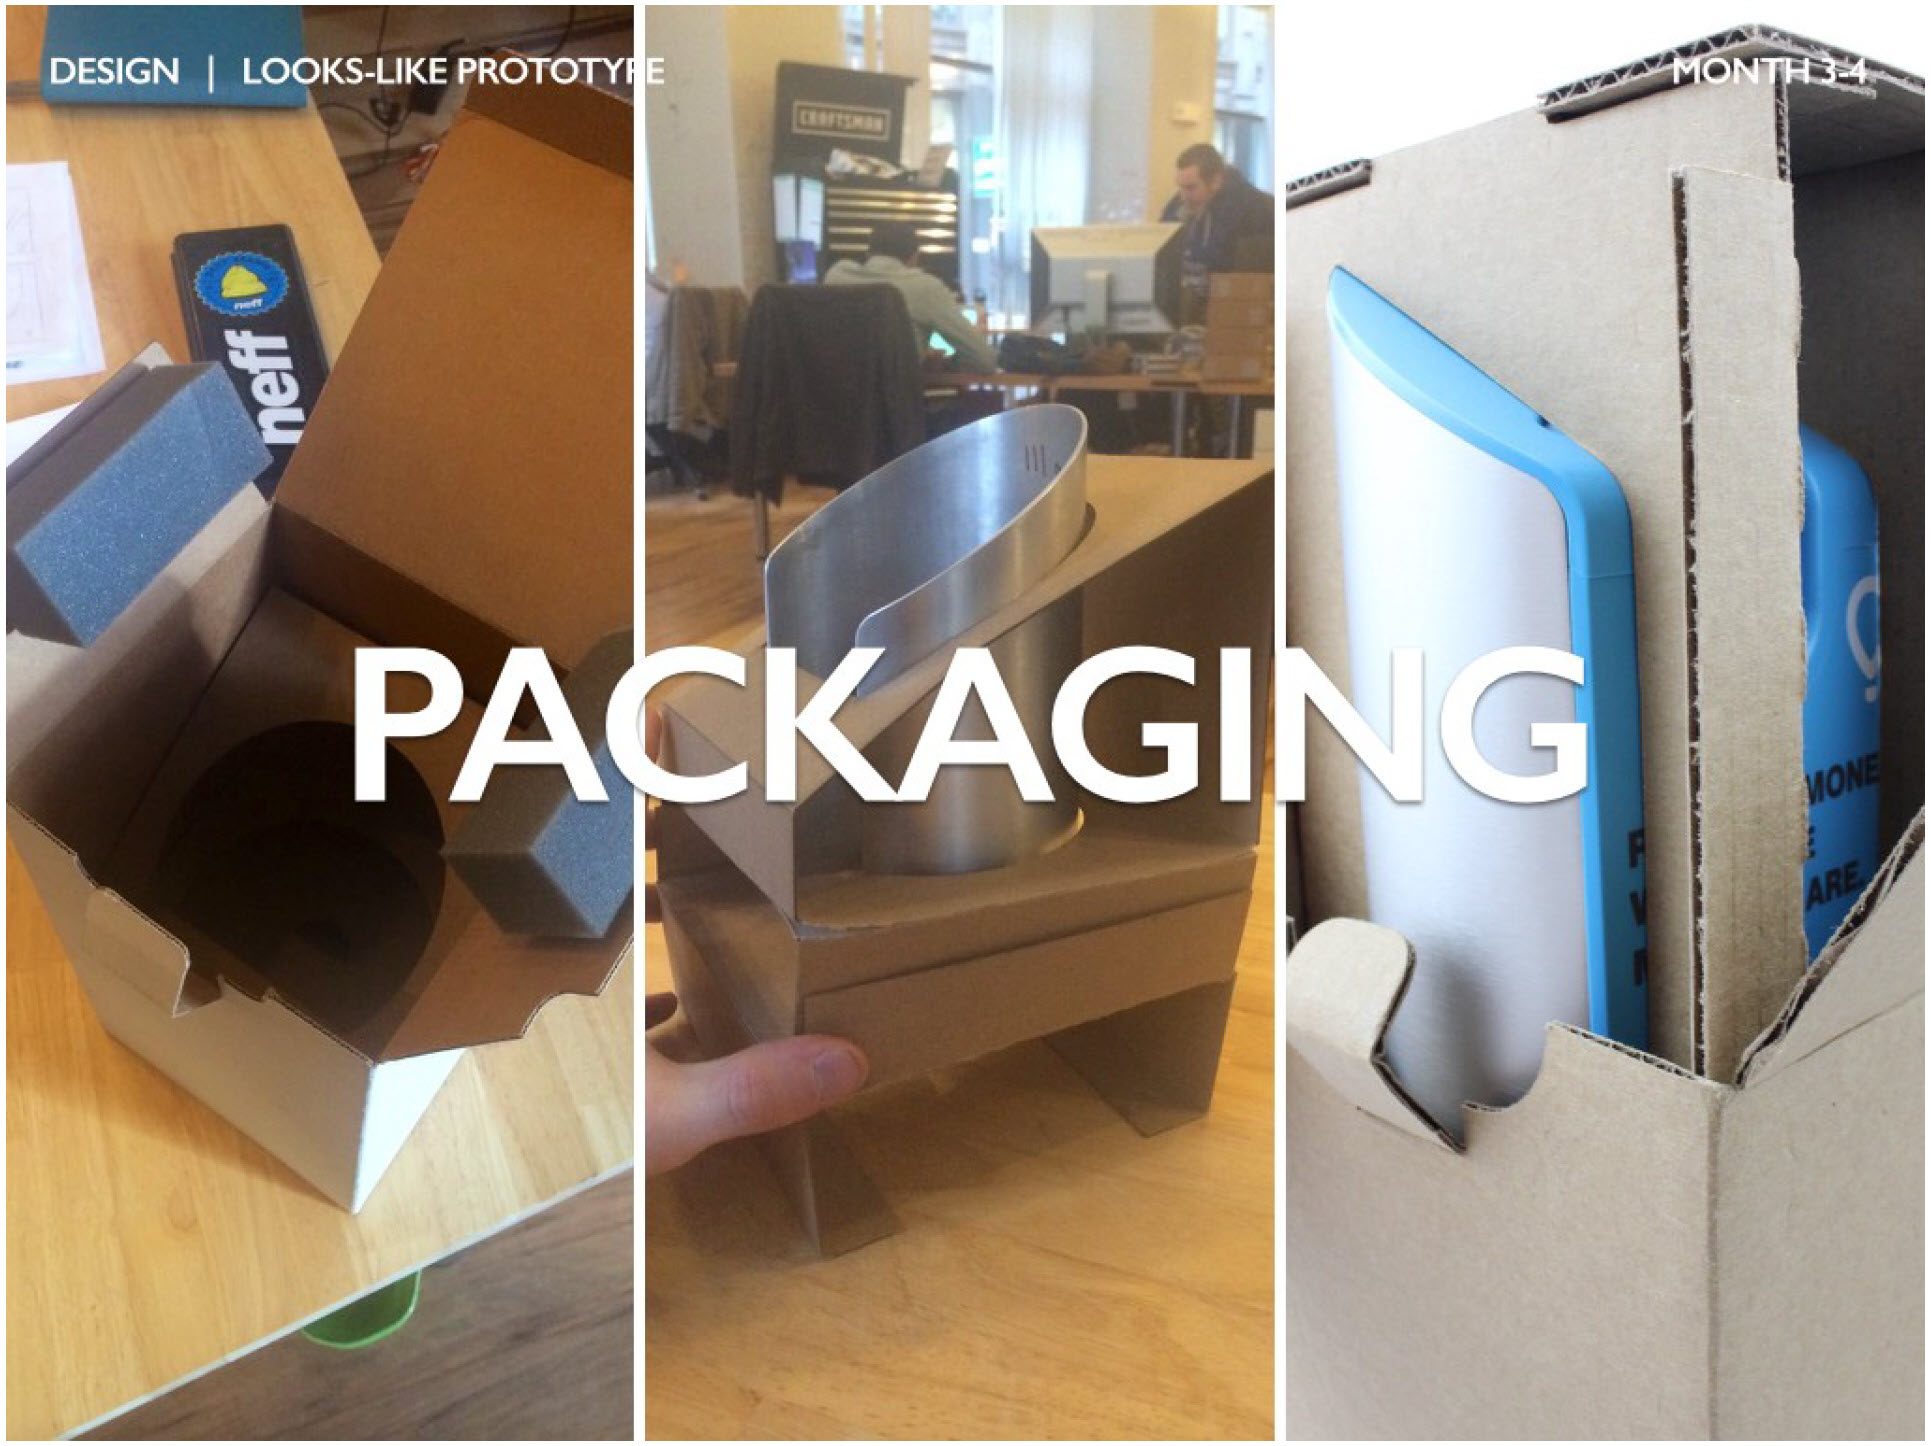
Figure 2.16. Choice of packaging configuration
An important stage that is easily forgotten at the design stage is packaging. Even such a relatively simple product, like DipJar, went through iterations in packaging design. In the photo on the left you can see the first version of the package; in the photo on the right - the more spectacular and elegant packaging of the second generation. Design optimization is an important part in creating a positive user experience and material specification.
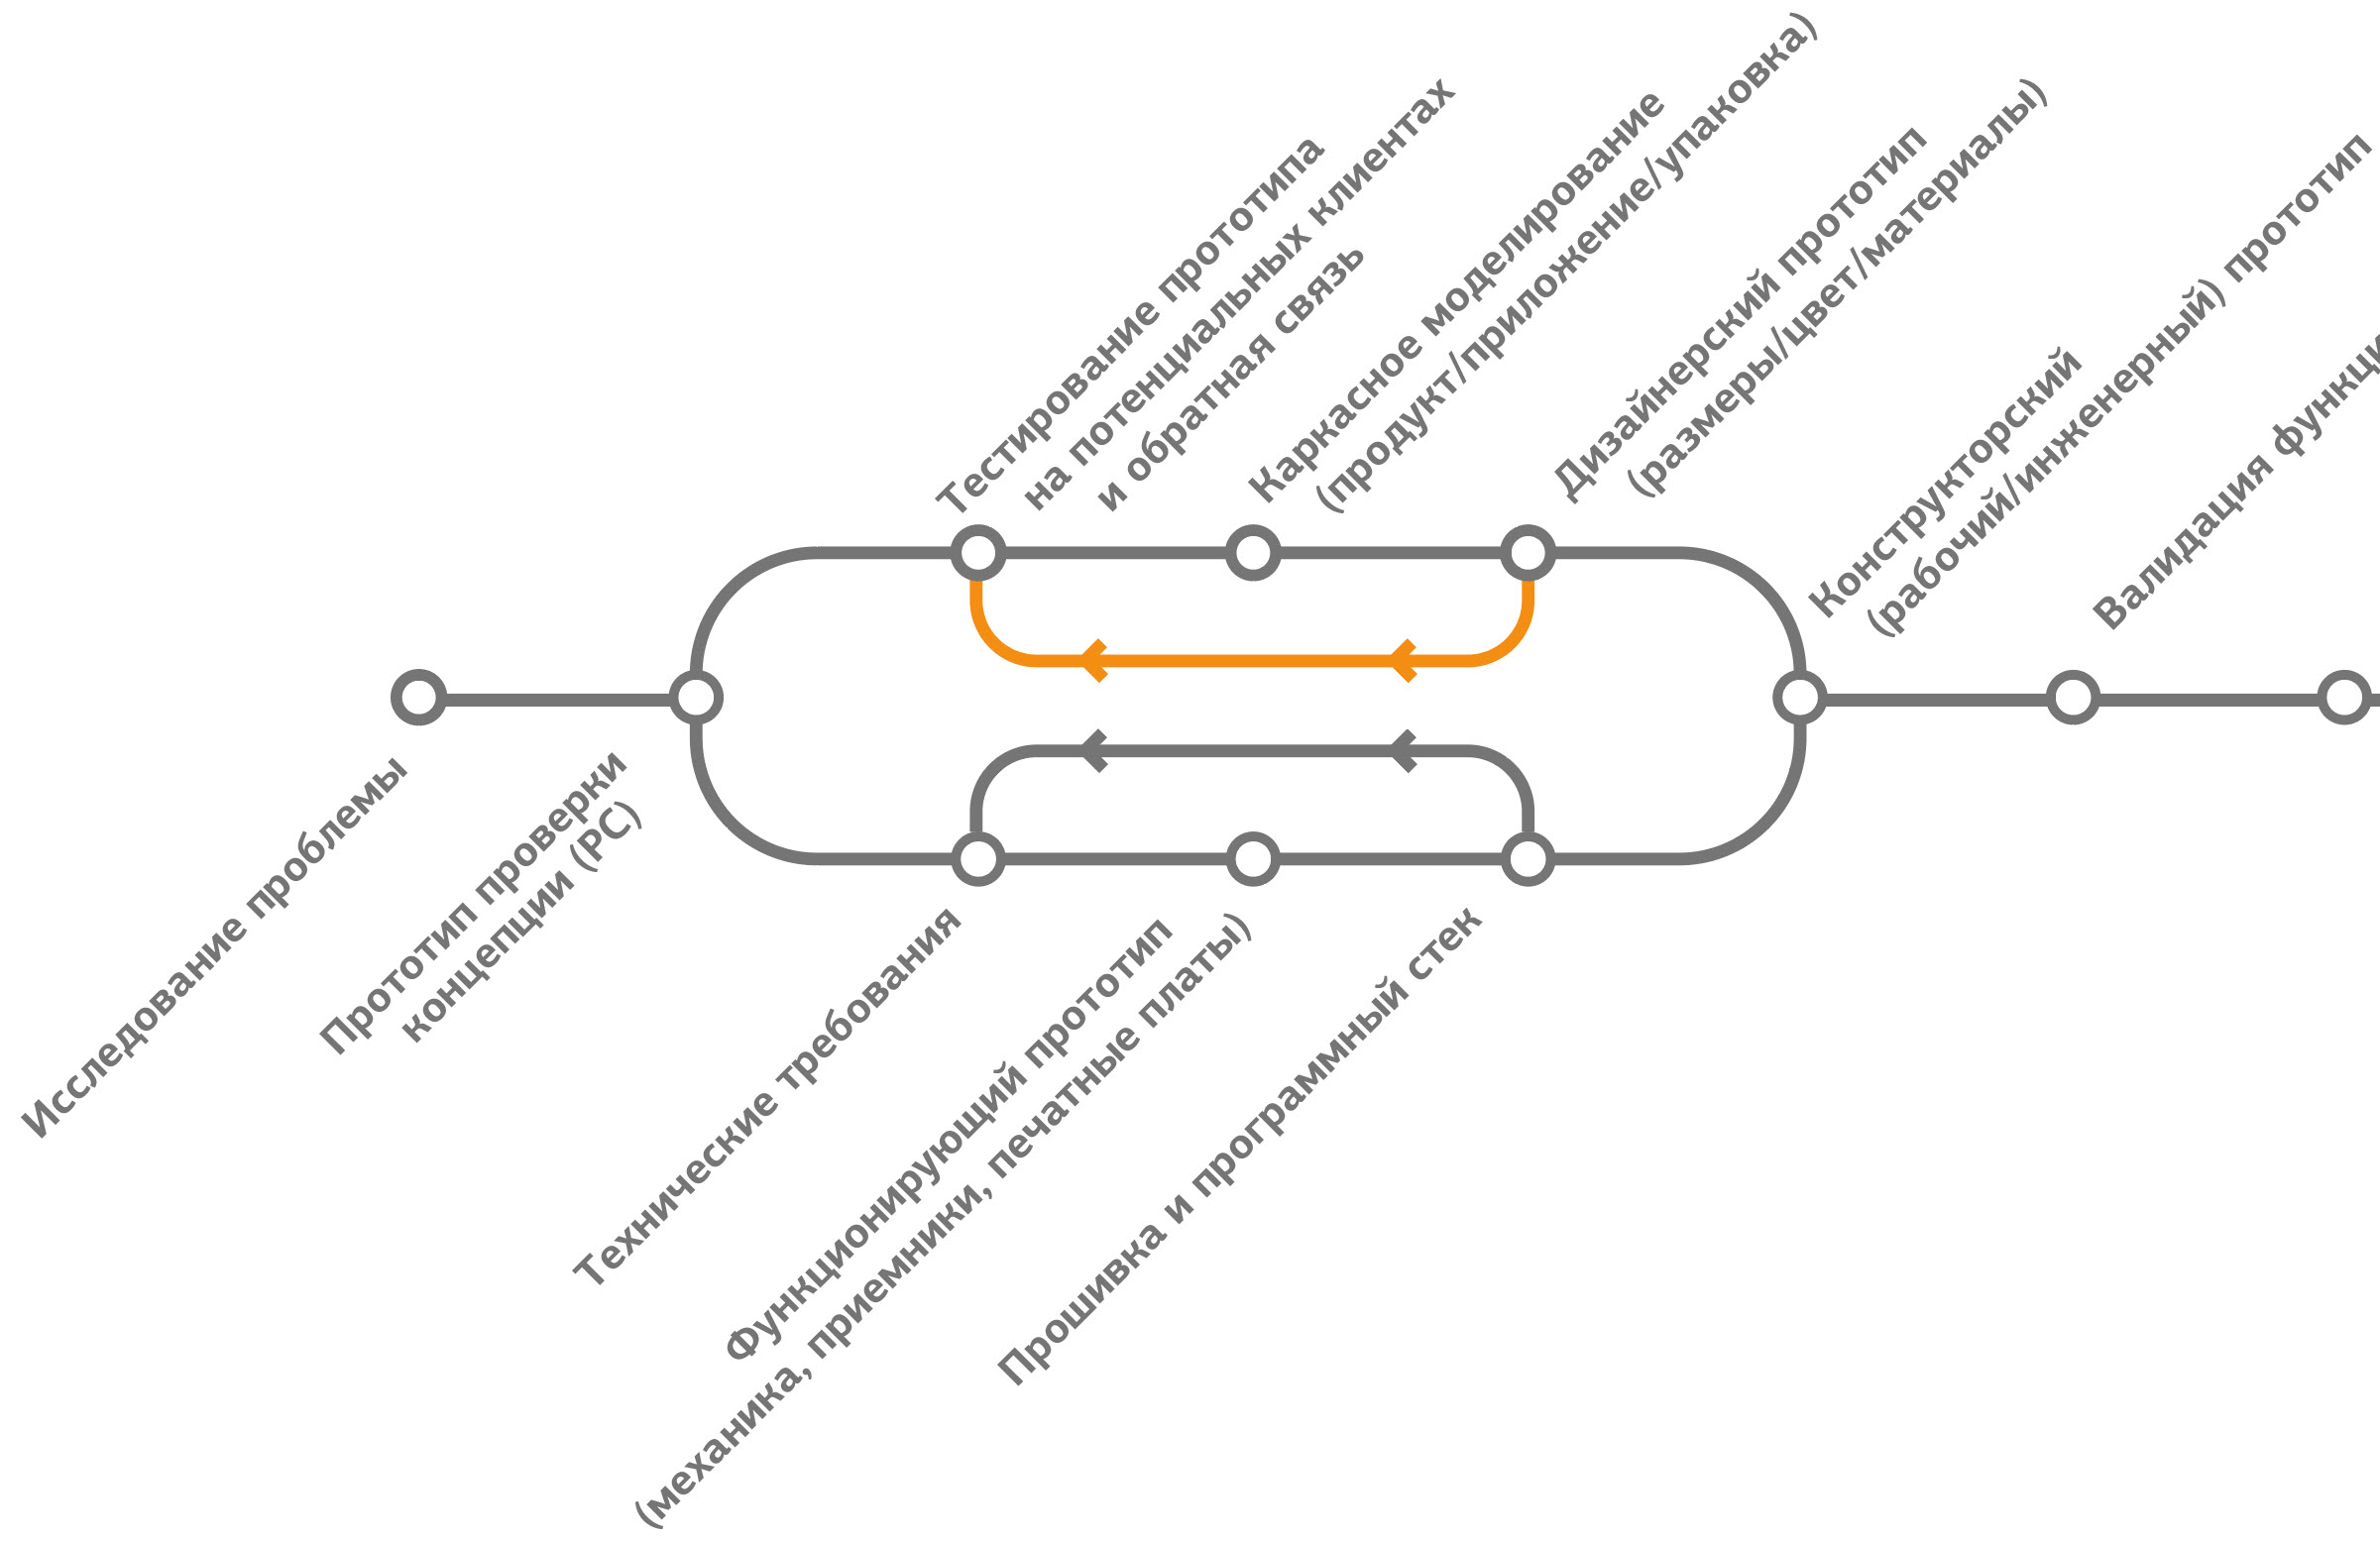
Figure 2.17. Do not forget about the iteration!
After the high-precision visual prototypes are produced, they are returned to customers to test many of the hypotheses made during the development. It is enough to do 2-3 iterations to get an excellent visual prototype.
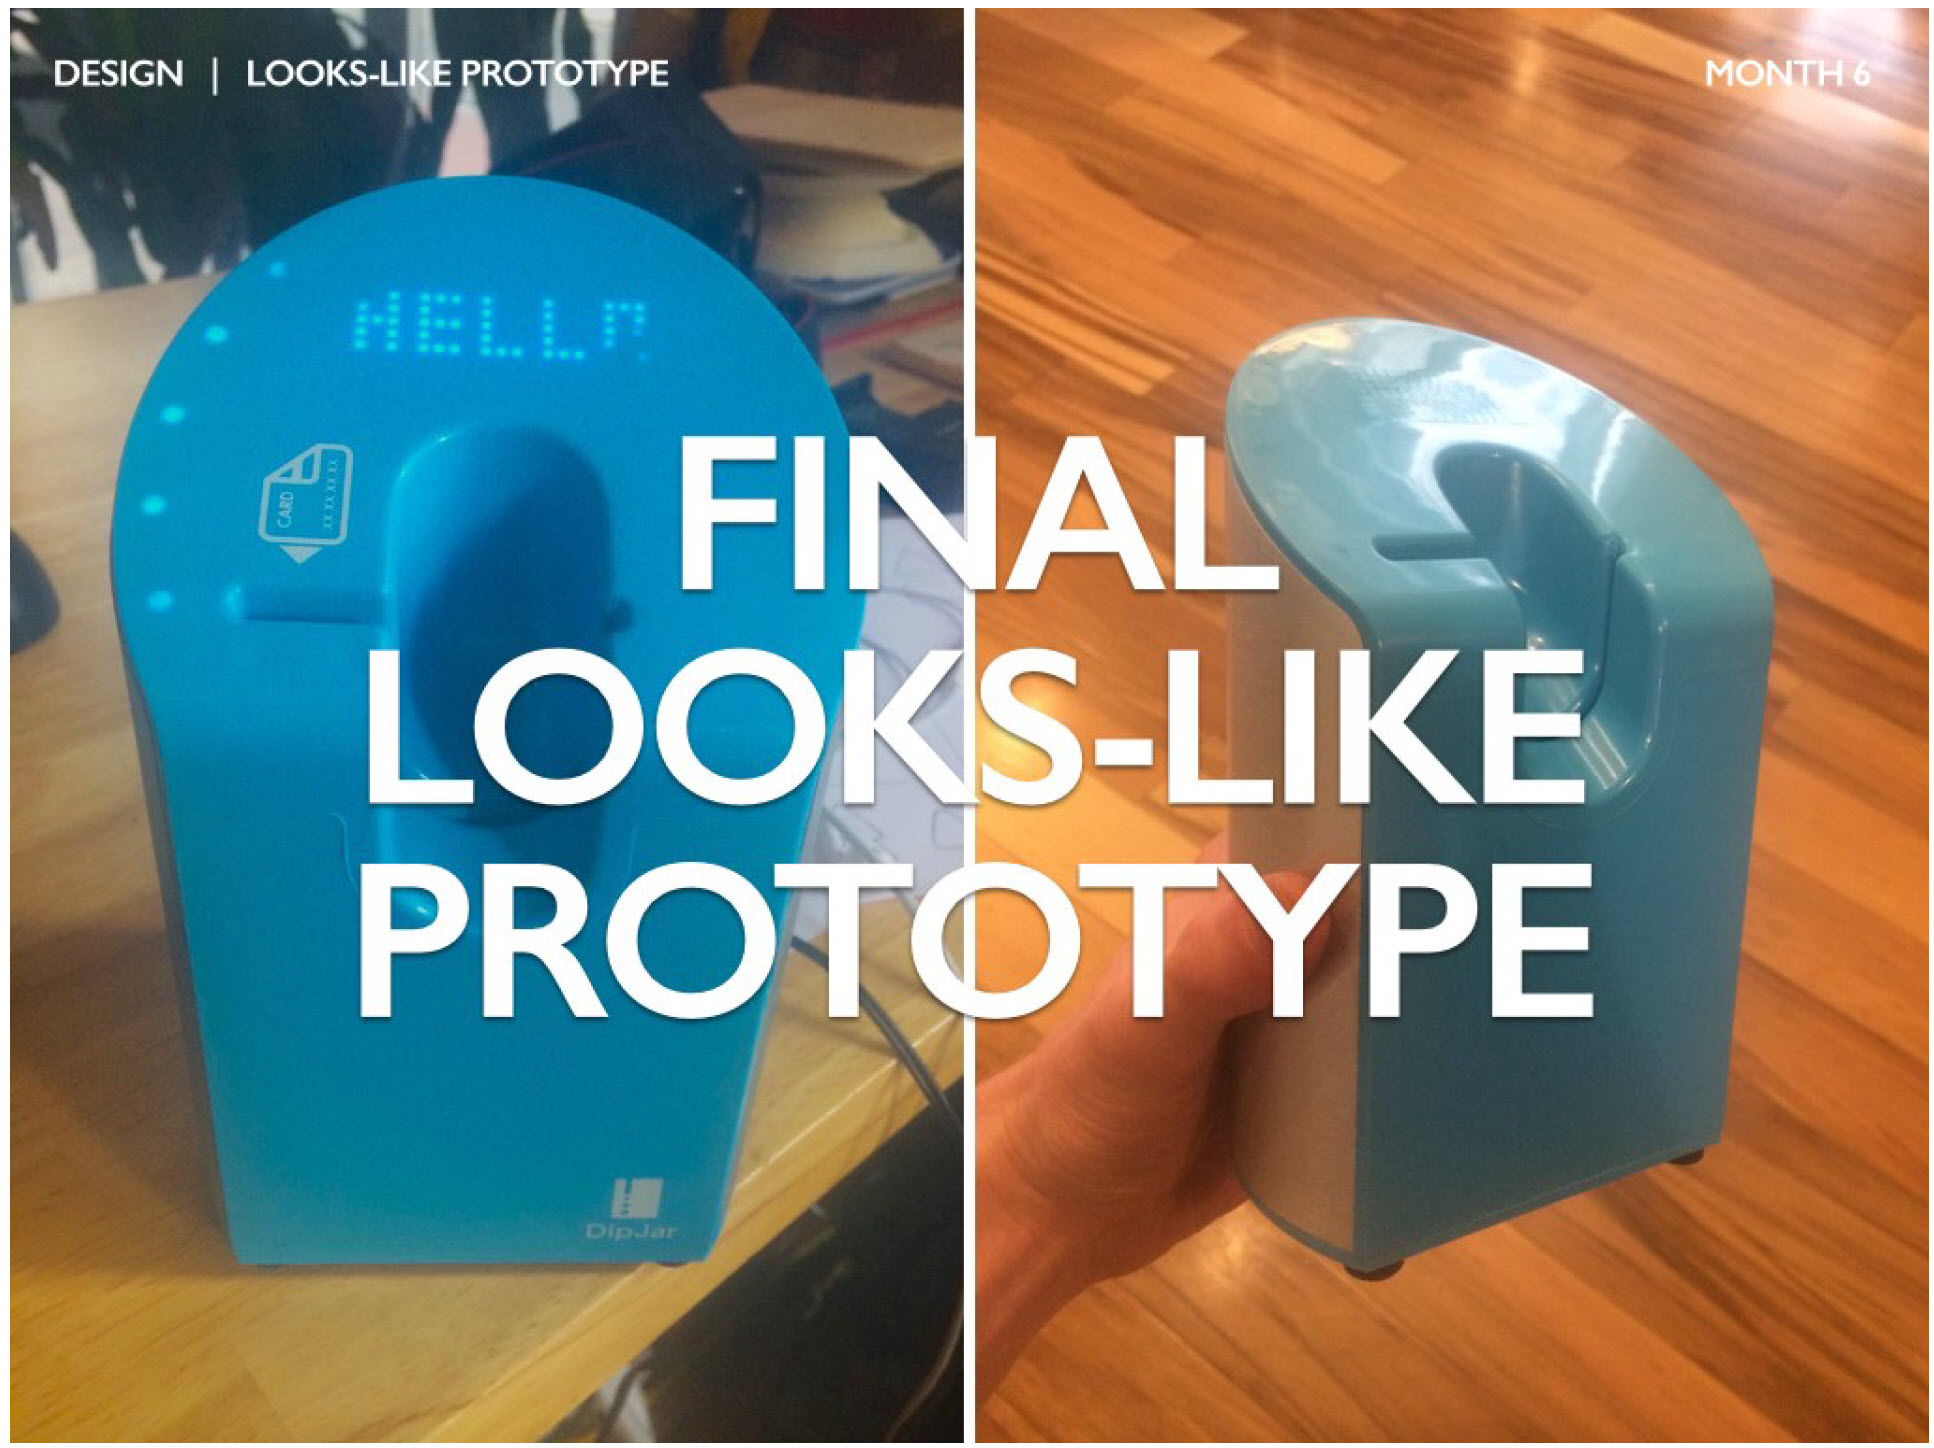
Figure 2.18. Final visually close to the product prototype
As soon as the design process is completed, you get a beautiful model showing the design intent, but so far without functionality. Customers and investors should be able to quickly understand your product by interacting with this model. But let's not forget the importance of making the product functional. To do this, dive into part 3: Construction.
You have read the second part of a series of four articles on the development of physical products. Be sure to read Part 1 : Forming an idea. Soon you will be able to proceed to Part 3: Design and Part 4: Validation. Posted by: Ben Einstein. The original translation is made by the teams of the FABLKA fab lab and the project ARM .
Part 2: Design
Each step at the design stage - customer study, wireframe modeling (wireframing, more in Russian ), a visual prototype - is needed to test hypotheses, how the product will look and how users will interact with it.
Figure 2.1 Product Design Stages
Customer research and feedback
')
Companies with a focus on customer feedback will be much more successful than those that sit endlessly in the studio and develop. This most often affects companies that produce material products. And if it is always useful to communicate with customers, it is extremely important at the early development stage.
Figure 2.2. Customer research and feedback
For DipJar, it was always very important to test and validate our hypotheses on clients. After creating a prototype concept verification ( PoC ), banks released into the real world.
Figure 2.3. Real customer photos taken at the early testing stage
One of my mentors once said: “Do you know how to understand how bad the design of your product is? See how people use it. ” The DipJar team constantly observed the same problem (the red arrow in the photo): users tried to insert the card incorrectly. It became clear that this is the main constructive restriction.
Recommendations for communicating with clients at this stage (as opposed to the problem research stage):
- Prepare a detailed conversation script and stick to it;
- Record in detail heard in writing or on a voice recorder;
- If possible, track the consumer loyalty index ( NPS , many companies prefer to do it later, and this is normal);
- Let users play with the product (when you are ready) without prior explanation or customization.
- Do not ask customers what they would change in the product: instead, observe how they use it;
- Do not pay much attention to details, for example, color and size - a matter of taste.
Frame Modeling
After a detailed feedback on the prototype of the concept check, it's time to do an iteration of the product design.
Figure 2.4. Frame Modeling Stage
The process of frame modeling begins with the creation of high-level sketches that fully describe the experience of using the product. We call this process storyboards.
Figure 2.5. Storyboard
The storyboard helps the founders of the company think through the entire path of the product. It is described with its help:
- Packaging: how will it look? How to describe a product in nine or less words on a package (average package size)? What is the size of the box? Where will it go in the store / on the shelf?
- Sales: where will the product be sold and how will people interact with it before buying? Will interactive displays help? Should customers know a lot about the product or will it be an impulsive purchase?
- Unpacking: what are the impressions from unpacking? It should be simple, understandable and require minimal effort.
- Setup: What should buyers do before the product is ready for first use? What is required, in addition to the accessories included? What happens if the product does not work (there is no wifi connection or the application is not installed on the smartphone)?
- First experience: how should the product be designed so that users can quickly start using it? How should the product be designed for users to return with positive emotions?
- Reuse or use in special cases: how to ensure that users constantly use the product and have fun? What happens with special use cases: connection / service loss, firmware update, no accessory, etc.?
- User support: what do users do in case of problems? If they are sent a replacement product, how will this happen?
- Service life: for most products, the service life expires after 18 or 24 months. How does this statistic compare with the client's path? Do you expect users to buy another product? How will they move from one product to the next?
Figure 2.6. Work with the future user of the application or web interface
Wireframe modeling is also useful if your product has a digital interface (embedded interface, web interface, smartphone app). These are usually simple black and white drawings, although digital tools can also be used. In the photo above (2.6) you can see the founder of the company (on the right). He polls a potential client (left) and makes notes while he is using the application on the paper "screen" of the smartphone. And although such testing of digital workflows may seem quite primitive, it is very effective.
By completing the wireframe modeling, you should have a detailed understanding of how users will interact with each part of your product.
Visual prototype.
A visual prototype is a model that represents the final, but not functioning product. As in the other stages, the creation of such a model (and associated frameworks) involves iterative interaction with users.
Figure 2.7. The stage of the visual prototype
Start with a wide range of ideas and work on the choice of several concepts that best meet the criteria of users.
Figure 2.8 Sketch
The design of a visual prototype almost always begins with the high-level sketches of the product itself (as opposed to the storyboard, which describes the experience of using the product). Most industrial designers first do a preliminary search for related forms and products. Designer DipJar studied a lot of other products and made sketches based on their forms.
Figure 2.9. Shape selection
As soon as you select a few draft concepts, you will need to check how they will look in the real world. In the photo you can see the draft forms of DipJar from foam base and tube. It takes several minutes to create each one, and as a result one can understand how the form will be perceived in the real world. I made these models of all sorts of things: from clay and Lego to foam plastic and toothpicks. There is one important rule: make models quickly and cheaply.
Figure 2.10. Sizing
After selecting the main form, you need to work on the size of the model and the scale of the individual parts. Usually there are two or three parameters that are important for the “right feel” of the product. In the case of the DipJar, it was the height of the can itself, the diameter of the front part and the geometry of the slot for a finger. For this, more accurate models are made with small differences in the parameters (of cardboard and foam).
Figure 2.11. Understanding of user experience
In parallel with form development, it often becomes apparent that certain features of user behavior (UX) need to be clarified. The DipJar team discovered that the likelihood of being generous increases when the tip leaves ahead of them in line. We found that the sound and light signal is a very effective way of attracting people in the queue and thereby increasing the frequency and size of the tip. As a result, we have done a lot to choose the most successful arrangement of LEDs and to design communications using light.
Figure 2.12. Design Language
Each product has a “design language”, through which there is a visual or empirical communication with the user. For DipJar it was important to quickly convey to the user how to insert a card. The team spent a lot of time optimizing the logo of the card (photo on the left) so that users can clearly understand how to insert the card correctly.
The DipJar team also worked on optimizing LED backlight patterns. The red arrow shows on the LED on the edge of the front, which playfully signal the manifestation of an act of generosity. The blue arrow indicates the result of a long discussion of the team - the ability of bank owners to change the amounts collected. Custom digital LED-display allows the owner DipJar easily change the size of the tip.
Figure 2.13. Colors, materials, finish
In order to quickly determine the final appearance of the product, designers choose colors, materials and finishes (colors, materials, finishes - CMF). This is often done digitally (as shown above), and then transformed into physical samples and models. DipJar tested various styles of metal cases, polishes and colors of plastics.
Figure 2.14. Final renders
The result of the initial selection of CMF is a high-quality digital product model. It typically includes all of the elements from the preceding steps: shape, size, symbols, user experience (UX), backlight (LED), colors, textures, and materials. Such high-quality visualizations, renders, are also the basis for virtually all marketing materials (even Apple’s marketing gods use renders for everything).
Figure 2.15. Web application design
If your product has a digital interface, creating more accurate layouts will be extremely useful for determining your product experience. DipJar's main digital asset is a web-based management dashboard for store owners and charitable organizations. Plans are also to launch a mobile app for employees and tipping people.
Figure 2.16. Choice of packaging configuration
An important stage that is easily forgotten at the design stage is packaging. Even such a relatively simple product, like DipJar, went through iterations in packaging design. In the photo on the left you can see the first version of the package; in the photo on the right - the more spectacular and elegant packaging of the second generation. Design optimization is an important part in creating a positive user experience and material specification.
Figure 2.17. Do not forget about the iteration!
After the high-precision visual prototypes are produced, they are returned to customers to test many of the hypotheses made during the development. It is enough to do 2-3 iterations to get an excellent visual prototype.
Figure 2.18. Final visually close to the product prototype
As soon as the design process is completed, you get a beautiful model showing the design intent, but so far without functionality. Customers and investors should be able to quickly understand your product by interacting with this model. But let's not forget the importance of making the product functional. To do this, dive into part 3: Construction.
You have read the second part of a series of four articles on the development of physical products. Be sure to read Part 1 : Forming an idea. Soon you will be able to proceed to Part 3: Design and Part 4: Validation. Posted by: Ben Einstein. The original translation is made by the teams of the FABLKA fab lab and the project ARM .
Source: https://habr.com/ru/post/449790/
All Articles