Navigation for Android using the Navigation Architecture Component: A Walkthrough
Let's try, using the official guidelines and code examples , to build a working navigation system for the future multi-screen application in accordance with the standards of the Navigation Architecture Component. The article includes the following sections:
Part 1. Preparatory work
- 1.1. Creating a project
- 1.2. Dependencies (Dependencies)
- 1.3. Pages: creating fragments
- 1.4. Addresses: resource file of type "Navigation"
- 1.5. Frame: NavHostFragment widget
Part 2. Navigation elements
- 2.1. Navigation with buttons
- 2.2. Side menu (Drawer)
- 2.3. Toolbar: Toolbar instead of ActionBar
- 2.4. Bottom menu (Bottom Navigation)
- 2.5. Pop-up menu (Overflow Menu)
Summary of findings and a link to github
We will need basic knowledge of Kotlin , IDE Android Studio version not lower than 3.3, a smartphone or an emulator with API version 14 or higher.
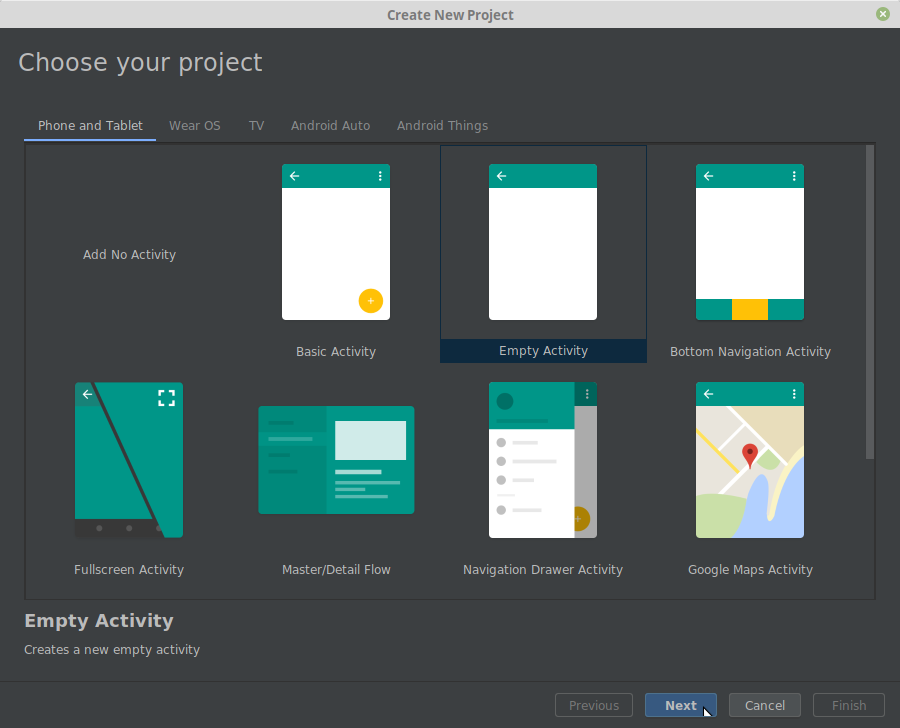
Create a new project in Android Studio called “Navigation2019”.
')

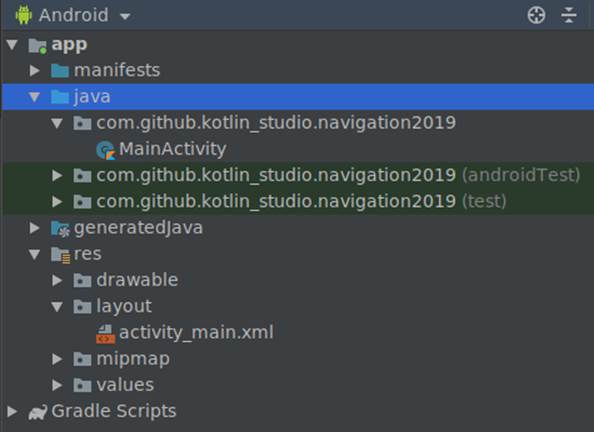
The IDE will create the main activity file “MainActivity.kt” and its layout (template) “activity_main.xml”.
Open the module's “build.gradle” file (not the project, but the module) and add the necessary dependencies to the “dependencies” block:

We used libraries version 1.0.0, but in the future the situation may change. You can check which versions of libraries are relevant here .
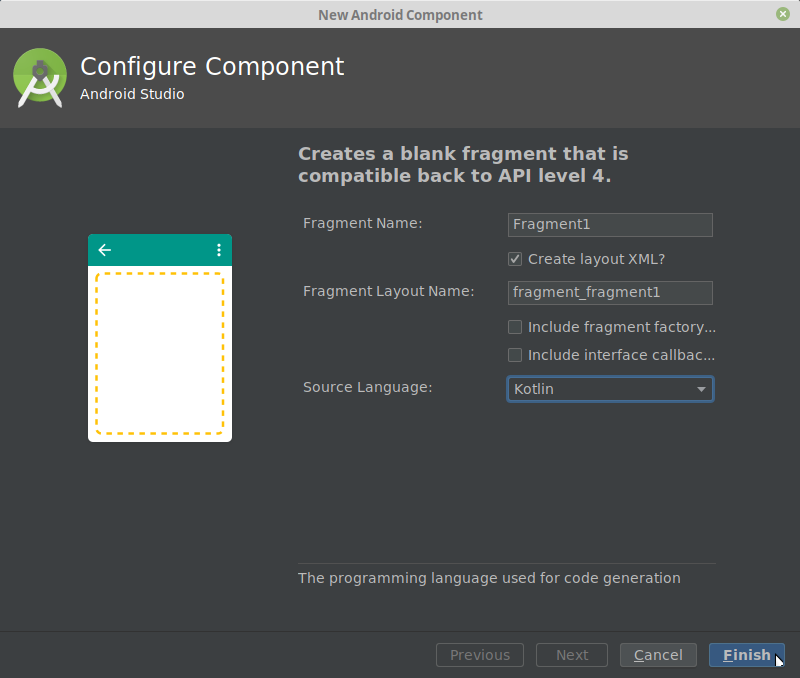
Fragments are the “pages” of our future application. Clicking the right button on the directory with the class files, the command “New -> Fragment -> Fragment (Blank)” will create “Fragment1”.

The IDE will create a kt-file with a fragment class and an xml file with a fragment layout. In the same way, we will generate three more fragments (“Fragment2”, “Fragment3”, “Fragment4”). We will use them to create four different types of navigation through the application.
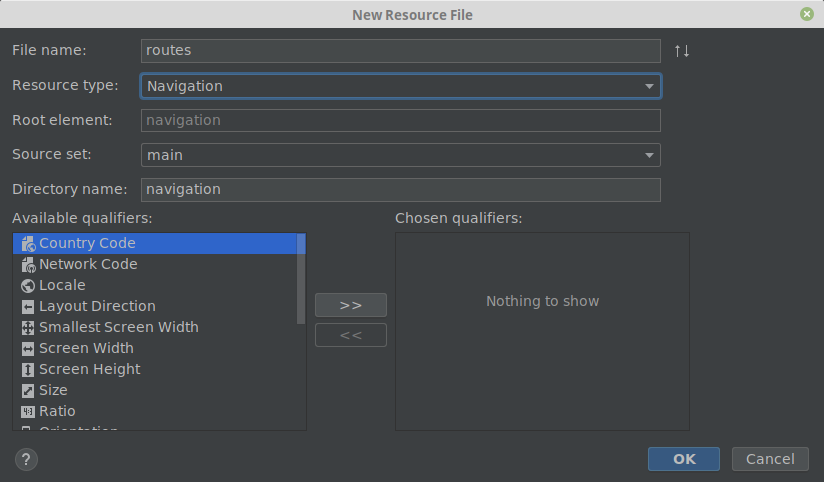
By right-clicking on the “res” folder, we will create a resource file of the type “Navigation” with the name “routes.xml” (“routes”).

Open the created file and add our fragments to the navigation scheme using the “New Destination” button.


Catching the mouse over a point in the middle of the right side of the fragment, connect the fragments with each other as they should be linked in the application.
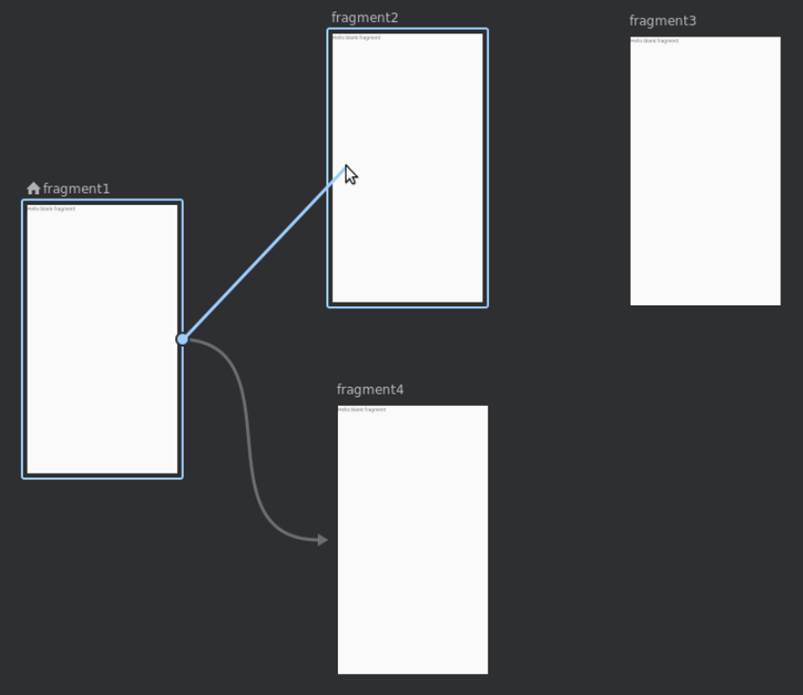
In accordance with their names, our fragments will receive identifiers (id) "fragment1", "fragment2", "fragment3", "fragment4". These are the “addresses” that will be used when specifying destinations in instructions to the navigation controller.
In addition to the “id”, each tag “fragment” contains three more parameters: “name”, “label” and “layout”. The parameters “name” and “layout” do not interest us now. The only thing that needs to be edited in the “routes.xml” file is the names ("label") of the fragments. Let's replace them with “Fragment №1”, “Fragment №2”, “Fragment №3” and “Fragment №4”.

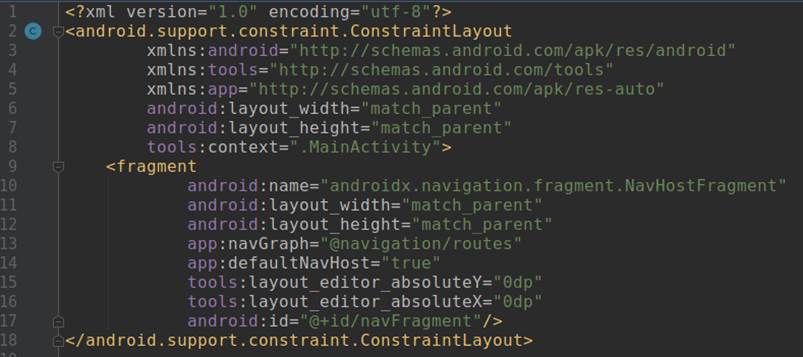
Open the res / layout / activity_main.xml layout file and remove the Hello World! Text widget, we will not need it. In the Palette, select the Containers section and drag the NavHostFragment widget from there to the activity layout (specifying our routes file as the source of information for it). It will act as a frame in which various fragments of the application will be displayed.


Change the fragment id to “navFragment”. The main activity layout code will now look like this:
This preparatory work is completed, you can now proceed directly to the creation of navigation elements.
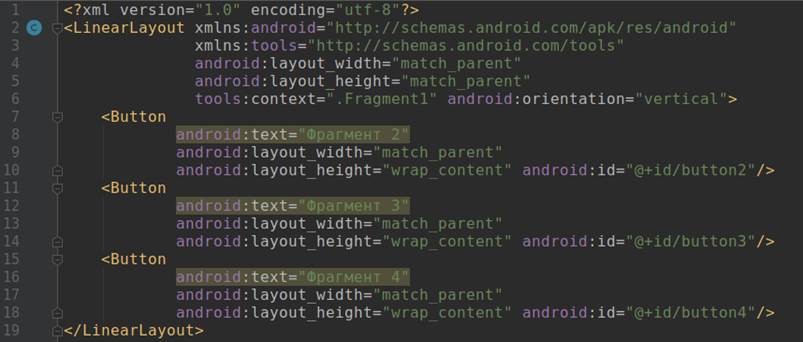
Open the layout of the first fragment (“fragment_fragment1.xml”). Delete an unnecessary text widget, change the layout type from “FrameLayout” to linear vertical and add three buttons with identifiers “button2”, “button3”, “button4” and corresponding names “Fragment 2”, “Fragment 3”, “Fragment 4”.
In the fragment's onCreateView method, we will get a link to the navigation controller (NavController object) and program the behavior when the buttons are pressed: using the setOnClickListener button, we will create a button listener for each button, which, when clicked, will send the address (id) of the button the destination along with the command navigate to the specified address.

Check out how our buttons work.
One button - one line of code - and clicking on the button moves us to the specified fragment. Simple, isn't it?
But without the menu is not very convenient, you have to use the "Back" button to return to the start screen.
In the “res / menu” directory we will create the resource file menu “drawer_menu.xml”. Add menu items to it, each of which is an “item” tag with “id” parameters (should correspond to that in the navigation column “routes.xml”, “title” (the title, it can be different), “icon” (we use the same picture for all items, but, of course, they can be different), etc. Our menu will look like this:

Open the activity layout file “activity_main.xml”.
After the first tag (xml version ...) we add the beginning of the “DrawerLayout” tag.

At the end of the file, add the “NavigationView” widget and the end of the “DrawerLayout” tag.

Open the “MainActivity.kt” file and in the “onCreate” method we get a link to the “navController” (in activity this looks a bit more complicated than it was in the fragments).

Then turn on the side menu:

The class code now looks like this:
Now the menu appears in response to the swipe from the left edge of the screen:
It would be nice to add a button on the left-top to call the side menu, right?
The default ActionBar, as the official guide recommends , is replaceable with the Toolbar.
To disable the existing ActionBar, in the file “res / values / styles.xml” we find the line
and replace “DarkActionBar” with “NoActionBar”.
Great, we have disabled ActionBar.

Now add a toolbar. Open the file “activity_main.xml”, in the Palette, select the Containers section and drag the Toolbar widget from there to the activity layout. The toolbar has been added, but it is still empty.

Go to the activity file "MainActivity.kt". To display the button and the name of the current fragment on the Toolbar, add the following lines to the onCreate () method:

The toolbar now displays the name of the fragment and the Up button (Up) for nested fragments.
The “up” button in android is for some reason indicated by an arrow to the left:

In order to display the hamburger button on the application start screen, we need to add the “drawerLayout” parameter to the toolbar configuration, which contains the widget DrawerLayout id from the file “activity_main.xml”.


Clicking this button displays the side menu.
Sometimes it is necessary to focus the user's attention on certain actions, and the bottom menu helps to do this effectively. Add it to the third fragment.
First, create a resource file menu "bottom_nav_menu.xml" with a couple of links. Then, open the fragment 3 model (file “fragment_fragment3.xml”) and drag the “BottomNavigationView” widget onto it, while agreeing with the IDE's suggestion to add the com.android.support:design library to the dependencies.

If we created the lower menu not for one fragment, but for all at once, then the following code would be included in the “onCreate” class of the activity class (the “MainActivity.kt” file):

Of course, the “BottomNavigationView” widget in this case would have to be placed in the layout of the activity, rather than a fragment.
But since we only need this menu in fragment No. 3, we will edit the fragment class (the file “Fragment3.kt”), and the code will look a bit more complicated:

As a result, we get the bottom menu, which will be displayed only in the 3rd fragment.

The same, but with other links, will do in the 4th fragment.
Another type of menu is the pop-up menu, which is displayed when you click on the button (three vertically arranged points) in the upper right corner of the screen.

Create a resource file menu "top_right_menu.xml" with the necessary links.
In the “MainActivity” file, in the “onCreate” method, before the “toolBar.setupWithNavController ...”, add the line “setSupportActionBar (toolBar)”.

And further in the same class we will redefine two methods:

Pressing the upper right button now displays a popup menu:

Obviously, the Navigation Architecture Component greatly facilitates the work of the developer. Challenges in the past are now solved with a few lines of code.
Since the main purpose of this publication was to highlight the basic algorithms for creating navigation in an android application, many implementation details were deliberately left behind the scenes.
My work schedule usually does not allow to support discussions, but your comments will in any case be useful for site visitors and therefore are always welcome.
Project files are here .
Part 1. Preparatory work
- 1.1. Creating a project
- 1.2. Dependencies (Dependencies)
- 1.3. Pages: creating fragments
- 1.4. Addresses: resource file of type "Navigation"
- 1.5. Frame: NavHostFragment widget
Part 2. Navigation elements
- 2.1. Navigation with buttons
- 2.2. Side menu (Drawer)
- 2.3. Toolbar: Toolbar instead of ActionBar
- 2.4. Bottom menu (Bottom Navigation)
- 2.5. Pop-up menu (Overflow Menu)
Summary of findings and a link to github
Part 1. Preparatory work
1.1. Creating a project
We will need basic knowledge of Kotlin , IDE Android Studio version not lower than 3.3, a smartphone or an emulator with API version 14 or higher.
Create a new project in Android Studio called “Navigation2019”.
')
The IDE will create the main activity file “MainActivity.kt” and its layout (template) “activity_main.xml”.
1.2. Dependencies (Dependencies)
Open the module's “build.gradle” file (not the project, but the module) and add the necessary dependencies to the “dependencies” block:
def nav_version = «1.0.0» implementation «android.arch.navigation:navigation-fragment-ktx:$nav_version» implementation «android.arch.navigation:navigation-ui-ktx:$nav_version» We used libraries version 1.0.0, but in the future the situation may change. You can check which versions of libraries are relevant here .
1.3. Pages: creating fragments
Fragments are the “pages” of our future application. Clicking the right button on the directory with the class files, the command “New -> Fragment -> Fragment (Blank)” will create “Fragment1”.
The IDE will create a kt-file with a fragment class and an xml file with a fragment layout. In the same way, we will generate three more fragments (“Fragment2”, “Fragment3”, “Fragment4”). We will use them to create four different types of navigation through the application.
1.4. Addresses: resource file of type "Navigation"
By right-clicking on the “res” folder, we will create a resource file of the type “Navigation” with the name “routes.xml” (“routes”).
Open the created file and add our fragments to the navigation scheme using the “New Destination” button.
Catching the mouse over a point in the middle of the right side of the fragment, connect the fragments with each other as they should be linked in the application.
In accordance with their names, our fragments will receive identifiers (id) "fragment1", "fragment2", "fragment3", "fragment4". These are the “addresses” that will be used when specifying destinations in instructions to the navigation controller.
In addition to the “id”, each tag “fragment” contains three more parameters: “name”, “label” and “layout”. The parameters “name” and “layout” do not interest us now. The only thing that needs to be edited in the “routes.xml” file is the names ("label") of the fragments. Let's replace them with “Fragment №1”, “Fragment №2”, “Fragment №3” and “Fragment №4”.
1.5. Frame: NavHostFragment widget
Open the res / layout / activity_main.xml layout file and remove the Hello World! Text widget, we will not need it. In the Palette, select the Containers section and drag the NavHostFragment widget from there to the activity layout (specifying our routes file as the source of information for it). It will act as a frame in which various fragments of the application will be displayed.
Change the fragment id to “navFragment”. The main activity layout code will now look like this:
This preparatory work is completed, you can now proceed directly to the creation of navigation elements.
Part 2. Navigation elements
2.1. Navigation with buttons
Open the layout of the first fragment (“fragment_fragment1.xml”). Delete an unnecessary text widget, change the layout type from “FrameLayout” to linear vertical and add three buttons with identifiers “button2”, “button3”, “button4” and corresponding names “Fragment 2”, “Fragment 3”, “Fragment 4”.
In the fragment's onCreateView method, we will get a link to the navigation controller (NavController object) and program the behavior when the buttons are pressed: using the setOnClickListener button, we will create a button listener for each button, which, when clicked, will send the address (id) of the button the destination along with the command navigate to the specified address.
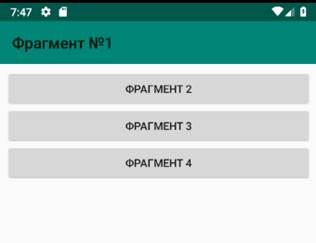
Check out how our buttons work.
One button - one line of code - and clicking on the button moves us to the specified fragment. Simple, isn't it?
But without the menu is not very convenient, you have to use the "Back" button to return to the start screen.
2.2. Side menu (drawer)
2.2.1. Menu resource file
In the “res / menu” directory we will create the resource file menu “drawer_menu.xml”. Add menu items to it, each of which is an “item” tag with “id” parameters (should correspond to that in the navigation column “routes.xml”, “title” (the title, it can be different), “icon” (we use the same picture for all items, but, of course, they can be different), etc. Our menu will look like this:
2.2.2. The DrawerLayout template and the NavigationView widget in the activity layout
Open the activity layout file “activity_main.xml”.
After the first tag (xml version ...) we add the beginning of the “DrawerLayout” tag.
At the end of the file, add the “NavigationView” widget and the end of the “DrawerLayout” tag.
2.2.3. Connecting the side menu in the activity class
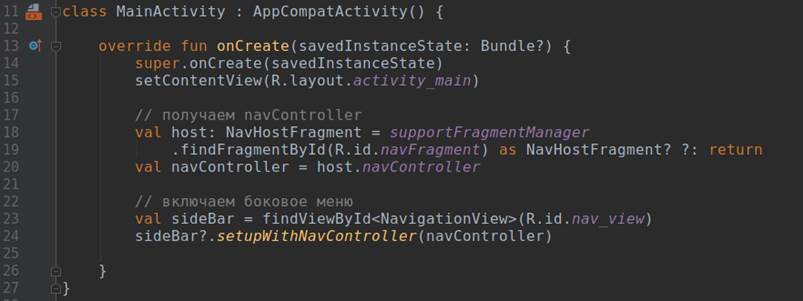
Open the “MainActivity.kt” file and in the “onCreate” method we get a link to the “navController” (in activity this looks a bit more complicated than it was in the fragments).
Then turn on the side menu:
The class code now looks like this:
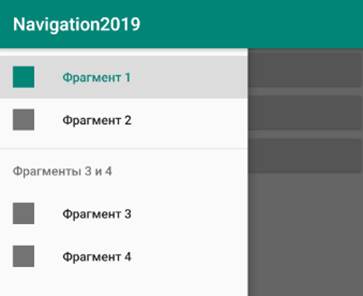
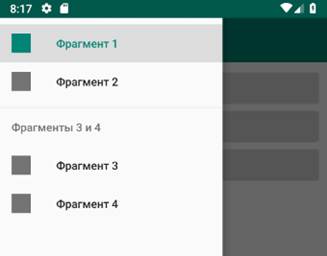
Now the menu appears in response to the swipe from the left edge of the screen:
It would be nice to add a button on the left-top to call the side menu, right?
2.3. Button and fragment name on the toolbar
The default ActionBar, as the official guide recommends , is replaceable with the Toolbar.
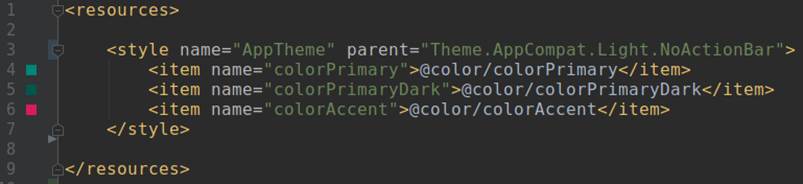
To disable the existing ActionBar, in the file “res / values / styles.xml” we find the line
<style name="AppTheme" parent="Theme.AppCompat.Light.DarkActionBar"> and replace “DarkActionBar” with “NoActionBar”.
Great, we have disabled ActionBar.
Now add a toolbar. Open the file “activity_main.xml”, in the Palette, select the Containers section and drag the Toolbar widget from there to the activity layout. The toolbar has been added, but it is still empty.
Go to the activity file "MainActivity.kt". To display the button and the name of the current fragment on the Toolbar, add the following lines to the onCreate () method:
The toolbar now displays the name of the fragment and the Up button (Up) for nested fragments.
In order to display the hamburger button on the application start screen, we need to add the “drawerLayout” parameter to the toolbar configuration, which contains the widget DrawerLayout id from the file “activity_main.xml”.
Clicking this button displays the side menu.
2.4. Bottom menu (Bottom Navigation)
Sometimes it is necessary to focus the user's attention on certain actions, and the bottom menu helps to do this effectively. Add it to the third fragment.
First, create a resource file menu "bottom_nav_menu.xml" with a couple of links. Then, open the fragment 3 model (file “fragment_fragment3.xml”) and drag the “BottomNavigationView” widget onto it, while agreeing with the IDE's suggestion to add the com.android.support:design library to the dependencies.
If we created the lower menu not for one fragment, but for all at once, then the following code would be included in the “onCreate” class of the activity class (the “MainActivity.kt” file):
Of course, the “BottomNavigationView” widget in this case would have to be placed in the layout of the activity, rather than a fragment.
But since we only need this menu in fragment No. 3, we will edit the fragment class (the file “Fragment3.kt”), and the code will look a bit more complicated:
As a result, we get the bottom menu, which will be displayed only in the 3rd fragment.
The same, but with other links, will do in the 4th fragment.
2.5. Pop-up menu (Overflow Menu)
Another type of menu is the pop-up menu, which is displayed when you click on the button (three vertically arranged points) in the upper right corner of the screen.
Create a resource file menu "top_right_menu.xml" with the necessary links.
In the “MainActivity” file, in the “onCreate” method, before the “toolBar.setupWithNavController ...”, add the line “setSupportActionBar (toolBar)”.
And further in the same class we will redefine two methods:
Pressing the upper right button now displays a popup menu:
Summary of findings and a link to github
Obviously, the Navigation Architecture Component greatly facilitates the work of the developer. Challenges in the past are now solved with a few lines of code.
Since the main purpose of this publication was to highlight the basic algorithms for creating navigation in an android application, many implementation details were deliberately left behind the scenes.
My work schedule usually does not allow to support discussions, but your comments will in any case be useful for site visitors and therefore are always welcome.
Project files are here .
Source: https://habr.com/ru/post/449776/
All Articles