Development and testing process with Docker and Gitlab CI
I suggest to get acquainted with the transcript of the report by Alexander Sigachev from Inventos "The process of development and testing with Docker + Gitlab CI"
Those who are just starting to implement the development and testing process based on Docker + Gitlab CI are often asked basic questions. Where to begin? How to organize? How to test?
This report is good for being structured about development and testing using Docker and Gitlab CI. The 2017 report itself. I think that from this report you can learn the basics, methodology, idea, experience of use.
Who cares, I ask under the cat.
My name is Alexander Sigachev. I work in the company Inventos. I will tell you about my experience in using Docker and how we gradually introduce it on projects in the company.
Topic: Development process using Docker and Gitlab CI.
This is my second Docker talk. At the time of the first report, we used Docker only in Development on development machines. The number of employees who used Docker was about 2-3 people. Gradually, experience was gained and we advanced a little further. Link to our first report .
What will be in this report? We will share our experience on what rakes we have collected, what problems we have solved. Not everywhere it was beautiful, but allowed to move on.
Our motto is: make sure everything your hands reach.
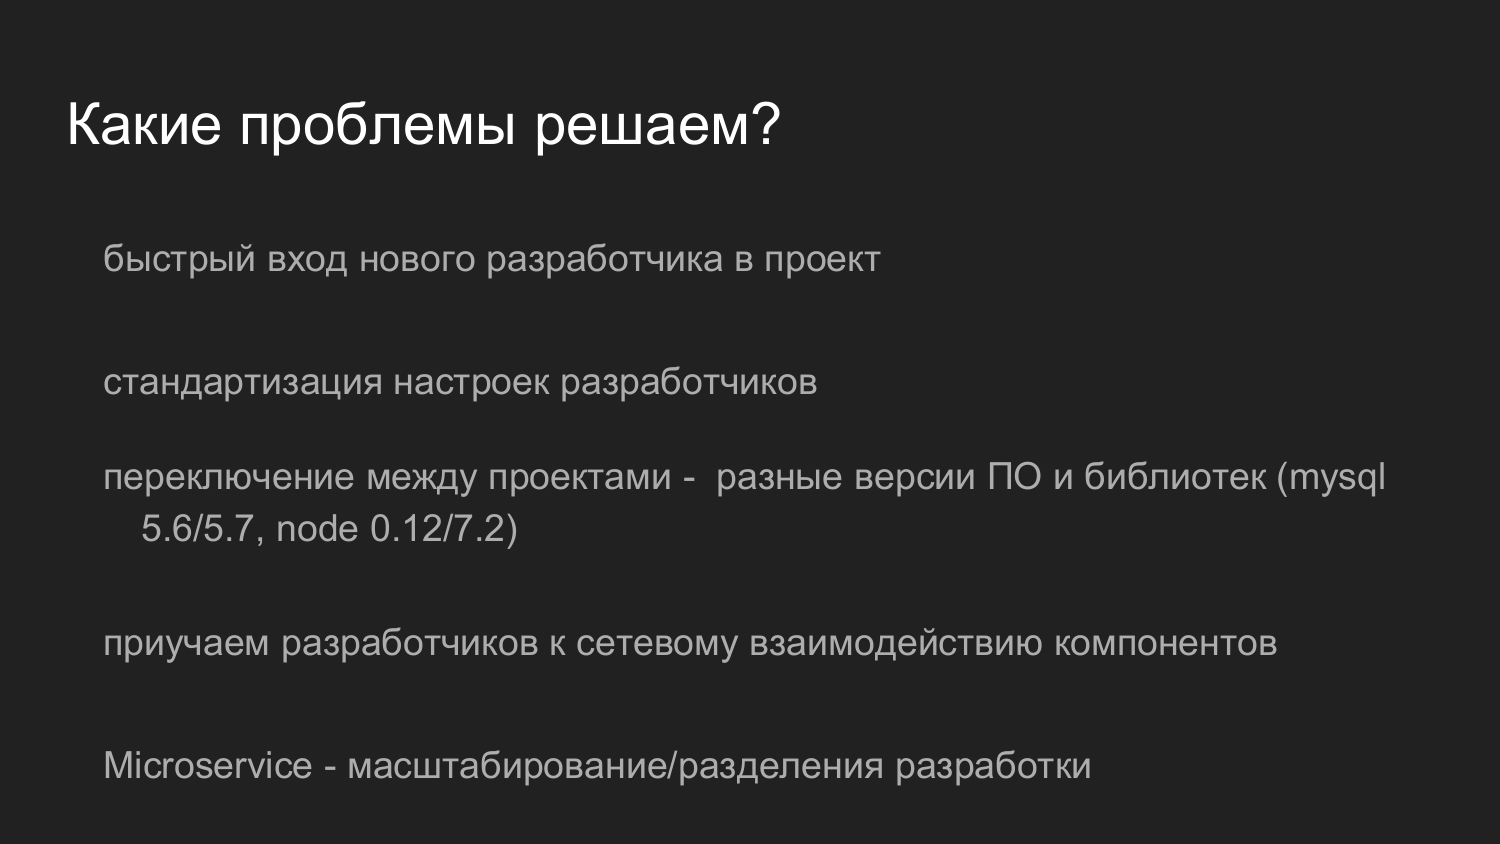
What problems we solve?
When there are several teams in a company, the programmer is a shared resource. There are stages when a programmer is pulled from one project and given for some time to another project.
In order for the programmer to quickly understand it, he needs to download the source code of the project and launch the environment as quickly as possible, which will allow him to continue to progress in solving the tasks of this project.
Usually, if you start from scratch, there is little documentation in the project. Information on how to configure, there is only the old-timers. On their own, employees set up their workplace in one or two days. To speed this up, we applied Docker.
The next reason is the standardization of settings in Development. In my experience, developers always take the initiative. In every fifth case, the custom domain is entered, for example, vasya.dev. Nearby sits a neighbor Peter, whose domain is petya.dev. They develop a website or some component of the system using this domain name.
When the system grows and these domain names begin to fall into the configuration, then there is a conflict Development environments and rewritten the site path.
The same thing happens with the database settings. Someone does not bother with security and works with an empty root password. Someone at the installation stage of MySQL required a password and the password turned out to be one 123. It often happens that the database config has been constantly changing depending on the developer’s commit. Someone corrected, someone did not correct the config. There were tricks when we carried out some test config in .gitignore and each developer had to install a database. This complicated the start process. It is necessary, among other things, to remember about the database. The database must be initiated, it is necessary to prescribe a password, it is necessary to prescribe the user, create a nameplate and so on.
Another problem is different versions of libraries. It often happens that the developer works with different projects. There is a Legacy project that started five years ago (from 2017 - note ed.). At the time of start started with MySQL 5.5. There are also modern projects, where we are trying to implement more modern versions of MySQL, for example, 5.7 or older (in 2017, note. Ed.)
Anyone working with MySQL knows that these libraries are pulling dependencies. It is difficult to run 2 bases together. At least, old customers are problematic to connect to the new database. This in turn causes several problems.
The next problem is when the developer is working on the local machine, he uses local resources, local files, local RAM. All interaction at the time of developing a solution to a problem is performed within the framework of the fact that it works on one machine. An example would be when we have backend servers in Production 3, and the developer saves the files to the root directory and from there nginx takes the files to answer the request. When such code gets into Production, it turns out that the file is present on one of the 3 servers.
Now the direction of microservices is developing. When we divide our large applications into some small components that interact with each other. This allows you to select technologies for a specific stack of tasks. It also allows you to divide the work and area of responsibility between the developers.
Frondend-developer, developing on JS, practically does not affect Backend. The backend developer in turn develops, in our case, Ruby on Rails and does not interfere with Frondend. The interaction is performed using the API.
As a bonus, with the help of Docker we managed to reclaim resources on Staging. Each project, due to its specificity, required certain settings. Physically, it was necessary to allocate either according to a virtual server and set them up separately, or to share some kind of variable environment and the projects could, depending on the version of the libraries, influence each other.
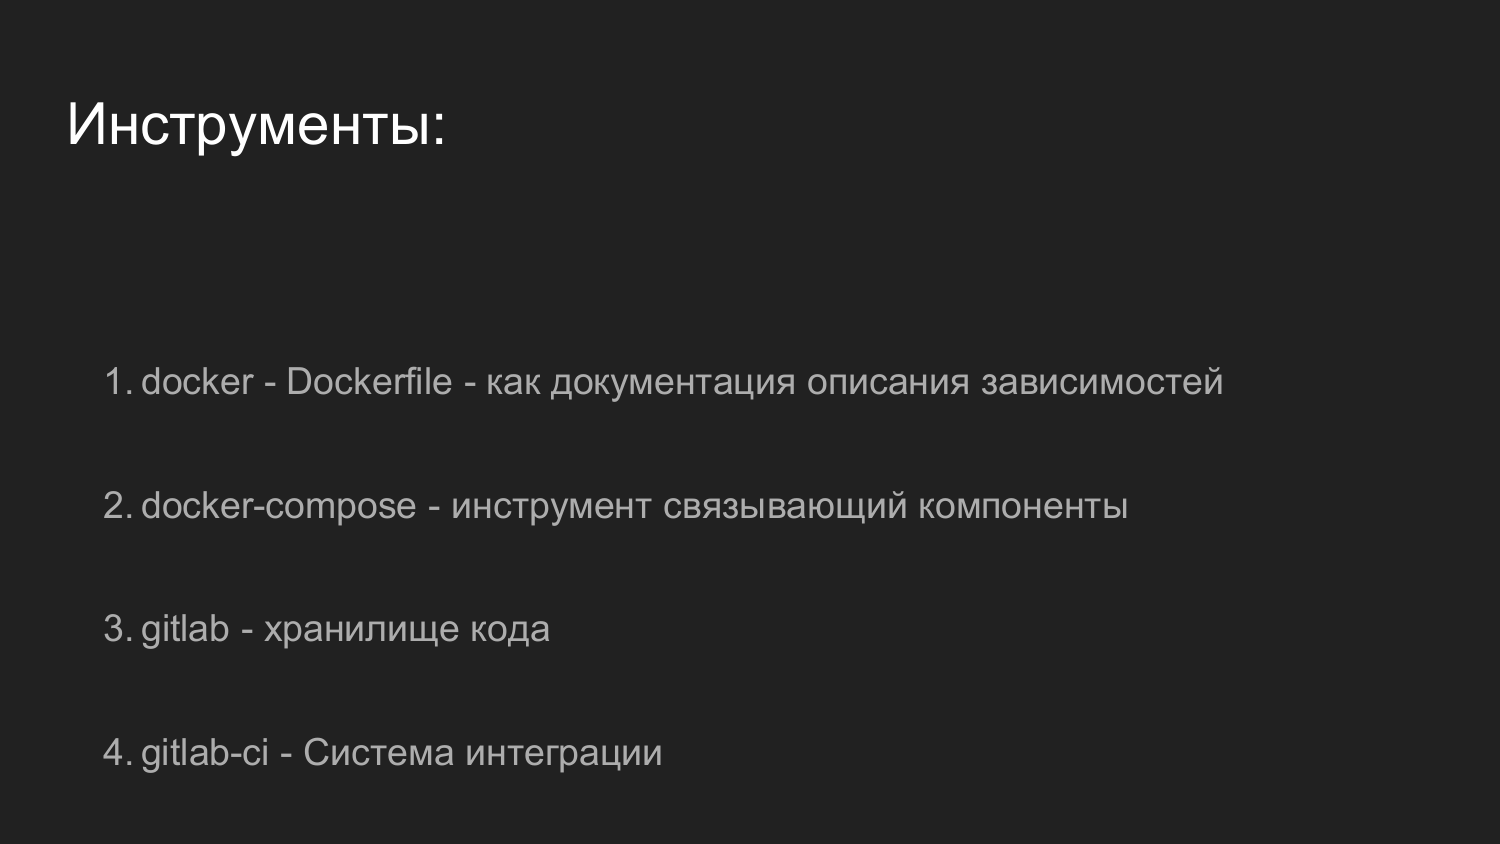
Instruments. What do we use?
- Docker itself. The Dockerfile describes the dependencies of a single application.
- Docker-compose is a bundle that combines the very few of our Docker applications.
- GitLab we use to store source code.
- GitLab-CI we use for system integration.

The report consists of two parts.
The first part will tell you how Docker was launched on the developers' machines.
The second part will tell you how to interact with GitLab, how we run the tests and how we roll out to Staging.
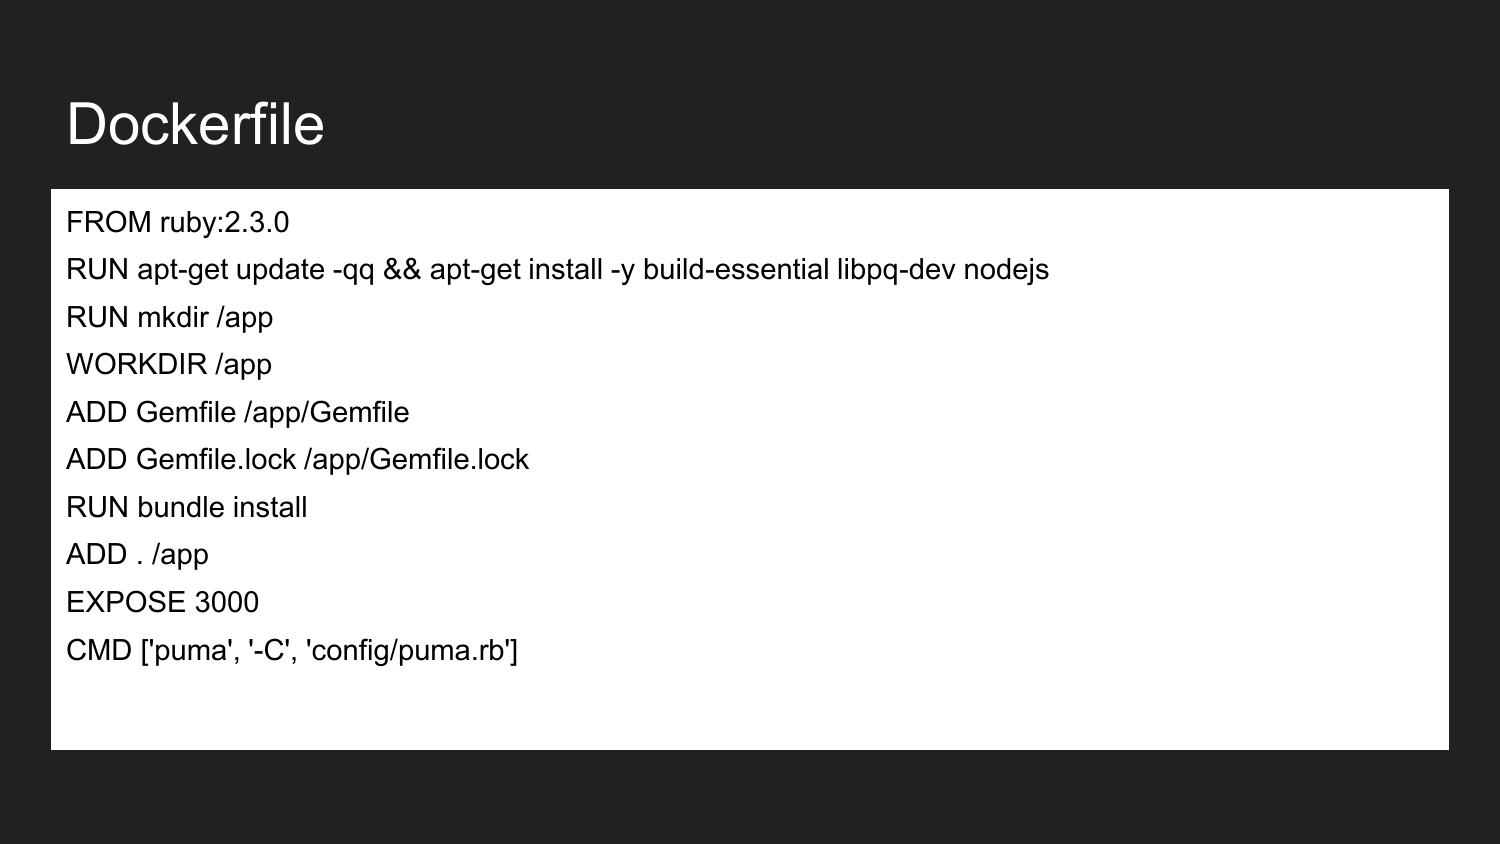
Docker is a technology that allows (using a declarative approach) to describe the necessary components. This is an example of a dockerfile. Here we announce that we inherit from the official Ruby Docker image: 2.3.0. It contains the installed Ruby version 2.3. We install the necessary build libraries and NodeJS. We describe that we create the /app directory. Assign the app directory to the working directory. In this directory we place the necessary minimum Gemfile and Gemfile.lock. Then we build the projects that install this dependency image. We indicate that the container will be ready to listen on the external port 3000. The last command is the command that directly launches our application. If we execute the project launch command, the application will try to execute and run the specified command.
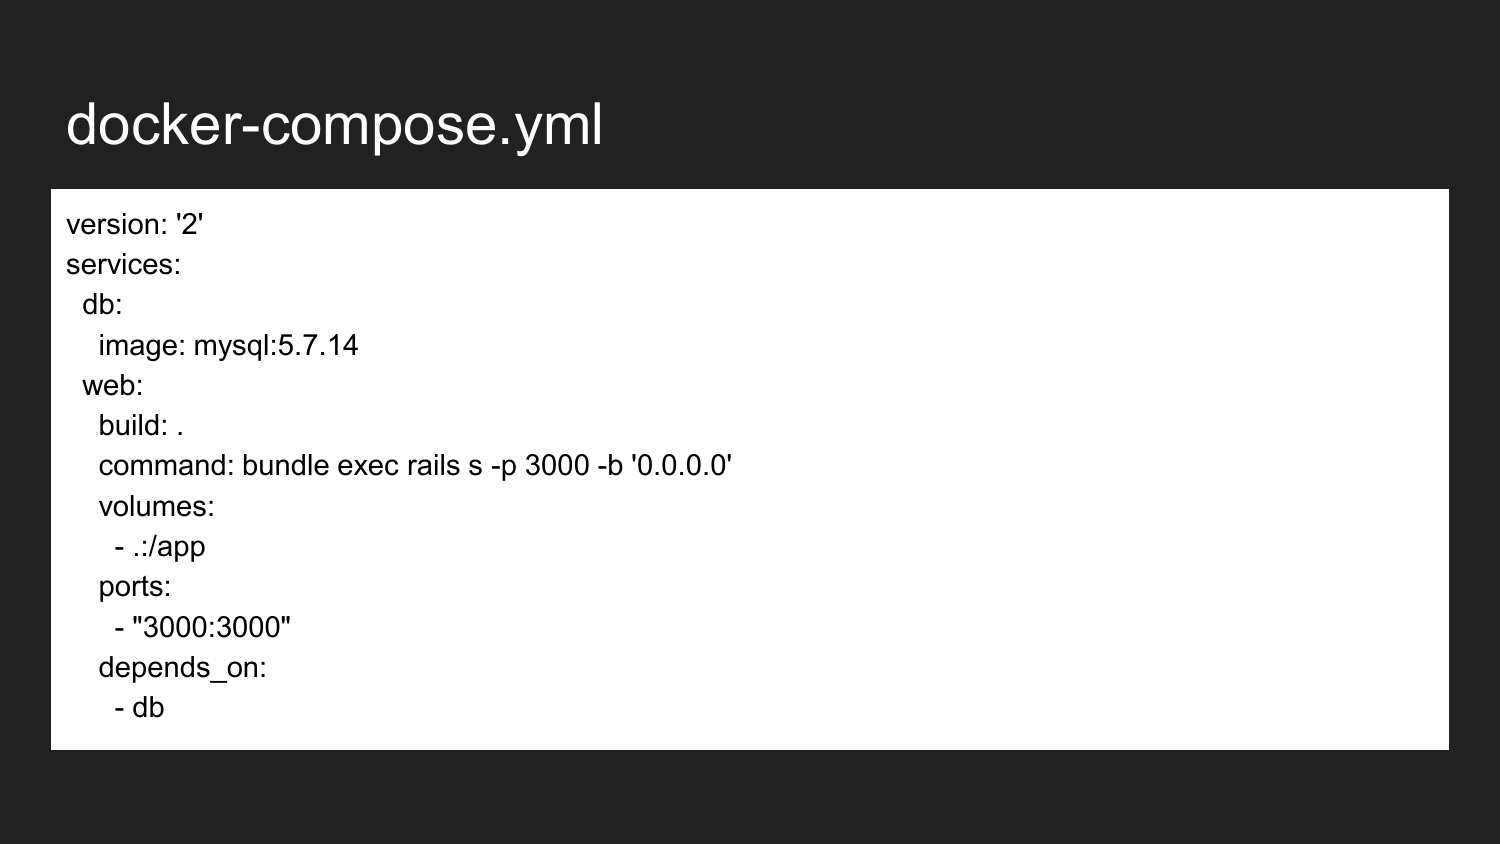
This is the minimal example of a docker-compose file. In this case, we show that the connection of two containers occurs. This is directly in the database service and web service. Our web applications in most cases require a database to be stored as data backend. Since we use MySQL, the example with MySQL - but nothing prevents you from using some other database (PostgreSQL, Redis).
We take from an official source with a Docker hub MySQL 5.7.14 image without changes. We collect the image that is responsible for our web application from the current directory. He during the first run collects an image to us. Then runs the command that we execute here. If we go back, we will see that the launch command has been defined via Puma. Puma is a service written in Ruby. In the second case, we redefine. This command can be arbitrary, depending on our needs or objectives.
We also describe what you need to forward a port on our developer’s host machine from a 3000 to 3000 container port. This is done automatically using iptables and its mechanism, which is directly incorporated in Docker.
The developer may also, as before, contact any available IP address, for example, 127.0.0.1 local or external IP address of the machine.
The last line says that the web container depends on the db container. When we trigger the web container launch, docker-compose pre-launches the database for us. Already at the start of the database (in fact, after the container has been launched! This does not guarantee readiness of the database), the application, our backend, will start for us.
This allows you to avoid errors when the database is not raised and allows you to save resources when we stop the database container, freeing up resources for other projects.

What gives us the use of database coding in the project. We have all developers fix the version of MySQL. This allows you to avoid some of the errors that can occur when versions diverge, when the syntax, configuration, default settings change. This allows you to specify a common hostname for the database, login, password. Moving away from the zoo names and conflicts in the config files that were previously.
We have the opportunity to use a more optimal config for the Development environment, which will be different from the default one. MySQL is configured by default on weak machines and its performance out of the box is very low.
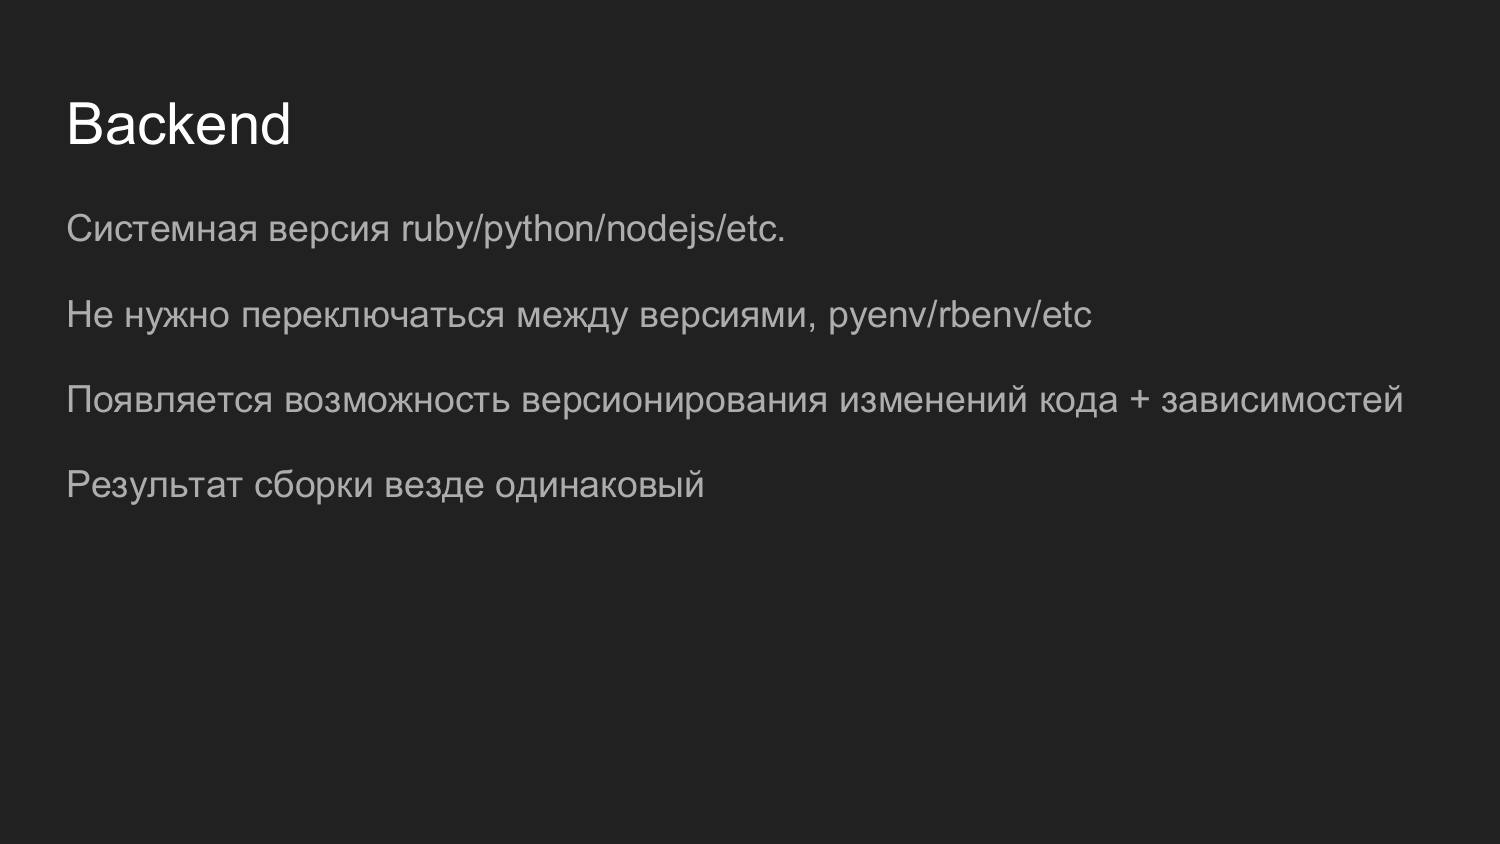
Docker allows you to use the necessary version of the Python, Ruby, NodeJS, PHP interpreter. We get rid of the need to use some kind of version manager. Earlier for Ruby used rpm-package, which allowed to change the version depending on the project. It also allows, thanks to the Docker container, to smoothly migrate the code and version it together with dependencies. We have no problem understanding the version of both the interpreter and the code. To update the version, it is necessary to lower the old container and lift the new container. If something went wrong, we can lower the new container, pick up the old container.
After the image is assembled, the containers in both Development and Production will be the same. This is especially true for large installations.
 On Frontend, we use JavaScipt and NodeJS.
Now we have the latest project at ReacJS. The developer ran all of the container and developed using hot-reload.
Next, the task of assembling JavaScipt is started and code compiled into statics is given via nginx saving resources.
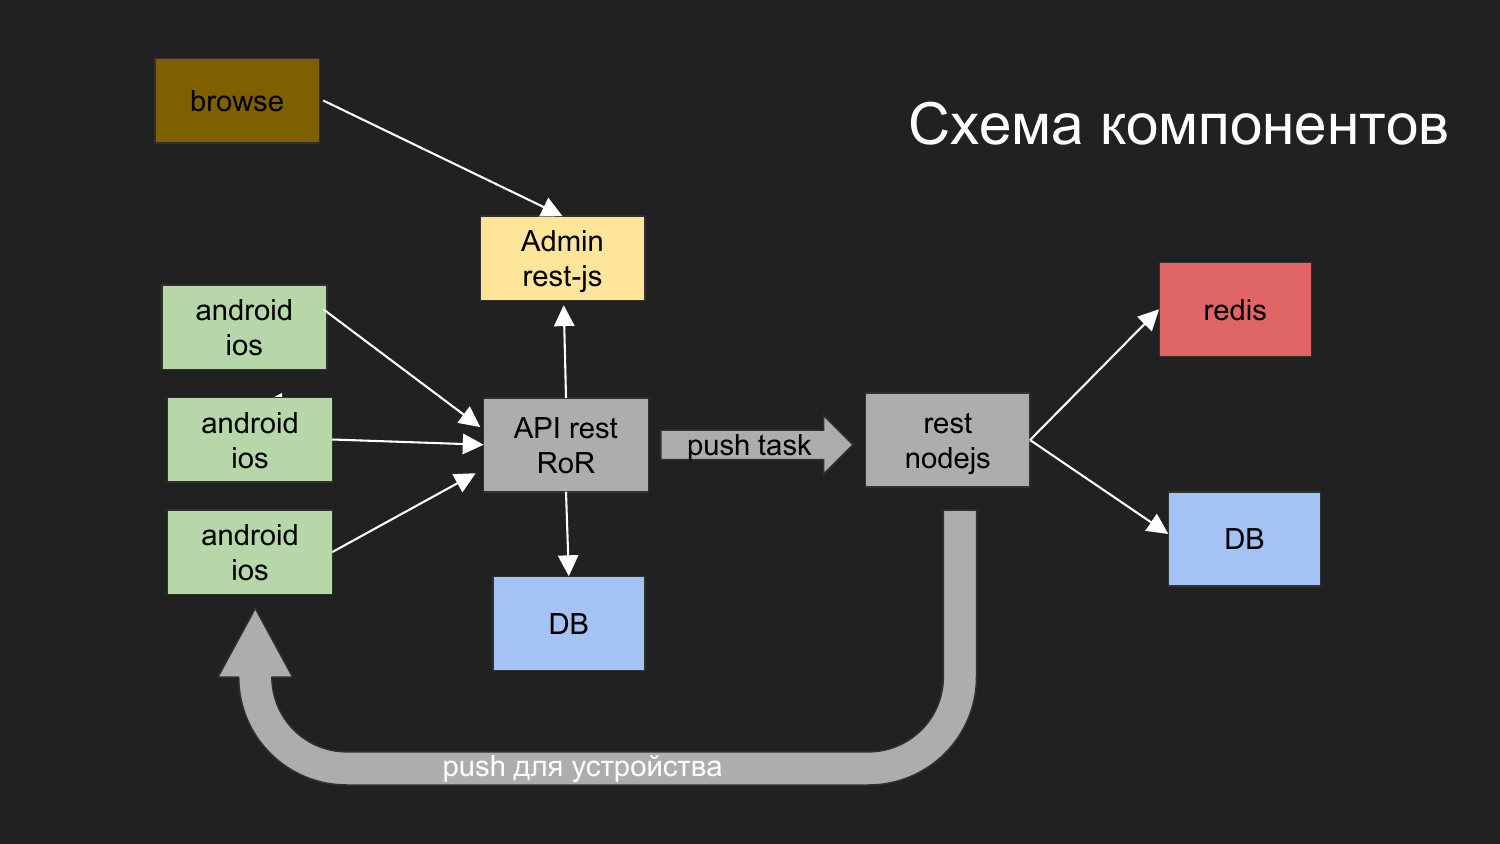
Here I gave a diagram of our last project.
What tasks solved? We have a need to build a system with which mobile devices interact. They get the data. One possibility is to send push notifications to this device.
What have we done for this?
We have divided into the application such components as: the admin part on JS, the backend, which works through the REST interface under Ruby on Rails. Backend interacts with the database. The result that is generated is given to the client. Admin with backend and database interacts via REST interface.
We also had the need to send push notifications. Before that, we had a project in which a mechanism was implemented that is responsible for delivering notifications to mobile platforms.
We have developed such a scheme: the operator from the browser interacts with the admin panel, the admin panel interacts with the backend, the task is to send Push notifications.
Push notifications interact with another component that is implemented on NodeJS.
Queues are being built and then sending notifications according to their mechanism.
Here are two databases drawn. At the moment, we use Docker to use 2 independent databases that are not related to themselves. In addition, they have a common virtual network, and the physical data is stored in different directories on the developer's machine.
The same but in numbers. Here it is important to reuse the code.
If earlier we talked about reuse of the code in the form of libraries, then in this example our service, which responds with Push notifications, is reused as a fully server. It provides an API. And our new development is interacting with it.
At that time, we used version 4 of NodeJS. Now (in 2017 - note ed.) In recent developments we are using version 7 of NodeJS. There are no problems in new components to attract new versions of libraries.
If necessary, you can refactor and raise the NodeJS version of the Push notification service.
And if we can maintain API compatibility, then it will be possible to replace it with other projects that were used earlier.
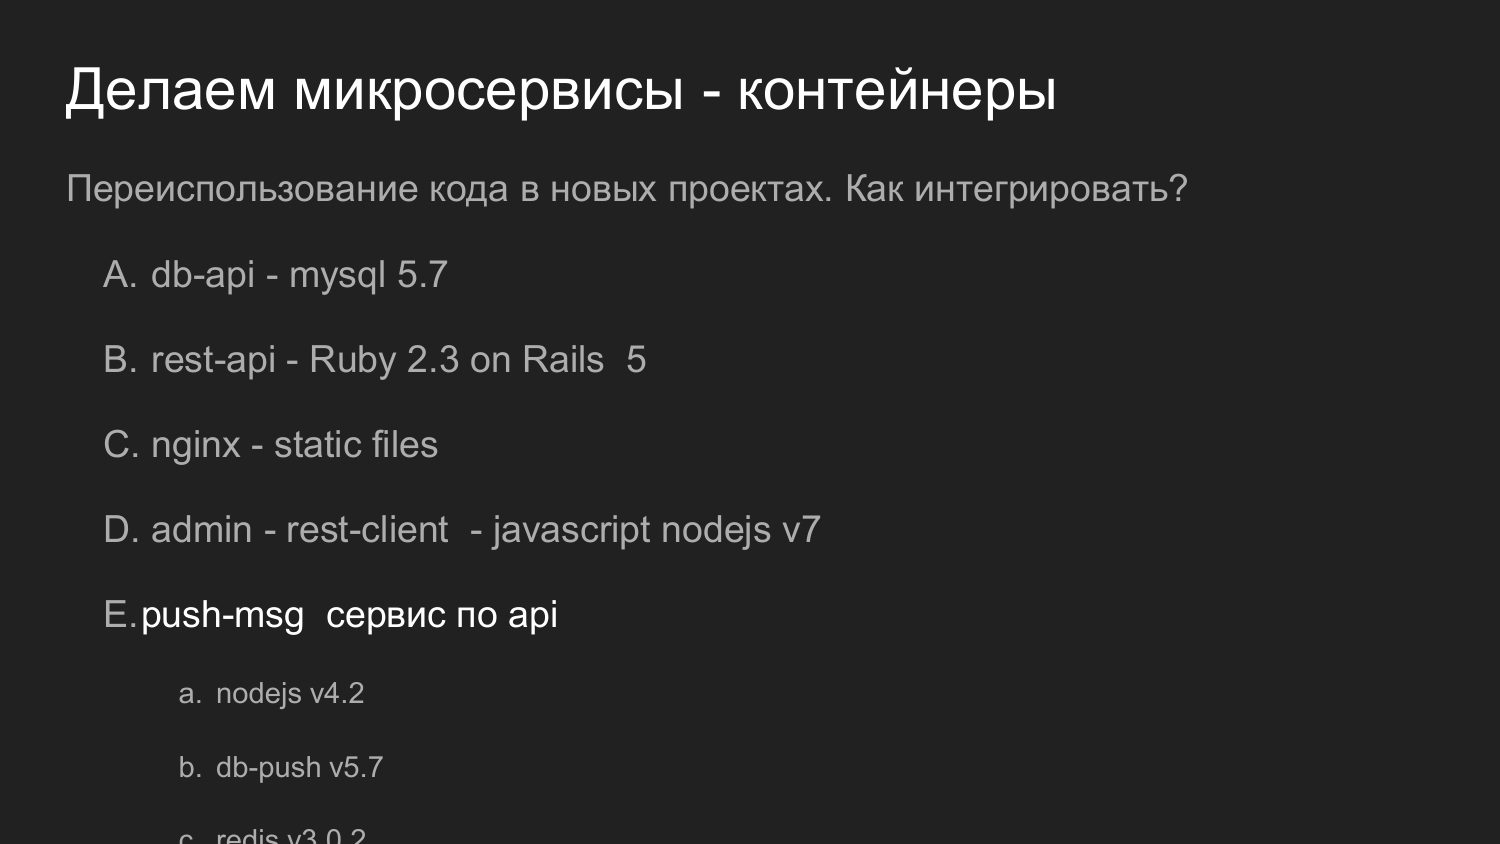
What do I need to add a Docker? Add to our Dockerfile repository, which describes the necessary dependencies. In this example, the components are broken down by logic. This is the minimum set of backend developer.
When creating a new project, create a Dockerfile, describe the desired ecosystem (Python, Ruby, NodeJS). In docker-compose, describes the necessary dependency - a database. We describe that we need a base of such a version, store the data there somewhere.
We use a separate third container with nginx to return statics. You can upload images. Backend puts them in a pre-prepared volume, which is also mounted in a container with nginx, which gives statics.
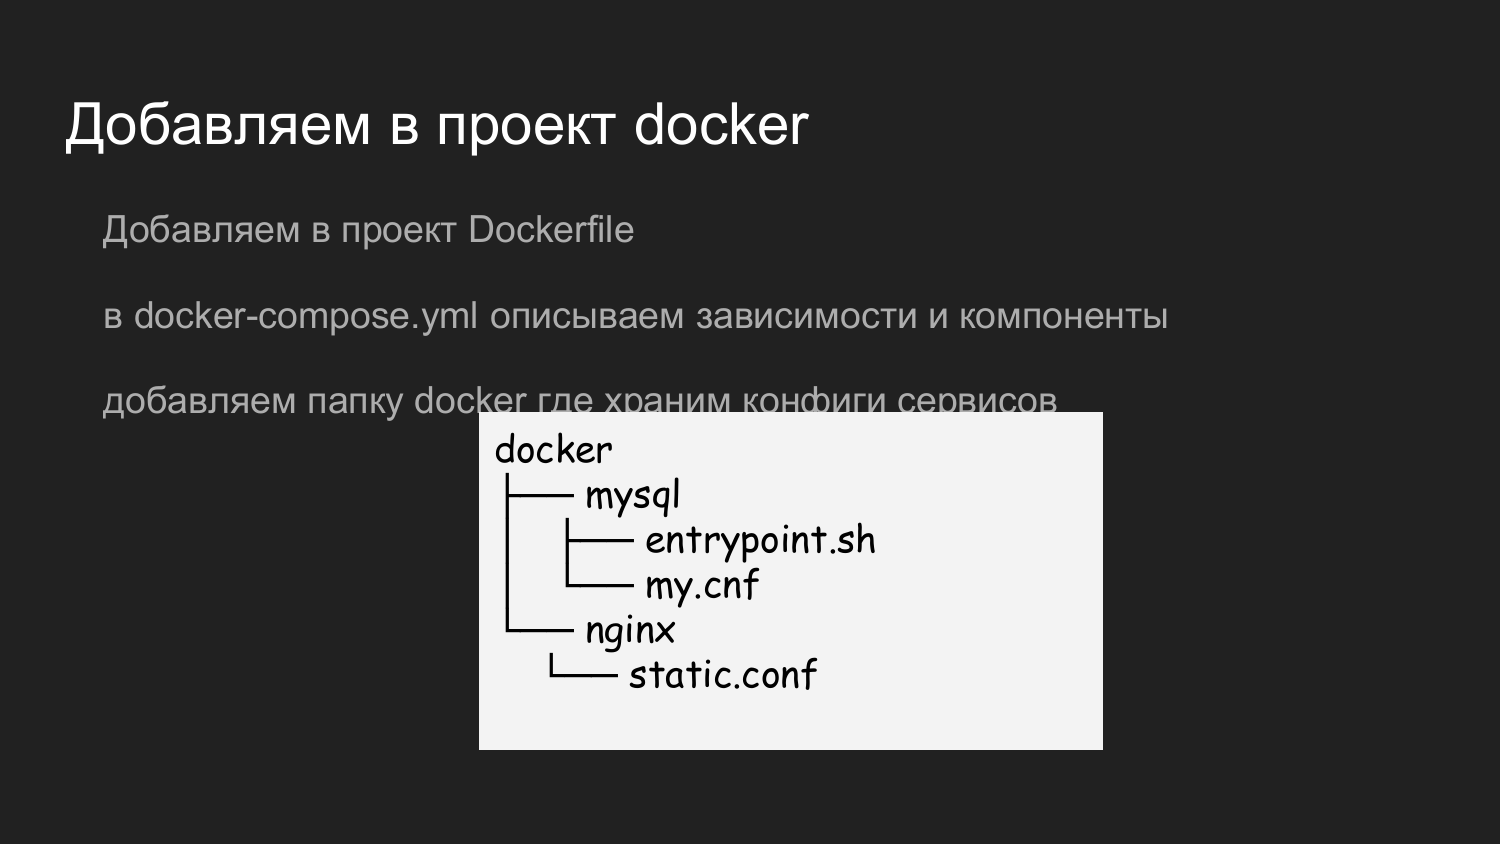
To store the nginx configuration, mysql we added the Docker folder in which we store the necessary configs. When a developer makes a git clone repository on his machine, he already has a project ready for local development. There is no question what port or what settings to apply.
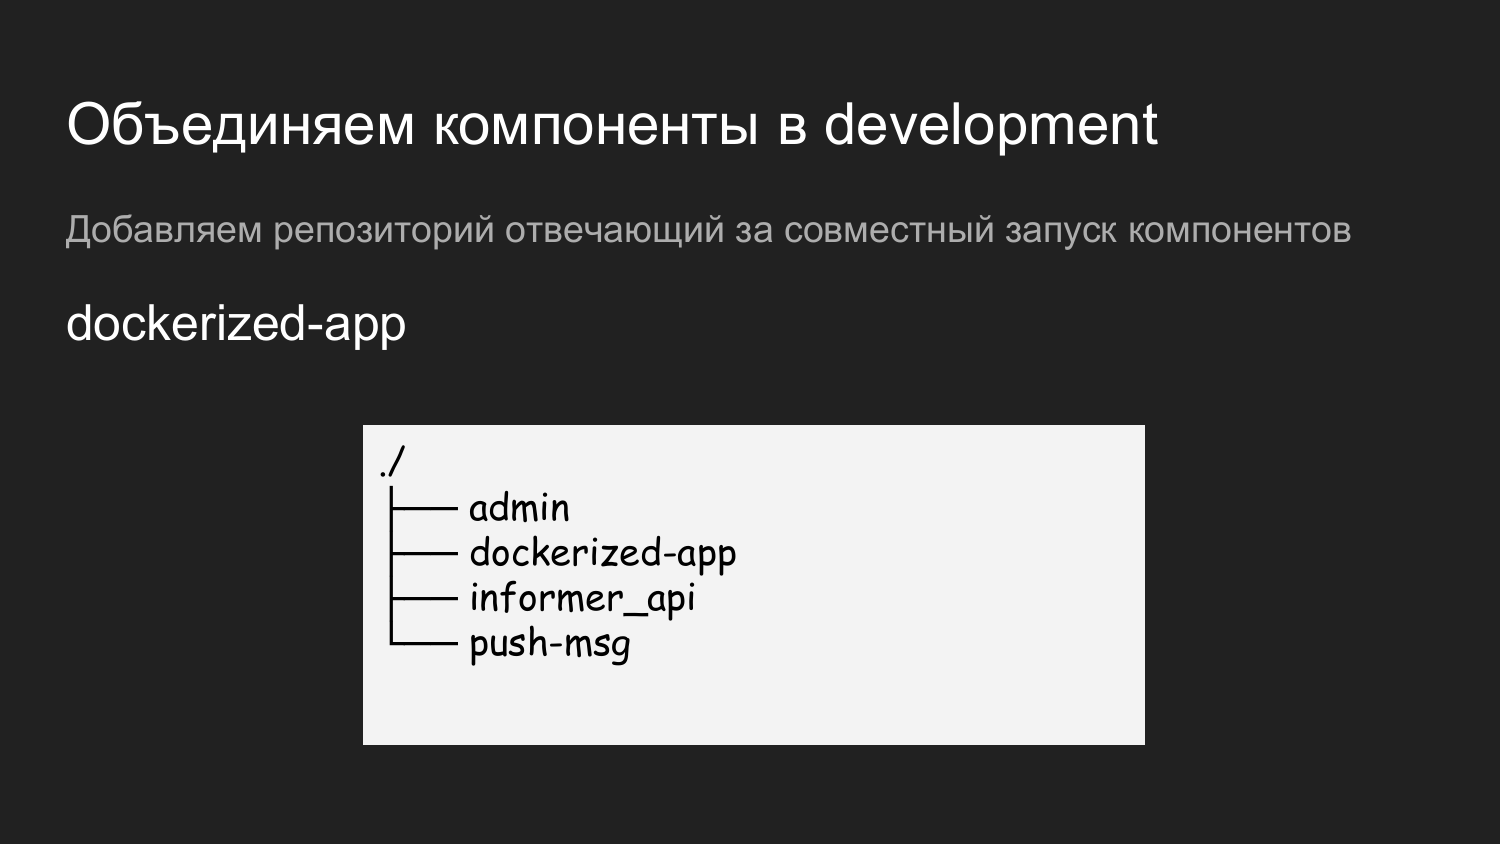
Next we have several components: admin, info-API, push-notifications.
In order to run all this, we created another repository, which was called dockerized-app. Currently we use several repositories for each component. They are just logically different - in GitLab it looks like a folder, and on the developer’s machine a folder for a specific project. On the level below are the components that will be combined.
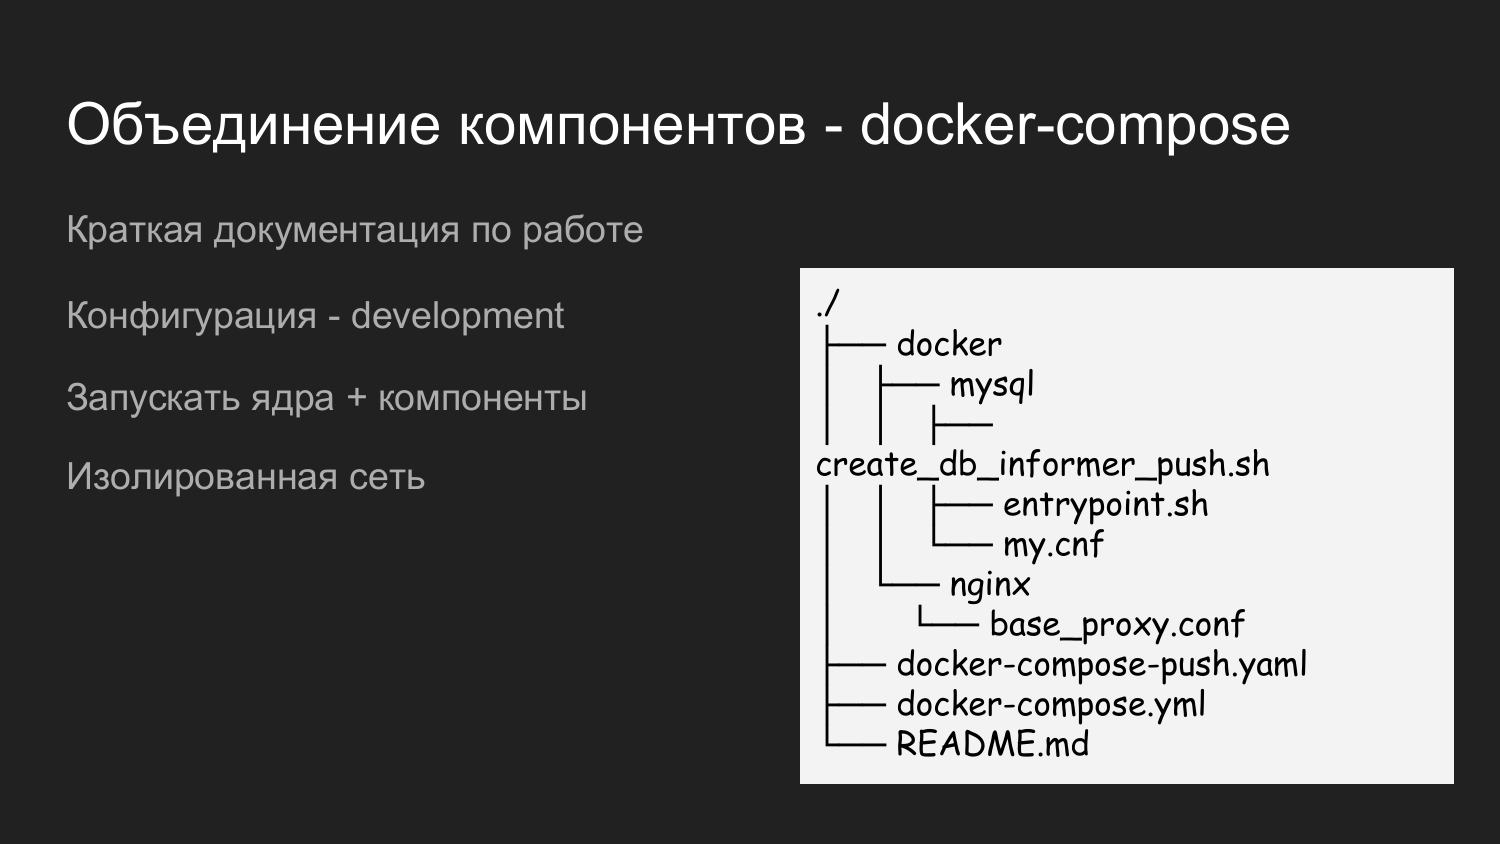
This is just an example of the contents of the dockerized-app. We also bring here the Docker directory in which we fill in the configurations required for the interactions of all components. There is README.md, which briefly describes how to run the project.
Here we applied two docker-compose files. This is done in order to be able to run in steps. When a developer works with the kernel, he does not need Push notifications, he simply starts the docker-compose file and, accordingly, the resource is saved.
If you need to integrate with push notifications, then docker-compose.yaml and docker-compose-push.yaml is launched.
Since docker-compose.yaml and docker-compose-push.yaml lie in a folder, a single virtual network is automatically created.
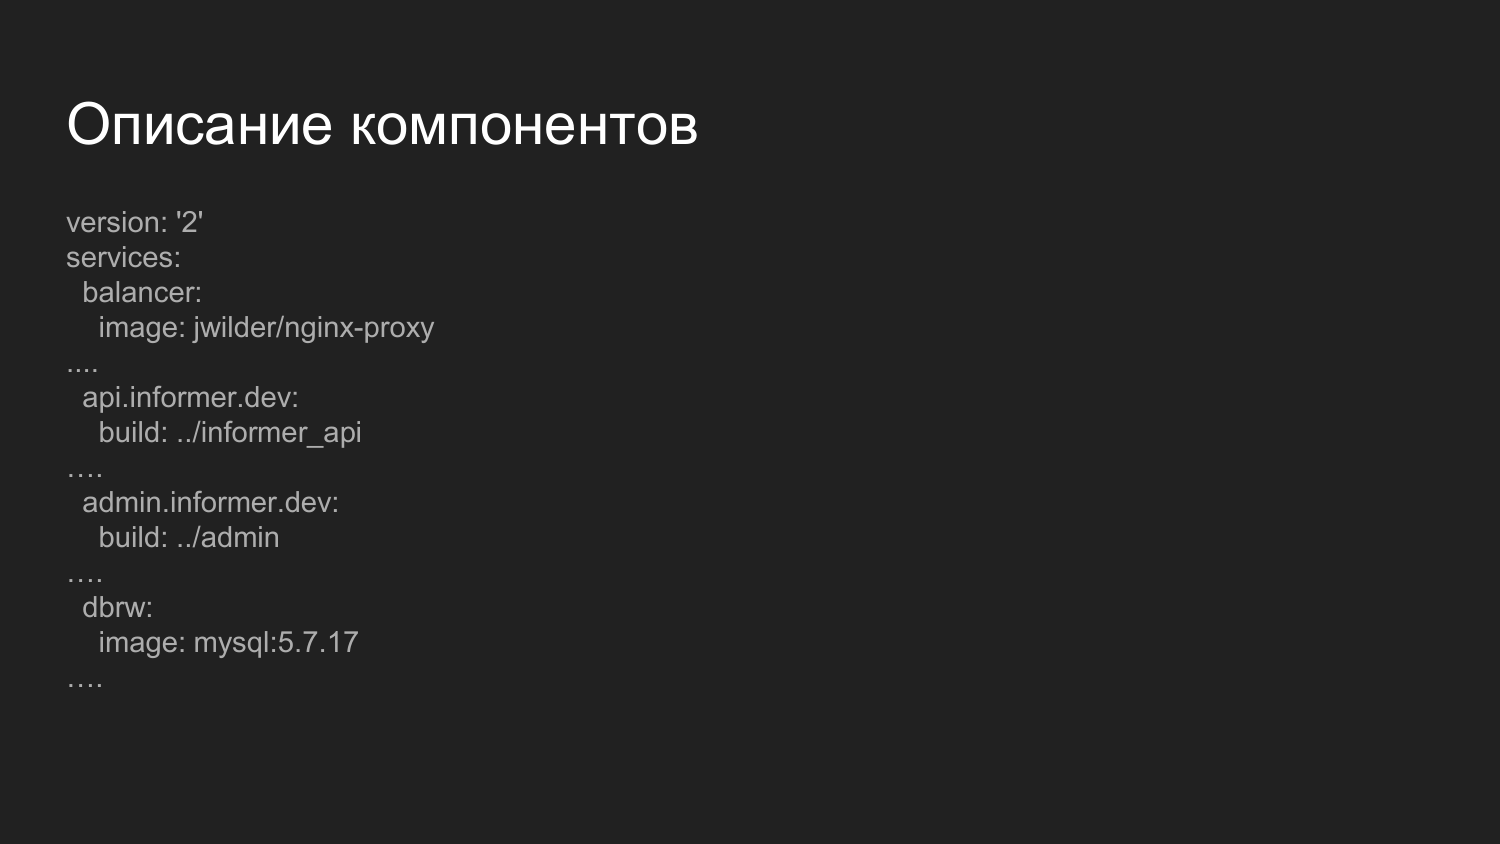
Description of the components. This is a more advanced file that is responsible for collecting components. What is remarkable here? Here we introduce the balancer component.
This is a ready-made Docker image in which nginx is launched and an application that listens to the Docker socket. Dynamic, as the containers are turned on and off, repent the nginx config. We distribute the handling of components by third-level domain names.
For the Development environment, we use the domain .dev - api.informer.dev. Applications with the .dev domain are available on the developer’s local machine.
Next, the configs are transferred to each project and all projects are launched together at the same time.
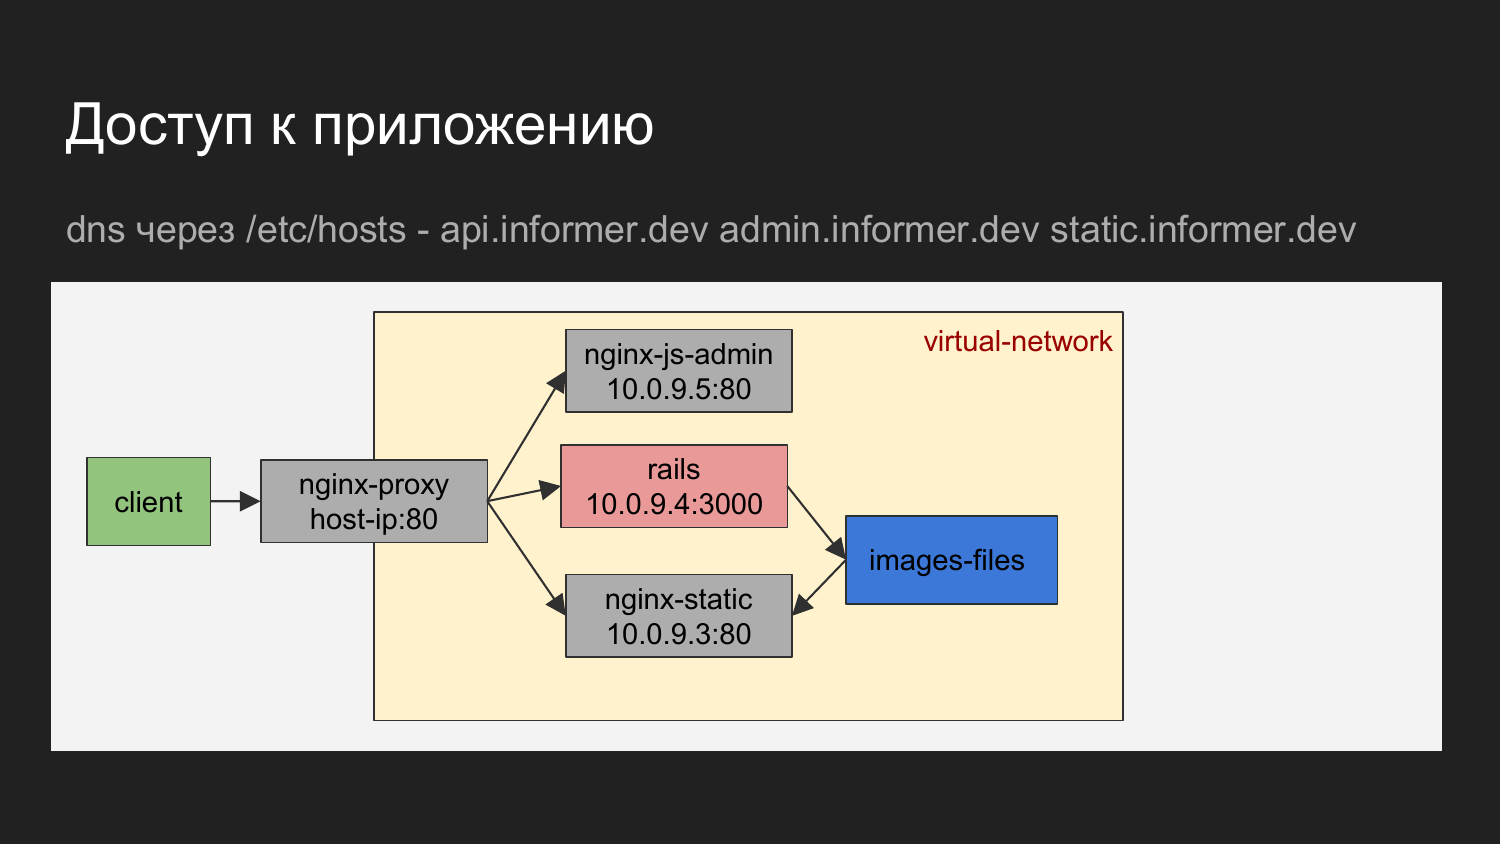
If you graphically depict, it turns out the client is our browser or some tool with which we carry out requests for a balancer.
Balancer on the domain name determines which container to apply.
This may be nginx, which gives JS admin. This can nginx, which gives the API, or static files, which are given to nginx in the form of loading images.
The diagram shows that the containers are connected to a virtual network and hidden behind a proxy.
On the developer's machine, you can access the container by knowing IP, but in principle we don’t use it. The need for direct circulation is practically non-existent.
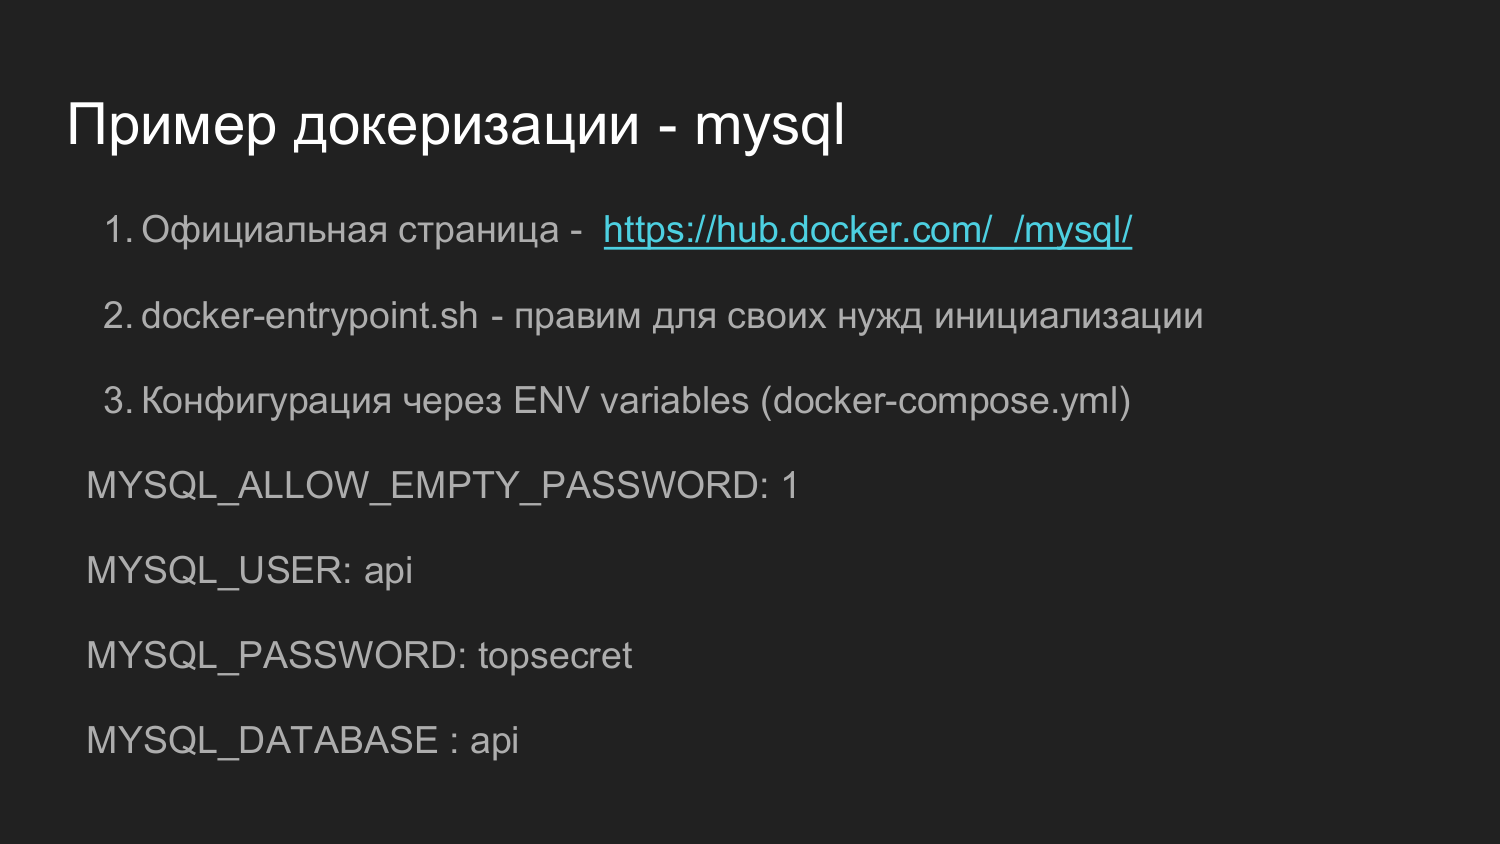
What is an example to see to your application? In my opinion a good example is the official docker image for MySQL.
It is quite complicated. There are many versions. But its functionality allows to cover many needs that may arise in the process of further development. If you spend time and figure out how it all interacts, then I think you will have no problems in self-implementation.
Hub.docker.com usually contains links to github.com, where you can find the raw data directly, from which you can collect an image yourself.
Further, in this repository, there is the docker- endpoint.sh script, which is responsible for the initial initialization and for the further processing of the application launch.
Also in this example is the ability to configure using environment variables. Defining a variable environment when running a single container or through docker-compose, we can say that we need to set an empty password for docker to root on MySQL or some other one that we want.
There is an option to create a random password. We say that we need a user, we need to set a password for the user and we need to create a database.
In our projects we have a little unified Dockerfile, which is responsible for initialization. There we adjusted for our needs to do just the user rights extension that the application uses. This allowed in the future to simply create a database from the application console. In Ruby applications there is a command to create, modify and delete databases.

This example of what a particular MySQL version looks like on github.com. You can open the Dockerfile and see how it is installed.
docker-endpoint.sh script responsible for the entry point. During initial initialization, some preparation actions are required and all these actions are placed in the initialization script.
We turn to the second part.
To store the source code, we switched to gitlab. This is quite a powerful system that has a visual interface.
One of the components of Gitlab is Gitlab CI. It allows you to describe follow commands that will later be used in order to organize the delivery system code or run automatic testing.
The report on Gitlab CI 2 https://goo.gl/uohKjI - the report from the Ruby Russia club is quite detailed and it may be of interest to you.
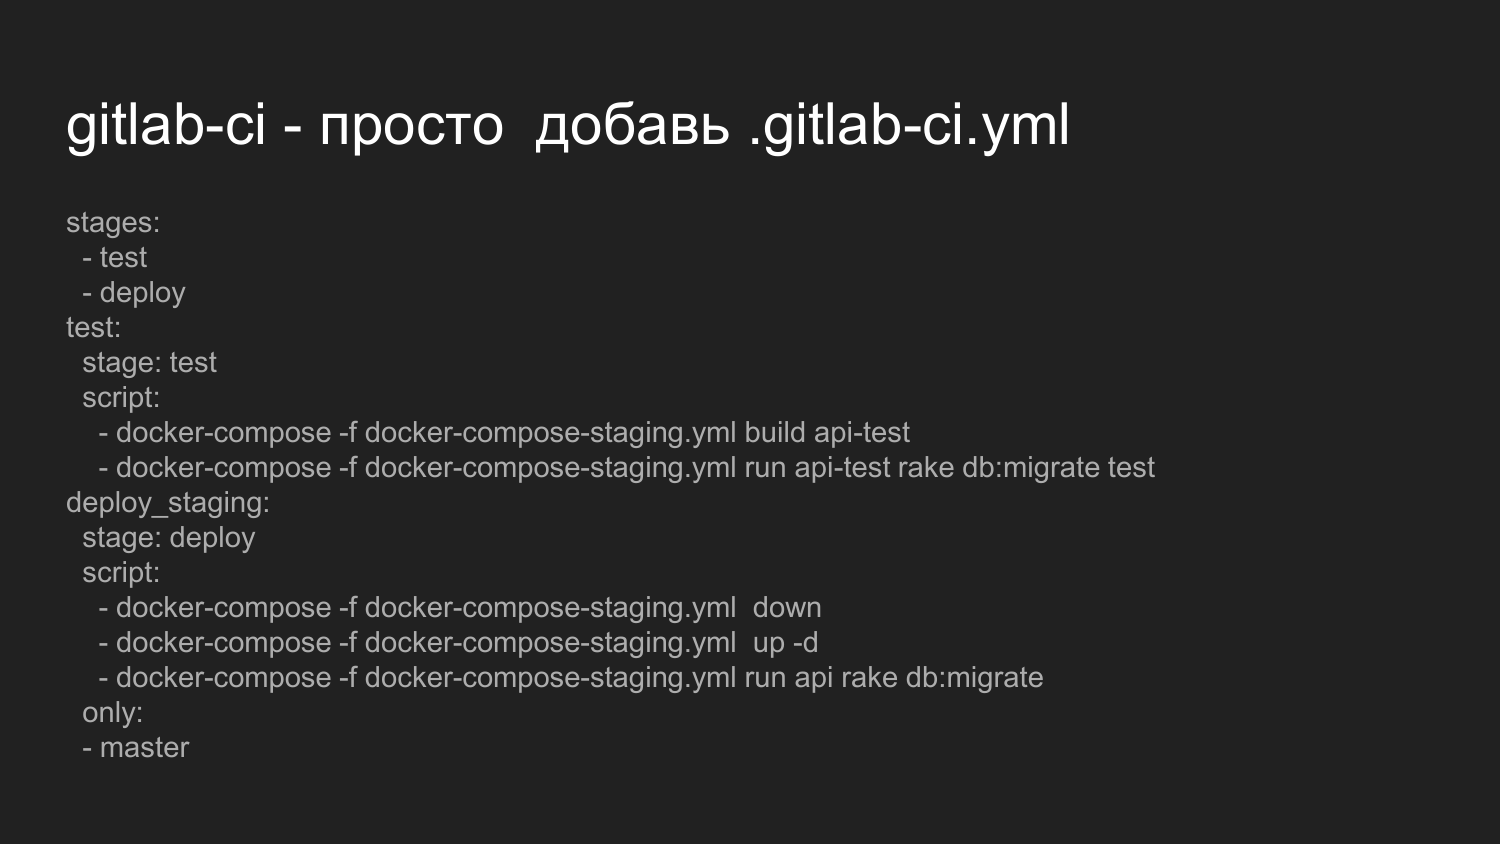
We’ll now look at what you need to activate Gitlab CI. In order to run Gitlab CI, we just need to put the .gitlab-ci.yml file in the project root.
Here we describe that we want to perform a sequence of states of the type of test, deployment.
We execute scripts that directly call the docker-compose build of our application. This is an example of just the backend.
Next, we say that it is necessary to run migrations to change the database and run the tests.
If the scripts are executed correctly and do not return an error code, then, accordingly, the system proceeds to the second stage of deployment.
Deploy stage is currently implemented for staging. We did not organize a simple restart.
We forcibly extinguish all containers, and then we re-raise all containers collected at the first stage during testing.
We run already for the current variable environment database migration, which were written by developers.
There is a mark that apply this only to the master branch.
When changing other branches is not performed.
It is possible to organize rollouts on the branches.
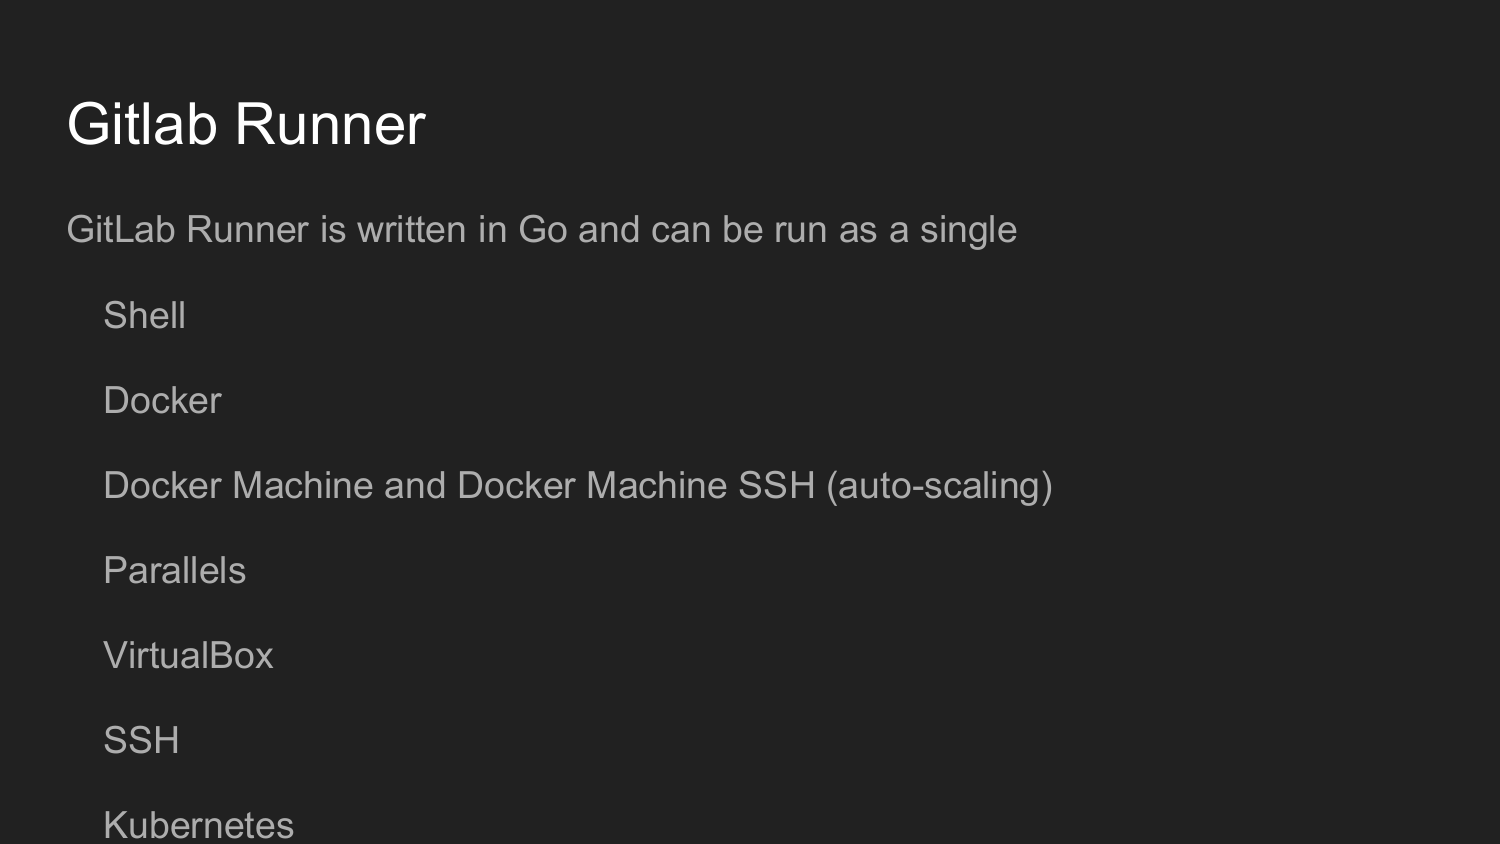
To further organize this, we need to install Gitlab Runner.
This utility is written in Golang. It is a single file as is customary in the world of Golang, which does not require any dependencies.
At startup, we register Gitlab Runner.
We get a key in the Gitlab web interface.
Then we call the initiation command in the command line.
Configuring Gitlab Runner in dialog mode (Shell, Docker, VirtualBox, SSH)
The code on Gitlab Runner will execute at each commit, depending on the .gitlab-ci.yml setting.
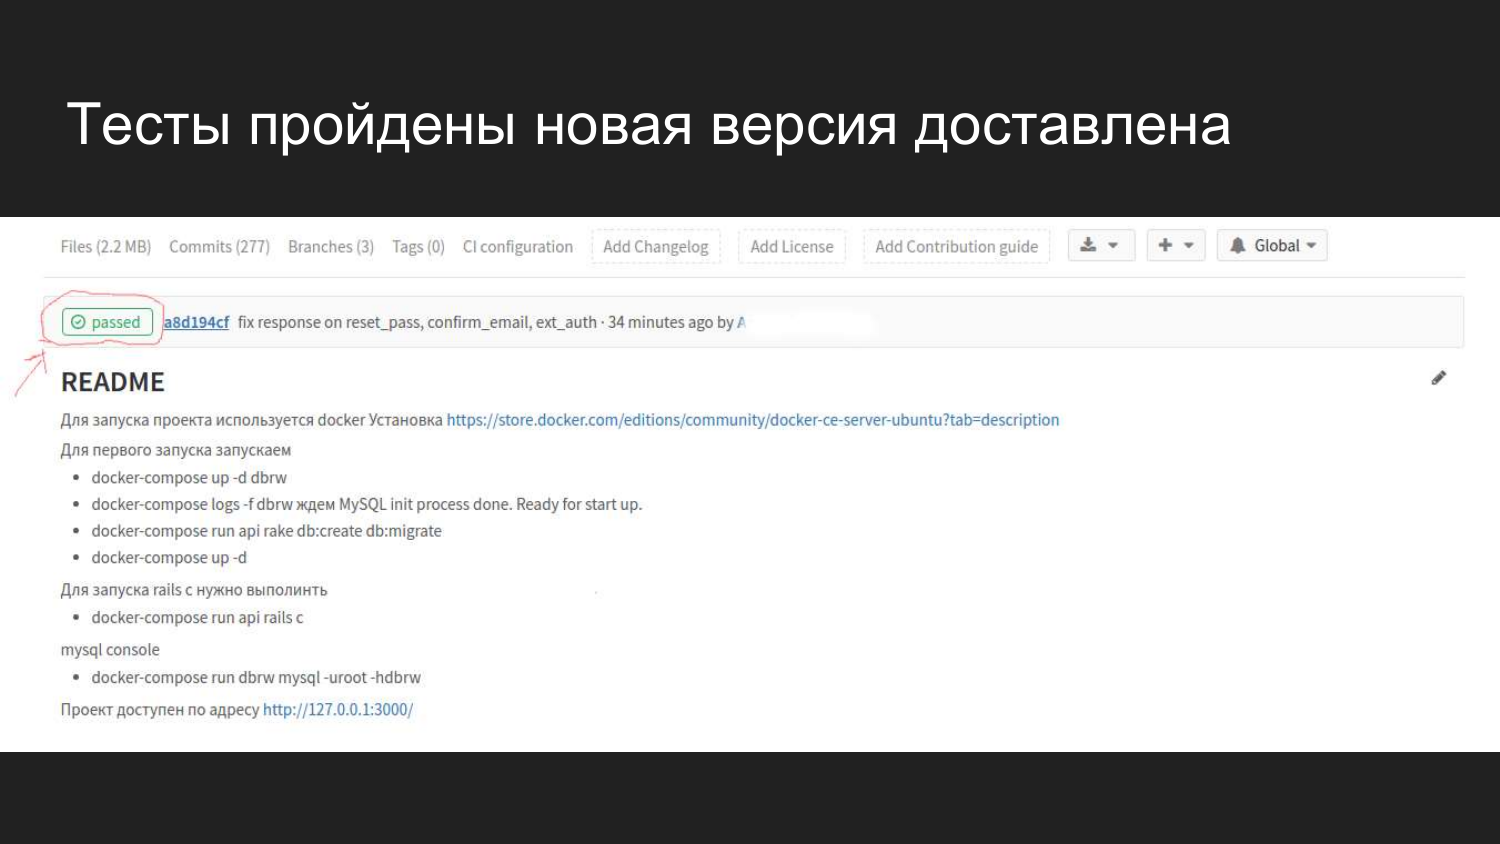
How it looks visually in Gitlab in the web interface. After we have connected GItlab CI, we have a flag that shows what state the build is currently in.
We see that a commit was made 4 minutes ago that passed all the tests and did not cause any problems.
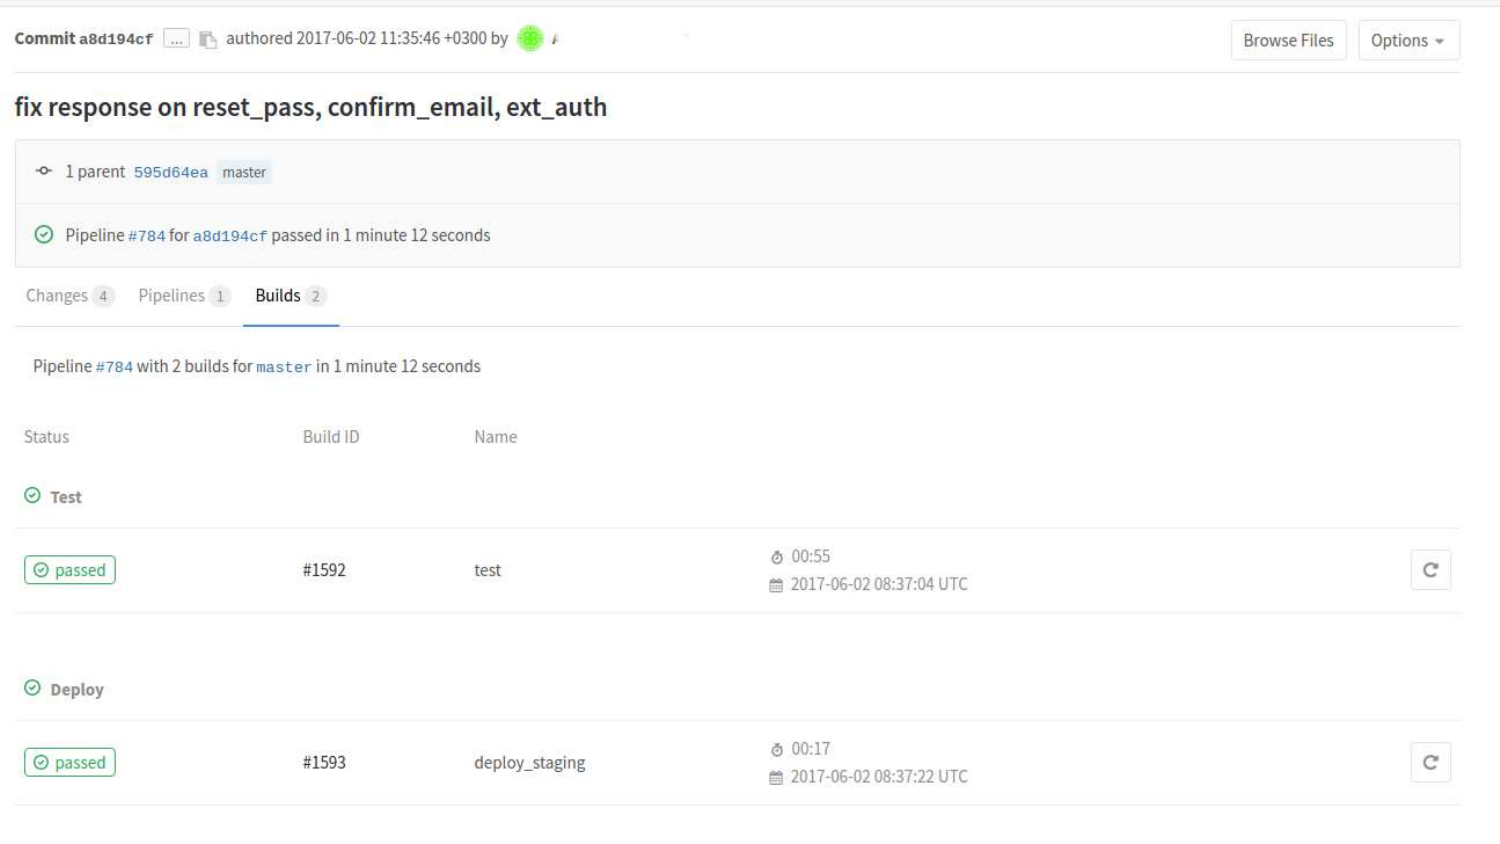
We can look at builds in more detail. Here we see that two states have already passed. Test status and deployment status at staging.
If we click on a specific build, then there will be a console output of commands that were run in the process according to .gitlab-ci.yml.
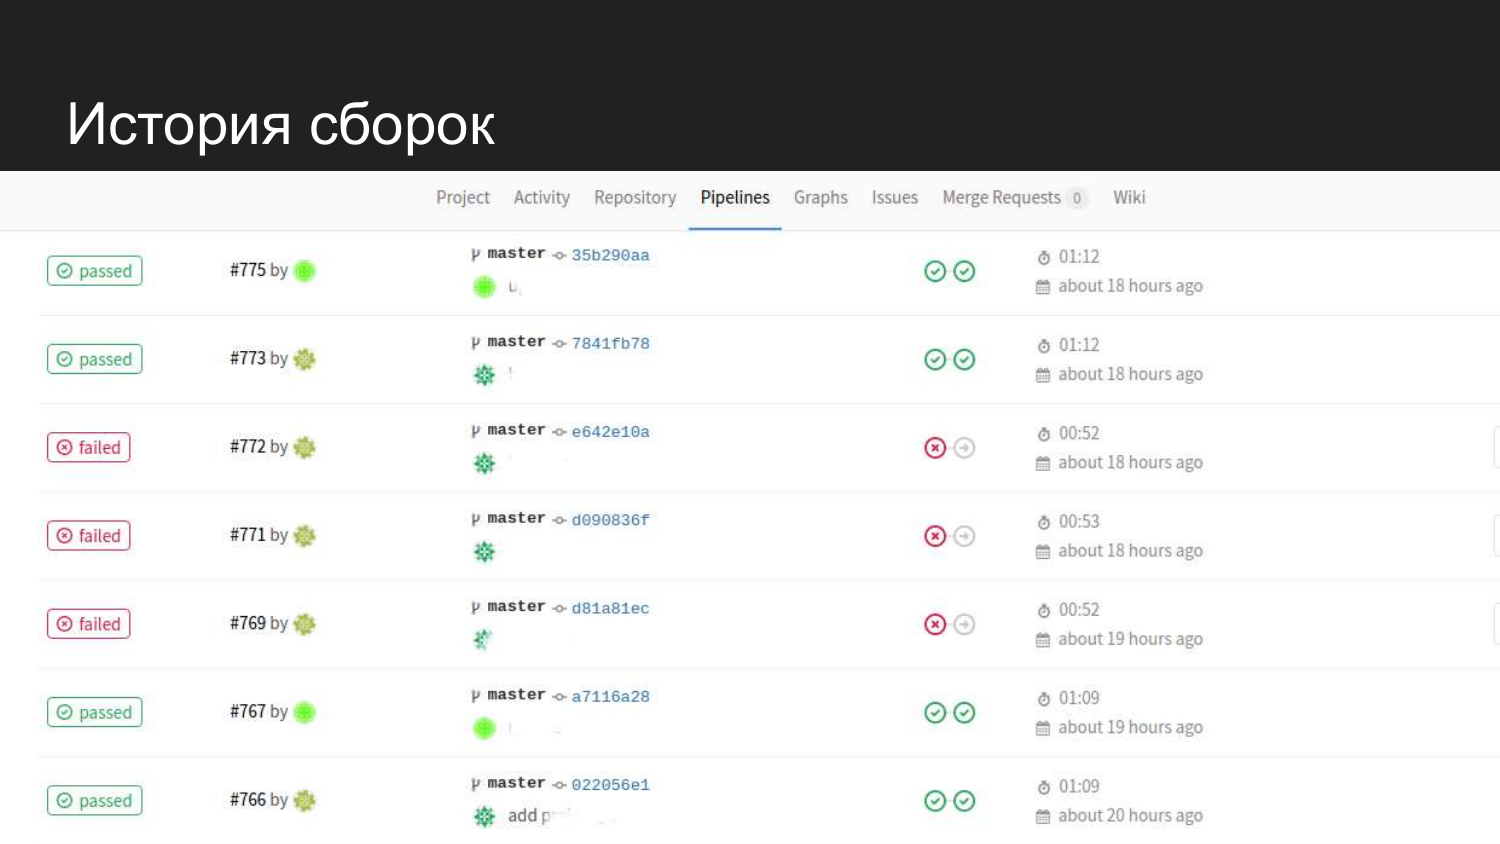
Here is the story of our product. We see that there were successful attempts. When the tests are submitted, the next step is not transferred and the code for staging is not updated.
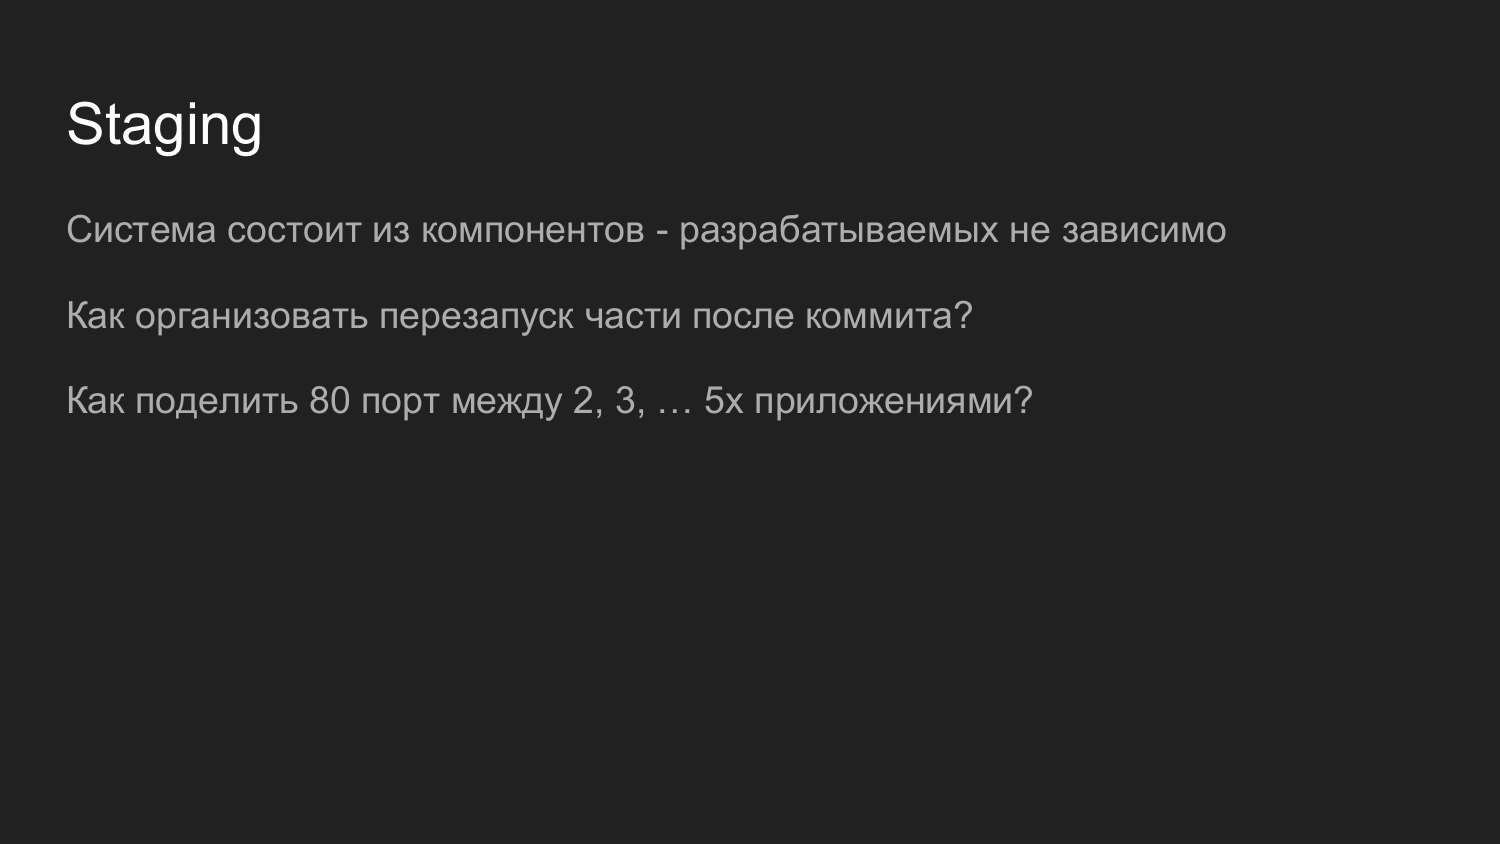
What tasks did we solve on staging when docker was implemented? , , , .
.
Docker-compose .
, Docker . Docker-compose .
, .
— staging .
production 80 443 , WEB.
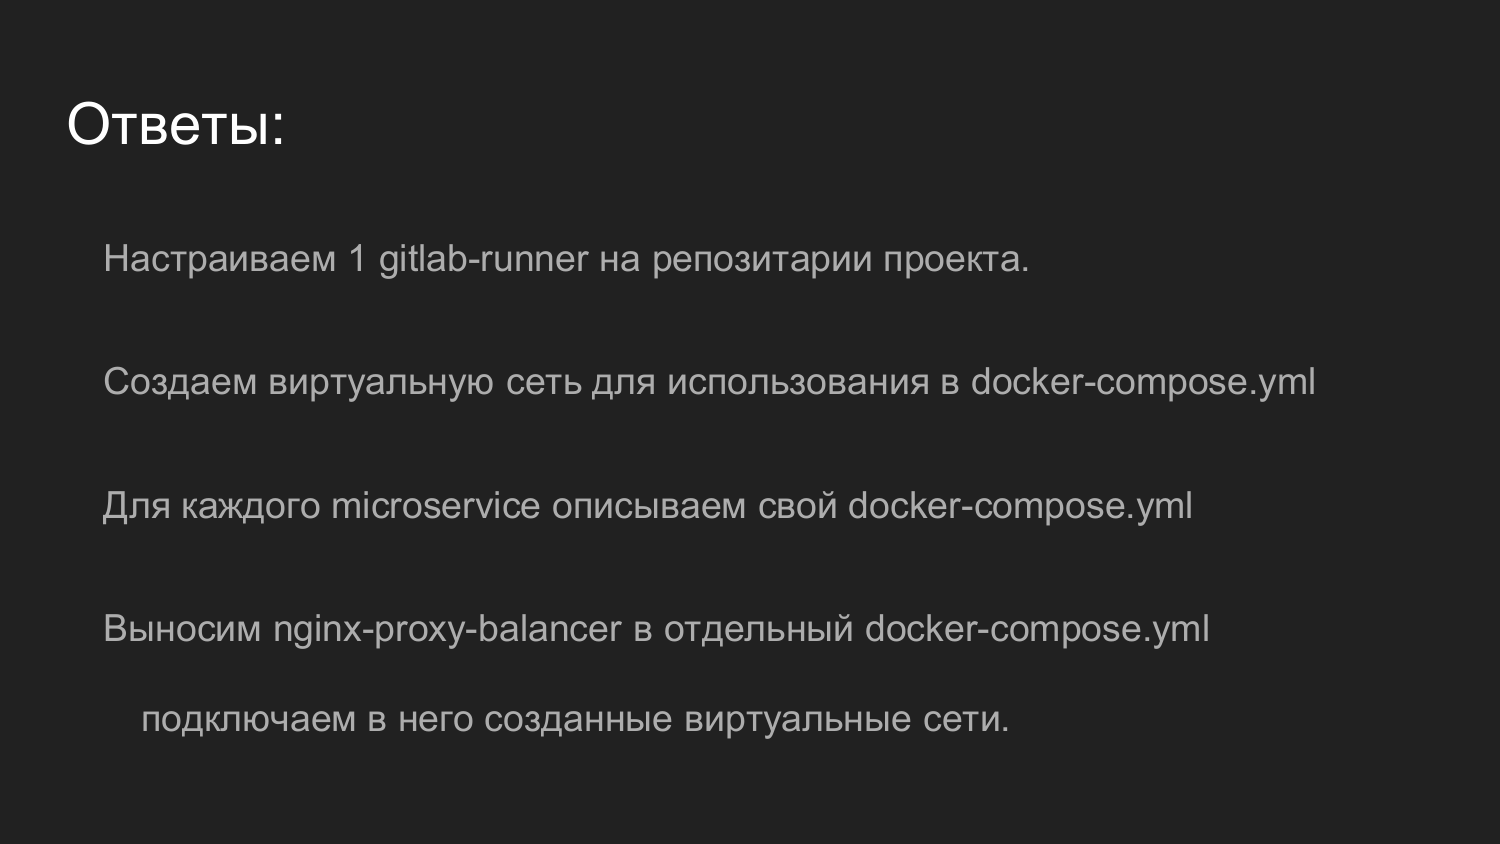
? Gitlab Runner .
Gitlab Gitlab Runner, - , .
Gitlab Runner, .
nginx-proxy .
, . .
80 , .
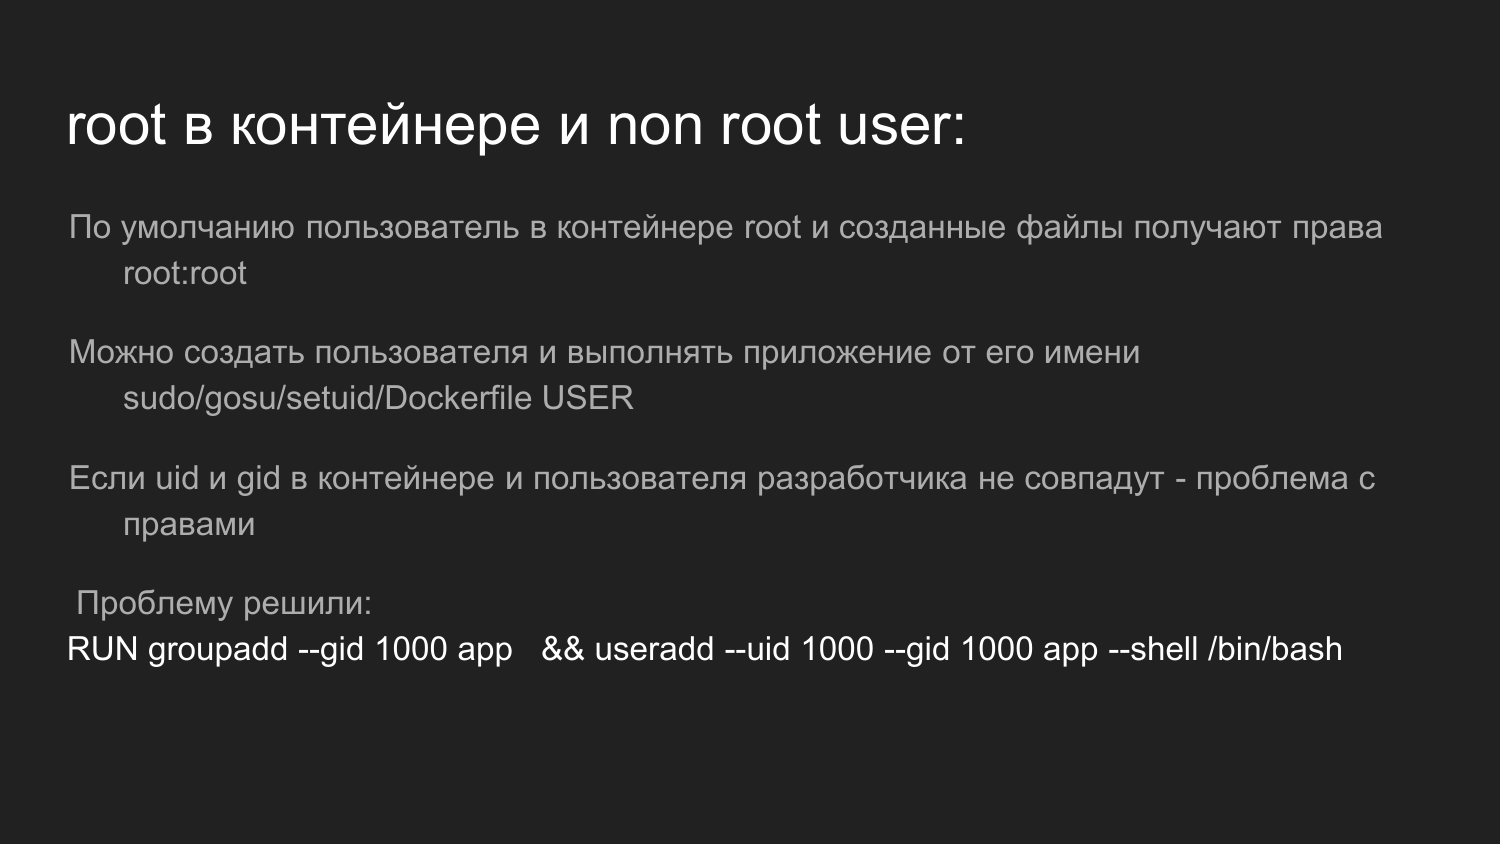
? root. root root .
, root , root.
- , , , , .
? , .
, ?
ID (UID) ID (GID).
ID 1000.
Ubuntu. Ubuntu ID 1000.
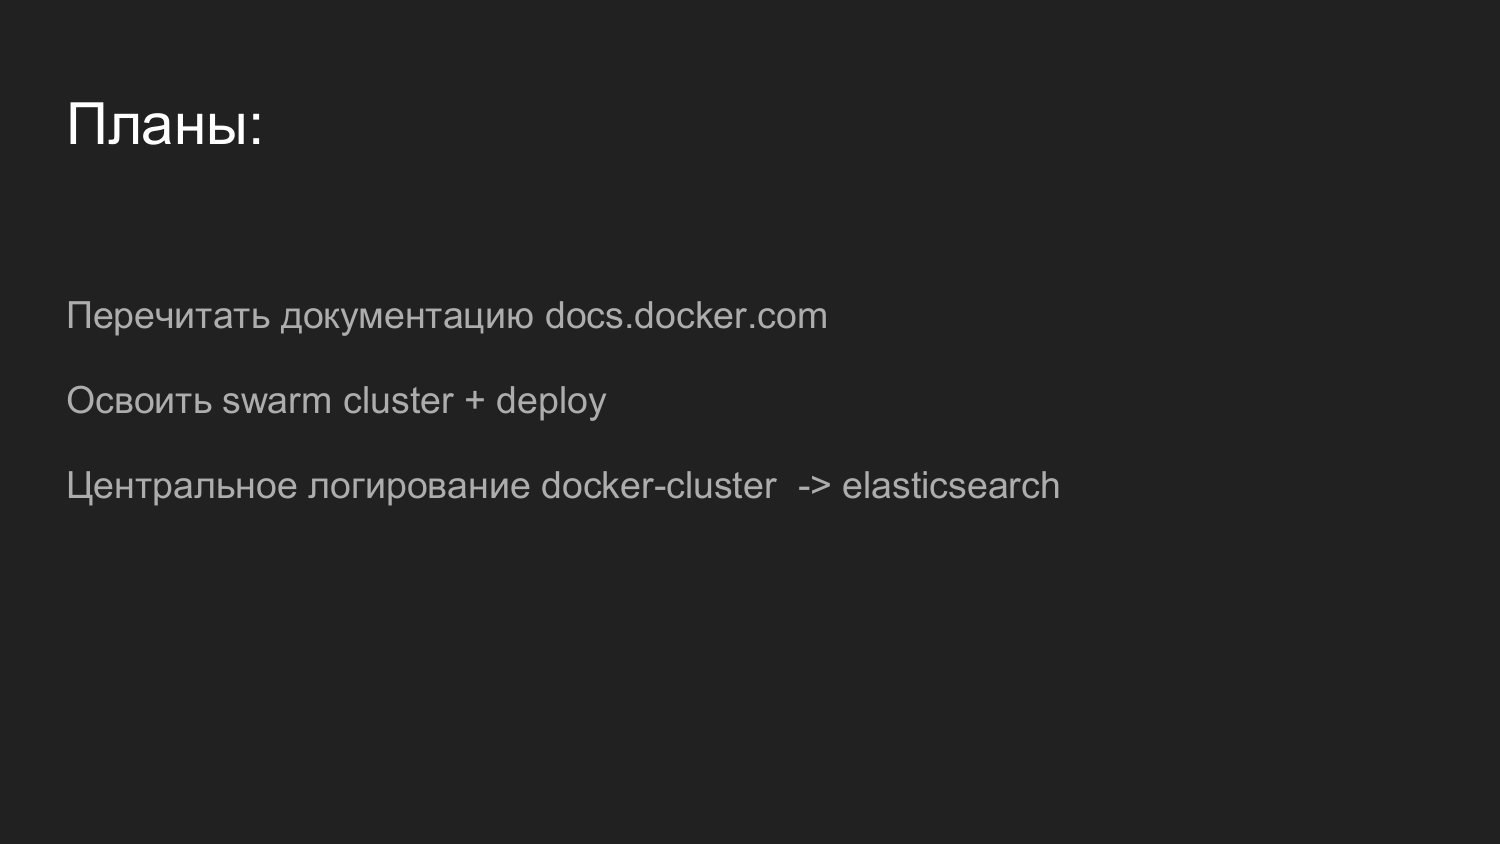
?
Docker. , . , - , .
, .
.
Docker Docker Swarm, . - Docker Swarm.
. . . web-.
')
Source: https://habr.com/ru/post/449742/
All Articles