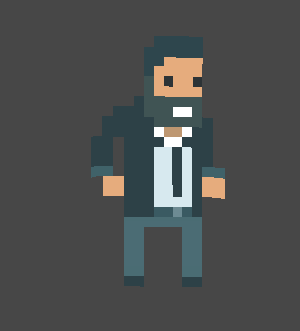
Doodle shader effect
In this tutorial, I’ll tell you how to use Shaders to recreate the popular sprite effect of Doodle in Unity. If your game requires this style, then from this article you will learn how to achieve it without drawing a heap of additional images.
For the past few years, this style has become increasingly popular and has been used extensively in games such as GoNNER and Baba is You .

This tutorial tells everything you need, from the basics of coding shaders to the mathematics used. At the end of the article there is a link to download the full Unity package.
')
I was inspired by the success of Doodle Studio 95 to create this tutorial ! .
In my blog, I explore fairly complex topics, from mathematics inverse kinematics to atmospheric Rayleigh scattering . I really like to make such difficult topics understandable to a wide audience. But the number of people interested in them and having a sufficient technical level is not so great. Therefore, you should not be surprised that the most popular articles are the simplest. This also applies to Nick Kaman’s recent tweet, in which he showed how to create a doodle effect in Unity.
After 1000 likes and 4000 retweets, it became clear that there is a strong demand for simpler tutorials that can be studied even by people who have almost no knowledge of creating shaders.
If you are looking for a professional and efficient way to animate 2D sprites with a high degree of artistic control, then I highly recommend Doodle Studio 95 to you! (see gif below). Here you can look at some games that use this tool.
To recreate the doodle effect, we first need to understand how it works and what techniques are used in it.
Shader effect First, we want this effect to be as simple as possible and not require additional scripts. This is possible through the use of shaders , telling Unity how to render 3D models (including flat ones!) On the screen. If you are unfamiliar with the world of shader coding , then you should study my article A Gentle Introduction to Shaders .
Sprite shader There are many types of shaders included in the Unity package. If you use the Unity-provided 2D tools, you are most likely working with sprites . If so, then you need a Sprite Shader - a special type of shader compatible with
Vertex offset. When drawing sprites manually, no frame will completely coincide with the others. We want to force the sprite to "hesitate" in some way in order to simulate this effect. In shaders, there is a very efficient way to do this by applying a vertex offset . This is a technique that allows you to change the position of the vertices of a 3D object. If we randomly shift them, we get the desired effect.
Travel time Hand-drawn animations usually have a low frame rate. If we want to simulate, say, five frames per second, then we need to change the position of the vertices of the sprites five times per second. However, Unity is likely to run the game with a much higher refresh rate; perhaps with 30 or even 60 frames per second. In order for the sprite to not change 60 times per second, you need to work on the component timings of the animation.
If you want to create a new shader in Unity, then the choice will be rather limited. The closest shader we can start with is the Unlit Shader , although it is not necessarily the best for our purposes.
If you want the Doodle shader to be fully compatible with
You can reach it by going to the Unity download archive page and downloading the Build in shaders package for the version of Unity you are working with. This is a zip file containing the source code of all the shaders shipped with your Unity build.

After downloading, unpack it and locate the
Inside
In short, the vertex function is called for each vertex of the 3D model and decides how to apply it to the two-dimensional screen space. In this tutorial we are only interested in how to displace an object.
The
By default, 2D-games created in Unity only operate on the X and Y axes, so we need to change
Doodle effect randomly shifts the position of each vertex. Sampling random numbers in a shader has always been a challenge. This is mainly due to the distributed GPU architecture, which complicates and reduces the efficiency of the reconstruction of the algorithm used in most libraries (including
In Nick Kaman's post, a noise texture was used, which, when sampled, gives the illusion of randomness. In the context of your project, this may not be the most efficient approach, because in this case the number of texture searches performed by the shader is doubled.
Therefore, in the majority of shaders, quite intricate and chaotic functions are used, which, despite their determinism, look like no regularities to us. And since they must be distributed, each random number must be generated with its own seed. This is great for us because the position of each vertex must be unique. We can use this to bind a random number to each vertex. We will discuss the implementation of this randomness function later; for now let's call it
We can use
Now we need to write the
One of the most common and iconic pseudo-random functions used in shaders is taken from a 1998 article by V. Ray called " On the formation of random numbers, with help of y = [(a + x) sin (bx)] mod 1 ".
This function is deterministic (that is, it is not truly random), but it behaves so chaotically that it looks completely random. Such functions are called pseudo-random . For my tutorial, I chose a more complex function, invented by Nikita Miropolsky
Generating a pseudo-random number in a shader is a very complex topic. If you are interested in learning more about it, then The Book of Shaders has a good chapter on it. In addition, Patricio Gonzales Vivo has assembled a large repository of pseudo-random functions called GLSL noise , which can be used in shaders.
Thanks to the code we wrote, each point is shifted in each frame by the same amount. So we get a distorted sprite, not a doodle effect. To fix this, you need to find a way to change the effect over time. One of the easiest ways to do this is to use both the vertex position and the current time to generate a random number.
In our case, I simply added the current time in seconds
More complex effects may require more complex ways of adding time to the equation. But since we are only interested in a discontinuous random effect, then two values are more than enough.
The main problem with adding
I have already considered binding in my blog, in the article How To Snap To Grid . In this article, I proposed a solution to the problem of binding an object position on a spatial grid. If we need to tie time to the time grid, then the mathematics, and therefore the code, will be the same.
The function shown below takes the number
That is, our code becomes:
The Unity package for this effect can be downloaded at Patreon .
Over the past few months, a large number of games in the style of doodles have appeared. It seems to me that the reason for this was the success of Doodle Studio 95! - Tool for Unity, developed by Fernando Ramallo . If this style fits your game, then I recommend to buy this amazing tool.
For the past few years, this style has become increasingly popular and has been used extensively in games such as GoNNER and Baba is You .
This tutorial tells everything you need, from the basics of coding shaders to the mathematics used. At the end of the article there is a link to download the full Unity package.
')
I was inspired by the success of Doodle Studio 95 to create this tutorial ! .
Introduction
In my blog, I explore fairly complex topics, from mathematics inverse kinematics to atmospheric Rayleigh scattering . I really like to make such difficult topics understandable to a wide audience. But the number of people interested in them and having a sufficient technical level is not so great. Therefore, you should not be surprised that the most popular articles are the simplest. This also applies to Nick Kaman’s recent tweet, in which he showed how to create a doodle effect in Unity.
After 1000 likes and 4000 retweets, it became clear that there is a strong demand for simpler tutorials that can be studied even by people who have almost no knowledge of creating shaders.
If you are looking for a professional and efficient way to animate 2D sprites with a high degree of artistic control, then I highly recommend Doodle Studio 95 to you! (see gif below). Here you can look at some games that use this tool.
Doodle effect anatomy
To recreate the doodle effect, we first need to understand how it works and what techniques are used in it.
Shader effect First, we want this effect to be as simple as possible and not require additional scripts. This is possible through the use of shaders , telling Unity how to render 3D models (including flat ones!) On the screen. If you are unfamiliar with the world of shader coding , then you should study my article A Gentle Introduction to Shaders .
Sprite shader There are many types of shaders included in the Unity package. If you use the Unity-provided 2D tools, you are most likely working with sprites . If so, then you need a Sprite Shader - a special type of shader compatible with
SpriteRenderer Unity. Or you can start with a more traditional Unlit shader .Vertex offset. When drawing sprites manually, no frame will completely coincide with the others. We want to force the sprite to "hesitate" in some way in order to simulate this effect. In shaders, there is a very efficient way to do this by applying a vertex offset . This is a technique that allows you to change the position of the vertices of a 3D object. If we randomly shift them, we get the desired effect.
Travel time Hand-drawn animations usually have a low frame rate. If we want to simulate, say, five frames per second, then we need to change the position of the vertices of the sprites five times per second. However, Unity is likely to run the game with a much higher refresh rate; perhaps with 30 or even 60 frames per second. In order for the sprite to not change 60 times per second, you need to work on the component timings of the animation.
Step 1: Supplement the Sprite Shader
If you want to create a new shader in Unity, then the choice will be rather limited. The closest shader we can start with is the Unlit Shader , although it is not necessarily the best for our purposes.
If you want the Doodle shader to be fully compatible with
SpriteRenderer Unity, then we need to add an existing Sprite Shader . Unfortunately, we cannot access it directly from Unity itself.You can reach it by going to the Unity download archive page and downloading the Build in shaders package for the version of Unity you are working with. This is a zip file containing the source code of all the shaders shipped with your Unity build.
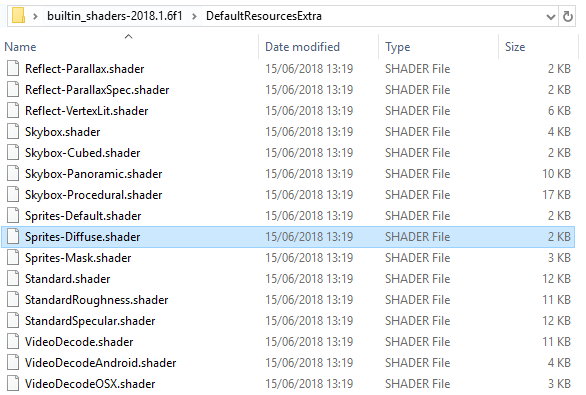
After downloading, unpack it and locate the
Sprites-Diffuse.shader file in the folder builtin_shaders-2018.1.6f1\DefaultResourcesExtra Sprites-Diffuse.shader . This is the file we will use in the tutorial.Sprites-Diffuse is not a standard sprite shader!
When creating a new sprite, its standard material uses a shader called
The difference between them is that the first one does not use lighting, and the second one reacts to the lighting in the scene. Due to the nature of the Unity implementation, the diffuse version is much easier to edit than the version without lighting.
At the end of this tutorial there is a link to download doodle shaders with and without lighting.
Sprites-Default.shader , not Sprites-Diffuse.shader .The difference between them is that the first one does not use lighting, and the second one reacts to the lighting in the scene. Due to the nature of the Unity implementation, the diffuse version is much easier to edit than the version without lighting.
At the end of this tutorial there is a link to download doodle shaders with and without lighting.
Step 2: Vertex Shift
Inside
Sprites-Diffuse.shader there is a function called vert , which is the vertex function that we talked about above. Its name is not important, the main thing is that it coincides with the directive #pragma specified in the vertex: section: #pragma surface surf Lambert vertex:vert nofog nolightmap nodynlightmap keepalpha noinstancing In short, the vertex function is called for each vertex of the 3D model and decides how to apply it to the two-dimensional screen space. In this tutorial we are only interested in how to displace an object.
The
appdata_full v parameter contains a vertex field, which contains the 3D position of each vertex in the object space . When the value changes, the vertex shifts. That is, for example, the code shown below will transfer the object with its shader by one unit along the X axis. void vert (inout appdata_full v, out Input o) { v.vertex = UnityFlipSprite(v.vertex, _Flip); v.vertex.x += 1; #if defined(PIXELSNAP_ON) v.vertex = UnityPixelSnap (v.vertex); #endif UNITY_INITIALIZE_OUTPUT(Input, o); o.color = v.color * _Color * _RendererColor; } By default, 2D-games created in Unity only operate on the X and Y axes, so we need to change
v.vertex.xy to move the sprite on a two-dimensional plane.What is object space?
The
Vertices expressed in world space reflect their real position in the Unity scene.
vertex field of the appdata_full structure contains the position of the current vertex processed by the shader in the object space. This is the vertex position with the assumption that the object is located in the center of the world (0,0,0), without changing the scale and without turning.Vertices expressed in world space reflect their real position in the Unity scene.
Why is the object not moving at a speed of one meter per frame?
If we add +1 to the
This happens because changes made by C # change the position itself. In the vertex function this does not occur. The shader changes only the visual representation of the model, but does not update or modify the stored model vertices. That is why adding +1 to
x component of the transform.position value in the Update method of the script in C #, we will see how the object flies to the right at a speed of 1 meter per frame, that is, approximately 216 kilometers per hour.This happens because changes made by C # change the position itself. In the vertex function this does not occur. The shader changes only the visual representation of the model, but does not update or modify the stored model vertices. That is why adding +1 to
v.vertex.x displaces an object by meter only once.Remember to import the sprite as a tight!
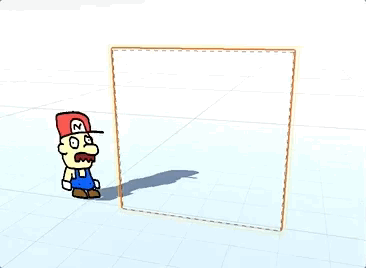
This effect offsets the vertices of the sprite. Traditionally sprites are imported to Unity as quadrangles (see on the left in the picture). This means that they have only four vertices. If so, then it will be possible to move only these points, which reduces the force of the doodle effect.
For stronger and more realistic distortion, you need to import sprites by selecting the Tight value for the Mesh Type parameter, which turns them into a convex shape (see the right of the figure).
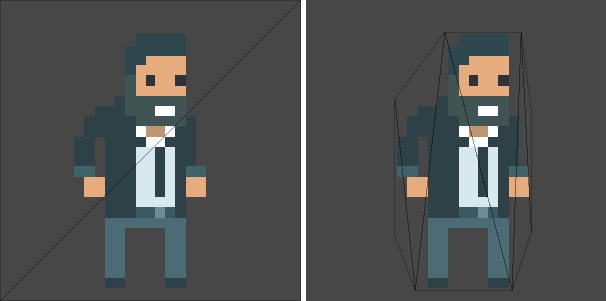
This increases the number of vertices. This is not always desirable, but this is exactly what we need now.
For stronger and more realistic distortion, you need to import sprites by selecting the Tight value for the Mesh Type parameter, which turns them into a convex shape (see the right of the figure).
This increases the number of vertices. This is not always desirable, but this is exactly what we need now.
Random offset
Doodle effect randomly shifts the position of each vertex. Sampling random numbers in a shader has always been a challenge. This is mainly due to the distributed GPU architecture, which complicates and reduces the efficiency of the reconstruction of the algorithm used in most libraries (including
Mathf.Random ).In Nick Kaman's post, a noise texture was used, which, when sampled, gives the illusion of randomness. In the context of your project, this may not be the most efficient approach, because in this case the number of texture searches performed by the shader is doubled.
Therefore, in the majority of shaders, quite intricate and chaotic functions are used, which, despite their determinism, look like no regularities to us. And since they must be distributed, each random number must be generated with its own seed. This is great for us because the position of each vertex must be unique. We can use this to bind a random number to each vertex. We will discuss the implementation of this randomness function later; for now let's call it
random3 .We can use
random3 to generate a random offset for each vertex. In the example below, random numbers are scaled using the _NoiseScale property, which allows you to control the strength of the offset. void vert (inout appdata_full v, out Input o) { ... float2 noise = random3(v.vertex.xyz).xy * _NoiseScale; v.vertex.xy += noise; ... } Now we need to write the
random3 code random3 .Shader randomness
One of the most common and iconic pseudo-random functions used in shaders is taken from a 1998 article by V. Ray called " On the formation of random numbers, with help of y = [(a + x) sin (bx)] mod 1 ".
float rand(float2 co) { return fract(sin(dot(co.xy ,float2(12.9898,78.233))) * 43758.5453); } This function is deterministic (that is, it is not truly random), but it behaves so chaotically that it looks completely random. Such functions are called pseudo-random . For my tutorial, I chose a more complex function, invented by Nikita Miropolsky
Generating a pseudo-random number in a shader is a very complex topic. If you are interested in learning more about it, then The Book of Shaders has a good chapter on it. In addition, Patricio Gonzales Vivo has assembled a large repository of pseudo-random functions called GLSL noise , which can be used in shaders.
Step 3: add time
Thanks to the code we wrote, each point is shifted in each frame by the same amount. So we get a distorted sprite, not a doodle effect. To fix this, you need to find a way to change the effect over time. One of the easiest ways to do this is to use both the vertex position and the current time to generate a random number.
In our case, I simply added the current time in seconds
_Time.y to the vertex position. float time = float3(_Time.y, 0, 0); float2 noise = random3(v.vertex.xyz + time).xy * _NoiseScale; v.vertex.xy += noise; More complex effects may require more complex ways of adding time to the equation. But since we are only interested in a discontinuous random effect, then two values are more than enough.
Time switching
The main problem with adding
_Time.y is that it causes the sprite to animate in each frame. This is undesirable for us, because most hand-drawn animations have a low frame rate. The time component should not be continuous, but discrete. This means that if we want to display five frames per second, then it should change only five times per second. That is, the time must be tied to one-fifth of a second. The only valid values should be , , , , , c, and so on ...I have already considered binding in my blog, in the article How To Snap To Grid . In this article, I proposed a solution to the problem of binding an object position on a spatial grid. If we need to tie time to the time grid, then the mathematics, and therefore the code, will be the same.
The function shown below takes the number
x and binds it to integer multiples of snap . inline float snap (float x, float snap) { return snap * round(x / snap); } That is, our code becomes:
float time = snap(_Time.y, _NoiseSnap); float2 noise = random3(v.vertex.xyz + float3(time, 0.0, 0.0) ).xy * _NoiseScale; v.vertex.xy += noise; Conclusion
The Unity package for this effect can be downloaded at Patreon .
Additional resources
Over the past few months, a large number of games in the style of doodles have appeared. It seems to me that the reason for this was the success of Doodle Studio 95! - Tool for Unity, developed by Fernando Ramallo . If this style fits your game, then I recommend to buy this amazing tool.
Source: https://habr.com/ru/post/449540/
All Articles