Create a widget using custom CSS properties: embed a custom link to the NHL website
The author of the course on Netology “HTML layout”, Stas Melnikov, showed an example of the layout of a widget that can be embedded on a third-party site.
Last time we told you what user properties are , and now, using the example of the NHL website, we will show how to build a custom link with them.
Sometimes you need to develop one widget that will be implemented in various projects. Because of the peculiarity of the work of CSS specificity, it often turns into a headache.
')
I came up with a solution to this problem when I found out about user properties. I’ll show how it works: I’ll create an
The widget will have three custom properties with which you can set values for the built-in
To connect my CSS file I open
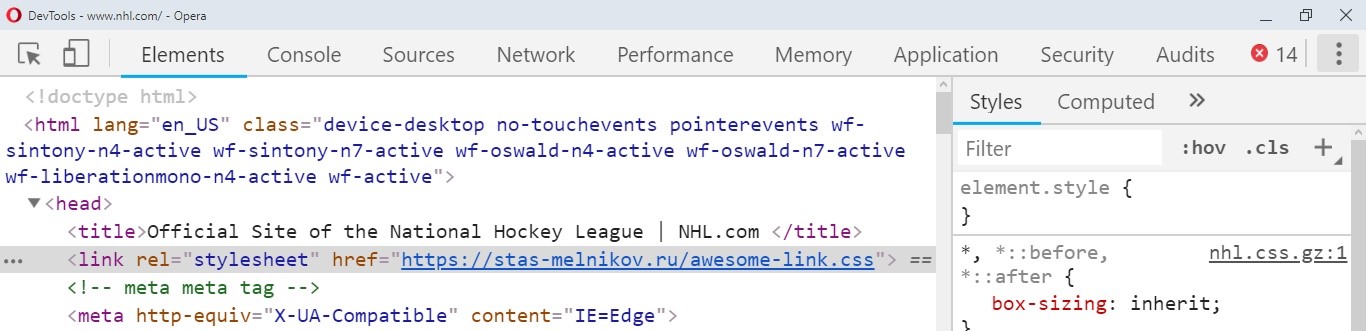
Let's change the Stats link in the site menu. Adding an
If you look at the CSS element, you can see that because of the specificity of the
Familiar picture, right? To make the built-in properties of the widget always take precedence over author styles, add
Many fear the words, and for a reason. Indeed, if you need to change the values, you will have to put once again
Let's solve this problem using custom properties: it is through them that you can control the values of the built-in properties. Let's see how it works.
Now you can set values for the built-in

Stats element changed color and size
We see that the settings work, but check their values in the Computed tab.
Everything worked as it should.
For the experiment, try adding another

Visually, the item is displayed as:

Shedule of a different color and size
I know that readers will have doubts about the use of the
Courses "Netology" on the topic:
Last time we told you what user properties are , and now, using the example of the NHL website, we will show how to build a custom link with them.
Sometimes you need to develop one widget that will be implemented in various projects. Because of the peculiarity of the work of CSS specificity, it often turns into a headache.
')
I came up with a solution to this problem when I found out about user properties. I’ll show how it works: I’ll create an
awesomeLink widget and try to embed it on NHL.com.The widget will have three custom properties with which you can set values for the built-in
color , font-size and display properties. For the display property, I set the default inline-block . .awesomeLink { --uiAwesomeLinkColor: var(--awesomeLinkColor); --uiAwesomeLinkFontSize: var(--awesomeLinkFontSize); --uiAwesomeLinkDisplay: var(--awesomeLinkDisplay, inline-block); display: var(--uiAwesomeLinkDisplay); font-size: var(--uiAwesomeLinkFontSize); color: var(--uiAwesomeLinkColor); } To connect my CSS file I open
devTools and add the link tag.Change the Stats element in the NHL.com site menu.
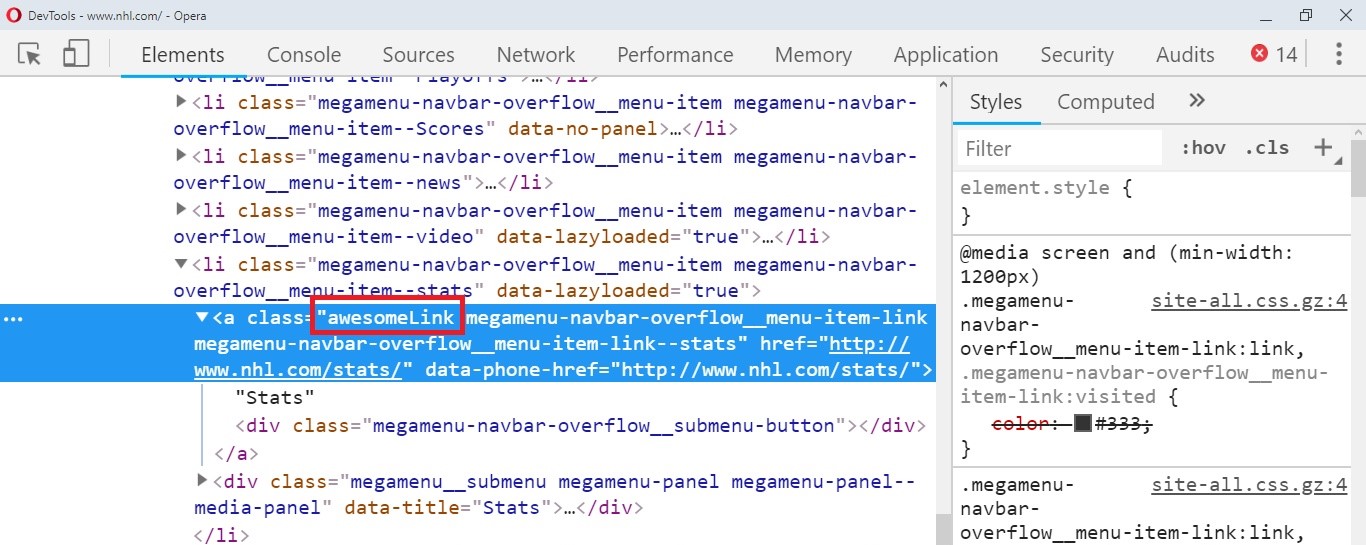
Let's change the Stats link in the site menu. Adding an
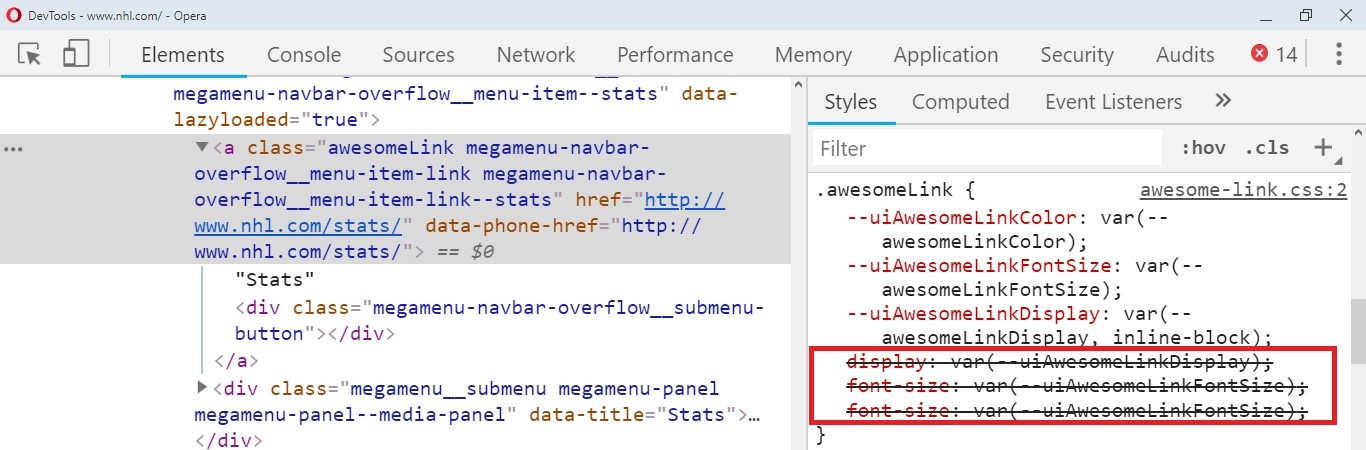
awesomeLink class to the “Stats” element in the navigation.If you look at the CSS element, you can see that because of the specificity of the
display , font-size and color properties are crossed out.Familiar picture, right? To make the built-in properties of the widget always take precedence over author styles, add
!important .Many fear the words, and for a reason. Indeed, if you need to change the values, you will have to put once again
!important , and this already leads to an endless struggle with it.Let's solve this problem using custom properties: it is through them that you can control the values of the built-in properties. Let's see how it works.
.awesomeLink { --uiAwesomeLinkColor: var(--awesomeLinkColor); --uiAwesomeLinkFontSize: var(--awesomeLinkFontSize); --uiAwesomeLinkDisplay: var(--awesomeLinkDisplay, inline-block); display: var(--uiAwesomeLinkDisplay) !important; font-size: var(--uiAwesomeLinkFontSize) !important; color: var(--uiAwesomeLinkColor) !important; } Now you can set values for the built-in
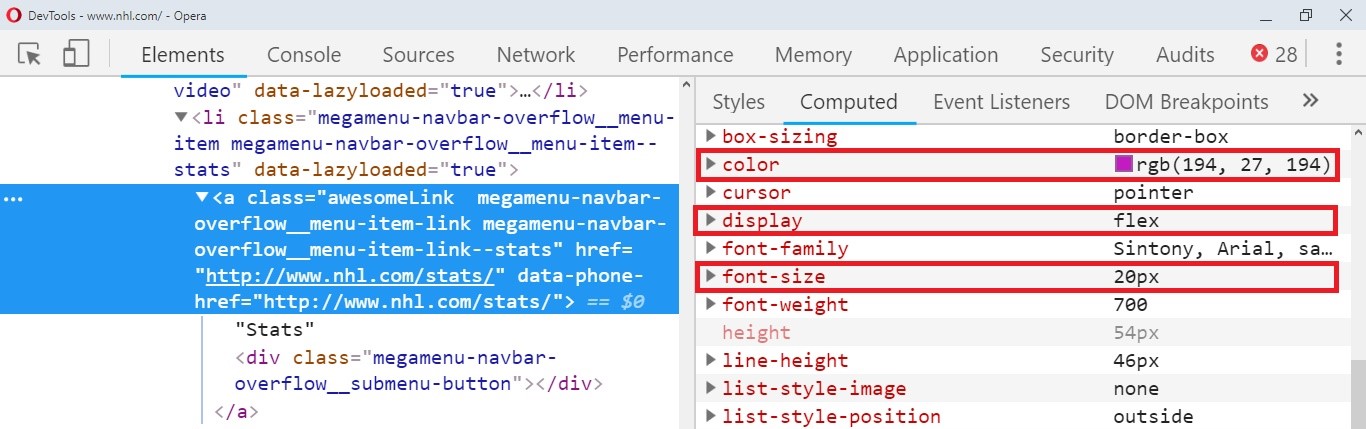
color , font-size and display properties: :root { --awesomeLinkColor: #c21bc2; --awesomeLinkFontSize: 20px; --awesomeLinkDisplay: flex; } Stats element changed color and size
We see that the settings work, but check their values in the Computed tab.
Everything worked as it should.
Control experiment: change the item Shedule
For the experiment, try adding another
awesomeLink class to the Schedule element. We set the settings in its parent element li with the class megamenu-navbar-overflow__menu-item . .megamenu-navbar-overflow__menu-item:nth-child(6) { --awesomeLinkColor: tomato; --awesomeLinkFontSize: 25px; --awesomeLinkDisplay: block; } Visually, the item is displayed as:
Shedule of a different color and size
I know that readers will have doubts about the use of the
!important declaration. I also had doubts, but so far I have not encountered any problems. If you see problems due to !important , let's discuss in the comments.From the Editor
Courses "Netology" on the topic:
- online profession " Frontend-developer "
- online profession " Web Developer "
- online profession " Tester "
- free online course "The Basics of HTML and CSS "
Source: https://habr.com/ru/post/449418/
All Articles