Comments on the release of Android Studio 3.4 (April 2019)
Android Studio 3.4 is a major release with various new features and enhancements.
IntelliJ IDEA 2018.3.4
- Android Studio core updated with improvements from IntelliJ IDEA from 2018.3.4 release
Android Gradle plugin 3.4.0
- About the new Android Gradle plugin 3.4.0 see the release notes
New Project Structure Dialog
- New Project Structure Dialogue (PSD) makes it easy to update dependencies and configure various aspects of your project, such as modules, build options, signing configurations, and build variables
- You can open the PSD by choosing "File> Project Structure" in the menu. You can also open the PSD via Ctrl + Shift + Alt + S on Windows and Linux, or Command +; (semicolon) in macOS. Below is a description of the innovations and PSD updates.
Variables
section allows you to create and manage build-variables, for example, to set what should be the version of the corresponding dependencies for the entire project

- quick review and editing of the build variables already existing in the Gradle build scripts of your project
- adding new build variables to the project- or modul-level directly from the Project Structure dialog
- NOTE: if existing build configuration files set values through Groovy complex scripts, you may not be able to edit these values through the Project Structure dialog. In addition, you cannot edit build files written in Kotlin using the Project Structure dialog
Modules
- configure the properties that are applied in all versions of the assembly existing in the modules or add new modules to your project using the Modules section. For example, here you can configure the defaultConfig property or manage signing configurations.
Dependencies
inspect and view each dependency graph of your project’s dependency graph built by Gradle when synchronizing a project by following these steps:
- on the left psd panel, select "Dependencies"
- On the Modules panel, select the module for which you would like to see the dependencies.
- on the right side of the PSD, open the "Resolved Dependencies" panel as shown below.
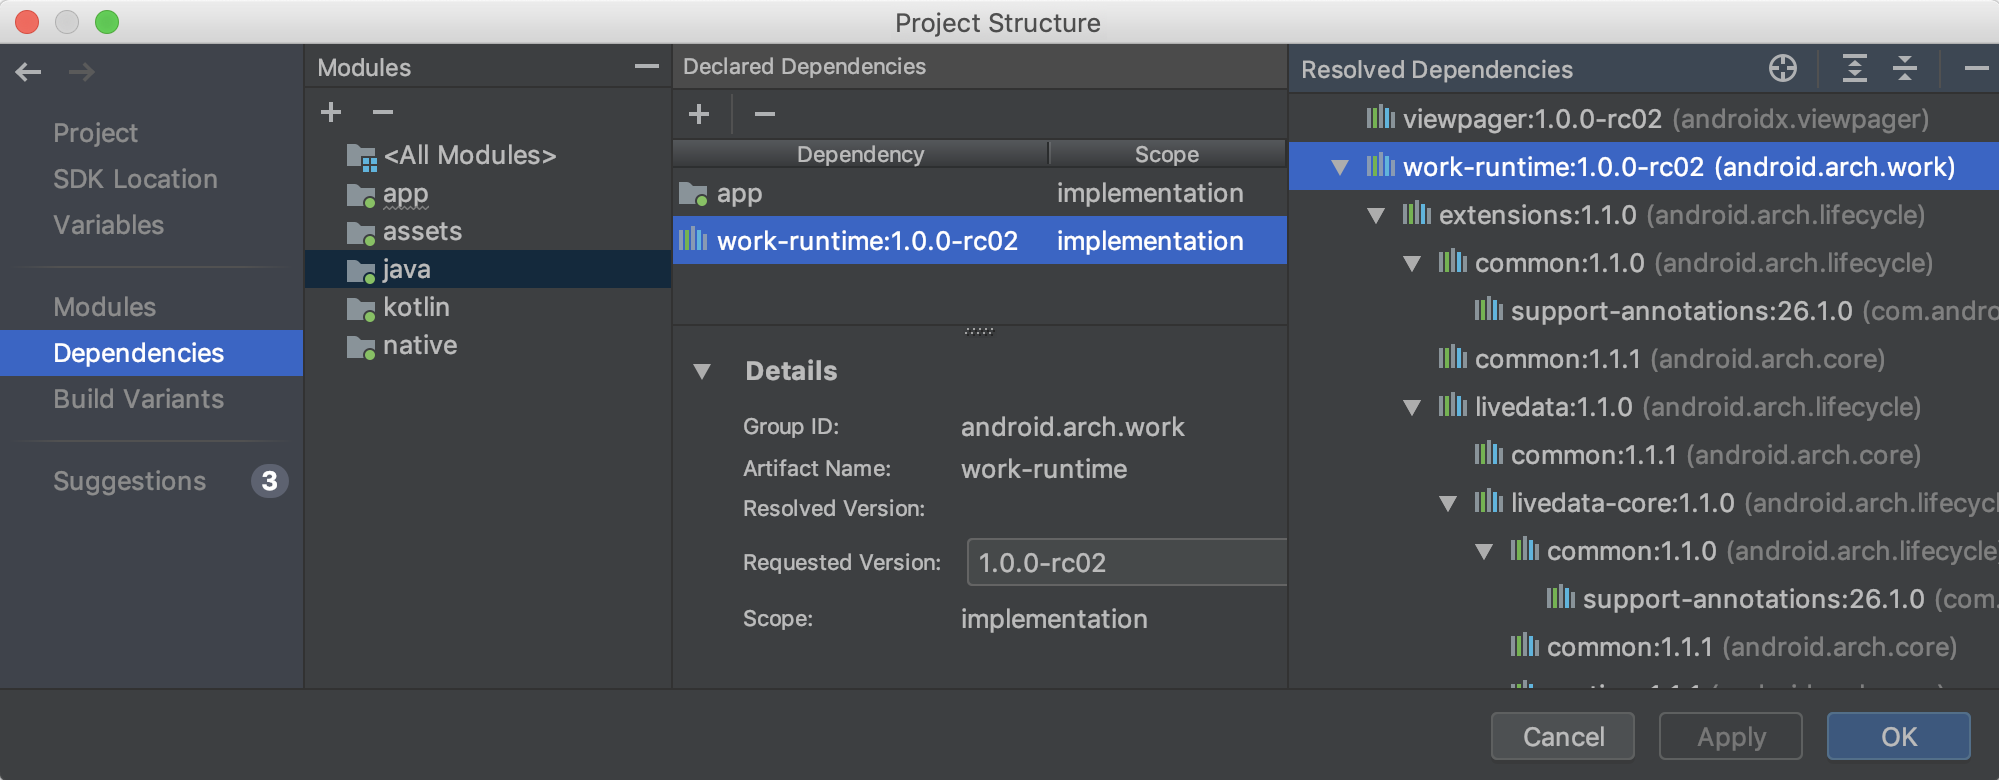
You can also quickly find and add dependencies to your project by selecting a module and clicking the "+" button in the "Declared Dependencies" section, and then selecting the type of dependency you want to add.
depending on the type of dependency you choose, you should see a dialog similar to the one below that helps you add dependencies to the module
')
Assembly options
- In this section of the PSD, builds and configurations ('product flavors') for each module of your project are created and configured. You can add templates ('placeholders') of the manifest, ProGuard files and assign signing keys, etc.

Tips
- You can see the proposed updates for your project’s dependencies and build options in the “Suggestions” section, as shown below.

New 'Resource Manager'
The 'Resource Manager' is a new tool for importing, creating, managing, and using the resources of your application. You can open this tool through the menu "View> Windows Tool> Resource Manager". Resource Manager allows you to do the following:

- Visualize resources: you can preview the drawables, colors and layouts to quickly find the right resource.
- Bulk import: you can import multiple drawable assets at once simply by dragging them into the 'resource manager' or through the "Import drawables" wizard. To access the wizard, click the "+" button in the upper left corner of the window and then select "Import Drawables" from the drop-down list
- Convert SVG files to VectorDrawables objects: you can use the "Import Drawables" wizard to convert your SVG images to VerctorDrawables objects
- Drag & Drop assets: from the 'Resource Manager' window you can drag drawables into your design and into the 'Layout Editor' XML widgets
- Alternative versions of widgets: now you can have alternative versions of your resources by double-clicking on a resource in the "Tool" window. You will see the various versions you have created and what qualifications they contain.
- Display by tile or list: you can change the display in the visualization window of your resources using their different placement
See Manage app resources for more information.
Check build IDs for profiling and debugging APKs
- when you provide "debugging symbol files" of shared .so libraries inside your APK, Android Studio checks that the build ID of the "debugging symbol files" matches the build ID of the .so libraries inside the APK
- if you build native libraries in your APK with a build ID, Android Studio checks if the build ID of your "symbol files" and build ID of your native libraries matches and resets the "symbol files" if there is no match. If you do not build with a build ID, then providing incorrect "symbol files" can lead to problems when debugging.
R8 is enabled by default
R8 combines desugaring, compression, obfuscation, optimization and dexing in one step, which gives a noticeable performance improvement. R8 was introduced in Android Gradle plugin 3.3.0 and is now enabled by default for both application and Android library projects using plugin version 3.4.0 or higher.
The image below outlines the process of compiling to R8.

Now, with R8, desugaring, compression, obfuscation, optimization, and dexing (D8) are performed in one step, as shown below

R8 is designed to work with your existing ProGuard rules, so you don’t need to take any action to take advantage of R8. Meanwhile, since this technology is different from ProGuard, which is designed specifically for Android projects, compression and optimization may consist in removing code that ProGuard does not delete. Therefore, in this unlikely situation, you may need to add additional rules to save this code in the final assembly.
if you have problems using R8, read the R8 compatibility FAQ to see if there is a ready-made solution. If the decision is not yet documented, please report the bug . You can disable R8 by adding one of the following instructions to your project’s gradle.properties file:
 <i> # disable R8 for Android Library modules only </ i>
 android.enableR8.libraries = false </ p>
 <p> <i> # Disable R8 for all modules </ i>
 android.enableR8 = false
NOTE: for the specified build type, if you set false for useProguard in the build.gradle file of your app module, the Android Gradle plugin will use R8 to compress the application code for this build type, whether or not R8 is disabled in your project’s gradle.properties
The Navigation Editor now supports all argument types.
- All types supported by the Navigation component are now supported in the Navigation Editor. For more information on supported types, see Pass data between destinations.
Improvements in the Layout Editor
The "Attributes" panel in the Layout Editor has been simplified to a single page with sections that you can expand to customize the attributes you want. The "Attributes" panel also has the following updates:
- The new section "Declared Attributes" lists the attributes specified in the layout file and allows you to quickly add new ones.
- The "Attributes" panel is now also equipped with an indicator next to each attribute that is filled when the attribute value is a resource.
- Now attributes with errors and warnings are highlighted. Red lights indicate errors (for example, when you use incorrect placement values), and orange indicates warnings (for example, when you use hard-coded values)
New action hints for quick import of dependencies
- If you start using certain Jetpack and Firebase classes in your code, new action hints suggest adding the necessary Gradle library dependencies to your project, if they have not yet been added. For example, if you refer to the WorkManager class for the first time, the android.arch.work:work-runtime dependency is required, and the action hint will allow you to add it in one click as shown below

- in particular, because Jetpack is presented in separate packages (which makes it easier to manage and update), an action prompt helps you to quickly add only dependencies necessary for Jetpack components you use.
3.4.0 known issues
- profiling is disabled when your application is enabled on devices running Android Q Beta
- when using the Data Binding Library, LiveDataListener.onChanged () may fall from a NullPointerException. A fix for this issue will be included in Android Studio 3.4.1 and this is already available in the latest Preview version of Android Studio 3.5 (see bug 122066788 )
Source: https://habr.com/ru/post/448860/
All Articles