SpaceVIL - cross-platform GUI framework for development on .Net Core, .Net Standard and JVM
In this article I will try to talk about the SpaceVIL (Space of Visual Items Layout) framework, which is used to build custom graphical interfaces on the .Net / .Net Core and JVM platforms.
SpaceVIL is a cross-platform and multilingual framework, it is based on the OpenGL graphics technology, and the GLFW library is responsible for creating windows. Using this framework, you can work and create graphical client applications in Linux, Mac OS X, Windows operating systems. For C # programmers at this time, this is especially true, given that Microsoft is not going to transfer WPF to other operating systems and Avalonia is the only possible counterpart. A special feature of SpaceVIL in this particular case is multilingual, that is, at the moment the framework for .Net Core can be used in conjunction with the following programming languages: C #, VisualBasic. The JVM framework can be used in conjunction with the Java and Scala languages. That is, SpaceVIL can be used with any of these languages and the final code will look the same, so you will not have to relearn again when switching to another language.
SpaceVIL is still at the alpha stage, but despite this, the framework can be fully used right now, because the framework has everything you need to build a complex UI, as well as to create completely new visual user elements. The purpose of this article is to convince you of this.
SpaceVIL was developed from scratch and that is why the framework contains its own principles that distinguish it from its counterparts.
- The user SpaceVIL full control over what is happening.
- Any application written in SpaceVIL will look exactly the same on all platforms. There are no pitfalls. You can use any version of SpaceVIL (.Net / JVM, Mac OS X, Linux, Windows), the result and appearance will always be the same.
- SpaceVIL version for JVM is identical in use to SpaceVIL version for .Net
- SpaceVIL provides opportunities for deep customization of the element, since all interactive objects are containers for other interactive objects.
- The framework is very flexible and easy to use, since there are few basic strict rules in it, and the only thing you need to understand before you start working with it is what the Padding, Margin, Alignment parameters mean (anyone who has created simple interfaces, for example , in WPF, Android Studio or wrote styles in CSS).
- SpaceVIL will not require you to do any deep study of its entrails and it will do exactly what you write. All elements follow the general rules, one approach will work on all elements. Having remembered the base, it will be possible to predict both the composition of the elements and the ways of its styling.
- The framework is very lightweight, less than a megabyte and all in one file.
Opportunities
Now let's see what the current version framework is capable of.
- 54 elements are available for use, of which 10 are specialized containers, 6 primitives (non-interactive elements) and 38 interactive elements for various purposes.
- On the basis of all these elements, together with the implementation of special interfaces, you can create your own elements of any complexity.
- There is a styling of elements, the ability to create entire themes styles or change / replace the style of any standard element in the framework. So far there is only one theme in SpaceVIL and it is installed by default.
- There is a state system. Each element can be assigned a visual state to one of the methods of external influence: hovering the cursor on the element, pressing the mouse button, releasing the mouse button, switching, focusing and turning off the element.
- Present event filtering. Each element in the interaction can filter out the events passing through it, which allows some events to pass through the element, and others to be discarded. In the example I will tell about it in more detail.
- Implemented a system of floating independent elements.
- Implemented a system of dialog boxes and dialog elements.
- Implemented independent rendering. Each window has two threads - one controls the rendering, the other performs tasks from incoming events, that is, the window now always continues rendering (and does not "hang"), regardless of the task that was started after pressing a button.
Structure
Now let's look at the structure of the elements. The framework contains the following types of elements: windows, both active and interactive, containers, for convenient positioning of elements, interactive elements and primitives. Let's take a quick look at all of the above. I hope that it is not necessary to explain such windows, I will only note that the dialog box blocks the window that caused it until it is closed.
Containers
The following container types are represented in SpaceVIL:
- Common container (elements inside such a container are positioned by the parameters alignment, padding, margin, size and size policy).
- Vertical and horizontal stacks (elements added to such a container will be arranged in order without the need to fine-tune the parameters that are needed when using the previous container type).
- Grid - elements are added to the grid cells and positioned inside their cell.
- A list (ListBox, TreeView) container based on a vertical stack, but with the ability to scroll to display items that did not fit into the container.
- The splitter (SplitArea), the container can be of two types - vertical and horizontal, separates two areas and interactively controls the sizes of these areas.
- A tabbed container (TabView) controls the visibility of pages.
- WrapGrid, positioning elements inside cells of a certain size, fills all free space according to the orientation with scrollability (the most vivid example is the Windows Explorer in the icon display mode).
- And finally, a free container, probably the rarest container named, is an endless area to which you can add any fixed-size items, but it’s better to use in combination with an item of the ResizableItem type.
Interactive elements
Elements of this type take many states and have different events. If it is simpler, everything with which you can interact and there are interactive elements, for example: a button, a checkbox, an element for entering text, and others.
Primitives
In contrast to interactive elements, there are primitives, completely non-interactive elements, it is impossible to contact them, they exist just to show themselves. Types of primitives: a triangle, a rectangle, an ellipse and a bit more complicated - an arbitrary shape that can take on the appearance of any complexity.
There are also static service classes. Some of these classes allow the programmer to get and customize items to your liking. For example, there is a class that controls the styles of elements, and a class with which you can set an arbitrary form of display to an interactive element, a class of default settings, and so on.
An example of a simple application using the SpaceVIL framework
I have a small point about examples. You can always come up with an abstract and accurately displaying functional example, but if you read it from the side, it always looks very unconvincing, so as examples I try to make small but ready-made applications that serve some sensible purpose.
Let's go to the description of the application. The program is an editor of hero cards for games like "Dungeons and Dragons" and has the name CharacterEditor. The program randomly generates a specified number of different characters with names, age, race, gender, class, and characteristics. The user is given the opportunity to write a biography and give the character specialized skills. As a result, you can save the hero card as a text file. Let's proceed directly to the analysis of the code. The program is written in C #. When using Java, the code will be essentially the same.
As a result, we get this application:

Creating an application window
At this stage we will create a window. Let me remind you that SpaceVIL uses GLFW, so if you are writing an application for the .Net platform, then the compiled GLFW library needs to be copied next to the executable file. The JVM uses the GLFW library wrapper (LWJGL), which already includes compiled GLFW.
Next, fill the rendering area with the necessary elements and give them a nice appearance. The main steps to achieve this are as follows:
- Initialize SpaceVIL before using it. In the Main function it is enough to write:
if (!SpaceVIL.Common.CommonService.InitSpaceVILComponents()) return; - Now create a window. To do this, you need to write the window class, inheriting it from the
SpaceVIL.ActiveWindowclass, describe theInitWindow()method and set it with several basic parameters, such as the window name, the text of the title bar, and dimensions. As a result, we get a code that looks like this:
using System; using SpaceVIL; namespace CharacterEditor { internal class MainWindow : ActiveWindow { public override void InitWindow() { SetParameters("CharacterEditor", "CharacterEditor", 1000, 600); } } } - It remains only to create an instance of this class and call it. To do this, add the Main method with the following lines of code:
MainWindow mw = new MainWindow(); mw.Show(); Everything, at this stage you can start the application and check whether everything works.
Filling elements
To implement the CharacterEditor application, I decided to place a title bar, a tool bar and a vertical separator on the window. The toolbar will contain: a button for updating the list of newly generated characters, a button for saving a character and an element with the number of characters generated. In the left part of the vertical separator will be a list of generated characters, and in the right text area to edit the selected character from the list. In order not to litter the window class with the element settings, you can write a static class, which will provide us with elements that are ready in appearance and settings. When adding it is important to remember that every interactive element, whether a button or a list is a container, that is, you can put anything you want into a button, from primitives to another container and any complex element is just a collection of simpler elements that serve one goal. Knowing this, you need to remember the first strict rule - before adding other elements to an element, you need to add it yourself somewhere, either to the window class itself (in our case, this is MainWindow ), or to the container or any other interactive element. Let's explain with an example:
public override void InitWindow() { SetParameters("CharacterEditor", "CharacterEditor", 1000, 600); // Frame frame = new Frame(); // , frame ButtonCore btn = new ButtonCore("Button"); // , // . // frame , //, . frame.AddItem(btn); // frame AddItem(frame); } It will be correct to first add the frame to the window, and then add a button to the frame . It may seem that the rule is very inconvenient and you have to sweat when creating a complex window, which is why SpaceVIL encourages you to create your own elements, which greatly simplify the addition of elements. Creating your own elements will show and explain later. Let's go back to the app. Here is a window as a result:

Now analyze the code:
internal ListBox ItemList = new ListBox(); // internal TextArea ItemText = new TextArea(); // internal ButtonCore BtnGenerate; // internal ButtonCore BtnSave; // internal SpinItem NumberCount; // public override void InitWindow() { SetParameters("CharacterEditor", "CharacterEditor", 1000, 600); IsBorderHidden = true; // IsCentered = true; // // TitleBar title = new TitleBar(nameof(CharacterEditor)); // title.SetIcon( DefaultsService.GetDefaultImage(EmbeddedImage.User, EmbeddedImageSize.Size32x32), 20, 20); // , VerticalStack layout = ItemFactory.GetStandardLayout(title.GetHeight()); // HorizontalStack toolbar = ItemFactory.GetToolbar(); // VerticalSplitArea splitArea = ItemFactory.GetSplitArea(); // BtnGenerate = ItemFactory.GetToolbarButton(); // BtnSave = ItemFactory.GetToolbarButton(); // NumberCount = ItemFactory.GetSpinItem(); // ItemText.SetStyle(StyleFactory.GetTextAreaStyle()); // AddItems(title, layout); layout.AddItems(toolbar, splitArea); toolbar.AddItems(BtnGenerate, BtnSave, ItemFactory.GetVerticalDivider(), NumberCount); splitArea.AssignLeftItem(ItemList); splitArea.AssignRightItem(ItemText); // BtnGenerate.AddItem(ItemFactory.GetToolbarIcon( DefaultsService.GetDefaultImage(EmbeddedImage.Refresh, EmbeddedImageSize.Size32x32))); BtnSave.AddItem(ItemFactory.GetToolbarIcon( DefaultsService.GetDefaultImage(EmbeddedImage.Diskette, EmbeddedImageSize.Size32x32))); } In the ItemFactory class ItemFactory I described the appearance and location of elements. For example, the ItemFactory.GetToolbarButton() method looks like this:
internal static ButtonCore GetToolbarButton() { ButtonCore btn = new ButtonCore(); // btn.SetBackground(55, 55, 55); // btn.SetHeightPolicy(SizePolicy.Expand); // btn.SetWidth(30); // btn.SetPadding(5, 5, 5, 5); // // , btn.AddItemState(ItemStateType.Hovered, new ItemState(Color.FromArgb(30, 255, 255, 255))); // ItemState return btn; } The remaining elements are described similarly.
Creating and applying styles
As you can see, I applied a style to the ItemText element. So let's take a look at how to create styles and, first, take a look at the style code:
Style style = Style.GetTextAreaStyle(); // style.Background = Color.Transparent; // Style textedit = style.GetInnerStyle("textedit"); // textedit.Foreground = Color.LightGray; // Style cursor = textedit.GetInnerStyle("cursor"); // cursor.Background = Color.FromArgb(0, 162, 232);// As you see, I took a ready-made style from the SpaceVIL.Style class for this element and slightly modified it by correcting the colors. Each style can contain several interior styles for styling each component of a complex element. For example, the CheckBox element consists of a container, an indicator and text, so its style has internal styles for the indicator ("indicator") and text ("textline").
The Style class covers all the visual properties of elements and, in addition, using the style, you can interactively change the shape of an element, for example, from ellipse to rectangle and back. To apply a style, you need to call the SetStyle(Style style) method on the element, as shown above:
ItemText.SetStyle(StyleFactory.GetTextAreaStyle()); Create your own item
We now turn to the creation of the element. The element itself does not have to be something specific, it can be a regular stack in which you add several other elements. For example, in the example above, I have a toolbar in which there are three elements. The toolbar itself is just a horizontal stack. Everything could be arranged as a separate element and call it ToolBar. By itself, it does nothing, but in the MainWindow class the number of lines would be reduced and understanding of the markup would be even easier, besides, it is also a way to weaken the first strict rule, although, of course, in the end, everything obeys everything. Okay, the toolbar we no longer touch. We need an item for the list that will display the generated character.
To make it more interesting, we define the composition of the element more difficult:
- Icon character, the color of which indicates the belonging to the fantasy race.
- Name, surname and race of the character in text form.
- Button for quick help on a character (needed to demonstrate event filtering).
- Button to delete a character if it does not suit us.
To create a class of your own element, you need to inherit it from any interactive element from SpaceVIL, if we have at least some class in it, but for the current example we will collect an element from scratch, so we will inherit it from the base abstract class of interactive elements - SpaceVIL.Prototype . We also need to implement the InitElements() method, in which we describe the appearance of the element, the location and type of nested elements, as well as the order of adding nested elements. The element itself is called CharacterCard .
Let's move on to parsing the code of the finished item:
using System; using System.Drawing; using SpaceVIL; using SpaceVIL.Core; using SpaceVIL.Decorations; using SpaceVIL.Common; namespace CharacterEditor { // SpaceVIL.Prototype internal class CharacterCard : Prototype { private Label _name; private CharacterInfo _characterInfo = null; // CharacterInfo, // internal CharacterCard(CharacterInfo info) { // // SetSizePolicy(SizePolicy.Expand, SizePolicy.Fixed); SetHeight(30); // SetBackground(60, 60, 60); // SetPadding(10, 0, 5, 0); // SetMargin(2, 1, 2, 1); // AddItemState(ItemStateType.Hovered, new ItemState(Color.FromArgb(30, 255, 255, 255))); _characterInfo = info; // // Label _name = new Label(info.Name + " the " + info.Race); } public override void InitElements() { // ImageItem _race = new ImageItem(DefaultsService.GetDefaultImage( EmbeddedImage.User, EmbeddedImageSize.Size32x32), false); _race.KeepAspectRatio(true); // // ImageItem _race.SetWidthPolicy(SizePolicy.Fixed); _race.SetWidth(20); // ImageItem // ImageItem _race.SetAlignment(ItemAlignment.Left, ItemAlignment.VCenter); // () switch (_characterInfo.Race) { case CharacterRace.Human: // _race.SetColorOverlay(Color.FromArgb(0, 162, 232)); break; case CharacterRace.Elf: // _race.SetColorOverlay(Color.FromArgb(35, 201, 109)); break; case CharacterRace.Dwarf: // _race.SetColorOverlay(Color.FromArgb(255, 127, 39)); break; } // Label _name _name.SetMargin(30, 0, 30, 0); // // ButtonCore infoBtn = new ButtonCore("?"); infoBtn.SetBackground(Color.FromArgb(255, 40, 40, 40)); infoBtn.SetWidth(20); infoBtn.SetSizePolicy(SizePolicy.Fixed, SizePolicy.Expand); infoBtn.SetFontStyle(FontStyle.Bold); infoBtn.SetForeground(210, 210, 210); infoBtn.SetAlignment(ItemAlignment.VCenter, ItemAlignment.Right); infoBtn.SetMargin(0, 0, 20, 0); infoBtn.AddItemState(ItemStateType.Hovered, new ItemState(Color.FromArgb(0, 140, 210))); // // info infoBtn.SetPassEvents(false); // // info // hover infoBtn.EventMouseHover += (sender, args) => { SetMouseHover(true); }; // info // infoBtn.EventMouseClick += (sender, args) => { // ImageItem ImageItem race = new ImageItem(DefaultsService.GetDefaultImage( EmbeddedImage.User, EmbeddedImageSize.Size32x32), false); race.SetSizePolicy(SizePolicy.Fixed, SizePolicy.Fixed); race.SetSize(32, 32); race.SetAlignment(ItemAlignment.Left, ItemAlignment.Top); race.SetColorOverlay(_race.GetColorOverlay()); // PopUpMessage popUpInfo = new PopUpMessage( _characterInfo.Name + "\n" + "Age: " + _characterInfo.Age + "\n" + "Sex: " + _characterInfo.Sex + "\n" + "Race: " + _characterInfo.Race + "\n" + "Class: " + _characterInfo.Class); // 3 popUpInfo.SetTimeOut(3000); popUpInfo.SetHeight(200); // // , // popUpInfo.Show(GetHandler()); // popUpInfo.AddItem(race); }; // ButtonCore removeBtn = new ButtonCore(); removeBtn.SetBackground(Color.FromArgb(255, 40, 40, 40)); removeBtn.SetSizePolicy(SizePolicy.Fixed, SizePolicy.Fixed); removeBtn.SetSize(10, 10); removeBtn.SetAlignment(ItemAlignment.VCenter, ItemAlignment.Right); removeBtn.SetCustomFigure(new CustomFigure(false, GraphicsMathService.GetCross(10, 10, 2, 45))); removeBtn.AddItemState(ItemStateType.Hovered, new ItemState(Color.FromArgb(200, 95, 97))); // removeBtn removeBtn.EventMouseClick += (sender, args) => { RemoveSelf(); // }; // CharacterCard AddItems(_race, _name, infoBtn, removeBtn); } internal void RemoveSelf() { // GetParent().RemoveItem(this); } public override String ToString() { return _characterInfo.ToString(); } } } In the example, I used an auxiliary class, which contains all the basic character characteristics such as first name, last name, race, gender, age, specialization class, characteristics, skills, and biography. In this class, all parameters, except for skills and biographies (it is assumed that the user will invent them independently), are generated.
Event handling and filtering
In the previous example, two types of events were described: MouseHover and MouseClick. Basic events currently only 11, here is the list:
- EventMouseHover
- EventMouseLeave
- EventMouseClick
- EventMouseDoubleClick
- EventMousePress
- EventMouseDrag
- EventScrollUp
- EventScrollDown
- EventKeyPress
- EventKeyRelease
- EventTextInput
Complex elements have their own unique events, but the events listed above are available (with reservations) to all.
Event processing syntax is trivial and looks like this:
// C# item.EventMouseClick += (sender, args) => { // - }; // Java item.eventMouseClick.add((sender, args) -> { // - }); We now turn to filtering events. By default, events pass through the pyramid of elements. In our example, the click event on the infoBtn button infoBtn first be received by the button itself, then this event will receive a CharacterCard element, then a ListBox in which it will be located, then SplitArea , VerticalStack and at the end it will reach the base element of the Wontainer .
On each element, you can handle the EventMouseClick event and all these actions will be executed in the specified order, but what if, when you click on any element, we do not want this event to go further along the chain? For this, there is just event filtering. Let's take a clearer example for showing on the CharacterCard element. Imagine that an EventMouseClick event is described in CharacterCard , which inserts information from an anchored CharacterInfo into a text field for editing a character. This behavior will be logical - we click on the element and see all the parameters of the character. Next, we edit the character, inventing a biography and skills, or changing the characteristics. At some point, we wanted to see a brief information about another generated character from the list and click on the infoBtn button. If we do not filter the events, then after calling the pop-up prompt, EventMouseClick will run on the CharacterCard element itself, which, as we remember, inserts text into the field for character editing, which will lead to loss of changes if we do not save the results, and the application itself will look illogical. Therefore, to make the event infoBtn.SetPassEvents(false) only on a button, we can set a filter using the infoBtn.SetPassEvents(false) method.
If you call this method in this way, the button will stop skipping any events after it. Suppose we do not want to skip the events of just mouse clicks, then we could call the method with other parameters, for example, infoBtn.SetPassEvents(false, InputEventType.MousePress, MouseRelease) .
Thus, you can filter events at each step to achieve the desired result.
You can once again look at the application, which turned out in the end. Of course, here the details of the implementation of business logic are omitted, in particular, the generation of characters, their skills and much more, which is no longer directly related to SpaceVIL. The full application code can be viewed via a link to GitHub, where there are already several other examples of working with SpaceVIL, both in C # and in Java.
Conclusion
In conclusion, I would like to remind you that the framework is in active development, so there may be crashes and crashes, some possibilities may be revised and the final result of use may be completely different from the current one, so if you are satisfied with the current version of the framework, do not forget Backup this version, because I can not guarantee that the new versions will be backward compatible. Some points can be redone to improve the comfort and speed of use of SpaceVIL and so far I don’t want to drag along old and discarded ideas. Also, the work of SpaceVIL has not been tested on AMD video cards, due to the lack of appropriate hardware. Testing was carried out on graphics cards from Intel and NVidia. Further development of SpaceVIL will be focused on adding new functionality (for example, there is currently no support for gradients) and optimization.
I would also like to mention the limitation that is worth remembering when writing a cross-platform application using this technology - it is not recommended to use dialog boxes (and generally create multi-window applications in Linux due to rendering errors), dialog boxes can be easily replaced with dialog elements. Mac OS X, in general, prohibits the creation of multi-window applications, since it requires that the GUI be launched only in the main application thread.
The framework of the required version and all the presented examples of test programs can be downloaded from the following links. The first version of the documentation is also available at the link.
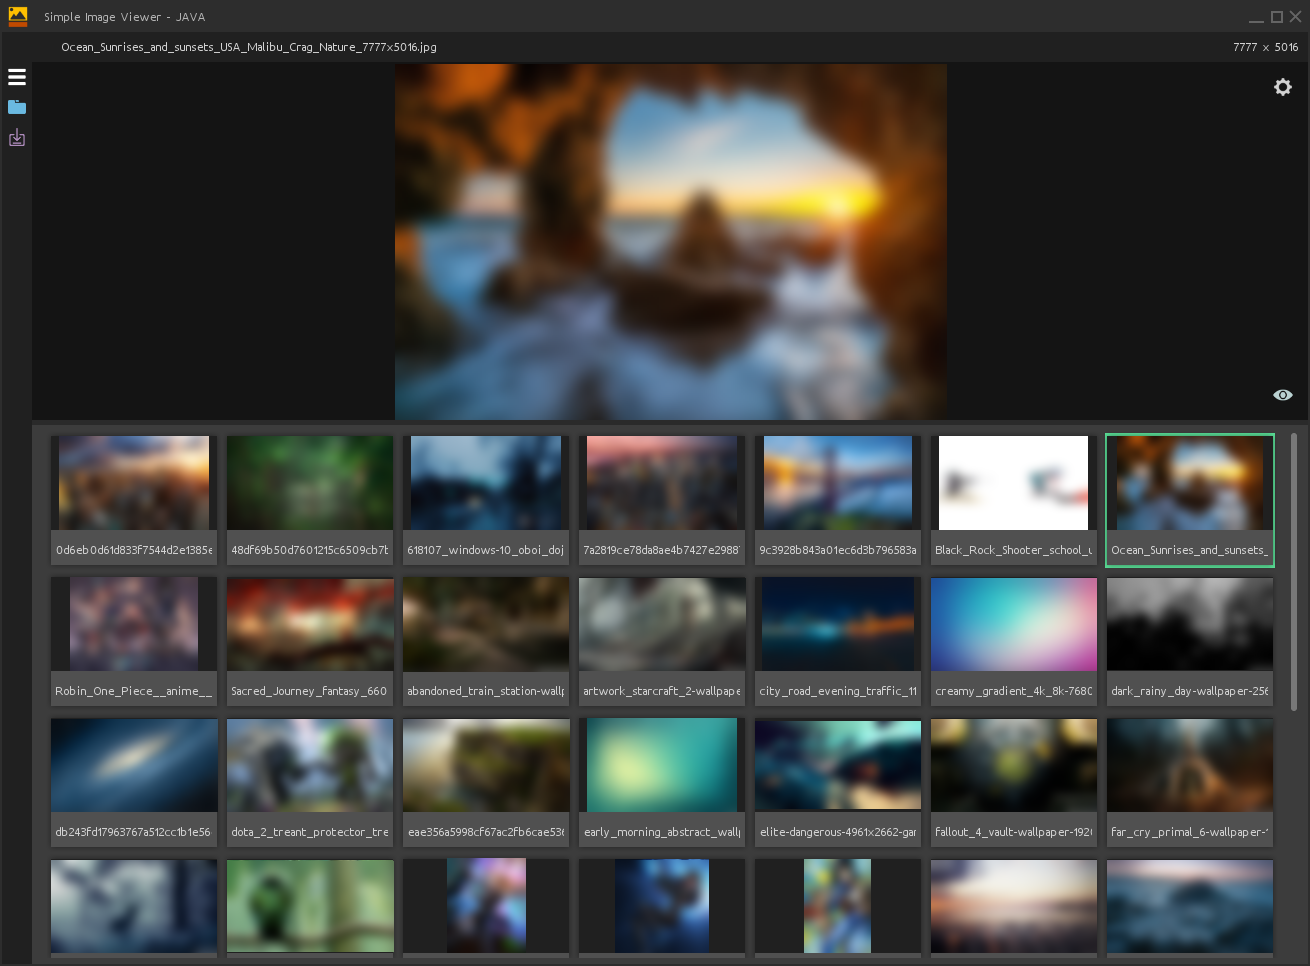
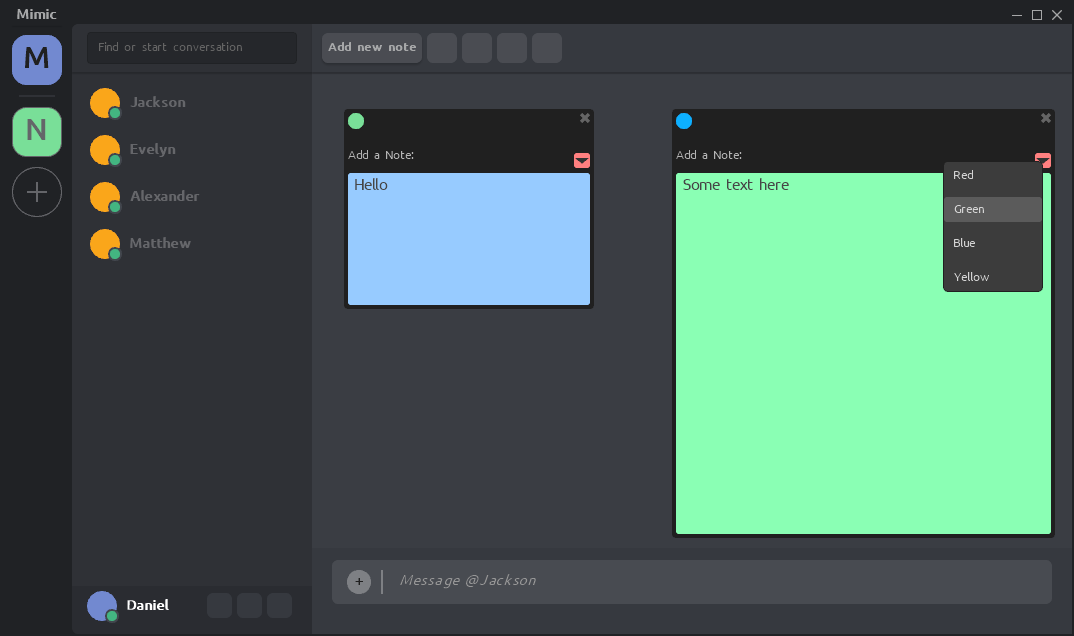
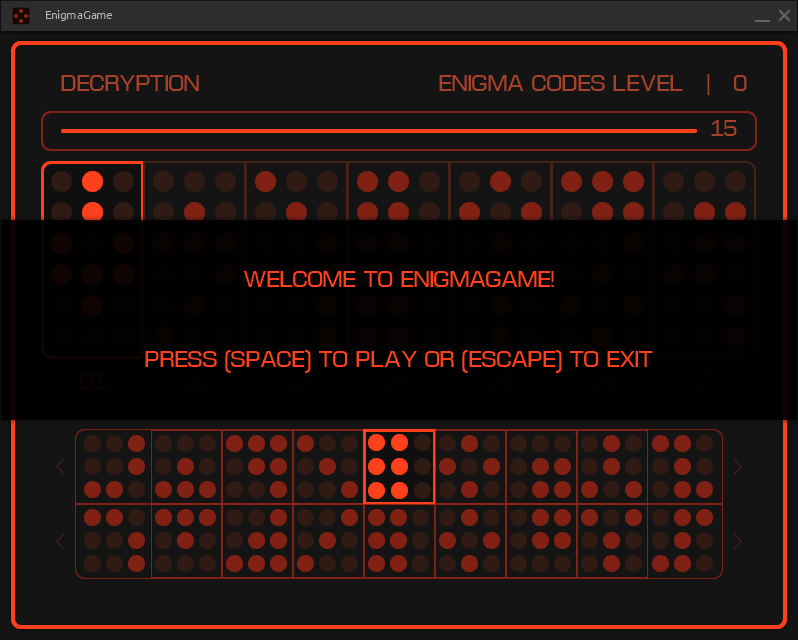
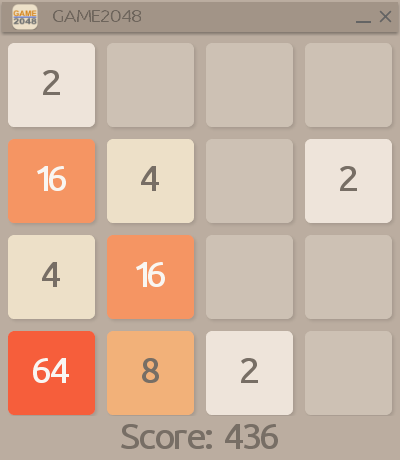
Finally, a little more visual demonstration. Below are the applications that are written in SpaceVIL technology, which can give you some idea of what can be achieved using SpaceVIL.
Links
')
Source: https://habr.com/ru/post/448790/
All Articles