Create a mono-repository with lerna & yarn workspaces

Over the past few years, the concept of monospositories has successfully established itself, as it allows to significantly simplify the process of developing modular software projects, such as infrastructures based on microservices. The main advantages of this architectural approach are obvious in practice, so I propose to create your own test mono-repository from scratch, incidentally understanding the nuances of working with yarn workspaces and lerna . Well, let's start!
Consider the structure of our project, which will consist of three libraries located in the packages / folder, as well as package.json in the root directory.
')
├── package.json └── packages ├── app │ ├── index.js │ └── package.json ├── first │ ├── index.js │ └── package.json └── second ├── index.js └── package.json This implies that we have two independent libraries, first and second , as well as the app library, which will import the functions from the first two. For convenience, all three packages are placed in the packages directory. You could leave them in the root folder or place them in a directory with any other name, but in order to follow generally accepted conventions, we will place them in that way.
For the sake of simplicity, the first and second libraries will contain only one function each in index.js , each of which will return a welcome string on behalf of the module. On the example of first, it will look like this:
// packages/first/index.js const first = () => 'Hi from the first module'; module.exports = first; In the app module, we will display the Hi from the app message in the console, as well as greetings from two other packages:
// packages/app/index.js const first = require('@monorepo/first'); const second = require('@monorepo/second'); const app = () => 'Hi from the app'; const main = () => { console.log(app()); console.log(first()); console.log(second()); }; main(); module.exports = { app, main }; To first and second were available in the app , we denote them as dependencies dependencies .
In addition, for each library, we will add the @ monorepo / prefix to the local package.json in the name value before the main package name.
// packages/app/package.json { "name": "@monorepo/app", "version": "1.0.0", "main": "index.js", "license": "MIT", "dependencies": { "@monorepo/first": "^1.0.0", "@monorepo/second": "^1.0.0" } } Why do I need a prefix with a dog sign in front of the npm package name (@ monorepo /)?
Adding a prefix is not necessary, but many mono-repositories follow this convention of naming packages: babel ,
material ui , angular and others. The fact is that each user or organization has its own scope on the npm site, so there is a guarantee that all the modules with the @ somescope / postfix are created by the somescope team, and not by the attackers. Moreover, it is possible to call modules by names that are already taken. For example, you cannot simply take and create your own utils module, because such a library already exists . However, by adding @ myscopename / postfix, we can get our utils ( @ myscopename / utils ) with blackjack and young ladies.
material ui , angular and others. The fact is that each user or organization has its own scope on the npm site, so there is a guarantee that all the modules with the @ somescope / postfix are created by the somescope team, and not by the attackers. Moreover, it is possible to call modules by names that are already taken. For example, you cannot simply take and create your own utils module, because such a library already exists . However, by adding @ myscopename / postfix, we can get our utils ( @ myscopename / utils ) with blackjack and young ladies.
Real-life analogue for our test project can be various libraries for working with data, validation tools, analytics, or just a set of UI components. If we assume that we are going to develop a web and mobile application (for example, using React and React Native, respectively), and we have part of the reusable logic, it may be worth putting it into separate components in order to use it in other projects. Add to this the server on Node.js and you’ll get a very real life case.
Yarn workspaces
The final touch before creating a full-fledged mono - repository will be package.json registration at the root of our repository. Pay attention to the workspaces property - we specified the value of packages / * , which means “all subsections in the packages folder”. In our case, this is app , first , second .
// package.json { "name": "monorepo", "version": "1.0.0", "main": "packages/app/index.js", "license": "MIT", "private": true, "workspaces": [ "packages/*" ] } In addition, in package.json, you must specify “private”: true , since workspaces are only available in private projects.
In order for everything to take off, run the yarn command (analogous to yarn install or npm install ) from the root directory. Because the dependencies that are in the app module are defined as workspaces in the root package.json , in fact, we will not download anything from the npm registry , but simply link (“link”) our packages.
yarn 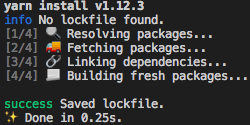
Now we can execute the node command . from the root directory that will run the script from the packages / app / index.js file .
node . 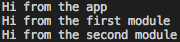
Let's see how it works. By calling yarn , we created symbolic links in node_modules to our directories in the packages folder.

Thanks to this connection in dependencies, we have one big advantage - now, when changing in the first and second modules, our app will get the current version of these packages without rebuilding. In practice, it is very convenient, because we can conduct local development of packages, still defining them as third-party dependencies (which they eventually become).
The next important advantage that can be gained from working with yarn workspaces is the organization of storing third-party dependencies.
Learn more about dependency storage at the top level.
Suppose we wanted to use the lodash library in first and second . Having executed the yarn add lodash command from the corresponding directories we will receive an update of the local package.json - the current version of the package will appear in the dependencies .
As for the lodash package itself , the library will physically be installed into node_modules at the root level once.
If the required version of the external package (in our case, lodash ) is different for first and second (for example, first you need lodash v3.0.0 and second v4.0.0 ), then a package with a lower version ( 3.0.0 ) will fall into the root node_modules , and the lodash version for the second module will be stored in local packages / second / node_modules .
In addition to the advantages of this approach may be minor drawbacks, which yarn allows you to bypass using additional flags. More information about such nuances can be found in the official documentation .
"dependencies": { "lodash": "^4.17.11" } As for the lodash package itself , the library will physically be installed into node_modules at the root level once.
If the required version of the external package (in our case, lodash ) is different for first and second (for example, first you need lodash v3.0.0 and second v4.0.0 ), then a package with a lower version ( 3.0.0 ) will fall into the root node_modules , and the lodash version for the second module will be stored in local packages / second / node_modules .
In addition to the advantages of this approach may be minor drawbacks, which yarn allows you to bypass using additional flags. More information about such nuances can be found in the official documentation .
Add Lerna
The first step in working with lerna is installing the package. Usually, a global installation is done ( yarn global add lerna or npm i -g lerna ), but if you are not sure that you want to use this library, you can use the call with npx .
From the root directory, initialize lerna :
lerna init 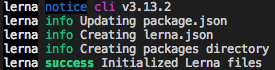
In fact, we performed several actions at once using one command: we created a git repository (if it was not initialized before), created a lerna.json file and updated our root package.json .
Now in the newly created lerna.json file we add two lines - “npmClient”: “yarn” and “useWorkspaces”: true . The last line says that we already use yarn workspaces and there is no need to create an app / node_modules folder with symbolic links to first and second .
// lerna.json { "npmClient": "yarn", "packages": [ "packages/*" ], "version": "1.0.0", "useWorkspaces": true } Tests with Lerna
In order to show the convenience of working with lerna we will add tests for our libraries.
From the root directory, perform the installation package for testing - jest . Run the command:
yarn add -DW jest Why do you need the -DW flag?
The -D (- dev) flag is needed so that the jest package is established as a dev dependency, and the -W flag (- ignore-workspace-root-check) allows you to perform the installation at the root level (which is what we need).
The next step is to add one test file to our package. For the convenience of our example, we will make all the tests similar. For example, the first file with the test will look like this:
// packages/first/test.js const first = require('.'); describe('first', () => { it('should return correct message', () => { const result = first(); expect(result).toBe('Hi from the first module'); }); }); We also need to add a script to run the tests in the package.json of each of our libraries:
// packages/*/package.json ... "scripts": { "test": "../../node_modules/.bin/jest --colors" }, ... The final touch is the update of the root package.json . Add a test script that will call lerna run test --stream . The parameter following lerna run defines the command that will be called in each of our packages from the packages / folder, and the --stream flag will allow us to see the output of the work in the terminal.
As a result, the package.json from the root directory will look like this:
// package.json { "name": "monorepo", "version": "1.0.0", "main": "packages/app/index.js", "license": "MIT", "private": true, "workspaces": [ "packages/*" ], "scripts": { "test": "lerna run test --stream" }, "devDependencies": { "jest": "^24.7.1", "lerna": "^3.13.2" } } Now, in order to run tests, it suffices to execute the command from the root of our project:
yarn test 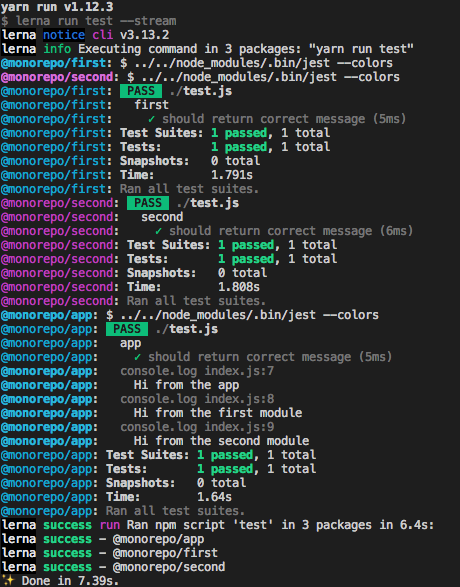
Upgrading from Lerna
The next popular task that lerna can do well with is updating package versions. Imagine that after the implementation of the tests we decided to upgrade our libraries from 1.0.0 to 2.0.0. In order to do this, it is enough to add the line “update: version”: “lerna version - no-push” in the scripts field of the root package.json , and then execute yarn update: version from the root directory. The --no-push flag has been added so that after updating the version, the changes are not sent to the remote repository, which lerna does by default (without this flag).
As a result, our root package.json will look like this:
// package.json { "name": "monorepo", "version": "1.0.0", "main": "packages/app/index.js", "license": "MIT", "private": true, "workspaces": [ "packages/*" ], "scripts": { "test": "lerna run test --stream", "update:version": "lerna version --no-push" }, "devDependencies": { "jest": "^24.7.1", "lerna": "^3.13.2" } } Run the version update script:
yarn update:version Next we will be asked to choose the version we want to switch to:
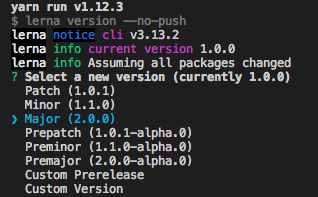
By clicking Enter we get a list of packages in which the version is updated.

Confirm the update by entering y and we get a message about the successful update.
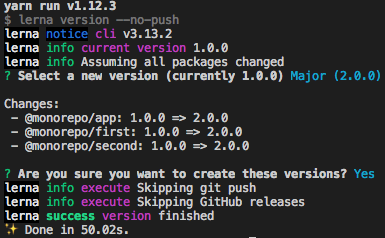
If we try to run the git status command, we get the message nothing to commit, working tree clean , because The lerna version not only updates the package versions, but also then creates a git commit and a tag indicating the new version (v2.0.0 in our case).
Features of working with the lerna version team
If you add the string “version”: “lerna version - no-push” instead of “update: version”: “lerna version - no-push” in the scripts field of the root package.json , then you will probably stumble upon unexpected behavior and red console. The fact is that the default npm-scripts invokes the version command (reserved script) immediately after updating the package version, which leads to a recursive call to the lerna version . To avoid such a situation, it is enough to give the script a different name, for example update: version , as was done in our example.
Conclusion
These examples show one hundredth of all the possibilities that lerna has in conjunction with yarn workspaces . Unfortunately, so far I have not found detailed instructions for working with monorepositions in Russian, so we can assume that a start has been made!
Link to the repository of the test project.
Source: https://habr.com/ru/post/448766/
All Articles