How to transfer a variable from fragment to activity in Android?
A story about how to transfer information from an Fragment to an Activity in Android. Information will be useful for beginners (Junior), mastering programming for Android, and is unlikely to be interesting for middles and seniors.
Launch IDE (integrated development environment) Android Studio . Create a new project: File -> New -> New Project. Select "Empty Activity", click "Next".

Fill in the fields "Name", "Package name", "Save location".
')
The IDE will automatically create two files: “MainActivity.java” - in the “java / [package name]” directory, and “activity_main.xml” - in the “res / layout” directory.

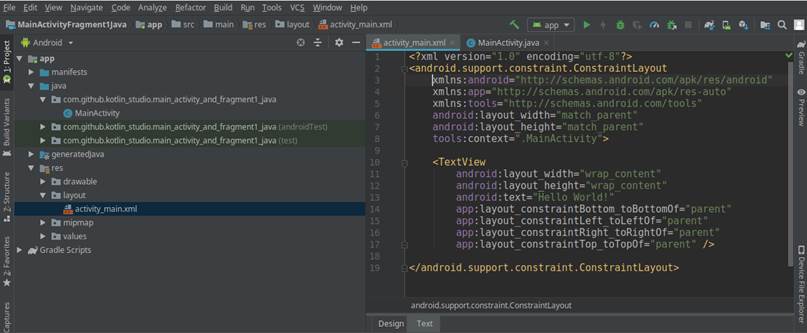
The java file defines what the application does , xml - what it looks like . It does so far very little, only "setContentView (R.layout.activity_main);". This line instructs the application to use the “activity_main.xml” layout at startup. And, since the layout contains only one “TextView” type widget with the text “Hello World!”, Our application also looks very modest.

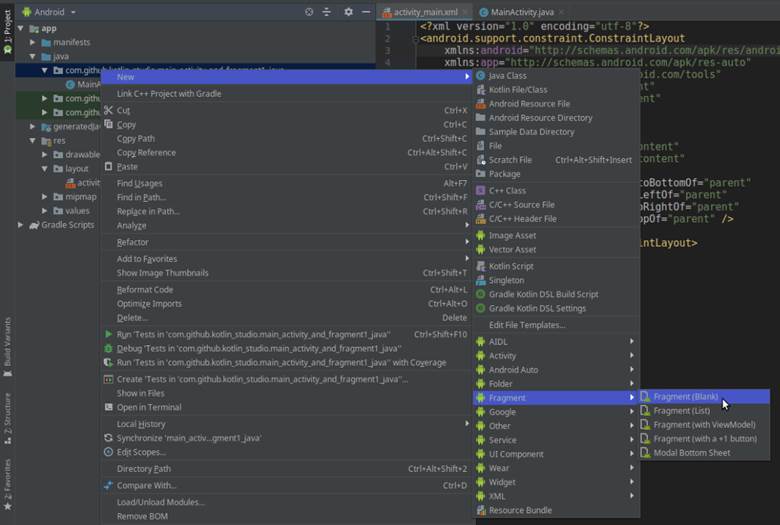
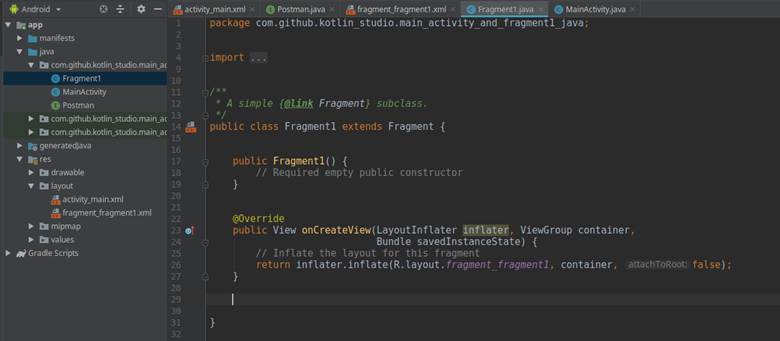
In the project folder, create a fragment with the name “Fragment1”.

The IDE will create two files: “Fragment1” and “fragment_fragment1.xml”.

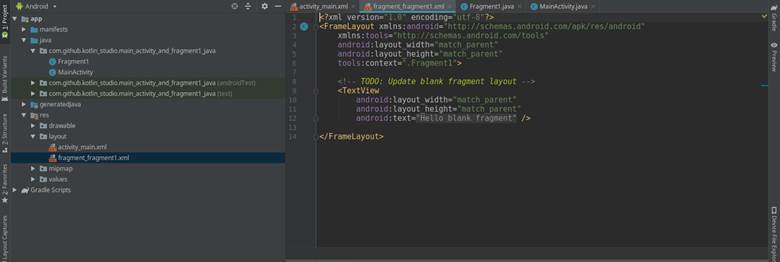
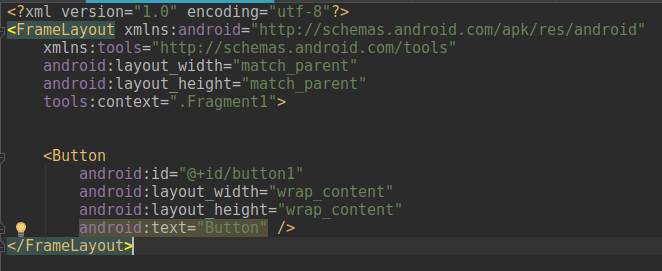
Open the fragment layout file and delete the “TextView” widget with a welcome line that we do not need.

Switch to design mode and drag a button to the layout (Button).
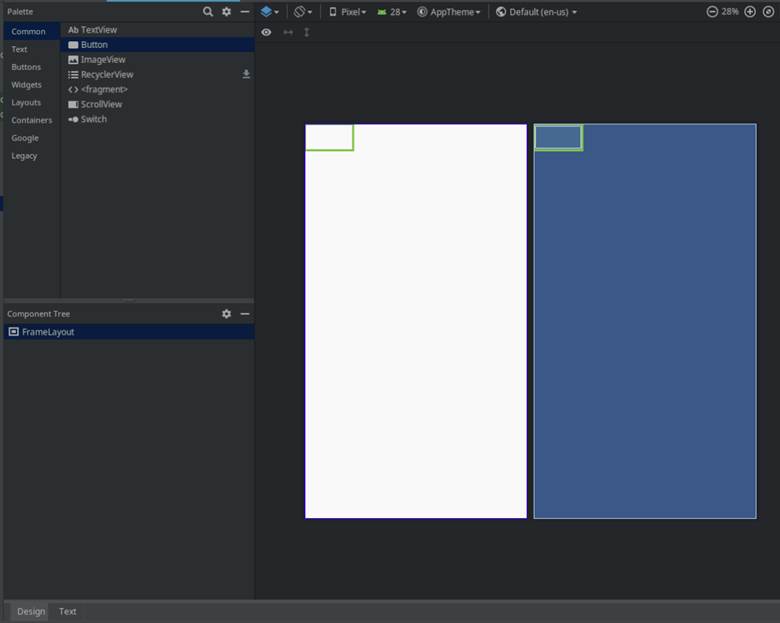
The IDE will create a button with the identifier "button1".
Now edit the layout of the main activity, i.e. file "activity_main.xml"

Move the text widget higher and add the fragment we created to the layout (to do this, drag the element "<>" onto the layout, select "Fragment1" and click "OK").
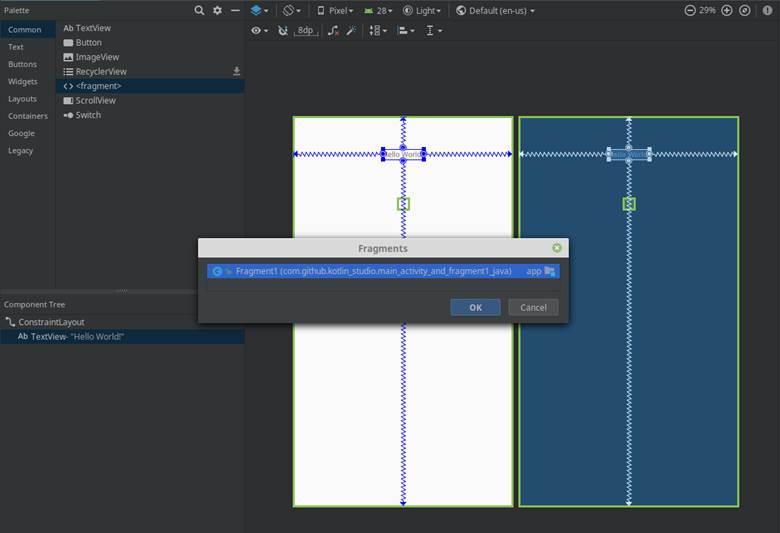
In the layout of the activity in the settings of the fragment, set layout_height = "wrap_content" and edit its placement to your taste. We will also change the identifier of the text field to “textReport”, and the fragment to “fragmentWithButton”.

Run the emulator (Shift + F10) and see what happened.
The application displays the inscription “Hello World!” And the “BUTTON” button. The inscription is derived from the activity , the button belongs to the fragment . The button is pressed, but it does not give any effect yet. Let's try to program an inscription to display the number of button presses. To do this, we will need to send a message about pressing a button from the fragment to the activity .
First we teach the fragment to count the number of button presses. Open the file "Fragment1.java".
Add the variable "counter". In the “onCreateView” method, which is called immediately after creating a fragment, we create a “listener” button. IDE will need to implement View.OnClickListener - agree (Alt + Enter). Let's create (override) the onClick method, which will increase the value of the counter variable with each click on the button and display a pop-up message.
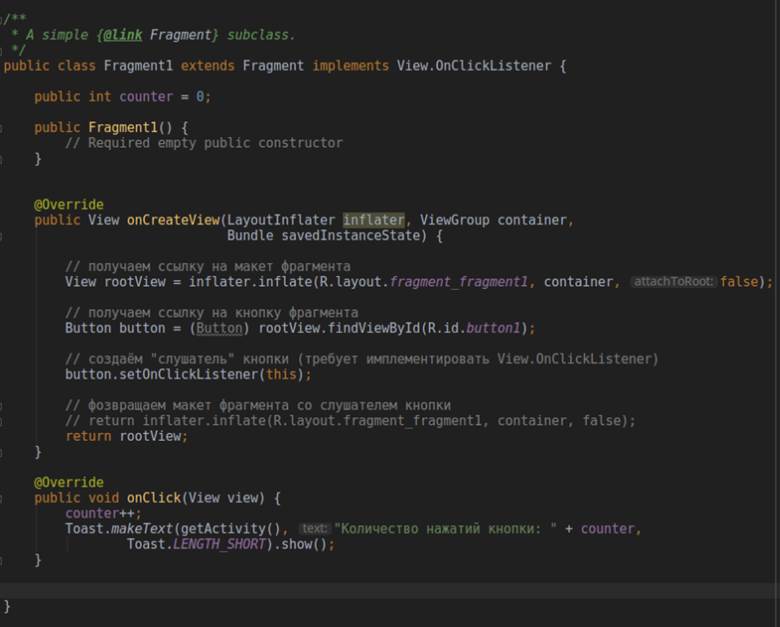
Check in the emulator (again Shift + F10) how it works. Pressing the button causes a pop-up message “Number of button presses: ...” to appear at the bottom of the application screen.
Great, go ahead. Our main goal is to transfer information (in this case, the number of button presses) from a fragment instance to an activity instance. Alas, the life cycles of activities and fragments are organized in such a way that Android (almost) does not allow the activity and the fragment to communicate directly, so we need a mediator-interface. Let's call it “Postman” (postman). The interface can be created both in a separate file and in a file with a fragment code; we will choose the first option. Our Postman interface will contain a single abstract (without “body”) method “fragmentMail”.

The variable "numberOfClicks" we will use as an "envelope" to send messages from the fragment to the activity.
Open the file with the activity code "MainActivity.java". As we remember, it looks like this:

We implement the Postman interface and add the fragmentMail interface method to the activity, overriding it ( Override ).
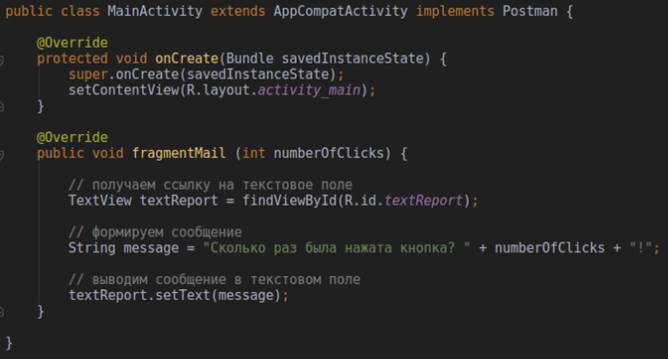
Now, as soon as the activity “sees” the new value in the “numberOfClicks” variable, it will display the updated message in the textReport text box.
But we still need to “put the letter in the envelope”, i.e. transfer to a variable number of clicks on the button. And we do this in the fragment code. Open the file "Fragment1.java".
D̶o̶b̶a̶v̶l̶ya̶e̶m̶ ̶v̶ ̶p̶o̶d̶p̶i̶s̶̶ ̶k̶l̶a̶s̶s̶a̶ ̶i̶m̶p̶l̶e̶m̶e̶n̶t̶a̶ts̶i̶yu̶ ̶i̶n̶t̶e̶r̶f̶e̶y̶s̶a̶ ̶ «̶P̶o̶s̶t̶m̶a̶n̶» ̶.̶ ̶I̶D̶E̶ ̶p̶o̶t̶r̶e̶b̶u̶e̶t̶ ̶p̶e̶r̶e̶o̶p̶r̶e̶d̶e̶l̶i̶t̶̶ ̶m̶e̶t̶o̶d̶ ̶i̶n̶t̶e̶r̶f̶e̶y̶s̶a̶ ̶ «̶f̶r̶a̶g̶m̶e̶n̶t̶M̶a̶i̶l̶» ̶, ̶ ̶n̶o̶ ̶d̶e̶l̶a̶t̶̶ ̶v̶ ̶n̶o̶m̶ ̶m̶y̶ ̶n̶i̶ch̶e̶g̶o̶ ̶n̶e̶ ̶b̶u̶d̶e̶m̶, ̶ ̶p̶o̶e̶t̶o̶m̶u̶ ̶o̶s̶t̶a̶v̶i̶m̶ ̶e̶g̶o̶ ̶t̶e̶l̶o̶ ̶p̶u̶s̶t̶y̶m̶. [Deleted, see “Note 1 dated 04.04.2019”]
We will need a link to the activity instance. We will get it when attaching a fragment to an activity like this:

In the “onClick” method (the one that is called when the button of our fragment is clicked) we add a call to the interface from the activity instance.

The final code of the fragment after deletion (for compactness) of comments looks like this:

Now our fragment counts the number of button presses , displays them in a pop-up message, and then using the Postman interface passes the value of the counter variable to the numberOfClicks variable , which serves as an envelope container for sending the message from the fragment to the activity. The activity, receiving a new message, immediately displays it in its widget text field with the identifier “textReport”. The goal is achieved!

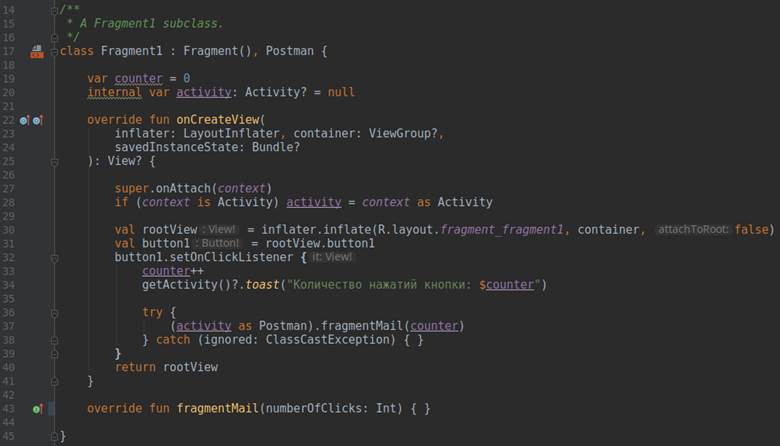
PS: Changing the programming language from Java to Kotlin allows you to significantly reduce fragment code:
PPS: Download project files here: Java , Kotlin .
The implementation of the Postman interface has been removed from the fragment code.
The fragment works with the interface through the activity in which this interface is already implemented.
Thanks to mikaakim for comment .
Updated files can be downloaded from github by the links above.
Launch IDE (integrated development environment) Android Studio . Create a new project: File -> New -> New Project. Select "Empty Activity", click "Next".
Fill in the fields "Name", "Package name", "Save location".
')
The IDE will automatically create two files: “MainActivity.java” - in the “java / [package name]” directory, and “activity_main.xml” - in the “res / layout” directory.
The java file defines what the application does , xml - what it looks like . It does so far very little, only "setContentView (R.layout.activity_main);". This line instructs the application to use the “activity_main.xml” layout at startup. And, since the layout contains only one “TextView” type widget with the text “Hello World!”, Our application also looks very modest.
In the project folder, create a fragment with the name “Fragment1”.
The IDE will create two files: “Fragment1” and “fragment_fragment1.xml”.
Open the fragment layout file and delete the “TextView” widget with a welcome line that we do not need.
Switch to design mode and drag a button to the layout (Button).
The IDE will create a button with the identifier "button1".
Now edit the layout of the main activity, i.e. file "activity_main.xml"
Move the text widget higher and add the fragment we created to the layout (to do this, drag the element "<>" onto the layout, select "Fragment1" and click "OK").
In the layout of the activity in the settings of the fragment, set layout_height = "wrap_content" and edit its placement to your taste. We will also change the identifier of the text field to “textReport”, and the fragment to “fragmentWithButton”.
Run the emulator (Shift + F10) and see what happened.
The application displays the inscription “Hello World!” And the “BUTTON” button. The inscription is derived from the activity , the button belongs to the fragment . The button is pressed, but it does not give any effect yet. Let's try to program an inscription to display the number of button presses. To do this, we will need to send a message about pressing a button from the fragment to the activity .
First we teach the fragment to count the number of button presses. Open the file "Fragment1.java".
Add the variable "counter". In the “onCreateView” method, which is called immediately after creating a fragment, we create a “listener” button. IDE will need to implement View.OnClickListener - agree (Alt + Enter). Let's create (override) the onClick method, which will increase the value of the counter variable with each click on the button and display a pop-up message.
Check in the emulator (again Shift + F10) how it works. Pressing the button causes a pop-up message “Number of button presses: ...” to appear at the bottom of the application screen.
Great, go ahead. Our main goal is to transfer information (in this case, the number of button presses) from a fragment instance to an activity instance. Alas, the life cycles of activities and fragments are organized in such a way that Android (almost) does not allow the activity and the fragment to communicate directly, so we need a mediator-interface. Let's call it “Postman” (postman). The interface can be created both in a separate file and in a file with a fragment code; we will choose the first option. Our Postman interface will contain a single abstract (without “body”) method “fragmentMail”.
The variable "numberOfClicks" we will use as an "envelope" to send messages from the fragment to the activity.
Open the file with the activity code "MainActivity.java". As we remember, it looks like this:
We implement the Postman interface and add the fragmentMail interface method to the activity, overriding it ( Override ).
Now, as soon as the activity “sees” the new value in the “numberOfClicks” variable, it will display the updated message in the textReport text box.
But we still need to “put the letter in the envelope”, i.e. transfer to a variable number of clicks on the button. And we do this in the fragment code. Open the file "Fragment1.java".
D̶o̶b̶a̶v̶l̶ya̶e̶m̶ ̶v̶ ̶p̶o̶d̶p̶i̶s̶̶ ̶k̶l̶a̶s̶s̶a̶ ̶i̶m̶p̶l̶e̶m̶e̶n̶t̶a̶ts̶i̶yu̶ ̶i̶n̶t̶e̶r̶f̶e̶y̶s̶a̶ ̶ «̶P̶o̶s̶t̶m̶a̶n̶» ̶.̶ ̶I̶D̶E̶ ̶p̶o̶t̶r̶e̶b̶u̶e̶t̶ ̶p̶e̶r̶e̶o̶p̶r̶e̶d̶e̶l̶i̶t̶̶ ̶m̶e̶t̶o̶d̶ ̶i̶n̶t̶e̶r̶f̶e̶y̶s̶a̶ ̶ «̶f̶r̶a̶g̶m̶e̶n̶t̶M̶a̶i̶l̶» ̶, ̶ ̶n̶o̶ ̶d̶e̶l̶a̶t̶̶ ̶v̶ ̶n̶o̶m̶ ̶m̶y̶ ̶n̶i̶ch̶e̶g̶o̶ ̶n̶e̶ ̶b̶u̶d̶e̶m̶, ̶ ̶p̶o̶e̶t̶o̶m̶u̶ ̶o̶s̶t̶a̶v̶i̶m̶ ̶e̶g̶o̶ ̶t̶e̶l̶o̶ ̶p̶u̶s̶t̶y̶m̶. [Deleted, see “Note 1 dated 04.04.2019”]
We will need a link to the activity instance. We will get it when attaching a fragment to an activity like this:
In the “onClick” method (the one that is called when the button of our fragment is clicked) we add a call to the interface from the activity instance.
The final code of the fragment after deletion (for compactness) of comments looks like this:
Now our fragment counts the number of button presses , displays them in a pop-up message, and then using the Postman interface passes the value of the counter variable to the numberOfClicks variable , which serves as an envelope container for sending the message from the fragment to the activity. The activity, receiving a new message, immediately displays it in its widget text field with the identifier “textReport”. The goal is achieved!
PS: Changing the programming language from Java to Kotlin allows you to significantly reduce fragment code:
PPS: Download project files here: Java , Kotlin .
Note 1 dated 04/20/2019:
The implementation of the Postman interface has been removed from the fragment code.
The fragment works with the interface through the activity in which this interface is already implemented.
Thanks to mikaakim for comment .
Updated files can be downloaded from github by the links above.
Source: https://habr.com/ru/post/448744/
All Articles