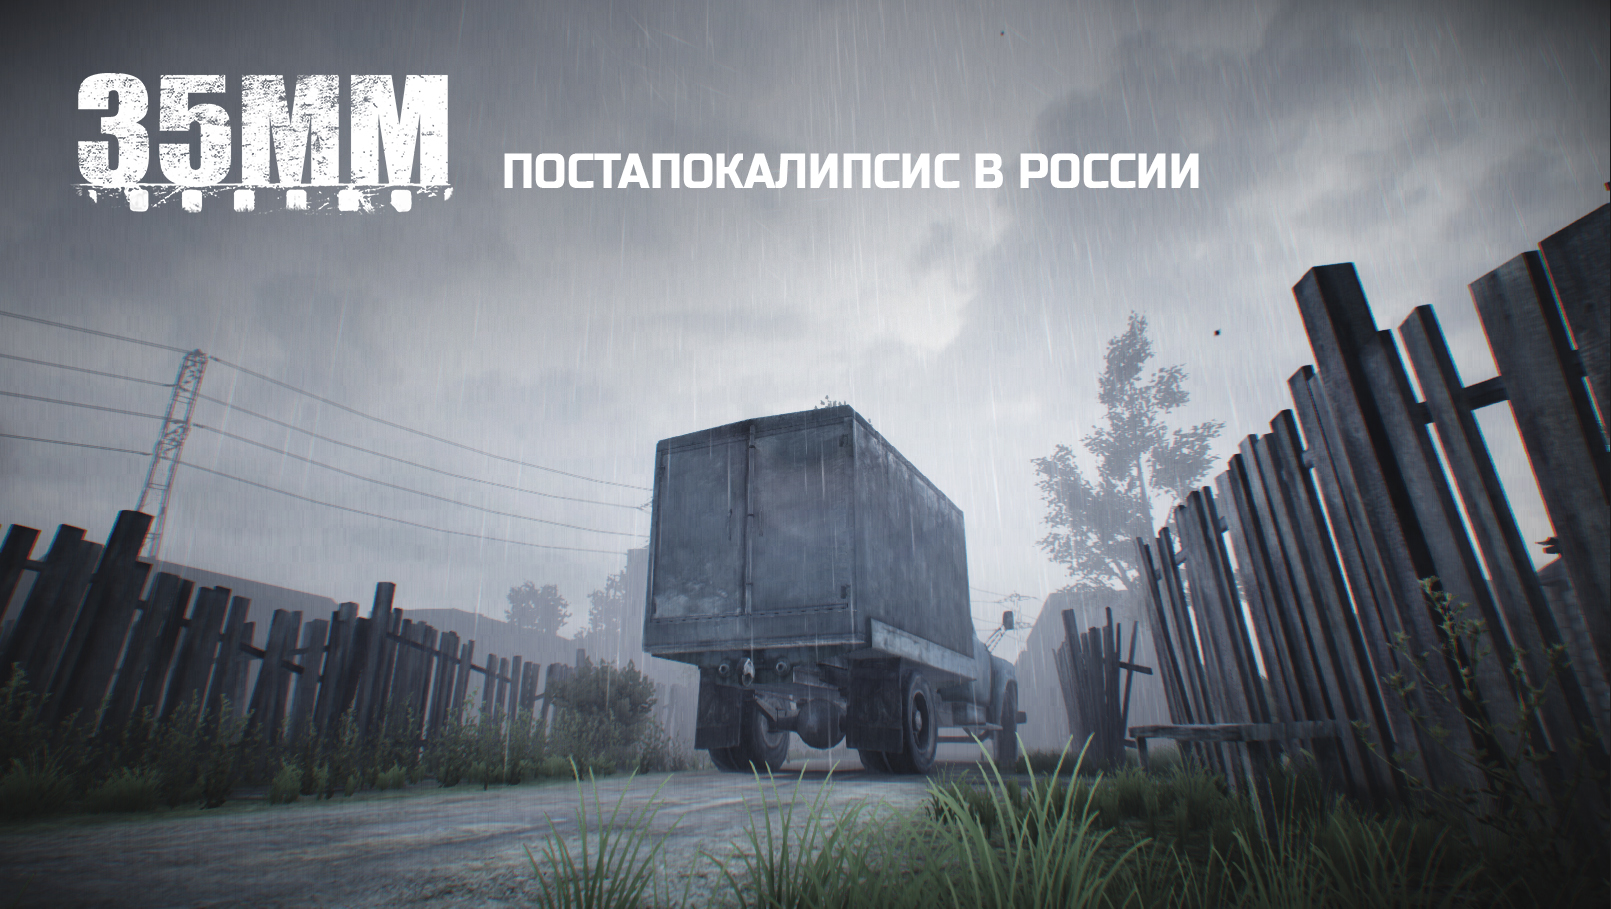
The creation of the game "35MM". Postapocalypse in Russia
Good day to all, my name is Sergey Noskov. Today I would like to talk about the creation of my first full-fledged indie project called 35MM, released on Steam in 2016. The story is certainly long-standing, and since then several articles and interviews have been published on the subject of the project; however, there has been no detailed description of the development process. Also, the technical aspects of implementation were hardly affected. About this, in fact, we'll talk.
Let's start with a little background. 35MM is a first-person adventure game in the post-apocalypse setting in Russia. In the people - walking simulator. The game tells us the story of the journey of two wanderers in the empty lands left by civilization. The bulk of the population died out after a terrible disease, and now nature plays its glasses off humanity. Unfortunately, I don’t remember exactly how the idea of this project originated, but I do remember that at that time I was an ardent fan of the topic of stalker, Metro games and in general similar atmospheric entourage. I have always been thrilled and delighted landscapes of abandoned cities, industrial zones and villages. I don’t know what kind of illness it is and how to explain such love, but there are a lot of us like that. In general, a similar passion on this topic was enough to start creating your own small game world.
')

Since I already had two small projects (Light and Train), as well as experience in the Unity engine, I started developing a new game in it. If I am not mistaken, at that time the fifth version of the engine was already available, but I am somewhat conservative (not my best professional trait), so I decided to stay in version 4.7. For a common understanding - between the versions of the engine 4 and 5 there are a lot of significant differences, especially in terms of rendering, lighting and materials. In Unity 5 appeared physically accurate shaders that can correctly reflect light and display reflexes. In simple words - highlights and reflections on materials with such shaders look more natural and cute. In version 4, basic shaders were much simpler, however, the skills of writing their own shaders could significantly improve the quality of the picture. We will talk about this a little later. It is clear that the development of the game includes many aspects, in addition to working in the engine itself. In order for the engine to be stuffed, content is required: models, textures, sounds, scripts, etc. All that in the end we see on the monitor and hear in the columns. And of course, for each type of content requires its own software. For creating 3D models I used 3D max, for working with 2D graphics and creating textures - Photoshop, for working with sound - Adobe Audition, the code was written in the Monodevelop program attached to Unity. I especially recommend you to close your eyes or skip to the next chapter - the game is written in Javascript. Just shh, don't tell anyone. I just know that for some this is a bad form and nobody already writes to Javascript. In general, the basic tools are selected and the workflow is slowly starting to move.
How it all began
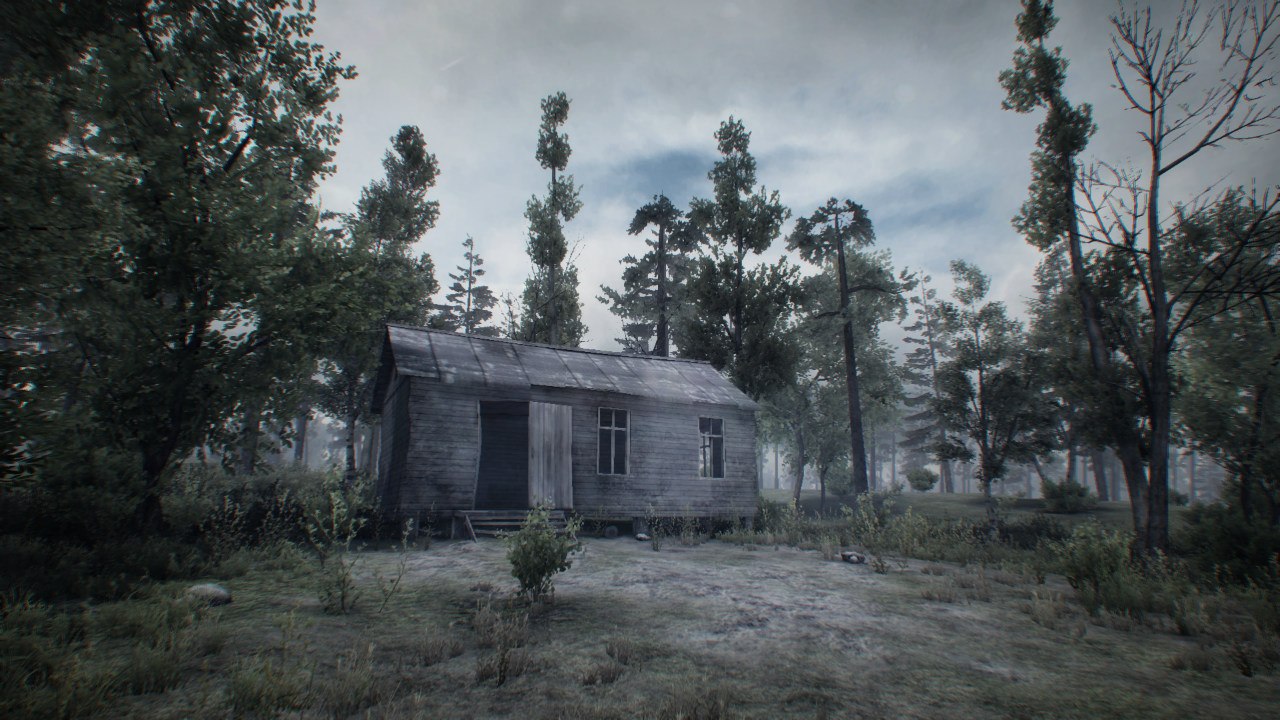
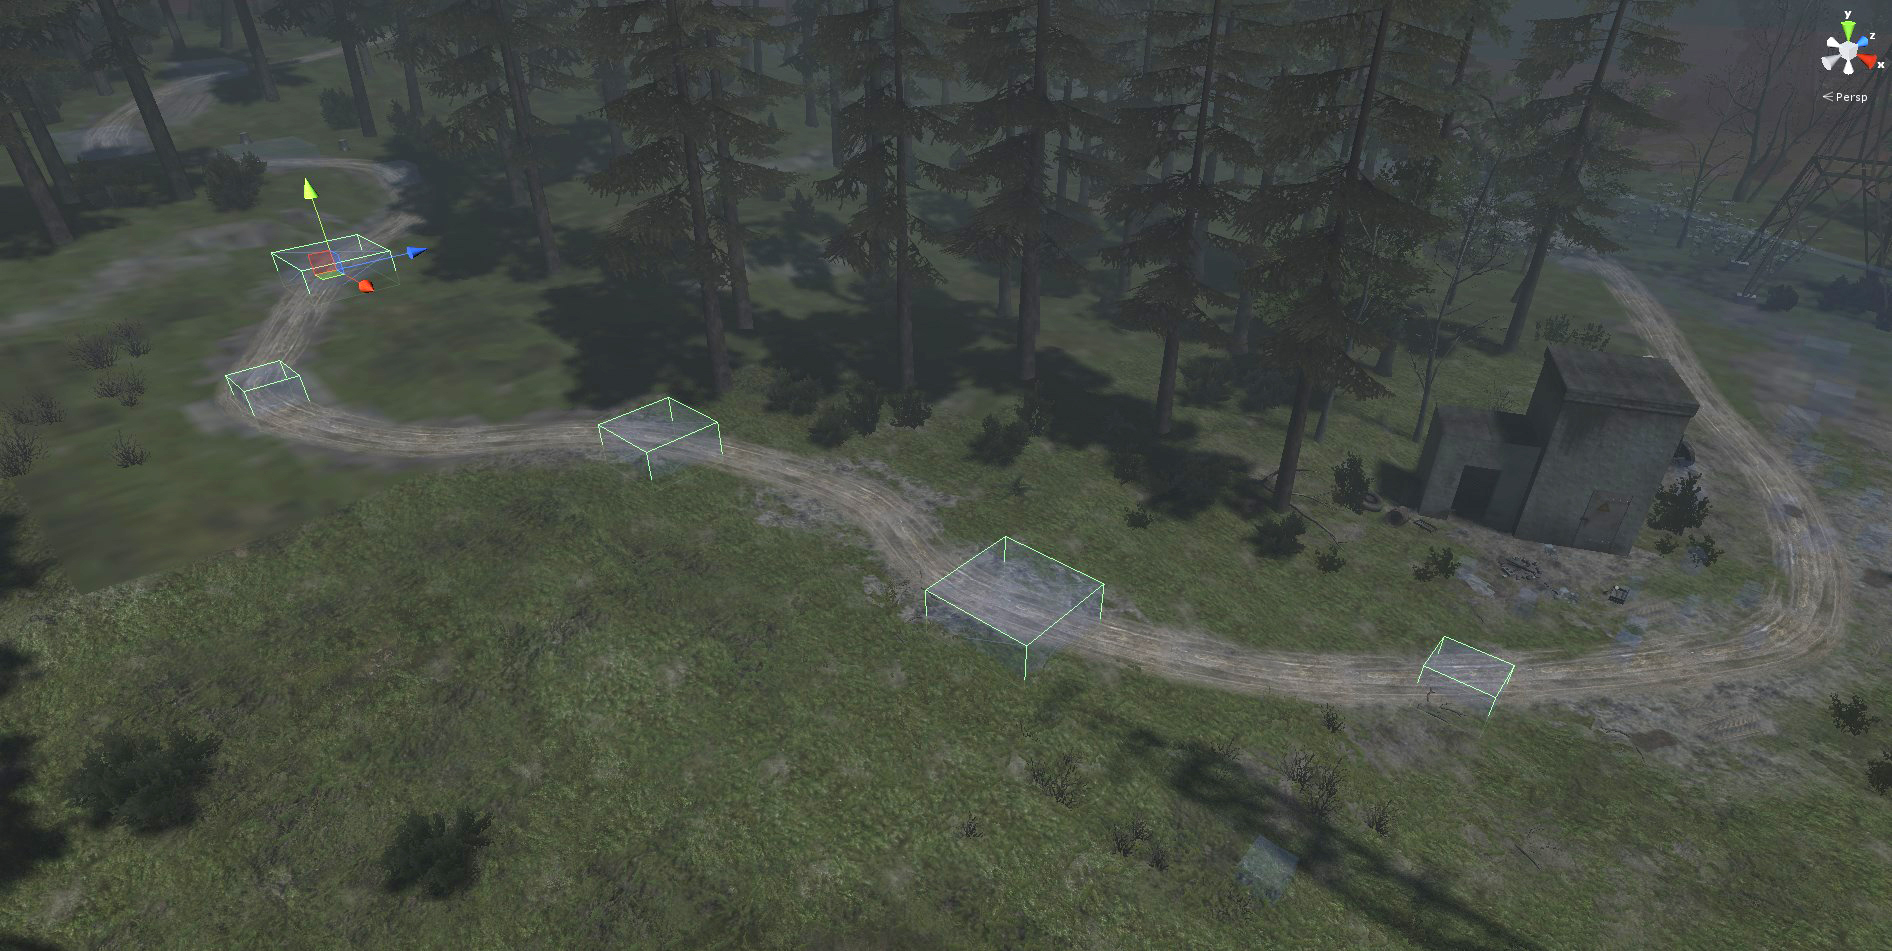
In some interviews I mentioned that I usually do not have a clear development plan, but only the big picture. Therefore, often, the creation of locations occurs spontaneously and the design is thought out on the go. This, of course, is more of a minus than a plus, but there is also a positive side - this is very entertaining and you never know exactly what will happen next. It turns out that the game to some extent lives its own life already in the initial stages. The development of 35MM began with the creation of the very first location - a forest abandoned house and a spacious plot with fields and coniferous forest.
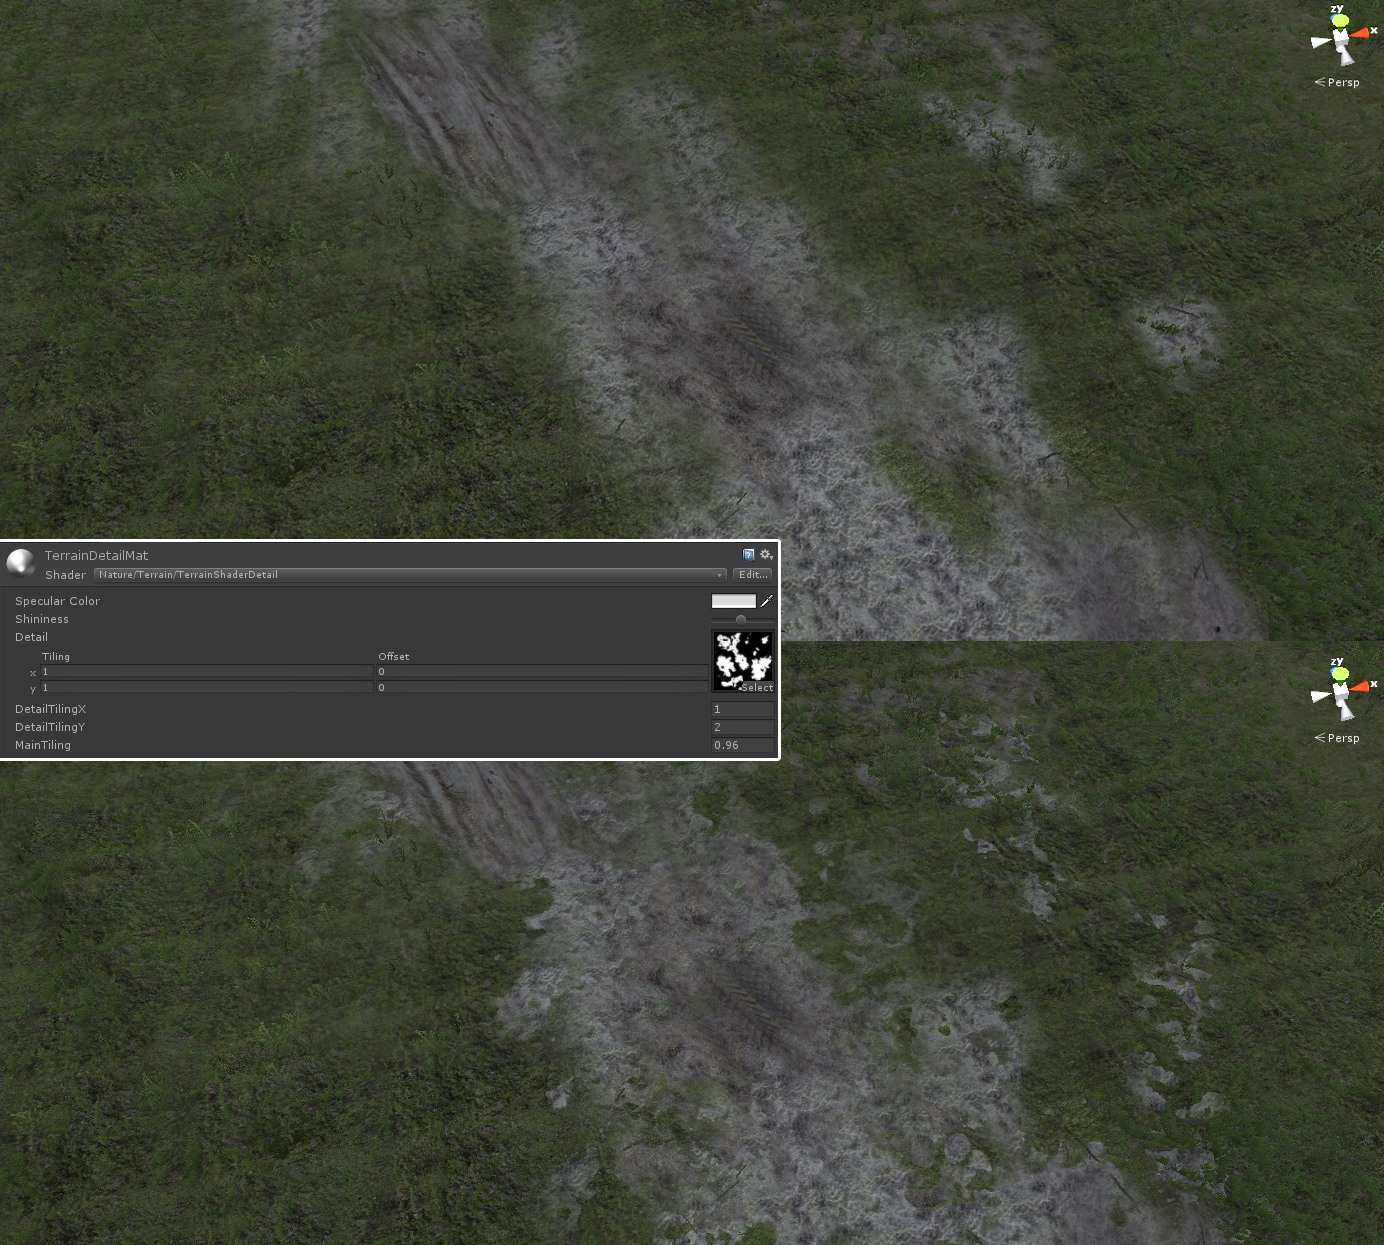
A terrain with 5-6 grass and earth textures was used to build the surface of the earth. The standard terrain shader paints the surface with different textures on the RGBA mask, which we create with a brush in the engine itself, and the result often looks very blurred, the transitions between textures are too smooth and do not seem natural. To refine this point, the terrain shader was changed and the offset mask was added. The BW texture “displaced” the mask drawn in the terrain and created more torn and sharp edges, which visually made the surface look a bit more complicated.
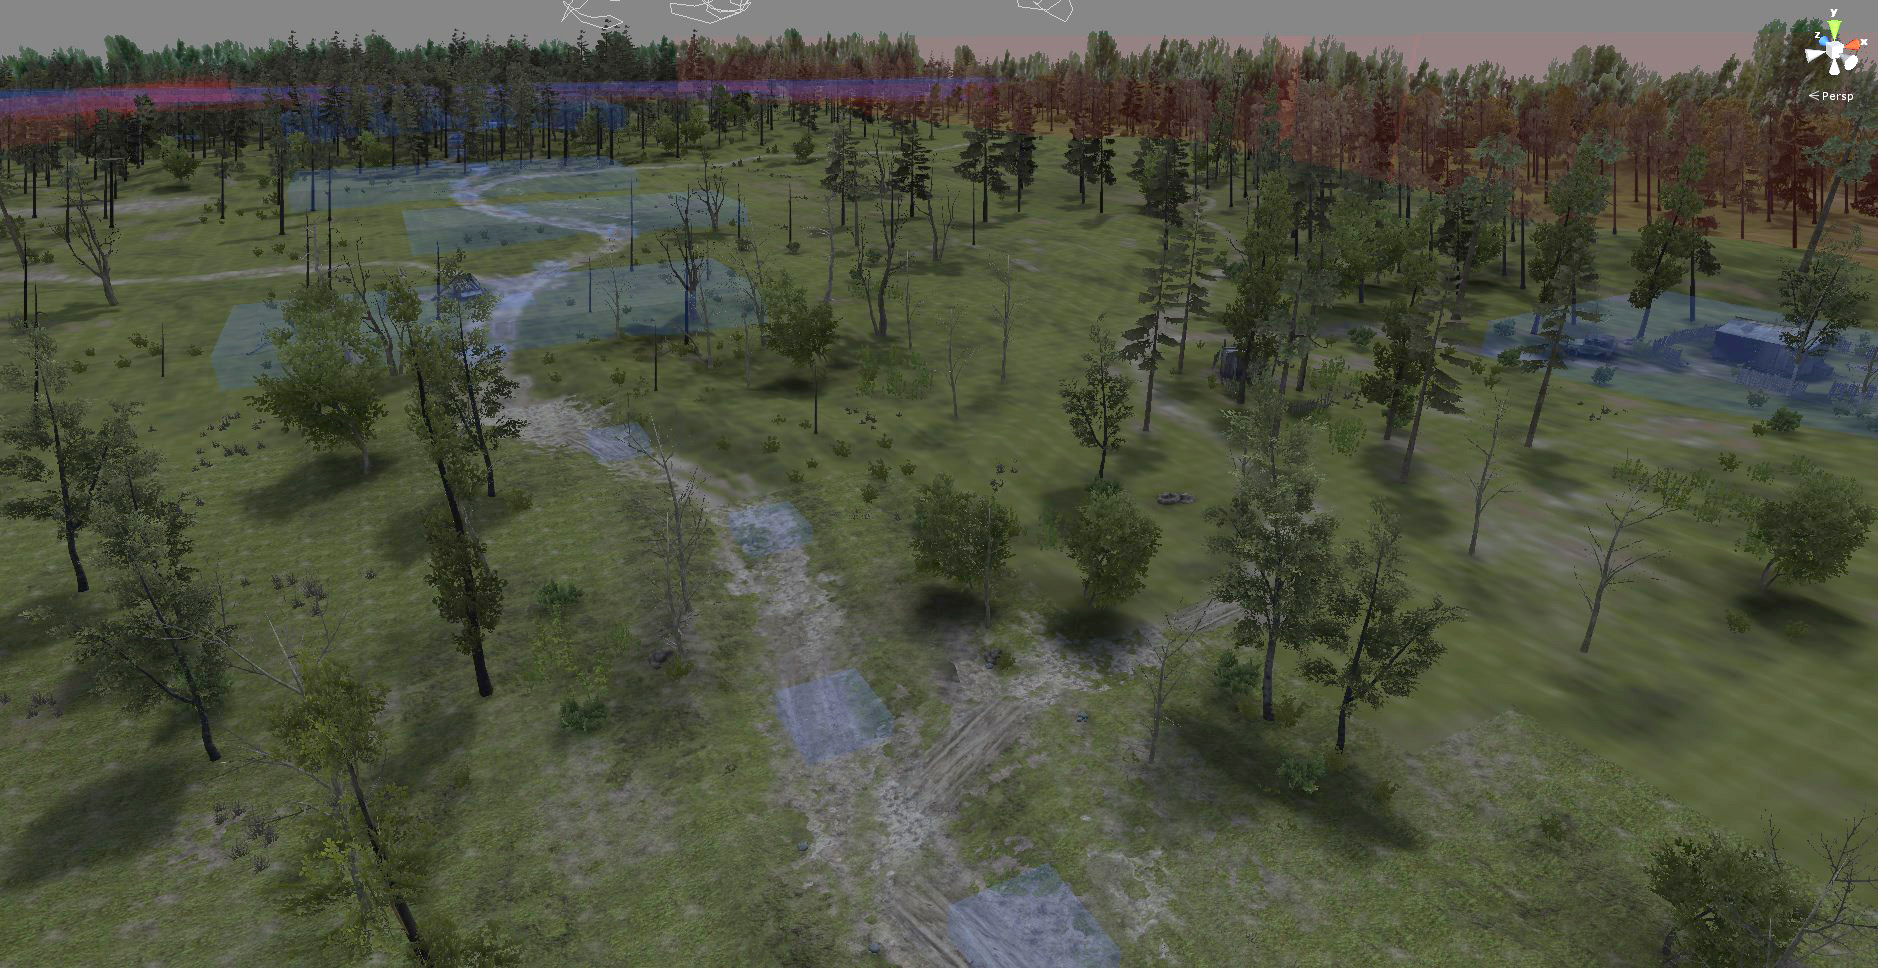
Complementing the surface of our land are several types of grass in the form of randomly scattered plains. In Unity, there is also a billboard mode (when grass planes always look at the player), but for the game with a first-person view, it is not very suitable, for it is too noticeable how the grass “watches” our camera. With grass, you should always be careful and add it within reasonable limits, since this pleasure throws quite a lot of drawcalls calls, and this in turn affects performance. The more drawcalls - the higher the load on the computer system. But do not forget that not only calls increase the load. There are lots of ways to kill the performance in the game. In addition to the grass on the ground, meshes with branches and stones, as well as a number of decals with dirt and traces of car wheels were scattered on the ground.

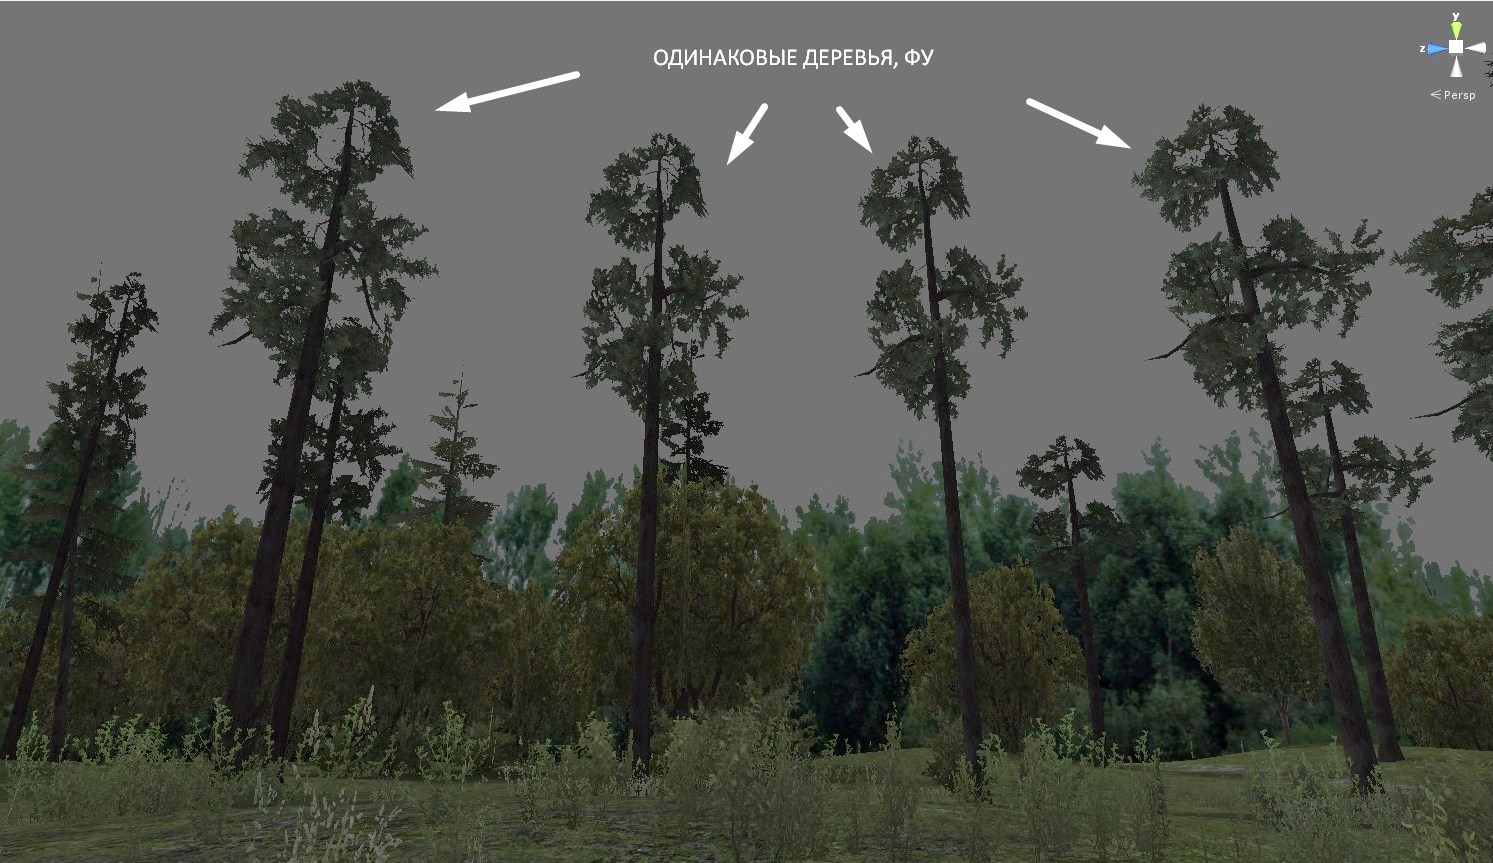
After creating the surface go to the vegetation, trees and bushes. I preferred to plant the main part of the forest (conifers) with the tools of the terrane itself - that is, with a brush. The advantage of this method is that it is done quickly and easily, moreover, at a great distance, such a forest is transformed from meshes into billboards, which is very good for optimization. However, near the load is greatly increased, because, as I understand it, such trees are not trapped. Maybe I'm wrong, and someone will correct me. Butching is a very important optimization tool. Roughly speaking, this is the combination of meshes with one material into one common mesh, which significantly reduces the number of drawcalls, respectively, reduces the load. One more minus of seating on the terrain is the same position of the trees, that is, they are all created at one angle and this sameness is striking. In connection with this, I installed some pines, spruces and deciduous trees manually from different angles and with different sizes, which made the landscape different. The bushes were arranged in the same way.
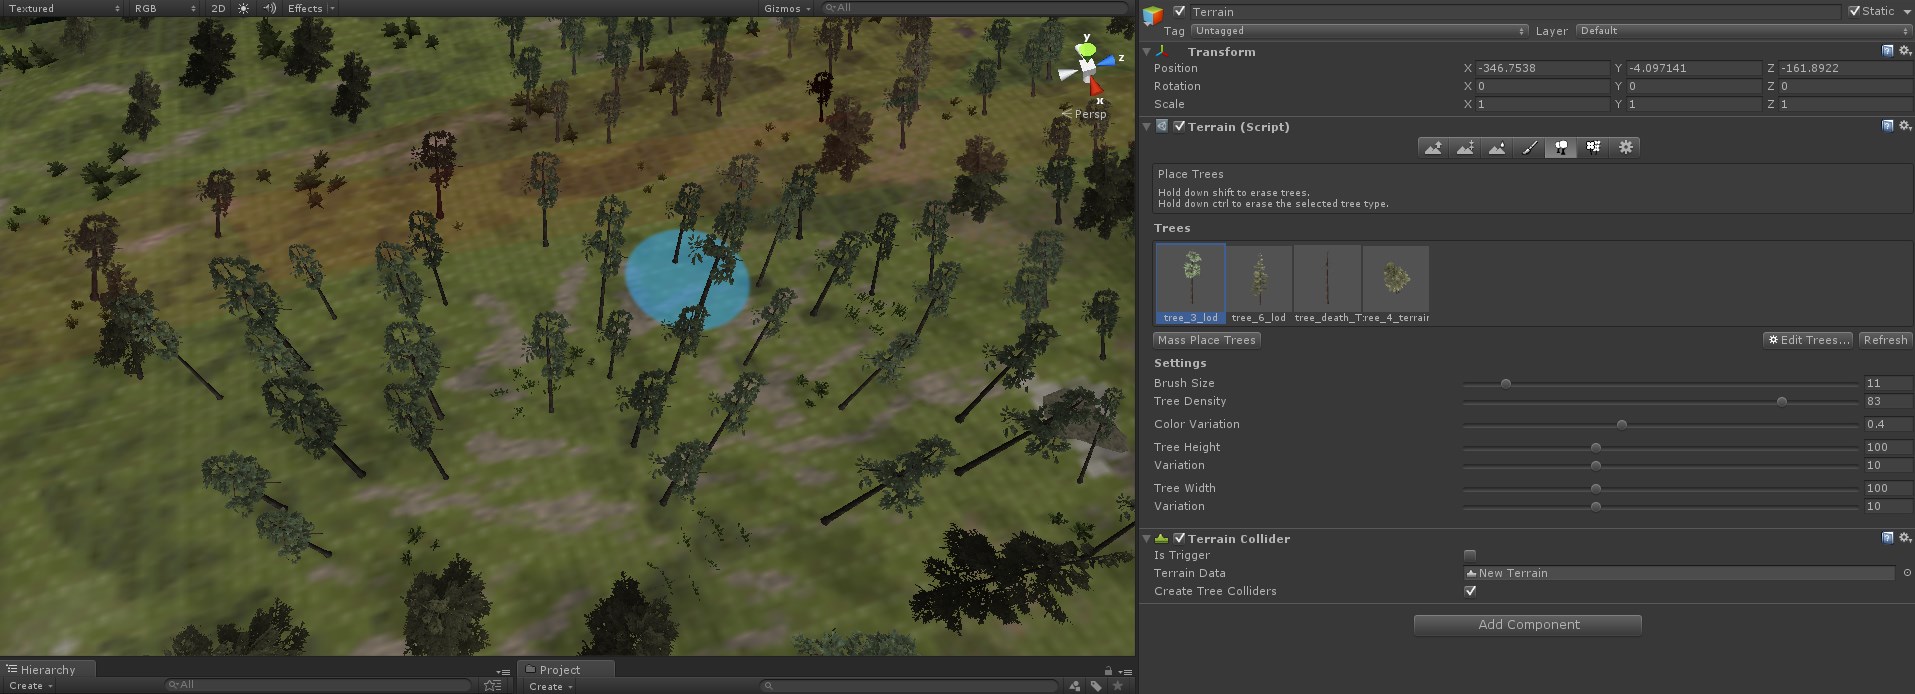
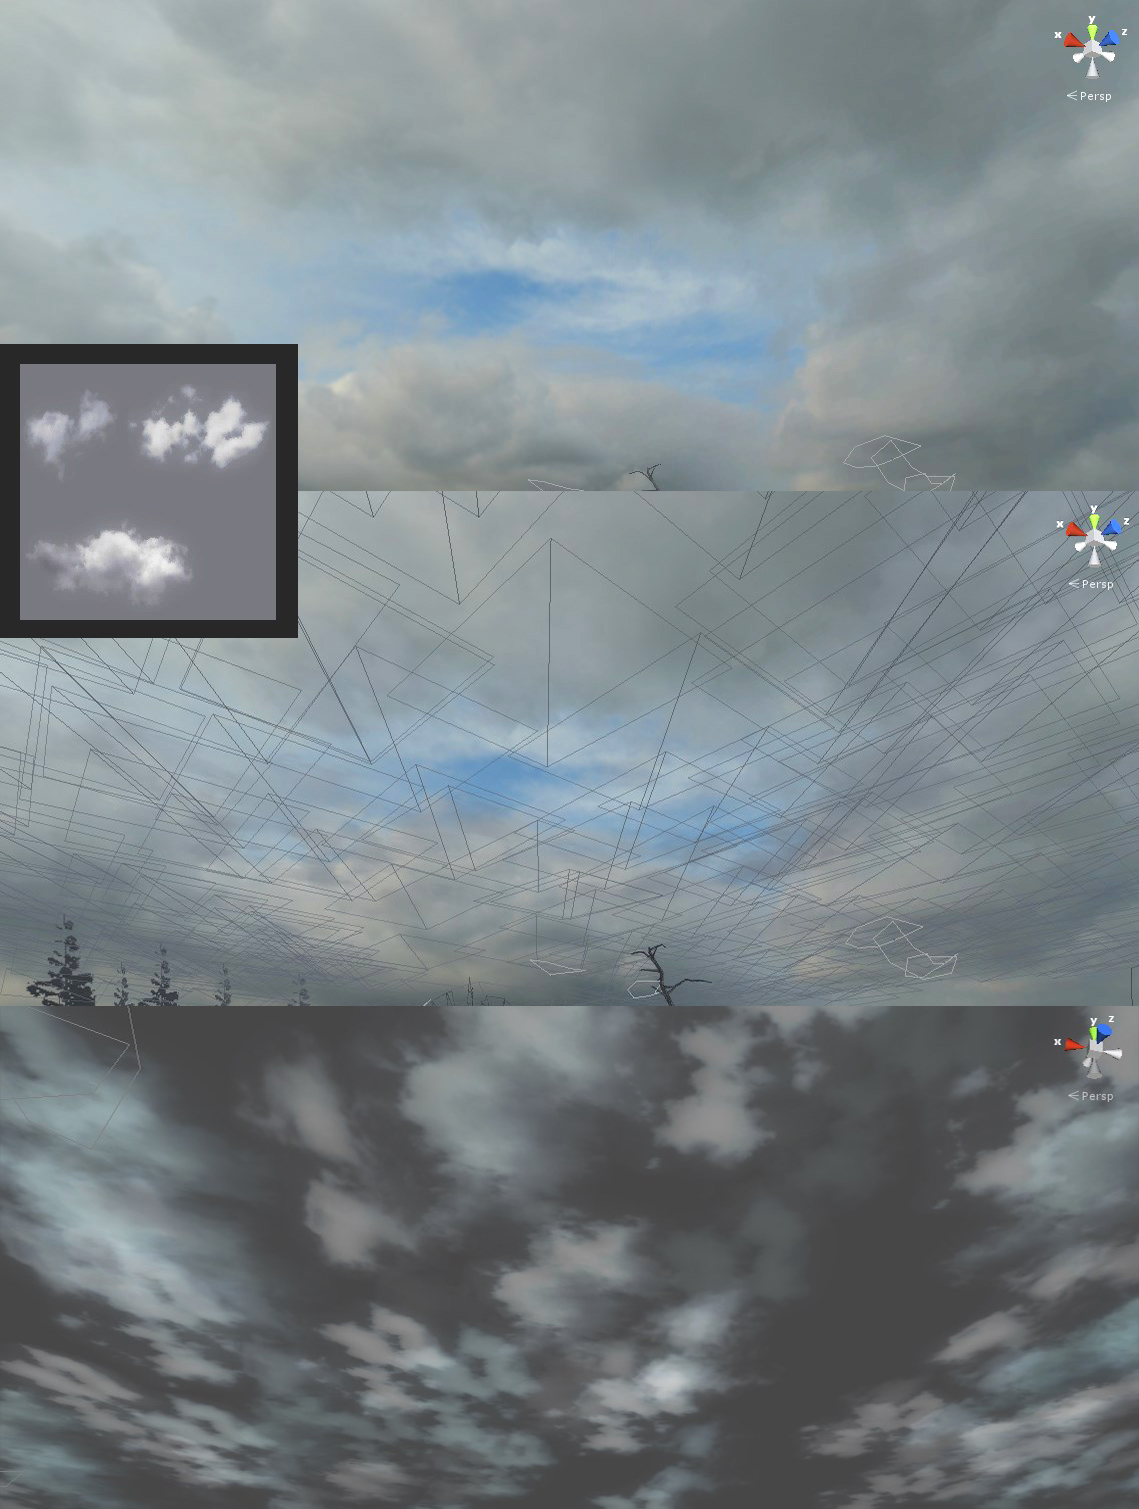
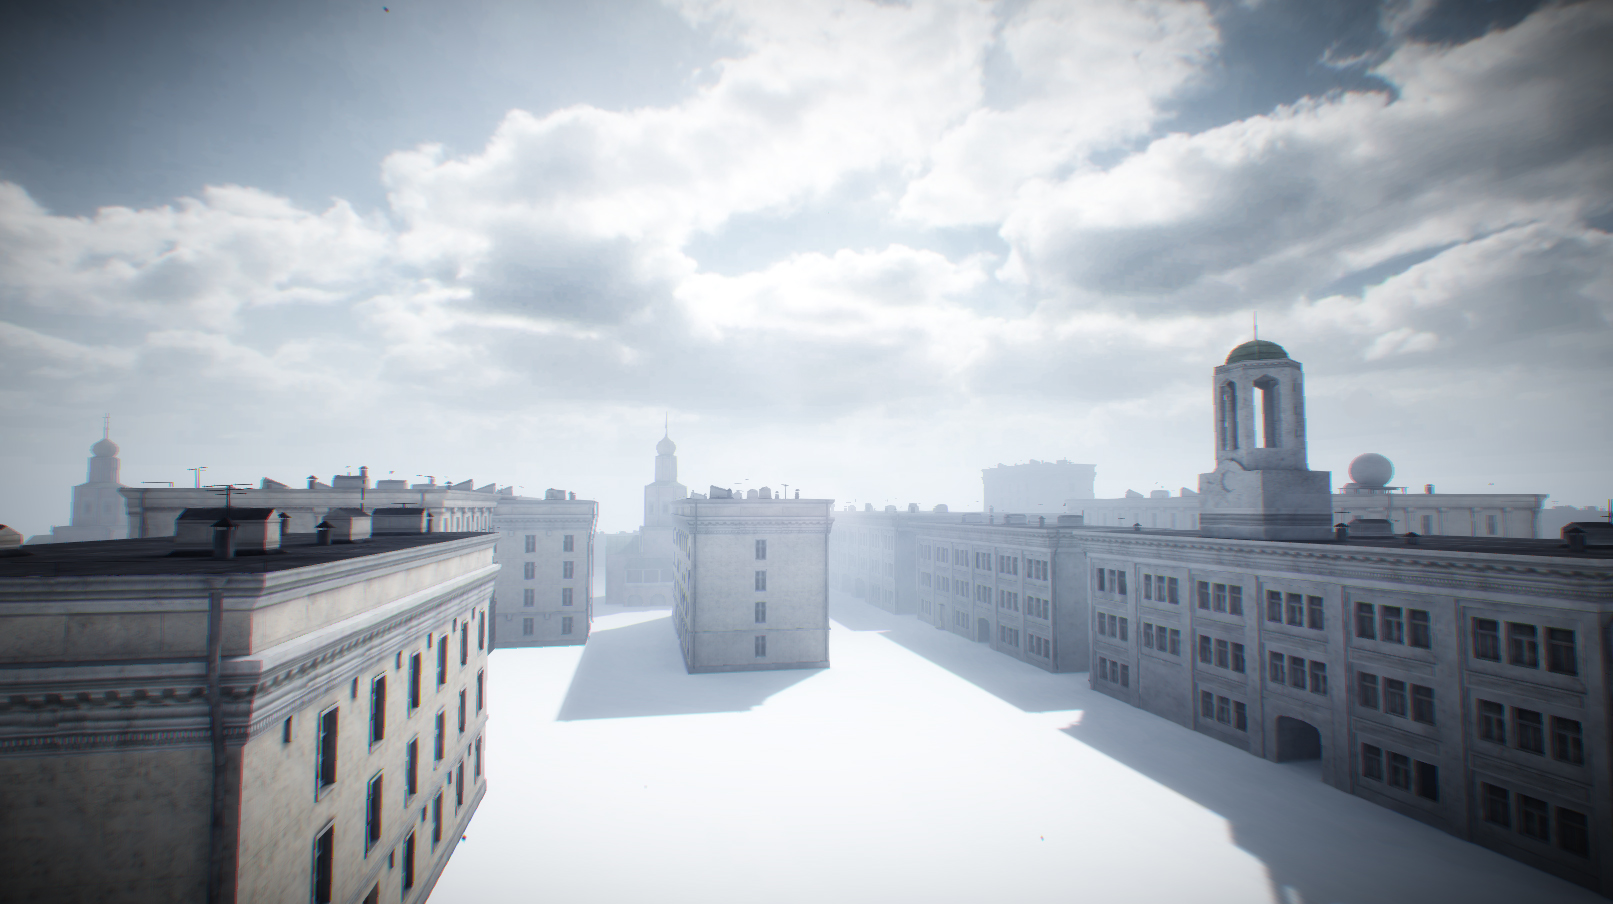
To complete the picture left to figure out the sky. For this task, the usual skybox material with six textures was used. There were attempts to modify the shader so that the sky looked dynamic, but the result did not justify itself and this idea had to be left. An alternative option was the use of a particle system with cloud texture and horizontal billboards with motion animation. As I recall, a similar option was used in the game Stalker, and surely there are many more.
Lighting
In the 4th version of the Unity engine there was a very convenient baking mode for lightmaps - dual lightmapping. In the current versions there is a similar option, but I have not studied it in detail yet. Dual mode allowed us to draw riltime shadows and highlights at near distances, but as we moved away from the camera, the whole thing smoothly turned into baked lightmaps, which made the task for our hardware very easy. In general, I applied this method in all locations of the game. As a result, for each middle location, a set of about 5-10 lightmaps for the middle plan was baked, and a similar number for the far one (lightmaps are also in the middle plan, but only with a baked ambient occlugen).

In general, in many areas I tried to use fully baked light, with the exception of the light of the sun. Mostly Point lamps were placed to emphasize accents and greater illumination. This was mainly done in rooms where little external light penetrated. In a number of places, of course, Riltime lights with shadows were used: light from a fire, a desk lamp, a ceiling or wall lamp. By the way, when working with lighting, we had to face a big problem associated with Point fixtures and Rilttime shadows. In some areas, the gaze of the camera at a point source of light with shadows gave terrible friezes and brakes. It is not entirely clear why the load was so great, but at this moment the profiler was showing overwhelming drawcalls for a split second. The situation was corrected by the use of two Spot luminaires, directed in opposite directions from each other. This option was less ponderous.
Models
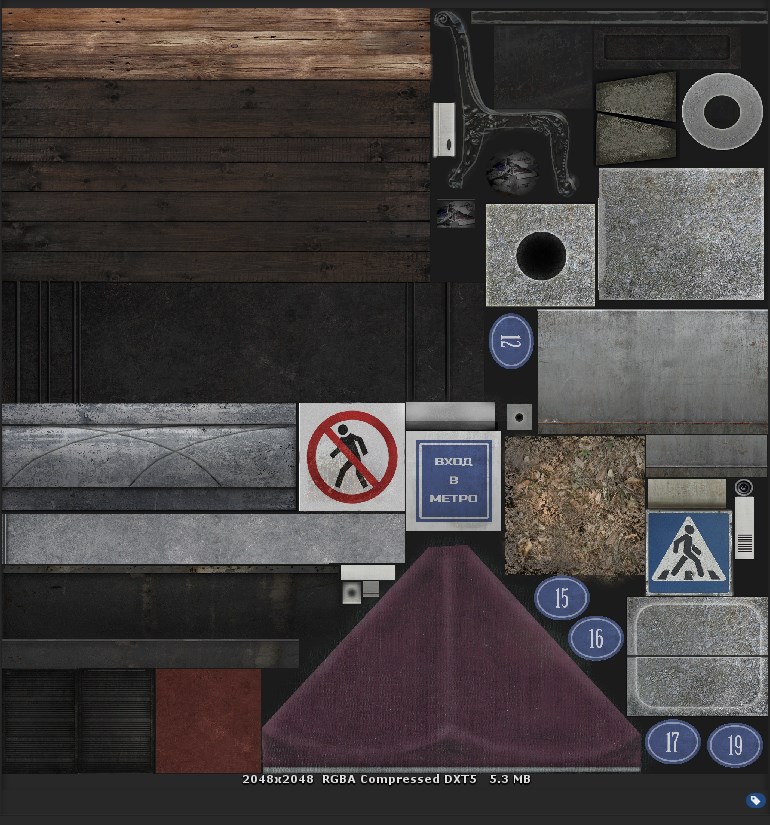
Most of the 3D models for the game was created independently. Something was done quite carefully, with baking normal maps and other subtleties, and something was created in haste to save time. The main part of the objects was created in groups and used a single atlas-texture. That is, in one texture there were areas, for example, for a concrete block, a road sign, brick debris, a manhole, and so on. This allowed the use of one material for all these objects, and, accordingly, allowed objects to get stuck. As we remember, this is pretty good. Some models were faithfully downloaded by me from the Internet, from free libraries. These are mostly small props for filling the rooms, however, I tried to modify all these models a bit so that the similarity is not very conspicuous. Often noticed in indie games the same assets, which somewhat influenced the perception not in the best way. The most problematic in terms of creation was transport. Modeling wheeled vehicles from scratch is very labor intensive and takes a lot of time. Therefore, several copies of the car was bought by me in the Asset Store.
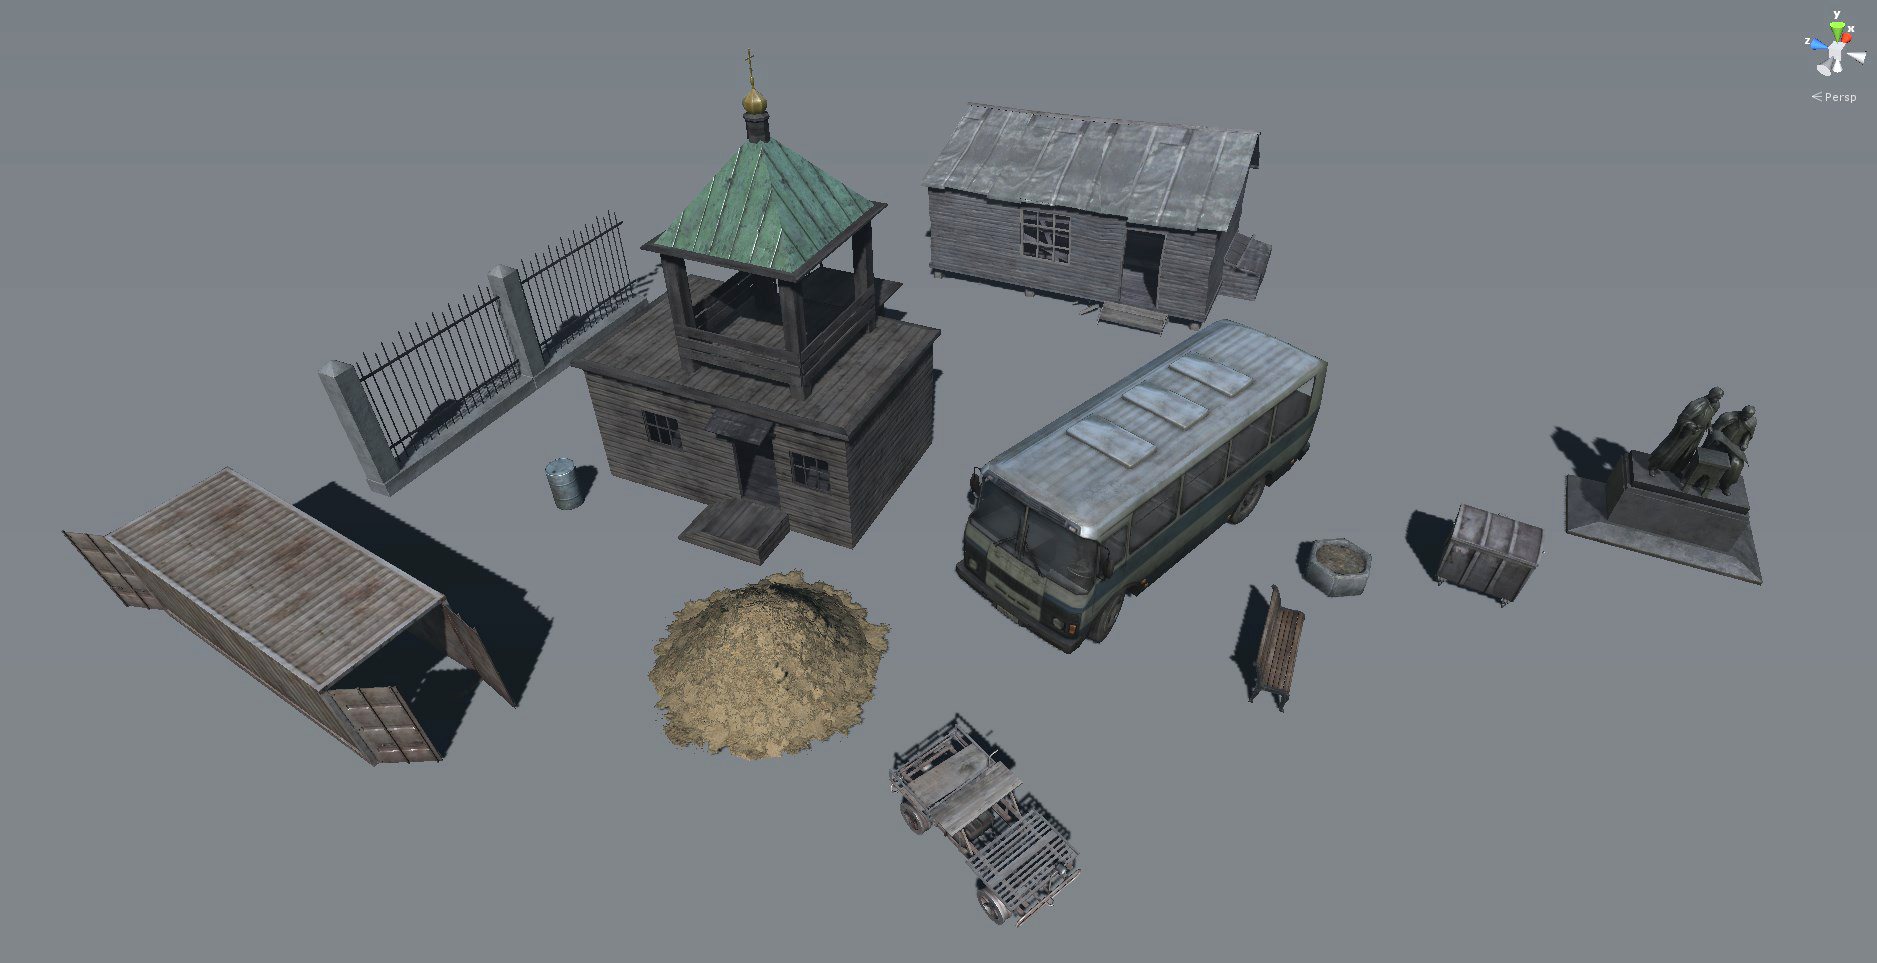
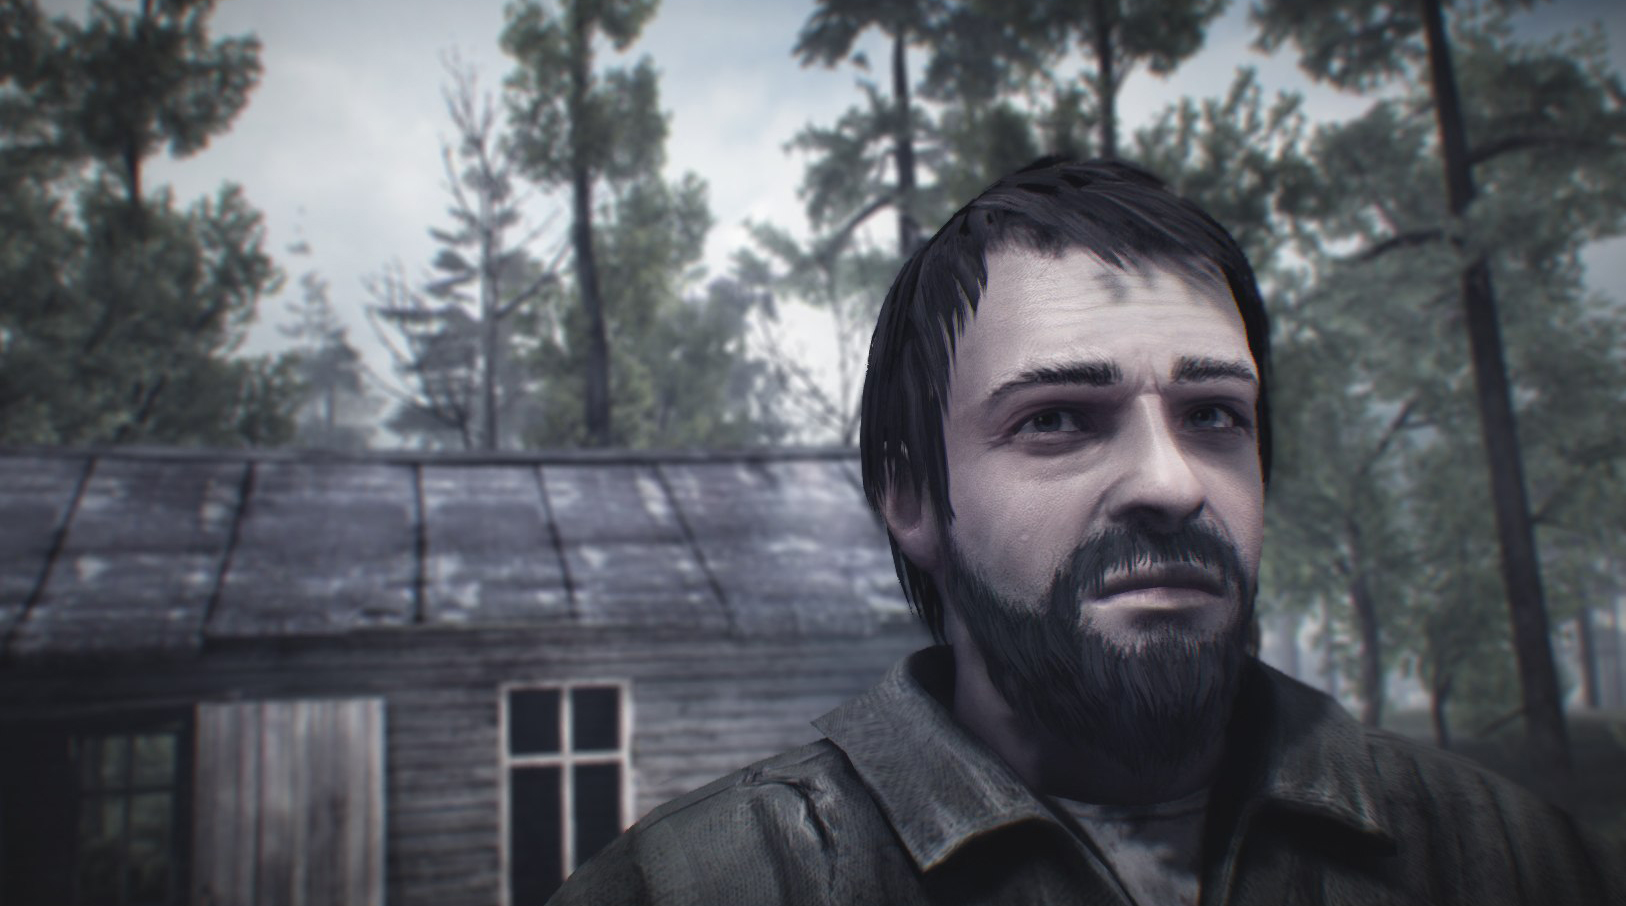
A separate "song" was the creation of characters. This one is still an experience. For those who are not very well aware of how much work is needed in order for a character to appear, who can somehow exist in the game, I will explain. It creates a high-poly model with all the details, buttons on the sleeves, wrinkles on the face and so on. A low-poly model of the same character with a texture scan is created (in my game, the number of polygons per character was on average about 5-8 thousand). Next, from the high-poly model for the low-poly by clever or simple manipulations, the normal map and the ambient map (soft shading) are taken. I usually from ambient then do a diffuse map in photoshop. In the diffuse map in the alpha channel we create a specular map to create brilliance.
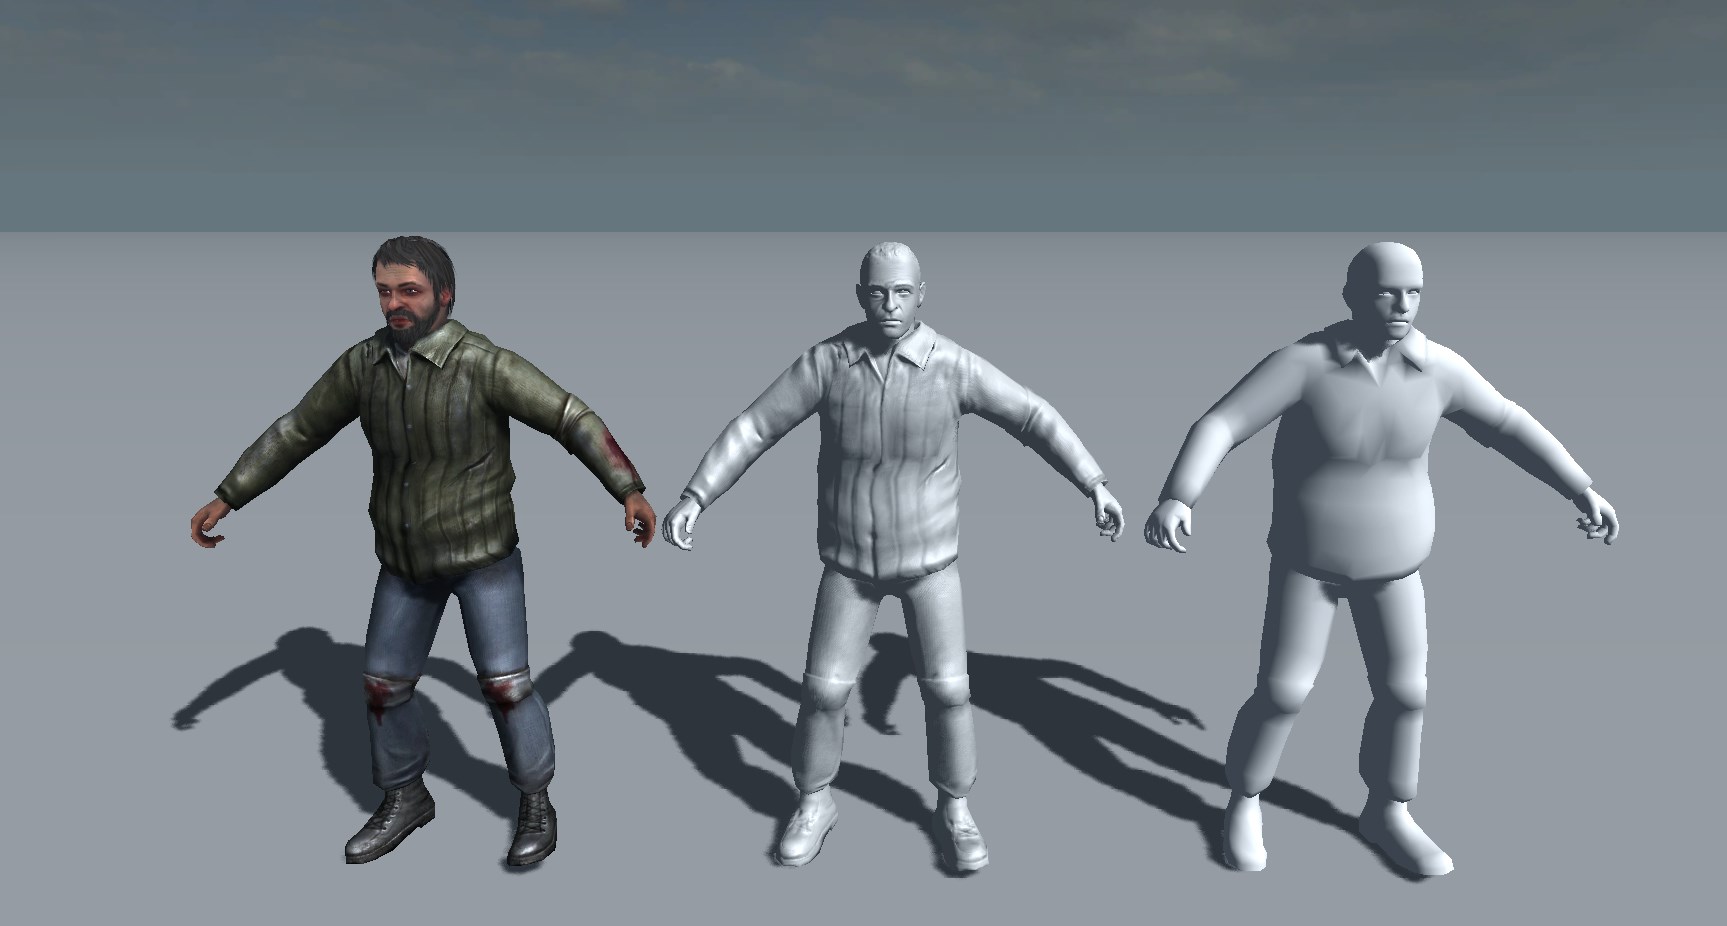
For 2019, of course, it is already too primitive, but for 16 and for the indie project it was quite suitable.
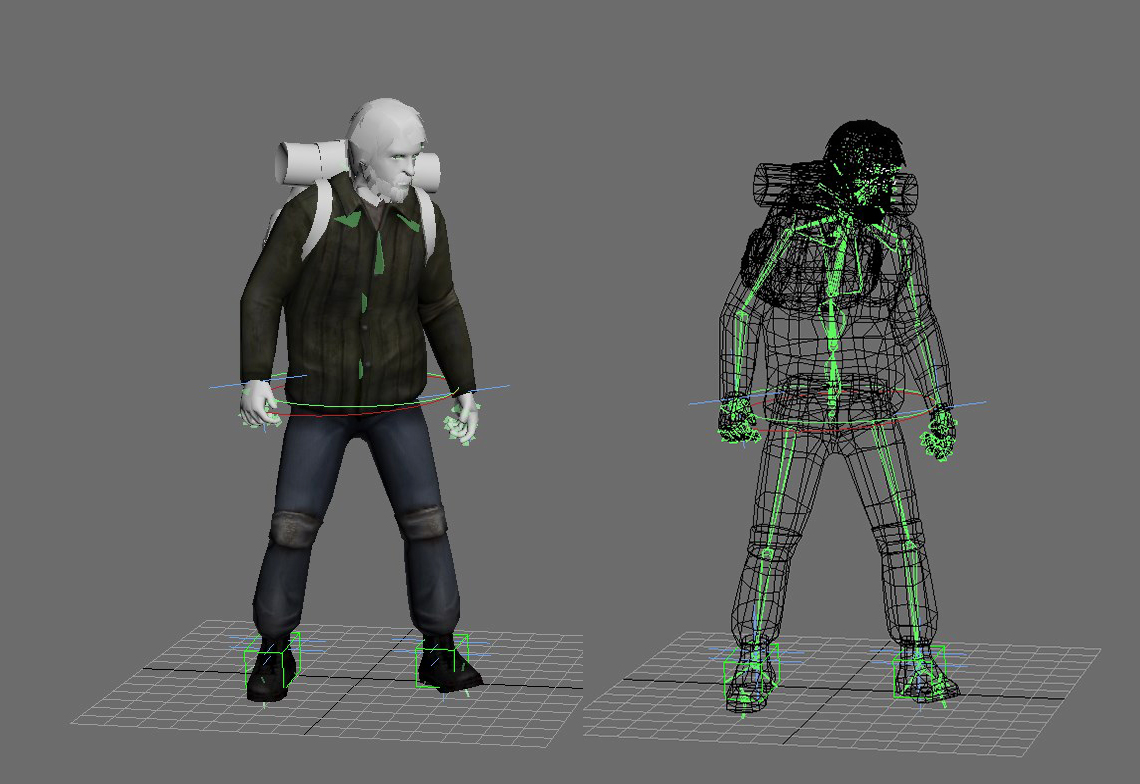
Further, our Persian needs to be ripped off - to place bones into him, due to which he will be able to move his limbs, move his jaw, bend and bend his fingers, etc. Well, in the end, the whole thing should be zanimirovat. Usually a character is created with a set of animations with different states: walking, running, standing or sitting. But unique fragments are also required, for example, in my case, a large number of variations of actions were required for the companion of our hero Petrovich: opening the doors, examining the map, fighting with the bandits, throwing light drafts at the Bor level, etc. All this had to be animated manually, which, of course, is very striking with its clumsiness. In general, manual animation of human movements is a very difficult task and it is extremely difficult to achieve a plausible result. Therefore, a motion keeper is the most appropriate solution for this task. As far as I know, now this option is cheaper and faster than the work of the animator, although the obtained data must be processed and “cleaned” manually.
Shaders
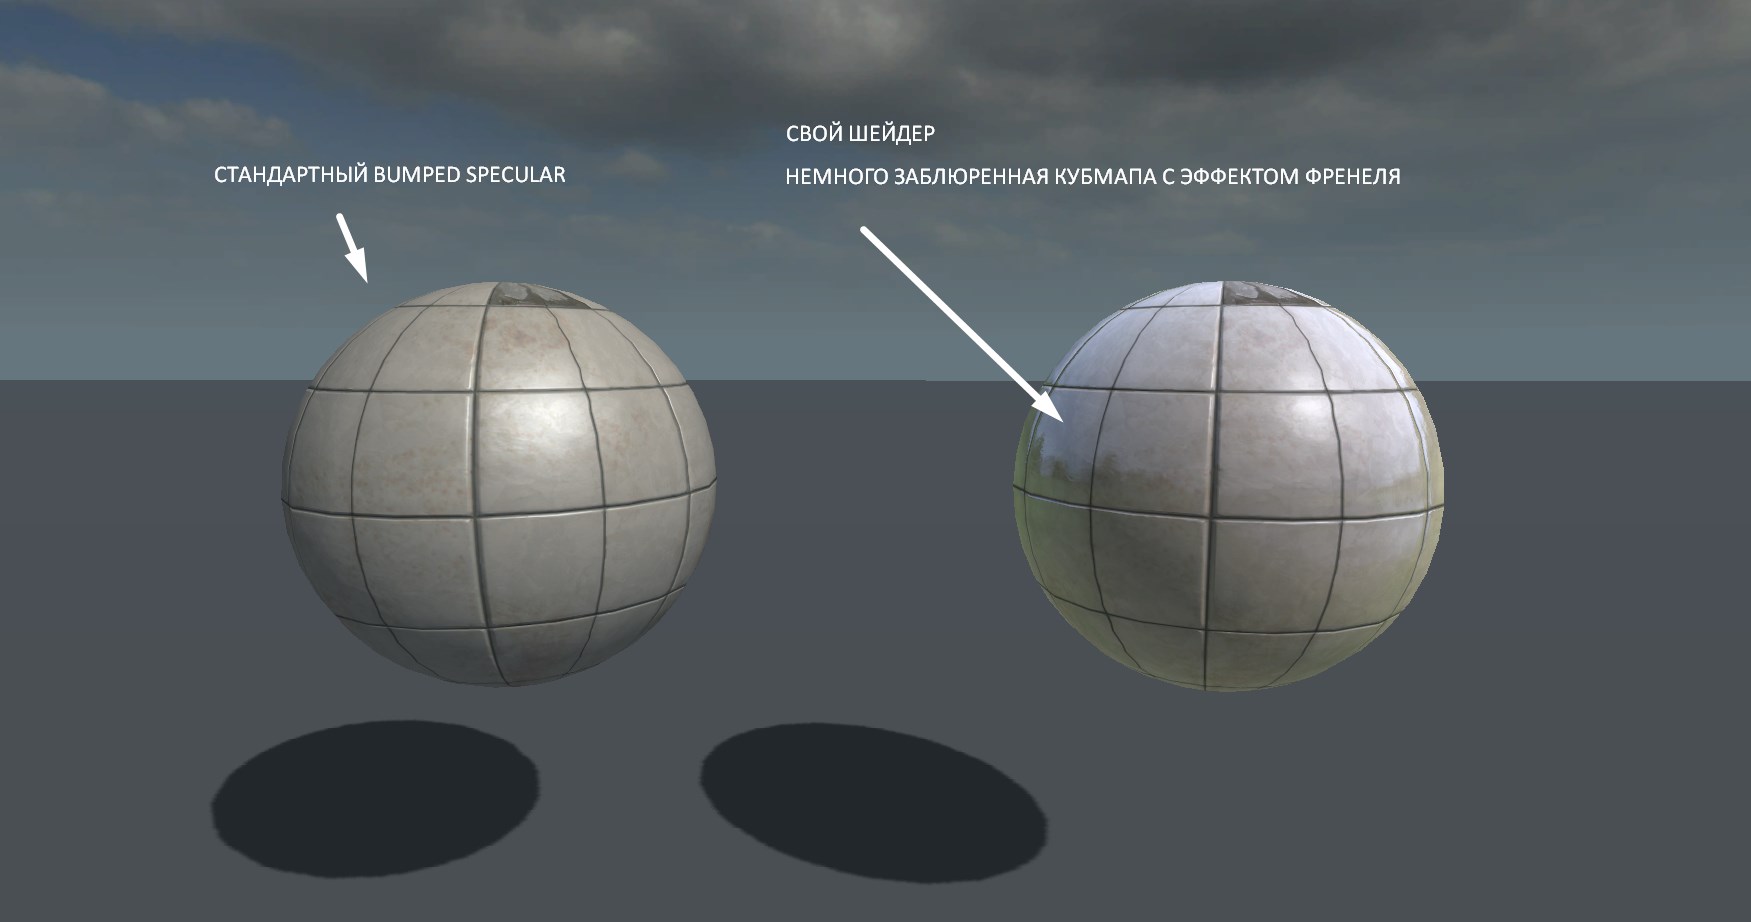
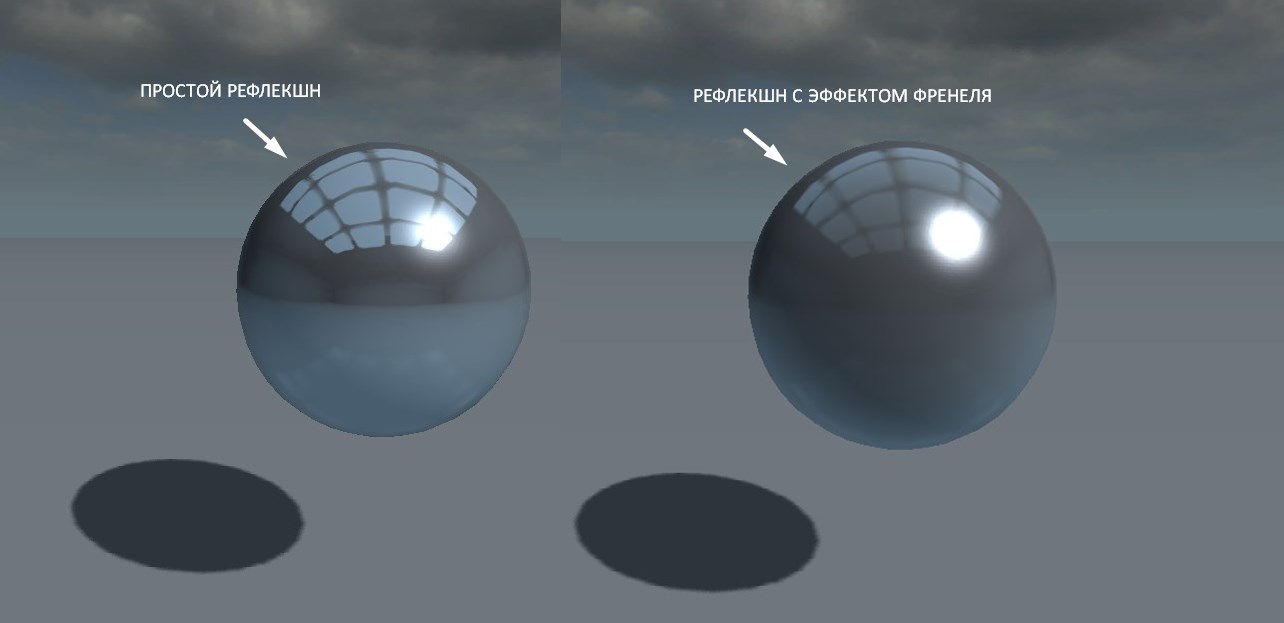
At once I will clarify - at that time I understood very superficially about writing shaders. My training basically consisted in the analysis of finished examples and their refinement. He took various options from the network, changed the parameters, added new ones or removed old ones and checked how it affects the result. It turned out that this is a very exciting activity. Of particular interest to me was operating with different texture channels as a mask. In some cases, I tried to fit the maximum amount of information into one texture and use it. At the beginning of the article, I mentioned the differences between the 4th and later versions of Unity, and specifically, the presence of physically correct shading in the latter. I tried to eliminate this drawback on my own and added a Fresnel effect to the standard shader with specular, cubic and normal mapy. This is such a feature of reflective materials, in which the surfaces at an angle relative to our view, reflect the environment (or cubmapu in this case) stronger and usually look brighter and more contrast. This is very noticeable on a glossy ball, the edges of which appear brighter than the center. I managed to repeat this effect, as well as add the ability to block the cubic in the material, which we usually see on reflective, but rough surfaces. This shader suited me completely and was applied to most of the materials in the game.
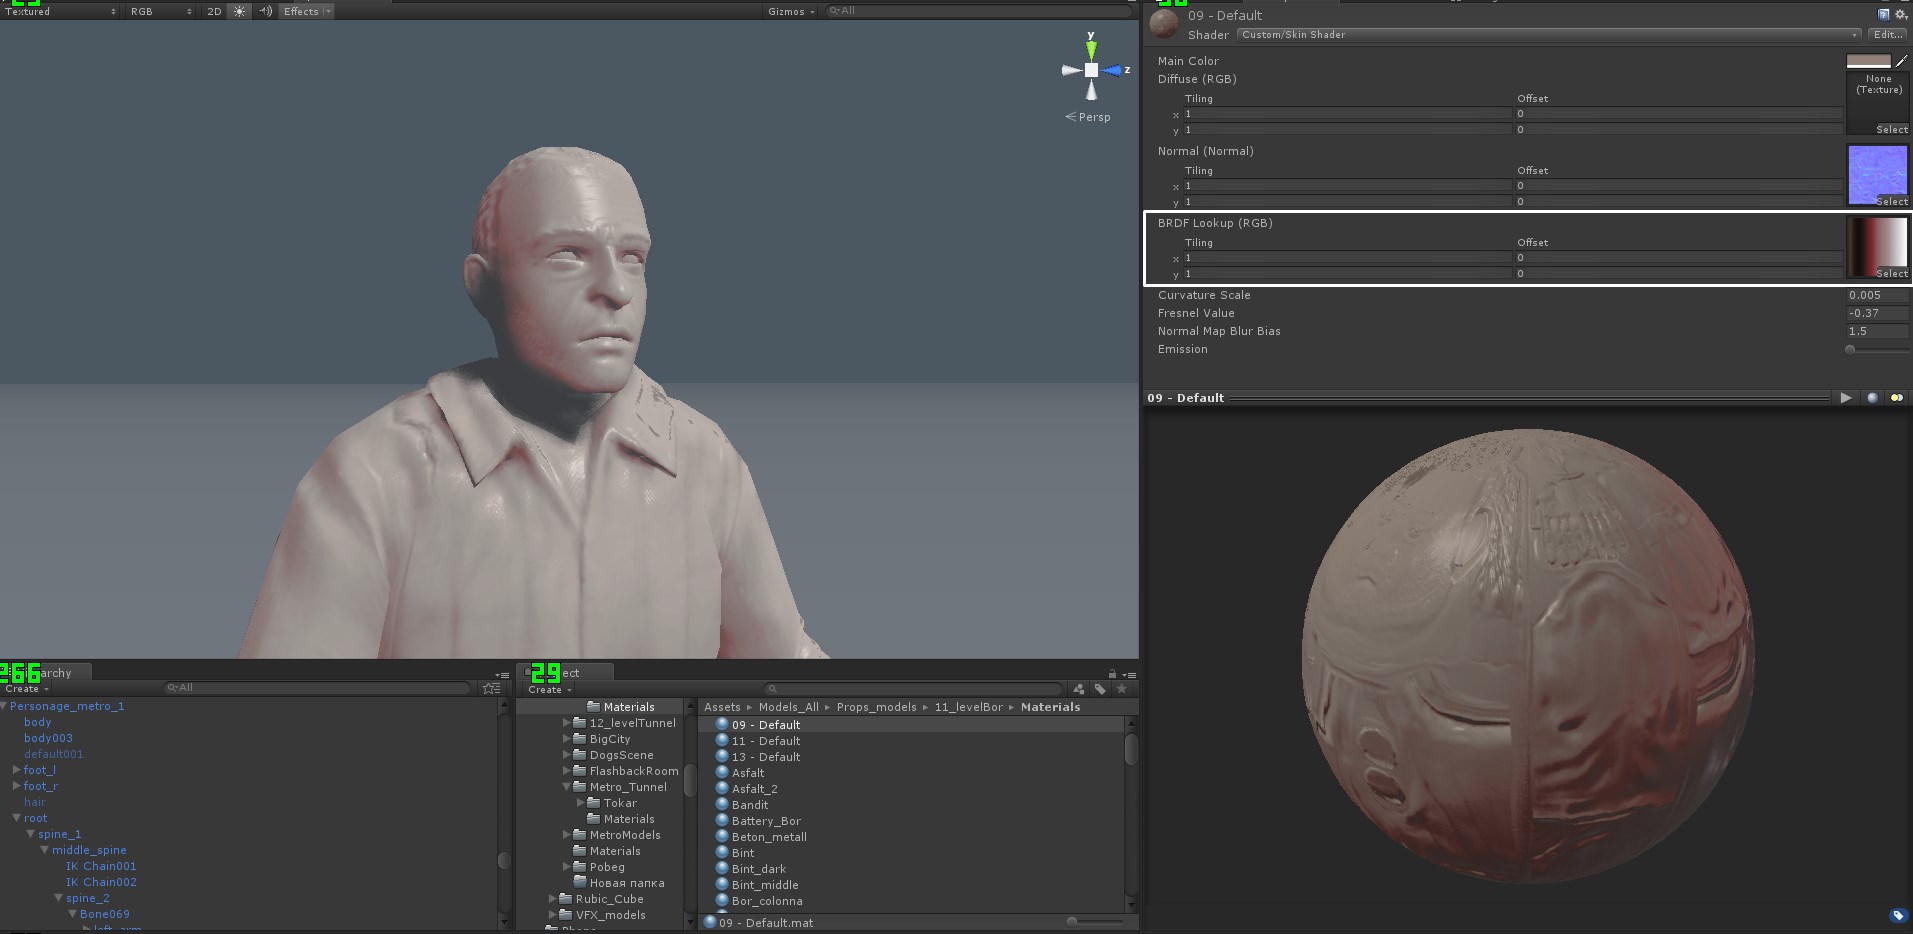
The second interesting experience was the creation of a shader for the skin of the characters. The basis was taken of the code found on the Internet, allowing the use of a gradient texture, which is responsible for the strength and color of the light that affects the model. A similar texture with a reddish tinge in the middle made it possible to imitate human skin, which appears to be a little translucent, that is, it has its own thickness, in which the light smoothly diffuses. The effect is not perfect, but it looks better than standard plastic Bumped Specular.
In addition to the above shaders in the process of work has been created a lot of secondary options with individual effects. For example, a shader puddles with cubic and deformation of the diffuse map. Since it’s too expensive to apply real reflections for puddles, I didn’t want to use a render in texture (this is when the frame is saved to the texture and used in the material, during which, for example, you can distort the warm air), I decided to make simple distortions of the ground texture stretched over a puddle. The effect was quite nice and did not strain the iron at all. By the way, for the distortion of air in kerosene lamps and a fire, a shader with a render into texture was used. It seems, it was Heat distort from asset Detonator. Also, to simulate the volume of light rays, a vertex shader was created with the effect of Soft Particle and rim light effect (when we look at the polygons at an angle, the mesh goes into alpha). This is a classic and already bearded way of implementation. Now, for the new Unity there is a cool option that works on the basis of the post-effect and allows you to draw real rays of light, even taking into account the shadows.
Another worth noting is a set of shaders that were made to simulate wet surfaces. The game has an episode in which at some point the pouring rain begins and some of the materials smoothly acquire a characteristic brilliance. The main effect was applied to the terrain, on which, as in the case of puddles, the diffuse texture began to distort. Also, there were water leaks on the windows of houses. Well, the very "wet" chip was flowing down the lens drops. Here, in fact, I was tormented by doubts, because the hero had neither glasses nor a helmet, and it was not clear how the drops so intrusively adorn the screen. However, visually I liked the effect so much that I just could not refuse it.

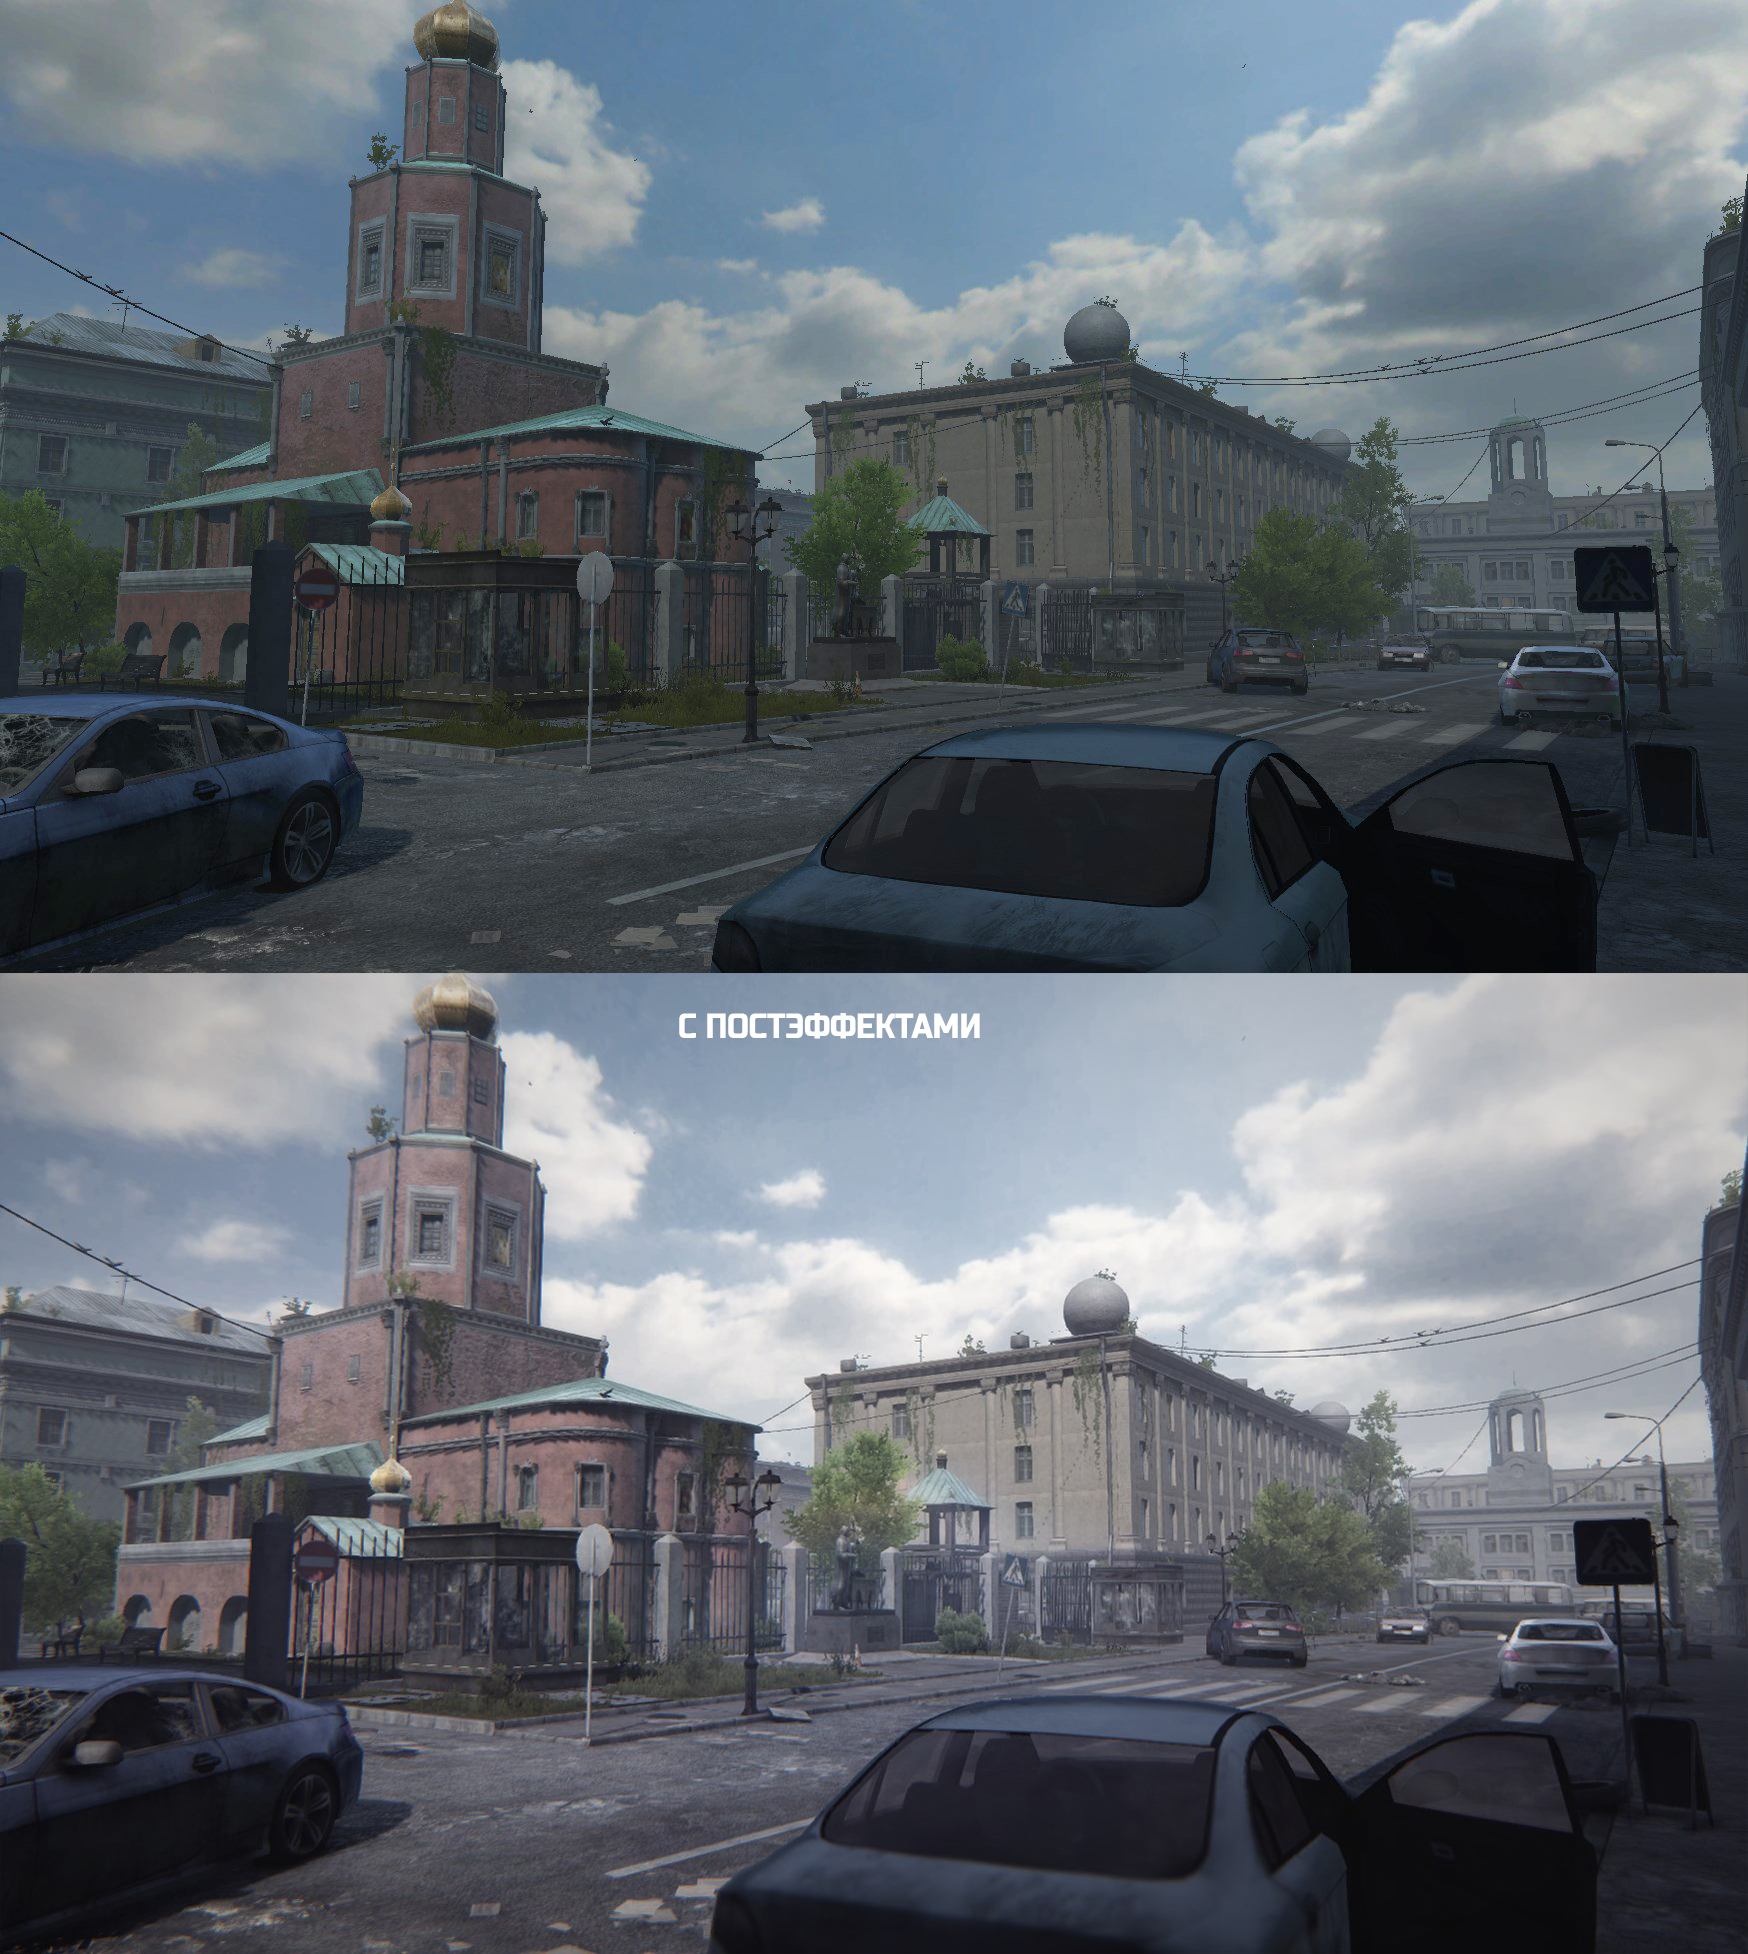
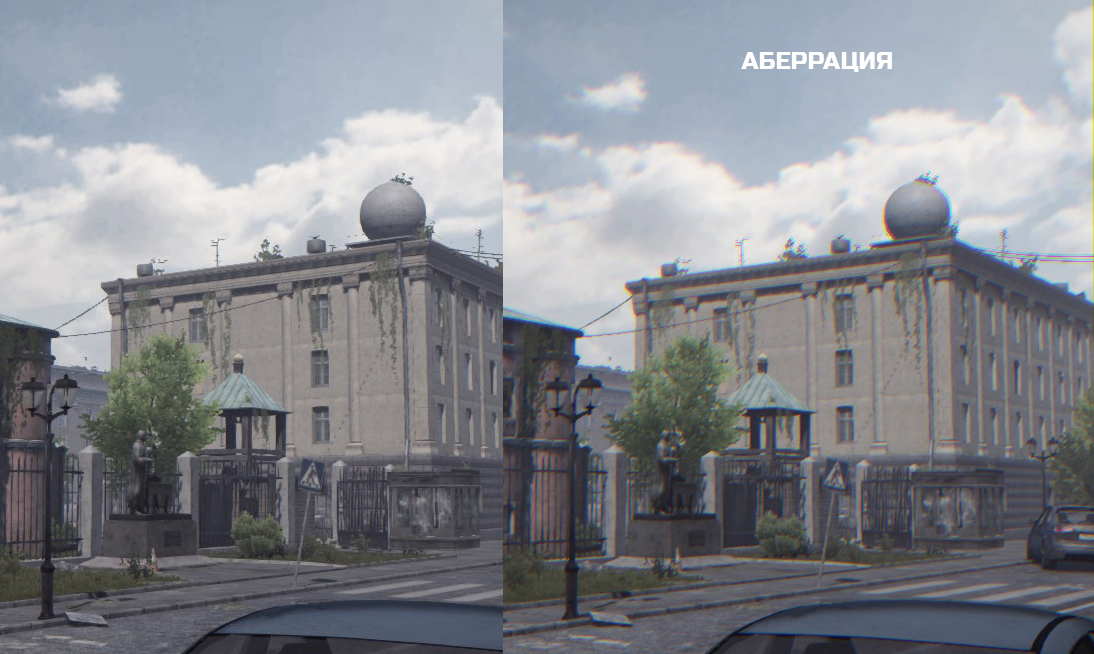
So we smoothly proceed to the post-effects. Speaking of drops on the screen - everything is simple: a few drops from the texture multiply and move down at different speeds. Waves moving in parallel (gradient textures), which multiply, each with its own group of drops. Then the whole thing is summed up, slightly displayed in the “diffuser”, if I may say so, but it is mainly used as a coordinate offset mask. As a result, our picture is distorted from the refractions of water droplets. The main set of post-effects, which were always on camera or optional (if the player turned them on or did not turn them off), is anti-aliasing, SSAO, Bloom, Aberration, Vignette, Sun Shafts. These are all standard effects of Unity, but the SSAO has been modified to render shadows in the distance to zero, because in the distance in the fog the dark spots of shadows look strange. The aberration effect was also changed (these are color distortions of the picture when using lenses, something like color contours at the edges of objects). The standard effect from Unity was drawing maroon-green edges of objects (quite a strange solution in my opinion). In fact, most often the colors are closer to the yellow-red-blue, which was implemented by me. Another permanent effect was a handwritten color correction. The standard effect of Unity seemed to me too resource-intensive, so my own, simplified, was implemented. Basically, he created the effect of mapping and slightly changed the color scheme to a colder one. The choice of a color palette of a picture is always a difficult task, in which it is difficult to decide. It so happens that they can like completely opposite options and make a decision is extremely difficult. In this project, I settled on a dull and cold range. To many, it seemed excessively faded, but it seems to me that it very accurately conveys the mood that I tried to reflect in my game, the mood of sadness, despondency and loneliness.
What about the code?
I repeatedly mentioned in an interview that I was always far from the topic of programming and focused more on the visual component. I started writing the first full-fledged code while working on the game “Train”, so by the time of the development of 35 MM some skills I already had. In general, the quest genre seemed to me very suitable for understanding programming at my initial level. Most of the actions in the game are triggered. A trigger hits the trigger (a cube with a collider), and something starts to happen, for example, a cut-scene starts. In the script, as in the script for a theatrical performance, it is described line by line when and what happens - now the player’s camera is turned off, the cut-scene camera turns on, the character appears in the frame, the conversation animation starts, etc. I believe that there are tools that make this whole process easier (I suppose, because I didn’t go deep), but this option still seems to me the most understandable, because you yourself control all the events.
The relocation of our partner in the game was realized with the help of triggers that were the checkpoints of his route. When hit in the trigger could be included some kind of animation, or a character could say something.
This method was used at all levels except the last. At the final location in the city, if we traveled to her with a partner, he no longer led us along the route, but rather ran after us. A controller based on NavMesh (a system that allows an object to search for a path to the target and move towards it) has already been used there.

The situation with the bear at the second location of the game was more complicated. There was used a controller that works only with the rigid body (physical body), so the beast was stupid and often crashed into trees and other objects. Physical material with zero friction allowed us to avoid serious jams and the bear eventually slipped off and continued to chase us. Here, and generally in areas where you can die, I was faced with the most serious problem for me - the launch of death and restart. At the time of death, it was necessary to take into account all the current states of the character: whether the flashlight is on, the card is open, the knife is activated, etc. Also, it was necessary to preserve the values of health and all resources, and then, all that is activated, it was necessary to deactivate and run the camera drop animation. After darkening the screen, you had to return everything and read the saved values. In fact, there are no great difficulties with the proper approach, but in my case, a lot of bugs popped up: now the knife remained in the hands before the eyes at the moment of the bear’s attack, or the card wasn’t removed — everything like that. In addition, you never know how a player at this moment can lead a player to where he will run and what conditions a bear will bring, which may get stuck somewhere or, for example, attack us through a wall. In general, there are a lot of nuances that you cannot even foresee.
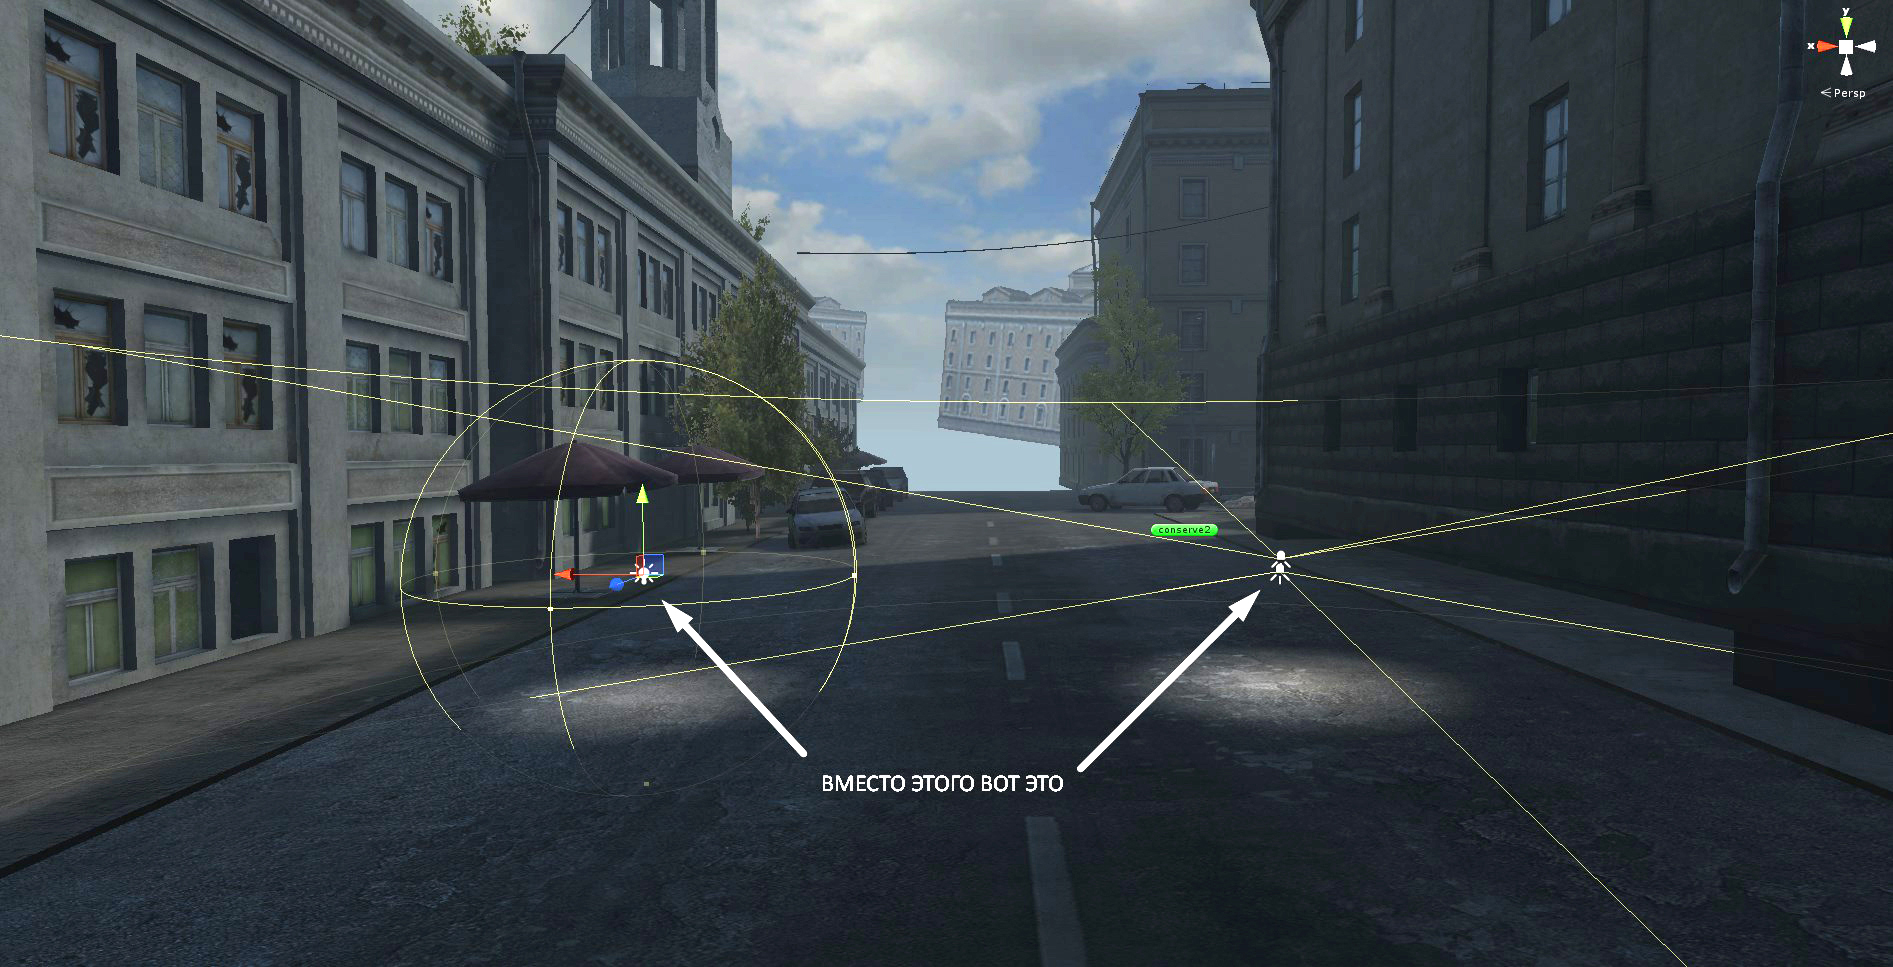
The interaction of our character with objects was implemented using Raycast ray. All interactive objects were marked with a Subject tag, and when the beam hits them, it activates the backlight (mesh - indicator with highlighted edges) and includes a script that is already responsible for what action we can take with this object, for example, pick up an object, read note or open the door.
For interaction, initially there were plans to make full-fledged hands that would stretch to objects, this would create a more pronounced effect of presence. But such an option was a great difficulty for me to realize and the prospect of having a whole “bundle” of bugs in the future, so there were only hands left that were already selected items. In front of the camera there is a prefab with small handles, in which all items are already available (camera, knife, ax, etc.). When you select the same item during the game, the desired is turned on, and unnecessary ones are turned off.

An interesting point was associated with the animation of the conversation of characters. The technique is primitive, but I thought of it myself, I am proud, yeah. At first, I thought that when communicating the characters, it would be necessary to run an animation of the opening of the jaw in random order with each phrase. But then it came to mind that you can read the sound level of the audio track at the time of playback by a script and transfer this level to the float value, which is already responsible for the position of the hero's jaw. In the end, the jaw automatically opened when the words were pronounced to the beat of the sound file. This greatly simplified the task, although it looked too “machine”.
Optimization
Optimization is a very important part of development, on which depends how “smoothly” the game will work on different hardware. I will touch on the optimization of the visual component of the project. There are several useful methods for this: groups of Lods, occluging the culling, clipping objects at a distance. LOD Group should be used in the case of "heavy" high poly objects. For this, several meshes are created with different numbers of polygons. The farther away the camera is from the object, the more simplified the model is drawn in the frame. For example, for 35MM Lody used in models of cars, characters, some trees. Usually, 2-3 LODs were made, among which each succeeding mesh had almost 2 times less polygons. For clarity: the original car model consists of 15 thousand polygons, the first LOD has already about 9 tons.(the number of ribs decreases, small parts are removed, such as hinges, interior parts), the second LOD reaches up to 5 tons (door handles are removed, mirrors inside the cabin, the geometry becomes even easier). Further in the same vein. For lodov, by the way, one interesting trick was used. When we bake lightmaps for an object with lodes, we have to bake for both objects. In order to reduce baking time and save system memory, I used a script that automatically transferred the assigned lightmap with all coordinates from the parent object (zero LOD) to all other lody.One interesting trick was used. When we bake lightmaps for an object with lodes, we have to bake for both objects. In order to reduce baking time and save system memory, I used a script that automatically transferred the assigned lightmap with all coordinates from the parent object (zero LOD) to all other lody.One interesting trick was used. When we bake lightmaps for an object with lodes, we have to bake for both objects. In order to reduce baking time and save system memory, I used a script that automatically transferred the assigned lightmap with all coordinates from the parent object (zero LOD) to all other lody.
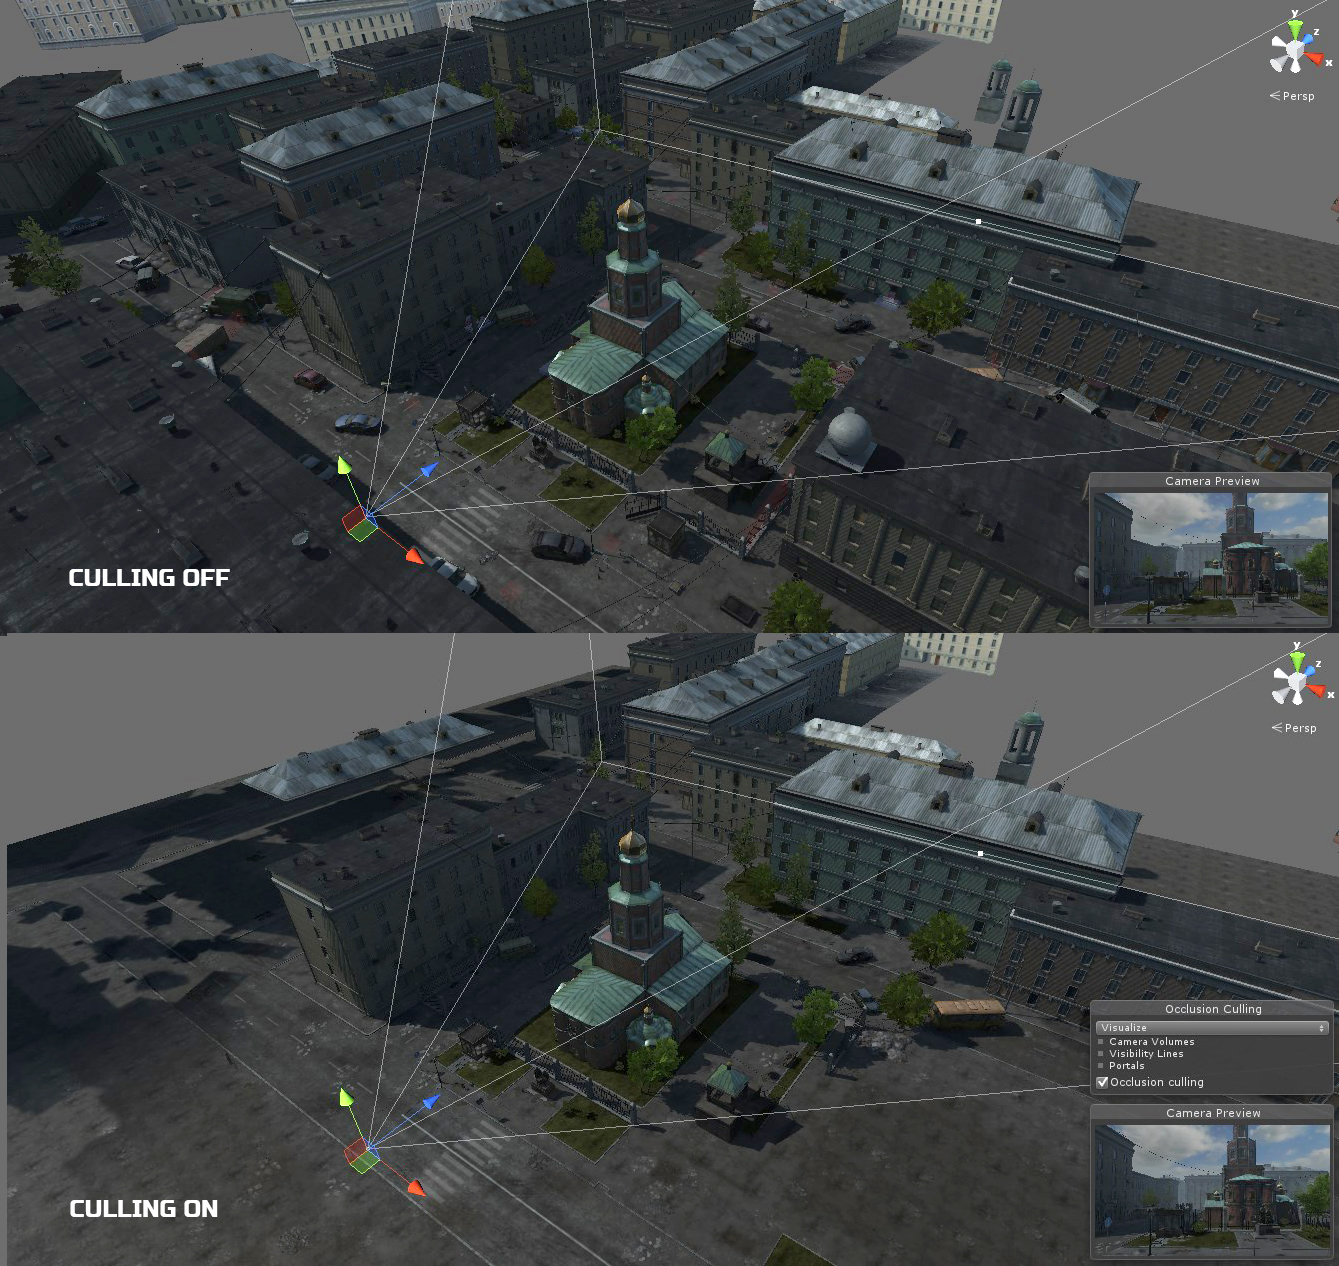
The second optimization method is Occlusion Culling. This is a mechanism in which everything that is not in the field of view of the camera is cut off, or is closed by another object. For example, when we go into the room, behind the wall we no longer see many objects on the street, and therefore there is no need to waste resources on their drawing.
Another useful way to simplify a render is to cut objects at a distance. This is the very first option that I met since the days of the project “Light”. A script is hung onto the camera that adjusts its rendering distance for each layer. In my case, three categories of layers were specially created, with small objects (household items, hammers, bricks and small garbage), with medium and slightly above average sizes (kettles, bushes, flower pots, small lampposts, etc.). Three categories were assigned distances: 40, 80 and 120 meters. Once beyond the specified distance, the camera stopped rendering the corresponding object. The option is very convenient and effective, since small props from afar can not be seen, and therefore, it makes no sense to draw them.
Sound
The main part of the sounds for the game was taken from free libraries from the Internet. Usually I downloaded the right options, and then I combined and mixed them in Adobe Audition. In general, there is nothing to tell about this part of the work, because it is a rather routine, tedious process and for me is not particularly attractive. By the way, work on introducing sounds, sounding cut-scenes, fitting sound files so that at the right moment plays the right sound - it all took, probably, one-fourth of the total time spent working on the game. The only pleasant moment here was the introduction of music, on which the talented and extremely talented composer Dmitry Nikolaev worked. I am very pleased with what he did, because by and large, I did not know exactly what I wanted to hear. But Dmitry is very well felt the moodwhich was incorporated into the project and implemented it in the form of atmospheric ambients. It turned out something fantastic, mysterious and melodic.
Another interesting step was the work with voice acting characters. Despite the criticism from the side, I am still pleased with the result and I think that the actors did a very good job with their task. By the way, the main characters were voiced by Vsevolod Petrykin and Alexander Bragi, for which he thanks a lot.
In general, there were no serious problems with working with sound, although after the release a rare bug was discovered that I still could not overcome, because I did not understand its nature. Sometimes a part of the sounds ceased to be played, or it sounded with some very strong echo effect. When talking to a hero, a voice could suddenly disappear and just as suddenly recover. There were guesses associated with a large load and a large number of sounds playing simultaneously. There were also assumptions about the connection of the bug with reverberation zones, but this is not accurate.
On this, perhaps, everything. Much time has passed since the moment of development, some things have been forgotten, and some have become completely irrelevant, but I hope that the article will be useful for someone and can be will give answers to some questions. Thank you all and good luck!
Source: https://habr.com/ru/post/448340/
All Articles