The book "Vue.js in action"
 Hi, Habrozhiteli! The purpose of this book is to give you the knowledge with which you would not hesitate to join any project using this library. The book is intended for all who are interested in learning Vue.js and have experience with JavaScript, HTML and CSS. You do not need deep knowledge of this area, but understanding the basics, such as arrays, variables, loops, and HTML elements, does not hurt.
Under the cut, there is an excerpt in the form of the chapter “Vuex”, describing: what is the state use of getters; implementation of mutations; adding actions; working with Vuex helper methods; modules and project setup.
10.1. Why do we need Vuex
The Vuex library manages the state. It stores it centrally, which makes it easier for any components to access it. A state is information or data that the application supports. This is important because we need a reliable and understandable mechanism for working with this information.
If you already have experience with other frameworks for creating single-page applications, some of these concepts may seem familiar. For example, React uses a similar state management system called Redux. Vuex and Redux are influenced by the Flux project. This is the architecture proposed by Facebook, which is designed to simplify the construction of client web applications. It facilitates the movement of data in one direction: from actions to the dispatcher, then to the repository, and finally to the presentation. This approach allows you to separate the state from the rest of the application and encourages synchronous updates. You can learn more about Flux from the official documentation on facebook.imtqy.com/flux/docs/overview.html.
')
Vuex works on the same principle, helping to change the state in a predictable and synchronous manner. Developers do not need to worry about the effects of state updates on synchronous and asynchronous functions. Imagine that we are interacting with a server API that returns data in JSON format. What happens if at the same time this data is modified by a third-party library? We do not want to get an unpredictable result. Vuex helps to avoid such situations, eliminating any asynchronous changes.
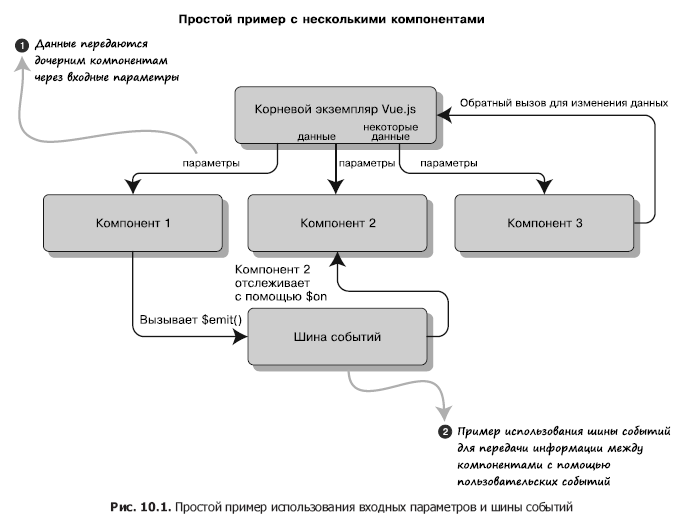
You are probably wondering why we even need the Vuex library. In the end, Vue.js allows you to transfer information to components. As you know from the previous chapters, input parameters and user events are intended for this. We could even create our own event bus for data transfer and inter-component communication. An example of such a mechanism is presented in Fig. 10.1.
This would be appropriate for small applications with a handful of components. In this case, you need to transmit information to only a few recipients. But what if the application is larger, more complex and multi-layered? It is clear that in a large project it is not so easy to keep track of all the callback functions, input parameters and events.
For these situations, the Vuex library has been created. It allows you to organize work with the state in the form of a centralized repository. Imagine a scenario in which you should consider using Vuex. For example, we are working on a blog with articles and comments that can be created, edited and deleted. At the same time, we have an administration panel that allows you to block and add users.
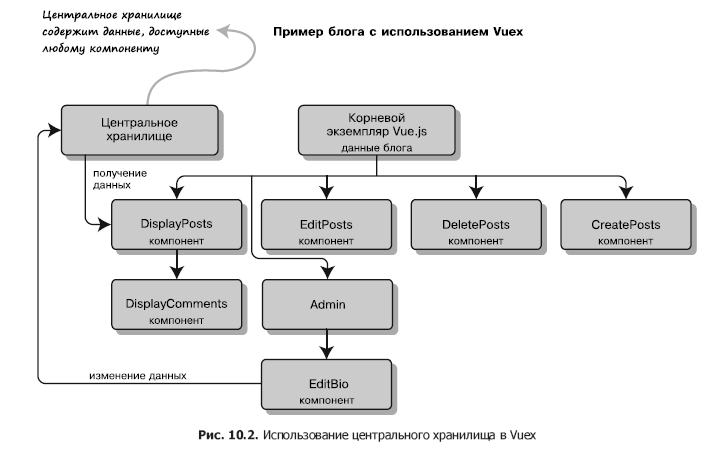
Let's see how this is implemented using Vuex. In fig. 10.2 shows that the EditBio component is a child of the admin panel. He needs access to user information so that he can update it. Working with Vuex, we can access the central repository, change the data and save the changes directly from the EditBio component. This is much better than passing information from the root instance of Vue.js to the Admin component, and then to EditBio using input parameters. It would be difficult for us to keep track of data placed in different places.
Nevertheless, Vuex has to pay its price in the form of an additional template code and complication of the application structure. As already mentioned, it is better not to use this library in simple projects consisting of several components. Indeed, its potential is manifested in large applications with a more complex state.
10.2. Status and mutations in Vuex
Vuex stores the state of the entire application in a single object, which is also called the single source of truth. As the name suggests, all data is collected in one place and not duplicated in other parts of the code.
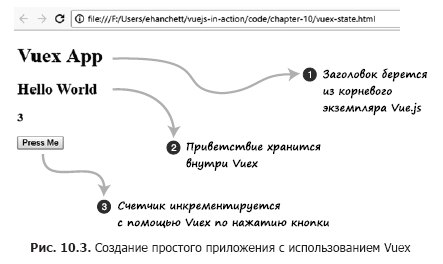
HINTConsider a simple example of working with state in Vuex. All our code will be placed in one file. Later you will learn how to add Vuex to your project using Vue-CLI. Open a text editor and create a file vuex-state.html. We will display a message located in the central repository and a counter. The result is shown in Fig. 10.3.
It is worth noting that we are not required to store all of our data in Vuex. Individual components may have their own local state. In certain situations, this is preferable. For example, your component has a variable that is used only inside it. It must remain local.
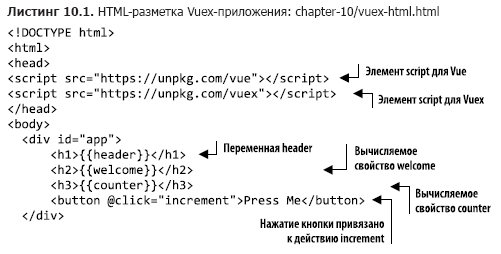
 First add script tags with links to Vue and Vuex. Then create the HTML markup. We will use the tags H1, H2, H3 and button. The h1 tag displays the header with a local variable declared in the Vue.js instance. The welcome and counter messages are executed as computed properties based on the Vuex repository.
The button element triggers the increment action. Copy the code from Listing 10.1 into the vuex-state.html file.
Having finished with the HTML markup, let's start creating the Vuex repository. It will contain all application data, including the msg and count properties.
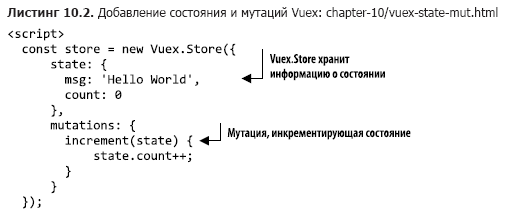
To update the state, we use mutations. This is something similar to setters from other programming languages. The setter sets the value, the mutation updates the program state. In Vuex, mutations must be synchronous. In our example, the counter is incremented only by pressing a button, so you do not need to worry about asynchronous code (later we will look at actions that help solve asynchronous problems).
Create an increment function inside the mutations object that increments the state. Take the code shown in Listing 10.2 and paste it at the bottom of the vuex-state.html file.
So, we have prepared the HTML markup and the Vuex repository. Now you can add logic that connects them. We want the template to display the msg and counter values that are part of the Vuex state. In addition, the counter needs to be updated.
Create an instance of Vue.js with a new data function that will return a local header property with the text Vuex App. In the computed section, add the calculated properties welcome and counter. The first will return store.state.msg, and the second - store.state.count.
Finally, you need to add a method called increment. A mutation has been declared in the Vuex repository, but we cannot use it directly to update the state. For this, a special function is provided commit. It tells Vuex to update the repository and thereby saves the changes. The expression store.commit ('increment') performs a mutation. Paste the following snippet (Listing 10.3) immediately after the code created in Listing 10.2.

This is a full-fledged working application based on Vuex! Try pressing the button - each time you press the counter should increase by 1.
Let's update the code so that pressing the button increments the counter by 10. If you look closely at the increment mutation, you can see that it takes only one argument, state. Give another one - let's call it payload. It will be passed by the increment method, which is created in the root instance of Vue.js.
Copy the contents of vuex-state.html to the new vuex-state-pass.html file. Using this application as an example, we will show how arguments are passed.
As you can see in Listing 10.4, only the mutations object and the increment method need to be updated. Add to the increment mutation another argument called payload. This is the value by which state.count will increase. Find the store.commit call inside the increment method and specify 10 as the second argument. Update the vuex-state.html file as shown below.

Save the vuex-state-pass.html file and open it in a browser. Now, when you press the button, the counter should increase by 10, not by 1. If something went wrong, check the browser console and make sure you did not make any typos.
10.3. Getters and actions
In the previous example, we accessed the repository directly from the calculated properties. But what if we had several components that need the same access? Suppose that we want to display a welcome message in capital letters. In this case, we will help getters.
Getters - part of Vuex. They allow you to implement a unified access to the state in all components. Take the example from section 10.2 and instead of directly accessing the repository through calculated properties, we use getters. In addition, we will make the getter for the msg property translate all its letters to uppercase.
Copy the contents of the vuex-state-pass.html file into vuex-state-getter-action.html. To simplify the task, let's leave the HTML code unchanged. In the end, something like fig. 10.4.
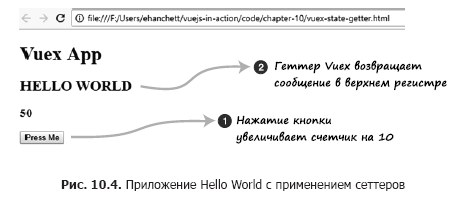 As you can see, the Hello World message is now displayed in words. Pressing the Press Me button increments the counter in the same way as in the previous example.
Look inside the new vuex-state-getter-action.html file for the Vuex.Store construct immediately below the tag
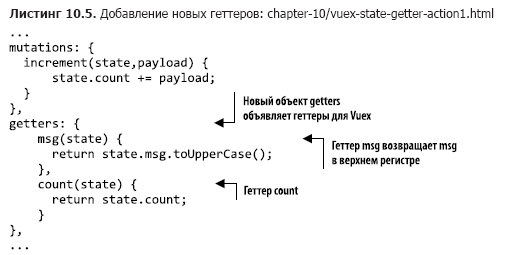
 Add after mutations a new object called getters. Create the msg and count methods inside this object, as shown in Listing 10.5. Both methods take the same state argument.
The msg getter will return state.msg.toUppercase (). Due to this, the message is always displayed in upper case. In the count getter, we will return state.count. After adding the getters to the bottom of the mutations, the vuex-state-getter-action.html file should look like this.
Actions are another integral part of Vuex. I mentioned earlier that mutations must be synchronous. But what if we work with asynchronous code? How to ensure that asynchronous calls can change state? In this we will help the actions of Vuex.
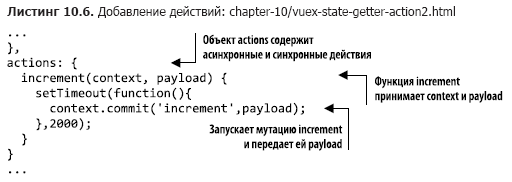
Imagine that the application is accessing the server and waiting for a response. This is an example of asynchronous action. Unfortunately, mutations are asynchronous, so we cannot use them here. Instead, add an asynchronous operation based on the Vuex action.
To create a delay, use the setTimeout function. Open the vuex-state-getter-action.html file and add the actions object to it immediately after getters. Inside this object we place an increment action that takes context and payload arguments. With context we will save the changes. Place the context.commit operation inside setTimeout. Thus we simulate a delay on the server. We can also pass in the context.commit argument payload, which then falls into the mutation. Update the code based on listing 10.6.
After updating Vuex.Store, you can go to the root instance of Vue.js. The calculated property will access the repository not directly, as before, but with the help of getters. We also modify the increment method. To access the new Vuex property we created earlier, it will use the store.dispatch ('increment', 10) call.
The first argument of the dispatch call is the name of the action, and the second argument always contains additional data that is passed to this action.
TIP
The additional data may be a regular variable or even an object.
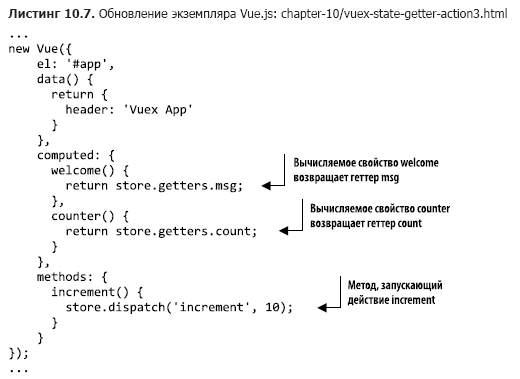
Update the Vue.js instance in the vuex-state-getter-action.html file as shown in Listing 10.7.
Download the application and press the button several times. You should notice a delay, but the counter will increase by 10 after each press.
10.4. Using Vuex in a pet store project using Vue-CLI
Let's return to the pet store project we were working on. If you haven't forgotten, we stopped adding animations and transitions. Now we integrate the Vuex library, which we met earlier.
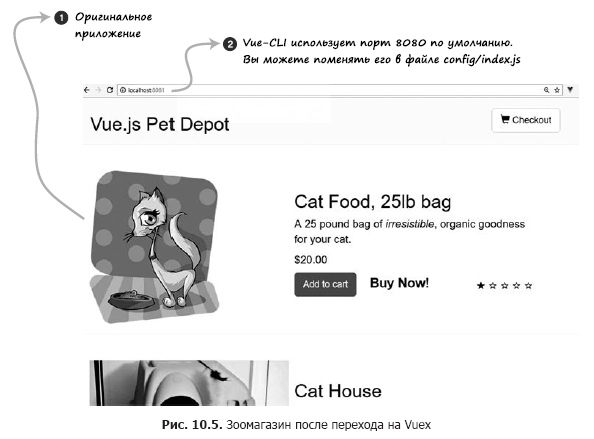
Let's transfer data on goods in storage. As you remember from the previous chapters, the data was initialized in the created hook inside the Main component. Now this hook should generate a new event that initializes the Vuex repository. We will also add the calculated products property, which retrieves products using a getter (we will create it later). The final result will look like in fig. 10.5.
10.4.1. Installing Vuex with Vue-CLI
First, install Vuex! This is a simple process. Prepare the latest pet store we worked on in chapter 8. You can also download all the code for this chapter on GitHub at github.com/ErikCH/VuejsInActionCode.
Open a terminal window and navigate to the project root directory. To install the latest version of Vuex, run the following command:
$ npm install vuex and save a record of it in the pet store's package.json file.
Now you need to add storage to the main.js file, which is located in the src folder. The storage itself does not exist yet, but we still import it. It is usually located in the src / store / store.js file, but you can choose a different path - all developers have their own preferences. Let's stop on the standard option. Later in this chapter, we will discuss an alternative directory structure using modules.
You need to add storage to the root instance of Vue.js below the router, as shown in Listing 10.8. By the way, we use the ES6 standard, therefore store: store can be reduced to store.
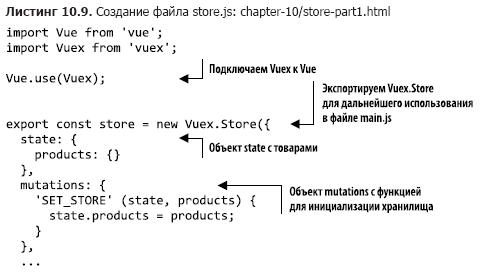
After connecting the storage to the root instance, we can access it from any part of the application. Create the file src / store / store.js. In it, we will place the Vuex repository with information about the goods offered by the pet store. At the top, add two import statements, one for Vue and one for Vuex. Then specify Vue.use (Vuex) to put everything together.
We imported the repository in the main.js file from ./store/store. Now you need to export the store object inside store.js. As you can see in Listing 10.9, we are exporting a const store value equal to Vuex.Store.
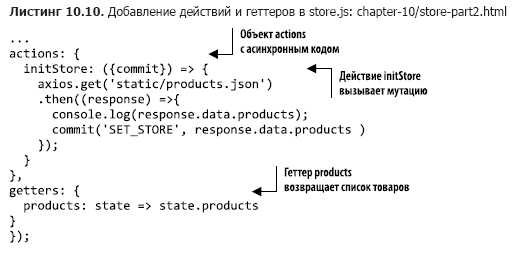
First add objects with state and mutations. The state will contain an empty object called products. Soon we will fill it with the initStore method. The mutation is called SET_STORE, it will assign the transferred goods to the state.products property. Paste the code from the following listing into the src / store / store.js file we just created.
We need to create an action and a getter in the repository. The getter will return the products object. With action, things are a little more complicated. You should transfer the created hook that reads the static / products.json file with Axios to the actions object inside Vuex.
I mentioned earlier that mutations must be synchronous and that only actions inside Vuex can accept asynchronous code. To get around this limitation, put the Axios code in the Vuex action.
Create an actions object in the store.js file and add the initStore method to it. Copy into this method the contents of the created hook from the file components / Main.vue. Instead of assigning response.data.products to the products object, we will invoke a mutation using the commit function. Pass in response.data.products as an argument to SET_STORE. The final code should look like this (Listing 10.10).
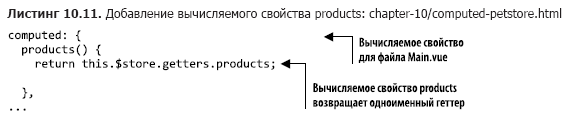
We’re almost done, all we have to do is update the Main.vue file and move the products from the local products object to the Vuex storage. Open the src / components / Main.vue file and find the data function. Delete the line products: {}. We will access the goods from the calculated property that the store returns.
Find the calculated properties of cartItemCount and sortedProducts inside Main.vue, they should go right after the methods section. Add the products property and make it return the getter of the same name.
We connected the repository to the root instance of Vue.js in the main.js file, so we no longer need to import it. In addition, when using Vue-CLI storage is always available in the form of this. $ Store. Do not forget the $ sign, otherwise there will be an error. Add the calculated products property, as shown in Listing 10.11.
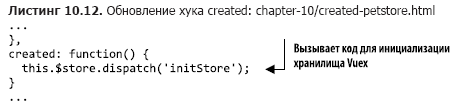
Find the created hook in which the products object is initialized, and delete its contents. Instead, insert a call to the initStore action that we created earlier in the Vuex repository. To trigger an action, use the dispatch function, as in the previous example. Listing 10.12 shows what the created hook should look like after updating the Main.vue file.
That should be enough. Run the npm run dev command in the terminal, and a window with a pet store application should appear on the screen. Try putting the items in the cart and make sure everything works as it should. If something went wrong, look for errors in the console. In the src / store / store.js file, instead of Vuex.store, you can randomly type Vuex.Store. Remember this!
10.5. Vuex Helper Methods
Vuex provides convenient helper methods that allow you to make the code more concise and get rid of adding the same getters, setters, mutations, and actions. For a complete list of Vuex helper methods, see the official tutorial at vuex.vuejs.org/guide/core-concepts.html. Let's see how they work.
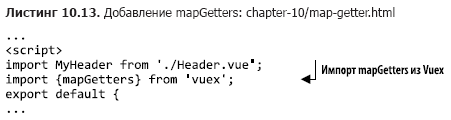
The main helper method you should be aware of is called mapGetters. It is used to add all available getters to the computed section and does not require listing each of them. But before using it, you need to import it into the component. Let's go back to the pet store and add the mapGetters method.
Open the src / components / Main.vue file and find the script tag. Somewhere inside this tag a Header component must be imported. Connect mapGetters immediately after this import, as shown in Listing 10.13.
Now we need to update the calculated property. Find the products function in the computed section and insert the mapGetters object instead.
mapGetters is a unique object, for its proper operation, it is necessary to use the spread operator from the ES6 structure - it expands the expression in a situation when it is expected to receive any arguments (zero and more). You can read more about this syntax in the MDN documentation at developer.mozilla.org/ru/docs/Web/JavaScript/Reference/Operators/Spread_syntax .
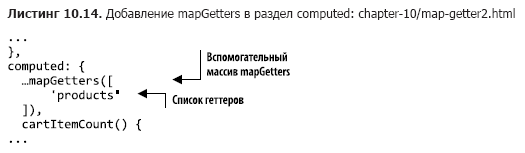
mapGetters will ensure that all getters are added in the form of calculated properties. This is a much simpler and more elegant way compared to writing a separate calculated property for each getter. All getters are listed in the mapGetters array. Add this helper method to the Main.vue file (Listing 10.14).
After running the npm run dev command, the pet store should work as before. The auxiliary method mapGetters does not look very useful yet, but the more getters we add, the more time it will save.
There are three more helper methods you should be aware of: mapState, mapMutations, and mapActions. All of them work in a similar way, reducing the amount of sample code that you have to write manually.
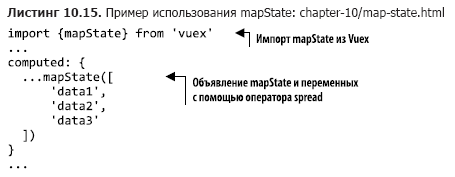
Imagine that in your repository there are several pieces of data and access to the state is carried out directly from the component, without using any getters. In this case, you can use the mapState method inside the computed section (Listing 10.15).
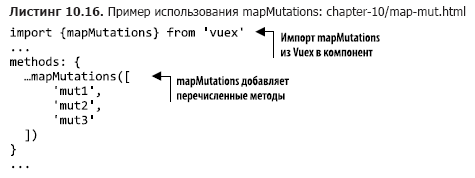
Now imagine that a component requires multiple mutations. To simplify this process, use the helper method mapMutations (Listing 10.16), as done with mapState and mapGetters. Next, mut1 binds this.mut1 () to this. $ Store.commit ('mut1').
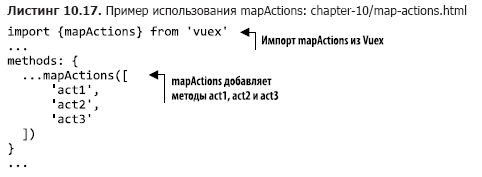
Finally, consider the auxiliary method mapActions. It allows you to add Vuex actions to your application, eliminating the need to create methods with a dispatch call in each case. Returning to the previous example, imagine that the application contains any asynchronous operations. Since the use of mutations is excluded, we must resort to action. After creating them in Vuex, you need to access them in the methods object of the component. This task can be solved using mapActions. act1 will bind this.act1 () to this. $ store.dispatch ('act1'), as shown in Listing 10.17.
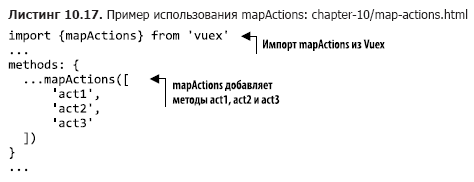
Finally, consider the auxiliary method mapActions. It allows you to add Vuex actions to your application, eliminating the need to create methods with a dispatch call in each case. Returning to the previous example, imagine that the application contains any asynchronous operations. Since the use of mutations is excluded, we must resort to action. After creating them in Vuex, you need to access them in the methods object of the component. This task can be solved using mapActions. act1 will bind this.act1 () to this. $ store.dispatch ('act1'), as shown in Listing 10.17.
As the application grows, these helper methods will be increasingly useful, reducing the amount of code you need to write. Keep in mind that you need to think over the names of the properties in your repository, as helper methods allow you to access them in the components.
10.6. Brief introduction to modules
At the beginning of this chapter, we created the file store.js in the src / store directory. For a small project, this approach is quite appropriate. But what if we are dealing with a much larger application? The store.js file will grow quickly, and it will be difficult to keep track of everything that happens in it.
To solve this problem, Vuex proposes the concept of modules. Modules allow you to divide the storage into several smaller parts. Each module has its own states, mutations, actions and getters, you can even make them nested into each other.
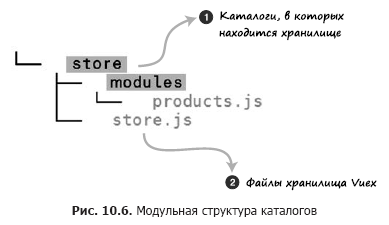
Let's rewrite the pet store using modules. The store.js file will remain in place, but next to it you should create the modules folder and place the products.js file there. The directory structure should look like fig. 10.6.
 Inside products.js, you need to create four objects: state, getters, actions, and mutations. The contents of each of them should be copied from the file store.js.
Open the src / store / store.js file and start copying the code from it. When done, the products.js file should look like this (Listing 10.18).
Now we need to export all the code that we added to the file product.js. This will allow importing it into store.js. At the bottom of the file, add the export default expression. This is an export instruction in ES6 format that will allow you to import this code from other files (Listing 10.19).
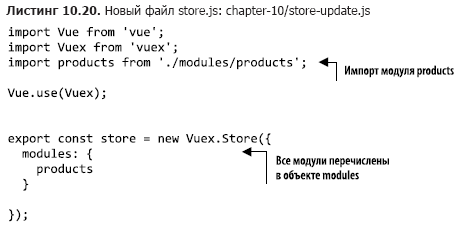
The store.js file should be updated. Add the modules object to it, inside which it will be possible to list all new modules. Remember to import the modules / products file we created earlier.

Our example contains only one module, so we immediately add it to the modules object. You also need to remove all unnecessary from Vuex.Store, as shown in Listing 10.20.
Having imported the modules, we have completed the refactoring process. After updating the page, the application should work exactly the same as before.
Namespaces in Vuex»More information about the book can be found on the publisher's website.
In some large projects, module partitioning can cause certain problems. As new modules are added, conflicts may arise with the names of actions, getters, mutations, and state properties. For example, you can randomly assign the same name to two getters in different files. And, since everything in Vuex is in a common global namespace, a duplicate key error will occur in the console.
To avoid this problem, place each module in a separate namespace. To do this, simply specify the namespaced: true at the top of Vuex.store. Read more about this feature in the official Vuex documentation at vuex.vuejs.org/ru/guide/modules.html.
» Table of Contents
» Excerpt
For Habrozhiteley a 25% discount on the coupon - Vue.js
Upon payment of the paper version of the book, an electronic version of the book is sent to the e-mail.
Source: https://habr.com/ru/post/448304/
All Articles