Types of modeling. Basics of Sculpting, Retopology and Sweep

In this article we will talk about sculpting, retopology and scan. But first you need to decide on the goal. What will we model, and in what way?
Suppose we decide to create a character for the game, but what if it is an environment, architecture, or something else? First you need to find out what are the ways of modeling and understand what suits us best.
Modeling methods
1. Polygonal modeling
This is probably the most popular way to develop a 3D model. The bottom line is creating and editing a mesh of polygons, which consist of vertices and edges. By clicking on the left mouse button, we create a new vertex, which is connected by an edge.
')

Such a modeling process can be represented as a form, for example, a person covered with rectangles with varying degrees of perspective distortion.

In simple terms: "We create a grid that consists of primitive figures (primitives)." The result is a polyhedron. To better associate, you can remember how in movies and animations many small robots turned into one big one. Similarly with polygonal modeling. Many primitives make up one large model.
By the way, most often the landfill has four faces, but there are three. Primitives with three faces are used only in certain cases, but there can be no more than four faces. There is no binding to real units, so the model is inaccurate. Accordingly, this method is not suitable for modeling some parts or architectural projects, where every millimeter is important.
You simply move the vertex, edge or the entire polygon, focusing on the appearance. Polygonal modeling is well suited if you are modeling an artistic thing, and exact dimensions are not important to you. This can be a character, a game level location or an animal.
2. NURBS modeling

The main difference between this method and polygon modeling is smoothness. The NURBS model does not consist of polygons, but of curves (splines), however, when rendering, it is still converted into polygons, although inside the modeling system it remains in the curves. Used to create smooth organic shapes and patterns.
Suppose you need to submit a complex three-dimensional surface of natural origin. It can be described by vertices and split into primitives, but it will take a lot of time, and changing the curvature of the surface in polygons will simply not be convenient. In such cases, the NURBS modeling method is applicable.
3. Exact modeling in Sapry

In this method, the model is defined by mathematical formulas, so the surface of the model will be absolutely smooth at any approximation, and you can adjust it to the nearest millimeter.
Used when accuracy is important, not artistic expression. Theoretically, this way you can create a character, but it will take a huge amount of time and effort, unlike polygonal modeling and sculpturing.
About polygons

We return to the polygon. Why are there more of them in some models and less in others?
The fact is that the models are divided by the number of polygons:
- Hi-poly - a large number of polygons (approximately, 1 - 3 million).
- Mid-poly is the average number of polygons.
- Low poly is a small number of polygons (approximately 5–10 thousand).
Accordingly, the more polygons, the more detailed the model, but it requires more resources. Thus, hi-poly is the most detailed.
In games on PCs and consoles, mid-poly is used most often, sometimes hi-poly (in AAA projects), and in mobile games low poly.
Sculpt

Getting to the part of the simulation called "Sculpting". This is the first 3D stage in creating a character. In it, the character is molded like clay, hence the name. At this stage, you can plunge into the art and sculpt without thinking about the landfills. And they will be many. Do not worry, later we will simplify the whole thing. By the way, for learning to sculpt it would be good to purchase a graphics tablet.
And so, smoothly proceed to the main topic of the article. But I did not say anything about the program. I suggest to take Zbrush for sculpting and 3D Coat for retopology and sweep. First you need to run Zbrush. We get to the main screen of the program. First we need to create a sphere.

In the Tool tab, which is located on the right side of the screen, select the “Sphere3D” item. Extend the sphere in the workspace by pressing LMB.

To move, use the hot keys:
- lkm - rotation.
- lkm + alt - move.
- ctrl + pkm - approximation.
Click "Load Next User Interface Layout".

A panel with brushes appears. To edit the sphere, click "Edit".

In order not to receive such a message, you need to click “Make PolyMesh 3D” in the Toolbar.

Now you can sculpt. It remains only to turn on the symmetry on the "X" key. When you click on the alt brush starts to work in the opposite direction. If the brush is squeezed out, then the opposite will be pressed. For the ears, eyes, nose, it is best to create separate spheres and sculpt them separately. Over time, the grid will change and you will need to recalculate polygons. To do this in the Geometry tab, you need to click DynaMesh.
If you work with only one sphere, then all the details will come to naught when recalculating polygons. So it is better to do it with separate objects, and at the end of the work to combine.

If there are no ideas for sculpting, you can go to artstation.com and find your favorite work. You can find concept art, add Zbrush and use it as a reference for training.
In the process of working on a model, you may need a mask tool. You can apply it by clicking on ctrl. A mask is an area that the brush does not respond to. This way you can make a lot of interesting things.

By the end of the work on the model, about 1 - 3 million polygons will be obtained. This model will be difficult to open in another program, so you need to reduce the number of polygons. To do this, in the Zplugin tab, select the “Decimation Master” item and click on Pre-process All. Zbrush will start the process and reduce the number of polygons.

The finished model can be displayed in obj format. Almost all editors eat it. You can save by clicking on "Export" in the Toolbar.
Rotopology
After sculpting, we will have a file with a model in the .obj extension. Open the 3D Coat and drag the file there.
There are a lot of polygons in our model. To simplify, you need to cover the model with polygons manually, keeping the shape. This is the process of retopology. To get started, you need to go to the Retopology tab. Here we need to actually draw polygons by hand. Here is an example of how they should be located.

We build polygons around the eyes and mouth around. At the site of the folds we add more polygons, and on the fixed parts polygons can be large and in small quantities, for example, at the back of the head and forehead.
Scan
Sweeping or UV mapping is a very important process in model development. At this stage, we are already preparing the model for texturing. What is the point? Imagine a cardboard box laid out on a plane. The box was disassembled and now it is in the form of a single sheet of cardboard. Likewise with our model, we laid it out in 2D space.
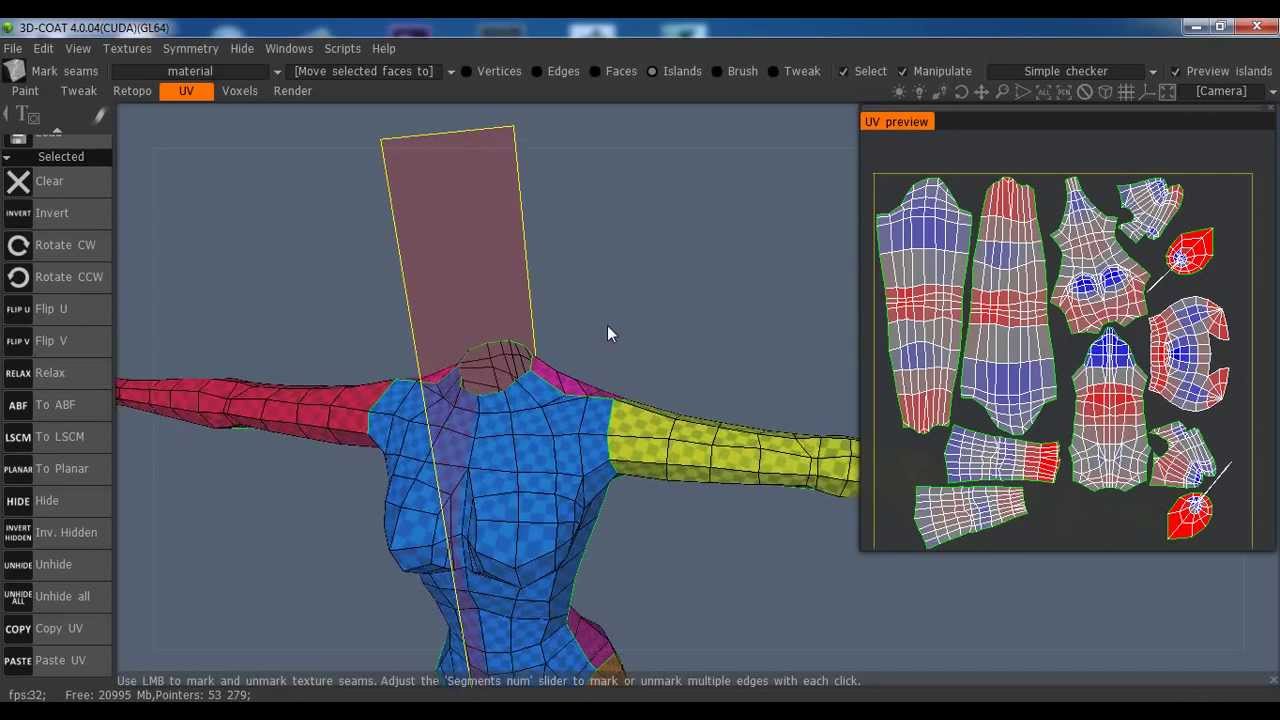
Click on the uv mapping tab. 3D Coat shows a sweep of the model at the moment. Artifacts are marked in blue and red. In order for the texture to fit on the model without any problems, it is necessary that in the UV Preview tab there be only gray color. How to do it? On shift + lkm, you need to remove unnecessary seams so that the model is divided into parts. UV scan is needed for easy texturing and resource saving.
After there are no artifacts left on the model, you need to click to pack UV, and then apply the UV layout. Congratulations, the model is finally ready for animation and texturing.
Source: https://habr.com/ru/post/448228/
All Articles