GLTF and GLB format basics, part 1
What is GLTF and GLB?
GLTF (GL Transmission Format) is a file format for storing 3D scenes and models, which is extremely simple to understand (the structure is written in the JSON standard), extensible and easily interacting with modern web technologies. This format well compresses 3D scenes and minimizes processing at runtime of applications using WebGL and other APIs. GLTF is now actively promoted by Khronos Group as a JPEG from the 3D world. Today GLTF version 2.0 is used. There is also a binary version of this format, called GLB, the only difference of which is that everything is stored in one file with the GLB extension.
This article is part 1 of 2. In it, we will look at such format artifacts and their attributes as Scene, Node, Buffer, BufferView, Accessor, and Mesh . And in the second article we will look at the rest: Material, Texture, Animations, Skin and Camera. More general information about the format can be found here .
If in the process of viewing the article you want to personally work with this format, you can download the GLTF 2.0 models from the official Khronos repository on GitHub

Problems and its solution
Initially, the GLTF format was conceived by the Khronos Group as a solution for transmitting 3D content over the Internet and was designed to minimize the number of importers and converters, various types of which are created when working with graphic API.
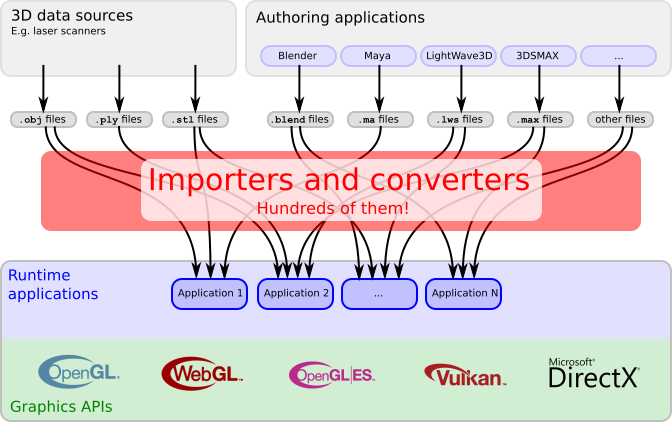
Currently GLTF and its binary brother GLB are used as unified formats in CAD programs (Autodesk Maya, Blender, etc.), in game engines (Unreal Engine, Unity and others), AR / VR applications, social. networks, etc.
Representatives of the Khronos Group say the following:
- GLTF is universal - it can be used equally well for simple geometry, as well as for complex scenes with animation, various materials, etc.
- It is compact enough. Yes, it can be challenged, because everything depends on the conversion algorithms and I personally know of cases when GLTF was larger than the original, for example, FBX file, but in most cases it is.
- Ease of data analysis is the root plus of this format. GLTF hierarchy uses JSON, and the geometry is stored in binary form, no decoding is needed!
Coordinate system and units
GLTF uses the right-sided coordinate system, that is, the cross product of + X and + Y gives + Z, where + Y is the upper axis. The front part of the GLTF 3D asset is facing the + Z axis. The units for all linear distances are meters, while the angles are measured in radians and the positive rotation of objects is counterclockwise. Transformation Node and channel paths of animations are three-dimensional vectors or quaternions with the following data types and semantics:
translation : a three-dimensional vector containing translation along the x, y, and z axes
rotation : quaternion (x, y, z, w) where w is a scalar
scale : a three-dimensional vector containing the scaling factors along the x, y, and z axes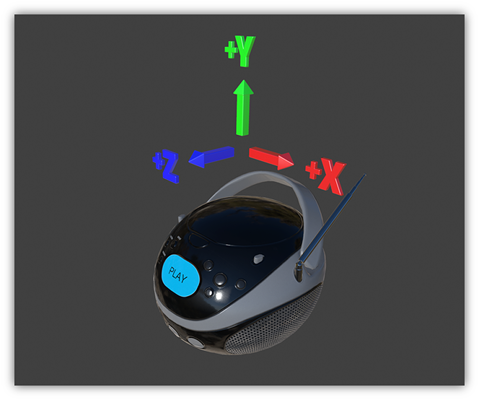
GLTF - Inside Look
As mentioned above, GLTF, as a rule, consists of 2 files: 1st with the .gltf format, which stores the structure of the 3D scene as JSON and the 2nd file with the .bin format, which stores all the data of this scene directly.
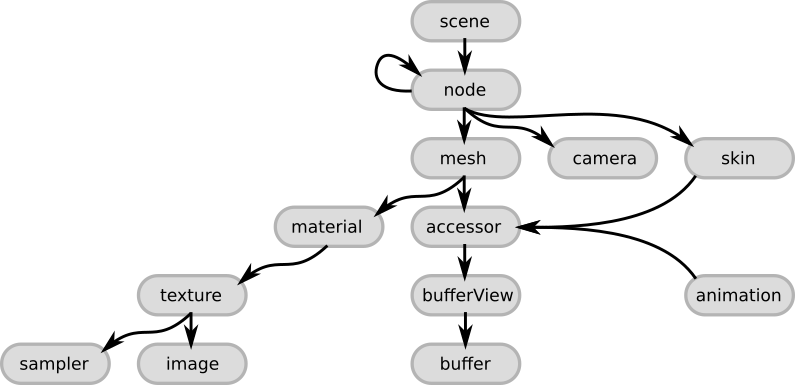
The format structure is strictly hierarchical and has the following form:
Talking further about the structure, I will use examples of the simplest GLTF file, which stores in itself 1 one-sided triangle with the default material. If you want, you can copy and paste it into any GLTF viewer in order to “touch” the contents of the file personally. In my practice, I used different ones, but stopped at this , which uses Three.js under the hood. Also a good option would be to use Visual Studio Code with the GLTF plugin. So you will have a choice immediately from 3 engines: Babylon.js, Cesium, Three.js
Scene and Node elements
The first thing is the main node called Scene. This is the root point in the file, where everything starts. This node contains an array of scenes that GLTF stores and the choice of the one that will be loaded by default after opening the file. The content of the 3D scene begins with the next object called “Node”. The array of scenes and nodes was mentioned for good reason, since the ability to store multiple scenes in one file is implemented, but in practice they try to store one scene in one file.
{ "scenes" : [ { "nodes" : [ 0 ] } ], "nodes" : [ { "mesh" : 0 } ], "scene": 0 Each node is an “entry point” for describing individual objects. If the object is complex and consists of several meshes, then such an object will be described by the “parent” and “child” nodes. For example, a car that consists of a body and wheels can be described as follows: the main node describes the car and, in particular, its body. This node contains a list of “child nodes”, which, in turn, describe the remaining components, such as, for example, wheels. All items will be processed recursively. Nodes can have TRS (translation, rotation, scale aka offset, rotation, and scaling) animations. Besides the fact that such transformations directly affect the mesh itself, they also affect the child nodes. In addition to all the above, I think it is worth mentioning that the internal "cameras", if any, which are responsible for displaying the object for the user in the frame, are also attached to the Node object. Objects link to each other using the appropriate attributes: scene has the node attribute, node object has the mesh attribute. For simpler understanding, all of the above is illustrated in the following figure.

Buffer, BufferView and Accessor
Under the Buffer object is meant the storage of binary, not processed, data without structure, without inheritance, without value. The buffer stores information about geometry, animations, and skinning. The main advantage of binary data is that they are extremely efficiently processed by the GPU, since do not require additional parsing, except, possibly, decompression. The data in the buffer can be found by the URI attribute, which clearly makes it clear where the data is located and there are only 2 options: either the data is stored in an external file with the .bin format, or they are embedded inside JSON itself. In the first case, the URI contains a link to an external file, in this case the folder in which the GLTF file is located is considered to be the root. In the second case, the file will have the format .glb, referring us to a more compact, in terms of the number of files, the twin brother of GLTF, the GLB format. Data in a binary file is stored as is, byte-by-byte.

JSON in our example with a triangle will look like this:
An example of base64 encoded buffer:
"buffers" : [ { "uri" : "data:application/octet-stream;base64,AAABAAIAAAAAAAAAAAAAAAAAAAAAAIA/AAAAAAAAAAAAAAAAAACAPwAAAAA=", "byteLength" : 44 } ], If you have an external file, then JSON converts its view into the following:
"buffers" : [ { "uri" : "duck.bin", "byteLength" : 102040 } ], The Buffers block also has an additional byteLength attribute that stores the value of the buffer size.
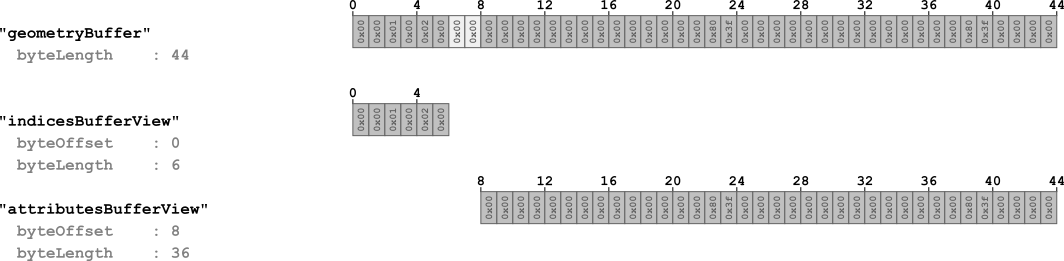
The first step in structuring data from the buffer is the BufferView object. BufferView can be called a "cut" of information from Buffer, which is characterized by a certain shift of bytes from the beginning of the buffer. This “slice” is described using 2 attributes: a “shift” count from the beginning of the read buffer and the length of the slice itself. A simple example of several BufferView objects for clarity of their use based on our example:
"bufferViews" : [ { "buffer" : 0, "byteOffset" : 0, "byteLength" : 6, "target" : 34963 }, { "buffer" : 0, "byteOffset" : 8, "byteLength" : 36, "target" : 34962 } ], As you can see, this example contains 4 basic attributes:
- Buffer points to the buffer index (the sequence number in the buffer array, starting at 0).
- byteOffset - defines the “shift” of origin in bytes for this “slice”
- byteLength - determines the length of the “slice”
- target - defines the type of data contained in bufferView
The first BufferView contains the first 6 bytes of the buffer and does not have a shift. With the second “slice” everything is a bit more complicated: as you can see, its shift is on the 8th byte, instead of the expected 6th. These 2 bytes are empty and were added during the buffer formation process due to a process called "padding". It is necessary for the value to adjust the value of the byte boundary to 4 bytes. This trick is needed for faster and easier reading of data from the buffer.
A few words should be said about the target attribute. It is used to classify the type of information referenced by bufferView. There are only 2 options: either this will be the value 34962, which is used to refer to the attributes of vertices (vertex attributes - 34962 - ARRAY_BUFFER) or 34963, which is used for the indexes of vertices (vertex indices - 34963 - ELEMENT_ARRAY_BUFFER). The final touch for understanding and structuring all the information in Buffer is the Accessor object.
Accessor is an object that accesses BufferView and contains attributes that define the type and location of data from BufferView. The accessor data type is encoded in type and componentType. The value of the type attribute is a string and has the following values: SCALAR for scalar values, VEC3 for 3-dimensional vectors and MAT4 for a 4x4 matrix or quaternion, which is used to describe rotation.
In turn, componentType indicates the type of component of this data. This is a GL constant, which can have values such as, for example, 5126 (FLOAT) or 5123 (UNSIGNED_SHORT), to indicate that the elements have a floating point, etc.
Various combinations of these properties can be used to describe arbitrary data types. An example based on our triangle.
"accessors" : [ { "bufferView" : 0, "byteOffset" : 0, "componentType" : 5123, "count" : 3, "type" : "SCALAR", "max" : [ 2 ], "min" : [ 0 ] }, { "bufferView" : 1, "byteOffset" : 0, "componentType" : 5126, "count" : 3, "type" : "VEC3", "max" : [ 1.0, 1.0, 0.0 ], "min" : [ 0.0, 0.0, 0.0 ] } ], Let's analyze the attributes represented in JSON:
- bufferView - indicates the sequence number of the BufferView from the BufferView array, which is used by Accessor. BufferView, in turn, stores information about indexes.
- byteOffset - shift bytes to start reading data by the current Accessor. Several objects of the Accessor type can refer to one BufferView.
- componentType is a constant indicating the type of elements. It may have values of 5123, which corresponds to the data type UNSIGNED_SHORT or 5126 for FLOAT.
- count - displays how many items are stored in buffer.
- type - defines the data type: scalar, vector, matrix.
- max and min are the attributes that determine the minimum and maximum value of the position of these elements in space.
Mesh
The Meshes object contains information about meshes located in the scene. One node (node object) can store only 1 mesh. Each object of the mesh type contains an array of the mesh.primitive type, in turn, the primitives are primitive objects (for example, triangles) of which the mesh itself consists. This object contains many additional attributes, but all of this serves one purpose - the correct storage of information about the display of an object. The main attributes of the mesh:
- POSITION - the position of the vertices along the XYZ axes
- NORMAL - normalized XYZ vertex normals
- TANGENT - XYZW tangents of vertices. W points to the direction of the tangent and has either +1 or -1.
- TEXCOORD_0 - UV texture coordinates. Maybe several sets are stored.
- COLOR_0 - RGB or RGBA color vertex.
- JOINTS_0 - this attribute contains joints / joints indices from the corresponding joints array, which should affect the vertex (vertex).
- WEIGHTS_0 - the data of this attribute determines weights indicating how strongly / joint affects the vertex.
- weights is the attribute responsible for the morph weights.
- material - contains an index, which is the material number in the Materials array
This object will have the following appearance for our case:
"meshes" : [ { "primitives" : [ { "attributes" : { "POSITION" : 1 }, "indices" : 0 } ] } ], Unfortunately, due to the restriction, all the material did not fit into one article, so the rest can be found in the second article , in which we will look at the remaining artifacts: Material, Texture, Animations, Skin and Camera , as well as collect the minimum working GLTF file.
')
Source: https://habr.com/ru/post/448220/
All Articles