Robo-footballer from beginners. Competitions in MIPT. Android & Arduino & Bluetooth
This article is a semi-sequel to the work of Love, Death and Robots "The machine on the Arduino, controlled by an Android device via Bluetooth, is a full cycle", consisting of two parts ( one , two ). The things described there were slightly modified, reworked, and the robot turned from a riding machine into a football player. In general, there is an interesting material on how to do it.
The previous instruction was divided into two parts: software and physical. There were not many changes in both directions, so this time everything is in one single copy. I will briefly remind you why the described part is needed, but for complete understanding it is better to run through the first two parts.
Based on all the same principles described in the first article:
Here are the changes:
')
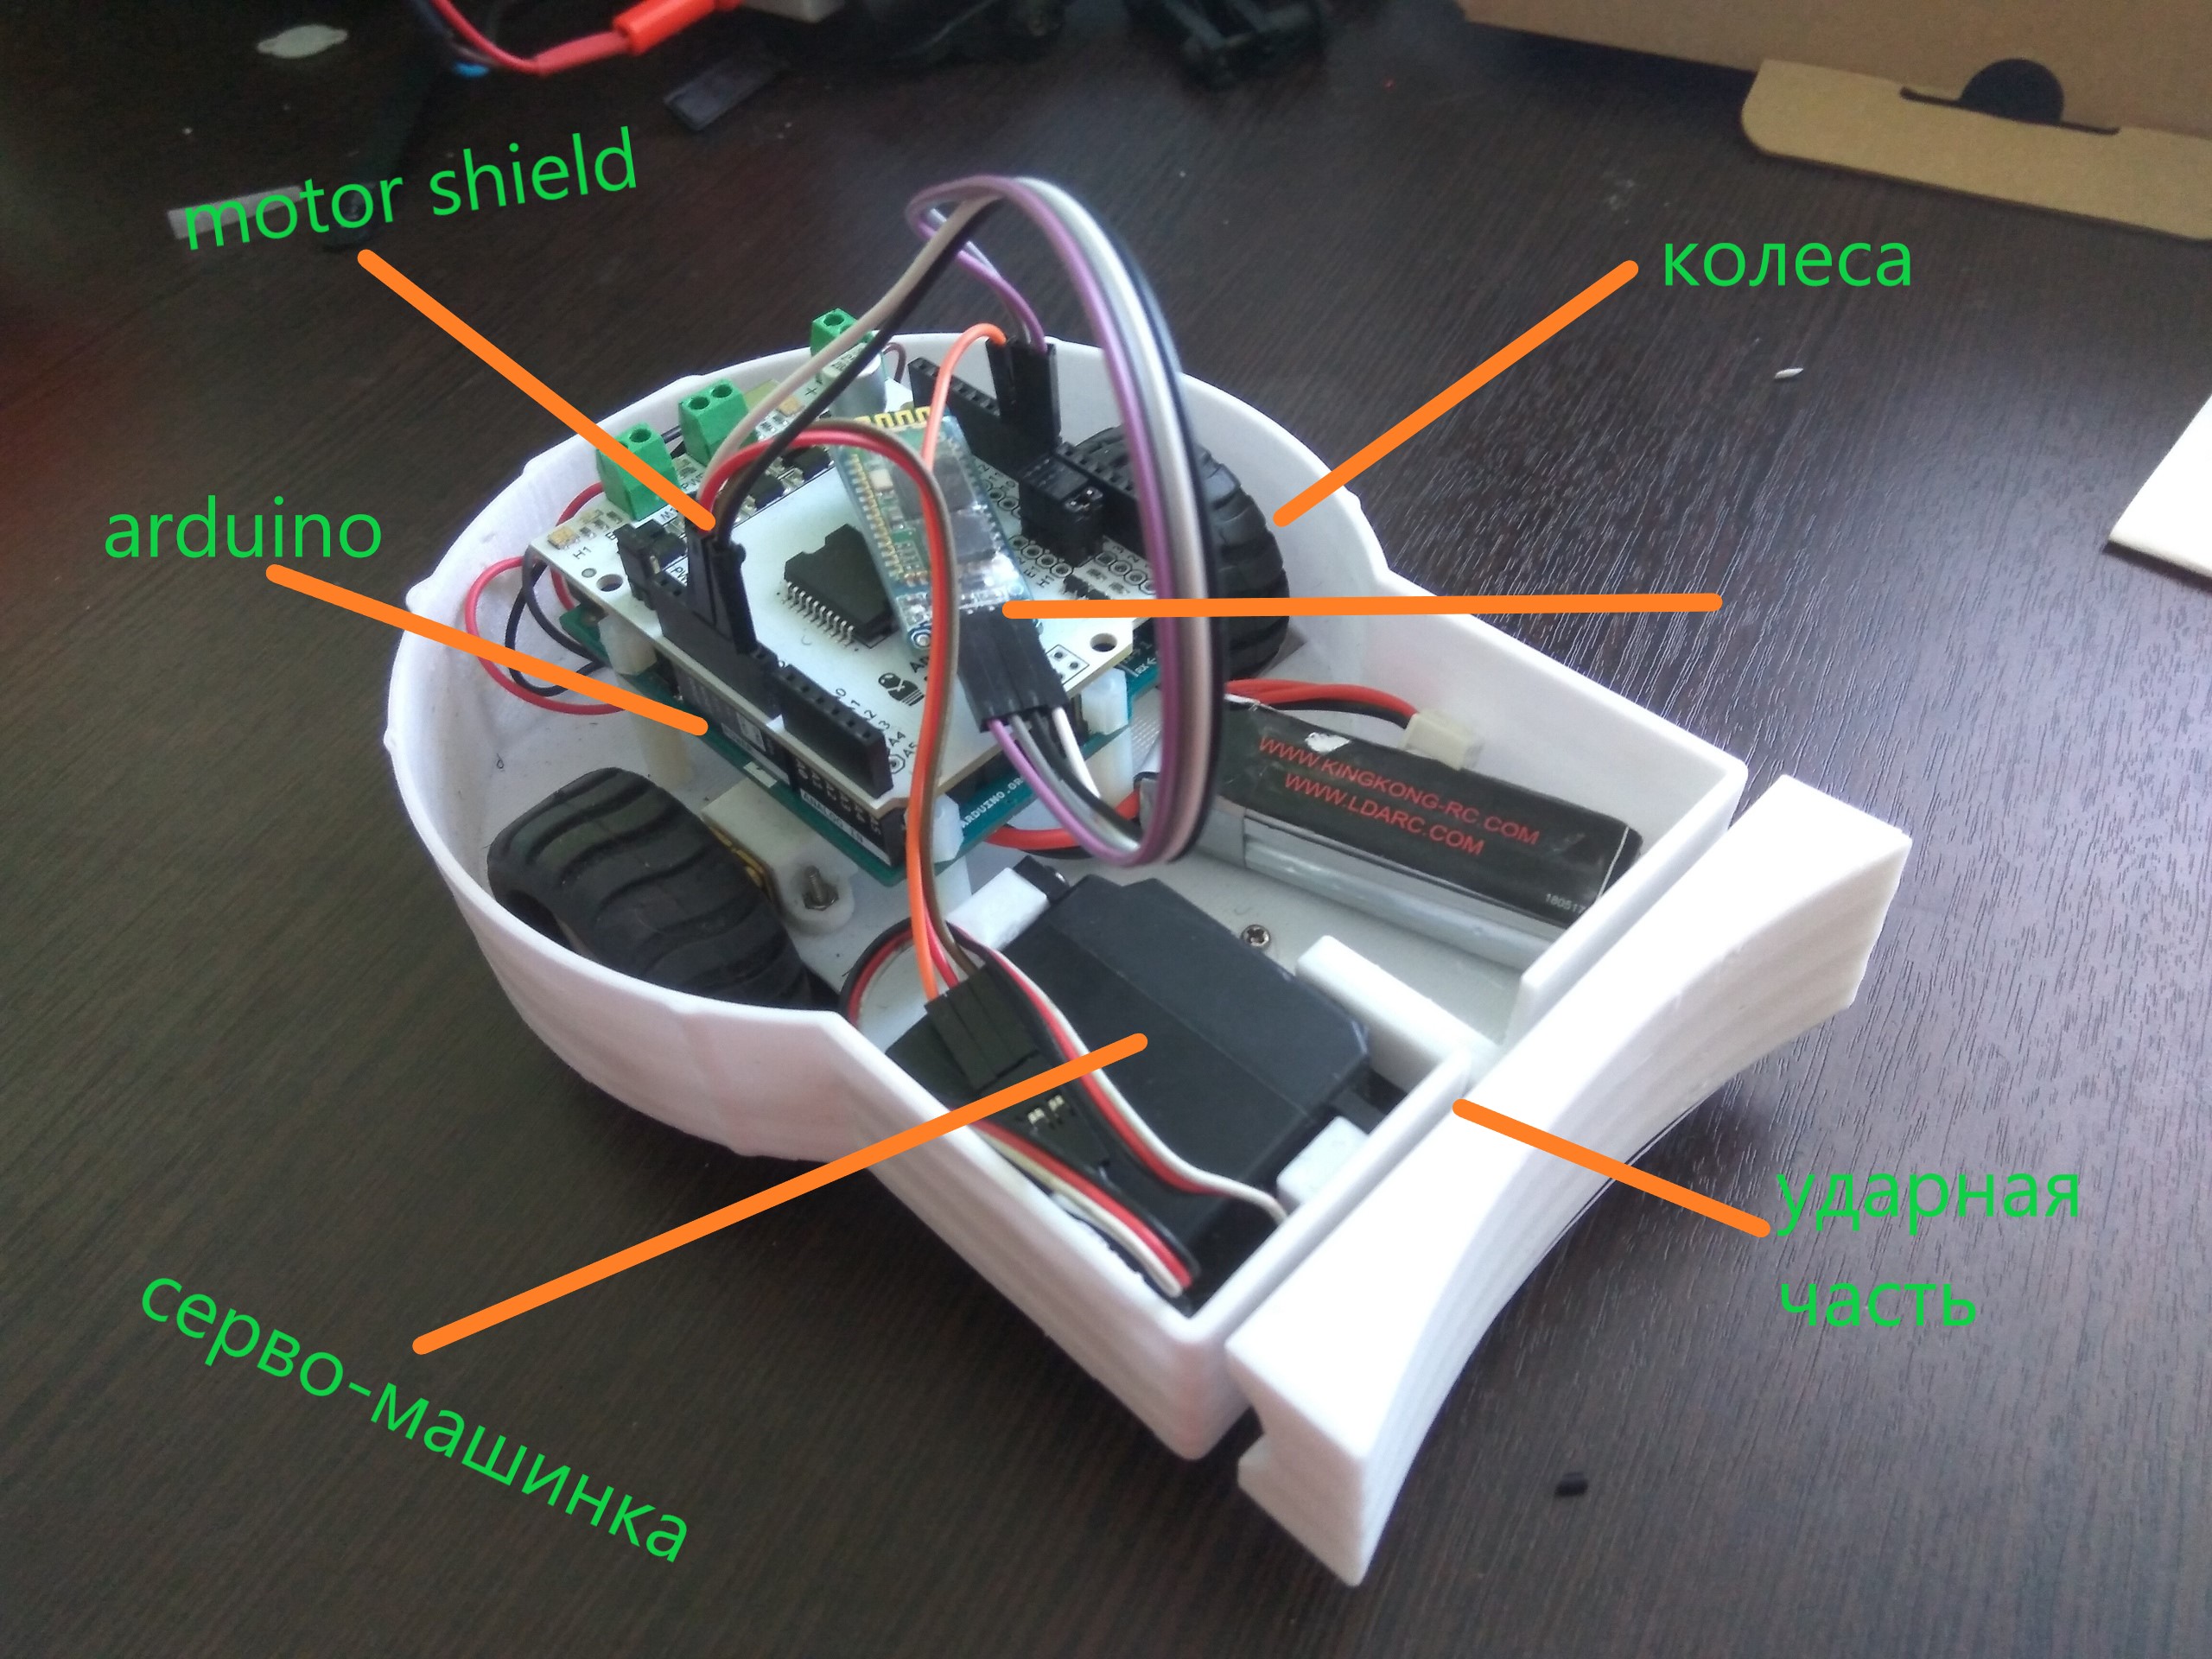
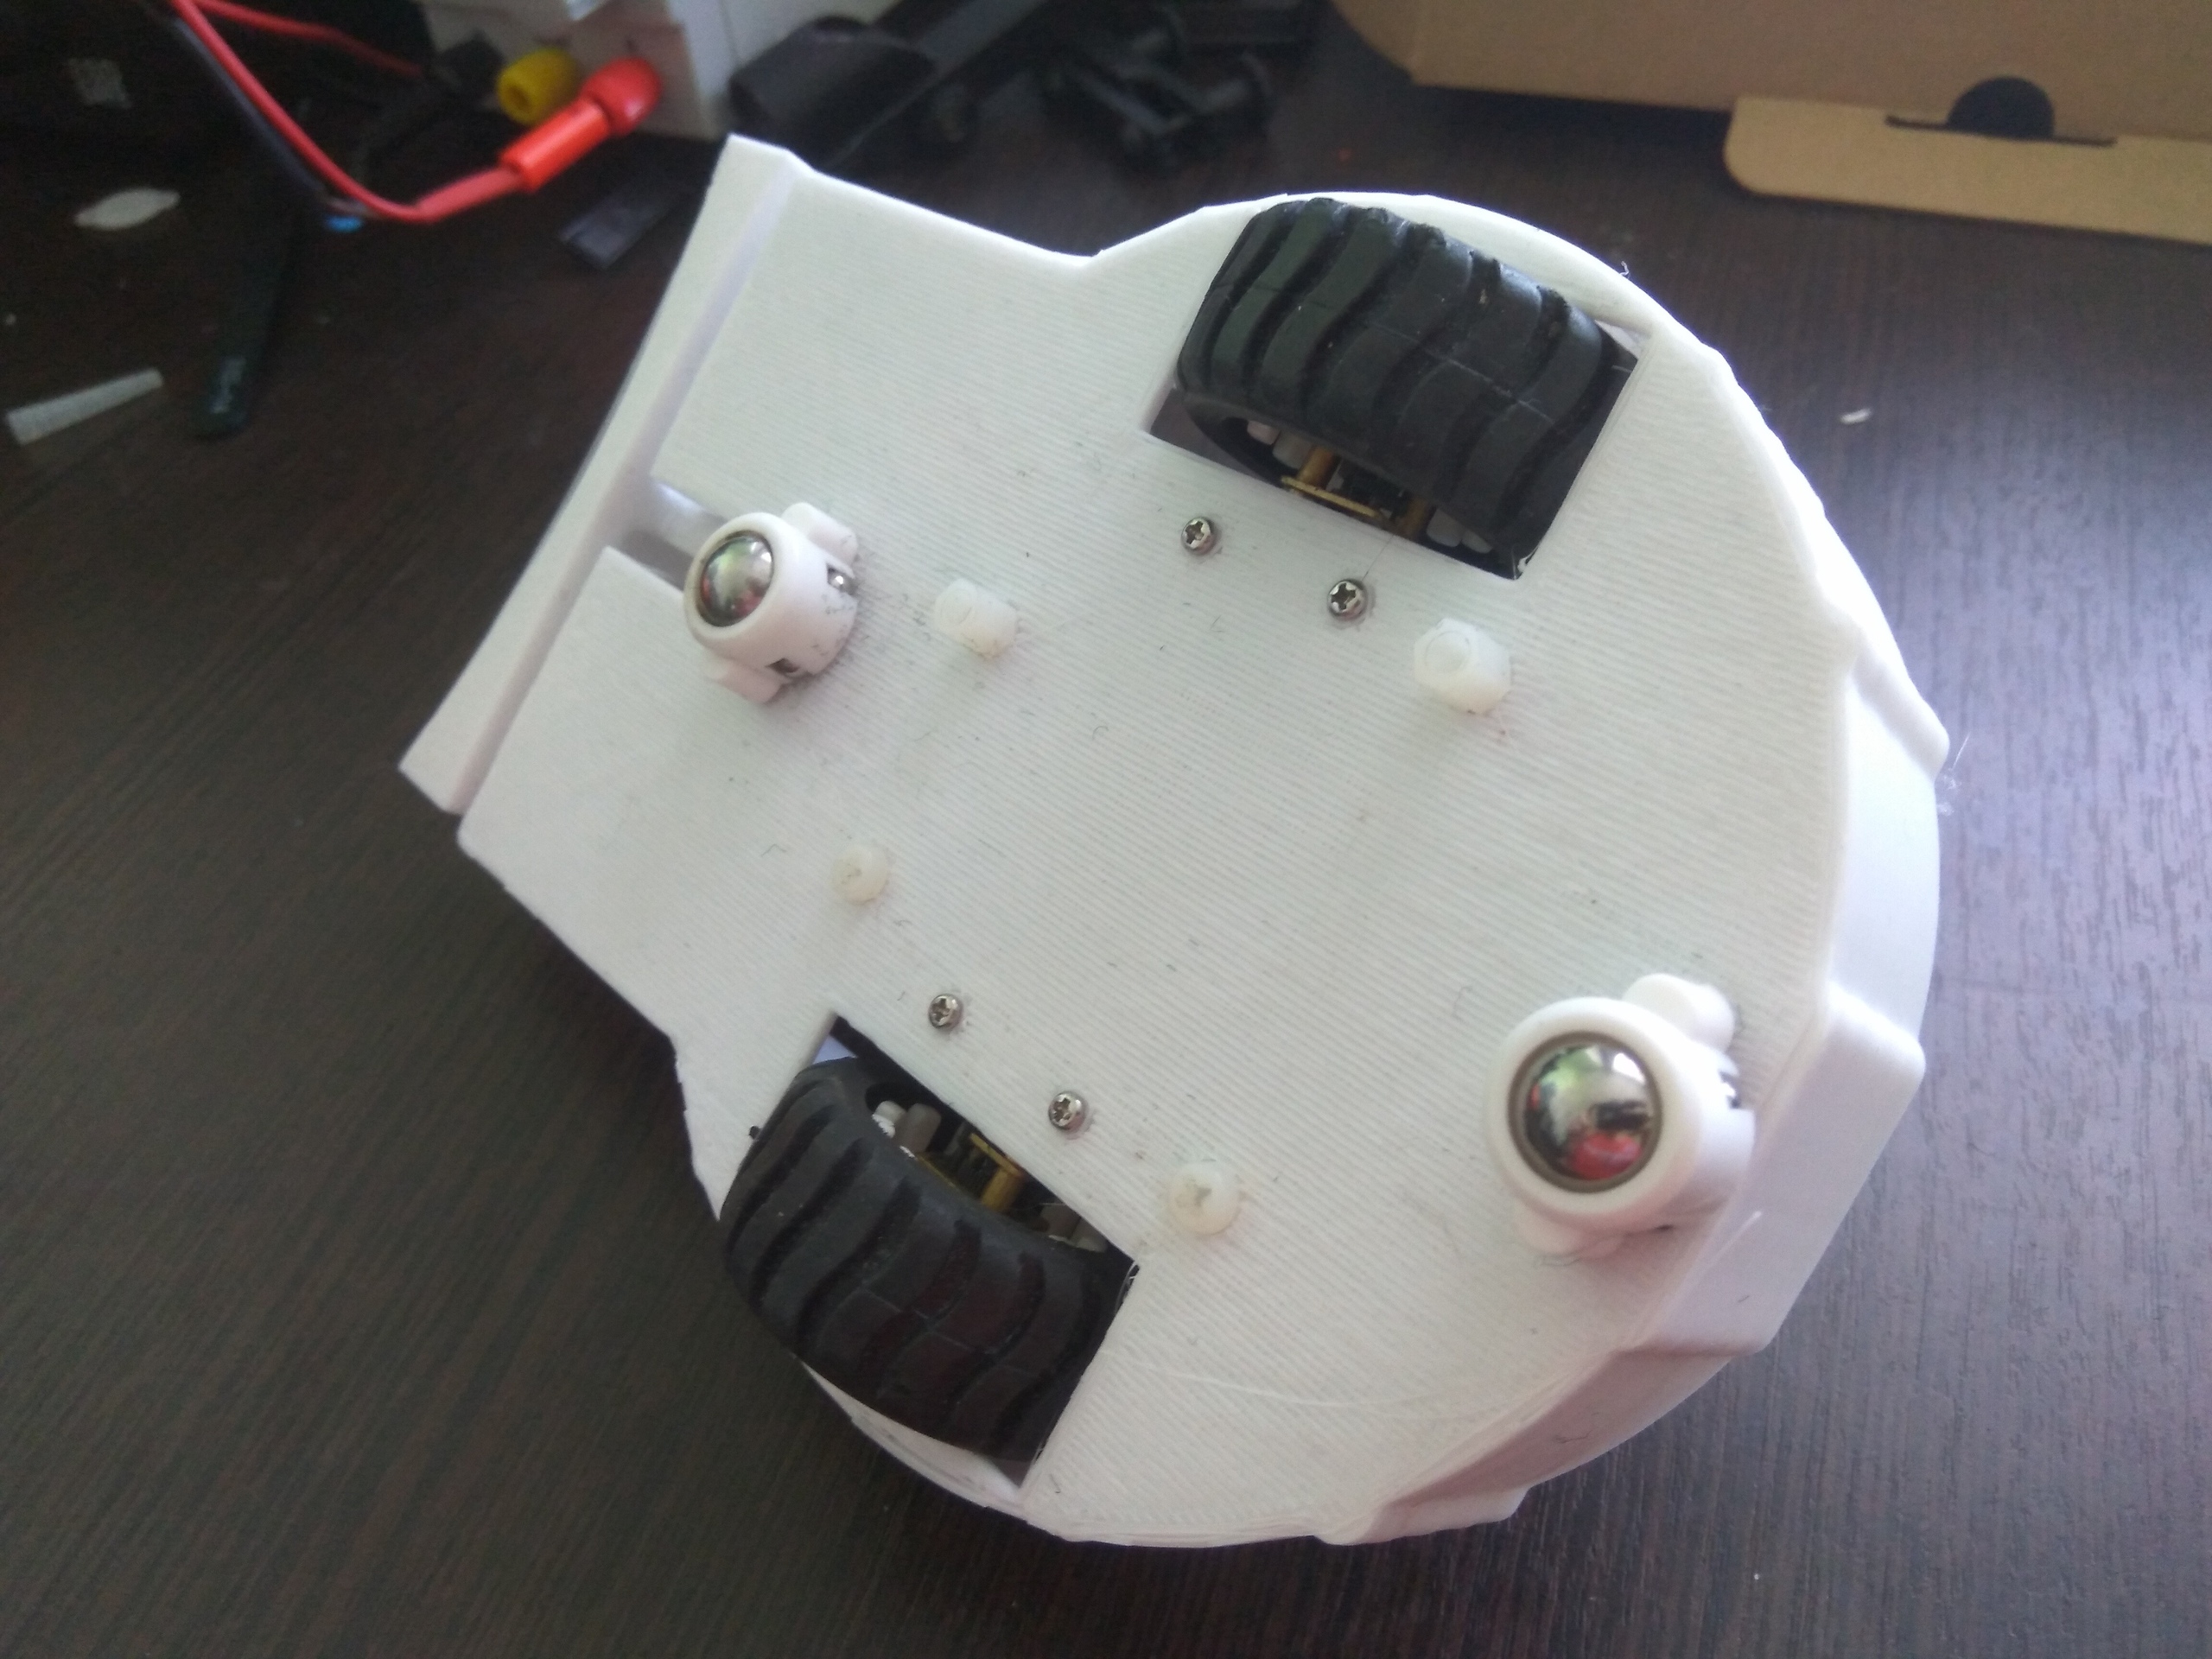
The form is a circle in which both the board and the two wheels fit. Lengthening for the part where the impact force will stand.
When constructing a similar pay attention to:
The balls added for lack of "pecking", lifted a platform so that wheels did not reach a floor. To avoid this, either use larger wheels or shorten supporting structures. In general, we calculate this in advance!
Shock part. She doesn't hit. Beats, but not cool enough. In our first model there was a servo machine to which a part resembling a snowplow bucket was connected. Changing the position of the serva (from 0 to 30 degrees), you can simulate a blow. But serfs were slow, so the blow goes to dvoechku.
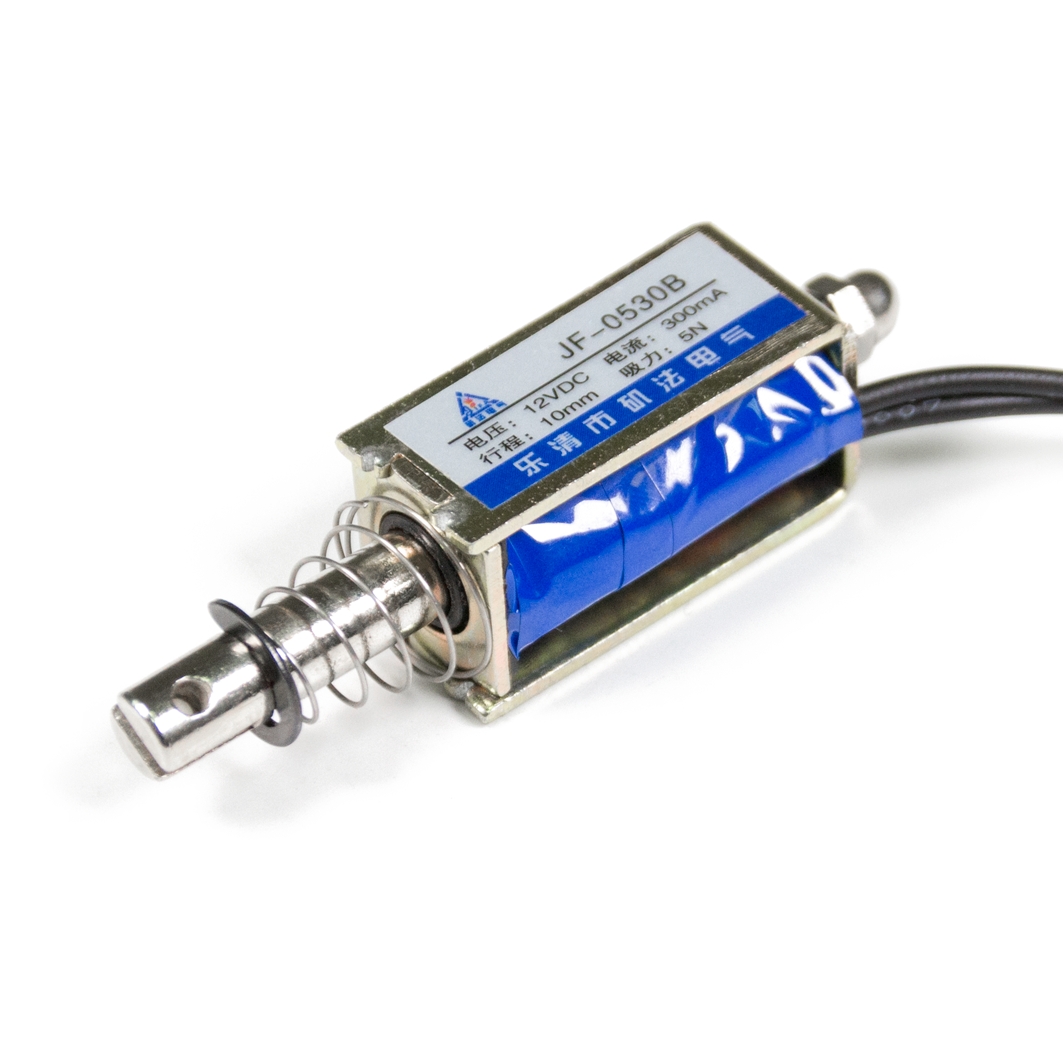
Exit two: add a jerk when struck or replace servy on solenoids. The first option is to increase the momentum by supplying speed to the wheels during impact. In practice, like this: the user presses the strike button, the robot starts from a place (slightly) and simultaneously makes a strike.
The second option is that solenoids push the shock part and it all depends on the power (speed) of the thrust, which in turn depends on the characteristics of the solenoid.
According to the good tradition, which is already one article, we divide this section into two parts. First, an Android application, then an Arduino sketch.
Let me remind you of the application written by me from scratch. Over the past six months, I have understood a little more in this matter, so I will describewhat I thought of before.
First, let's go to the simplification. Now the communication protocol is the following: “opening character” + “value” + “closing character” (To understand how I get these values and what it is all about, see the full analysis of the application here ). This works for both the speed value and the angle. Since there is only one type of impact, he does not need such wisdom, therefore the command consists of a single "/" character (about the command for hitting through a paragraph).
A typical command would look like this: # 125 # @ 180 @, where 125 is speed and 180 is angle. Of course, this can still be simplified, but one of the tasks was to preserve ease and readability, so that later it could be easily explained, including to children.
A new sendHit () command has been added, which is triggered while clicking on the “Strike” button. It sends one "/" character. Since the usual bluetooth 2.0+ does not suffer from data received at the same time, that is, it can put them in a queue and not lose them, we do not need to control this. If you are going to work with Bluetooth Low Energy 4.0+ (well, all of a sudden), then there will already have to be a queue manually, otherwise the data will be lost.
So the command sending protocol changed, the reception algorithm also changed. He simplified. Also added one if tracking hit. Full analysis of the sketch here .
bt.read () reads one character. If it is equal to "#", then the symbols of speed begin. Read them until the closing "#" appears. A for loop cannot be used here, because the velocity length is not known in advance (it can be a single-digit, two-digit, or three-digit number). The resulting value is written to the variable.
The same thing happens with the turn. After both the speed and the angle are read, we transfer everything to the turn (int speed, int angle) function.
The turn () function determines which way to move (forward, backward) and where to turn (right, left, straight). The if (speed> 0 && speed <70) constraint is necessary so that the robot does not brake if bytes are lost. I encountered this when I increased the transmission speed (played with delays of 100-300ms between the teams) - sometimes the speed did not reach the value and turned into 0.40 (although, for example, 240 was actually sent). A crutch, but it works.
Can be called "protection from uncontrollable factors."
With our robot, we went to the robot football competitions, which were arranged and held at the MIPT University, Dolgoprudny, 04/14/2019. We managed to reach the 1/4 finals, but did not advance further.

The process itself was interesting to us, and here I will describe the conclusions that were made by looking at the robot in the field:
Comments and suggestions will be very happy. Under previous articles, comments are sometimes more interesting than the article itself. Thanks for the work to me , Sasha and Dana .
The previous instruction was divided into two parts: software and physical. There were not many changes in both directions, so this time everything is in one single copy. I will briefly remind you why the described part is needed, but for complete understanding it is better to run through the first two parts.
Physical part
Based on all the same principles described in the first article:
- Arduino Uno and Motor Shield sandwich.
- two motors connected to motor shield.
Here are the changes:
')
- there was a shock, oddly enough, responsible for hitting the ball.
- The body is now completely your own, printed on a 3D printer.
Housing
The form is a circle in which both the board and the two wheels fit. Lengthening for the part where the impact force will stand.
When constructing a similar pay attention to:
- High bumpers. Robots during the game collide, the sides protect not only your wires, but also your opponents from your wires.
- Center of gravity and stability. The center of gravity is of course where the charge is. The wheels are located near it, so they will not slip. Plus a battery is put on top of the board.
- So that the robot does not nod or backwards, we put both the balls going in the set from the amperca to and from here (if there are none, you can replace it with any other sliding design).
- Stiffness design. The platform should not sag under the weight of boards and motors. Do not be stingy, either use solid materials (plywood), or strengthen the plastic construction with slats.
And now the main nonsense
The balls added for lack of "pecking", lifted a platform so that wheels did not reach a floor. To avoid this, either use larger wheels or shorten supporting structures. In general, we calculate this in advance!
Shock part. She doesn't hit. Beats, but not cool enough. In our first model there was a servo machine to which a part resembling a snowplow bucket was connected. Changing the position of the serva (from 0 to 30 degrees), you can simulate a blow. But serfs were slow, so the blow goes to dvoechku.
Exit two: add a jerk when struck or replace servy on solenoids. The first option is to increase the momentum by supplying speed to the wheels during impact. In practice, like this: the user presses the strike button, the robot starts from a place (slightly) and simultaneously makes a strike.
The second option is that solenoids push the shock part and it all depends on the power (speed) of the thrust, which in turn depends on the characteristics of the solenoid.
Software part
According to the good tradition, which is already one article, we divide this section into two parts. First, an Android application, then an Arduino sketch.
Android
Let me remind you of the application written by me from scratch. Over the past six months, I have understood a little more in this matter, so I will describe
First, let's go to the simplification. Now the communication protocol is the following: “opening character” + “value” + “closing character” (To understand how I get these values and what it is all about, see the full analysis of the application here ). This works for both the speed value and the angle. Since there is only one type of impact, he does not need such wisdom, therefore the command consists of a single "/" character (about the command for hitting through a paragraph).
private void sendCommand(String speed, String angle) { String speedCommand = "#" + speed + "#"; // String angleCommand = "@" + angle + "@"; try { outputStream.write(speedCommand.getBytes()); // outputStream.write(angleCommand.getBytes()); } catch(Exception e) { e.printStackTrace(); } } A typical command would look like this: # 125 # @ 180 @, where 125 is speed and 180 is angle. Of course, this can still be simplified, but one of the tasks was to preserve ease and readability, so that later it could be easily explained, including to children.
A new sendHit () command has been added, which is triggered while clicking on the “Strike” button. It sends one "/" character. Since the usual bluetooth 2.0+ does not suffer from data received at the same time, that is, it can put them in a queue and not lose them, we do not need to control this. If you are going to work with Bluetooth Low Energy 4.0+ (well, all of a sudden), then there will already have to be a queue manually, otherwise the data will be lost.
... bHit = findViewById(R.id.b_high_hit); // bHit.setOnClickListener(new View.OnClickListener() { @Override public void onClick(View view) { threadCommand.sendHit(); // "" } }); ... private void sendHit() { try { outputStream.write("/".getBytes()); // }catch (Exception e) { e.printStackTrace(); } } } Arduino
So the command sending protocol changed, the reception algorithm also changed. He simplified. Also added one if tracking hit. Full analysis of the sketch here .
bt.read () reads one character. If it is equal to "#", then the symbols of speed begin. Read them until the closing "#" appears. A for loop cannot be used here, because the velocity length is not known in advance (it can be a single-digit, two-digit, or three-digit number). The resulting value is written to the variable.
The same thing happens with the turn. After both the speed and the angle are read, we transfer everything to the turn (int speed, int angle) function.
void loop() { if(BTSerial.available() > 0) {// char a = BTSerial.read(); // if(a == '#') { // sp=""; char b = BTSerial.read(); while( b != '#') { // , sp+=b; b = BTSerial.read(); } } else if (a == '@') {// val = ""; char b = BTSerial.read(); while(b != '@') { // val+=b; // b = BTSerial.read(); } turn(val.toInt(), sp.toInt()); // , } else if (a == '/') { //, Serial.println(a); servo.write(30); // delay(150); servo.write(0); // } lastTakeInformation = millis(); } else { if(millis() - lastTakeInformation > 150) { // 150 // lastTakeInformation = 0; analogWrite(speedRight, 0); analogWrite(speedLeft, 0); } } delay(5); } The turn () function determines which way to move (forward, backward) and where to turn (right, left, straight). The if (speed> 0 && speed <70) constraint is necessary so that the robot does not brake if bytes are lost. I encountered this when I increased the transmission speed (played with delays of 100-300ms between the teams) - sometimes the speed did not reach the value and turned into 0.40 (although, for example, 240 was actually sent). A crutch, but it works.
Can be called "protection from uncontrollable factors."
void turn(int angle, int speed) { if(speed >= 0 && speed < 70) return; if(speed > 0) { digitalWrite(dirLeft, HIGH); digitalWrite(dirRight, HIGH); } else if (sp < 0) { digitalWrite(dirLeft, LOW); digitalWrite(dirRight, LOW); } if(angle > 149) { analogWrite(speedLeft, speed); analogWrite(speedRight, speed - 65); // } else if (angle < 31) { analogWrite(speedLeft, speed - 65); // analogWrite(speedRight, speed); } else { analogWrite(speedLeft, speed); analogWrite(speedRight, speed); } } Competitions in MIPT instead of the total
With our robot, we went to the robot football competitions, which were arranged and held at the MIPT University, Dolgoprudny, 04/14/2019. We managed to reach the 1/4 finals, but did not advance further.
The process itself was interesting to us, and here I will describe the conclusions that were made by looking at the robot in the field:
- need more powerful. Preferably four wheels or more powerful engines and other wheels. Although, of course, it was four-wheeled models that looked better.
- management is not a buzz. It is necessary to transfer the robot to a tank turn (turn at one point due to the wheels spinning in opposite directions), otherwise the turning radius is too large. And in general, the option with four arrows, and not around with proportional speed, is preferable for football . The described option is better suited for racing, where you go continuously, but you need clarity (turned 10 degrees around its axis, aimed at the ball and squeezed the button forward. But then, when I grabbed the ball, I would like to flexibly maneuver, but here it is necessary proportional speed ... you need to somehow combine this business).
Comments and suggestions will be very happy. Under previous articles, comments are sometimes more interesting than the article itself. Thanks for the work to me , Sasha and Dana .
Source: https://habr.com/ru/post/448080/
All Articles