Import to J.Connect from the file of the list of users through the API
Faced the problem of “not finding” the actual script for the mass creation of employees.
The problem is connected with the transition of Yandex from PDD (Mail for the domain) to Ya. Connect with the new API version.
The scripts that I came across were written only for the “old” version of the API, and therefore are considerednon-working irrelevant.
')
Therefore, here is the current unpretentious creak for today, for the mass creation of "Employees" in the organization.
If you have several departments in the organization, then in the line:
There is a parameter:
Now how to get debug OAuth-Token
For the operation ofthe script applications , with Yandex services, which uses the OAuth 2.0 authorization protocol, there is a debugging token, which we will use. After use, the debugging token can be revoked, and the application removed.
Let's go to the Yandex OAuth page to create a new application (By the way, we need administrator rights!).
I chose the following application rights:
Next you need to select a platform and click "Substitute URL for development":
After all thetorment, you can return to Yandex OAuth , and see our application, go into it and we are interested in the “ID” line, take a number-letter value, copy it to this line:
Then, on the page that opens, click the Confirm button to allow access.
voila , this is your OAuth_Token.
Finally: if you are interested in additional user attributes such as (date of birth, gender, allyses, telephones), feel free to read the Documentation , there is quite accessible information for the basic use of this api.
: wq
The problem is connected with the transition of Yandex from PDD (Mail for the domain) to Ya. Connect with the new API version.
The scripts that I came across were written only for the “old” version of the API, and therefore are considered
')
Therefore, here is the current unpretentious creak for today, for the mass creation of "Employees" in the organization.
#!/bin/bash # employees='./usrlist' # usrlist: email_firstname_lastname_middlename # OAuth_Token # # https://tech.yandex.ru/oauth/doc/dg/tasks/get-oauth-token-docpage/ TOKEN="bash!bash!bash!bash!bash!bash!bash!bash!" # PASS="superstrongpasswordforyou" # for i in $( cat $employees ); do value=($(echo $i | tr "_" " ")) # email="${value[0]}" firstname="${value[1]}" lastname="${value[2]}" middlename="${value[3]}" # curl -i -X POST -H 'Content-type: application/json' -d '{"department_id": 1, "password": "'$PASS'", "nickname": "'$email'", "name": {"first": "'$firstname'", "last": "'$lastname'", "middle": "'$middlename'"}}' -H "Authorization: OAuth $TOKEN" 'https://api.directory.yandex.net/v6/users/' | grep HTTP done If you have several departments in the organization, then in the line:
curl -i -X POST -H 'Content-type: application/json' -d '{"department_id": 1, "password": "'$PASS'", "nickname": "'$email'", "name": {"first": "'$firstname'", "last": "'$lastname'", "middle": "'$middlename'"}}' -H "Authorization: OAuth $TOKEN" 'https://api.directory.yandex.net/v6/users/' There is a parameter:
"department_id": 1 , we are interested in the number, "1", this is the default department "All employees". When you create a new department (regardless of the name), it will be "2", respectively, and subsequent ones.Now how to get debug OAuth-Token
For the operation of
Let's go to the Yandex OAuth page to create a new application (By the way, we need administrator rights!).
I chose the following application rights:
Screenshot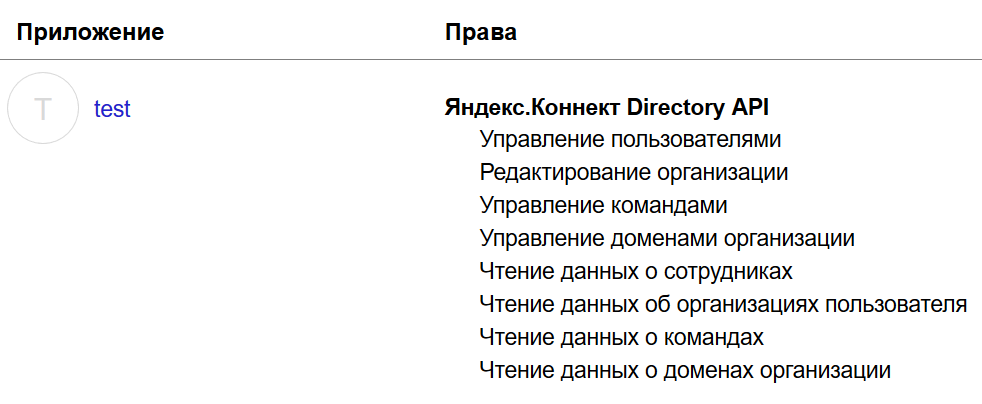
Next you need to select a platform and click "Substitute URL for development":
Screenshot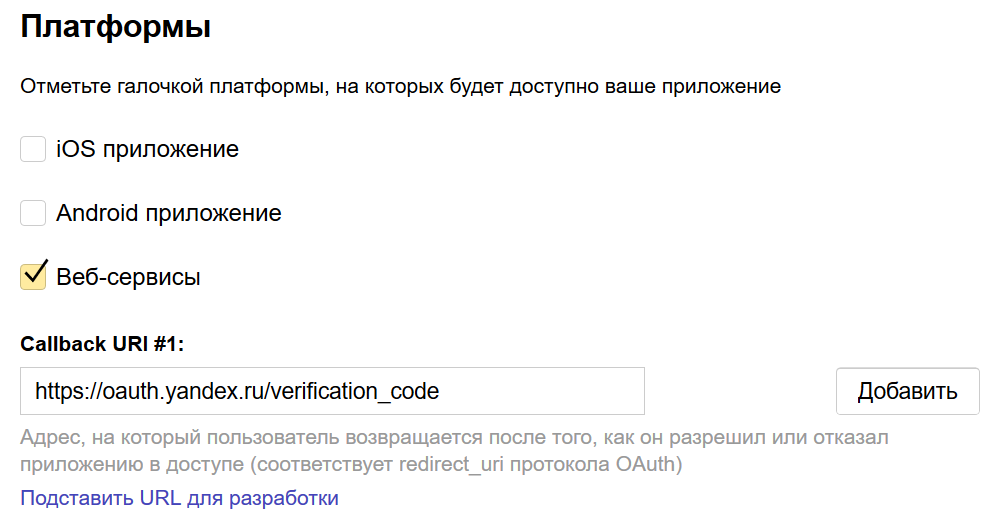
After all the
https://oauth.yandex.ru/authorize?response_type=token&client_id=< > Then, on the page that opens, click the Confirm button to allow access.
Finally: if you are interested in additional user attributes such as (date of birth, gender, allyses, telephones), feel free to read the Documentation , there is quite accessible information for the basic use of this api.
Source: https://habr.com/ru/post/448036/
All Articles