The story of the hacking of the classic game Dendy or Contra for 100 lives
As some Japanese company , still carefully keeps its copyright. I can not provide you with either my version of the rum or the source I used. Let me just say that I found it in the torrent collection "All games on Dendy". Taking from there the Japanese version of the game "Contra (J) [T + Rus_Chronix]" translated into Russian, I went through it several times and, being an extremely inquisitive person, decided to scratch the ROM image a little, in particular, to give some lives to the players.
For hacking the game, I used the FCEUX emulator.
And these are all preliminary preparations, not counting the settings of the screen and gamepad.
The hacking itself takes place in several stages:
- Search for the necessary values, or rather the variables storing them, or rather the addresses containing the necessary values
- Search for instructions that change or read these values, depending on what interests you
- Analysis of code blocks containing these instructions
- Changing blocks of code of interest, followed by recording in a ROM file
Moreover, if the result of the analysis of blocks of code will be other addresses, paragraphs 2 and 3 will have to be repeated. Then I will show this moment.
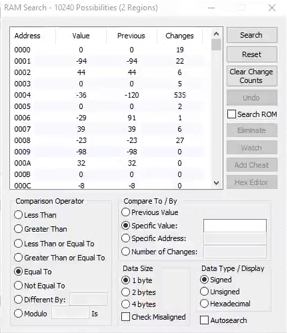
To search for values in memory, the RAM search tool built into the emulator is used.
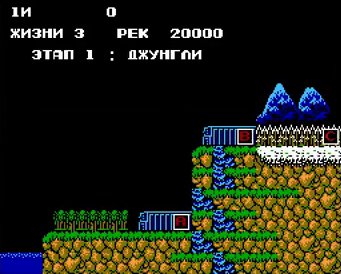
I do not know if they used encryption in games for NES, such games have not come across to me so far. And on the screen after the splash screen and before the start of the level I saw the number of lives “three”.
I started the search from the troika.
The comparison operator "equals to", compare with a certain value of "3" and do not click on the search button before the start of the level. The idea for the NES game is not important, but I prefer to perebdet and start the search after I know exactly what the desired value lies in its place in memory, that is, after the beginning of the level.
The search for addresses is very routine, you need to slightly change the different values except for the desired one, repeat the search and so on several times. By the way, right now the value of lives does not change at all and you can delete all the values that have changed recently several times, but it is better to do this if you open the search window after the start of the level, or if you reset the search before the first comparison, but after the start of the level. Then you can change the desired value (in this case, kill the character) and set a new value in the comparison field and so on until one variable remains.
But I didn’t have any variables after this and there could be two reasons for this:
- human factor, simply put, I was wrong in the search process
- in the variable responsible for life is something else
The first option will be postponed later, not that I rarely make a mistake, I just always start the search with checks on everything else, so I'm self-confident.
And before you think through a plan to circumvent cunning encryption, look at the screen again.

The player has three lives, and two medals hang over him. Perhaps when a player has three lives, the meaning of "two" is recorded in memory (two spare lives). Having reset the game and starting a new search, already with the number of medals and two players, I almost immediately found two addresses with suitable values.

These are 32 16 and 33 16 addresses. The easiest way to check the address found is to change its value. To do this, you need the HEX Editor tool built into the emulator, and in the "RAM Search" window it can be opened by right-clicking on the address, so you will open this address in memory. And putting in the 32 16 address of the "four" I saw how the stock of the first player changed, and putting it in the 33 16 address I changed the life of the second player.
The most boring and routine part of the work is done. With the "Watch" button you can add an address to the "RAM Watch" window created for monitoring values, and in my case, the computer remembers the addresses I need, my memory is full, I will forget. By the way, these variables are stored in the static memory of the emulator and having found them once you can always use them without fear of restarting the game, the emulator and even the computer.
At the second stage, you need to look for functions / subroutines / code blocks (favorite underline) changing these values. If the game was not created by fools, but it is, at the beginning of the game of life, both players are given one subroutine, but without knowing this in advance such things are better to check. For these purposes, a debugger is built into the emulator, the "Debugger" window.
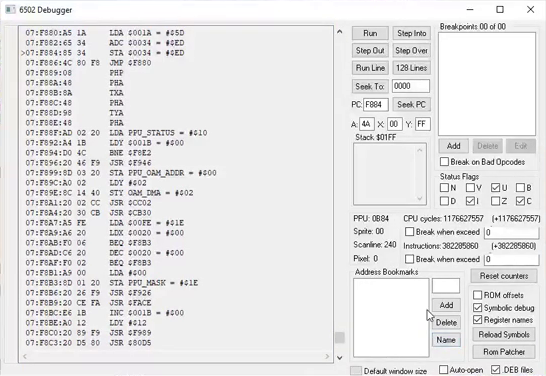
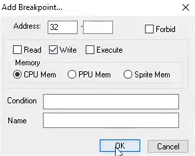
And this is probably the most difficult window in the emulator. Formally, it can be divided into two parts; a large field on the left shows the entire contents of the memory, breaking it into opcodes with parameters / arguments and writing the mnemonics corresponding to them. And in the right half, at first glance, the devil himself will break his leg. Although there is nothing complicated, you just need to read everything carefully and, if possible, remember. I am here first of all interested in the "Breakpoints" field, where you can add breakpoints on the addresses using the "Add" button. To find out what instructions write data to these addresses, I checked the "Write" checkbox.
Setup is ready.
You can restart the game and see what instructions, from which subroutines and what values they write to this address. Remembering that I am interested in writing to this address of a two, we can safely ignore all subroutines writing zeros there. To continue the program after stopping, click the "Run" button in the debugger window.
And finally, an interesting piece of code.
| Address | Opcode | Mnemonic | Arguments | A | X | Y |
|---|---|---|---|---|---|---|
| ?? | ?? | |||||
| C2E9 | A9 02 | Lda | # $ 02 | ?? | 00 | ?? |
| C2EB | A4 24 | LDY | $ 0024 | 02 | 00 | 00 |
| C2ED | F0 02 | BEQ | $ C2F1 | 02 | 00 | 00 |
| C2EF | A9 1D | Lda | # $ 1D | 02 | 00 | 00 |
| C2F1 | 95 32 | Sta | $ 32, X | 02 or 1D | 00 | 00 |
| C2F3 | CA | Dex | 02 or 1D | 00 | 00 | |
| C2F4 | 10 F3 | BPL | C2E9 | 02 or 1D | FF | 00 |
The crossed out instructions do not interest me, because they work with completely different addresses. And I will consider in detail the instructions that interest me. At address C2E9 16 lies the opcode A9 16 writing the value to register A, it corresponds to the human-readable abbreviation LDA "LoaD A", which means writing to register A. This reduction corresponds to eight opcodes and specifically A9 16 means that the value following is written in the following byte instruction . In addition to the value itself, an address can be transmitted from where the value should be taken. You can read more about opcodes here , about mnemonics (abbreviations) here , and study the given assembly language here in detail (although why?). Now you are armed with knowledge can decipher the rest of the instructions. Only the debugger in the emulator is a little tricky and in the address C2EB 16 shows the instruction LDY $ 0024 and in fact this instruction is written as LDY $ 24, both of these entries are the same, but the first one converted to the opcode will take one byte more and will look like AC 24 00. To the instructions at the address C2ED 16 questions may also arise, this branching instruction is triggered when it is equal, but nothing compares to it, how does it work? In fact, very simple, this instruction reads only the Zero flag of the status register. The comparison instruction in the assembly works by subtracting one value from another without writing the result to somewhere, but with changing the flags of the status register. Therefore, branch instructions read only flags. In this case, the LDY instruction from the C2EB 16 address puts in the Y register the zero previously written in the address 0024 16 and puts the one in the Zero Flag, because the result of the last operation was zero. And the branch instruction ignores everything except the Zero flag state and seeing the unit in it jumps 2 bytes forward, from the beginning of the instruction following it, that is, to the address C2EF 16 + 2 16 = C2F1 16 . In this address in register A lies 2 16 or 1D 16 , depending on whether the jump was made or not, the jump was and therefore there is a two in the register. It falls into the address 32 16 indented into the value of the register X, that is, 0032 16 + 00 16 = 0032 16 . The following DEX instruction reduces the value of register X by 1 by writing the value of FF 16 to it . Remember that in 8 bit sign arithmetic, the values (00 16 - 7F 16 are positive, and the values (80 16 - FF 16 ) are negative. It is the sign of the number that the BPL instruction checks and if the number is positive it returns execution to the address C2E9 16. F3 16 = - 13 10 = -D 16 , C2F6 16 - D 16 = C2E9 16. Here we can assume that somewhere before in the code in the register X was written 0 if the game is for one player or 1 if the game is for two. Obviously, the second player has already received his portion of lives on the previous iteration of the cycle (C2E9 16 - C2F4 16 ), and the address monitor it shows, in the address 0033 16 there is a two. View The EE code above in the C2DD 16 address shows an entry in the X register of the value from the address 0022 16 , if you set a breakpoint to this address on the entry and check when and what is written there, you can see that the value in this address really changes to 0 if the player is alone and 1 if there are two players. I disassembled this moment. Now we need to deal with the record. At first glance, the obvious solution is to transfer the argument C2E9 16 to the opcode A9 argument 99 10 = 63 16 , but if the player enters "Konami code"?
I had to go on a more difficult path.
The idea is this: the code entered by Konami cannot be canceled, which means you can convince the game that the code has already been entered, and enter the value 99 10 in the instruction argument from the C2EF 16 address, the one that is triggered by the entered Konami code. So I am guaranteed to enter both players for 99 10 spare lives, regardless of whether they entered the code or not. It sounds simple enough and I started by analyzing the address 0024 16 , from where the game reads Konami Code, setting a breakpoint to write to this address, I got into the next block of code.
| Address | Opcode | Mnemonic | Arguments | A | X | Y |
|---|---|---|---|---|---|---|
| F95B | 91 00 | Sta | ($ 00) Y | 00 | ?? | 24 or 23 ... or FF |
| F95D | 88 | DEY | 00 | ?? | 24 or 23 ... or FF | |
| F95E | C0 FF | CPY | $ FF | 00 | ?? | 23 or 22 ... or FF |
| F960 | D0 F9 | Bne | $ F95B | 00 | ?? | 23 or 22 ... or FF |
After carefully reading it, I came to the conclusion that this subroutine nulls the address range, which means it does not suit me. More than this address nothing touched the player selection screen. Where did the Konami code itself write the unit to this address? Therefore, simply changing the value in the address 0024 16 will not work. Then you can pay a little more attention to the instructions:
| Address | Opcode | Mnemonic | Arguments | A | X | Y |
|---|---|---|---|---|---|---|
| C2EB | A4 24 | LDY | $ 0024 | 02 | 00 | 00 |
As written above, it writes the value from the address 0024 16 into the Y register and it is already clear that the value of this address cannot easily be changed. Why not change the value of the register itself. To do this, change the opcode A4 16 to opcode A0 16 and pass any value other than zero to the argument. It is said - done, but here another problem arises. Having opened the "HEX Editor" (you cannot do this from the Debugger, you will have to use the window menu) I cannot change this opcode. The explanation is very simple, the game uses the so-called mapping. The technology allows you to run on the console of the game a larger volume than the console is able to accept. It works by replacing the real ROM addresses with the addresses available to the processor, transferring to it for processing the pieces necessary for the work of the game right now. That is, the address that I see in the debugger does not correspond to the real address on ROM, and I have no idea where to look for this instruction in ROM. It is at this moment that the selected emulator begins to shine, because all I need now is to click on the opcode with the right mouse button and select the item "Go Here In ROM File", this will take me to the same instruction in ROM itself where I can safely change the opcode to new value. In exactly the same way, I changed the instruction argument:
| Address | Opcode | Mnemonic | Arguments | A | X | Y |
|---|---|---|---|---|---|---|
| C2EF | A9 1D | Lda | # $ 1D | 02 | 00 | 00 |
From 1D 16 to 63 16 . Afterwards I will definitely save the result to a new file, because if I didn’t get around all the defenses of the game, I just broke ROM and I don’t want to be left without a working original.
PS: I apologize for mnogabukaff and thorough, perhaps too thorough chewing. Ready to accept any criticism, comments and corrections. Thank you very much, your Victor.
')
Source: https://habr.com/ru/post/447758/
All Articles