Unity: draw a lot of health bars in one drawcall
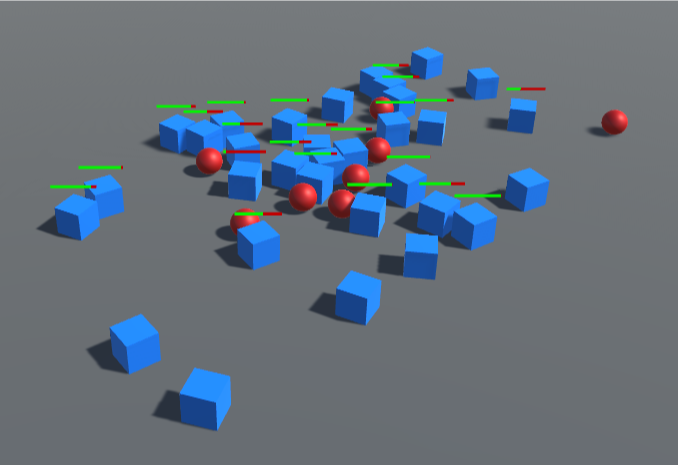
Recently, I had to solve a problem that is quite common in many games from above: to render on the screen a whole bunch of stripes of the health of enemies. Like this:
Obviously, I wanted to do this as efficiently as possible, preferably in a single draw call. As usual, before starting work, I did a little online research on other people's decisions, and the results were very different.
I will not shame anyone for the code, but suffice it to say that some of the solutions were not entirely brilliant, for example, someone added a Canvas object to each enemy (which is very inefficient).
')
The method I came to as a result is slightly different from what I’ve seen from others, and doesn’t use any UI classes at all (including Canvas), so I decided to document it for the public. And for those who want to study the source code, I posted it on Github .
One Canvas for each enemy is obviously a bad decision, but I could use a common Canvas for all enemies; the only Canvas would also lead to the rendering of the draw calls.
However, I don’t like the amount of work done with each approach associated with such an approach. If you use Canvas, then in each frame you will have to perform the following operations:
Anyway, all this would pollute the buffers of the Canvas geometry and result in the rebuilding of all the vertex data in the processor. I did not want all this to be done for such a simple element.
Brief description of my work process:
And now let's consider the solution in more detail.
Standard equipment has long been used in working with graphics: several objects are combined together so that they have common vertex data and materials and can be rendered in one draw call. We need exactly this, because every draw call is an additional load on the CPU and GPU. Instead of performing a single draw call on each object, we render them all at the same time and use a shader to add variability to each copy.
You can do this manually by duplicating the vertices of the X mesh in one buffer, where X is the maximum number of copies that can be rendered, and then using an array of shader parameters to transform / color / vary each copy. Each copy must have knowledge of how numbered it is in order to use this value as an array index. Then we can use an indexed render call that orders “render only to N”, where N is the number of instances that you actually need in the current frame, less than the maximum number X.
Most modern APIs already have code for this, so you do not need to manually do this. This operation is called "Instancing"; in fact, it automates the process described above with predefined constraints.
The Unity engine also supports instancing , it has its own API and a set of shader macros to help in its implementation. It uses certain assumptions, for example, that a complete 3D transformation is required in each instance. Strictly speaking, for 2D strips it is not needed completely - we can do with simplifications, but since they are, we will use them. This will simplify our shader, as well as provide the ability to use 3D-indicators, for example, circles or arcs.
Our enemies will have a component called
The health band object is very simple: in fact, it’s just a quad attached to the enemy.

We use the scale of this object to make the strip long and thin, and place it directly above the enemy. Do not worry about its rotation, we will fix it with the code attached to the object in
This code always directs the quad towards the camera. We can perform resizing and rotation in the shader, but I implement them here for two reasons.
First, instancing in Unity always uses the full transform of each object, and since we still pass all the data, we can use it. Secondly, setting the scale / rotation here ensures that the bounding parallelogram for truncating the strip will always be correct. If we did specify the size and rotation of the shader responsibility, then Unity could truncate the stripes that should be visible when they are close to the edges of the screen, because the size and rotation of their bounding parallelogram will not match what we are going to render. Of course, we could implement our own truncation method, but usually it’s better to use what we have (Unity code is native and has access to more spatial data than we do).
I will explain how the strip is rendered after we look at the shader.
In this version we will create a simple classic red and green strip.
I use a 2x1 texture, with one green pixel on the left and one red on the right. Naturally, I turned off mipmapping, filtering and compression, and for the parameter addressing mode set the value to Clamp - this means that the pixels of our strip will always be perfectly green or red, and not spread around the edges. This will allow us to change the texture coordinates in the shader to shift the line separating the red and green pixels down and up along the strip.
(Since there are only two colors here, I could simply use the step function in the shader to return to the point of one or the other. However, in this method, it’s convenient that you can use a more complex texture if desired, and this will work similarly while the transition is in the middle of the texture.)
To begin, we will declare the properties we need:
Next, we need to order the strip to be rendered in the overlay queue, which means to ignore all the depth in the scene and to render on top of everything:
The next part is the shader code itself. We are writing a shader without lighting (unlit), so we don’t need to worry about integration with various Unity surface shaders, it’s just a simple vertex / fragment shader pair. First, let's write bootstrapping:
At most, this is a standard bootstrap, with the exception of
The vertex structure must include instance data, so we will do the following:
We also need to specify what exactly will be in these instances, besides what Unity (transform) processes for us:
So we’re announcing that Unity has to create a buffer called “Props” to store the data for each instance, and inside it we will use one float per instance for the property called
You can use multiple buffers; it is worth doing if you have several properties that are updated with different frequencies; separating them, you can, for example, not to change one buffer when you change the other, which is more efficient. But we do not need this.
Our vertex shader almost completely performs the standard work, because the size, position and rotation are transferred to the transform. This is implemented using
It also needs to change UV to change the location of the red to green transition point in accordance with the
We know that in the normal state, the UV coordinates of a quadrilateral (quad) cover the entire texture interval, and that the dividing line of the strip is in the middle of the texture horizontally. Therefore, small mathematical calculations horizontally move the strip left or right, and the value of the Clamp texture ensures the filling of the remaining part.
The fragment shader could not be simpler, because all the work has already been done:
The full shader code with comments is available in the GitHub repository .
Then everything is simple - we just need to assign the material that this shader uses to our strip. You don’t need to do much more, all you have to do is select the desired shader in the upper part, assign a red-green texture, and, most importantly, check the “Enable GPU Instancing” box .
So, we have a health strip object, a shader and the material that needs to be rendered, now we need to set the
We turn the
If you have not used
In our case, when instancing is used, the values for all health bars are packed into a buffer of constants so that they can be transferred all together and drawn at one time.
There is almost nothing here except a boilerplate for setting variables, and the code is pretty boring; see the GitHub repository for details.
In the GitHub repository there is a test demo in which a bunch of evil blue cubes are destroyed by heroic red spheres (hurray!), Receiving damage displayed by the stripes described in the article. The demo is written in Unity 2018.3.6f1.
The effect of instancing can be observed in two ways:
After clicking Play, click on the Stats button above the Game panel. Here you can see how many draw calls are saved thanks to instancing (batching):

By running the game, you can click on the HealthBar material and uncheck the “Enable GPU Instancing” checkbox , after which the number of saved calls will drop to zero.
When you start the game, go to Window> Analysis> Frame Debugger, and then click “Enable” in the window that appears.
At the bottom left you will see all the rendering operations performed. Note that while there are a lot of separate calls for enemies and shells (if you wish, you can implement instancing for them). If you scroll to the bottom, then you will see the item "Draw Mesh (instanced) Healthbar".
This single call renders all stripes. If you click on this operation and then on the operation on it, then you will see that all the bars will disappear, because they are drawn in one call. If you are in the Frame Debugger, you uncheck the box “Enable GPU Instancing” from the material, you will see that one line has turned into several, and after checking this box - again into one.
As I said before, since these health strips are real objects, nothing prevents you from turning simple 2D strips into something more complex. They can be semicircles under enemies that diminish in an arc, or rotating diamonds over their heads. Using the same approach, you can still render them all in one call.
Obviously, I wanted to do this as efficiently as possible, preferably in a single draw call. As usual, before starting work, I did a little online research on other people's decisions, and the results were very different.
I will not shame anyone for the code, but suffice it to say that some of the solutions were not entirely brilliant, for example, someone added a Canvas object to each enemy (which is very inefficient).
')
The method I came to as a result is slightly different from what I’ve seen from others, and doesn’t use any UI classes at all (including Canvas), so I decided to document it for the public. And for those who want to study the source code, I posted it on Github .
Why not use Canvas?
One Canvas for each enemy is obviously a bad decision, but I could use a common Canvas for all enemies; the only Canvas would also lead to the rendering of the draw calls.
However, I don’t like the amount of work done with each approach associated with such an approach. If you use Canvas, then in each frame you will have to perform the following operations:
- Determine which of the enemies are on the screen, and select a strip of UI for each of them from the pool.
- Project the enemy's position in the camera to position the strip.
- Change the size of the "fill" part of the strip, probably as Image.
- Most likely to change the size of the strips in accordance with the type of enemies; for example, large enemies should have large stripes so that it does not look stupid.
Anyway, all this would pollute the buffers of the Canvas geometry and result in the rebuilding of all the vertex data in the processor. I did not want all this to be done for such a simple element.
Briefly about my decision
Brief description of my work process:
- Attaching objects strips of energy to the enemies in 3D.
- This allows you to automatically position and truncate the strips.
- The position / size of the strip can be adjusted according to the type of enemy.
- We will send the strips to the camera in code with the help of transform, which is still there.
- The shader ensures that they will always be rendered on top of everything.
- Use Instancing to render all stripes in a single draw call.
- We use simple procedural UV coordinates to display the level of occupancy of the strip.
And now let's consider the solution in more detail.
What is Instancing?
Standard equipment has long been used in working with graphics: several objects are combined together so that they have common vertex data and materials and can be rendered in one draw call. We need exactly this, because every draw call is an additional load on the CPU and GPU. Instead of performing a single draw call on each object, we render them all at the same time and use a shader to add variability to each copy.
You can do this manually by duplicating the vertices of the X mesh in one buffer, where X is the maximum number of copies that can be rendered, and then using an array of shader parameters to transform / color / vary each copy. Each copy must have knowledge of how numbered it is in order to use this value as an array index. Then we can use an indexed render call that orders “render only to N”, where N is the number of instances that you actually need in the current frame, less than the maximum number X.
Most modern APIs already have code for this, so you do not need to manually do this. This operation is called "Instancing"; in fact, it automates the process described above with predefined constraints.
The Unity engine also supports instancing , it has its own API and a set of shader macros to help in its implementation. It uses certain assumptions, for example, that a complete 3D transformation is required in each instance. Strictly speaking, for 2D strips it is not needed completely - we can do with simplifications, but since they are, we will use them. This will simplify our shader, as well as provide the ability to use 3D-indicators, for example, circles or arcs.
Class Damageable
Our enemies will have a component called
Damageable , giving them health and allowing them to take damage from collisions. In our example, it is quite simple: public class Damageable : MonoBehaviour { public int MaxHealth; public float DamageForceThreshold = 1f; public float DamageForceScale = 5f; public int CurrentHealth { get; private set; } private void Start() { CurrentHealth = MaxHealth; } private void OnCollisionEnter(Collision other) { // Collision would usually be on another component, putting it all here for simplicity float force = other.relativeVelocity.magnitude; if (force > DamageForceThreshold) { CurrentHealth -= (int)((force - DamageForceThreshold) * DamageForceScale); CurrentHealth = Mathf.Max(0, CurrentHealth); } } } HealthBar object: position / rotation
The health band object is very simple: in fact, it’s just a quad attached to the enemy.
We use the scale of this object to make the strip long and thin, and place it directly above the enemy. Do not worry about its rotation, we will fix it with the code attached to the object in
HealthBar.cs : private void AlignCamera() { if (mainCamera != null) { var camXform = mainCamera.transform; var forward = transform.position - camXform.position; forward.Normalize(); var up = Vector3.Cross(forward, camXform.right); transform.rotation = Quaternion.LookRotation(forward, up); } } This code always directs the quad towards the camera. We can perform resizing and rotation in the shader, but I implement them here for two reasons.
First, instancing in Unity always uses the full transform of each object, and since we still pass all the data, we can use it. Secondly, setting the scale / rotation here ensures that the bounding parallelogram for truncating the strip will always be correct. If we did specify the size and rotation of the shader responsibility, then Unity could truncate the stripes that should be visible when they are close to the edges of the screen, because the size and rotation of their bounding parallelogram will not match what we are going to render. Of course, we could implement our own truncation method, but usually it’s better to use what we have (Unity code is native and has access to more spatial data than we do).
I will explain how the strip is rendered after we look at the shader.
HealthBar shader
In this version we will create a simple classic red and green strip.
I use a 2x1 texture, with one green pixel on the left and one red on the right. Naturally, I turned off mipmapping, filtering and compression, and for the parameter addressing mode set the value to Clamp - this means that the pixels of our strip will always be perfectly green or red, and not spread around the edges. This will allow us to change the texture coordinates in the shader to shift the line separating the red and green pixels down and up along the strip.
(Since there are only two colors here, I could simply use the step function in the shader to return to the point of one or the other. However, in this method, it’s convenient that you can use a more complex texture if desired, and this will work similarly while the transition is in the middle of the texture.)
To begin, we will declare the properties we need:
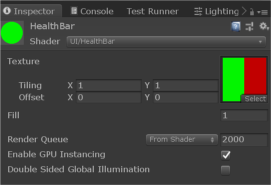
Shader "UI/HealthBar" { Properties { _MainTex ("Texture", 2D) = "white" {} _Fill ("Fill", float) = 0 } _MainTex is a red-green texture, and _Fill is a value from 0 to 1, where 1 is total health.Next, we need to order the strip to be rendered in the overlay queue, which means to ignore all the depth in the scene and to render on top of everything:
SubShader { Tags { "Queue"="Overlay" } Pass { ZTest Off The next part is the shader code itself. We are writing a shader without lighting (unlit), so we don’t need to worry about integration with various Unity surface shaders, it’s just a simple vertex / fragment shader pair. First, let's write bootstrapping:
CGPROGRAM #pragma vertex vert #pragma fragment frag #pragma multi_compile_instancing #include "UnityCG.cginc" At most, this is a standard bootstrap, with the exception of
#pragma multi_compile_instancing , which tells the Unity compiler what to compile for Instancing.The vertex structure must include instance data, so we will do the following:
struct appdata { float4 vertex : POSITION; float2 uv : TEXCOORD0; UNITY_VERTEX_INPUT_INSTANCE_ID }; We also need to specify what exactly will be in these instances, besides what Unity (transform) processes for us:
UNITY_INSTANCING_BUFFER_START(Props) UNITY_DEFINE_INSTANCED_PROP(float, _Fill) UNITY_INSTANCING_BUFFER_END(Props) So we’re announcing that Unity has to create a buffer called “Props” to store the data for each instance, and inside it we will use one float per instance for the property called
_Fill .You can use multiple buffers; it is worth doing if you have several properties that are updated with different frequencies; separating them, you can, for example, not to change one buffer when you change the other, which is more efficient. But we do not need this.
Our vertex shader almost completely performs the standard work, because the size, position and rotation are transferred to the transform. This is implemented using
UnityObjectToClipPos , which automatically uses the transform of each instance. One can imagine that without instancing it would usually be a simple use of a single matrix property. but when using instancing inside the engine, it looks like an array of matrices, and Unity independently selects the matrix that is appropriate for this instance.It also needs to change UV to change the location of the red to green transition point in accordance with the
_Fill property. Here is the corresponding code snippet: UNITY_SETUP_INSTANCE_ID(v); float fill = UNITY_ACCESS_INSTANCED_PROP(Props, _Fill); // generate UVs from fill level (assumed texture is clamped) o.uv = v.uv; o.uv.x += 0.5 - fill; UNITY_SETUP_INSTANCE_ID and UNITY_ACCESS_INSTANCED_PROP do all the magic by accessing the correct version of the _Fill property from the constant buffer for this instance.We know that in the normal state, the UV coordinates of a quadrilateral (quad) cover the entire texture interval, and that the dividing line of the strip is in the middle of the texture horizontally. Therefore, small mathematical calculations horizontally move the strip left or right, and the value of the Clamp texture ensures the filling of the remaining part.
The fragment shader could not be simpler, because all the work has already been done:
return tex2D(_MainTex, i.uv); The full shader code with comments is available in the GitHub repository .
Healthbar material
Then everything is simple - we just need to assign the material that this shader uses to our strip. You don’t need to do much more, all you have to do is select the desired shader in the upper part, assign a red-green texture, and, most importantly, check the “Enable GPU Instancing” box .
HealthBar Fill Property Update
So, we have a health strip object, a shader and the material that needs to be rendered, now we need to set the
_Fill property for each instance. We do this inside HealthBar.cs as follows: private void UpdateParams() { meshRenderer.GetPropertyBlock(matBlock); matBlock.SetFloat("_Fill", damageable.CurrentHealth / (float)damageable.MaxHealth); meshRenderer.SetPropertyBlock(matBlock); } We turn the
CurrentHealth class of Damageable into a value from 0 to 1, dividing it by MaxHealth . Then we pass it the _Fill property using the MaterialPropertyBlock .If you have not used
MaterialPropertyBlock to transfer data to shaders, even without instancing, then you need to study it. It is not as well explained in the Unity documentation, but is the most efficient way to transfer the data of each object to shaders.In our case, when instancing is used, the values for all health bars are packed into a buffer of constants so that they can be transferred all together and drawn at one time.
There is almost nothing here except a boilerplate for setting variables, and the code is pretty boring; see the GitHub repository for details.
Demo
In the GitHub repository there is a test demo in which a bunch of evil blue cubes are destroyed by heroic red spheres (hurray!), Receiving damage displayed by the stripes described in the article. The demo is written in Unity 2018.3.6f1.
The effect of instancing can be observed in two ways:
Stats panel
After clicking Play, click on the Stats button above the Game panel. Here you can see how many draw calls are saved thanks to instancing (batching):
By running the game, you can click on the HealthBar material and uncheck the “Enable GPU Instancing” checkbox , after which the number of saved calls will drop to zero.
Frame debugger
When you start the game, go to Window> Analysis> Frame Debugger, and then click “Enable” in the window that appears.
At the bottom left you will see all the rendering operations performed. Note that while there are a lot of separate calls for enemies and shells (if you wish, you can implement instancing for them). If you scroll to the bottom, then you will see the item "Draw Mesh (instanced) Healthbar".
This single call renders all stripes. If you click on this operation and then on the operation on it, then you will see that all the bars will disappear, because they are drawn in one call. If you are in the Frame Debugger, you uncheck the box “Enable GPU Instancing” from the material, you will see that one line has turned into several, and after checking this box - again into one.
How can I expand this system
As I said before, since these health strips are real objects, nothing prevents you from turning simple 2D strips into something more complex. They can be semicircles under enemies that diminish in an arc, or rotating diamonds over their heads. Using the same approach, you can still render them all in one call.
Source: https://habr.com/ru/post/447716/
All Articles