Building a BEM project with a Webpack
The article focuses on building BEM projects using the Webpack bundler. I will show one of the configuration examples, without loading readers with unnecessary entities.
The material is suitable for those who are just starting to get acquainted with BEM. First we will touch on the theoretical aspects of the methodology, and in the “Practice” section I will show how they can be applied.
A bit of theory
If you first hear about BEM and want to get to know it yourself, keep the documentation .
BEM - a methodology that is used to organize projects of any scale. It was developed by Yandex and at first used only in the work of its services, but later published in the public domain.
BEM stands for “Block, Element, Modifier”.
A block is an entity with a standalone architecture that can be reused. A block may contain its own elements.
Element - part of the block. The element can be used only inside the parent block.
A modifier is an entity that changes the display, state, or behavior of a block.
These components underlie the methodology. They provide beauty and convenient code separation. More information about their device is written in the documentation .
The BEM documentation is written in detail. However, there is one “but”: a high threshold for entry into the material. If you can deal with the basics of layout by reading one page of documentation, then the question of assembling a project is more complicated.
Why are we talking about building a project? When working on a large-scale project, everyone faces the problem of organizing code. It is inconvenient to store all the code of a large project in one file. Breaking the code into several files, then compiling it manually is also not the best way. To solve this problem, collectors, or bundlers , are used that automate the transformation of the project's source code into code that is ready to be sent to production.
Let me remind you: further implies that readers have basic skills in working with Webpack. If you have not worked with him before, I recommend to get acquainted with this tool first.
The BEM documentation provides recommendations for building projects. As examples, only two options are offered: build with ENB and Gulp.
ENB is a utility designed specifically for building BEM projects. She is able to work with BEM entities out of the box. But take a look at the code. At first glance, it can demotivate an unprepared developer:
const techs = { // essential fileProvider: require('enb/techs/file-provider'), fileMerge: require('enb/techs/file-merge'), // optimization borschik: require('enb-borschik/techs/borschik'), // css postcss: require('enb-postcss/techs/enb-postcss'), postcssPlugins: [ require('postcss-import')(), require('postcss-each'), require('postcss-for'), require('postcss-simple-vars')(), require('postcss-calc')(), require('postcss-nested'), require('rebem-css'), require('postcss-url')({ url: 'rebase' }), require('autoprefixer')(), require('postcss-reporter')() ], // js browserJs: require('enb-js/techs/browser-js'), // bemtree // bemtree: require('enb-bemxjst/techs/bemtree'), // bemhtml bemhtml: require('enb-bemxjst/techs/bemhtml'), bemjsonToHtml: require('enb-bemxjst/techs/bemjson-to-html') }, enbBemTechs = require('enb-bem-techs'), levels = [ { path: 'node_modules/bem-core/common.blocks', check: false }, { path: 'node_modules/bem-core/desktop.blocks', check: false }, { path: 'node_modules/bem-components/common.blocks', check: false }, { path: 'node_modules/bem-components/desktop.blocks', check: false }, { path: 'node_modules/bem-components/design/common.blocks', check: false }, { path: 'node_modules/bem-components/design/desktop.blocks', check: false }, 'common.blocks', 'desktop.blocks' ]; module.exports = function(config) { const isProd = process.env.YENV === 'production'; config.nodes('*.bundles/*', function(nodeConfig) { nodeConfig.addTechs([ // essential [enbBemTechs.levels, { levels: levels }], [techs.fileProvider, { target: '?.bemjson.js' }], [enbBemTechs.bemjsonToBemdecl], [enbBemTechs.deps], [enbBemTechs.files], // css [techs.postcss, { target: '?.css', oneOfSourceSuffixes: ['post.css', 'css'], plugins: techs.postcssPlugins }], // bemtree // [techs.bemtree, { sourceSuffixes: ['bemtree', 'bemtree.js'] }], // bemhtml [techs.bemhtml, { sourceSuffixes: ['bemhtml', 'bemhtml.js'], forceBaseTemplates: true, engineOptions : { elemJsInstances : true } }], // html [techs.bemjsonToHtml], // client bemhtml [enbBemTechs.depsByTechToBemdecl, { target: '?.bemhtml.bemdecl.js', sourceTech: 'js', destTech: 'bemhtml' }], [enbBemTechs.deps, { target: '?.bemhtml.deps.js', bemdeclFile: '?.bemhtml.bemdecl.js' }], [enbBemTechs.files, { depsFile: '?.bemhtml.deps.js', filesTarget: '?.bemhtml.files', dirsTarget: '?.bemhtml.dirs' }], [techs.bemhtml, { target: '?.browser.bemhtml.js', filesTarget: '?.bemhtml.files', sourceSuffixes: ['bemhtml', 'bemhtml.js'], engineOptions : { elemJsInstances : true } }], // js [techs.browserJs, { includeYM: true }], [techs.fileMerge, { target: '?.js', sources: ['?.browser.js', '?.browser.bemhtml.js'] }], // borschik [techs.borschik, { source: '?.js', target: '?.min.js', minify: isProd }], [techs.borschik, { source: '?.css', target: '?.min.css', minify: isProd }] ]); nodeConfig.addTargets([/* '?.bemtree.js', */ '?.html', '?.min.css', '?.min.js']); }); }; The code from the project-stub public repository.
The ENB config code will obviously be difficult for those who are just starting to use BEM.
The documentation presents the ready-made settings of the collector , and they can be used without going into the details of the assembly. But what if you and I would like to have a complete idea of what is happening with the project during assembly?
The BEM documentation explains the assembly process well in theory, but there are few practical examples and they are not always suitable for a visual understanding of the process. To solve this problem, I will try to build an elementary BEM project using a Webpack.
Practice
Before that, I mentioned that code separation and organization of the assembly simplify the work with the project. In the example below, we will provide code separation using BEM and its assembly using a Webpack.
We want to get the simplest config, the build logic should be linear and intuitive. Let's build a page with one BEM block, which will have two technologies: CSS and JS.
You can write HTML code with one DIV with the class "block" and manually connect all its technologies. Using BEM-naming classes and the corresponding file structure , we do not violate the principles of the methodology.
I got this project tree:
├── desktop # "desktop" │ └── block # "block" │ ├── block.css # CSS- "block" │ └── block.js # JS- "block" ├── dist # , ├── pages # , JS- │ ├── index.html # , │ └── index.js # index.html └── webpack.config.js # - Webpack The first line mentions the override level “desktop”. In BEM terminology, override levels are directories that contain their own block realizations. When building a project, implementations from all levels of override in a certain order fall into the final bundle.
For example, we have a redefinition level of "desktop" in which implementations of blocks for desktop devices are stored. If we need to supplement the project with a layout for mobile devices, it will be enough for us to create a new level of redefinition of "mobile" and fill it with new implementations of the same blocks. The convenience of this approach is that at the new level of redefinition, we will not need to duplicate code that already exists in the "desktop", as it will connect automatically.
Before you Webpack config:
// webpack.config.js // const path = require('path'); const opy = require('copy-webpack-plugin'); module.exports = { // entry output - entry: path.resolve(__dirname, "pages", "index.js"), output: { filename: 'index.js', path: path.join(__dirname, 'dist') }, module: { rules: [ // CSS- { test: /\.css$/, loader: 'style-loader!css-loader' } ] }, plugins: [ new opy([ // HTML- { from: path.join(__dirname, 'pages'), test: /\.html$/, to: path.join(__dirname, "dist") } ]) ] } Here we specify the file /pages/index.js as an entry point, add loaders for CSS styles and copy /pages/index.html to /dist/index.html .
<html> <body> <div class="block">Hello, World!</div> <script src="index.js"></script> </body> </html> .block { color: red; font-size: 24px; text-align: center; } document.getElementsByClassName('block')[0].innerHTML += " [This text is added by block.js!]" The example uses one override level and one block. The task is to assemble the page so that the technologies (css, js) of our block are connected to it.
To connect technologies, we will use require() :
// index.js require('../desktop/block/block.js'); require('../desktop/block/block.css'); Launch the Webpack and see what happens. Open index.html from the ./dist folder:

Block styles were loaded, javascript worked successfully. Now we can rightfully add the coveted letters "BEM" to our project.
First of all, BEM was created to work with large projects. Let's imagine that our designer tried and now on the page there is not one block, but one hundred. Acting on the previous scenario, we will manually connect the technologies of each block using require() . That is, at least one hundred additional lines of code will appear in index.js.
Unnecessary lines of code that could have been avoided are bad. Unused code is even worse. What if on our page there are only 10 of the available blocks, or 20, or 53? The developer will have additional work: he will have to focus on exactly which blocks are used on the page, as well as manually connect and disconnect them to avoid unnecessary code in the final bundle.
Fortunately, this work can be entrusted to the Webpack.
The optimal sequence of actions to automate this process:
- Select from the existing HTML code classes that correspond to the BEM naming;
- Based on the classes, get a list of BEM entities used on the page;
- Check if the levels of the directory use blocks, elements and modifiers;
- Connect the technologies of these entities to the project by adding the appropriate
require()expressions.
To begin, I decided to check if there are any ready-made loaders for this task. I did not find a module that would provide all the necessary functionality in one bottle. But I came across a bemdecl-to-fs-loader , which converts BEM declarations into require() expressions. It is based on redefinition levels and technologies that are available in the project file structure.
BEM Declaration - a list of BEM entities used on the page. More about them in the documentation .
One link is missing - converting HTML into an array of BEM entities. This task is solved by the html2bemjson module.
bemjson - data that reflects the structure of the future page. Usually they are used by the bem-xjst template engine to form pages. The syntax of bemjson is similar to the syntax of declarations, but the declaration contains only a list of the entities used, while bemjson also reflects their order.
bemjson is not a declaration, so we first convert it to decl format for transmission to bemdecl-to-fs-loader. For this task we use the module from the SDK: bemjson-to-decl . Since these are ordinary NodeJS-modules, and not Webpack loaders, you will have to make a wrapper loader. After that we will be able to use them for conversions in the webpack.
We get the following loader code:
let html2bemjson = require("html2bemjson"); let bemjson2decl = require("bemjson-to-decl"); module.exports = function( content ){ if (content == null && content == "") callback("html2bemdecl requires a valid HTML."); let callback = this.async(); let bemjson = html2bemjson.convert( content ); let decl = bemjson2decl.convert( bemjson ); console.log(decl); // callback(null, decl); } To simplify the installation of the bootloader and save time in the future, I downloaded the module on NPM .
Let's install the bootloader in our project and make changes to the Webpack configuration:
const webpack = require('webpack'); const path = require('path'); const opy = require('copy-webpack-plugin'); module.exports = { entry: path.resolve(__dirname, "pages", "index.js"), output: { filename: 'index.js', path: path.join(__dirname, 'dist') }, module: { rules: [ { test: /\.html$/, use: [ { // bemdecl-to-fs-loader loader: 'bemdecl-to-fs-loader', // options: { levels: ['desktop'], extensions: ['css', 'js'] } }, // html2bemdecl-loader { loader: 'html2bemdecl-loader' } ] }, { test: /\.css$/, loader: 'style-loader!css-loader' } ] }, plugins: [ new opy([ { from: path.resolve(__dirname, 'pages'), test: /\.html$/, to: path.resolve(__dirname, "dist") } ]) ] } The levels parameter of the bemdecl-to-fs-loader indicates which redefinition levels to use and in which order. The extensions are given the file technology extensions that are used in our project.
As a result, instead of connecting technologies manually, we only include the HTML file. All necessary conversions will be performed automatically.
Let's replace the contents of index.js with the string:
require('./index.html'); Now run the webpack. At assembly the line is displayed:
[ BemEntityName { block: 'block' } ] This means that the declaration was successful. We look directly output Webpack:
Entrypoint main = index.js [0] ./pages/index.js 24 bytes {0} [built] [1] ./pages/index.html 74 bytes {0} [built] [2] ./desktop/block/block.css 1.07 KiB {0} [built] [3] ./node_modules/css-loader/dist/cjs.js!./desktop/block/block.css 217 bytes {0} [built] [7] ./desktop/block/block.js 93 bytes {0} [built] + 3 hidden modules 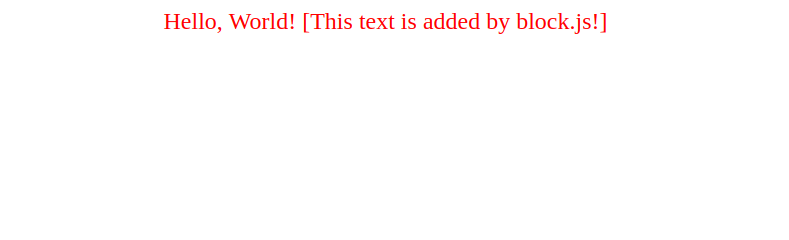
We obtained the result identical to the previous one, with the difference that all the technologies of the unit were connected automatically. For now we just need to add a BEM-named class to the HTML, connect this HTML using require() and create the corresponding directory with technologies for the connection.
So, we have a file structure that complies with the BEM methodology, as well as a mechanism for automatically connecting block technologies.
Abstracting from the mechanisms and entities of the methodology, we have created an extremely simple, but effective, Webpack config. I hope this example will help everyone who begins their acquaintance with BEM to better understand the basic principles of assembling BEM projects.
useful links
')
Source: https://habr.com/ru/post/447560/
All Articles